Hyundai Elantra (2025 year). Manual in english - page 2
Convenience features
Battery replacement
If you suspect your smart key might have
sustained some damage, or you feel your
Battery Type: CR2450
smart key is not working correctly,
To replace the battery:
contact an authorized HYUNDAI dealer.
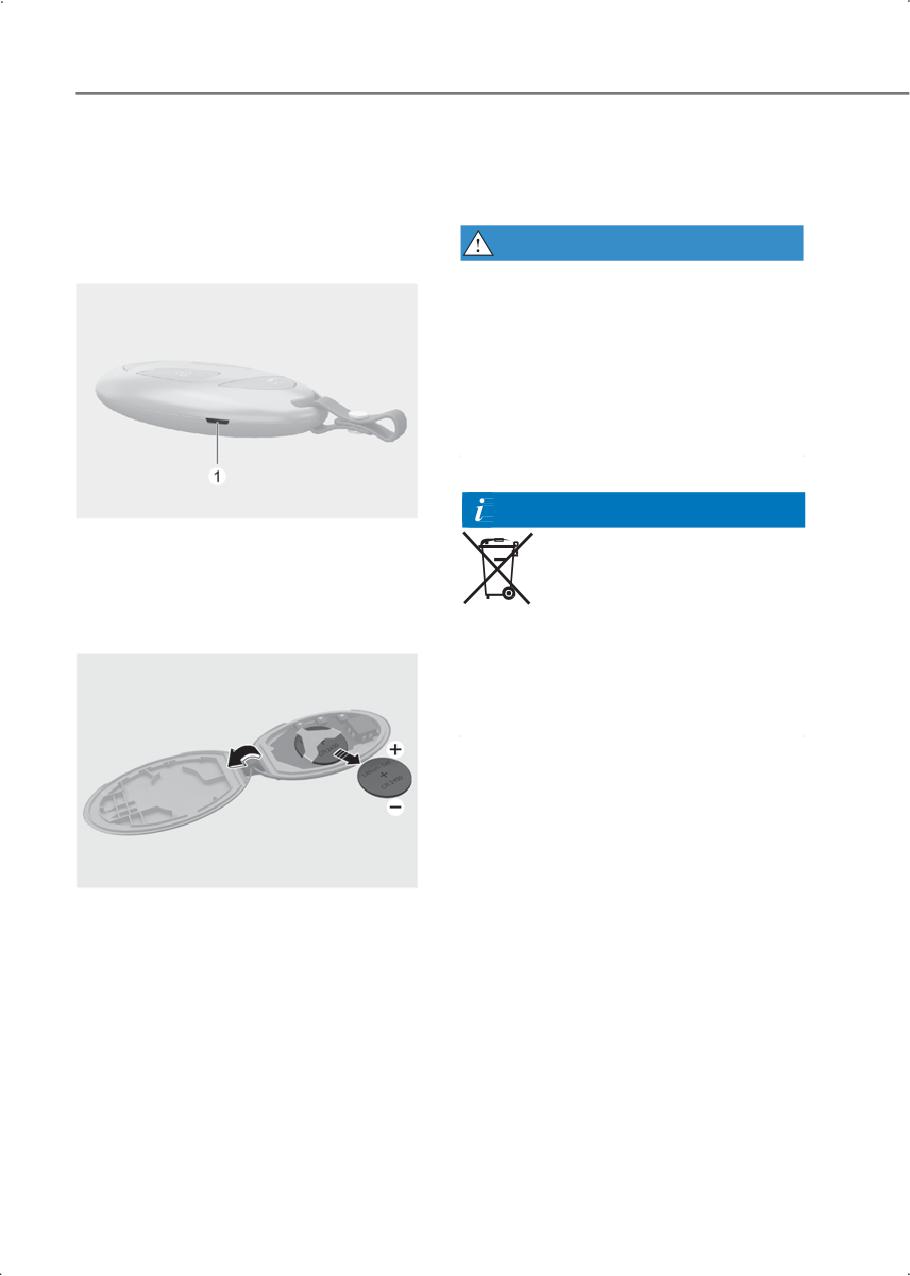
1. Put the slim tool into the key hole (1) to
pry open the rear cover of the smart
WARNING
key.
This product contains a button battery.
If swallowed, a lithium button battery can
cause severe or fatal injuries within 2
hours. Keep batteries out of reach of
children.
If you think batteries may have been
swallowed or placed inside any part of the
body, seek immediate medical attention.
Information
2. Remove the old battery and insert a
new battery. Make sure the battery
position is correct. An improperly
positioned battery may discharge the
battery, causing smart key failure.
An inappropriately disposed battery may
be harmful to the environment and
human health. Always dispose of a used
battery according to your local law(s) or
regulations.
3. Reinstall the rear cover of the smart
key.
5-12
5
Door locks
Operating door unlocks from
inside the vehicle
Operating door locks from
With the door inside handle
outside the vehicle
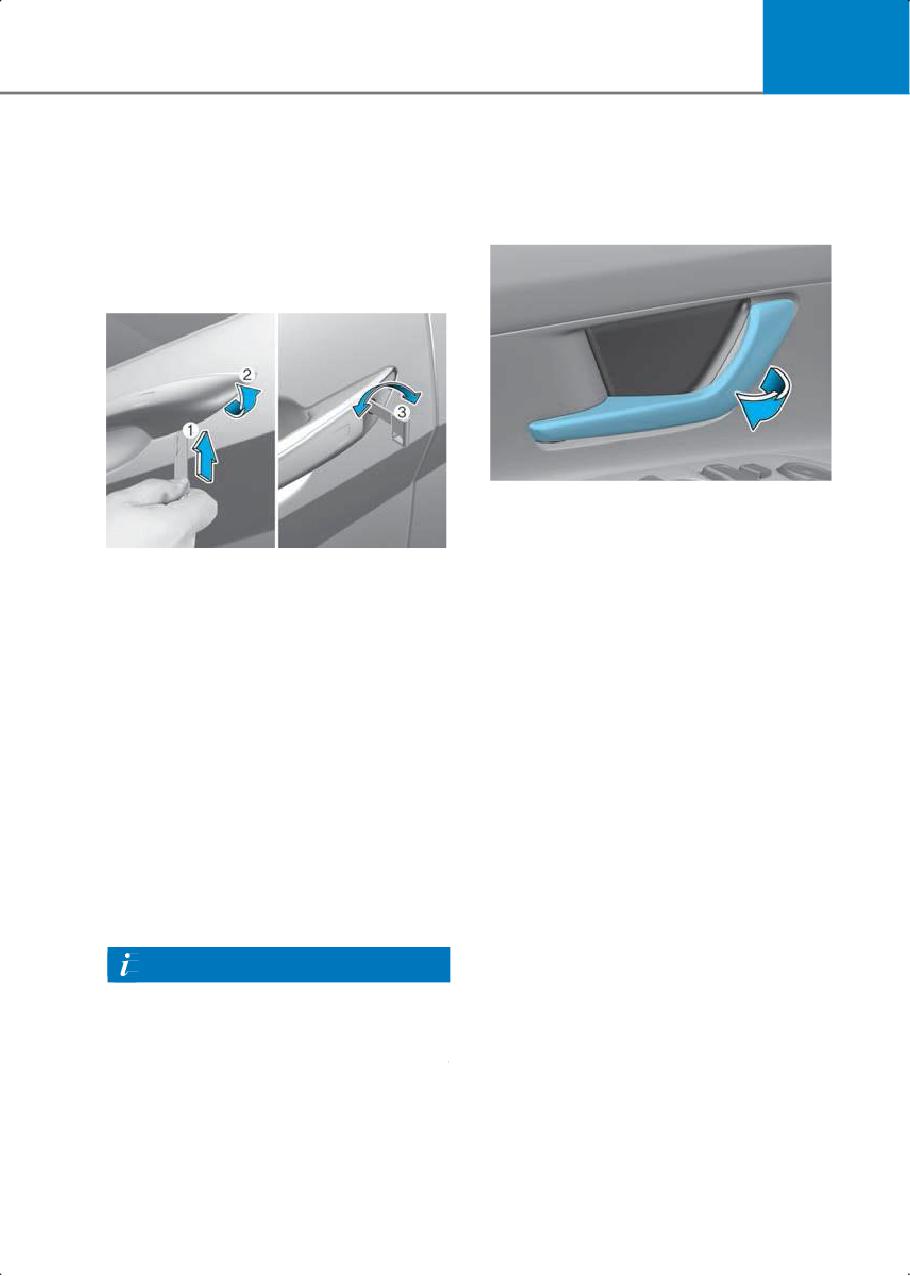
Using the mechanical key
Driver door & Passenger door
If the inner door handle is pulled when the
door is locked, the door is unlocked and
To unlock:
opened.
1. Pull the door handle.
2. Press the release button (1) located
Rear door - Two pull operation
inside the bottom part of the cover with
If the inner door handle is pulled once
a mechanical key or flat-head
when the door is locked, the door is
screwdriver.
unlocked. If the inner door handle is
3. Carefully pull out the cover (2) while
pulled once more, the door is opened.
continuing to press the release button
to remove the cover and expose the key
cylinder.
4. Insert the mechanical key into the key
cylinder and rotate (3) clockwise to
unlock the vehicle and
counterclockwise to lock the vehicle.
Once the doors are unlocked, they can
be opened by pulling the door handle.
Information
Only the driver’s door can be
locked/unlocked using the mechanical
key.
5-13
Convenience features
With the central door lock/unlock
In case of an emergency
switch
Driver’s door
In case of emergency such as when the
battery is discharged, the only way to lock
Front passenger’s door
the door(s) is with the mechanical key
from the outside key hole.
Doors without an outside key hole can be
locked as follows:
1. Open the door.
2. Insert the key into the emergency door
lock hole and turn the key to the lock
position.
3. Close the door securely.
WARNING
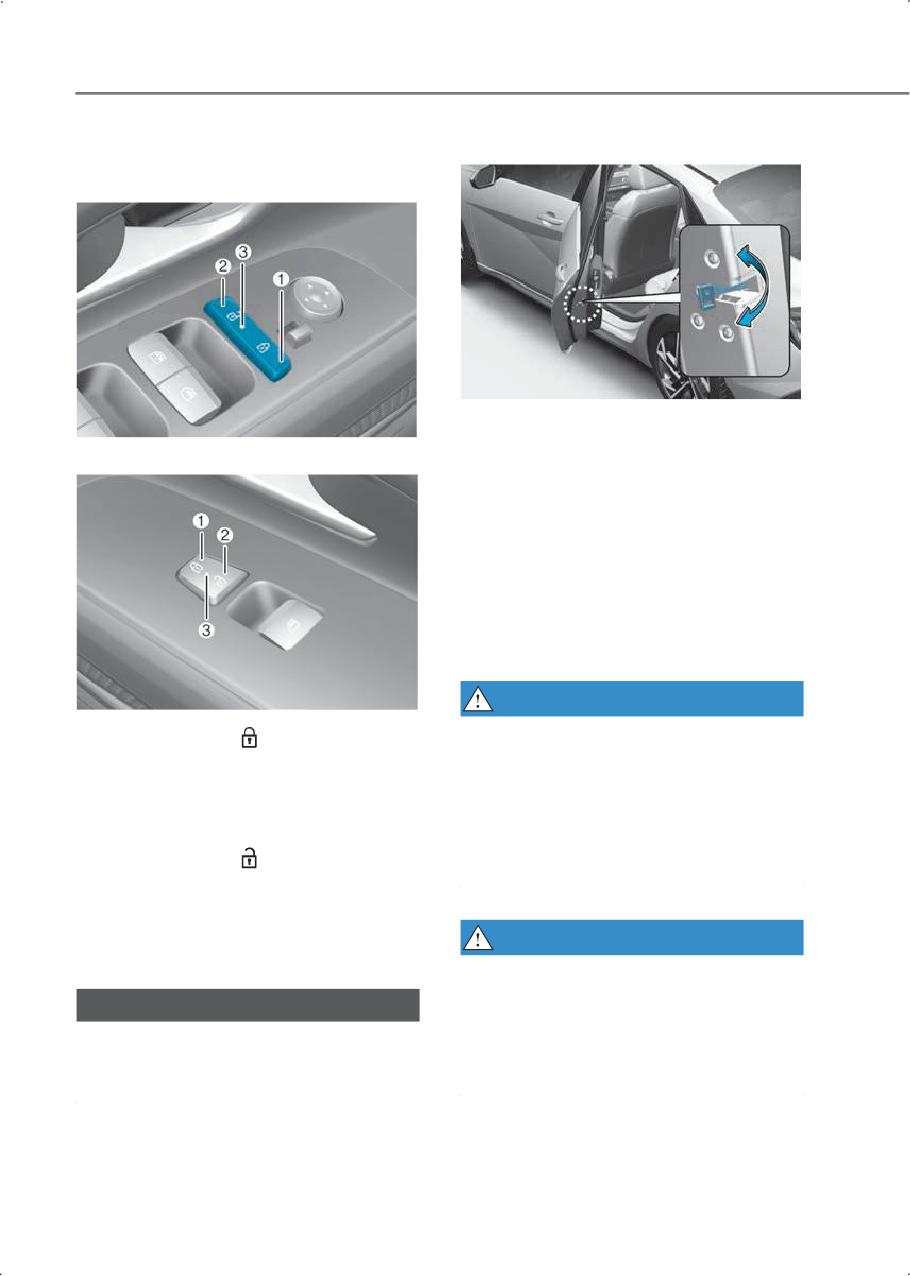
When pressing the ( ) portion (1) on the
• Always close and lock the doors while
switch, all vehicle doors are locked.
the vehicle is moving. If the doors are
unlocked, the risk of being thrown from
• If any door is opened, the doors are not
the vehicle in a collision increases.
locked even though the lock switch (1)
of the door is pressed.
• Do not pull the inner door handle of the
driver’s or passenger’s door while the
When pressing the (
) portion (2) on the
vehicle is moving.
switch, all vehicle doors are unlocked.
When all vehicle doors are locked, the
indicator lights (3) on the driver’s door
WARNING
and passenger’s door turn off. If any door
is unlocked, the indicator turns on.
Do not leave the elderly, children, or
animals unattended in your vehicle. An
NOTICE
enclosed vehicle can become extremely
hot and the elderly, unattended children
If the smart key is in the vehicle and the
or animals who cannot escape the vehicle
front door is opened, the central door lock
may be seriously injured or killed.
button (1) cannot lock the doors.
5-14
5
Child-protector rear door
WARNING
locks
Always park your vehicle properly.
Depress the brake pedal, change the gear
to P (Park), apply the parking brake, move
the ignition switch to the LOCK/OFF
position, close all windows, lock all doors,
and always take the keys with you.
WARNING
Be careful when opening doors and
watch for vehicles, motorcycles, bicycles,
or pedestrians approaching the vehicle to
prevent serious injury or death.
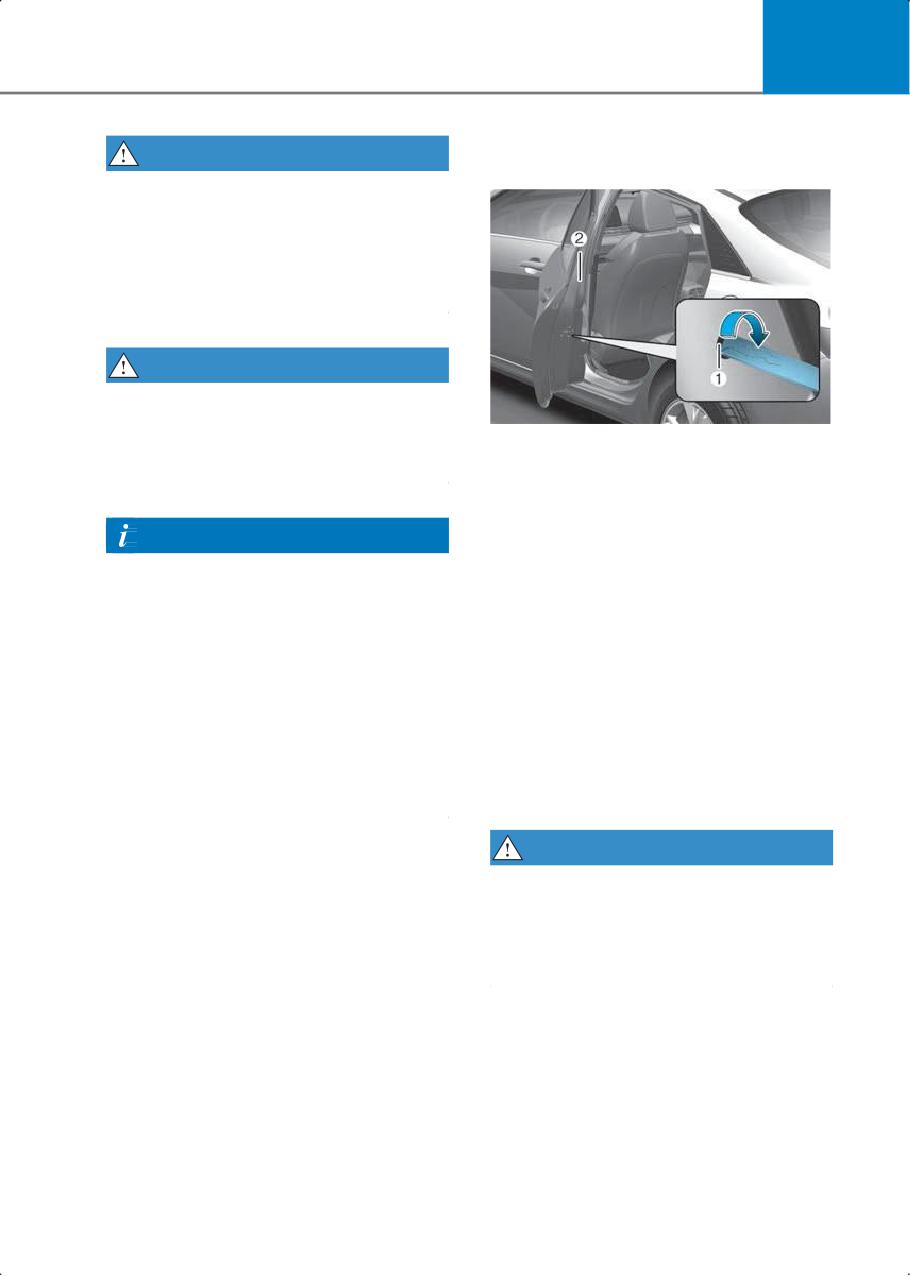
The child safety lock is provided to help
prevent children seated in the rear from
accidentally opening the rear doors. The
rear door safety locks must be used
Information
whenever children are in the vehicle.
To exit the vehicle if the power door lock
The child safety lock is located on the
does not function:
edge of each rear door. When the child
safety lock is in the lock position, the rear
• Operate the door unlock feature
door does not open if the inner door
repeatedly (both electronic and
handle is pulled.
manual) while simultaneously pulling
on the door handle.
To lock the child safety lock, insert a small
flat blade tool (e.g. screwdriver or similar)
• Operate the other door locks and
(1) into the slot and turn it to the lock
handles.
position as shown.
• Lower the driver’s front window and
To allow a rear door to be opened from
use the mechanical key to unlock the
inside the vehicle, unlock the child safety
door from outside.
lock.
WARNING
Never allow children to open the rear
doors while the vehicle is moving. They
may fall out of the vehicle. Be sure to use
the rear door safety locks whenever
children are in the vehicle.
5-15
Convenience features
Rear Occupant Alert
System operations
When you turn off the engine and open
(ROA)
the driver’s door after opening and
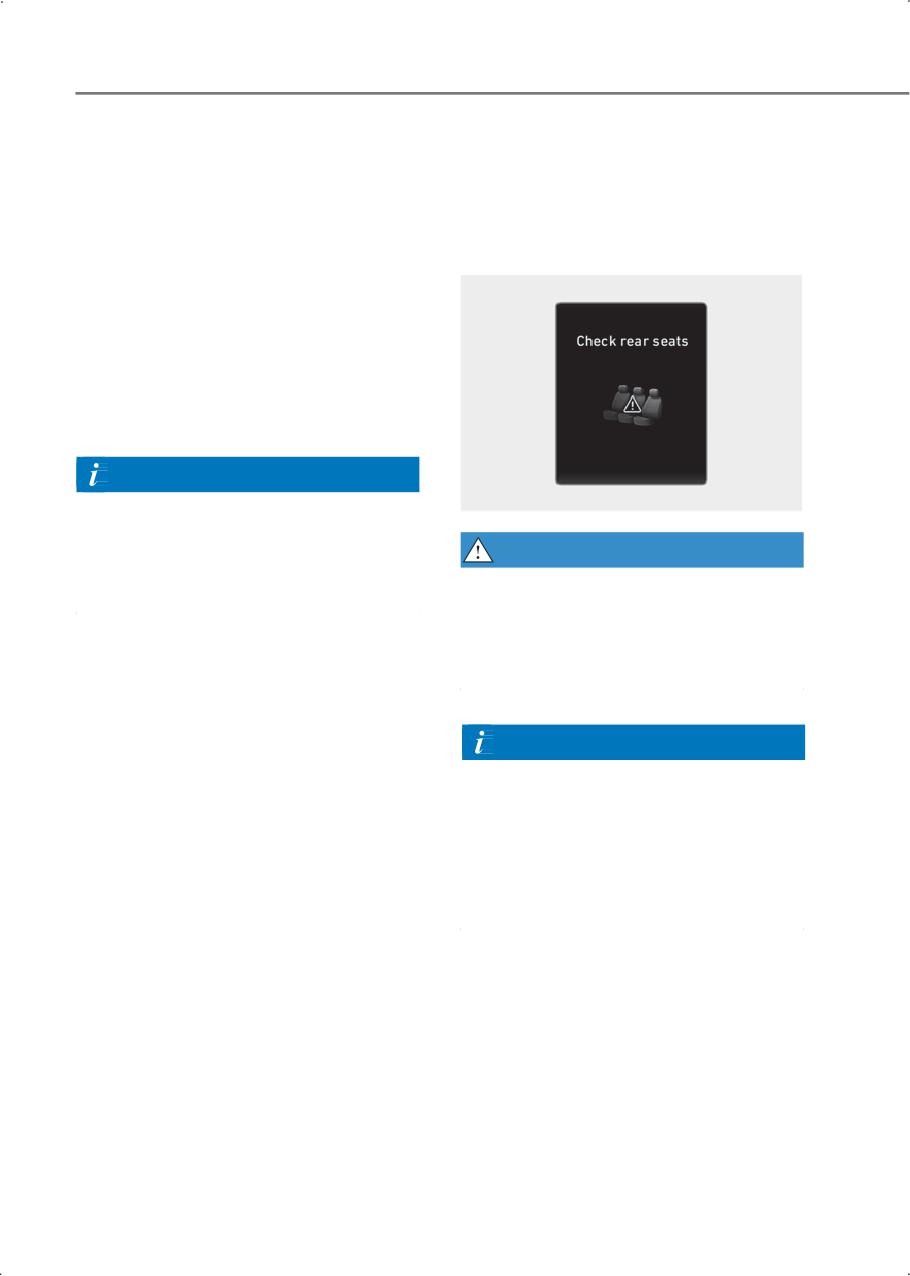
Rear Occupant Alert is provided to
closing the rear door or trunk, the "Check
prevent the driver from leaving with any
rear seats" warning message appears on
rear passenger left in the vehicle.
the cluster display.
System setting
To use Rear Occupant Alert, it can be
enabled from the Settings menu in the
infotainment system. Select:
Setup>Vehicle>Convenience>Rear
Occupant Alert
Information
The infotainment system may change
after software updates. For more
information, refer to the user's manual
WARNING
provided in the infotainment system and
Rear Occupant Alert provides information
the quick reference guide.
to the driver to check the rear seats but it
does not detect whether there is an
object or passenger. Always check the
rear seats when leaving the vehicle.
Information
The open and close history of the rear
door is initialized if the driver turns off the
engine and lock vehicle doors.
However, the alarm may sound again
whenever the driver’s door is opened if
the previous history of the rear door is not
initialized.
5-16
5
Steering wheel
Tilt/telescopic steering
Adjust the steering wheel toward your
chest, not toward your face. Make sure
Motor Driven Power Steering
you can see the instrument cluster
(MDPS)
warning lights and gauges. After
adjusting, push the steering wheel up and
The system assists you with steering the
down to be in the locked position.
vehicle. If the vehicle is turned off or if the
power steering system becomes
WARNING
inoperative, you may still steer the
vehicle, but it requires increased steering
Never adjust the steering wheel while
effort.
driving. This may cause loss of vehicle
control resulting in a collision.
If you notice any change in the effort
required to steer during normal vehicle
operation, contact an authorized
HYUNDAI dealer.
CAUTION
If the Motor Driven Power Steering (
)
warning light and the message, "Check
motor driven power steering" illuminate
on the instrument cluster, you can
continue to steer the vehicle, but it
requires increased effort. Contact an
authorized HYUNDAI dealer and have the
system inspected as soon as possible.
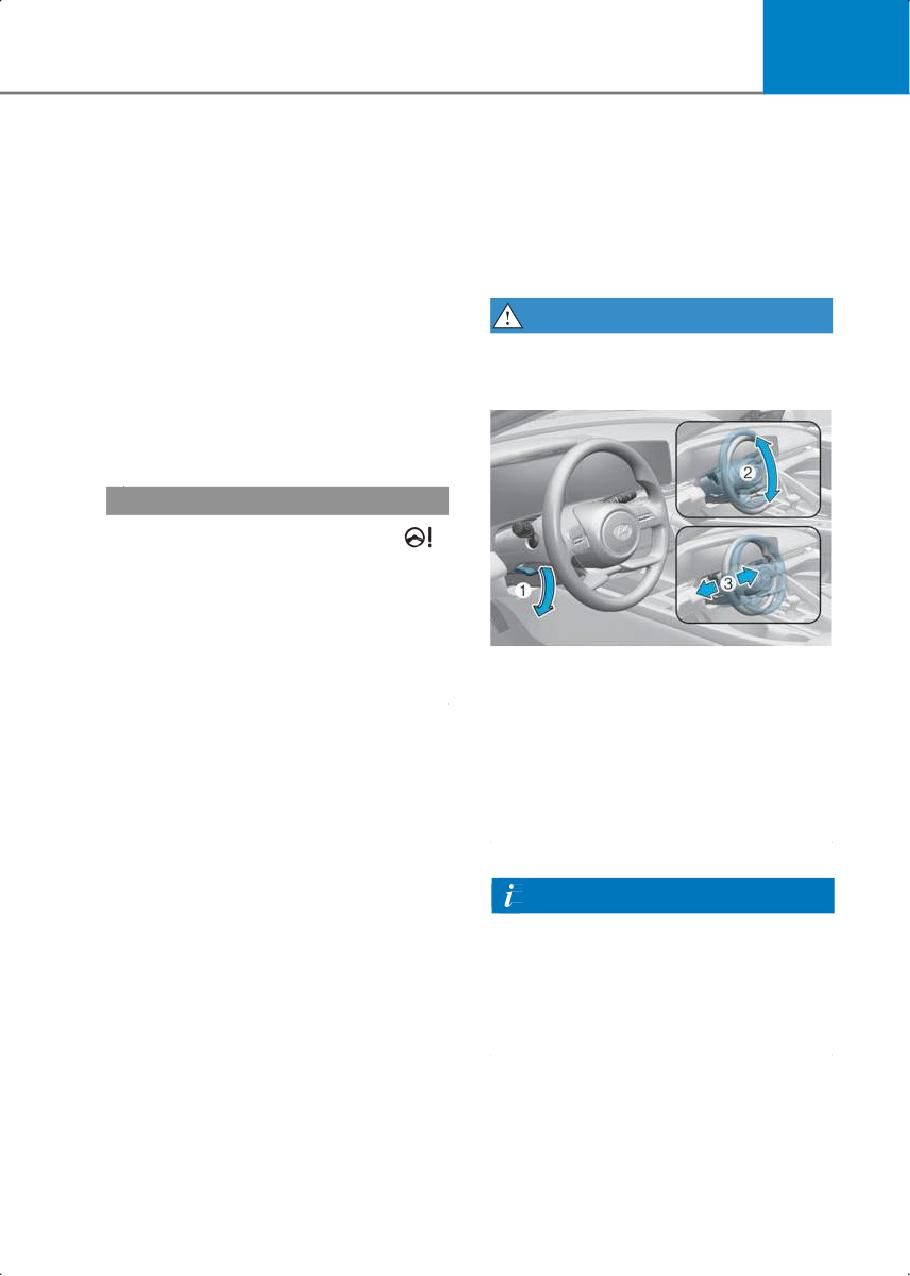
To adjust:
1. Pull down the lock-release lever (1).
2. Adjust the steering wheel to the desired
angle (2) and distance forward/back
(3).
3. Pull the lock-release lever up to lock the
steering wheel in place.
Information
Sometimes the lock-release lever may
not engage completely. Pull down on the
lock-release lever, readjust the steering
wheel again, and then pull back up on the
lock-release lever to lock the steering
wheel in place.
5-17
Convenience features
Day/night rearview mirror
Mirrors
if equipped
Inside rearview mirror
Before driving your vehicle, check to see
that your inside rearview mirror is
properly positioned. Adjust the rearview
mirror so that the view through the rear
window is properly centered.
WARNING
Make sure your line of sight is not
obstructed. Do not place objects in the
rear seat, cargo area, or behind the rear
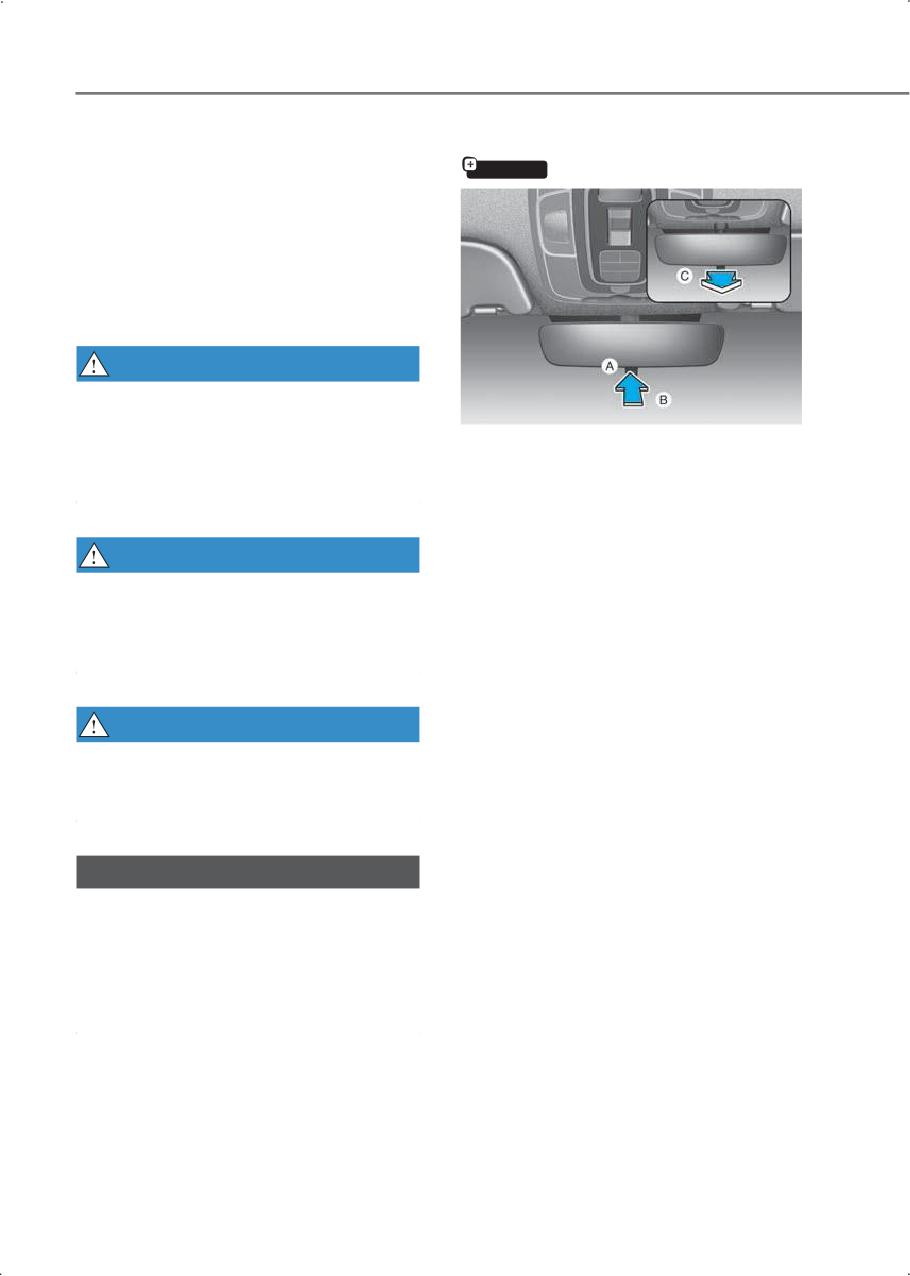
[A] Lever
head restraints which could interfere with
[B] Day
your vision through the rear window.
[C] Night
Before driving at night, pull the day/night
lever toward you to reduce glare from the
headlights of the vehicles behind you.
WARNING
Remember that you lose some rearview
To prevent serious injury during an
clarity in the night position.
accident or deployment of the air bag, do
not modify the rearview mirror and do not
install a wide mirror.
WARNING
Never adjust the mirror while driving. This
may cause loss of vehicle control
resulting in an accident.
NOTICE
When cleaning the mirror, use a paper
towel or similar material dampened with
glass cleaner. Do not spray glass cleaner
directly on the mirror as this may cause
the liquid cleaner to enter the mirror
housing.
5-18
5
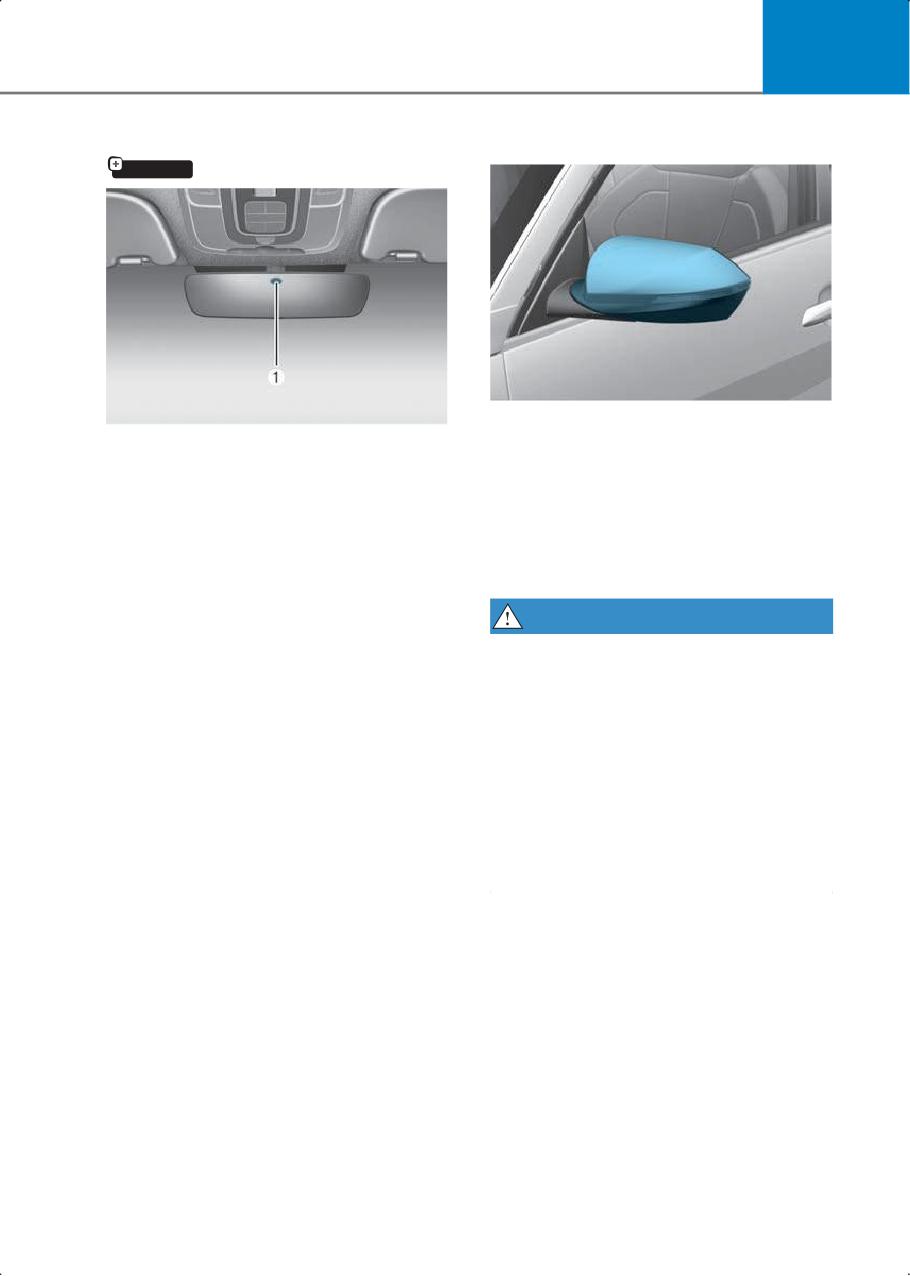
Electrochromic mirror (ECM)
Side view mirrors
if equipped
Your vehicle is equipped with both
(1) Sensor
left-hand and right-hand side view
mirrors. The mirrors can be adjusted
When the engine is running, the glare
remotely with the remote switch. The side
from vehicle headlights behind you is
view mirrors can be folded to help
automatically controlled by the sensor
prevent damage when going through an
mounted in the rearview mirror.
automatic car wash or when passing
When the gear is shifted to R (Reverse),
through a narrow street.
the mirror automatically goes to the
brightest setting in order to improve the
WARNING
driver’s view behind the vehicle
• The right side view mirror is convex.
Objects seen in the mirror are closer
than they appear.
• Use the inside rear view mirror or look
back directly to determine the actual
distance of other vehicles prior to
changing lanes.
• Do not adjust or fold the side view
mirrors while driving. This may cause
loss of vehicle control resulting in an
accident.
5-19
Convenience features
Folding the side view mirrors
NOTICE
• Do not scrape ice off the mirror face;
this may damage the surface of the
glass.
• If the mirror is jammed with ice, do not
adjust the mirror by force. Use an
approved de-icer (not radiator
antifreeze) spray, or a sponge or soft
cloth with very warm water, or move
the vehicle to a warm place and allow
the ice to melt.
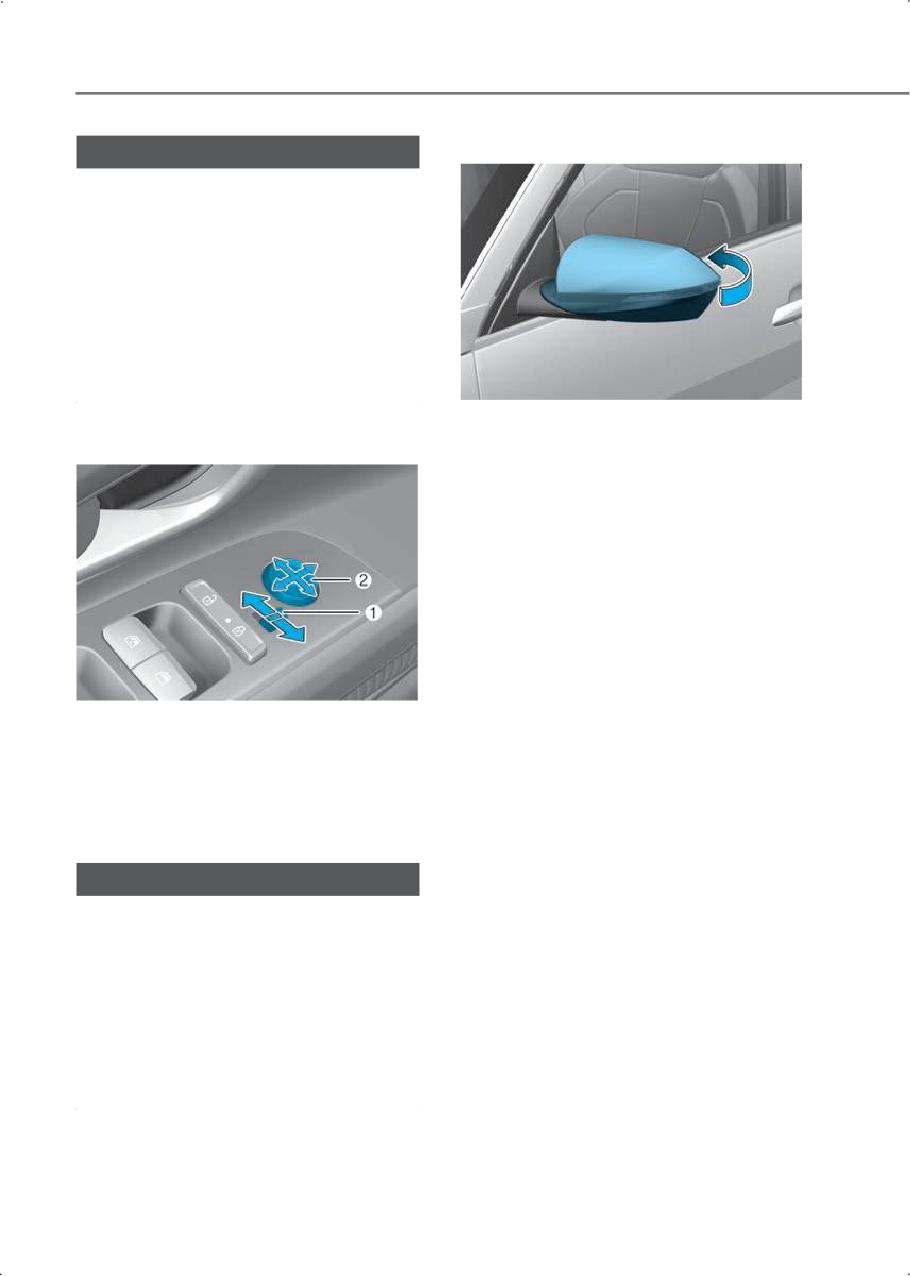
To fold the side view mirrors, grasp the
Side view mirror adjustment
housing of the mirror and then fold it
inwards.
1. Move either the L (left side) or R (right
side) lever (1) to select the side view
mirror you would like to adjust.
2. Use the mirror adjustment control (2) to
position the selected mirror up, down,
left or right.
NOTICE
• The mirrors stop moving when they
reach the maximum adjusting angles,
but the motor continues to operate
while the switch is pressed. Do not
press the switch longer than necessary,
because this can damage the motor.
• Do not attempt to adjust the side view
mirrors by hand, because this can
damage the motor.
5-20
5
Windows
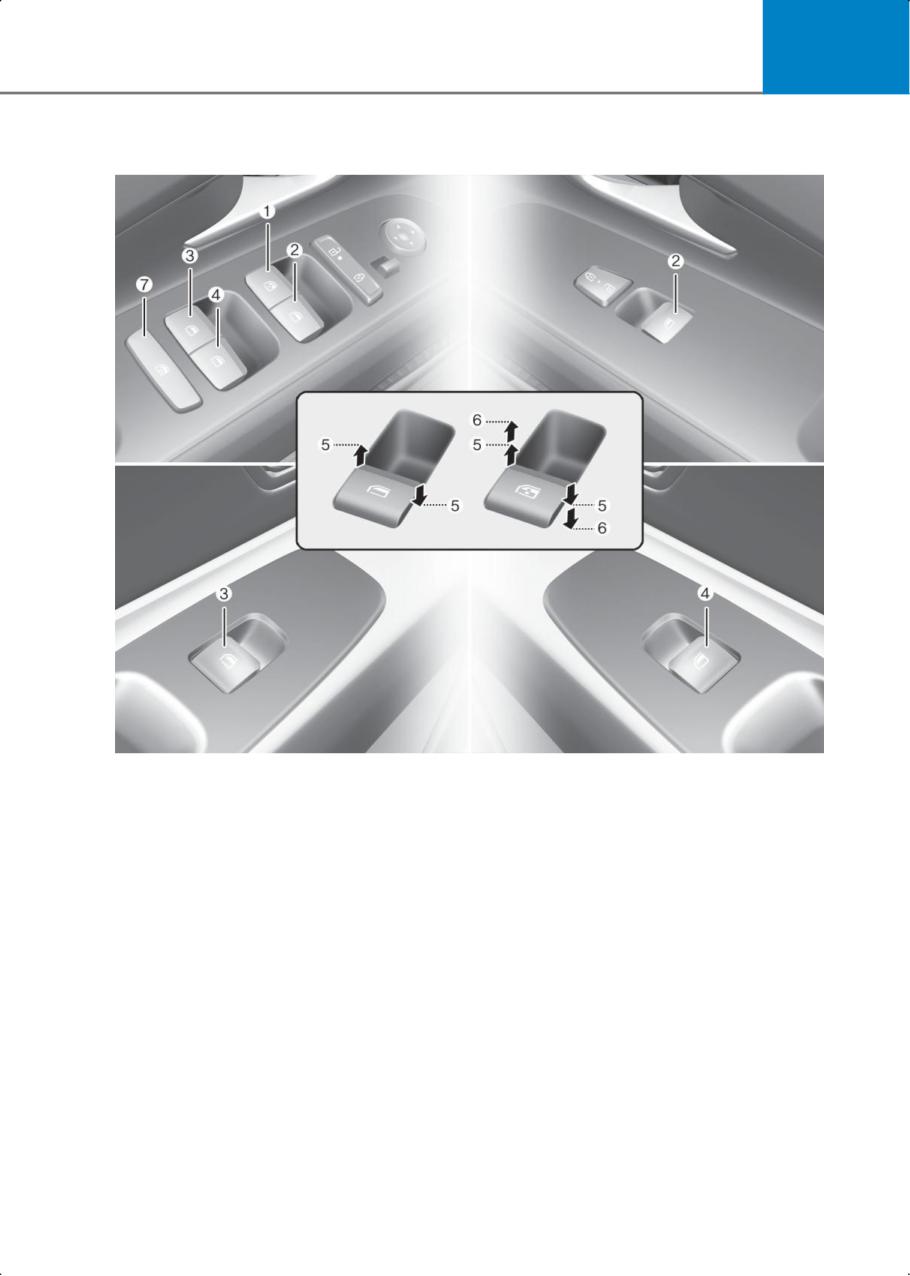
(1) Driver’s door power window switch
(2) Front passenger’s door power window switch
(3) Rear door (left) power window switch
(4) Rear door (right) power window switch
(5) Window opening and closing
(6) Automatic power window
(7) Power window lock button
5-21
Convenience features
Power windows
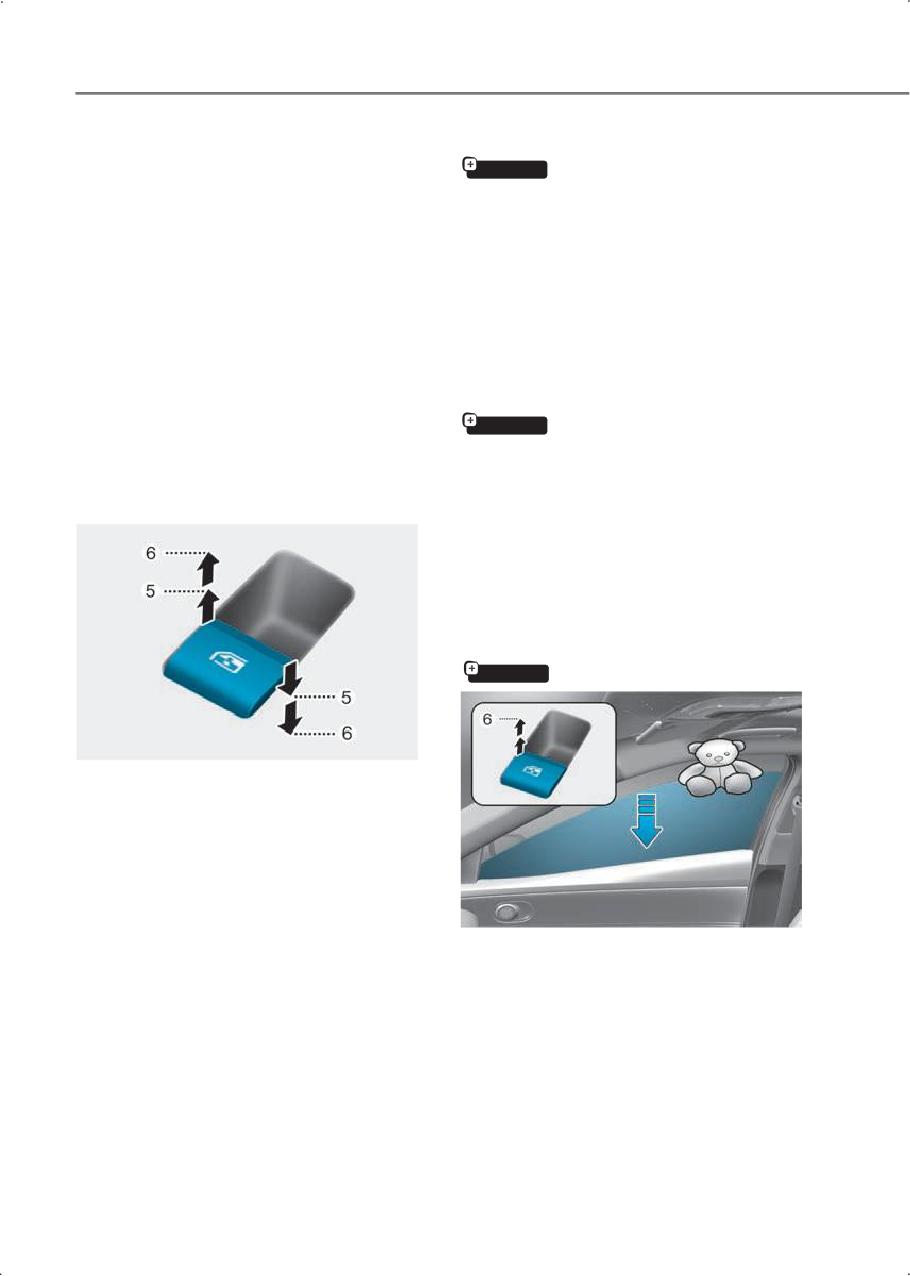
Auto down window
if equipped
The ignition switch must be in the ON
position to be able to raise or lower the
Pressing the power window switch
windows. Each door has a Power Window
momentarily to the second detent
switch to control the door’s window. The
position (6) completely lowers the
driver has a Power Window Lock button
window even when the switch is released.
that can block the operation of rear
To stop the window at the desired
passenger windows. The power windows
position while the window is operating,
will operate for about 3 minutes after the
pull up or press down and release the
ignition is turned LOCK/OFF or if the
switch.
ignition is placed in the ACC position, as
long as the front doors remain closed.
Auto up/down window
If the front doors are opened, the battery
if equipped
power is turned OFF and the Power
Windows do not operate.
Pressing or pulling up the power window
switch momentarily to the second detent
position (6) completely lowers or lifts the
Window opening and closing
window even when the switch is released.
To stop the window at the desired
position while the window is operating,
pull up or press down and release the
switch.
Automatic reversal
if equipped
To open:
Press the window switch down to the first
detent position (5). Release the switch
when you want the window to stop.
To close:
Pull the window switch up to the first
detent position (5). Release the window
switch when you want the window to
If a window senses any obstacle while it is
stop.
closing automatically, it stops and lowers
approximately 12 in. (30 cm) to allow the
object to be cleared.
If the window detects any resistance
while the power window switch is pulled
up continuously, the window stops
upward movement and then lowers
approximately 1 in. (2.5 cm).
5-22
5
If the power window switch is pulled up
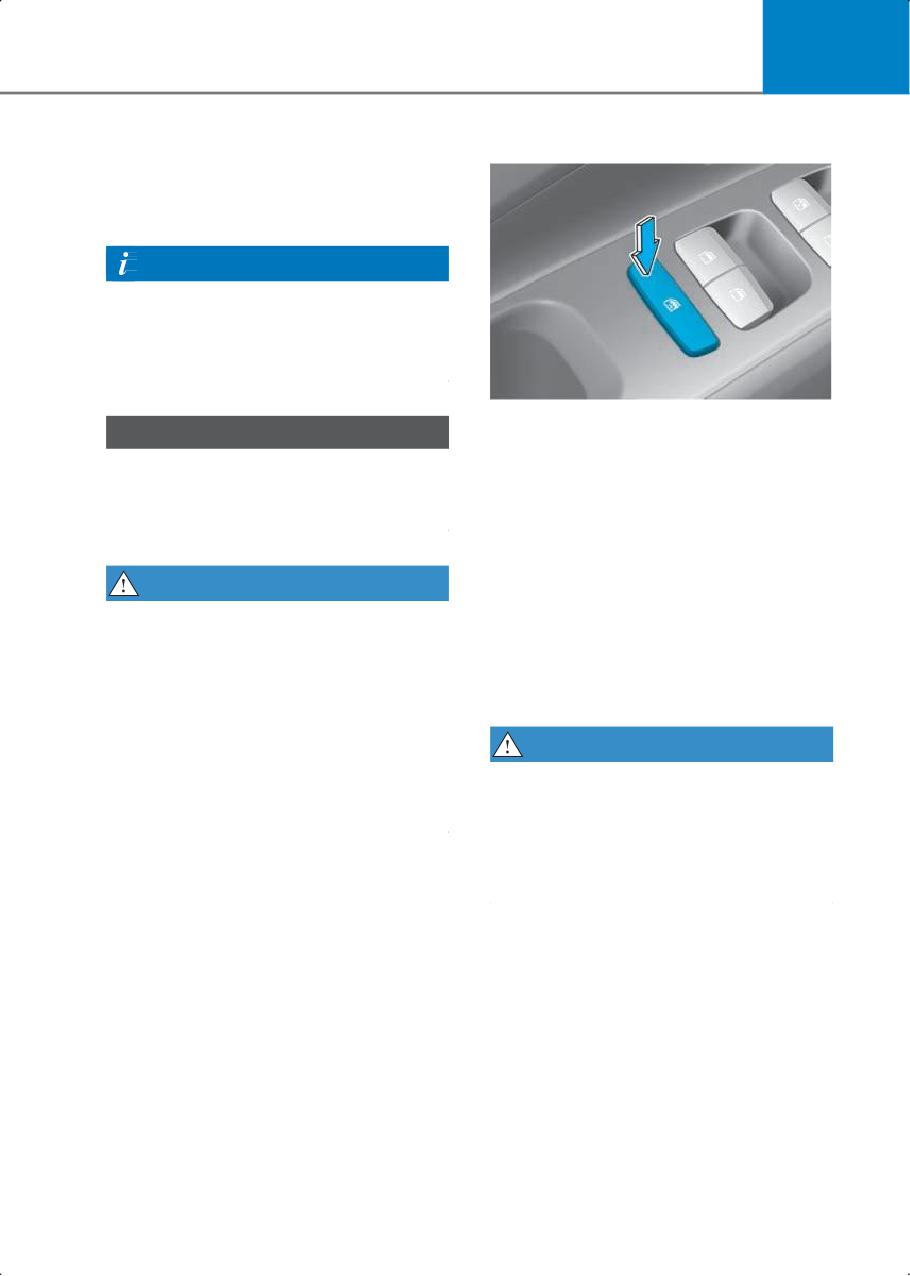
Power window lock button
continuously again within 5 seconds after
the window is lowered by the automatic
window reverse feature, the automatic
window reverse does not operate.
Information
The automatic reverse feature is active
only when the "Auto Up" feature is used
by fully pulling up the switch to the
second detent.
NOTICE
The driver can disable the power window
switches on the rear passenger doors by
Do not install any accessories on the
pressing the power window lock button.
windows. The automatic reverse feature
When the power window lock button is
may not operate.
pressed:
• The driver’s master control can operate
all the power windows.
WARNING
• The front passenger’s control can
Make sure body parts or other objects are
operate the front passenger’s power
safely out of the way before closing the
window.
windows to avoid injuries or vehicle
• The rear passenger’s control cannot
damage.
operate the rear passengers’ power
Objects less than 0.16 in. (4 mm) in
window.
diameter caught between the window
glass and the upper window channel may
WARNING
not be detected by the automatic reverse
Do not allow children to play with the
window and the window does not stop
power windows. Keep the driver’s door
and reverse direction.
power window lock button in the LOCK
position. Serious injury or death may
result from unintentional window
operation by a child.
5-23
Convenience features
NOTICE
Sunroof
if equipped
• To prevent possible damage to the
power window system, do not open or
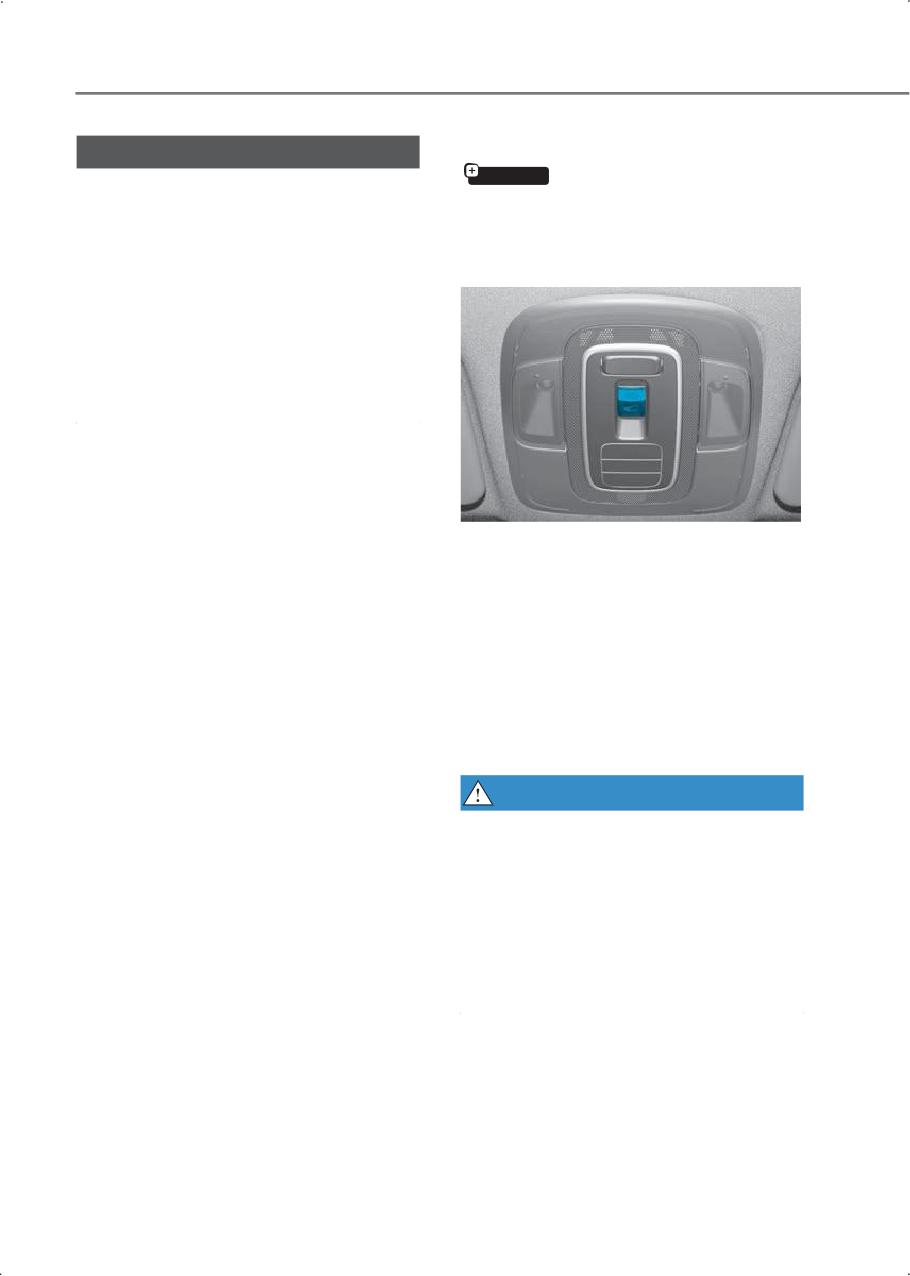
If your vehicle is equipped with a sunroof,
close two windows or more at the same
you can slide or tilt your sunroof with the
time. This also ensures the longevity of
sunroof switch located on the overhead
the fuse.
console.
• Never try to operate the main switch on
the driver’s door and the individual
door window switch in opposite
directions at the same time. If this is
done, the window stops and cannot be
opened or closed.
The sunroof can be operated when the
ignition switch is in the ON or START
position.
The sunroof can also be operated for
about 3 minutes after the ignition switch
is in the ACC or LOCK/OFF position unless
a front door is opened.
However, if the front door is open, the
sunroof cannot be operated even within
the 3 minute period.
WARNING
To prevent serious injury or death:
• Adjust he sunroof or sunshade when
your vehicle stops.
• Do not leave the engine running and
the key in your vehicle with
unsupervised children. Unattended
children may operate the sunroof.
• Do not sit on the top of the vehicle.
5-24
5
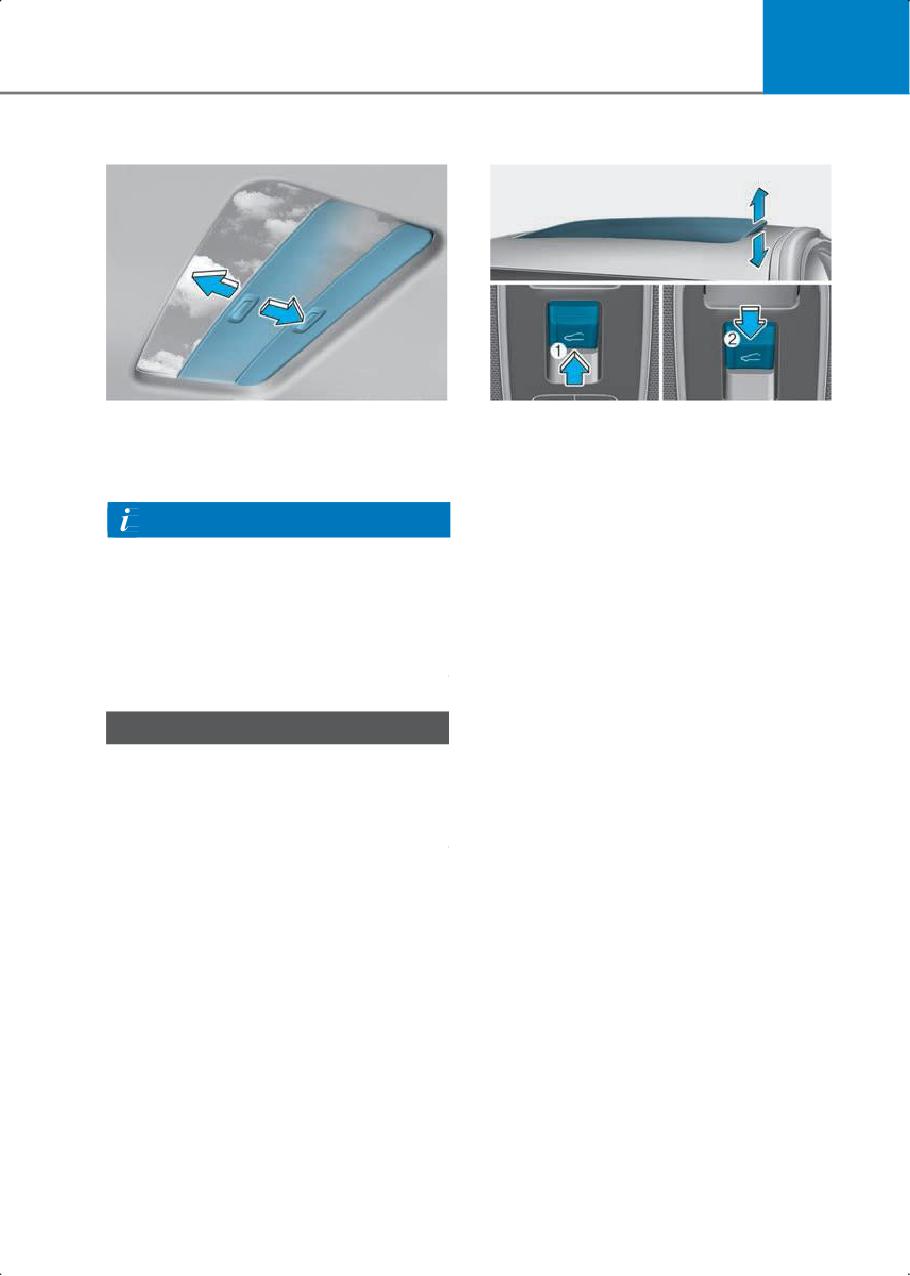
Sunshade
Tilt open/close
Use the sunshade to block direct sunlight
(1) Tilt open
coming through the sunroof glass.
(2) Tilt close
Open or close the sunshade by hand.
• Push the sunroof switch up to tilt the
sunroof glass open. If the sunshade is
Information
closed, open the sunshade manually
first.
The sunshade opens automatically when
the sunroof glass is opened, but the
• Push the sunroof switch forward when
sunshade does not close automatically
the sunroof glass is tilt opened, the
when the sunroof glass is closed. Also,
sunroof glass closes.
only the sunshade cannot be closed when
The sunroof glass tilts open or closes
the sunroof glass is opened.
while the switch is pushed.
NOTICE
Do not pull the sunshade up or down, or
apply excessive force as such action may
damage the sunshade or cause it to
malfunction.
5-25
Convenience features
Slide open/close
Automatic reversal
if equipped
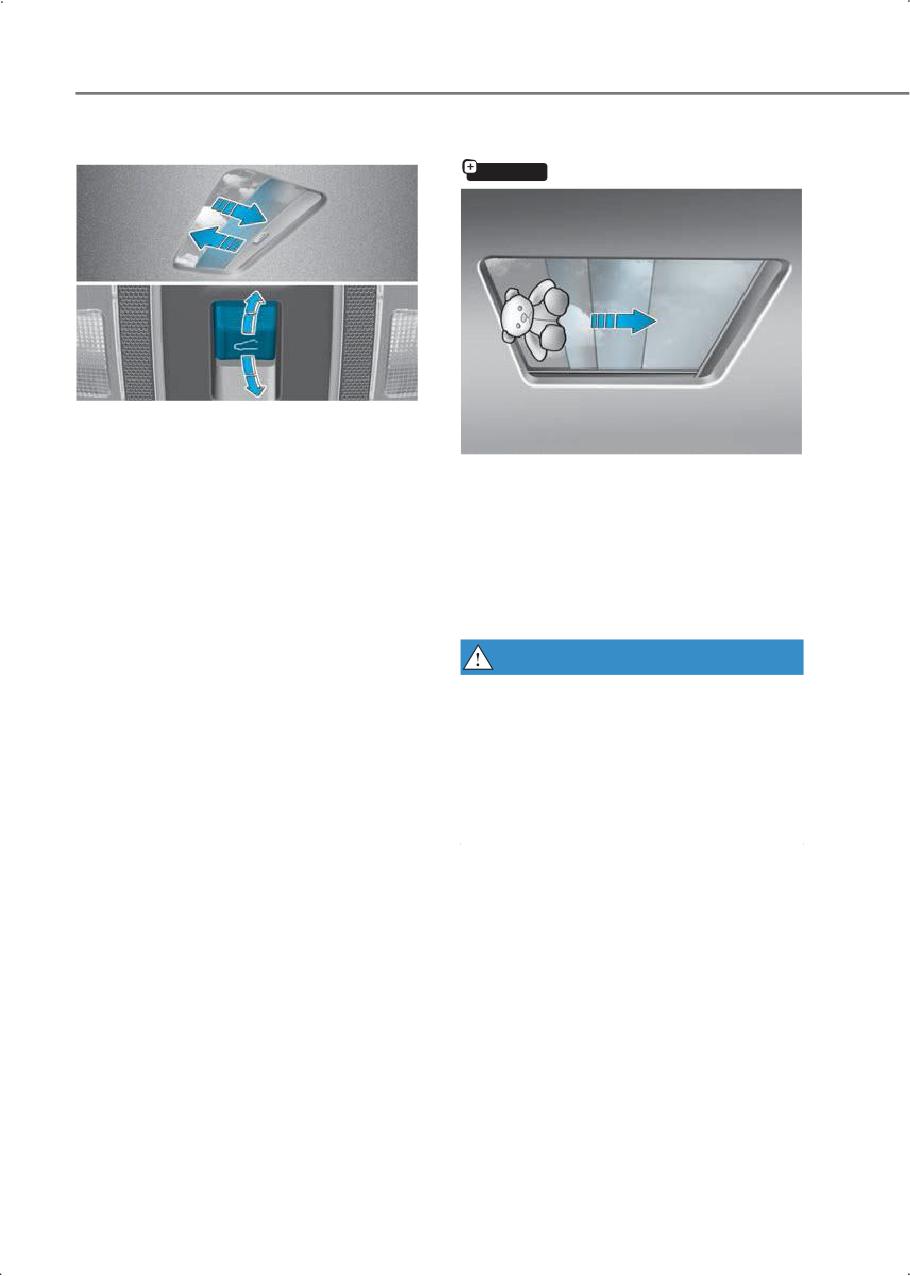
• Push the sunroof switch rearward. The
sunroof glass slides open. If the
sunshade is closed, the sunshade
If the sunroof glass senses any
opens first and then the sunroof glass
obstruction while closing, it reverses
opens.
direction then stops.
Push the sunroof switch forward. The
The automatic reverse feature may not
sunroof glass closes.
work if a thin or soft object is caught
Push the sunroof switch forward or
between the sliding sunshade or sunroof
rearward to the first detent position.
glass and sunroof sash.
The sunroof glass moves until the
switch is released.
WARNING
• Push the sunroof switch forward or
• Make sure that heads, hands, arms, any
rearward to the second detent position.
other body parts, or objects are out of
The sunroof glass operates
the way before operating the sunroof.
automatically (auto slide feature).
Body parts or objects may get caught
To stop the sunroof movement, push
causing injuries or vehicle damage.
the sunroof switch in any direction.
• Never deliberately use your body parts
• The sunroof glass stops halfway (first
to test the automatic reverse feature.
detent position) before it is fully
opened. To fully open the sunroof glass,
push the sunroof switch rearward once
more. At this time, the sunroof glass
opens only while the switch is pushed.
5-26
5
NOTICE
Hood
• Do not continue to push the sunroof
switch after the sunroof is fully opened,
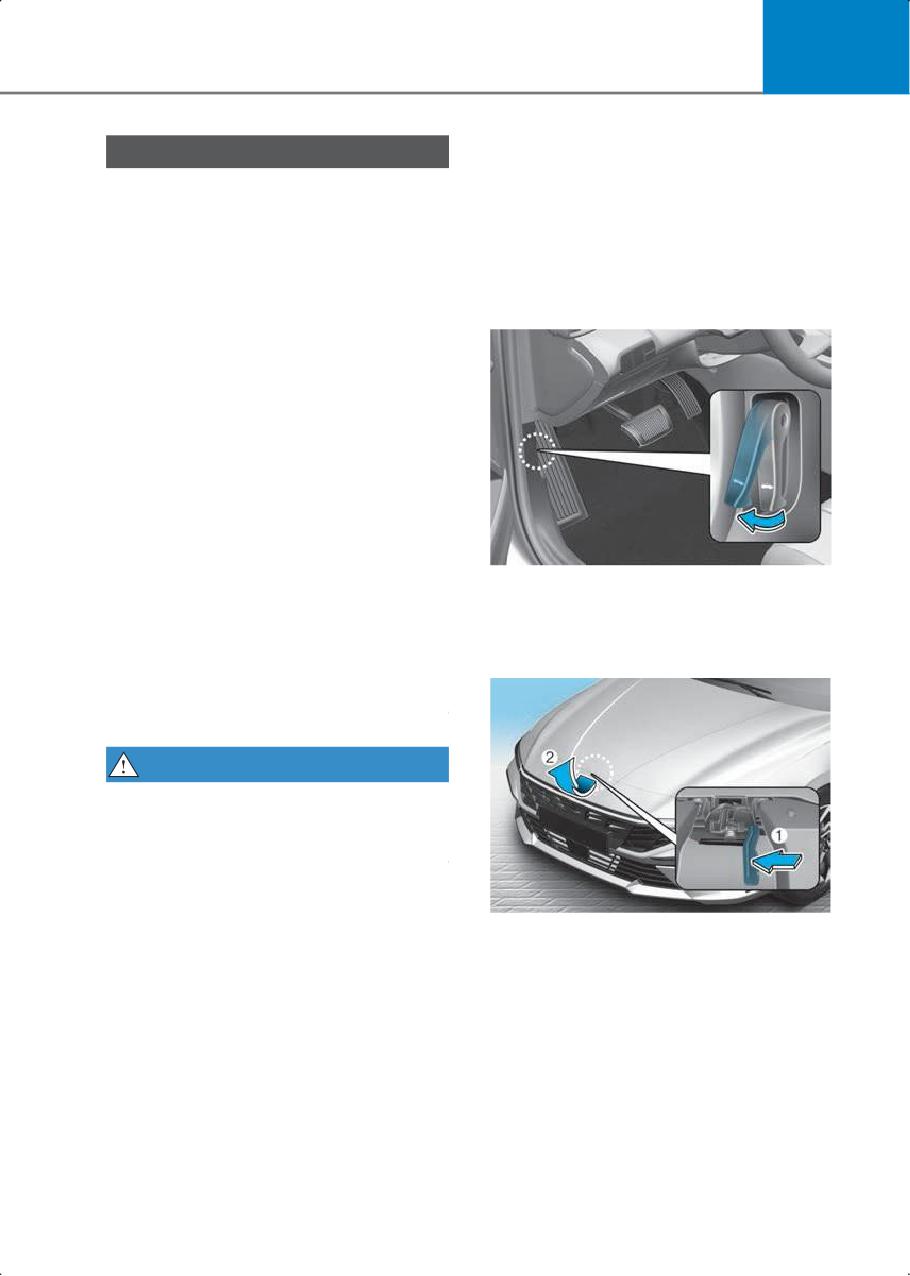
Opening the hood
closed, or tilted. Damage to the sunroof
1. Park the vehicle and apply the parking
motor may occur or may cause the
brake.
motor or sunroof system to
malfunction.
2. Pull the release lever to unlatch the
hood. The hood pops open slightly.
• Using the sunroof for a long time may
make noise caused by dust
accumulated between the sunroof and
vehicle body. Open the sunroof and
remove dust regularly using a clean
cloth.
• Do not try to open the sunroof when the
temperature is below freezing or when
the sunroof is covered with snow or ice.
Otherwise, the motor may be damaged.
In a cold and wet weather, the sunroof
may not work properly.
• Do not open or drive with the sunroof
glass open immediately after rain or
3. Go to the front of the vehicle, raise the
washing the vehicle. Water may wet the
hood slightly, push up the secondary
interior of the vehicle.
hood release lever (1) inside of the hood
center and lift the hood (2).
• Do not extend any cargo outside the
sunroof while driving.
WARNING
Do not extend your head, arms, body
parts or objects outside the sunroof while
driving.
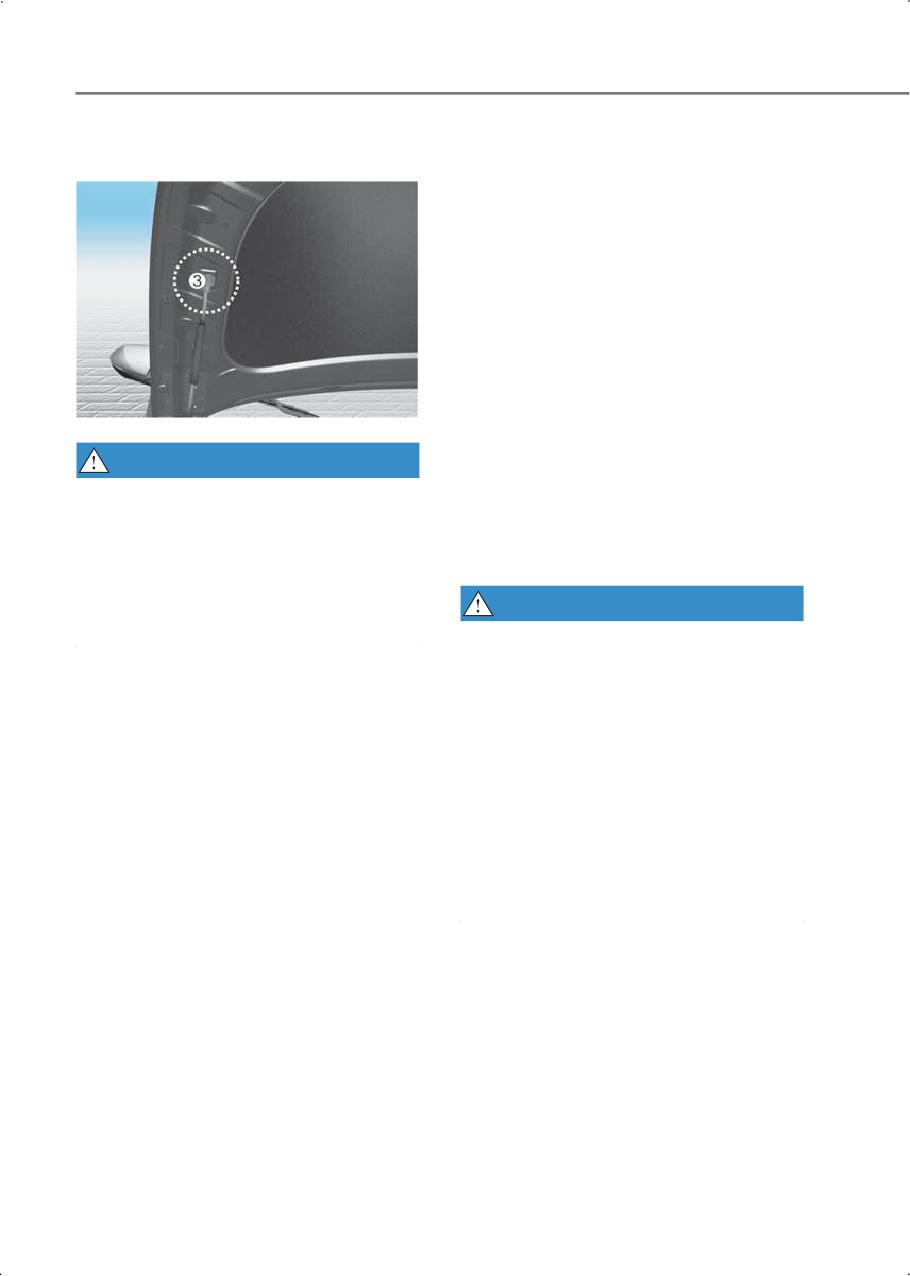
4. Lift the hood support rod.
5-27
Convenience features
5. Insert the end of the hood support rod
Closing the hood
into the slot located on the hood (3).
1. Before closing the hood, check in and
around the engine compartment to
ensure the following:
• Any tools or other loose objects have
been removed.
• All glove, rags, or other combustible
material have been removed.
• All filler caps are tightly and correctly
installed.
2. Return the hood support rod to its
stored location.
3. Lower the hood until it is about 12 in. (30
cm) above the closed position and then
WARNING
let it drop.
• Grasp the hood support rod in the area
4. Check the hood has locked properly. If
wrapped in rubber when the engine is
the hood is raised slightly, open it again
hot to protect you from burn or injury.
and drop it from a little higher. Check
• Make sure that the end of the hood
again.
support rod is inserted fully into the
hood slot to prevent the hood from
WARNING
falling.
• Before closing the hood, ensure all
obstructions are removed from around
the hood opening.
• Always double check to make sure that
the hood is firmly latched before driving
away. Check there is no hood open
warning light or message displayed on
the instrument cluster. Driving with the
hood open may cause a total loss of
visibility, resulting in a collision.
• Do not move the vehicle with the hood
raised. It may block your vision and may
result in a collision.
5-28
5
Closing the trunk
Trunk
Lower the trunk lid and press down until it
locks. Always check it is secure by pulling
Opening the trunk
up the trunk lid.
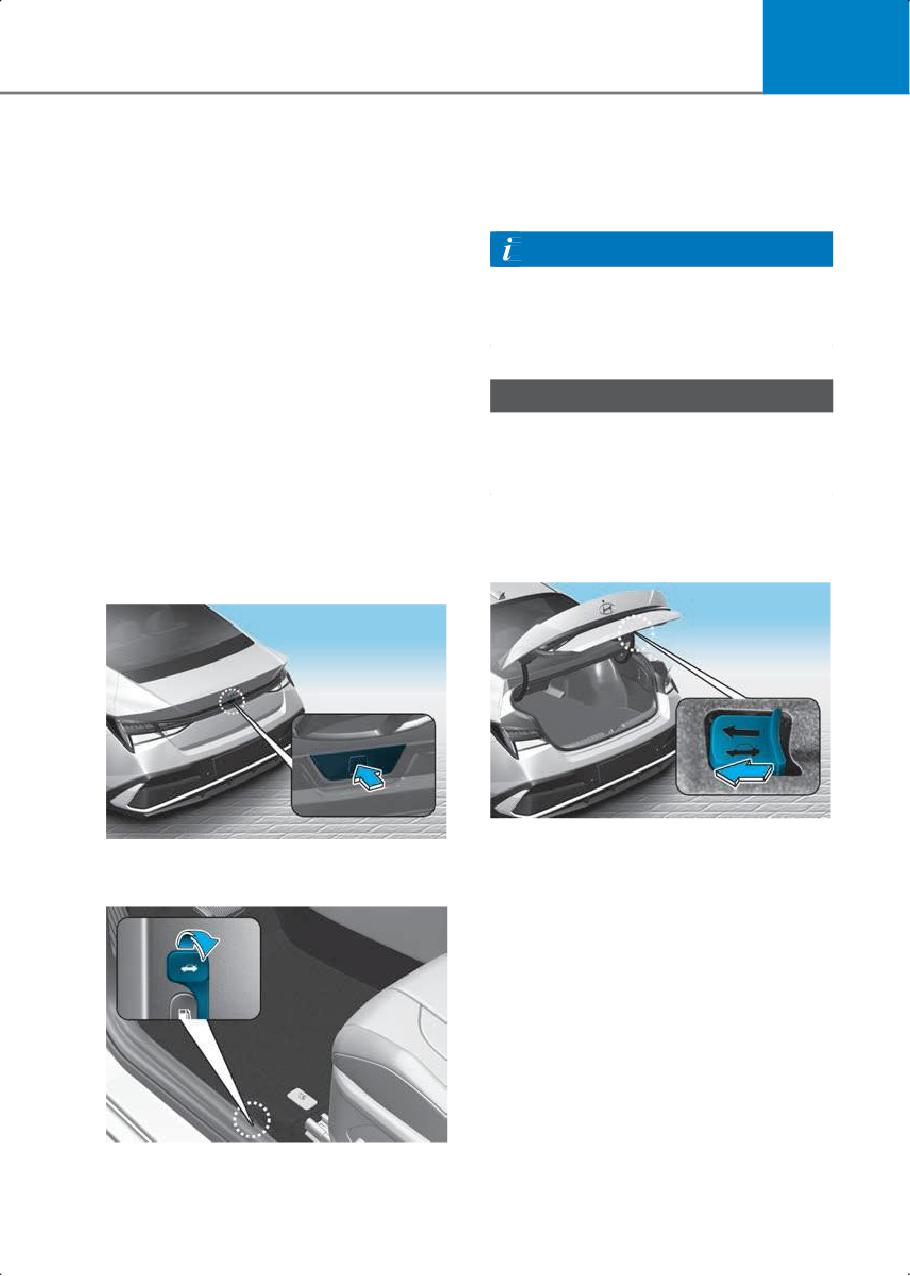
1. Make sure the shift lever is in P (Park)
and set the parking brake.
Information
2. Then do one of the following:
To prevent damage to the trunk lift
• Hold down the trunk unlock button
cylinders and the attached hardware,
located on your remote key or smart
always close the trunk before driving.
key for more than 1 second.
• Additionally, for vehicles equipped
with smart key :
NOTICE
- While all doors are unlocked, press
the switch on the trunk to open the
Trunk lock and the trunk may not work if
trunk with or without the smart key
frozen shut due to moisture and freezing
in your possession.
conditions.
- If any door is locked or all doors are
locked, the switch can still be used
Emergency trunk safety
to open the trunk, as long as the
smart key is in your possession.
release
Outside
Your vehicle is equipped with an
- Use the trunk release lever.
Emergency Trunk Safety Release lever
Inside
located inside the trunk. When someone
is inadvertently locked in the trunk, the
trunk can be opened by moving the lever
in the direction of the arrow and pushing
the trunk open.
3. Lift the trunk lid up.
5-29
Convenience features
Smart Trunk release
WARNING
if equipped
•
You and your passengers must be
aware of the location of the Emergency
Trunk Safety Release lever in this
vehicle and how to open the trunk in
case you are accidentally locked in the
trunk.
•
NEVER allow anyone to occupy the
trunk of the vehicle at any time. If the
trunk is partially or totally latched and
the person is unable to get out, serious
injury or death could occur due to lack
of ventilation, exhaust fumes and rapid
heat build-up, or because of exposure
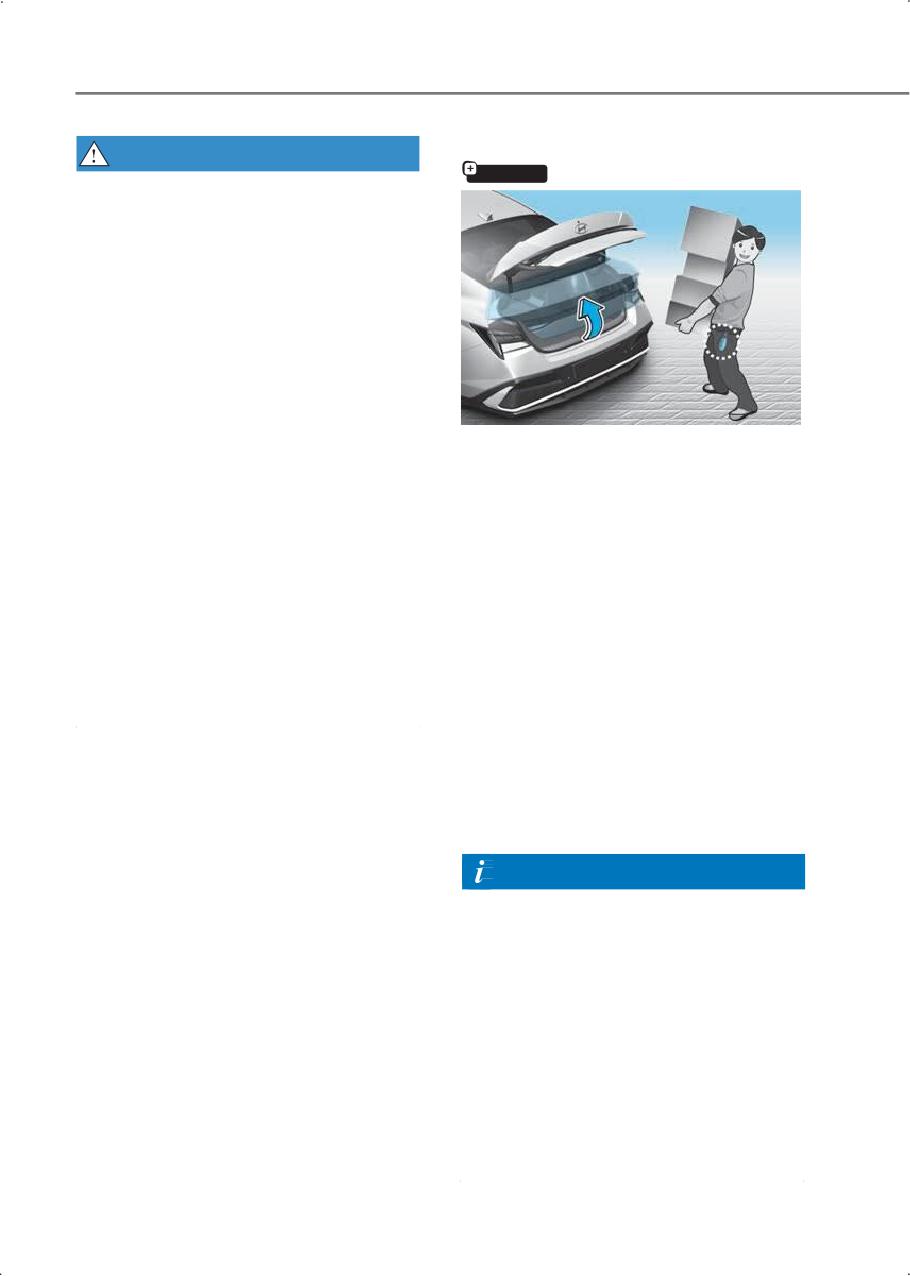
On a vehicle equipped with a smart key,
to cold weather conditions. The trunk is
the trunk can be opened using the Smart
also a highly dangerous location in the
Trunk release system.
event of a crash because it is not a
protected occupant space but is a part
You can enable the Smart Trunk release
of the vehicle’s crush zone.
system from the Settings menu in the
instrument cluster.
•
Your vehicle should be kept locked and
the Smart Key should be kept out of the
Select: User Settings > Doors > Smart
reach of children. Parents should teach
Trunk
their children about the dangers of
playing in trunks.
How to use the Smart Trunk release
•
Use the release lever for emergencies
The trunk can be opened with no touch
only.
activation satisfying all the conditions
below.
• After 15 seconds when all doors are
closed and locked
• Positioned in the detecting area for
more than 3 seconds
Information
The Smart Trunk release does not operate
when:
• The smart key is detected within 15
seconds after the doors are closed and
locked, and is continuously detected.
• The smart key is detected within 15
seconds after the doors are closed and
locked, and 60 in. (1.5 m) from the front
door handles. (for vehicles equipped
with Welcome Light)
• A door is not locked or closed.
• The smart key is in the vehicle.
5-30
5
1. Setting
WARNING
To activate the Smart Trunk release, go
to User Settings Mode and select Smart
• Make sure you close the trunk before
Trunk on the cluster display.
driving your vehicle.
For more information, refer to the
• Make sure there are no people or
"Cluster display (Type A)" section in the
objects around the trunk before
complete Owner's Manual. If your
opening or closing the trunk.
vehicle is equipped with additional
• Make sure objects in the trunk do not
navigation, please refer to the user's
come out when opening the trunk on a
infotainmentsystemmanualseparately
slope. It may cause serious injury.
supplied.
• Make sure to deactivate the Smart
Trunk when washing your vehicle.
Otherwise, the trunk may open
inadvertently.
• The key should be kept out of reach of
children. Children may inadvertently
open the Smart Trunk release while
playing around the rear area of the
vehicle.
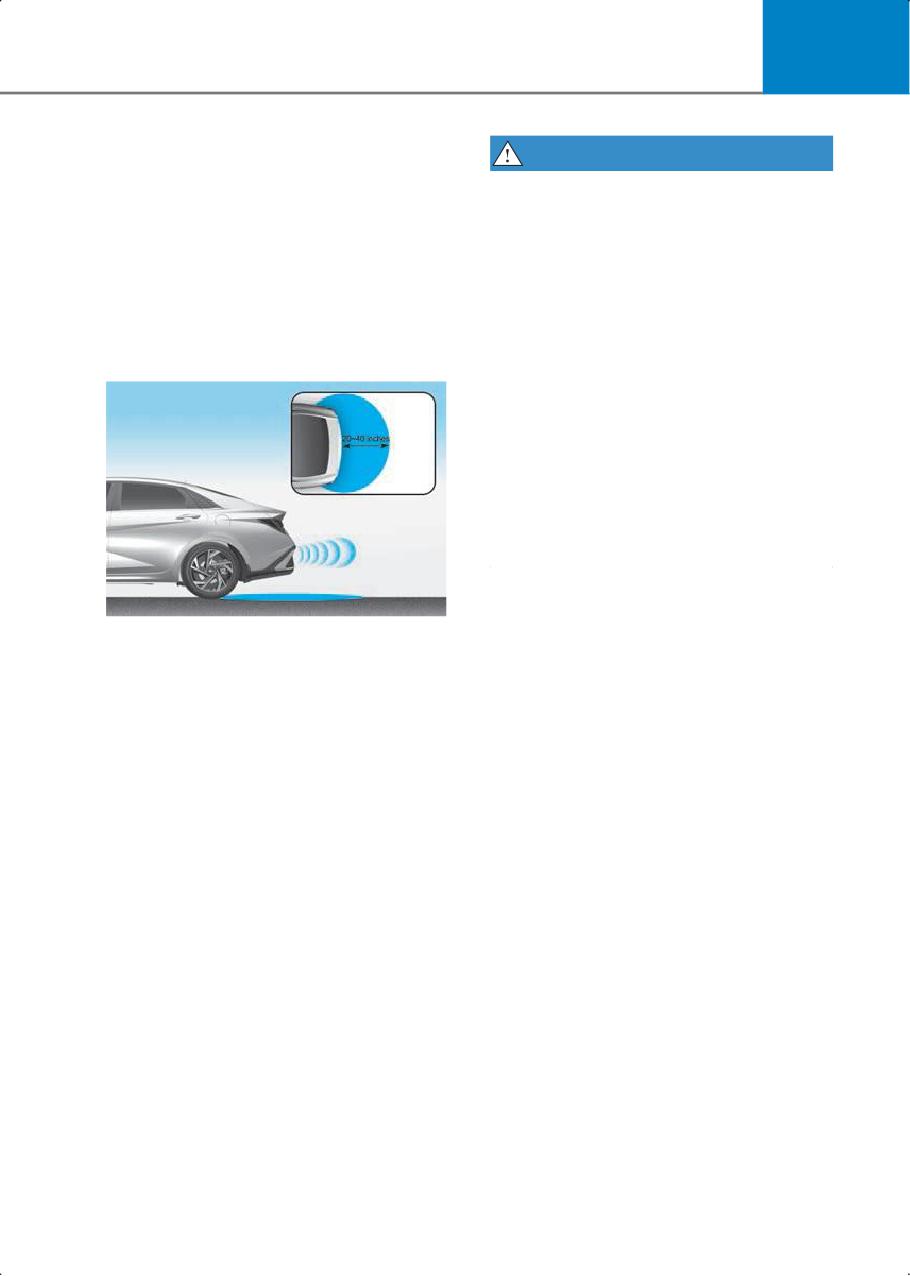
2. Detect and Alert
If you are positioned in the detecting
area (20-40 in. (50-100 cm) behind the
vehicle) carrying a smart key, the
hazard warning lights will blink and
chime will sound to alert you the smart
key has been detected and the trunk
will open.
3. Automatic opening
The hazard warning lights will blink and
chime will sound 6 times and then the
trunk will open.
5-31
Convenience features
How to deactivate the Smart Trunk
release function using the smart key
Information
Type A
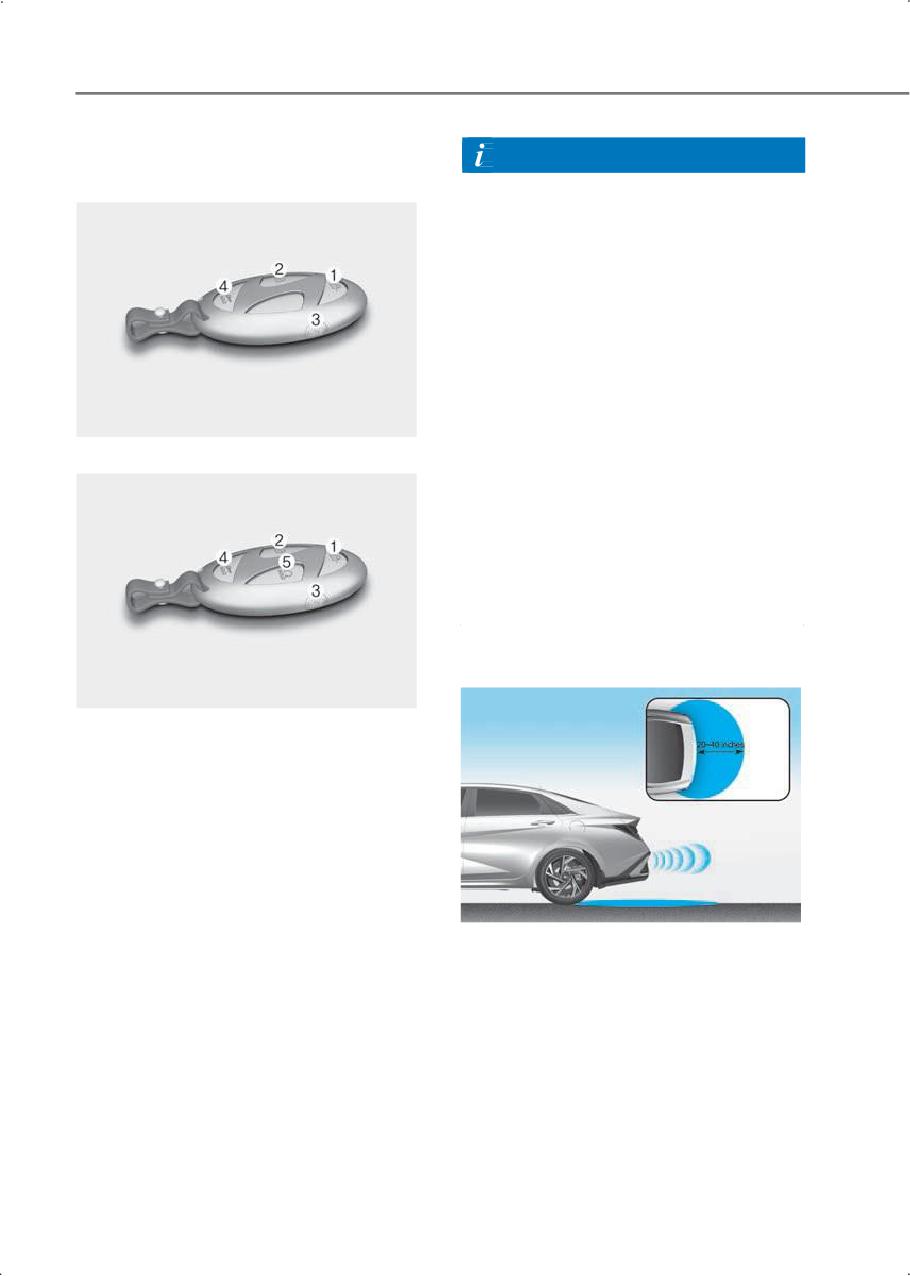
• If you press the door unlock button (2),
the Smart Trunk release function will be
deactivated temporarily. But, if you do
not open any door for 30 seconds, the
smart trunk function will be activated
again.
• If you press the trunk open button (3)
for more than 1 second, the trunk
opens.
• If you press the door lock button (1) or
trunk open button (3) when the Smart
Trunk release function is not in the
Detect and Alert stage, the smart trunk
Type B
function will not be deactivated.
• In case you have deactivated the Smart
Trunk function by pressing the smart
key button and opened a door, the
Smart Trunk release function can be
activated again by closing and locking
all doors.
Detecting area
(1) Door lock
(2) Door unlock
(3) Trunk open
(4) Panic
(5) Remote Start (if equipped)
If you press any button of the smart key
during the Detect and Alert stage, the
Smart Trunk release function will be
deactivated.
Make sure to be aware of how to
deactivate the Smart Trunk release
• The Smart Trunk release operates with
function for emergency situations.
a welcome alert if the smart key is
detected within 20-40 in. (50-100 cm)
from the trunk.
• The alert stops at once if the smart key
is positioned outside the detecting area
during the Detect and Alert stage.
5-32
5
Fuel filler door
Closing the fuel filler door
1. To install the fuel tank cap, turn it
clockwise until it "Clicks".
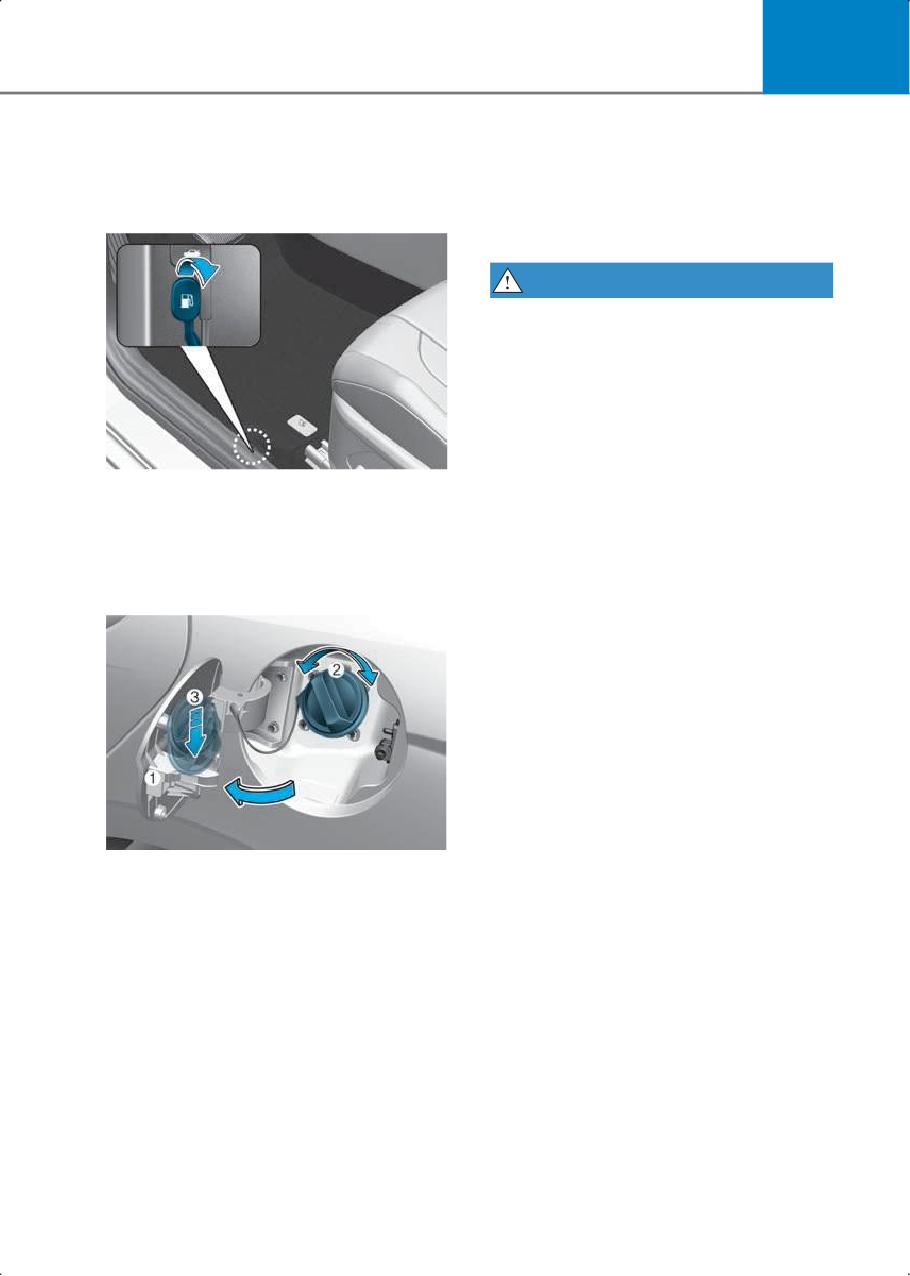
Opening the fuel filler door
2. Close the fuel filler door until it is
latched securely.
WARNING
Automotive fuel is highly flammable and
explosive. Failure to follow these
guidelines may result in serious injury or
death:
•
Read and follow all warnings posted at
the gas station.
•
Before refueling, note the location of
the Emergency Gasoline Shut-Off, if
available, at the gas station.
The fuel filler door must be opened from
inside the vehicle by pulling up the fuel
•
Before touching the fuel nozzle,
filler release lever.
eliminate the potential build-up of
static electricity by touching a metal
1. Turn the engine off.
part of the vehicle, a safe distance away
2. Pull up the fuel filler release lever.
from the fuel filler neck, nozzle, or other
gas source, with your bare hand.
•
Do not use cellular phones while
refueling. Electric current and/or
electronic interference from cellular
phones may potentially ignite fuel
vapors and cause a fire.
•
Do not get back into a vehicle once you
have begun refueling.
You can generate a build-up of static
electricity by touching, rubbing, or
sliding against any item or fabric
capable of producing static electricity.
3. Pull the fuel filler door (1) outward to
Static electricity discharge may ignite
access the fuel tank cap.
fuel vapors causing a fire. If you must
4. To remove the fuel tank cap (2), turn it
re-enter the vehicle, once again
counterclockwise. A hissing noise is
eliminate potentially dangerous static
heard because the pressure inside the
electricity discharge by touching a
tank equalizes.
metal part of the vehicle, away from the
5. Place the cap (3) on the fuel filler door
fuel filler neck, nozzle, or other gasoline
(1).
source, with your bare hand.
5-33
Convenience features
•
When refueling, always move the shift
lever to the P (Park) position, apply the
Information
parking brake, and move the ignition
Make sure to refuel your vehicle
switch to the LOCK/OFF position.
according to the "Fuel requirements"
Sparks produced by electrical
suggested in the complete Owner's
components related to the engine can
Manual.
ignite fuel vapors causing a fire.
•
When using an approved portable fuel
container, be sure to place the
NOTICE
container on the ground prior to
refueling. Static electricity discharge
• Do not spill fuel on the exterior
from the container may ignite fuel
surfaces. It may damage the paint.
vapors causing a fire. Once refueling
• If the cap needs to be replaced, only
has begun, contact between your bare
use a genuine HYUNDAI cap or the fuel
hand and maintain the vehicle until the
system or emission control system may
filling is complete.
malfunction.
•
Use only approved portable plastic fuel
containers designed to carry and store
gasoline.
•
Do not use matches or a lighter and do
not smoke or leave a lit cigarette in your
vehicle at a gas station,especially
during refueling.
•
Do not over-fill or top-off your vehicle
tank, which may cause gasoline
spillage.
•
If a fire breaks out during refueling, get
away from the vehicle, and
immediately contact a gas station
employee and then contact the local
fire department.
•
If pressurized fuel sprays out, it can
cover your clothes or skin and increase
the risk of fire and burns. If the cap is
venting fuel or if you hear a hissing
sound, wait until the condition stops
before completely removing the cap.
•
Always check that the fuel cap is
installed securely to prevent fuel
spillage in the event of a collision.
5-34
5
AUTO headlight
Exterior lights
Lighting control
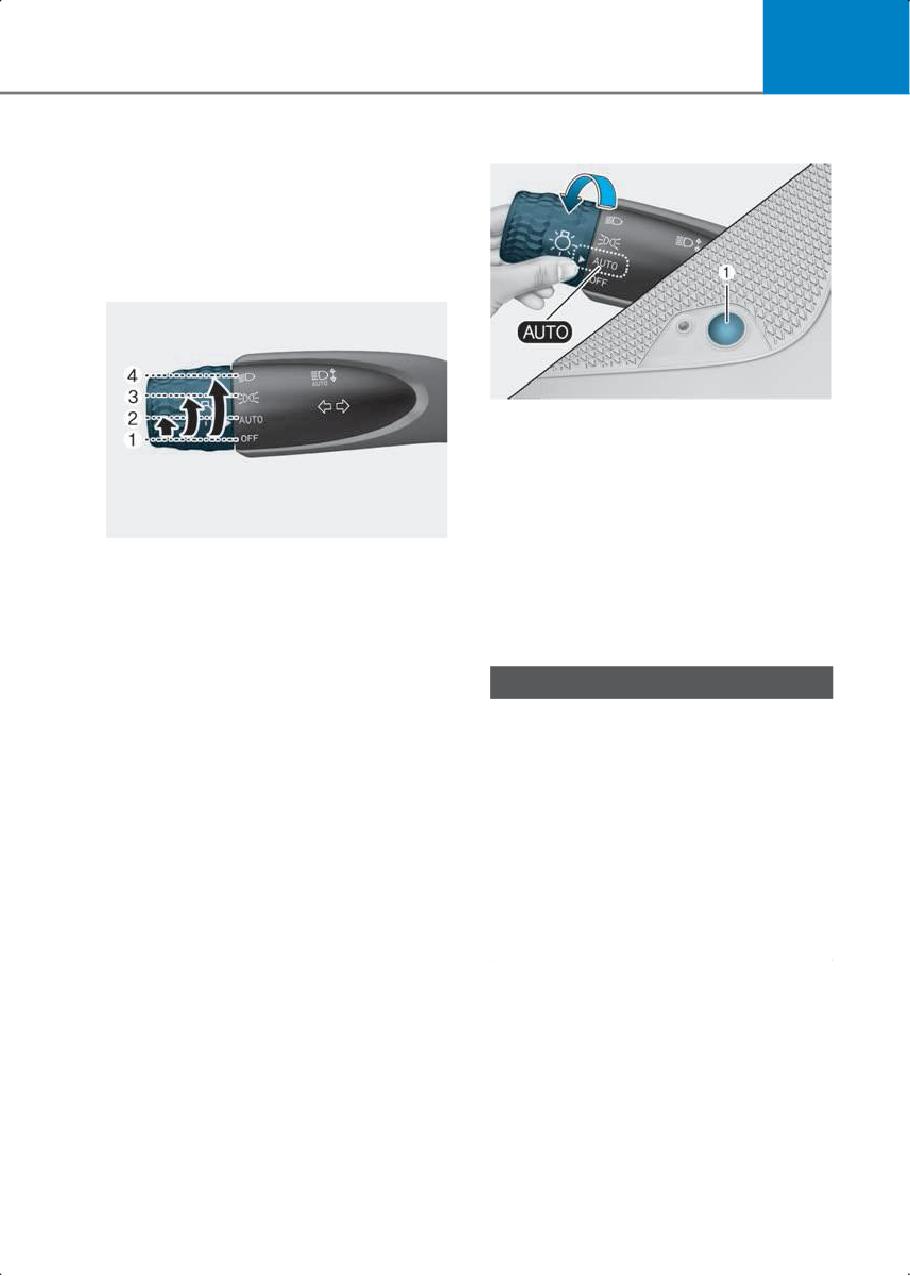
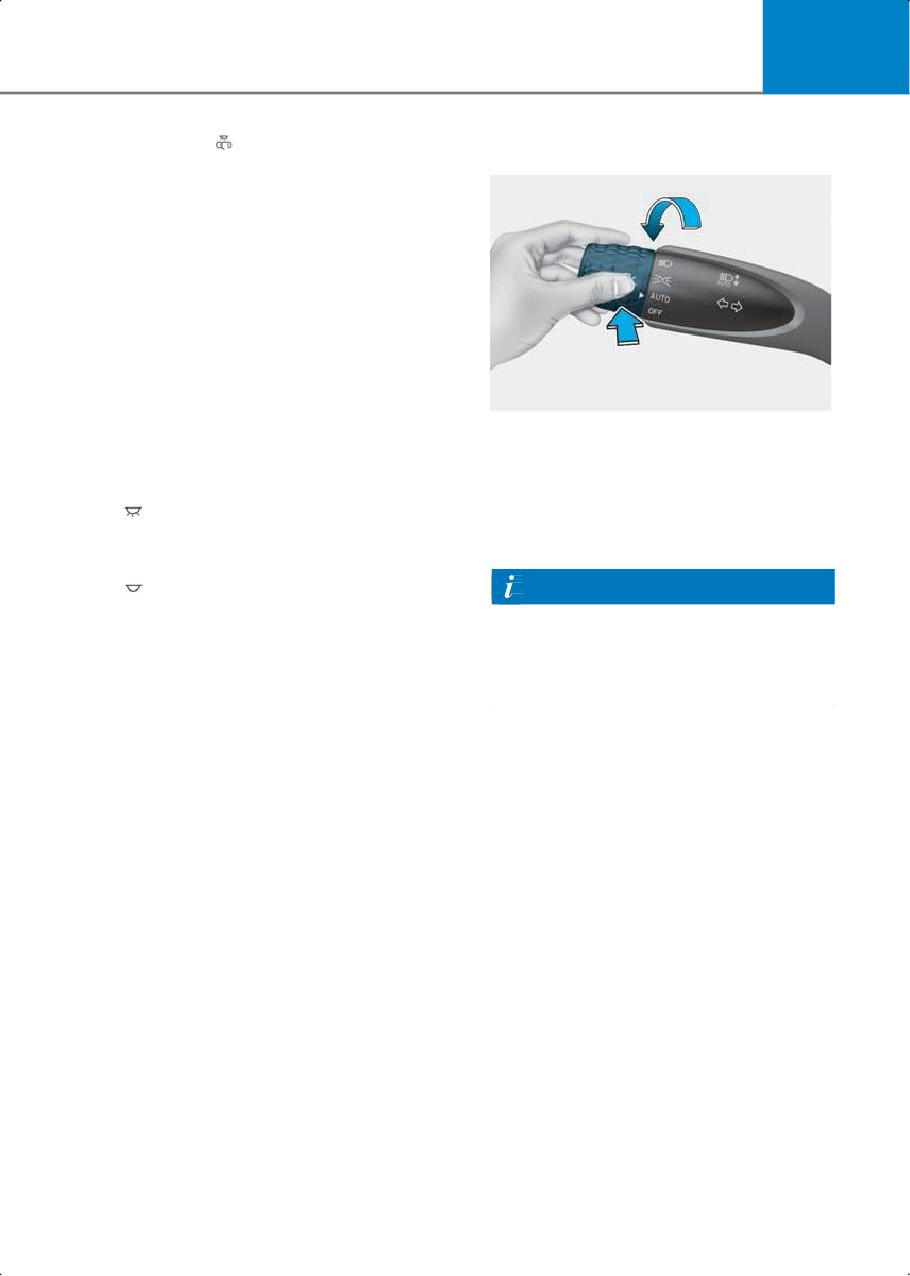
To operate the lights, turn the knob at the
end of the control lever to one of the
following positions:
The headlights and parking lights are
turned ON or OFF automatically
depending on the amount of daylight as
measured by the ambient light sensor (1)
in front of the instrument panel.
Even with the AUTO headlight feature in
operation, it is recommended to manually
(1) OFF
turn ON the headlights when driving at
(2) AUTO headlight
night or in a fog, driving in the rain, or
(3) Parking light
when you enter dark areas, such as
(4) Headlight
tunnels and parking facilities.
NOTICE
Daytime Running Lights (DRL)
The Daytime Running Lights can make it
• Do not cover or spill anything on the
easier for others to see the front of your
sensor (1) located in front of the
vehicle during the day, especially after
instrument panel.
dawn and before sunset. The DRL system
• Do not clean the sensor using a window
is ON when the headlight switch is in the
cleaner, the cleaner may leave a light
OFF or the AUTO headlight position and
film which could interfere with sensor
the Parking Brake is released.
operation.
It turns off when:
• If your vehicle has window tint or other
• The headlights are ON.
types of metallic coating on the front
windshield, the AUTO headlight system
• The parking brake is applied.
may not work properly.
• The vehicle is turned off.
5-35
Convenience features
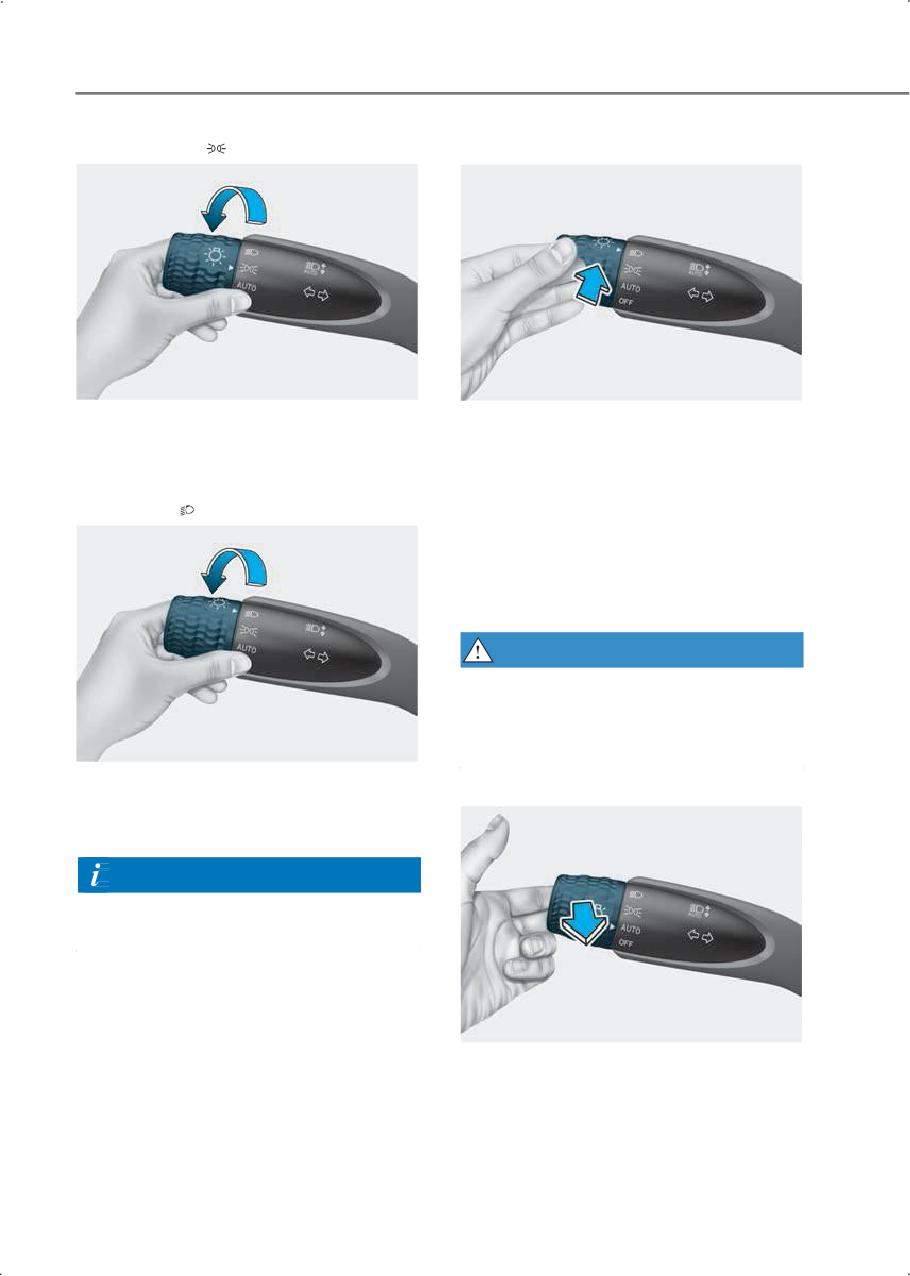
Parking light (
)
High beam operation
The parking light, license plate light, and
To turn on the high beam headlight, push
instrument panel light are turned ON.
the lever away from you. The lever returns
to its original position.
Headlight (
)
The high beam indicator illuminates when
the headlight high beams are switched
on.
To turn off the high beam headlight, pull
the lever toward you. The low beams turn
on.
WARNING
Do not use high beam when there are
other vehicles approaching you. Using
high beam may obstruct the other driver’s
vision.
The headlight, parking light, license plate
light, and instrument panel light are
turned ON.
Information
The ignition switch must be in the ON
position to turn on the headlight.
To flash the high beam headlight, pull the
lever toward you, then release the lever.
The high beams remain ON as long as you
hold the lever.
5-36
5
Turn signals and lane change
One touch turn signal
signals
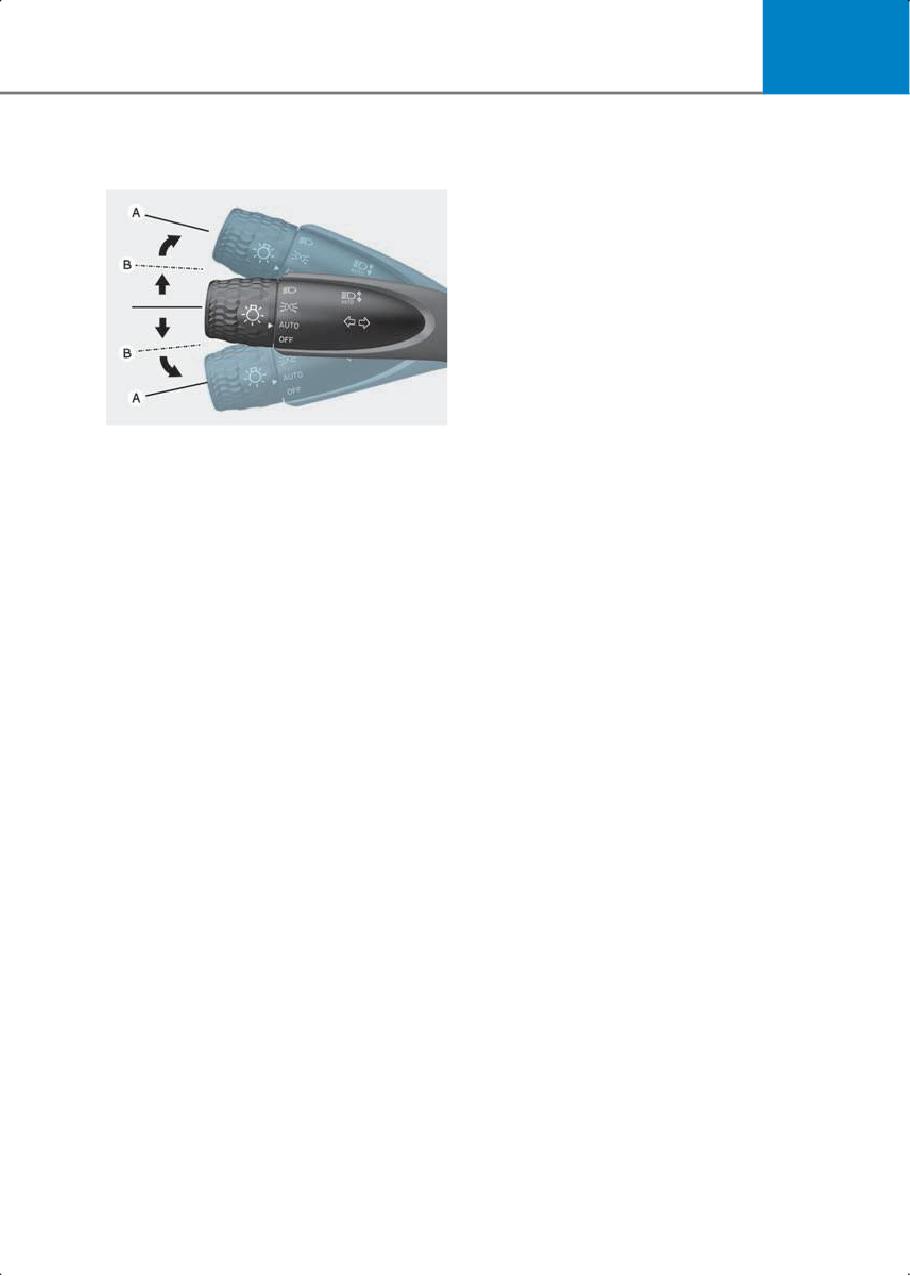
To use One Touch Turn Signal, push the
turn signal lever up or down to position
(B) and then release it.
The lane change signals blinks 3, 5 or 7
times.
You can enable the One Touch Turn
Signal function or choose the number of
blinking from the Settings menu in the
instrument cluster or infotainment
system.
Select:
• User Settings > Lights > One Touch
Turn Signal > Off/3 flashes/5 flashes/7
To signal a turn, push down on the lever
flashes (for instrument cluster type)
for a left turn or up for a right turn in
• Settings > Vehicle > Lights > One
position (A).
Touch Turn Signal > 3 flashes/5
If an indicator stays on and does not flash
flashes/7 flashes/Off (for infotainment
or if it flashes abnormally, one of the turn
system type)
signal bulbs may be burned out and
require replacement. Contact an
authorized HYNDAI dealer.
Battery saver function
To prevent the battery from being
discharging, the system automatically
turns off the parking lights when the
driver turns the vehicle off and opens the
driver’s door.
To keep the lights on when the vehicle is
turned off:
(1) Open the driver’s door.
(2) Turn the parking lights OFF and ON
again using the headlight switch.
5-37
Convenience features
Headlight delay function
Interior lights
if equipped
If you place the ignition switch to the ACC
WARNING
or OFF position with the headlights ON,
Do not use the interior lights when driving
the headlights (and/or parking lights)
in the dark. The interior lights may
remain on for about 5 minutes. If the
driver’s door is opened and closed, the
obscure your view and result in a collision.
headlights are turned off after 15 seconds.
Do not use the interior lights for extended
Also, with the vehicle off if the driver’s
periods when the vehicle is turned off.
door is opened and closed, the headlights
Otherwise, the battery discharges.
(and/or parking lights) are turned off after
15 seconds.
The headlights (and/or parking lights) can
Interior lights auto off
be turned off by pressing the lock button
The interior lights automatically go off
on the remote key or smart key twice or
about 20 minutes after the vehicle is
turning the headlight switch to the OFF or
turned off and the doors are closed. If a
AUTO position.
door is opened, the light go off 40
You can enable the headlight delay
minutes after the vehicle is turned off. If
function from the Settings menu in the
the doors are locked by the remote key or
instrument cluster or infotainment
smart key and the vehicle enters the
system.
armed stage of the theft alarm system,
the lights go off five seconds later.
Select:
• User Settings > Lights > Headlight
Delay (for instrument cluster type)
Front lights
• Settings > Vehicle > Lights > Headlight
Delay (for infotainment system type)
Information
If the driver exits the vehicle through
another door besides the driver’s door,
the battery saver function does not
operate and the headlight delay function
does not turn OFF automatically.
To avoid battery discharge, turn OFF the
headlights manually before exiting the
vehicle.
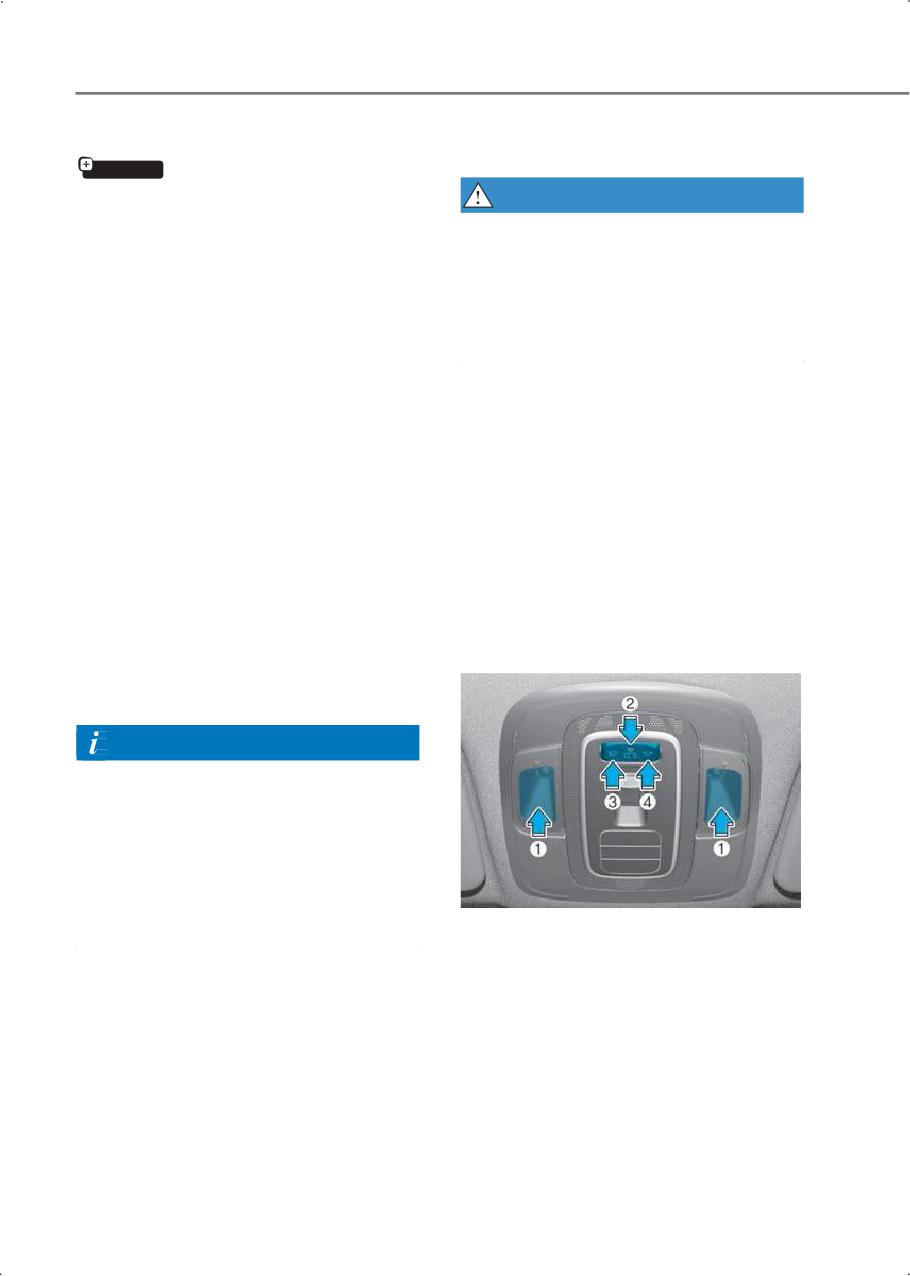
(1) Map lamp
(2) Door lamp
(3) Room lamp ON
(4) Room lamp OFF
Map lamp:
Press either lens to turn the map lamp on
or off. This light produces a spot beam for
convenient use as a map lamp at night or
as a personal lamp for the driver and the
front passenger.
5-38
5
Door lamp ():
High Beam Assist (HBA)
The front or rear room lamps come on
when the front or rear doors are opened.
When doors are unlocked by the remote
key or smart key, the front and rear lamps
come on for about 30 seconds as long as
any door is not opened. The front and rear
room lamps go out gradually after about
30 seconds if the door is closed. However,
if the ignition switch is in the ON position
or all doors are locked, the front and rear
lamps will turn off. If a door is opened
with the ignition switch in the ACC or
LOCK/OFF position, the front and rear
lamps stay on for about 10 minutes.
High Beam Assist automatically adjusts
the headlights between high beam and
Room lamp:
low beam depending on the light
detected from oncoming vehicles or
•
:
vehicles in front using the front view
Press the button to turn ON the room
camera.
lamp for the front/rear seats.
•
:
Information
Press the button to turn OFF the room
Refer to the "Driver assistance system
lamp for the front/rear seats.
sensors" section in chapter 7 for the
location and the general precautions of
front view camera.
5-39
Convenience features
High Beam Assist settings
• When High Beam Assist is operating:
- If the turn signal lever is pulled
toward you when the high beams are
off, the high beams turn on. When
you let go of the turn signal lever,
High Beam Assist operates again.
- If the turn signal lever is pulled
toward you when the high beams are
on by High Beam Assist, the low
beams turn on and High Beam Assist
turns off.
- If the turn signal lever is pushed away
from you, the high beams turn on and
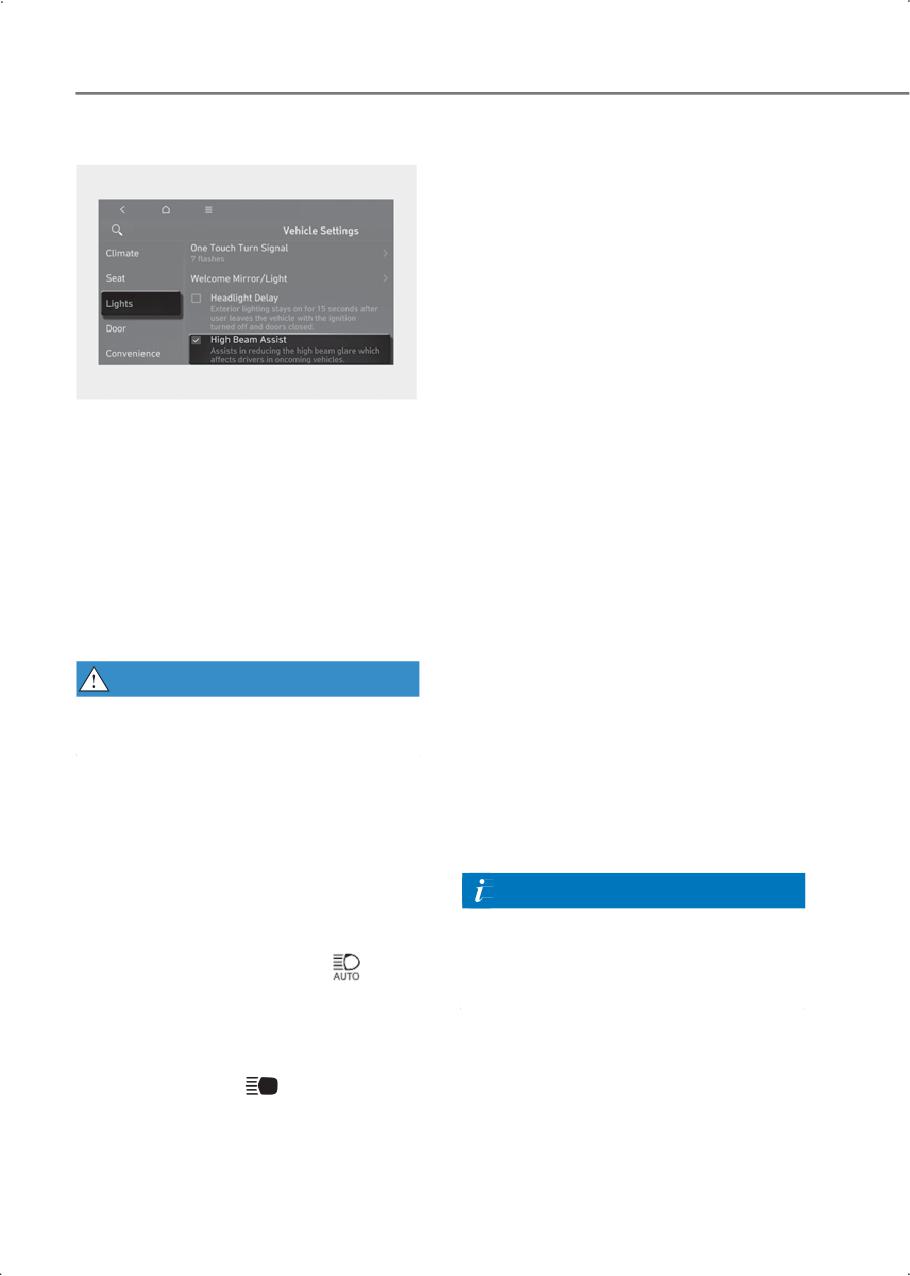
With the ignition switch ON, go to the
High Beam Assist turns off.
User Settings menu to turn on High Beam
- If the headlight switch is moved from
Assist and deselect to turn off the
AUTO to another position
function in the instrument cluster.
(headlight/position/off), the
Select:
corresponding light turns on and
User Settings > Lights > High Beam
High Beam Assist turns off.
Assist (for cluster type)
• When High Beam Assist is operating,
or
high beam switches to low beam if:
Settings > Lights > High Beam Assist (for
- The headlights of an oncoming
infotainment system)
vehicle are detected.
- The tail lights of a front vehicle are
WARNING
detected.
Only change the settings after parking
- The headlight or tail light of a
your vehicle at a safe location.
motorcycle or a bicycle is detected.
- The surrounding ambient light is
bright enough so high beams are not
High Beam Assist operation
required.
• After selecting High Beam Assist from
- Streetlights or other lights are
the settings menu to operate High
detected.
Beam Assist:
- Place the headlight switch in the
Information
AUTO position and push the turn
The images and colors in the instrument
signal lever toward the instrument
cluster may differ depending on the
cluster. High Beam Assist (
)
cluster type or theme selected from the
indicator light illuminates.
settings menu.
- When High Beam Assist is enabled,
high beams turn on when the vehicle
speed is above 20 mph (30 km/h) and
the High Beam (
) indicator light
illuminates. When the vehicle speed
is below 12 mph (20 km/h), high
beams do not turn on and the
indicator light illuminates in white.
5-40
5
High Beam Assist malfunction
• There is a temporary reflector or flash
ahead (construction area).
and limitations
• There is a traffic light, reflecting sign,
LED sign, or reflectors ahead.
High Beam Assist malfunction
• The road is wet or covered with snow or
ice.
• A vehicle suddenly appears from a
curve.
• The vehicle is tilted due to a flat tire or
being towed.
• The headlights from an oncoming or
front vehicle is not detected because of
exhaust fumes, smoke, fog, snow,
blizzard, water spray on the road, or
windshield condensation, etc.
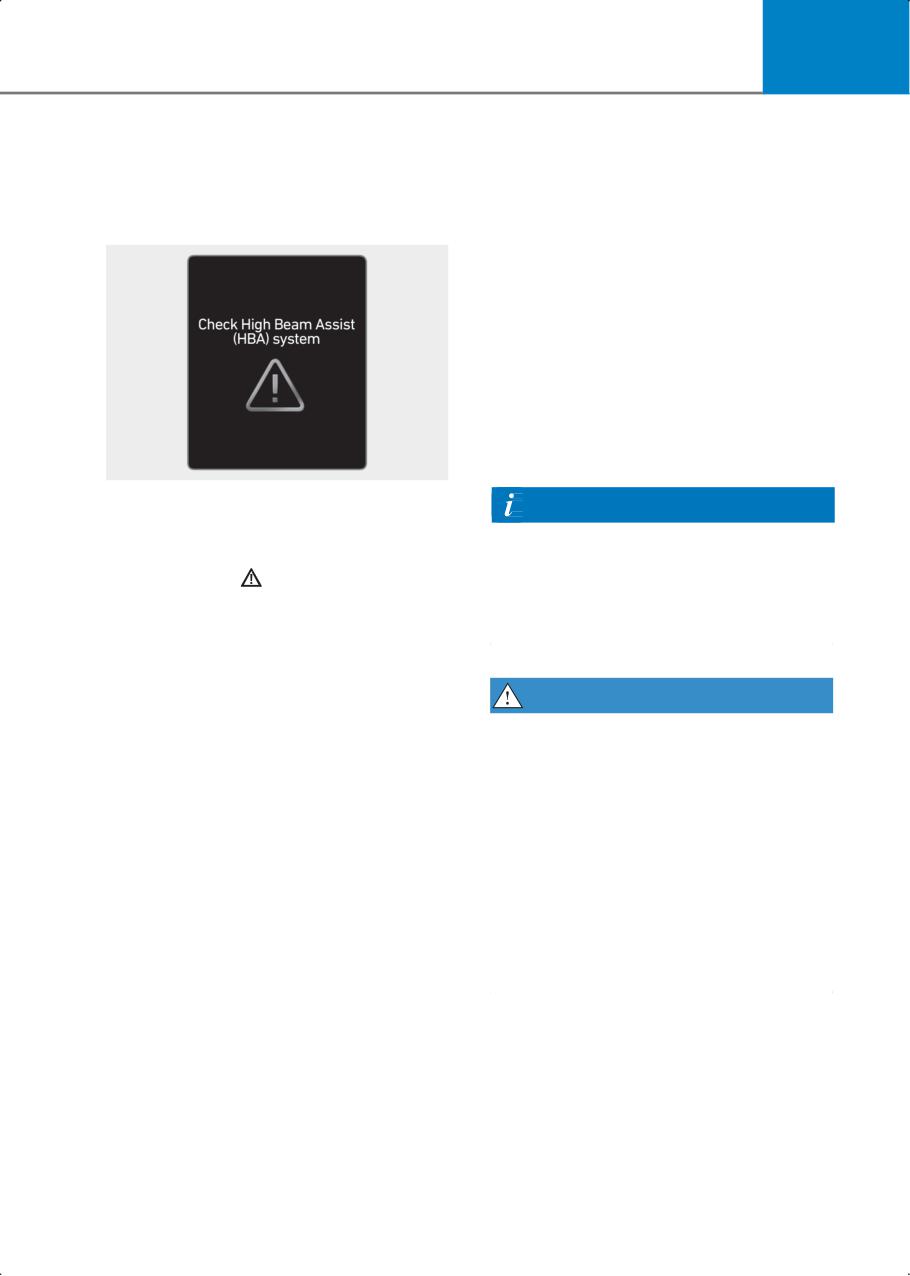
When High Beam Assist is not working
Information
properly, the "Check High Beam Assist
For more information on the limitations of
(HBA) system" warning message may
the front view camera, refer to the
appear, and the
warning light may
"Forward Collision-Avoidance Assist
illuminate on the instrument cluster.
(FCA) (Sensor fusion)" section in chapter
Contact an authorized HYUNDAI dealer.
7.
Limitations of High Beam Assist
High Beam Assist may not work properly
WARNING
in the following situations if:
• Always check road conditions, and if
• The headlights from an oncoming or
necessary, take appropriate actions to
front vehicle is damaged or out of the
drive safely. It is your responsibility to
detection range.
operate your vehicle in a safe manner.
• The headlights from an oncoming or
• If High Beam Assist does not operate
front vehicle are covered with dust,
properly, use the turn signal lever to
snow, or water.
switch between high beam and low
• An oncoming or front vehicle’s
beam.
headlights are off but the fog lamps are
• High Beam Assist may not operate for
on.
15 seconds right after your vehicle is
• There are lights that have a similar
started or when the front view camera
shape as a vehicle’s light ahead.
is initialized.
• The headlights are not repaired or
replaced properly.
• The headlights are not aimed properly.
• You are driving on a narrow curved
road, rough road, uphill, or downhill.
• A front vehicle is partially visible at a
crossroad or on a curved road.
5-41
Convenience features
Wipers and washers
Windshield wipers
Operates as follows when the ignition
switch is turned ON.
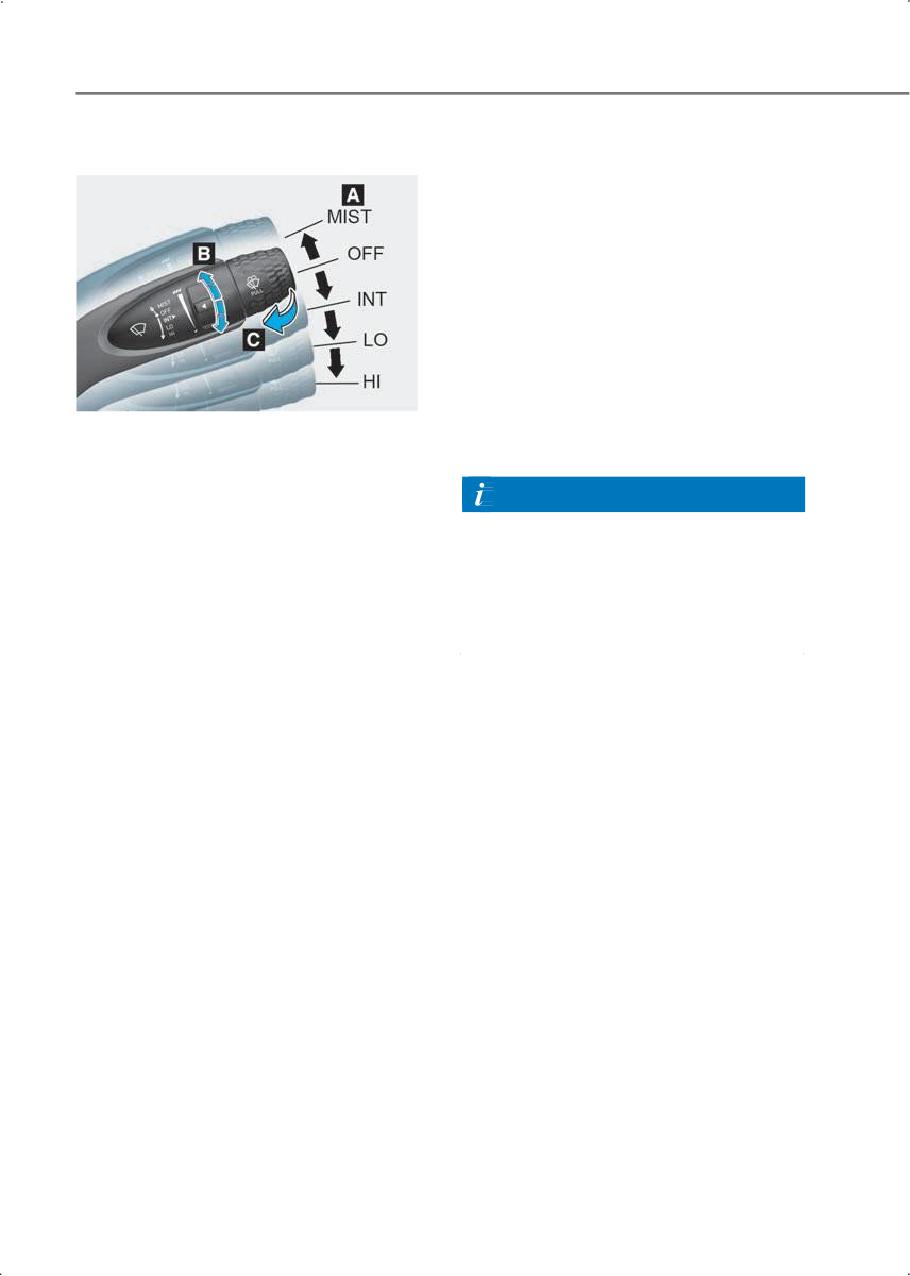
MIST: For a single wiping cycle, move the
lever up (MIST) and release it. The wipers
operate continuously if the lever is held in
this position.
OFF: Wipers are not in operation.
INT: Wipers operate intermittently at the
same wiping intervals. Use this mode in
light rain or mist. To change the speed
setting, turn the speed control knob.
LO: The wiper runs at a lower speed.
A. Wiper speed control
HI: The wiper runs at a higher speed.
• MIST - Single wipe
• OFF - Off
Information
• INT - Intermittent wipe
If there is heavy accumulation of snow or
• LO - Low wiper speed
ice on the windshield, defrost the
windshield for about 10 minutes, or until
• HI - High wiper speed
the snow and/or ice is removed to
B. Intermittent control wipe time
prevent damage to the wiper and washer
adjustment
system.
C. Wash with brief wipes (pull lever
towards you)
5-42
5
Front windshield washers
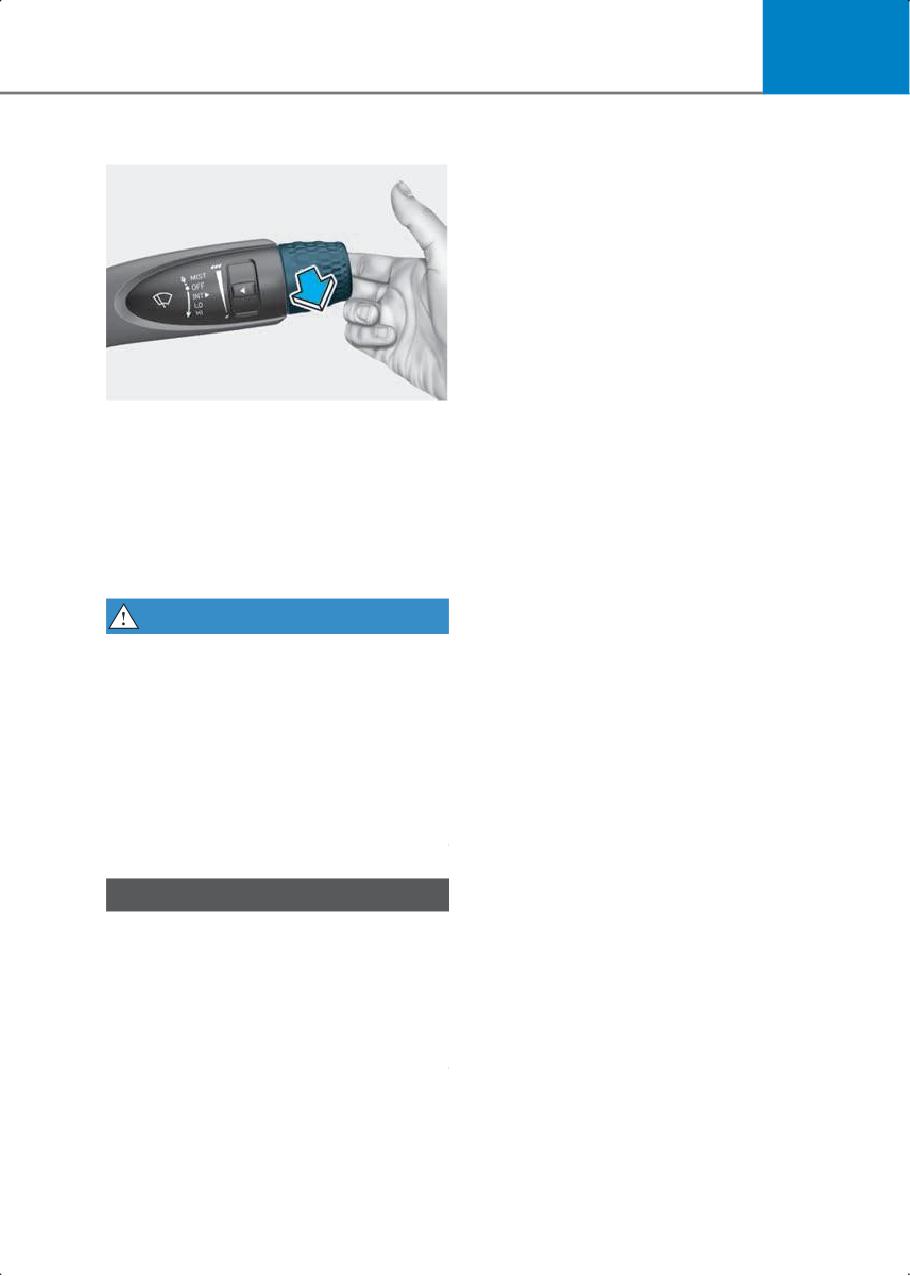
In the OFF position, pull the lever gently
toward you to spray washer fluid on the
windshield and to run the wipers 1-3
cycles. The spray and wiper operation
continues until you release the lever. If
the washer does not work, you may need
to add washer fluid to the washer fluid
reservoir.
WARNING
When the outside temperature is below
freezing, always warm the windshield
using the defroster to prevent the washer
fluid from freezing on the windshield and
obscuring your vision that could lead to a
collision resulting in serious injury or
death.
Always use appropriate washer fluids in
the winter season or cold weather.
NOTICE
To prevent damage:
• Do not operate the washer when the
fluid reservoir is empty or when the
windshield is dry.
• Do not attempt to move the wipers
manually.
5-43
Convenience features
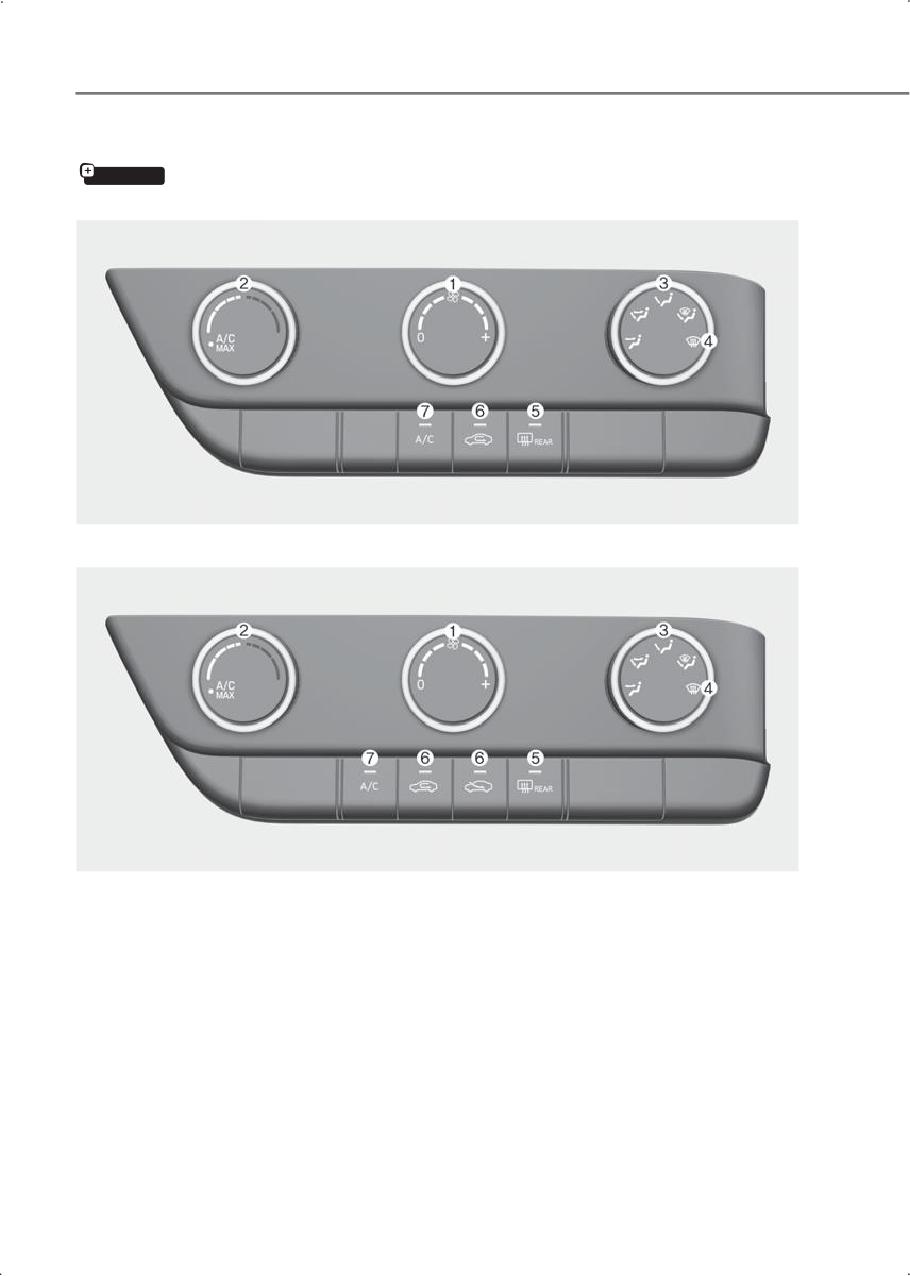
Manual climate control system
if equipped
Type A
Type B
(1) Fan speed control knob
(2) Temperature control knob
(3) Mode selection knob
(4) Front windshield defroster position
(5) Rear window/side view mirror defroster (if equipped) button
(6) Air intake control button
(7) A/C (Air conditioning) button
5-44
5
Heating and air conditioning
Mode selection
1. Start the engine.
2. Set the mode to the desired position.
To improve the effectiveness of heating
and cooling, select:
• Heating:
• Cooling:
3. Set the temperature control to the
desired position.
4. Set the air intake control to outside
(fresh) air or recirculated air position.
5. Set the fan speed control to the desired
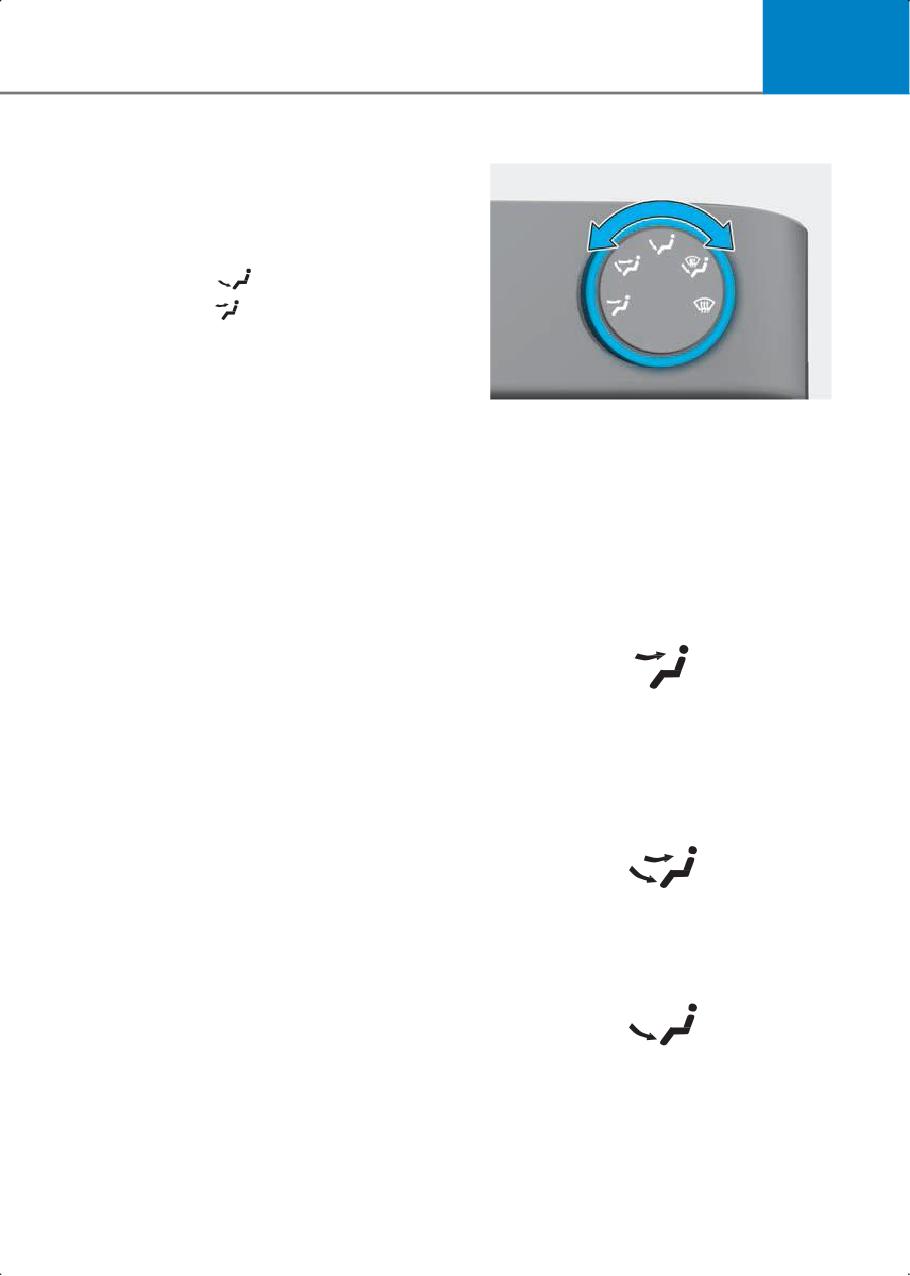
The mode selection knob controls the
speed.
direction of the air flow through the
ventilation system.
6. If air conditioning is desired, turn on the
air conditioning system.
Air can be directed to the floor,
dashboard outlets, or windshield. Five
When starting the vehicle in cold weather
symbols are used to represent Face, Bi-
a more efficient way to heat the
Level, Floor, Floor-Defrost and Defrost air
passenger compartment is to do the
position.
following.
• Turn off or lower the blower, right after
Face-Level (B, D)
starting the engine.
- Engine temperature is still low and
the air flow from the heater is still
cold.
Air flow is directed toward the upper body
• After a few minutes of engine warm up,
and face. Additionally, each outlet can be
turn on or set the fan to a higher level
controlled to direct the air discharged
and adjust the temperature setting
from the outlet.
towards hot.
Bi-Level (B, C, D, E)
Air flow is directed toward the face and
the floor.
Floor-Level (C, E)
Most of the air flow is directed to the
floor, with a small amount of the air being
directed to the windshield and side
window defrosters.
5-45
Convenience features
Floor & Defrost (A, C, D, E)
Air intake control
Type A
Most of the air flow is directed to the floor
and the windshield with a small amount
directed to the side window defrosters.
Defrost-Level (A, D)
Most of the air flow is directed to the
windshield with a small amount of air
Type B
directed to the side window defrosters.
Temperature control
To select outside (fresh) air or
recirculated air, press this button.
Recirculated air position
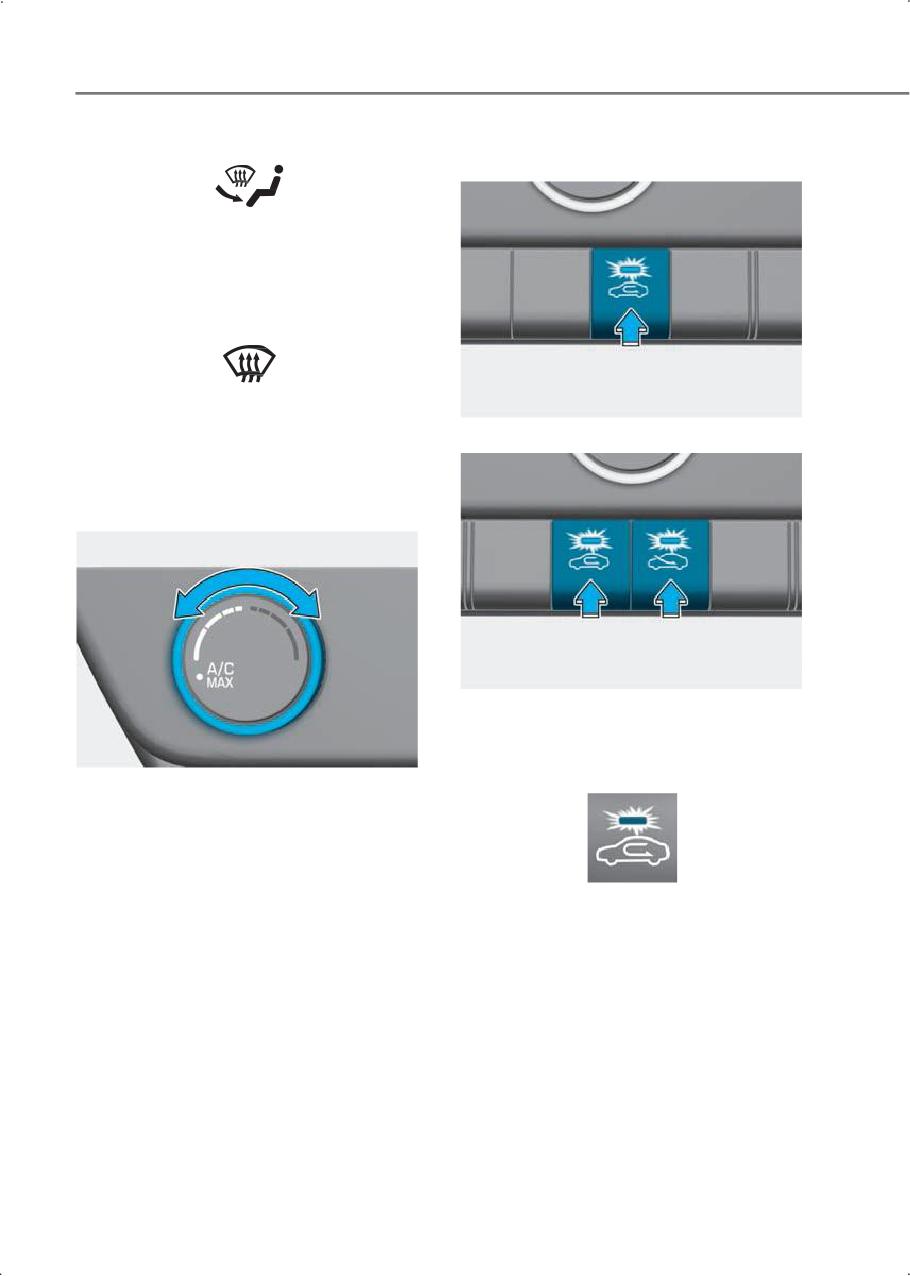
The temperature increases by turning the
knob to the right.
The temperature decreases by turning
the knob to the left.
With the recirculated air selected, air
from the passenger compartment is
drawn through the climate control
system.
5-46
5
Outside (fresh) air position
WARNING
Type A
To prevent serious injury or death:
• Continued climate control system
operation in the recirculated air
position may allow humidity to increase
inside the vehicle that could fog the
Type B
windshield and the side windows and
obscure visibility.
• Do not sleep in a vehicle with the air
conditioning or heating system on.
• Continued climate use of recirculated
With the outside (fresh) air selected, air
air may cause drowsiness or sleepiness,
enters the vehicle from outside and is
and loss of vehicle control. Set the air
drawn through the climate control
intake control to the outside (fresh) air
system.
position while driving.
Information
Fan speed control
Using the system in the fresh air position
is recommended.
Prolonged operation of the heater in the
recirculated air position (without air
conditioning selected) can cause fogging
of the windshield and side windows and
the air within the passenger
compartment will become stale.
In addition, prolonged use of the air
conditioning with the recirculated air
position selected will result in excessively
dry air in the passenger compartment.
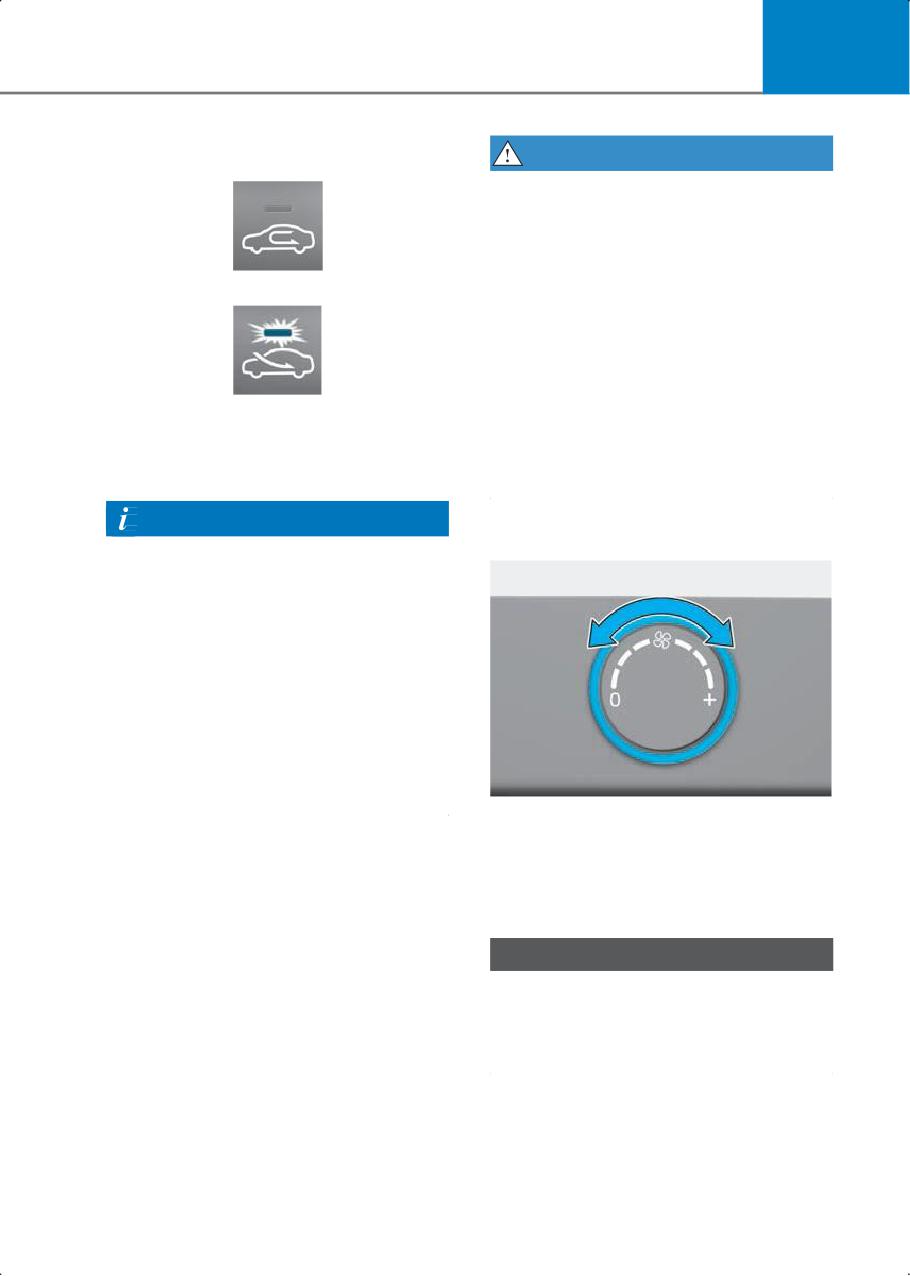
Turn the knob to the right to increase the
fan speed and airflow. Turn the knob to
the left to decrease fan speed and airflow.
Setting the fan speed control knob to the
"0" position turns off the fan.
NOTICE
Operating the fan speed when the
ignition switch is in the ON position may
cause the battery to discharge. Operate
the fan speed when the engine is running.
5-47
Convenience features
Air conditioning (A/C)
if equipped
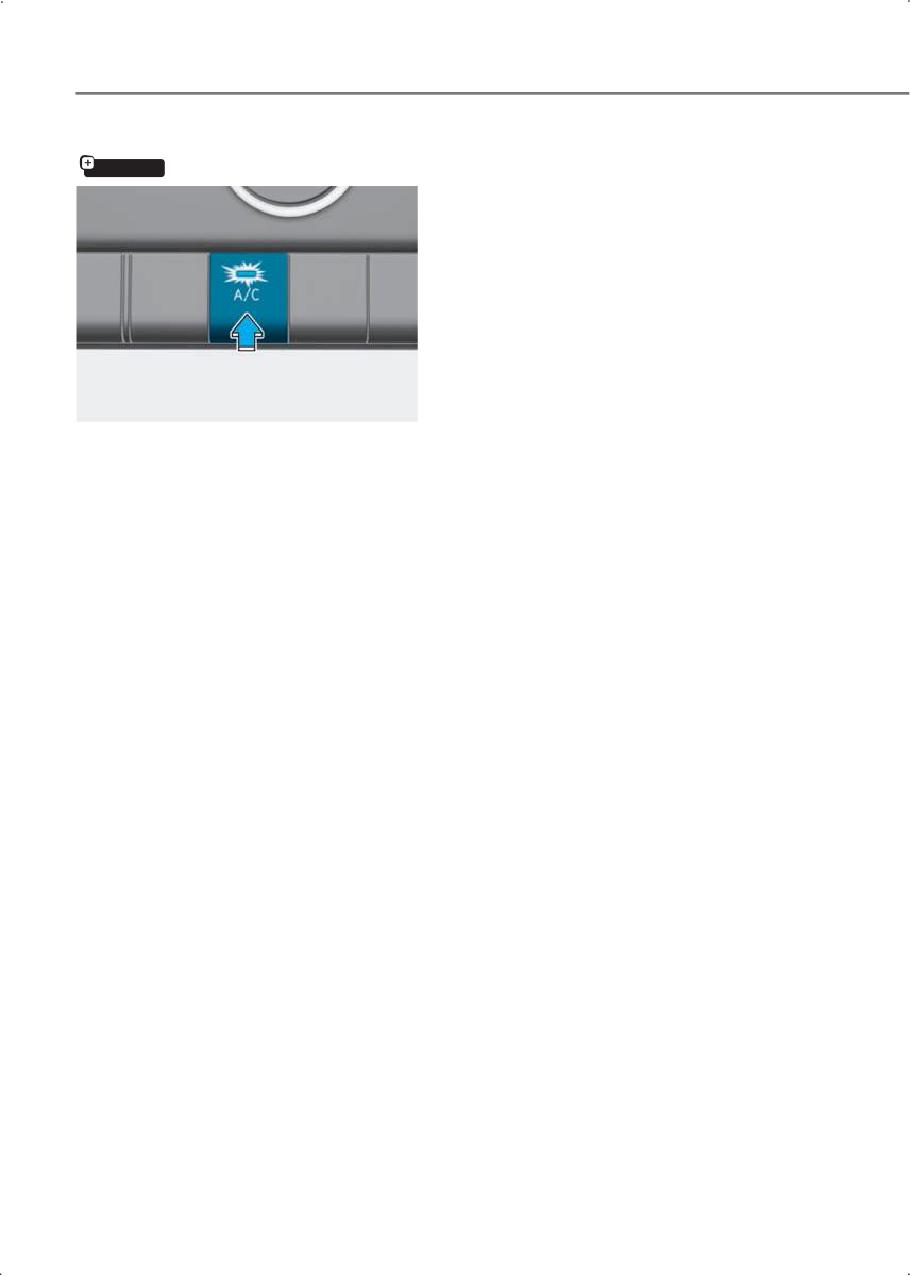
Press the A/C button to turn the air
conditioning system on (indicator light
will illuminate). Press the button again to
turn the air conditioning system off.
5-48
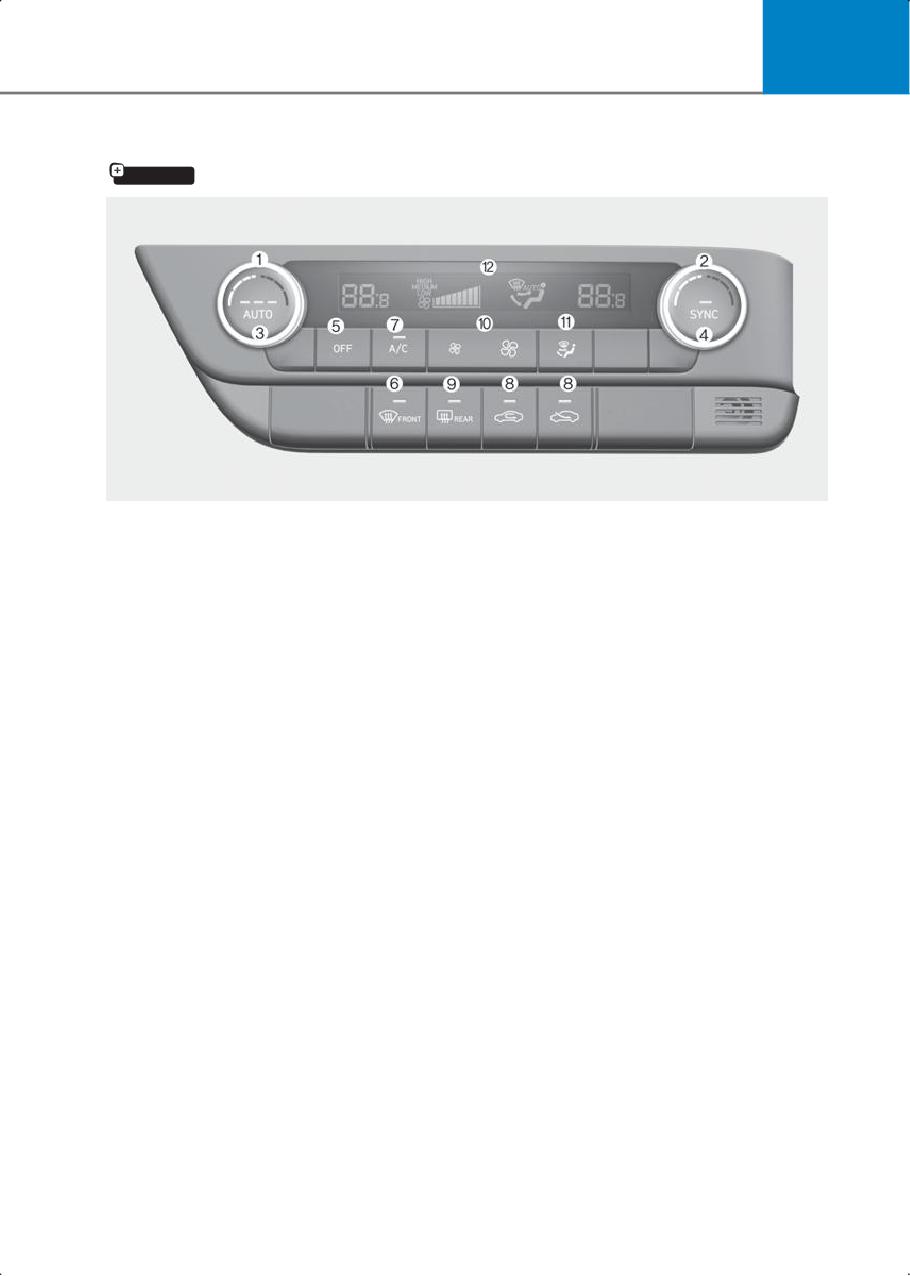
5
Automatic climate control system
if equipped
(1) Driver’s temperature control knob
(2) Passenger’s temperature control knob
(3) AUTO (automatic control) button
(4) SYNC button
(5) OFF button
(6) Front windshield defroster button
(7) Air conditioning button
(8) Air intake control button
(9) Rear window/side view mirror (if equipped) defroster button
(10)Fan speed control button
(11) Mode selection button
(12) Climate control information screen
5-49
Convenience features
Automatic heating and air
• To turn the automatic operation off,
select any button of the following
conditioning
buttons:
The Automatic Climate Control System is
- Mode selection button
controlled by setting the desired
temperature.
- Front windshield defroster button
1. Press the AUTO button
(Press the button one more time to
deselect the front windshield
The modes, fan speeds, air intake, and
defroster function. The "AUTO" sign
air conditioning are controlled
illuminates on the information screen
automatically by the temperature
once again.)
setting.
- Fan speed control toggle switch
The selected function is controlled
manually while other functions
operate automatically.
• For your convenience and overall
system efficiency, use the AUTO button
and set the temperature to 72 °F (22 °C).
Information
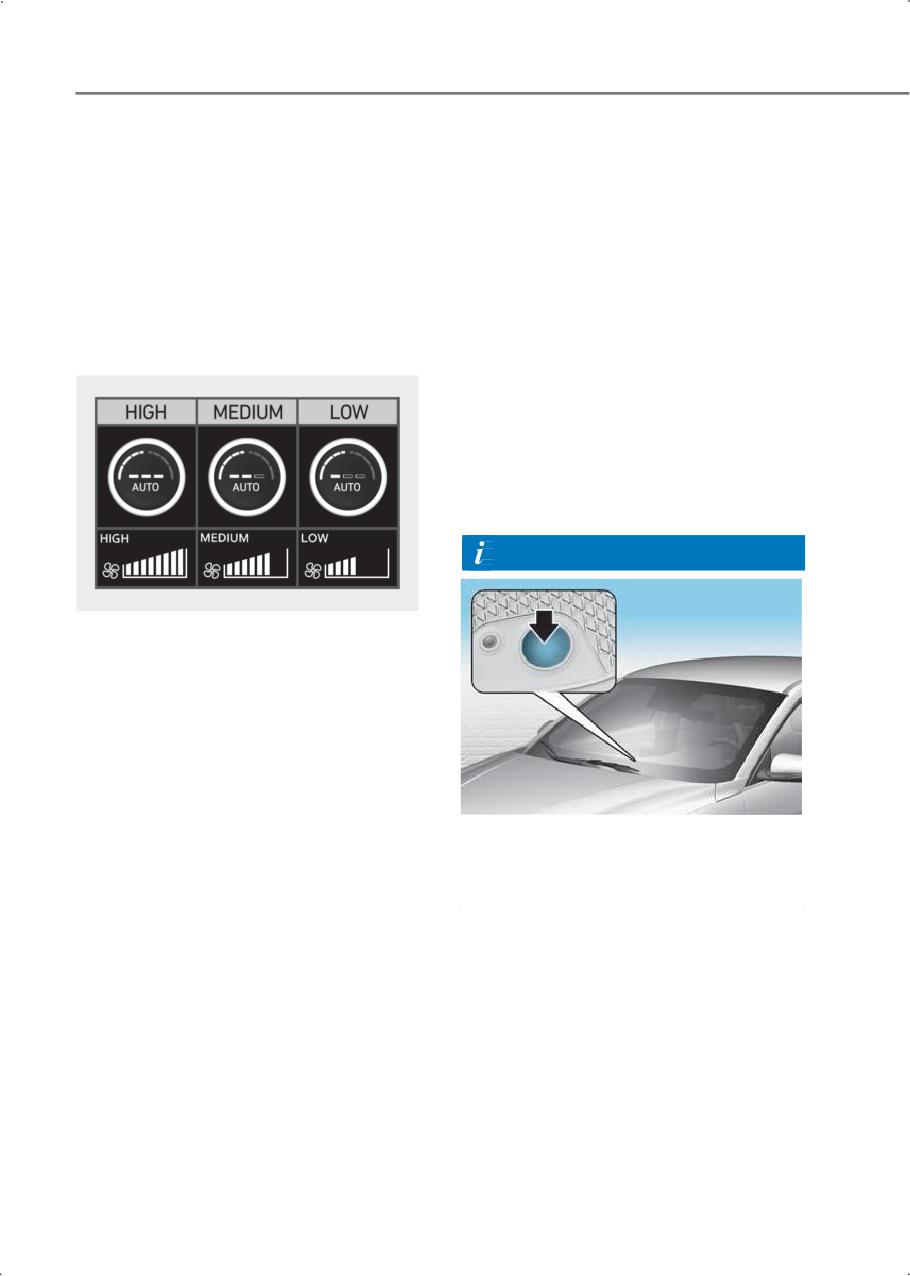
You can control the blower strength in
three stages by pressing the AUTO
button during automatic operation.
• HIGH: Provides rapid air conditioning
and heating with the maximum fan
speed setting.
• MEDIUM: Provides air conditioning
and heating with the mid-level fan
speed setting.
• LOW: Fan speed is set to the lowest
Never place anything near the sensor to
setting range (1 to 3 bars range).
ensure better control of the heating and
cooling system.
2. Turn the temperature control knob to
set the desired temperature. If the
temperature is set to the lowest setting
(Lo), the air conditioning system
operates continuously.
After the interior has cooled
sufficiently, adjust the knob to a higher
temperature set point whenever
possible.
5-50
5
Manual heating and air
Mode selection
conditioning
The heating and cooling system can be
controlled manually by pushing buttons
other than the AUTO button. In this case,
the system works sequentially according
to the order of buttons selected. When
pressing any button except the AUTO
button while using automatic operation,
the functions not selected is controlled
automatically.
1. Start the engine.
2. Set the mode to the desired position.
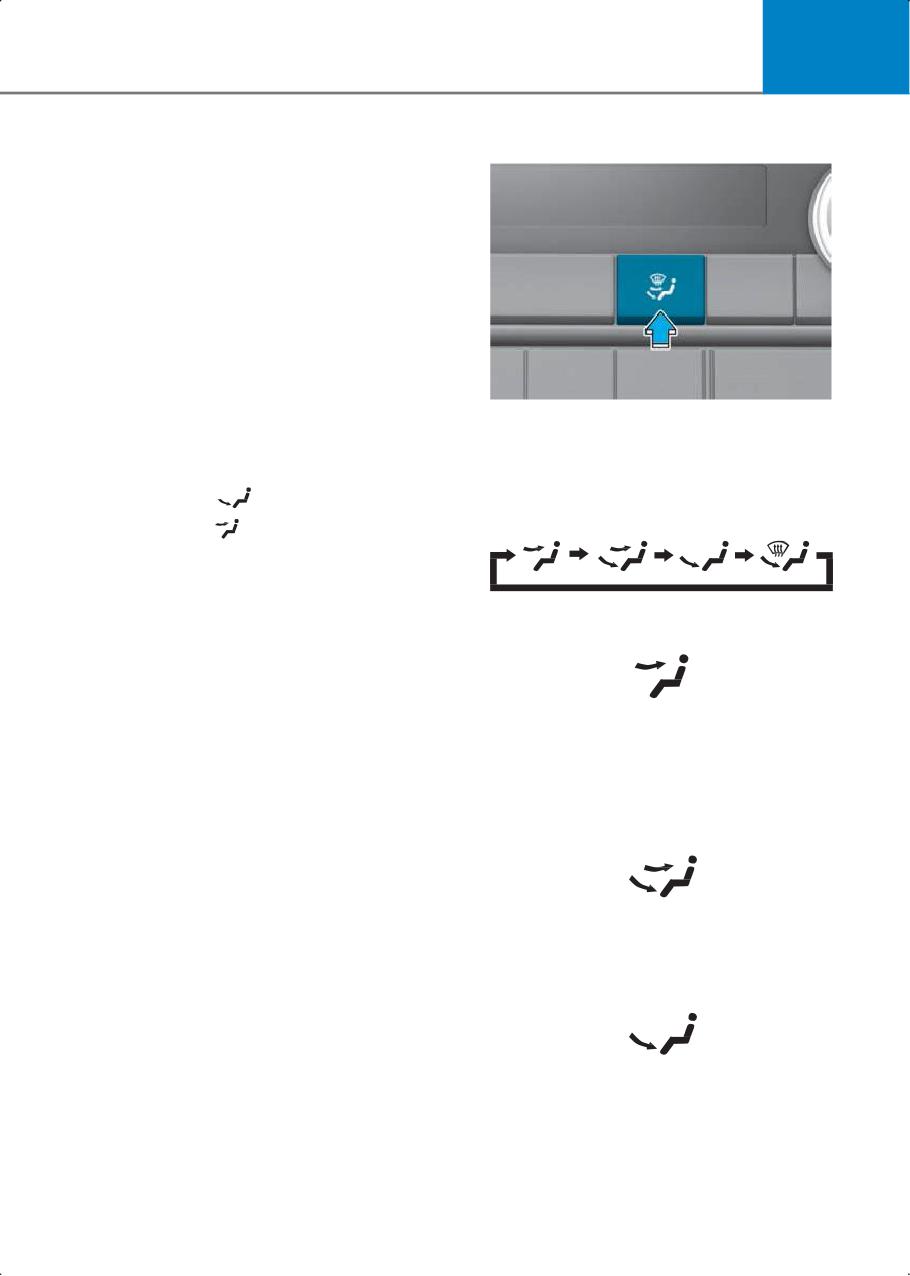
The mode selection button controls the
To improve the effectiveness of heating
direction of the air flow through the
and cooling, select:
ventilation system.
• Heating:
The air flow outlet direction is cycled as
follows:
• Cooling:
3. Set the temperature control to the
desired position.
4. Set the air intake control to the outside
(fresh) air position.
Face-Level (B, D)
5. Set the fan speed control to the desired
speed.
6. If air conditioning is desired, turn the air
conditioning system on.
Air flow is directed toward the upper body
7. Press the AUTO button in order to
and face. Additionally, each outlet can be
convert to full automatic control of the
controlled to direct the air discharged
system.
from the outlet.
Bi-Level (B, C, D, E)
Air flow is directed toward the face and
the floor.
Floor-Level (A, C, D, E)
Most of the air flow is directed to the
floor, with a small amount of the air being
directed to the windshield and side
window defrosters.
5-51
Convenience features
Floor & Defrost (A, C, D, E)
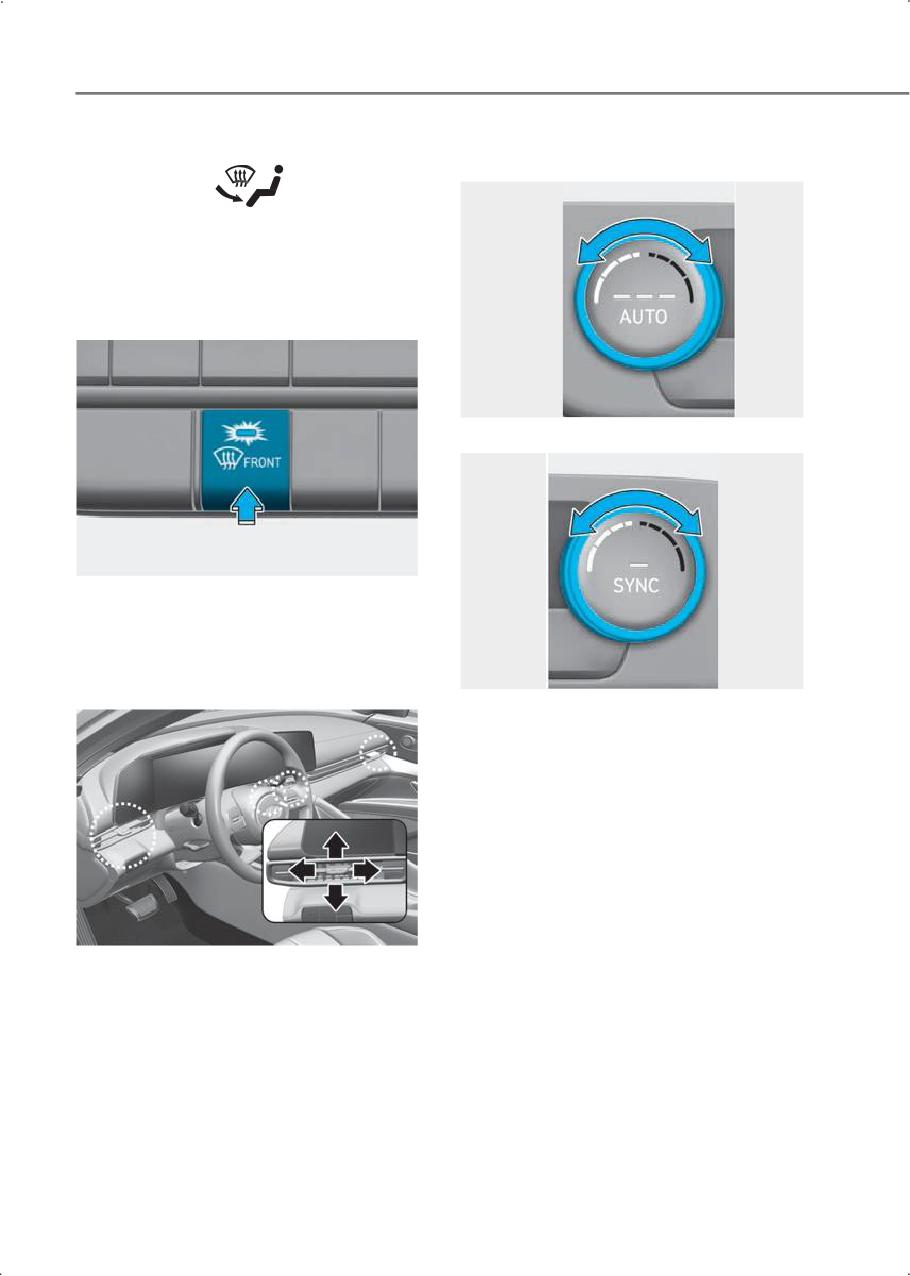
Temperature control
Driver’s seat
Most of the air flow is directed to the floor
and the windshield with a small amount
directed to the side window defrosters.
Defrost-Level (A, D)
Passenger’s seat
Most of the air flow is directed to the
windshield with a small amount of air
directed to the side window defrosters.
Instrument panel vents
The temperature will increases by turning
the knob to the right.
The temperature will decreases by
turning the knob to the left.
The instrument panel vent air flow can be
directed up/down or left/right using the
vent adjustment lever.
To close the vent, push the air vent lever
in the opposite direction of the
passenger. To open the vent, push the air
vent lever in the same direction of the
passenger.
5-52
5
Adjusting the temperature equally
Temperature conversion
If the battery has been discharged or
disconnected, the temperature mode
display is reset to Celsius.
To change the temperature unit from °C
to °F or °F to °C:
• Automatic climate control system
Press the AUTO button for 3 seconds
while pressing the OFF button.
• Instrument cluster or infotainment
system screen, select:
- User Settings > Unit > Temperature
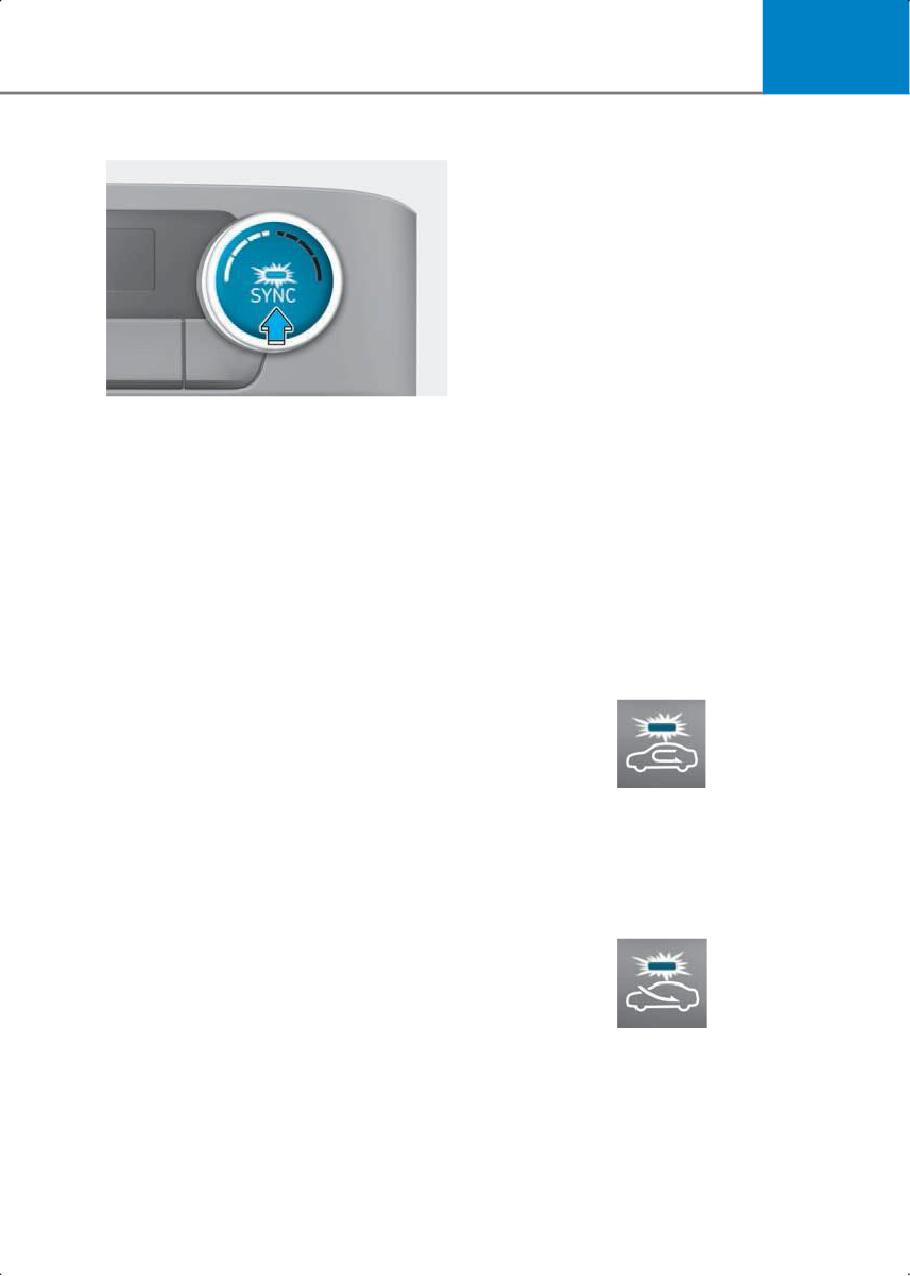
• Press the SYNC button (indicator light
Unit > °F/°C (for instrument cluster
ON) to adjust the driver and passenger
type)
side temperature equally.
- Settings > General > Unit >
• Turn the driver side temperature
Temperature Unit > °F/°C (for
control knob. The driver and passenger
infotainment system type)
side temperature is adjusted equally.
The temperature unit on both the
• If you rotate the passenger’s
cluster display and the climate control
temperature control knob, the
screen will change.
passenger side temperature can be
operated individually.
Air intake control
Adjusting the temperature individually
Recirculated air position
Press the SYNC button (indicator light
OFF) again to adjust the driver and
passenger side temperature individually.
With the recirculated air position
selected, air from the passenger
compartment will be drawn through the
climate control system.
Outside (fresh) air position
With the outside (fresh) air position
selected, air enters the vehicle from
outside and is drawn through the climate
control system.
5-53
Convenience features
Fan speed control
Information
Using the system in the fresh air position
is recommended.
Prolonged operation of the heater in the
recirculated air position (without air
conditioning selected) can cause fogging
of the windshield and side windows and
the air within the passenger
compartment will become stale.
In addition, prolonged use of the air
conditioning with the recirculated air
position selected will result in excessively
dry air in the passenger compartment.
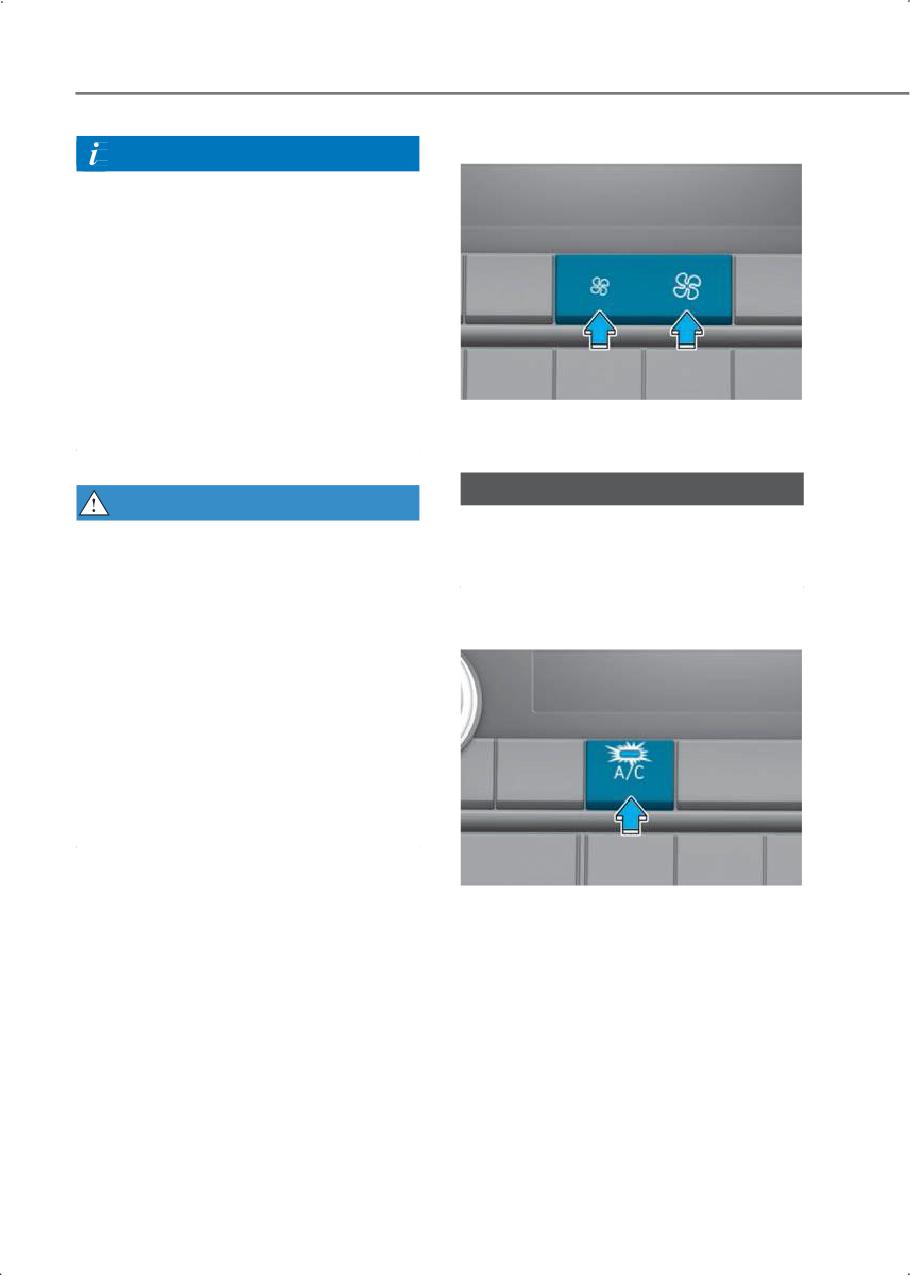
The fan speed can be adjusted as desired
by pressing the fan speed control button.
NOTICE
WARNING
Operating the fan speed when the
To prevent serious injury or death:
ignition switch is in the ON position may
• Continued climate control system
cause the battery to discharge.
operation in the recirculated air
position may allow humidity to increase
inside the vehicle that could fog the
Air conditioning
windshield and the side windows and
obscure visibility.
• Do not sleep in a vehicle with the air
conditioning or heating system on.
• Continued climate use of recirculated
air may cause drowsiness or sleepiness,
and loss of vehicle control. Set the air
intake control to the outside (fresh) air
position while driving.
Press the A/C button to turn on the air
conditioning system (indicator light ON).
Press the button again to turn off the air
conditioning system.
5-54
5
OFF mode
Windshield defrosting
and defogging
WARNING
Do not use the defrost-level
position
during the cooling operation in extremely
humid weather. The outer surface of the
windshield may fog and reduce visibility,
causing a collision that results in serious
injury or death.
Set the mode selection button to the
face-level
position and lower the fan
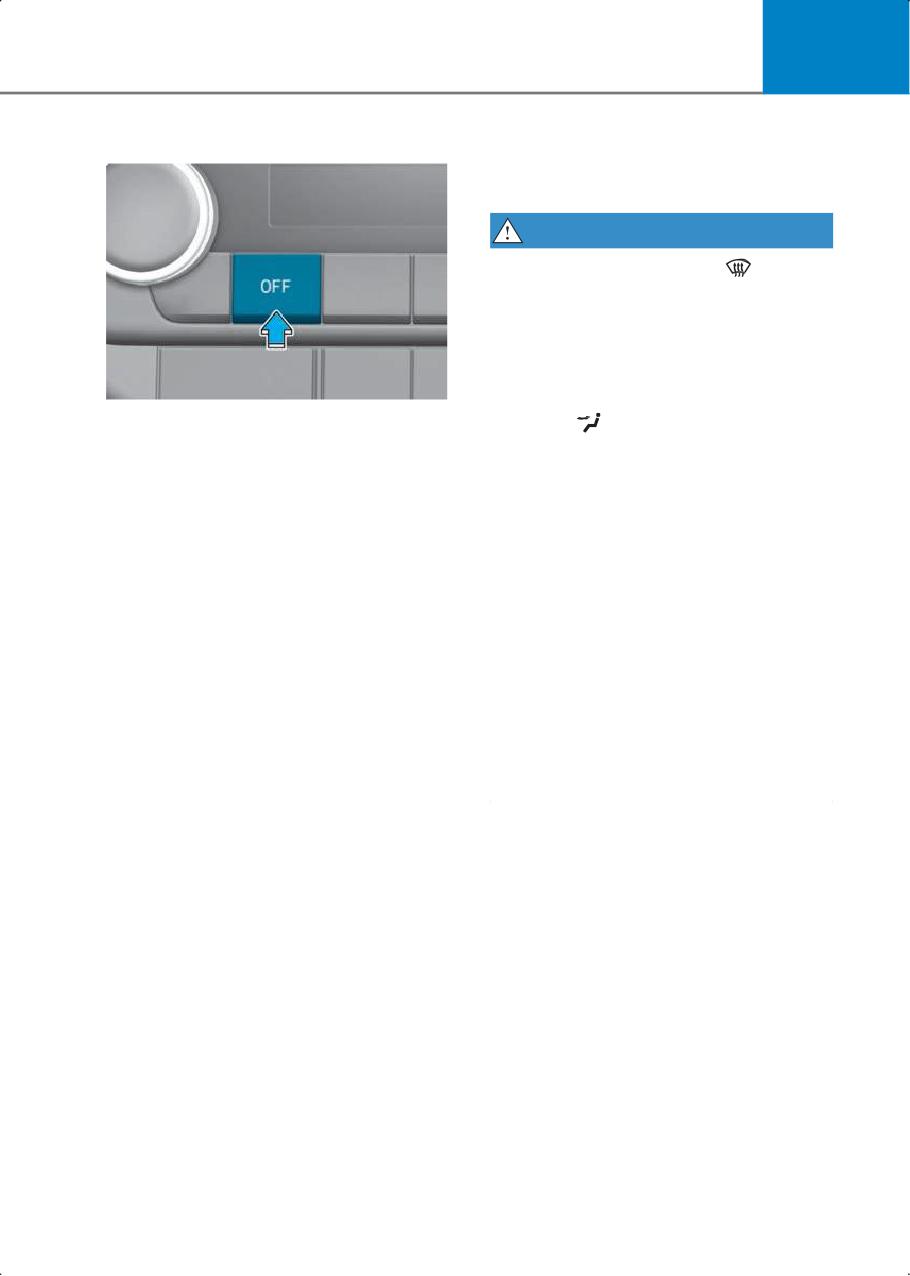
Press the OFF button to turn off the
speed.
climate control system.
• For maximum defrost performance, set
You can still operate the mode buttons
the temperature control to the highest
and air intake buttons as long as the
temperature setting and the fan speed
ignition switch is in the ON position.
control to the highest setting.
• If warm air to the floor is desired while
defrosting or defogging, select the
floor-defrost position.
• Before driving, clear all snow and ice
from the windshield, rear window, side
view mirrors, and all side windows.
• Clear all snow and ice from the hood
and air inlet to improve heater and
defroster efficiency and to reduce the
probability of fogging up the inside of
the windshield.
5-55
Convenience features
Manual climate control
To defrost outside windshield
system
To defog inside windshield
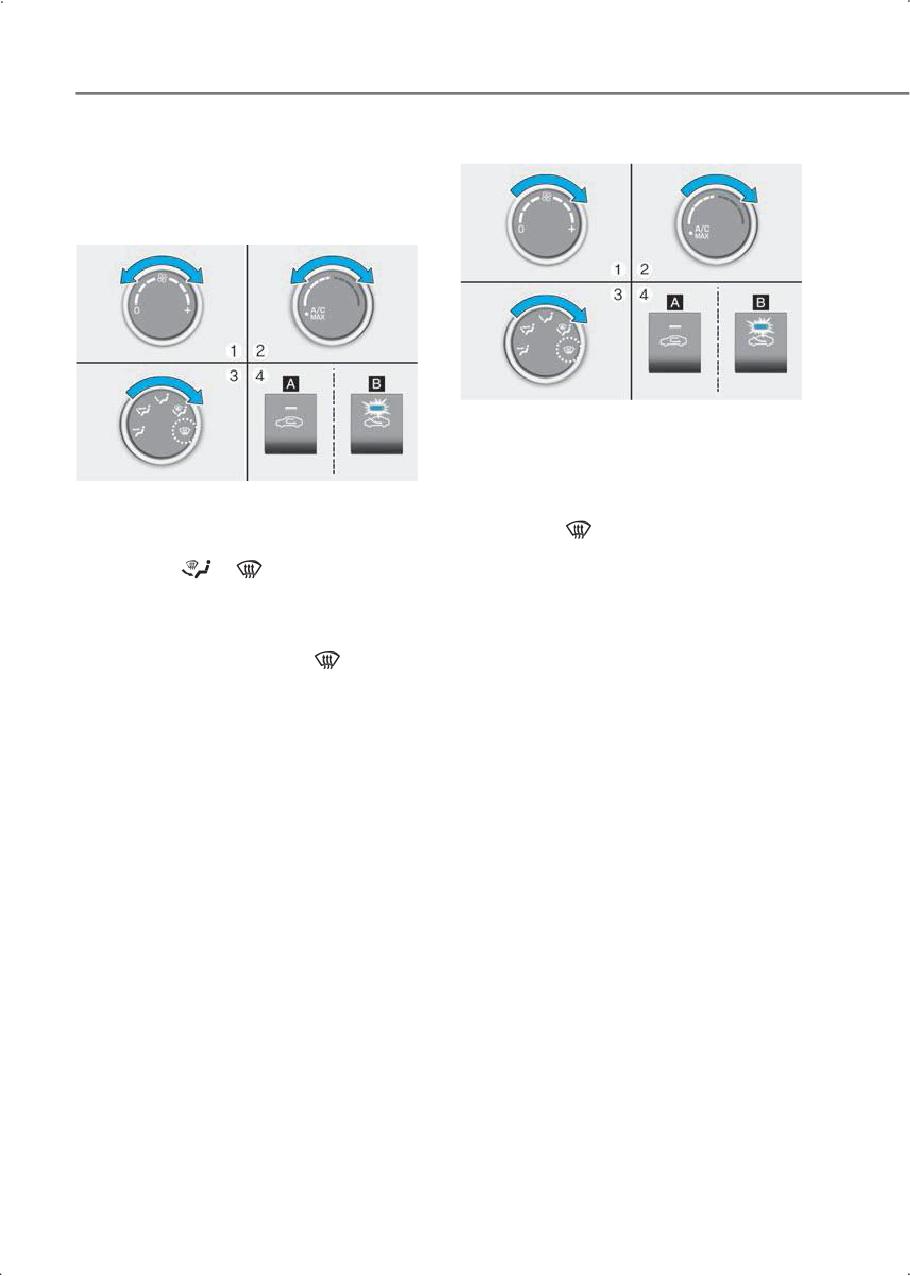
1. Set the fan speed to the highest
(extreme right) position.
2. Set the temperature to the hottest
position.
1. Select any fan speed.
3.
Select the
position.
2. Select the desired temperature.
The outside (fresh) air and air
3. Select the
or
position.
conditioning is selected automatically.
The outside (fresh) air is selected
automatically. The air conditioning
automatically operates if the mode is
selected to the defrost-level
position.
If the air conditioning and outside (fresh)
air position are not selected
automatically, press the corresponding
button.
5-56
5
Automatic climate control
To defrost outside windshield
system
To defog inside windshield
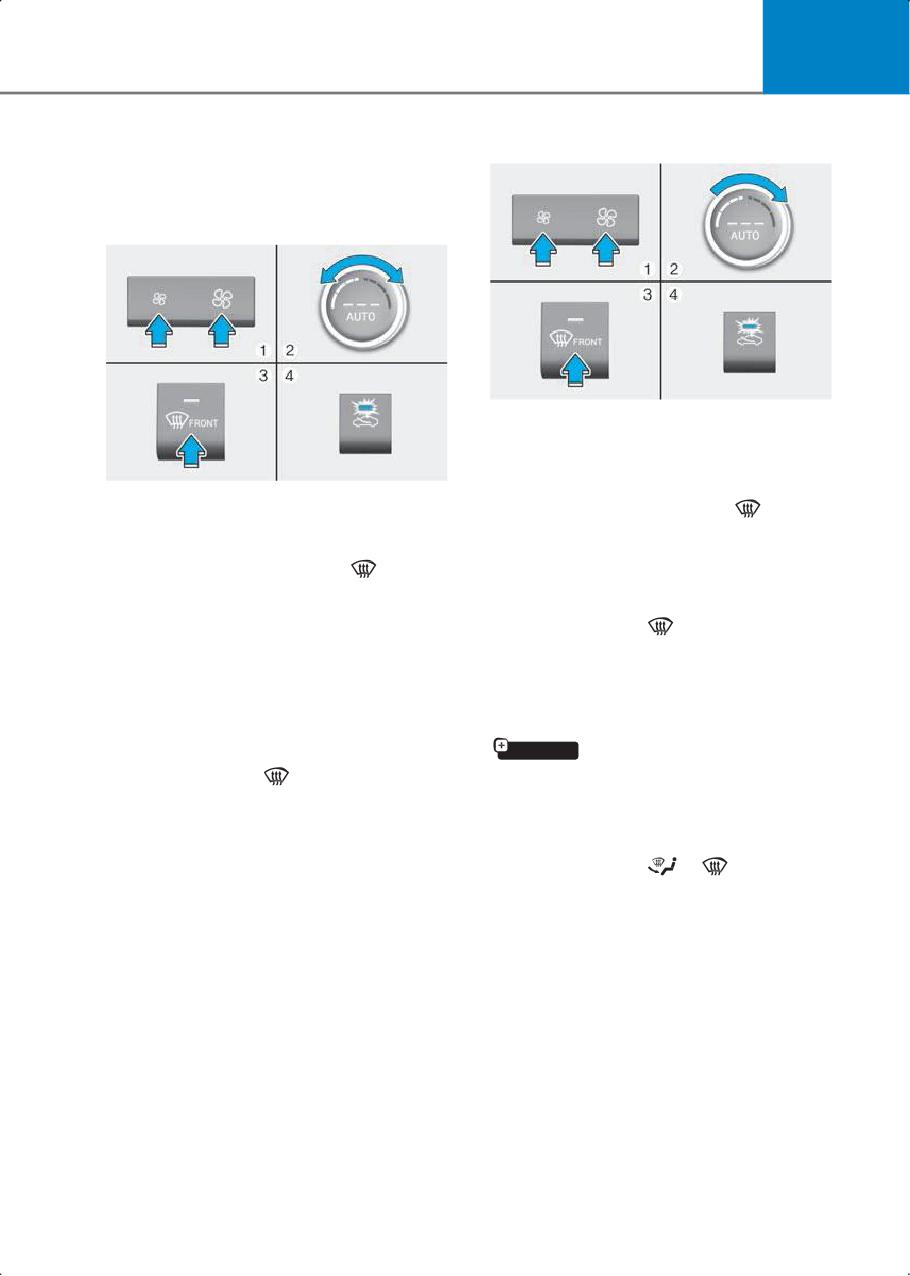
1. Set fan speed to the highest position.
2. Set temperature to the extreme hot (HI)
position.
1. Select the desired fan speed.
3. Press the defroster button (
).
2. Select the desired temperature.
The air conditioning turns on according to
the detected ambient temperature and
3. Press the defroster button (
).
the outside (fresh) air position is selected
The air conditioning turns on according to
automatically.
the detected ambient temperature, the
If the defrost-level
position is
outside (fresh) air position and higher fan
selected, lower fan speed is adjusted to
speed are selected automatically.
higher fan speed.
If the air conditioning, outside (fresh) air
position and higher fan speed are not
selected automatically, adjust the
Defogging logic
corresponding button or knob.
if equipped
If the defrost-level
position is
To help reduce the probability of fogging
selected, the fan speed increases.
up the inside of the windshield, the air
intake or air conditioning are controlled
automatically according to certain
conditions such as
or
position. To
cancel or return the defogging logic, do
the following
5-57
Convenience features
Manual climate control system
Rear window defroster
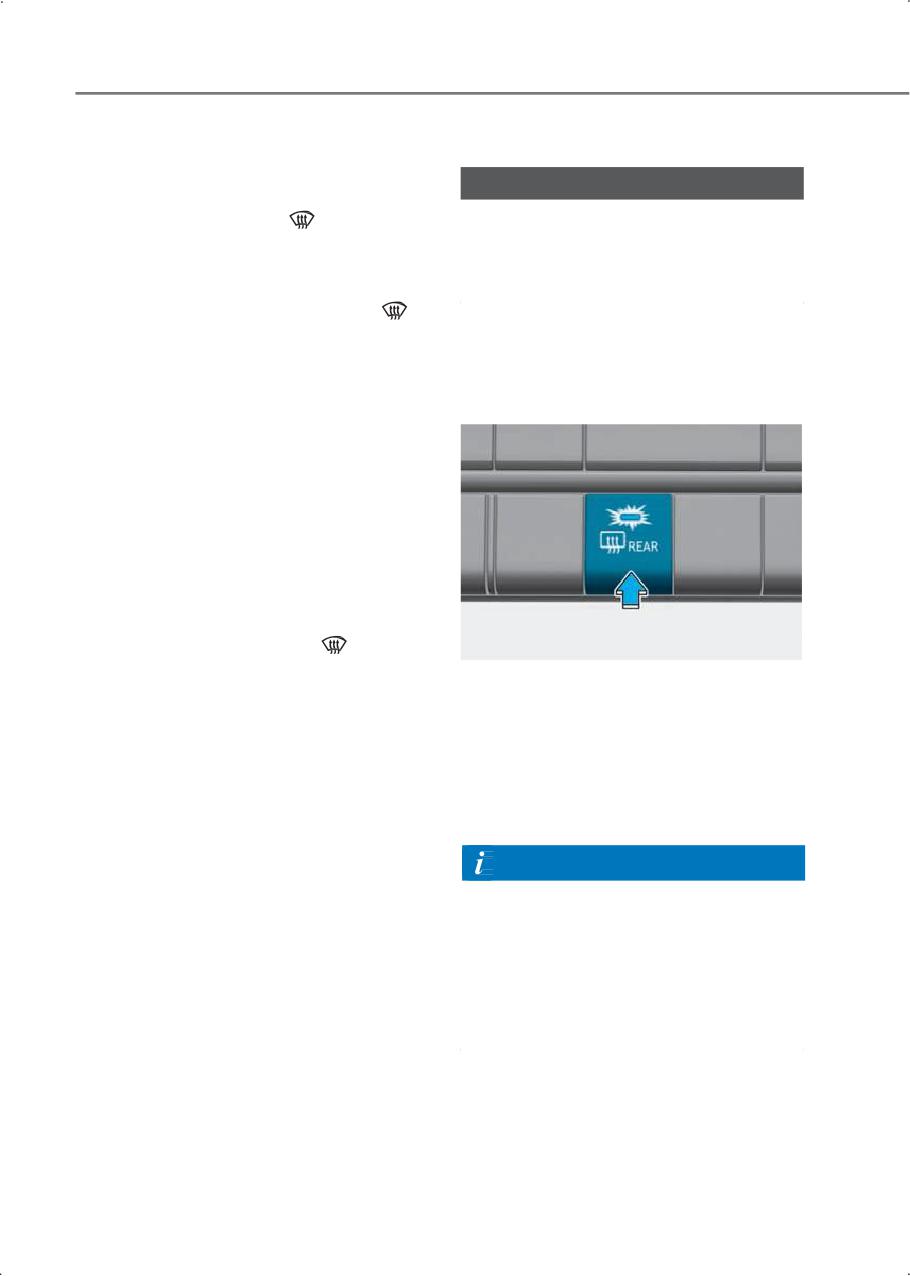
1. Turn the ignition switch to the ON
NOTICE
position.
2. Select defroster mode (
).
Never use sharp instruments or window
3. Press the air intake control button at
cleaners containing abrasives to clean the
least 5 times within 3 seconds. The
window to prevent damage to the rear
window defroster.
process should be completed within 10
seconds after the defroster mode (
)
is selected.
The defroster heats the window to
The LED indicator on the air intake button
remove frost, fog, and thin ice from the
will blink 3 times to indicate that the
interior and exterior of the rear window,
defogging logic has been disabled.
while the engine is running.
Repeat the steps again to re-enable the
defogging logic.
If the battery has been discharged or
disconnected, it resets to the defog logic
status.
Automatic climate control system
1. Turn the ignition switch to the ON
position.
2. Press the defroster button (
).
3. While pressing the air conditioning
button (A/C), press the air intake
•
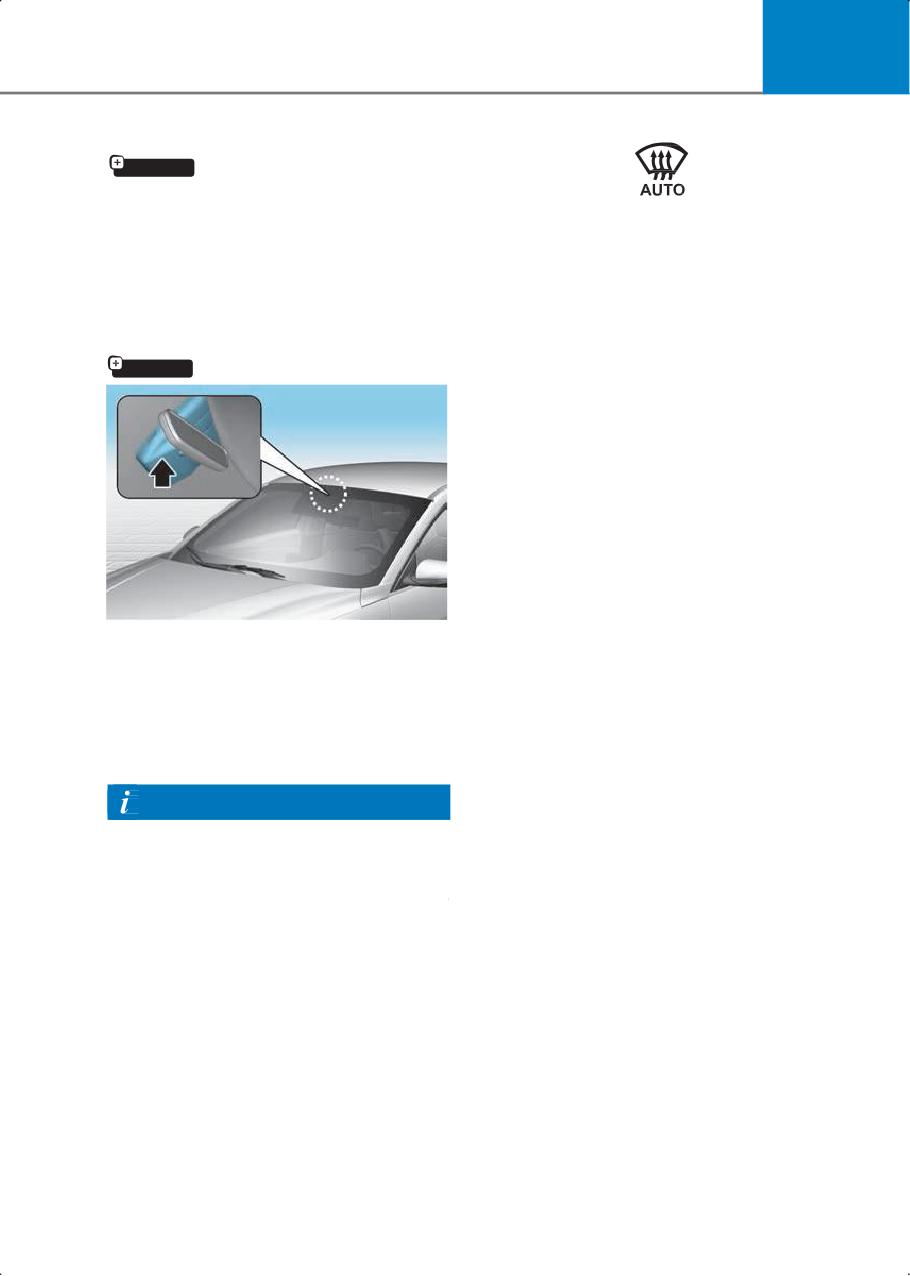
To activate it, press the rear window
control button at least 5 times within 3
defroster button located in the center
seconds.
control panel. The indicator on the rear
window defroster button illuminates
The automatic climate control
when the defroster is ON.
information screen will blink 3 times to
indicate that the defogging logic has
•
To turn it off, press the rear window
been disabled.
defroster button again.
Repeat the steps again to re-enable the
defogging logic.
Information
If the battery has been discharged or
•
If there is heavy accumulation of snow
disconnected, it resets to the defog logic
on the rear window, brush it off before
status.
operating the rear defroster.
•
The rear window defroster
automatically turns off after about 20
minutes or when the ignition switch is
in the LOCK/OFF position.
5-58
5
Side view mirror defroster
if equipped
The side view mirror defrosters operate
when you turn on the rear window
When the Auto Defogging System
defroster.
operates, the indicator illuminates.
If a high amount of humidity is detected in
Auto defogging system (only
the vehicle, the Auto Defogging System is
for automatic climate control
enabled.
system)
The following steps are performed
automatically:
if equipped
Step 1) A/C button turns on.
Step 2) Air intake control changes to
outside (fresh) air position under low
outside temperature.
Step 3) Defrost-level is selected.
Step 4) Fan speed increases.
Auto defogging helps reduce the
possibility of fogging up the inside of the
windshield by automatically sensing the
moisture on inside the windshield.
The auto defogging system operates
when the heater or air conditioning is on.
Information
The Auto Defogging system may not
operate normally, when the outside
temperature is below 14 °F (-10 °C).
5-59
Convenience features
To cancel or reset the Auto Defogging
Infotainment system
System
Press the front windshield defroster
button for 3 seconds when the ignition
switch is in the ON position.
Steering wheel audio controls
When the Auto Defogging System is
canceled, the defroster button indicator
blinks 3 times.
When the Auto Defogging System is
reset, the defroster button indicator
blinks 6 times without a signal.
Information
• When the air conditioning is turned on
by Auto defogging system, if you try to
turn off the air conditioning, the
indicator blinks 3 times and the air
conditioning does not turned off.
NOTICE
• Do not select recirculated air while the
Auto defogging system is operating.
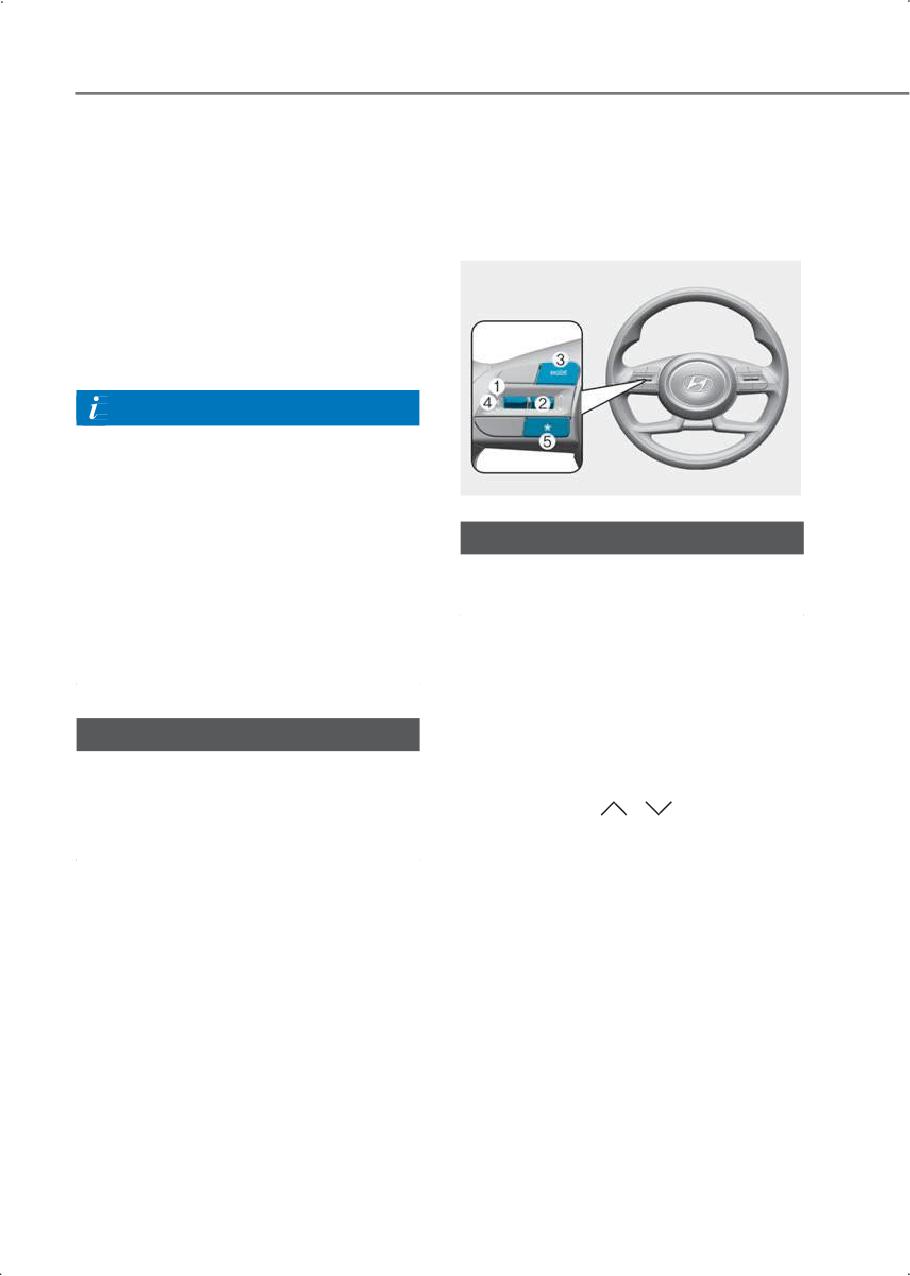
Do not operate multiple audio remote
control buttons simultaneously.
• When the Auto Defogging System is
operating, fan speed adjustment,
temperature adjustment, and air intake
VOLUME (VOL + / VOL -) (1)
control selection are all disabled.
• Rotate the VOLUME scroll up to
increase volume.
NOTICE
• Rotate the VOLUME scroll down to
decrease volume.
Do not remove the sensor cover located
on the top of the windshield glass.
SEEK/PRESET (
/
) (2)
Damage may not be covered by your
If the SEEK/PRESET switch is pressed up
vehicle warranty.
or down and held for 0.8 seconds or
more, it functions in the following modes:
RADIO mode
It functions as the AUTO SEEK select
button. It seeks until you release the
button.
MEDIA mode
It functions as the FF/RW button.
5-60
5
If the SEEK/PRESET switch is pressed up
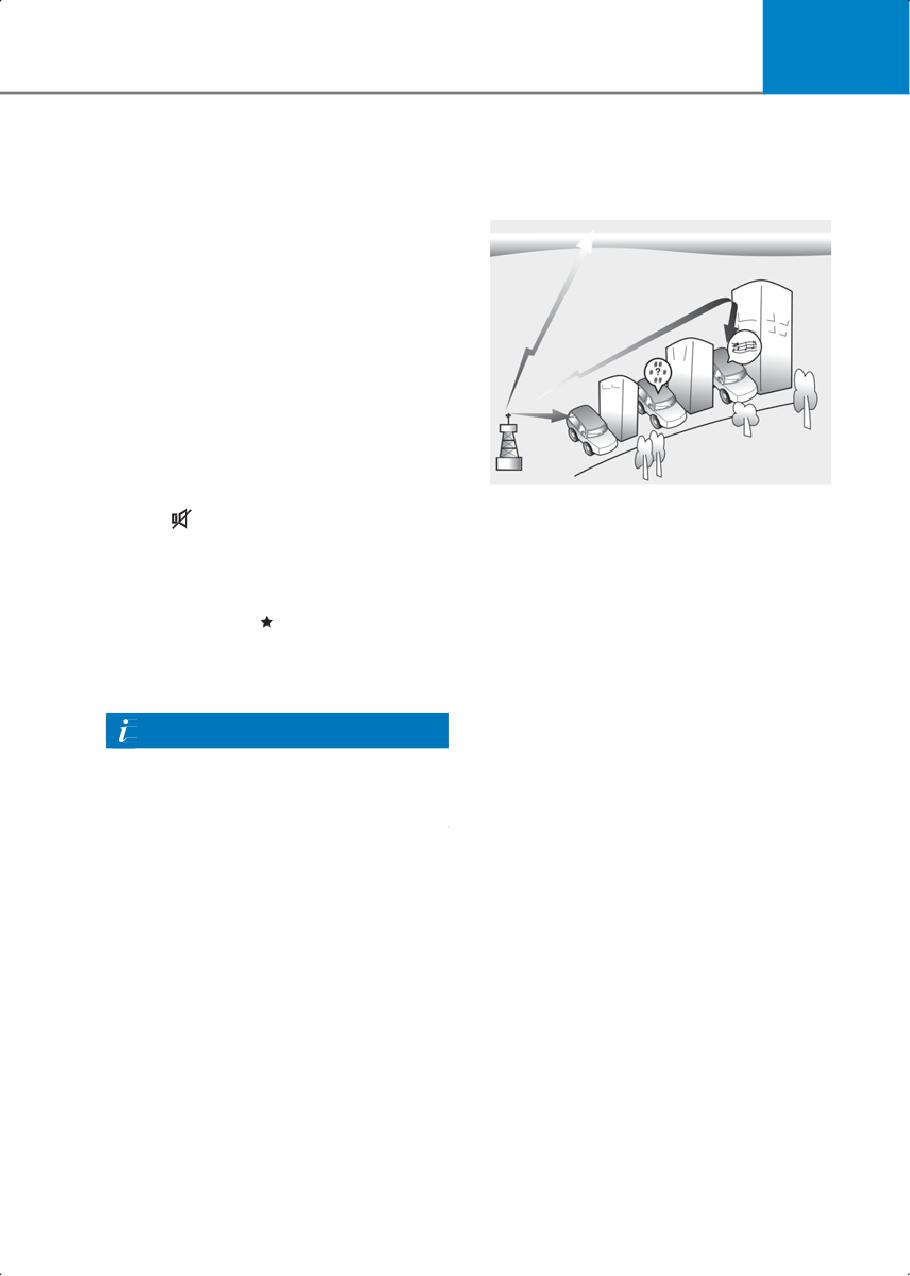
How vehicle radio works
or down, it functions in the following
modes.
FM reception
RADIO mode
It functions as the PRESET STATION
UP/DOWNbutton.
MEDIA mode
It functions as the TRACK UP/ DOWN
button.
MODE (3)
Press the MODE button to toggle through
Radio mode.
MUTE (
) (4)
AM and FM radio signals are broadcast
from transmitter towers located around
Press the MUTE button to mute or
your city. They are intercepted by the
activate the sound.
radio antenna on your vehicle. This signal
is then received by the radio and sent to
Custom button (
) (5)
your vehicle speakers.
• Custom function
When a strong radio signal has reached
• Press and hold to move to the function
your vehicle, the precise engineering of
setting screen.
your audio system ensures the best
possible quality reproduction. However,
Information
in some cases the signal coming to your
vehicle may not be strong and clear.
For more information, refer to the
This can be due to factors, such as the
separately supplied infotainment system
distance from the radio station, closeness
manual.
of other strong radio stations or the
presence of buildings, bridges or other
large obstructions in the area.
5-61
Convenience features
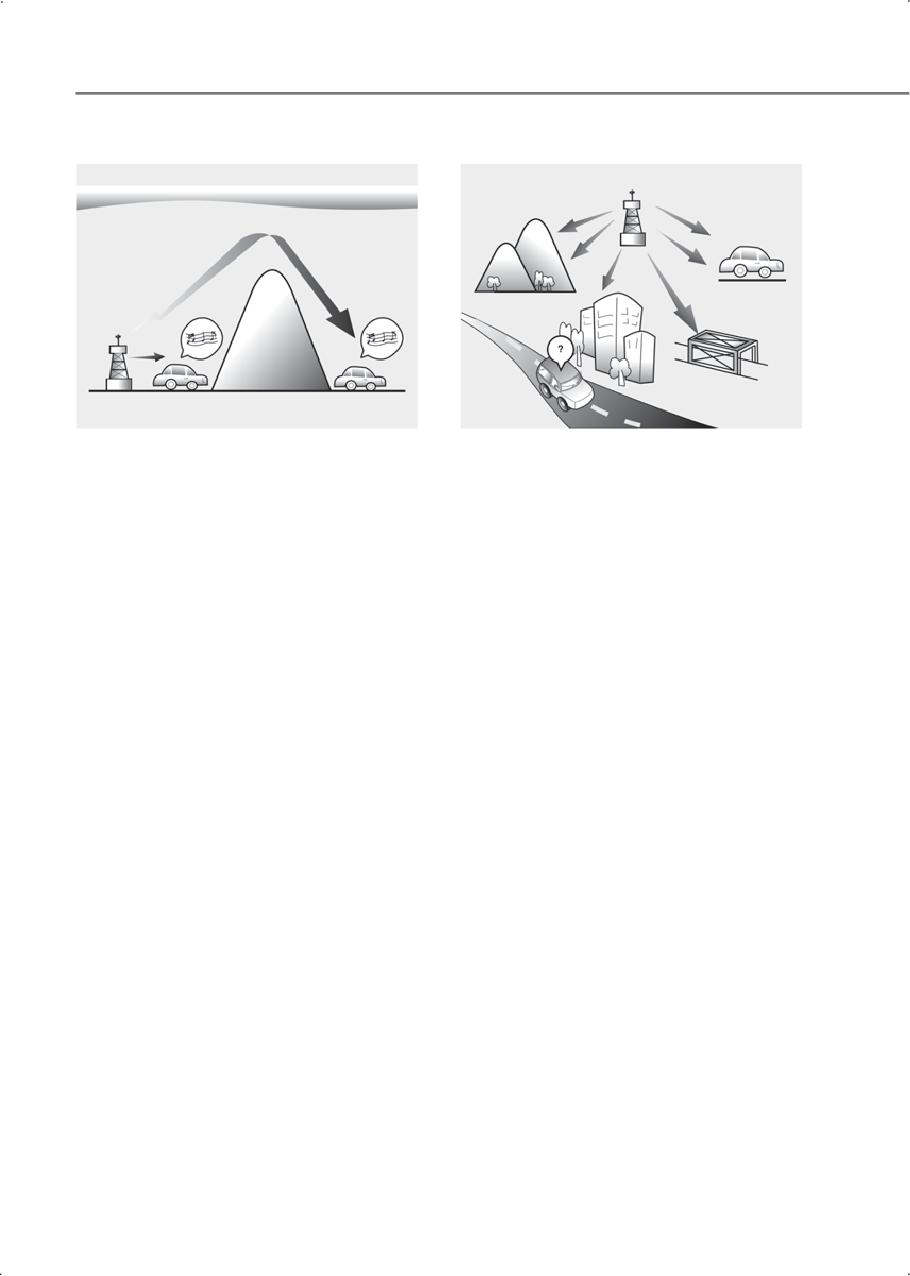
AM(MW, LW) reception
FM radio station
AM broadcasts can be received at greater
FM broadcasts are transmitted at high
distances than FM broadcasts. This is
frequencies and do not bend to follow the
because AM radio waves are transmitted
earth’s surface. Because of this, FM
at low frequencies. These long, low
broadcasts generally begin to fade at
frequency radio waves can follow the
short distances from the station. Also, FM
curvature of the earth rather than
signals are easily affected by buildings,
travelling straight out into the
mountains, or other obstructions.
atmosphere. In addition, they curve
around obstructions so that they can
provide better signal coverage.
5-62
5
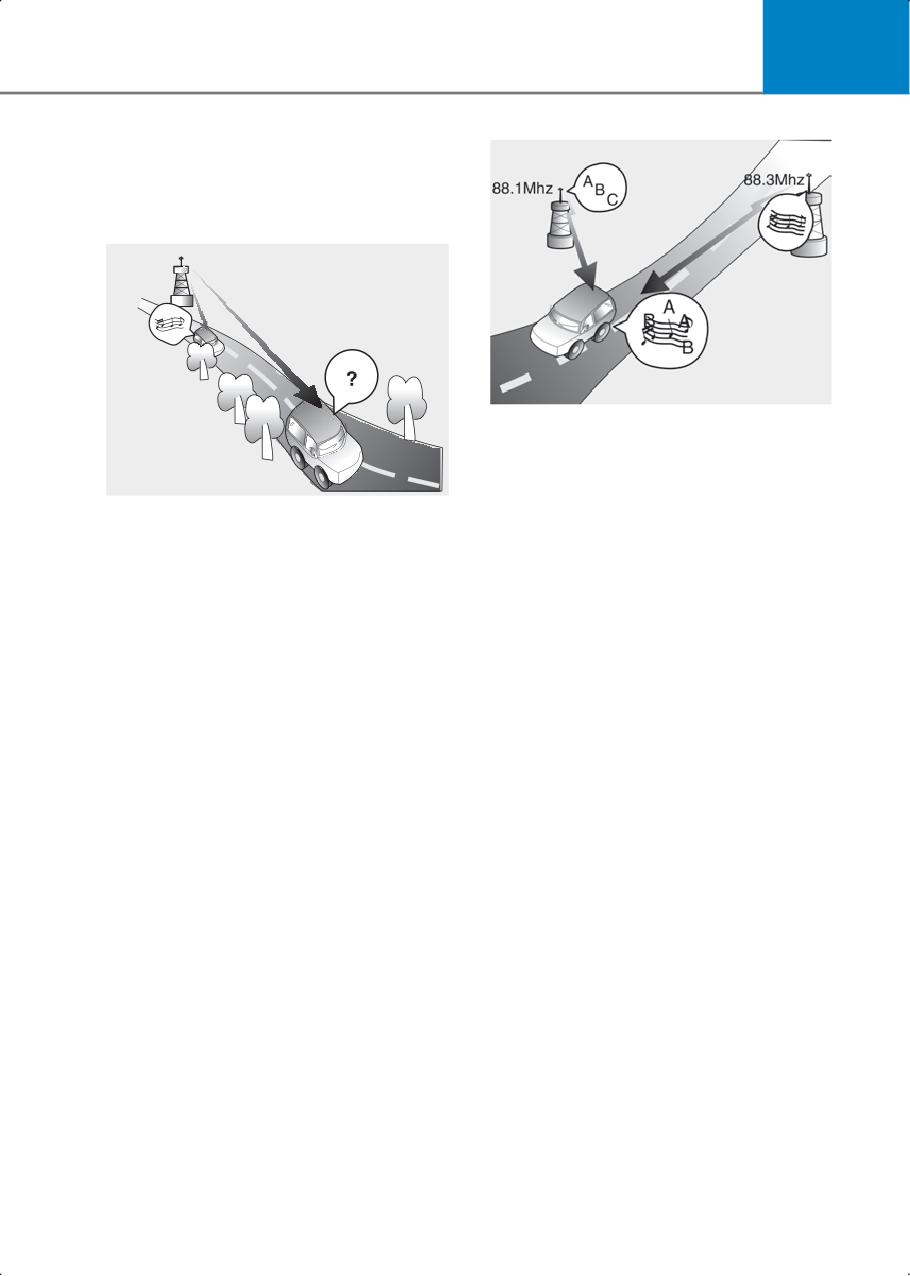
These can result in certain listening
conditions which might lead you to
believe a problem exists with your radio.
The following conditions are normal and
do not indicate radio trouble :
• Station Swapping As a FM signal
weakens, another more powerful signal
near the same frequency may begin to
play. This is because your radio is
• Fading As your vehicle moves away
designed to lock onto the clearest
from the radio station, the signal will
signal. If this occurs, select another
weaken and sound will begin to fade.
station with a stronger signal.
When this occurs, we suggest that you
• Multi-Path Cancellation Radio signals
select another stronger station.
being received from several directions
• Flutter/Static Weak FM signals or large
can cause distortion or fluttering. This
obstructions between the transmitter
can be caused by a direct and reflected
and your radio can disturb the signal
signal from the same station, or by
causing static or fluttering noises to
signals from two stations with close
occur. Reducing the treble level may
frequencies. If this occurs, select
lessen this effect until the disturbance
another station until the condition has
clears.
passed.
5-63
6. Driving your vehicle
Before driving
Before entering the vehicle
Before starting
Vehicle break-in process
Key ignition switch
Key ignition switch positions
Starting the engine
Turning off the engine
Push button start ignition switch
Push button start ignition switch positions
Starting the engine
Turning off the engine
Vehicle Auto-Shut Off
Operating conditions
System operation
Deactivating conditions
Intelligent Variable Transmission (IVT)
6
Intelligent Variable Transmission operation
Parking
Dual Clutch Transmission
Dual Clutch Transmission operation
Parking
Paddle shifter (Manual shift mode)
Braking system
Power-assist brakes
Parking brake
Electronic Parking Brake (EPB)
Auto Hold
Anti-lock Brake System (ABS)
Electronic Stability Control (ESC)
Winter driving
Snow or icy conditions
Trailer towing
Vehicle load limit
The loading information label
Driving your vehicle
Before driving
WARNING
To reduce the risk of serious injury or
death:
Before entering the vehicle
• Always wear your seat belt. All
• Make sure all windows, outer side view
passengers must be properly belted
mirror(s), and outside lights are clean
whenever the vehicle is moving. For
and unobstructed.
more information, refer to the "Seat
• Remove frost, snow, or ice from both
belts" section in chapter 3.
the front and rear windshield as well as
• Always drive defensively. Do not
the front side windows.
assume that the other drivers are
• Visually check the tires for uneven wear
seeing your vehicle. They may not act
and damage.
as you expect. Be prepared to react to
• Check under the vehicle for any sign of
avoid a possible collision. Plan your
leaks.
movements anticipating the
• Make sure there are no obstacles
"worst-case" scenario.
behind you if you intend to back up.
• Stay focused on driving. Driver
distraction may cause a collision.
• Leave plenty of space between you and
Before starting
the vehicle in front of you.
• Make sure the hood, the trunk, and the
doors are securely closed and locked.
• Adjust the position of the seat and
WARNING
steering wheel.
• Adjust the inside and side view mirrors.
Never drink or take drugs while driving.
• Verify all the lights work.
Drinking or taking drugs while driving is
dangerous and may result in a collision,
• Fasten your seat belt. Check that all
causing serious injury or death.
passengers have fastened their seat
belts.
Drunk driving is the number one
contributor to the highway death toll each
• Check the gauges and indicators in the
year. Even a small amount of alcohol can
instrument panel and the messages on
affect your reflexes, perceptions, and
the instrument display when the
judgment. Just one drink may reduce
ignition switch is in the ON position.
your ability to respond to changing
• Check that any items you are carrying
conditions and emergencies and your
are stored properly or fastened down
reaction time gets worse with each
securely.
additional drink.
Driving while under the influence of drugs
is as dangerous or more dangerous than
driving under the influence of alcohol.
You are much more likely to have a
serious accident if you drink or take drugs
while driving. If you are drinking or taking
drugs, never drive. Do not ride with a
driver who has been drinking or taking
drugs. Choose a designated driver or call
a taxi.
6-2
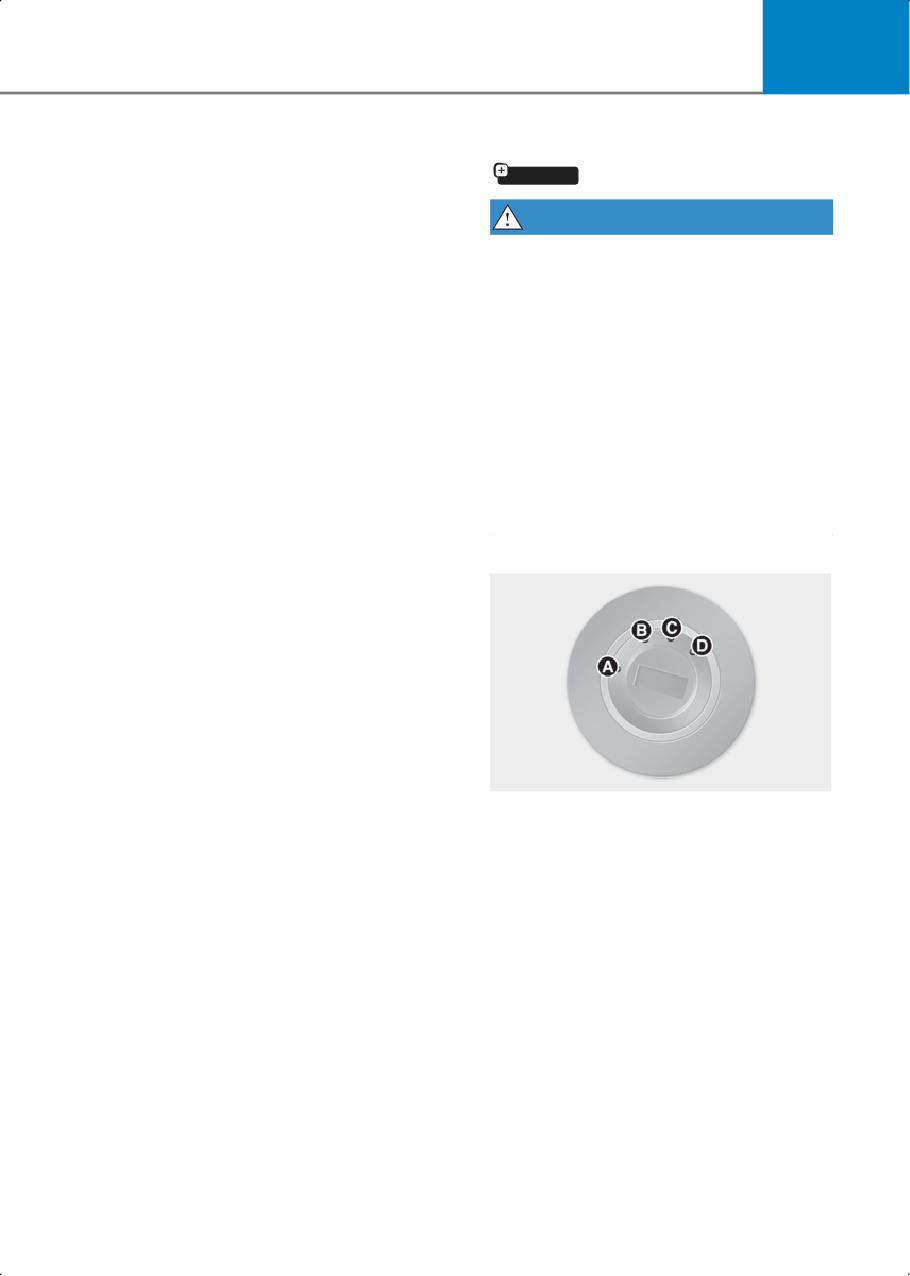
6
Vehicle break-in process
Key ignition switch
By following a few simple precautions for
if equipped
the first 600 mi. (1,000 km), you can add
to the performance, economy, and life of
WARNING
your vehicle.
To reduce the risk of serious injury or
• While driving, avoid sudden
death:
acceleration.
• Never allow children or any person who
• Do not maintain a single speed for a
is unfamiliar with the vehicle to touch
long time, either fast or slow. Varying
the ignition switch or related parts.
the engine speed is needed to properly
Unexpected and sudden vehicle
break-in the engine.
movement may occur.
• Avoid hard stops, except in
• Never reach through the steering wheel
emergencies, to allow the brakes to
for the ignition switch, or any other
seat properly.
control, while the vehicle is moving.
• Fuel economy, engine performance,
The presence of your hand or arm in
and engine oil consumption may differ
this area may cause a loss of vehicle
depending on the vehicle break-in
control resulting in a collision.
process and be stabilized after 4,000
mi. (6,000 km). New engines may
consume more oil during the vehicle
break-in period.
• Do not tow a trailer during the first
1,200 mi. (2,000 km) of operation.
[A] Lock
[B] ACC
[C] ON
[D] START
Whenever the front door is opened, the
ignition switch illuminates if the ignition
switch is not in the ON position. The light
goes off immediately when the ignition
switch is turned ON or goes off after
about 30 seconds when the door is
closed. (for vehicles equipped with
ignition switch illumination)
6-3
Driving your vehicle
WARNING
• Never turn the ignition switch to the
LOCK or ACC position while the vehicle
is moving except in an emergency. This
may result in the engine turning off and
loss of power assist for the steering and
brake systems. This may cause loss of
directional control and braking
function, which could cause a collision.
• Before leaving the driver's seat, always
make sure the shift lever is in the P
(Park) position, apply the parking brake,
turn the ignition switch to the LOCK
position, and take the keys with you to
prevent unintended vehicle movement.
NOTICE
Never use aftermarket keyhole covers.
These covers may prevent the vehicle
from recognizing the key and not allow
the vehicle to start.
6-4

6
Key ignition switch positions
Switch
Action
Notes
Position
To turn the ignition switch to the LOCK
Always stop the vehicle before turning
position, push the key in at the ACC
the ignition switch to the LOCK
position and turn the key towards the
position.
LOCK
LOCK position.
The ignition key can be removed in
the LOCK position.
Some electrical accessories are
ACC
usable. The steering wheel unlocks.
This is the normal key position when
Do not leave the ignition switch in the
the engine has started. All features
ON position when the engine is not
and accessories are usable.
running to prevent the battery from
ON
The warning lights can be checked
discharging.
when you turn the ignition switch
from ACC to ON.
To start the engine, turn the ignition
The engine attempts to start until you
switch to the START position. The
release the key.
START
switch returns to the ON position
when you let go of the key.
6-5
Driving your vehicle
Starting the engine
NOTICE
WARNING
To prevent damage to the vehicle:
• Do not hold the ignition key in the
• Always wear appropriate shoes when
operating your vehicle. Unsuitable
START position for more than 10
shoes such as high heels, ski boots,
seconds. Wait 5 to 10 seconds before
trying again.
sandals, and flip-flops may interfere
with your ability to use the brake,
• Do not turn the ignition switch to the
accelerator, and clutch pedals. Do not
START position with the engine
drive barefoot.
running. It may damage the starter.
• Do not start your vehicle with the
• If the engine stalls while the vehicle is
accelerator pedal depressed. Place
moving, shift to N (Neutral) and use the
your foot firmly on the brake pedal
ignition switch to attempt to restart the
while starting your vehicle.
engine.
• Wait until the engine is at normal idle
• Do not push or tow your vehicle to start
before shifting gears and releasing the
the engine.
brake. Your vehicle may move suddenly
if your vehicle is shifted while the
engine RPM is high. It may cause
Turning off the engine
damage to the transmission system.
1. Stop the vehicle and depress the brake
pedal fully.
1. Make sure the parking brake is applied.
2. Make sure the gear is in P (Park).
2. Make sure the shift lever is in P (Park).
3. Turn the ignition switch to the LOCK
position and apply the parking brake.
3. Depress the brake pedal.
4. Take the key with you when you leave
4. Turn the ignition switch to the START
the vehicle.
position. Hold the key (maximum of 10
seconds) until the engine starts and
release it.
Information
• Do not wait for the engine to warm up
or race the engine while the vehicle
remains stationary.
• Start driving at moderate engine
speeds. Do not rapidly accelerate and
decelerate while driving.
6-6
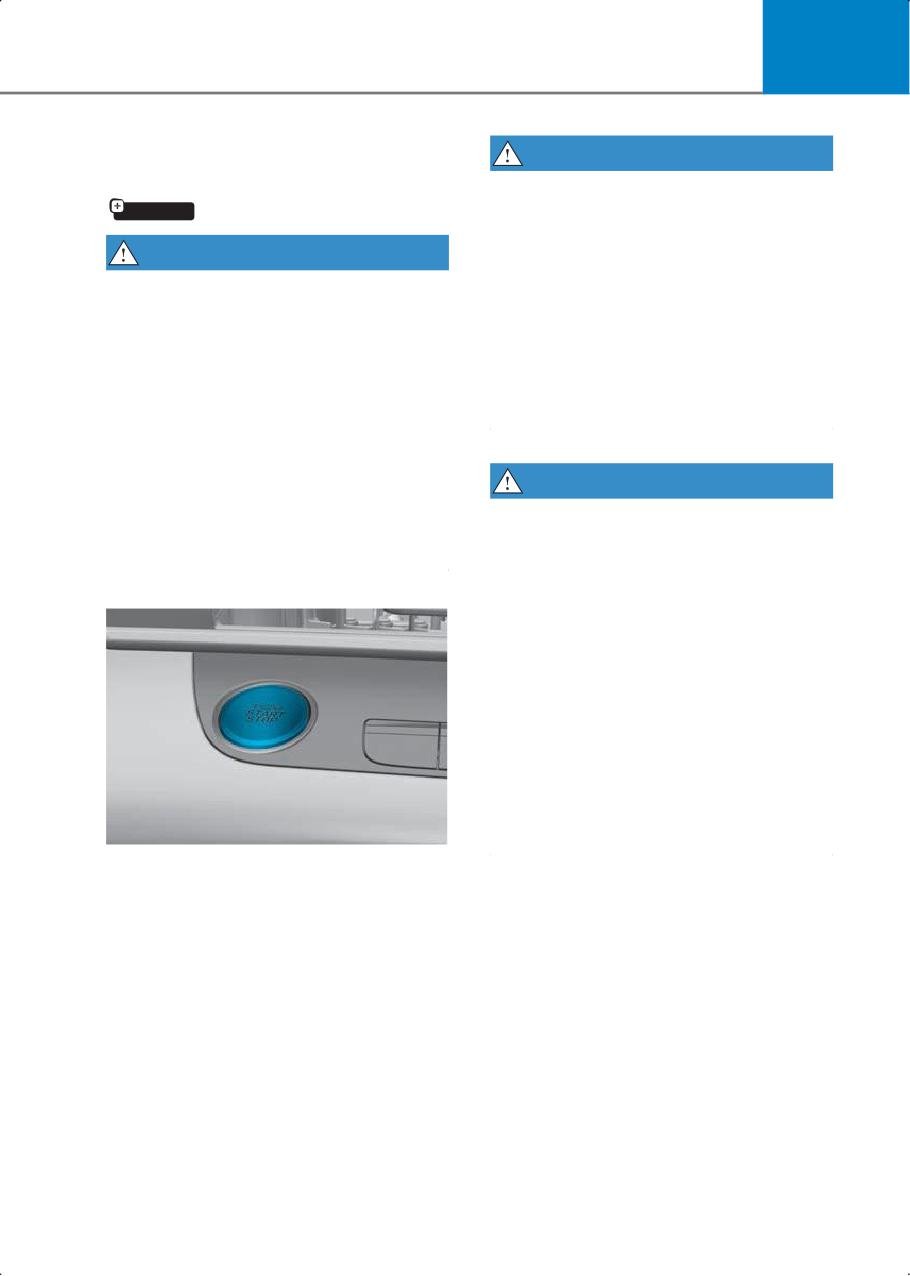
6
Push button start ignition
WARNING
switch
To turn off the vehicle in an emergency:
if equipped
Press and hold the Push Button Start
ignition switch for more than two
WARNING
seconds. Or rapidly press and release the
Push Button Start ignition switch three
To reduce the risk of serious injury or
times (within three seconds).
death:
If the vehicle is still moving, you can
• Never allow children or any person who
restart the vehicle without depressing the
is unfamiliar with the vehicle to touch
brake pedal by pressing the Push Button
the Push Button Start ignition switch or
Start ignition switch with the gear in the N
related parts. Unexpected and sudden
(Neutral) position.
vehicle movement may occur.
• Never reach through the steering wheel
for the ignition switch, or any other
control, while the vehicle is moving.
WARNING
The presence of your hand or arm in
• Never press the Push Button Start
this area may cause a loss of vehicle
ignition switch while the vehicle is
control resulting in a collision.
moving except in an emergency. This
may result in the vehicle turning off and
loss of power assist for the steering and
brake systems. This may cause loss of
directional control and braking
function, which could cause an
accident.
• Before leaving the driver’s seat, always
make sure the gear is in the P (Park)
position, apply the parking brake, press
the Push Button Start ignition switch to
the OFF position, and take the Smart
Key with you to prevent unintended
vehicle movement.
Whenever the front door is opened, the
Push Button Start ignition switch
illuminates and goes off 30 seconds after
the door is closed. (if equipped)
6-7
Driving your vehicle
Push button start ignition switch positions
Button
Action
Notes
Position
To turn off the engine, press the Push
Always stop the vehicle before
Button Start ignition switch with the
pressing the Push Button Start
vehicle shifted to P (Park).
ignition switch to the OFF position.
If the Push Button Start ignition switch
OFF
is pressed with the gear shifted to D
(Drive), R (Reverse), or N (Neutral), the
Push Button Start ignition switch
changes to the ACC position.
Press the Push Button Start ignition
If you leave the Push Button Start
switch when the button is in the OFF
ignition switch in the ACC position for
position without depressing the brake
a period of time, the engine turns off
ACC
pedal.
automatically to prevent battery
Some of the electrical accessories are
discharge.
usable.
Press the Push Button Start ignition
Do not leave the Push Button Start
switch while it is in the ACC position
ignition switch in the ON position
ON
without depressing the brake pedal.
when the engine is not running to
The warning lights can be checked
prevent the battery from discharging.
before the engine is started.
To start the engine, depress the brake
If you press the Push Button Start
pedal and press the Push Button Start
ignition switch without depressing the
ignition switch with the gear shifted to
brake pedal, the engine does not start
the P (Park) or the N (Neutral)
and the Push Button Start ignition
START
position.
switch changes as follows: OFF→ ACC
For your safety, start the engine with
· ON→ OFFor ACC
the gear shifted to the P (Park)
position.
6-8
6
Starting the engine
1. Always carry the smart key with you.
2. Make sure the parking brake is applied.
WARNING
3. Make sure the shift lever is in P (Park).
•
Always wear appropriate shoes when
4. Depress the brake pedal.
operating your vehicle. Unsuitable
5. Press the Push Button Start ignition
shoes such as high heels, ski boots,
switch.
sandals, and flip-flops may interfere
with your ability to use the brake,
Information
accelerator, and clutch pedals. Do not
drive barefoot.
• Do not wait for the engine to warm up
or race the engine while the vehicle
•
Do not start your vehicle with the
remains stationary.
accelerator pedal depressed. Place
your foot firmly on the brake pedal
• Start driving at moderate engine
while starting your vehicle.
speeds. Do not rapidly accelerate and
decelerate while driving.
•
Wait until the engine is at normal idle
before shifting gears and releasing the
brake. Your vehicle may move suddenly
if your vehicle is shifted while the
NOTICE
engine RPM is high. It may cause
damage to the transmission system.
To prevent damage to the vehicle:
• Do not press the Push Button Start
ignition switch for more than 10
seconds except when the stop light
Information
fuse is blown.
•
The vehicle starts by pressing the Push
When the stop light fuse is blown,
Button Start ignition switch, only when
replace the fuse. If you cannot replace
the smart key is in the vehicle.
the fuse, start the engine by pressing
•
The vehicle may not start even if the
and holding the Push Button Start
smart key is in the vehicle but it is not
ignition switch for 10 seconds with the
near you (e.g. in the cargo area).
Push Button Start ignition switch in the
ACC position.
•
When the Push Button Start ignition
switch is in the ACC or ON position, if
• If the engine stalls while the vehicle is
any door is open, the system checks for
moving, shift to N (Neutral) and use the
the smart key. When the smart key is
Push Button Start ignition switch to
not in the vehicle, the
indicator
attempt to restart the engine.
blinks and the warning, "Key not in
• Do not push or tow your vehicle to start
vehicle" appears. When all doors are
the engine.
closed, the chime also sounds for about
5 seconds.
6-9
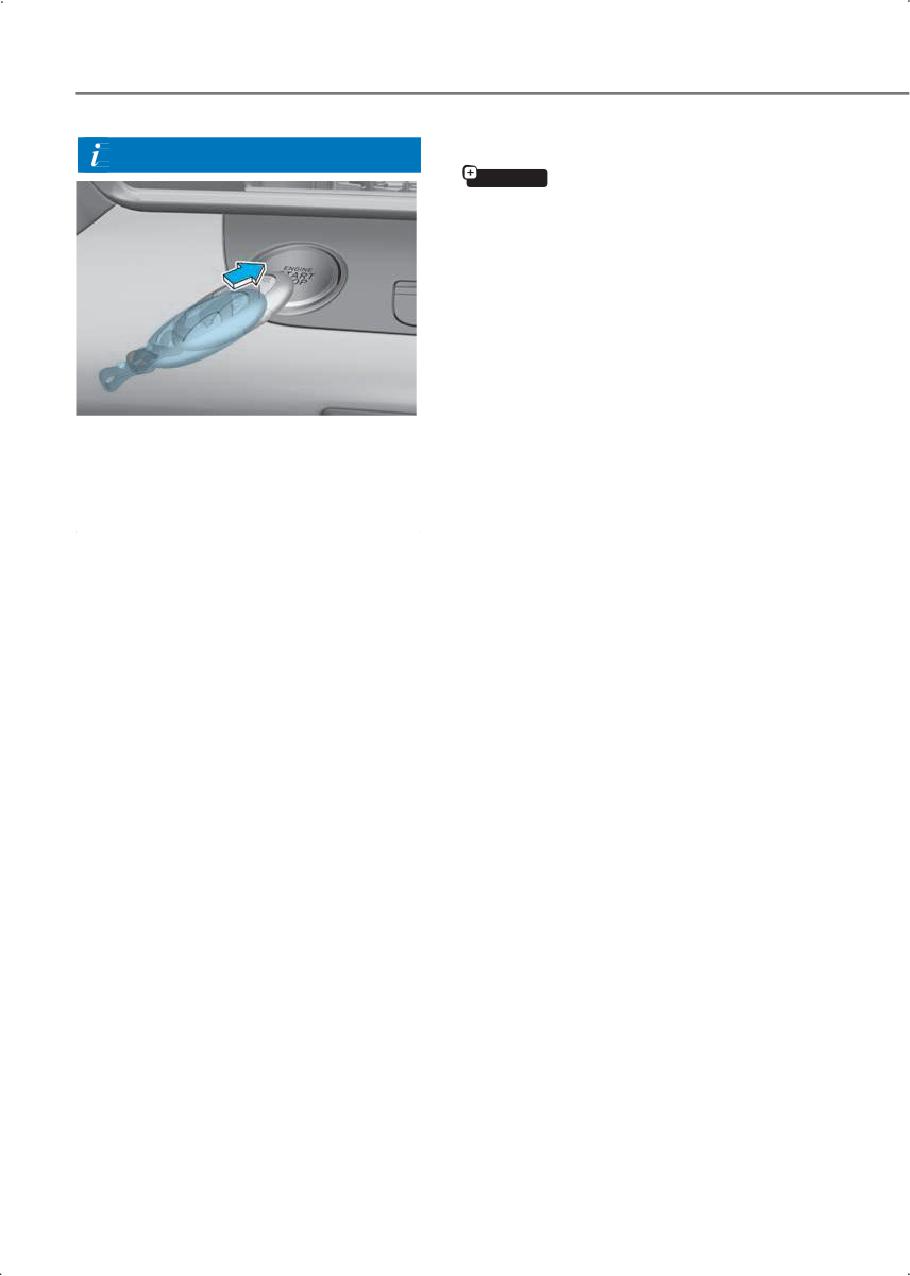
Driving your vehicle
Vehicle Auto-Shut Off
Information
if equipped
If your vehicle is parked and the engine is
left on for a long period of time, the
engine turns off automatically to help
reduce fuel consumption and prevent
carbon dioxide poisoning.
Operating conditions
Vehicle Auto-Shut Off timer operates
when all the following conditions are
satisfied:
If the smart key battery is weak or the
• The driver does not fasten their seat
smart key does not work correctly, press
belt.
the Push Button Start ignition switch with
• No occupant is detected in the
the smart key.
passenger's seat.
• The vehicle is stopped and the gear
shift is in P (Park).
Turning off the engine
• If the brake or accelerator pedals have
1. Stop the vehicle and depress the brake
not been depressed.
pedal fully.
• The infotainment system is not being
2. Make sure the gear is in P (Park).
updated.
3. Press the Push Button Start ignition
switch to the OFF position and apply
the parking brake.
4. Take the key with you when you leave
the vehicle.
6-10
6
System operation
Deactivating conditions
The system does not automatically shut
off the engine if:
• The driver’s seat belt is fastened.
• An occupant is detected in the
passenger's seat.
• Driving over 2 mph (3 km/h).
• The brake pedal or accelerator pedal is
depressed.
• The gear is shifted to R (Reverse), D
(Drive), or N (Neutral).
When all the conditions are satisfied, the
Vehicle Auto-Shut Off operates and turns
the engine off automatically after 60
minutes.
A timer appears on the instrument cluster
30 minutes before vehicle shuts off.
Resetting cluster timer
A timer appears on the instrument cluster
after 30 minutes and is reset by:
• Releasing the accelerator pedal or
brake pedals.
• Pressing the OK button on the steering
wheel while the timer appears on the
instrument cluster.
6-11
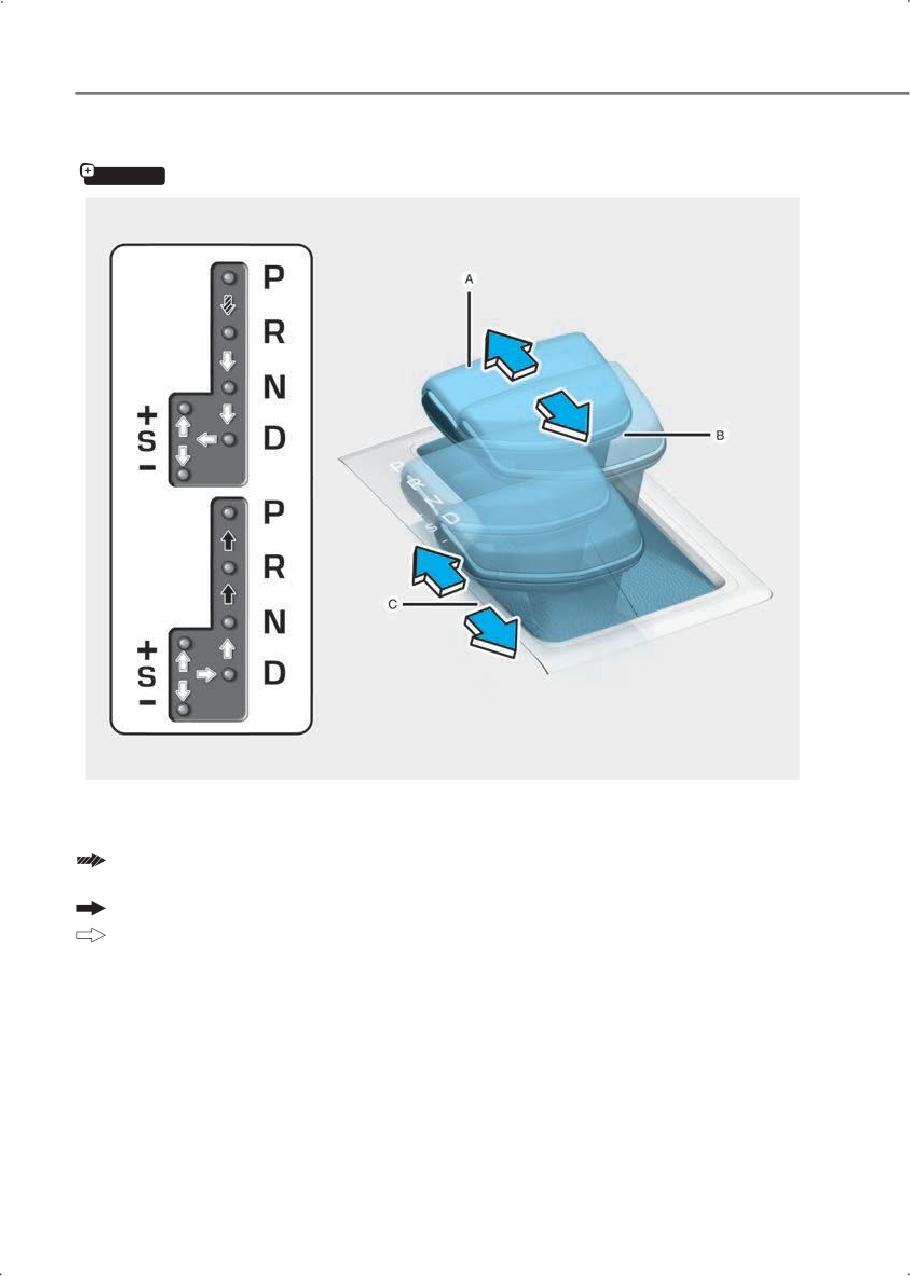
Driving your vehicle
Intelligent Variable Transmission (IVT)
if equipped
[A] Shift release button
[B] Shift lever
[C] DS mode, manual shift mode
Depress the brake pedal and press the shift release button while moving the shift
lever.
Press the shift release button while moving the shift lever.
The shift lever can freely operate.
6-12
6
Intelligent Variable
WARNING
Transmission operation
• Shifting into P (Park) while the vehicle is
The IVT has no actual fixed gears. The
moving may cause you to lose control
varying gear ratios are selected
of the vehicle.
automatically, depending on the position
of the shift lever, vehicle's speed and
• After the vehicle has stopped, always
position of the accelerator pedal.
make sure the shift lever is in P (Park),
apply the parking brake, and turn the
The indicator on the instrument cluster
engine off.
the shift lever position when the ignition
switch is in the ON position.
• When parking on an incline, shift the
gear to P (Park), apply the parking
WARNING
brake, and turn the wheels toward the
curb to prevent the vehicle from rolling
To reduce the risk of serious injury or
downhill.
death:
• Do not use the P (Park) position instead
• Always check the surrounding areas
of the parking brake.
near your vehicle for people, especially
children, before shifting into D (Drive)
or R (Reverse).
• Before leaving the driver's seat, always
Information
make sure the shift lever is in the P
The RPM (revolution per minute) may
(Park) position, then apply the parking
increase or decrease when performing
brake, and place the ignition switch in
the IVT self-diagnosis.
the LOCK/OFF position. Unexpected
and sudden vehicle movement may
occur if these precautions are not
R (Reverse)
followed.
Use this position to drive the vehicle
• Do not use engine braking (using the
backward.
manual shift mode to shift from a
higher gear to a lower gear) on slippery
NOTICE
roads. The vehicle may lose traction
Always come to a complete stop before
with the roadway, resulting in a
shifting into or out of R (Reverse) to
collision.
prevent damaging the transmission.
P (Park)
N (Neutral)
Always come to a complete stop before
The wheels and transmission are not
shifting into P (Park).
engaged.
To shift from P (Park), depress the brake
Use N (Neutral) if you need to restart a
pedal firmly and make sure your foot is
stalled engine, or if it is necessary to stop
not depressing the accelerator pedal.
with the engine ON. Shift into P (Park) if
If you cannot shift the lever out of P
you need to leave your vehicle for any
(Park), refer to the "Shift lock release"
reason.
section in this chapter if equipped with a
Always depress the brake pedal when you
shift lever.
are shifting from N (Neutral) to another
gear.
6-13
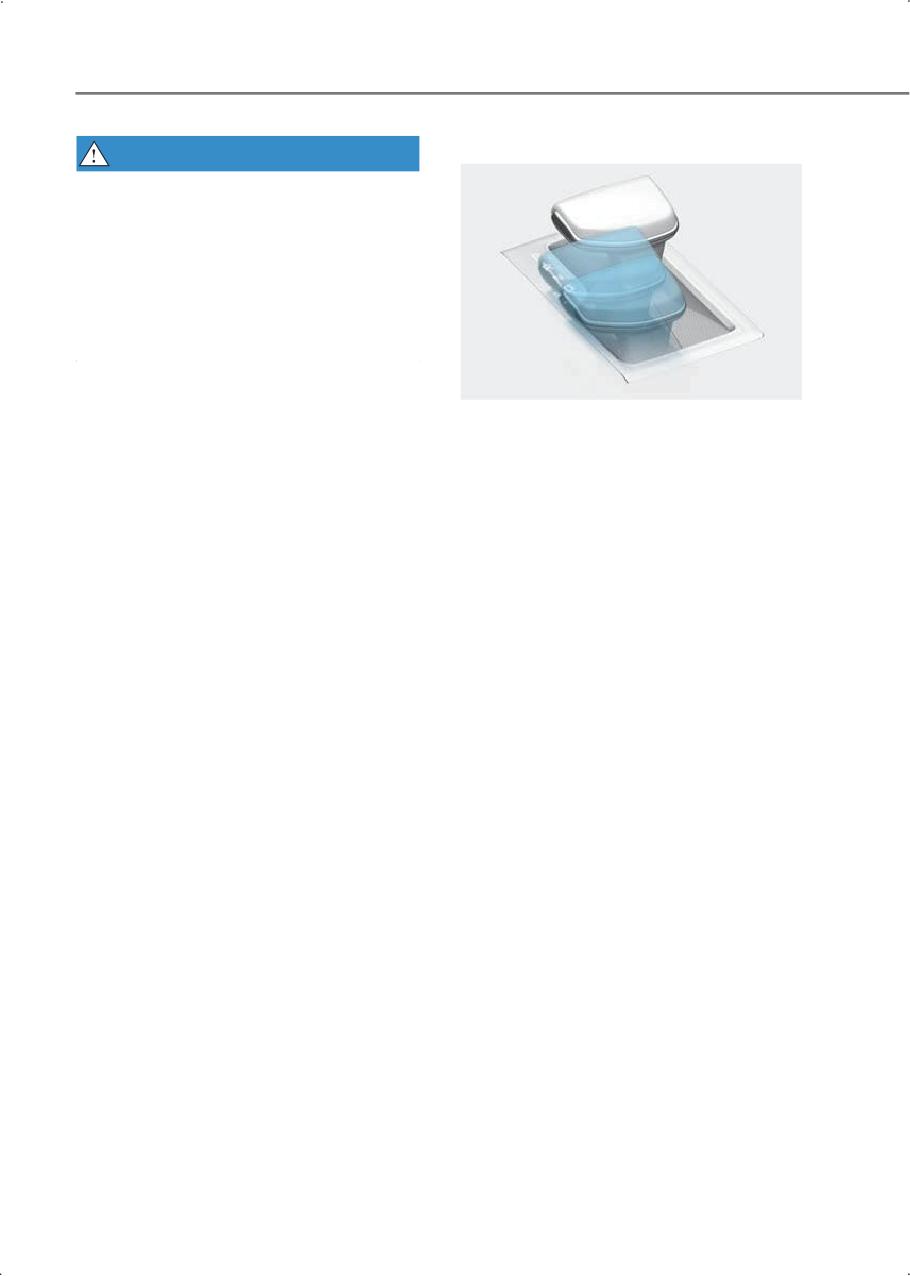
Driving your vehicle
DS (Drive Sporty) mode
WARNING
• Do not shift into gear unless your foot is
firmly on the brake pedal.
• Do not shift gears with the accelerator
pedal depressed. Wait until the engine
RPM is normal. The vehicle may
suddenly move if you shift gears and
release the brake pedal when the RPM
is high.
D (Drive)
The transmission automatically shifts to
•
To shift into DS mode, move the shift
the optimal gear ratio, providing the best
lever from D (Drive) to the center of the
fuel economy and power.
manual shift mode. The engine and
Shift to D (Drive) while depressing the
transmission control logic is
brake pedal with the engine ON. Then
automatically optimized for sporty
release the brake pedal and depress the
driving.
accelerator pedal.
•
In DS mode, if you move the shift lever
For extra power when passing another
to + (Up) or - (Down), the gear changes
vehicle or driving uphill, depress the
to the manual shift mode. If the shift
accelerator pedal fully. The transmission
lever is moved back into D (Drive), it
automatically downshifts to the next
changes to D (Drive) and shifts
lower gear.
automatically. The vehicle performs
according to the mode selected from
The DRIVE MODE switch, located on the
the drive mode (NORMAL, SPORT,
shift lever console or on the left side of
SMART).
the dashboard, allows the driver to switch
from NORMAL mode to SPORT or SMART
mode (if equipped).
For more information, refer to the "Drive
mode integrated control system" in the
complete Owner's Manual.
6-14
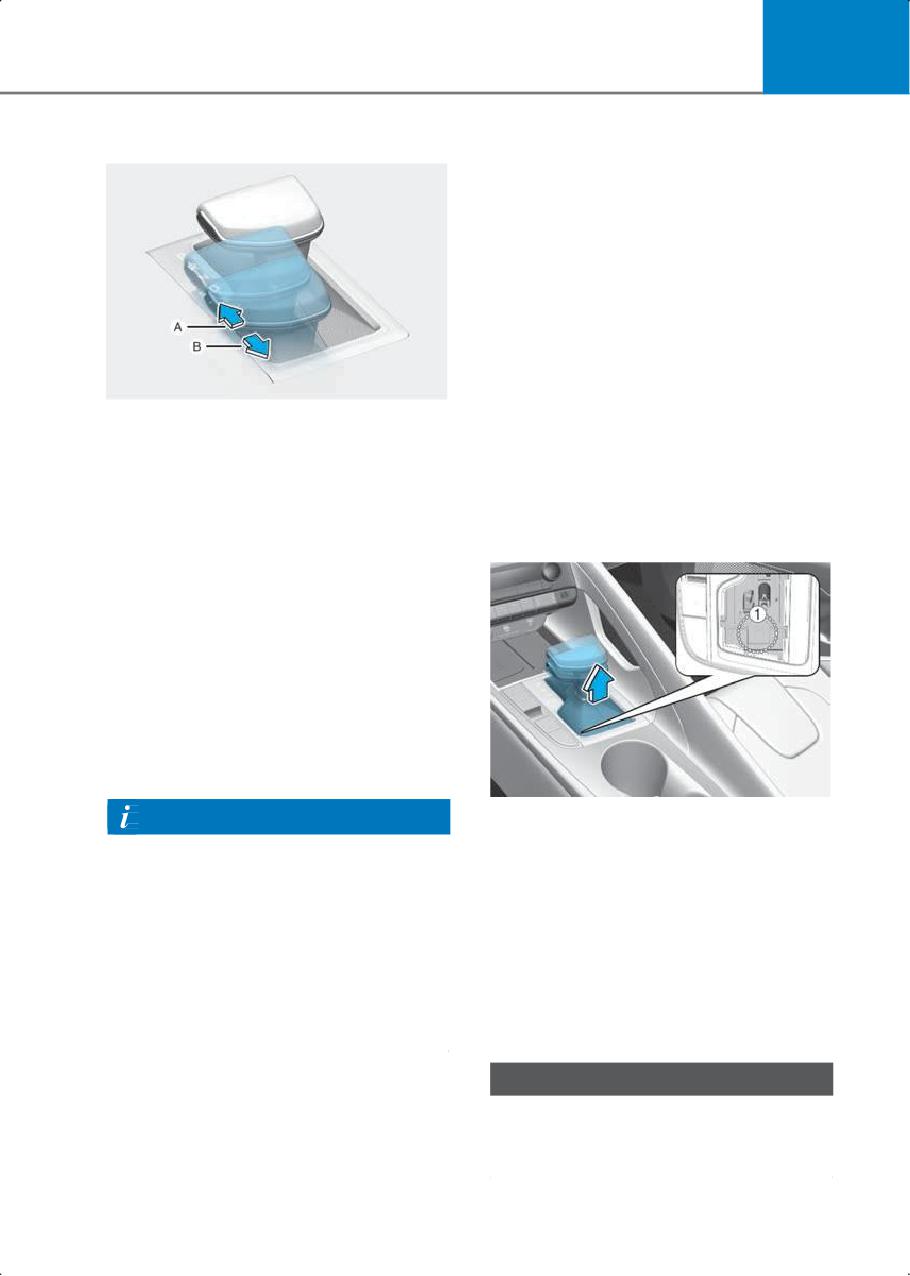
6
Manual shift mode
Shift lock system
For your safety, the IVT has a shift lock
system that prevents the transmission
from shifting P (Park) into R (Reverse)
unless the brake pedal is depressed.
To shift the transmission from P (Park)
into R (Reverse):
1. Depress and hold the brake pedal.
2. Start the engine or place the ignition
switch in the ON position.
3. Depress the brake pedal. press the shift
release button, and put the gear in R
[A] + (Up)
(Reverse).
[B] - (Down)
Whether the vehicle is stationary or
Shift lock release
moving, the manual shift mode is
selected by pushing the shift lever from
If the shift lever cannot be moved from
the D (Drive) position into the manual
the P (Park) into R (Reverse) with the
gate. To return to D (Drive) range
brake pedal depressed then:
operation, push the shift lever back into
the main gate.
In manual shift mode, moving the shift
lever backward and forward allows you to
select the desired range of gears for the
current driving conditions.
+ (Up) : Push the lever forward once to
shift up one gear.
- (Down) : Pull the lever backwards once
to shift down one gear.
Information
1. Place the ignition switch in the
• Downshifts are made automatically
LOCK/OFF position.
when the vehicle slows down.
2. Apply the parking brake.
• When the engine rpm approaches the
3. Carefully remove the shift lever boots.
red zone, the transmission upshifts
4. Move the shift lever while holding the
automatically.
release button (1) with a tool (e.g.
• If the driver pushes the lever to + (Up) or
flathead screw-driver).
- (Down), the transmission may not
If you need to use the shift lock release,
shift if the next gear is outside of the
have the vehicle inspected by an
allowable engine RPM range.
authorized HYUNDAI dealer immediately.
NOTICE
Be careful not to damage the trim around
the shift lever while removing the shift
lever boots.
6-15
Driving your vehicle
Ignition key interlock system
if equipped
The ignition key cannot be removed
unless the shift lever is in the P (Park)
position.
Parking
Always come to a complete stop and
continue to depress the brake pedal. Shift
the gear to the P (Park) position, apply the
parking brake, and place the ignition
switch in the LOCK/OFF position. Take
the key with you when exiting the vehicle.
WARNING
• When you stay in the vehicle with the
engine running, be careful not to
depress the accelerator pedal for a long
time. The engine or exhaust system
may overheat and start a fire.
• The exhaust gas and the exhaust
system are very hot and may cause
burns. Keep away from the exhaust
system components.
• Do not stop or park over flammable
materials, such as dry grass, paper, or
leaves. They may ignite and cause a
fire.
6-16
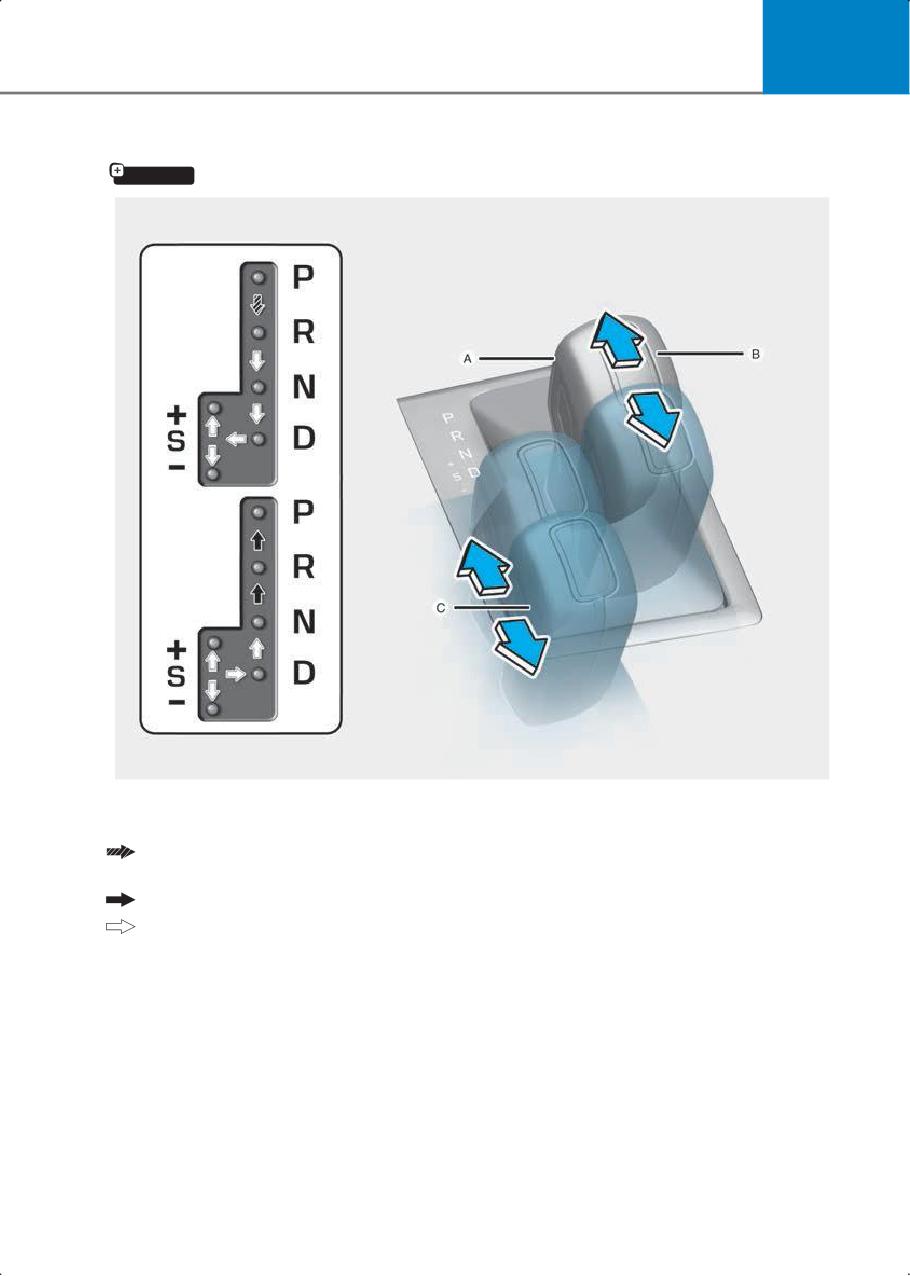
6
Dual Clutch Transmission
if equipped
[A] Shift release button
[B] Shift lever
[C] DS mode, manual shift mode
Depress the brake pedal and press the shift release button while moving the shift
lever.
Press the shift release button while moving the shift lever.
The shift lever can freely operate.
6-17
Driving your vehicle
Dual Clutch Transmission
•
When D (Drive) is selected, the
transmission will automatically shift
operation
through the gears similar to a
The dual clutch transmission has 7
conventional automatic transmission.
forward speeds and one reverse speed.
Unlike a traditional automatic
The individual speeds are selected
transmission, the gear shifting can
automatically in the D (Drive) position.
sometimes be felt and heard as the
actuators engage the clutches and the
The indicator on the instrument cluster
gears are selected.
the shift lever position when the ignition
switch is in the ON position.
•
The dual clutch transmission adopts a
dry-type dual clutch, which is different
WARNING
from the torque converter of the
automatic transmission. It shows better
To reduce the risk of serious injury or
acceleration performance and
death:
increased fuel efficiency while driving
• Always check the surrounding areas
but initial launch might be little bit
near your vehicle for people, especially
slower than the automatic
children, before shifting into D (Drive)
transmission.
or R (Reverse).
As a result, gear shifts are sometimes
• Before leaving the driver’s seat, always
more noticeable than a conventional
make sure the shift lever is in the P
automatic transmission and a light
(Park) position, then apply the parking
vibration during launching can be felt
brake, and place the ignition switch in
as the transmission speed. This is a
the LOCK/OFF position. Unexpected
normal condition of the dual clutch
and sudden vehicle movement may
transmission.
occur if these precautions are not
•
The dry-type clutch transfers torque
followed.
more directly and provides a direct
• Do not use engine braking (using the
drive feeling which may feel different
manual shift mode or paddle shifters to
from a conventional automatic
shift from a higher gear to a lower gear)
transmission. This may be more
on slippery roads. The vehicle may lose
noticeable when launching the vehicle
traction with the roadway, resulting in a
from a stop or when traveling at low,
collision.
stop-and-go vehicle speeds.
•
When rapidly accelerating at a low
vehicle speed, the engine rpm may
• The dual clutch transmission can be
increase highly depending on the
thought of as an automatically shifting
vehicle’s driving condition.
manual transmission. It gives the
driving feel of a manual transmission,
•
For smooth launch uphill, press down
yet provides the ease of a fully
the accelerator pedal smoothly
automatic transmission.
depending on the current conditions.
•
If you release your foot from the
accelerator pedal at low vehicle speed,
you may feel strong engine braking,
which is similar to manual transmission.
6-18
6
• When driving downhill, you may use
P (Park)
Sports Mode or press the paddle
Always come to a complete stop before
shifters (if equipped) to downshift to a
shifting into P (Park).
lower gear in order to control your
To shift from P (Park), depress the brake
speed without using the brake pedal
pedal firmly and make sure your foot is
excessively.
not depressing the accelerator pedal.
• When you turn the engine on and off,
If you cannot shift the lever out of P
you may hear clicking sounds as the
(Park), refer to the "Shift lock release"
system goes through a self-test. This is
section in this chapter if equipped with a
a normal sound for the dual clutch
shift lever.
transmission.
• During the first 1000 mi. (1,500 km), you
WARNING
may feel that the vehicle may not be
smooth when accelerating at low
• Shifting into P (Park) while the vehicle is
speed. During this break-in period, the
moving may cause you to lose control
shift quality and performance of your
of the vehicle.
new vehicle is continuously optimized.
• After the vehicle has stopped, always
make sure the shift lever is in P (Park),
WARNING
apply the parking brake, and turn the
engine off.
In case of transmission failure, you may
not continue to drive and the position
• When parking on an incline, shift the
indicator (D, R) on the cluster will blink.
gear to P (Park), apply the parking
Contact an authorized HYUNDAI dealer
brake, and turn the wheels toward the
and have the system checked.
curb to prevent the vehicle from rolling
downhill.
• Do not use the P (Park) position instead
of the parking brake.
R (Reverse)
Use this position to drive the vehicle
backward.
NOTICE
Always come to a complete stop before
shifting into or out of (Reverse) to prevent
damaging the transmission.
6-19
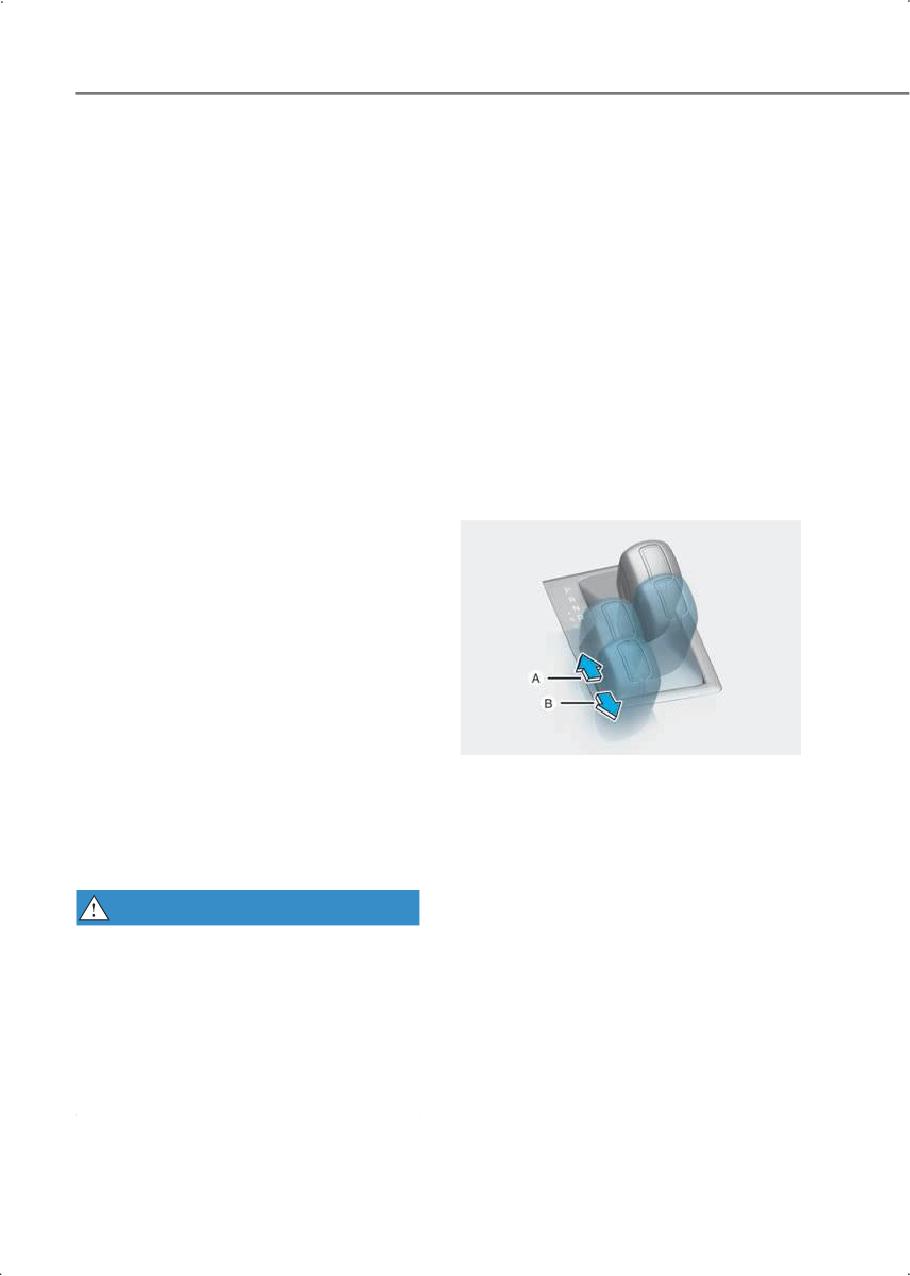
Driving your vehicle
N (Neutral)
DS (Drive Sporty) mode
Use N (Neutral) if you need to restart a
To shift into DS mode, move the shift
stalled engine, or if it is necessary to stop
lever from D (Drive) to the center of the
with the engine ON. Shift into P (Park) if
manual shift mode. The engine and
you need to leave your vehicle for any
transmission control logic is
reason.
automatically optimized for sporty
driving.
The wheels and transmission are not
engaged.
In DS mode, if you move the shift lever to
+ (Up) or - (Down), the gear changes to
Always depress the brake pedal when you
the manual shift mode. If the shift lever is
are shifting from N (Neutral) to another
moved back into D (Drive),it changes to D
gear.
(Drive) and shifts automatically. The
vehicle performs according to the mode
D (Drive)
selected from the drive mode (NORMAL,
The transmission automatically shifts
SPORT, SMART).
through a 7-gear sequence, providing the
best fuel economy and power.
Manual shift mode
Shift to D (Drive) while depressing the
brake pedal with the engine ON. Then
release the brake pedal and depress the
accelerator pedal.
For extra power when passing another
vehicle or driving uphill, depress the
accelerator fully. The transmission
automatically downshifts to the next
lower gear.
The DRIVE MODE switch, located on the
shift lever console or on the left side of
the dashboard, allows the driver to switch
[A] + (Up)
from NORMAL mode to SPORT or SMART
[B] - (Down)
mode (if equipped)
Whether the vehicle is stationary or
For more information, refer to the "Drive
moving, the manual shift mode is
mode integrated control system" in the
selected by pushing the shift lever from
complete Owner's Manual.
the D (Drive) position into the manual
gate. To return to D (Drive) range
WARNING
operation, push the shift lever back into
• Do not shift into gear unless your foot is
the main gate.
firmly on the brake pedal.
In manual shift mode, moving the shift
• Do not shift gears with the accelerator
lever backward and forward allows you to
pedal depressed. Wait until the engine
select the desired range of gears for the
RPM is normal. The vehicle may
current driving conditions.
suddenly move if you shift gears and
Up (+) : Push the lever forward once to
release the brake pedal when the RPM
shift up one gear.
is high.
Down (-) : Pull the lever backwards once
to shift down one gear.
6-20
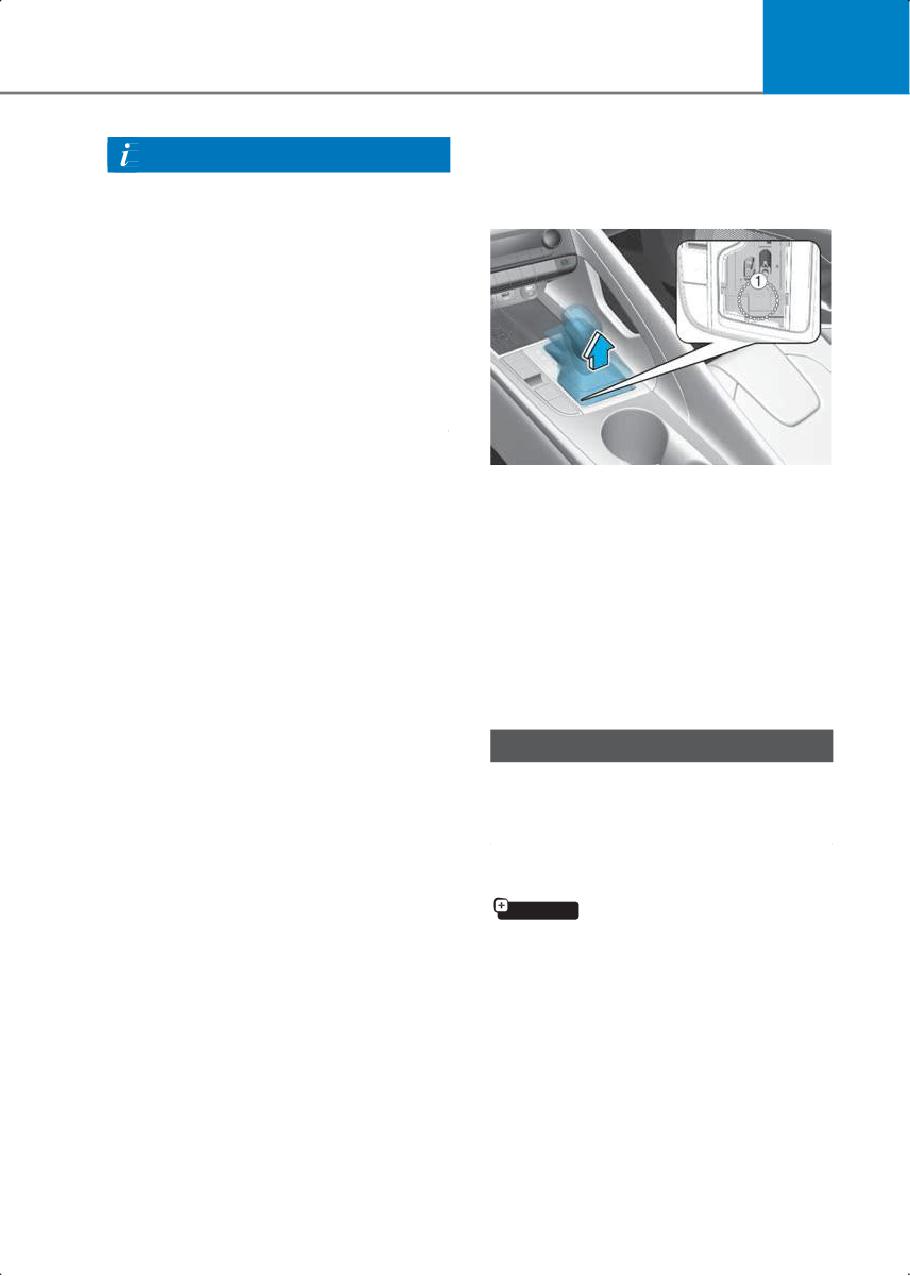
6
Shift lock release
Information
If the shift lever cannot be moved from
• Downshifts are made automatically
the P (Park) into R (Reverse) with the
when the vehicle slows down. When
brake pedal depressed then:
the vehicle stops, the first gear is
automatically selected.
• When the engine rpm approaches the
red zone, the transmission upshifts
automatically.
• If the driver pushes the lever to + (Up) or
- (Down), the transmission may not
shift if the next gear is outside of the
allowable engine RPM range.
Shift lock system
For your safety, the dual clutch
1. Place the ignition switch in the
transmission has a shift lock system that
LOCK/OFF position
prevents the transmission from shifting P
2. Apply the parking brake.
(Park) into R (Reverse) unless the brake
3. Carefully remove the shift lever boots.
pedal is depressed.
4. Move the shift lever while holding the
To shift the transmission from P (Park)
release button (1) with a tool (e.g.
into R (Reverse):
flathead screw-driver).
1. Depress and hold the brake pedal.
If you need to use the shift lock release,
2. Start the engine or place the ignition
have the vehicle inspected by an
switch in the ON position.
authorized HYUNDAI dealer immediately.
3. Depress the brake pedal. press the shift
NOTICE
release button, and put the gear in R
(Reverse).
Be careful not to damage the trim around
the shift lever while removing the shift
lever boots.
Ignition key interlock system
if equipped
The ignition key cannot be removed
unless the shift lever is in the P (Park)
position.
6-21
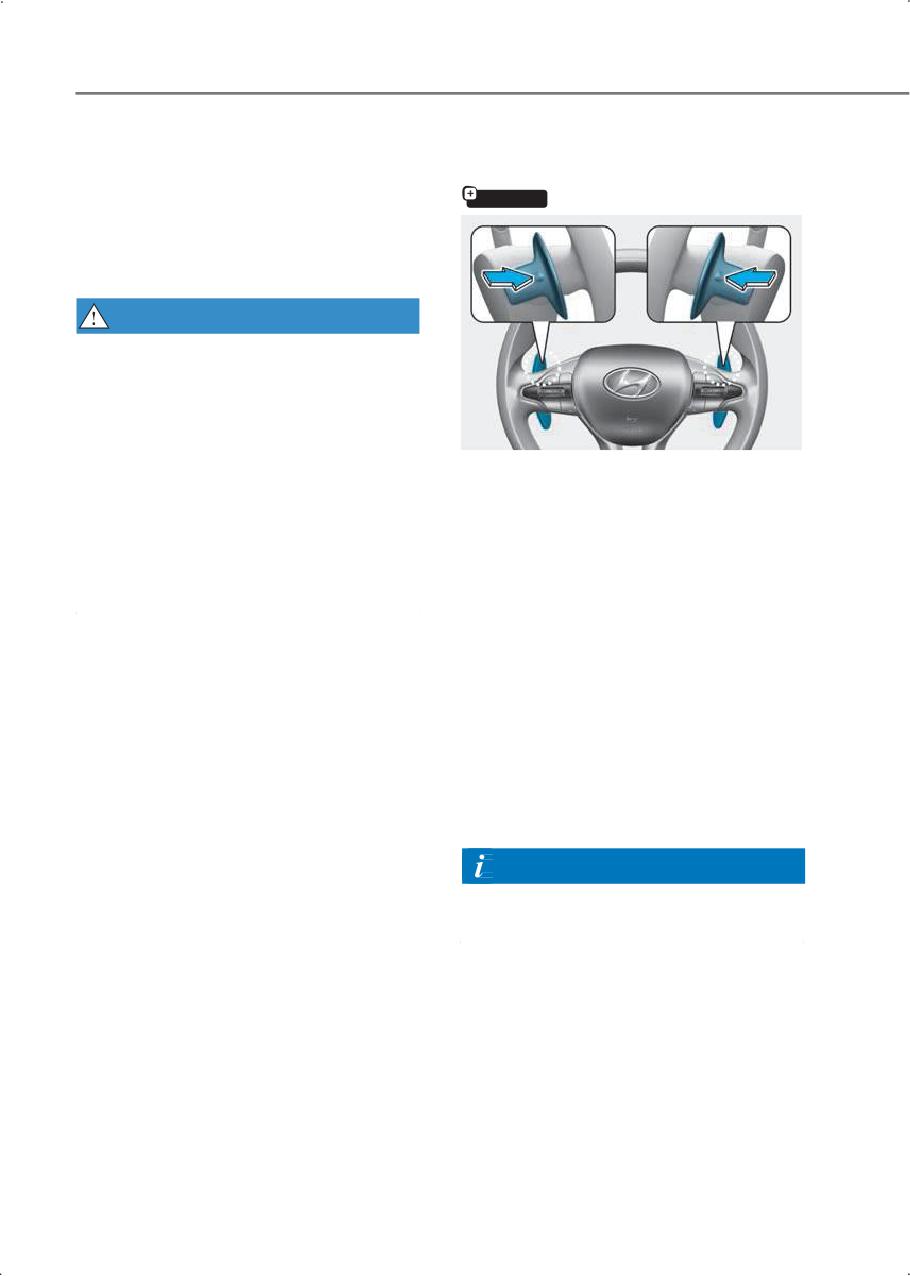
Driving your vehicle
Parking
Paddle shifter (Manual shift
Always come to a complete stop and
mode)
continue to depress the brake pedal. Shift
if equipped
the gear to the P (Park) position, apply the
parking brake, and place the ignition
switch in the LOCK/OFF position. Take
the key with you when exiting the vehicle.
WARNING
When you stay in the vehicle with the
engine running, be careful not to depress
the accelerator pedal for a long time. The
engine or exhaust system may overheat
and start a fire.
The exhaust gas and the exhaust system
are very hot and may cause burns. Keep
The paddle shifter is available when the
away from the exhaust system
gears is in the D (Drive) position.
components.
Pull the + or - paddle shifter once to shift
Do not stop or park over flammable
up or down one gear and the system
materials, such as dry grass, paper, or
changes from automatic shift mode to
leaves. They may ignite and cause a fire.
manual shift mode.
To change back to the automatic shift
mode from manual shift mode, do one of
the following:
• Gently depress the accelerator pedal
for more than 5 seconds (Except Sport
Mode).
• Drive the vehicle under 6 mph (10
km/h).
• Pull and hold the right side paddle
shifter.
Information
If the + and - paddle shifters are pulled at
the same time, gear shift may not occur.
6-22
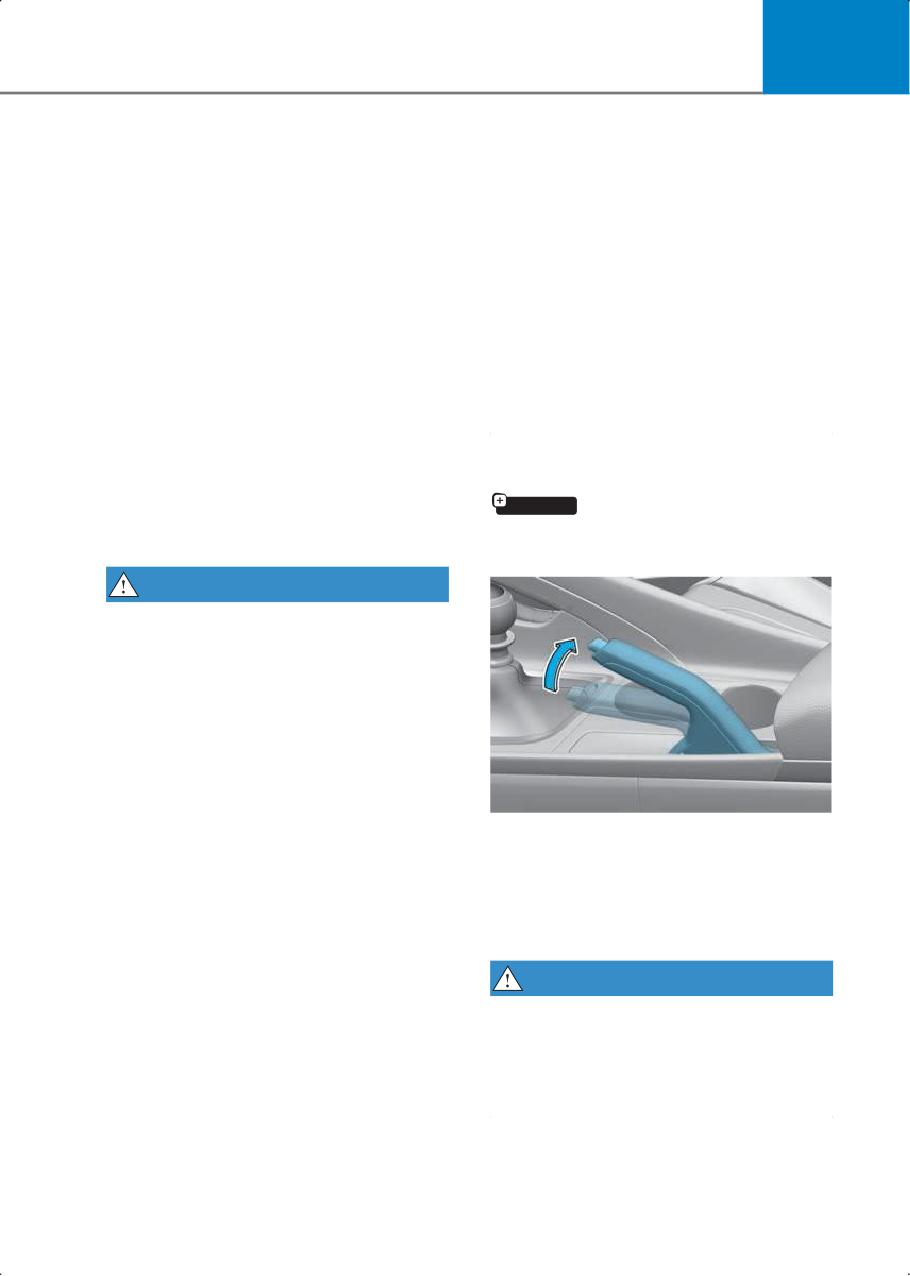
6
• Wet brakes may impair the vehicle's
Braking system
ability to safely slow down and the
vehicle may also pull to one side when
the brakes are applied. Applying the
Power-assist brakes
brakes lightly indicates whether they
Your vehicle has power-assisted brakes
have been affected in this way. Always
that adjust automatically through normal
test your brakes in this fashion after
usage.
driving through deep water. To dry the
If the engine is not running or is turned off
brakes, lightly tap the brake pedal to
while driving, the power assist for the
heat up the brakes while maintaining a
brakes does not work. You can still stop
safe forward speed until the brake
your vehicle by applying greater force to
performance returns to normal. Avoid
the brake pedal than typical. The stopping
driving at high speeds until the brakes
distance, however, may be longer than
function correctly.
with power brakes.
When the engine is not running, the
Parking brake
reserve brake power is partially depleted
each time the brake pedal is depressed.
if equipped
Do not pump the brake pedal when the
power assist has been interrupted.
Applying the parking brake
WARNING
Take the following precautions:
• Do not drive with your foot resting on
the brake pedal. This creates abnormal
high brake temperatures, excessive
brake lining and pad wear, and
increased stopping distances.
• When descending down a long or steep
hill, use the paddle shifter or shift lever
and manually downshift to a lower gear
in order to control your speed without
using the brake pedal excessively.
Always set the parking brake before
Applying the brakes continuously will
leaving the vehicle, to apply:
cause the brakes to overheat and may
Firmly depress the brake pedal.
result in a temporary loss of braking
performance.
Pull up the parking brake lever as far as
possible.
WARNING
To reduce the risk of serious injury or
death, do not operate the parking brake
while the vehicle is moving except in an
emergency situation. It may damage the
brake system and cause a collision.
6-23
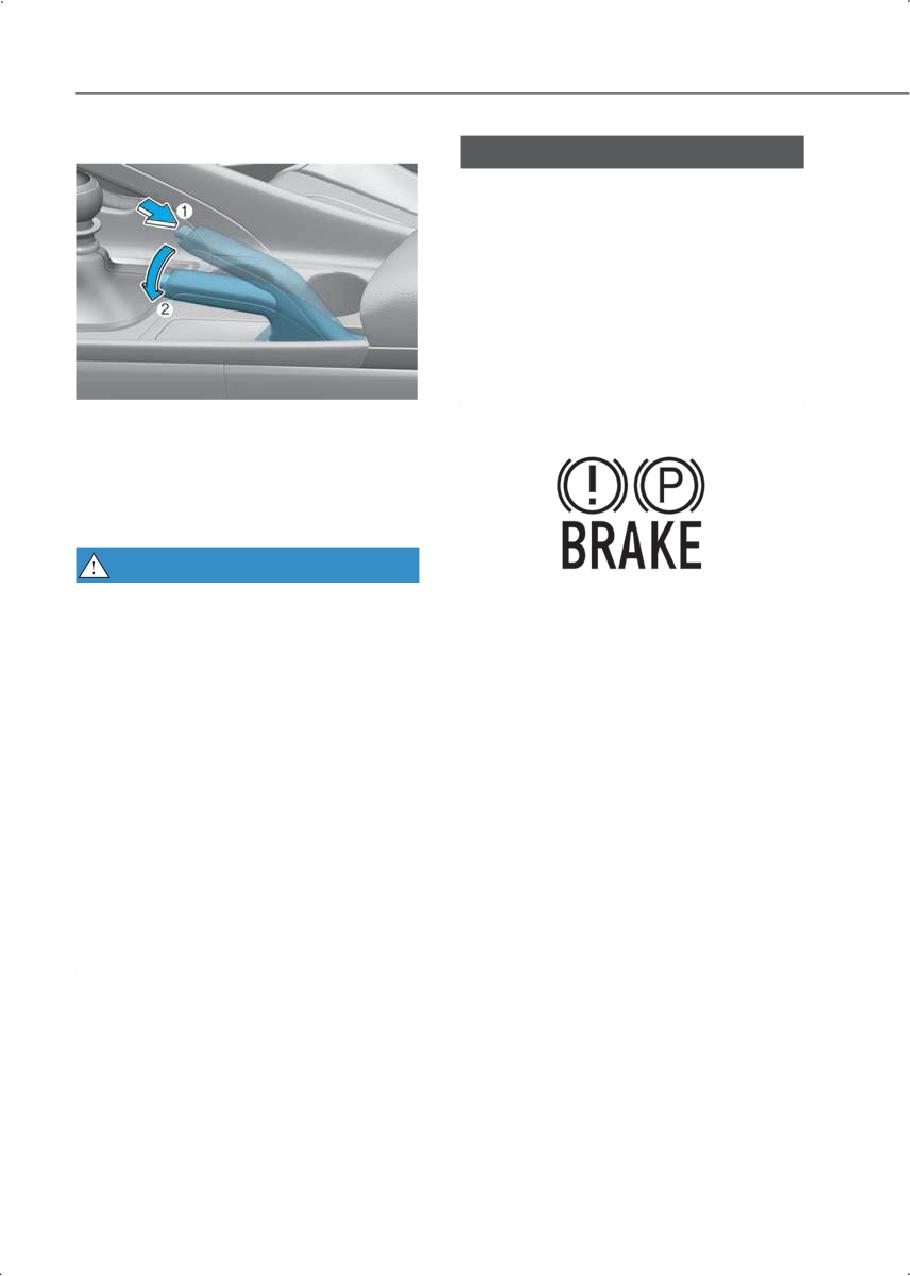
Driving your vehicle
Releasing the parking brake
NOTICE
• Do not apply the accelerator pedal
while the parking brake is engaged. If
you depress the accelerator pedal with
the parking brake engaged, a warning
will sound. Damage to the parking
brake may occur.
• Driving with the parking brake on may
overheat the braking system and cause
premature wear or damage to brake
parts.
To release:
Firmly depress the brake pedal.
While pressing the release button (1),
slightly pull up on the parking brake lever
then lower the parking brake lever (2).
WARNING
• Whenever leaving the vehicle or
This light illuminates when the Parking
parking, always come to a complete
stop and continue to depress the brake
Brake is applied with the ignition switch in
pedal. Shift the vehicle into the P (Park)
the ON position or when the engine is
running.
position, then apply the parking brake,
and move the ignition switch to the
Before driving, make sure the parking
LOCK/OFF position.
brake is released and the parking brake
warning light is OFF.
• Vehicles with the parking brake not
fully engaged are at risk of moving
If the Parking Brake warning light remains
inadvertently and causing serious injury
on after the Parking Brake is released
to yourself or others.
while the engine is running, there may be
• Never allow anyone who is unfamiliar
a malfunction in the brake system.
with the vehicle to touch the parking
If at possible, stop driving the vehicle
brake.
immediately. If that is not possible, use
• Only release the parking brake when
extreme caution while operating the
you are seated inside the vehicle with
vehicle and only continue to drive the
vehicle until you can reach a safe
your foot firmly on the brake pedal.
location.
6-24
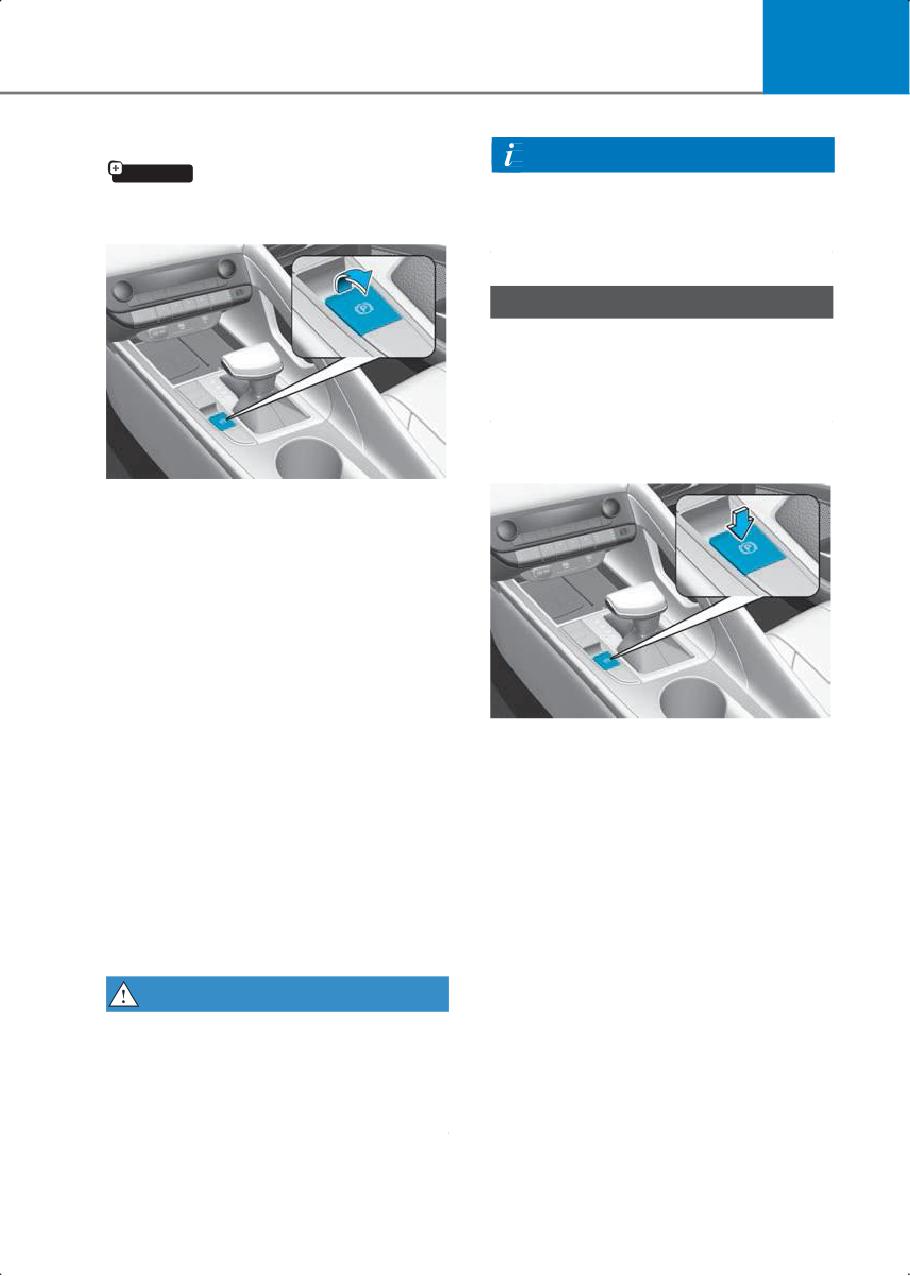
6
Electronic Parking Brake (EPB)
Information
if equipped
During emergency braking, the Parking
Brake warning light illuminates and you
Applying the parking brake
may hear a clicking noise.
NOTICE
If you notice a noise or burning smell
when the EPB is used for emergency
braking, have the system inspected by an
authorized HYUNDAI dealer.
Releasing the parking brake
To apply EPB (Electronic Parking Brake):
1. Depress and hold the brake pedal.
2. Pull up the EPB switch.
Make sure the Parking Brake warning light
comes on.
EPB (Electronic Parking Brake) may be
automatically applied when:
• Requested by other systems.
• The driver turns the vehicle off while
Auto Hold is operating.
To release EPB (Electronic Parking
Brake):
Emergency braking
1. Move the ignition switch to ON or
If there is a problem with the brake pedal
START.
while driving, emergency braking is
2. Press the EPB switch while depressing
possible by pulling up and holding the
the brake pedal.
EPB switch. Braking is possible only while
Make sure the Parking Brake warning light
you are holding the EPB switch. However,
goes off.
braking distance may be longer than
normal.
WARNING
To reduce the risk of serious injury or
death, do not operate the EPB while the
vehicle is moving except in an emergency
situation. It may damage the brake
system and cause a collision.
6-25
Driving your vehicle
To release EPB (Electronic Parking Brake)
EPB malfunction
automatically:
Electronic Parking Brake (EPB) warning
• Gear in P (Park) or in N (Neutral)
light illuminates if the ignition switch is in
the ON position and goes off in about 3
With the engine running, depress the
seconds if the system is operating
brake pedal and shift out of P (Park) or
normally.
N (Neutral) to R (Reverse) or D (Drive).
Make sure the doors, hood, and trunk
If the EPB warning light remains on,
are closed and the seat belt is fastened.
comes on while driving, or does not come
on when the ignition switch is ON, the
Information
EPB may have malfunctioned.
• You can engage EPB even though the
If this occurs, have the system inspected
ignition switch is in the LOCK/OFF
by an authorized HYUNDAI dealer.
position (only if battery power is
The EPB warning light may illuminate
available), but you cannot release it.
when the ESC indicator light comes on to
• Depress the brake pedal and release
indicate that ESC is not working properly,
the parking brake manually with the
but it does not indicate a malfunction of
EPB switch before you drive downhill or
EPB.
when backing up.
NOTICE
• If the Parking Brake warning light does
NOTICE
not illuminate or blinks after the EPB
switch has been pulled, the EPB may
• If the Parking Brake warning light is still
not be applied.
on even though the EPB has been
• If the EPB warning light is still on or the
released, have the system inspected by
Parking Brake warning light blinks
an authorized HYUNDAI dealer.
when the EPB warning light is on, press
• Do not drive your vehicle with EPB
the switch, and then pull it up. Repeat
applied. It may cause excessive brake
this one more time. If the EPB warning
pad and brake rotor wear.
does not go off, have your vehicle
towed on a flatbed tow truck to an
authorized HYUNDAI dealer.
6-26
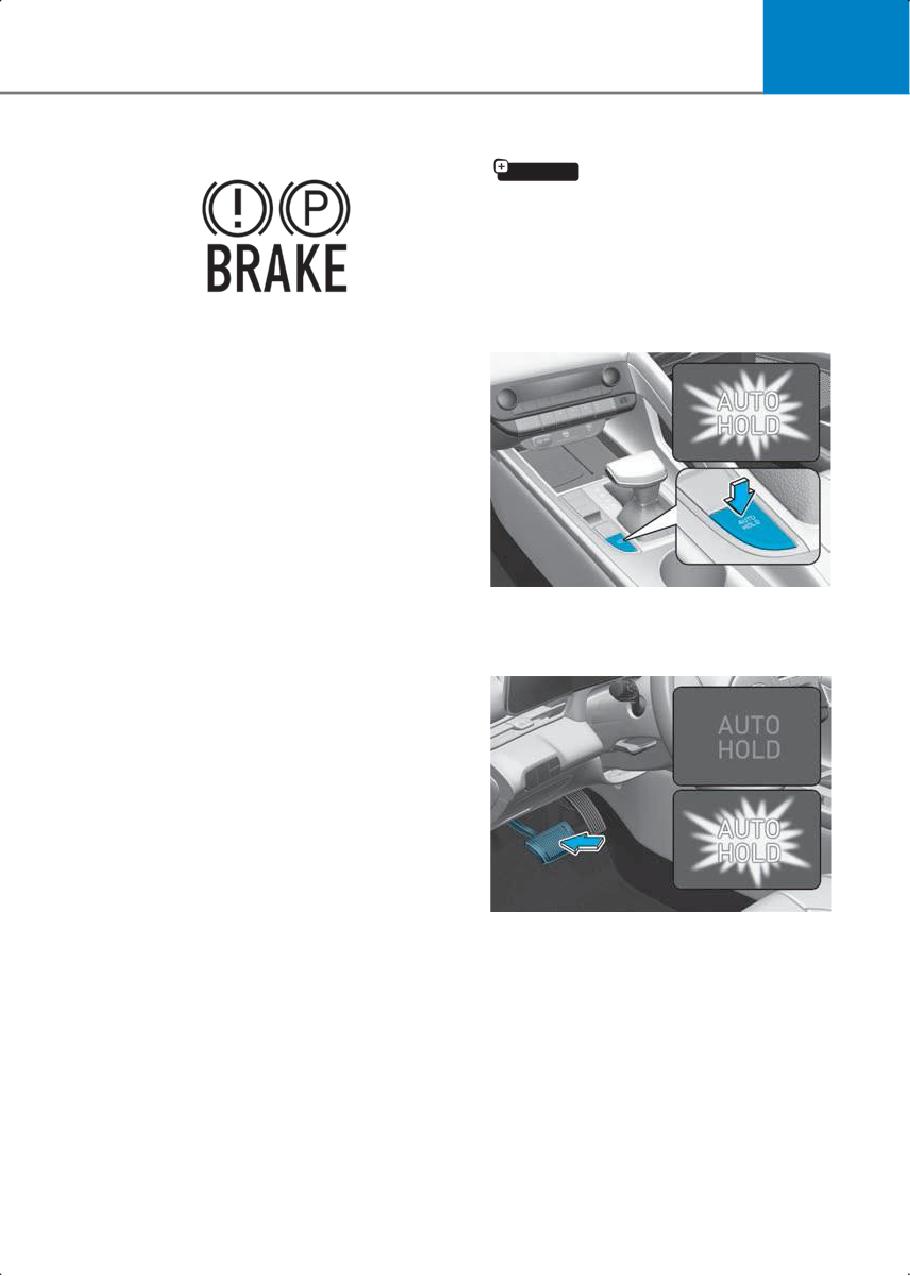
6
Parking brake warning light
Auto Hold
if equipped
Auto Hold maintains the vehicle in a
standstill even though the brake pedal is
not depressed after the driver brings the
vehicle to a complete stop by depressing
the brake pedal.
To apply:
This light illuminates when the Parking
Brake is applied with the ignition switch in
the ON position or when the engine is
running.
Before driving, make sure the parking
brake is released and the parking brake
warning light is OFF.
If the Parking Brake warning light remains
on after the Parking Brake is released
while the engine is running, there may be
a malfunction in the brake system.
If possible, stop driving the vehicle
immediately. If that is not possible, use
1. Press the AUTO HOLD switch. The
extreme caution while operating the
white AUTO HOLD indicator comes on
vehicle and only continue to drive the
and the system is in standby.
vehicle until you can reach a safe
location.
2. When you stop the vehicle completely
by depressing the brake pedal, Auto
Hold maintains the brake pressure to
hold the vehicle stationary. The
indicator changes from white to green.
The vehicle remains stationary even if
you release the brake pedal.
6-27
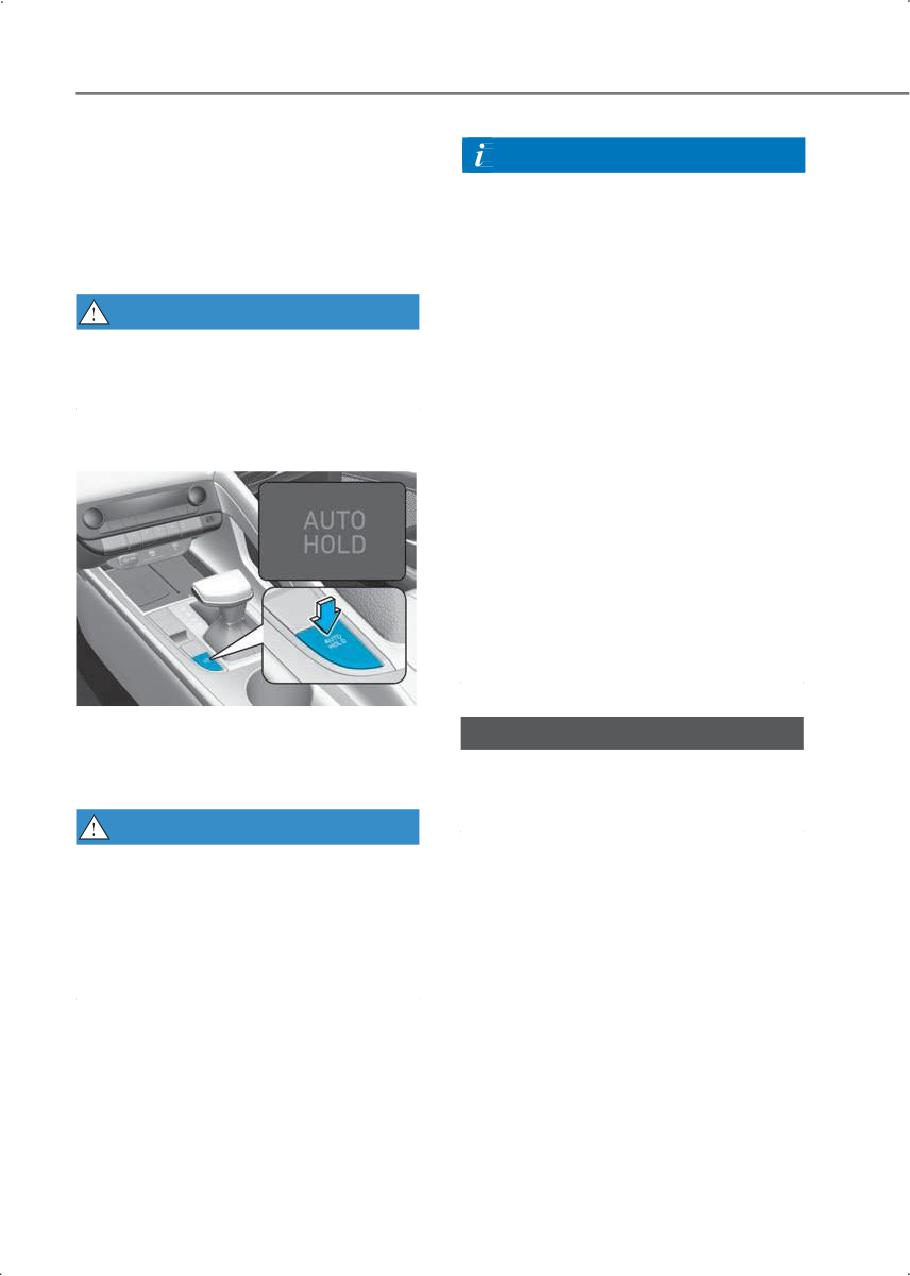
Driving your vehicle
To release:
Information
If you depress the accelerator pedal with
the gear in D (Drive) or manual shift mode
• The Auto Hold does not operate when:
or R (Reverse), the Auto Hold is released
- The gear is in P (Park).
automatically and the vehicle starts to
- The gear is in R (Reverse).
move. The AUTO HOLD indicator changes
from green to white.
- EPB is applied.
• The Auto Hold automatically switches
WARNING
to EPB when:
Always look around your vehicle before
- The driver's door or hood is opened.
depressing the accelerator pedal to
- The vehicle is in a standstill for more
release Auto Hold.
than 10 minutes.
- The vehicle is on a steep slope.
To cancel:
- The vehicle moves several times.
The Parking Brake warning light comes
on, the AUTO HOLD indicator changes
from green to white, and a warning
sounds and a message appears to
inform you that EPB has been
automatically engaged. Before driving,
depress the brake pedal, check the
surrounding area, and release the
parking brake manually with the EPB
switch.
1. Depress and hold the brake pedal.
NOTICE
2. Press the AUTO HOLD switch.
If the AUTO HOLD indicator changes to
The AUTO HOLD indicator turns off.
yellow, Auto Hold does not work properly.
Contact an authorized HYUNDAI dealer.
WARNING
To prevent unintended vehicle
movement, always depress your foot on
the brake pedal to cancel the Auto Hold
before you:
• Drive downhill.
• Park the vehicle.
6-28
6
Anti-lock Brake System (ABS)
Using ABS
To obtain the maximum benefit from your
WARNING
ABS in an emergency situation, do not
attempt to modulate your brake pressure
Anti-Lock Braking System (ABS) or
and do not try to pump your brakes.
Electronic Stability Control (ESC) system
Depress your brake pedal as hard as
will not prevent accidents due to
possible.
improper or dangerous driving
maneuvers. Even though vehicle control
When you apply your brakes under
is improved during emergency braking,
conditions that may lock the wheels, you
always maintain a safe distance between
may hear sounds from the brakes, or feel
you and objects ahead of you. Always
a corresponding sensation in the brake
reduce the vehicle speed in extreme road
pedal. This is normal and it means your
conditions.
ABS is active.
The braking distance for vehicles
ABS does not reduce the time or distance
equipped with ABS or ESC may be longer
to stop the vehicle.
than for those without these systems in
Always maintain a safe distance from the
the following road conditions:
vehicle in front of you.
• Rough, gravel, or snow-covered roads.
ABS does not prevent a skid that results
• On roads where the road surface is
from sudden changes in direction, such
pitted or has different surface height.
as trying to take a corner too fast or
making a sudden lane change. Always
• Tire chains are installed on your vehicle.
drive at a safe speed for the road and
Never test the safety features of an ABS or
weather conditions.
ESC equipped vehicle by high speed
ABS cannot prevent a loss of stability.
driving or cornering. It may cause a
Always steer moderately when braking
collision and endanger the safety of
hard. Severe or sharp steering wheel
yourself or others.
movement can still cause your vehicle to
veer into oncoming traffic or off the road.
ABS is an electronic braking system that
On loose or uneven road surfaces,
helps prevent a braking skid. ABS allows
operation of the anti-lock brake system
the driver to steer and brake at the same
may result in a longer stopping distance
time.
than for vehicles equipped with a
conventional brake system.
The ABS ( ) warning light stays on for
several seconds after the ignition switch
is in the ON position.
During that time, ABS goes through
self-diagnosis and the light goes off if
everything is normal. If the light stays on,
contact an authorized HYUNDAI dealer as
soon as possible.
6-29
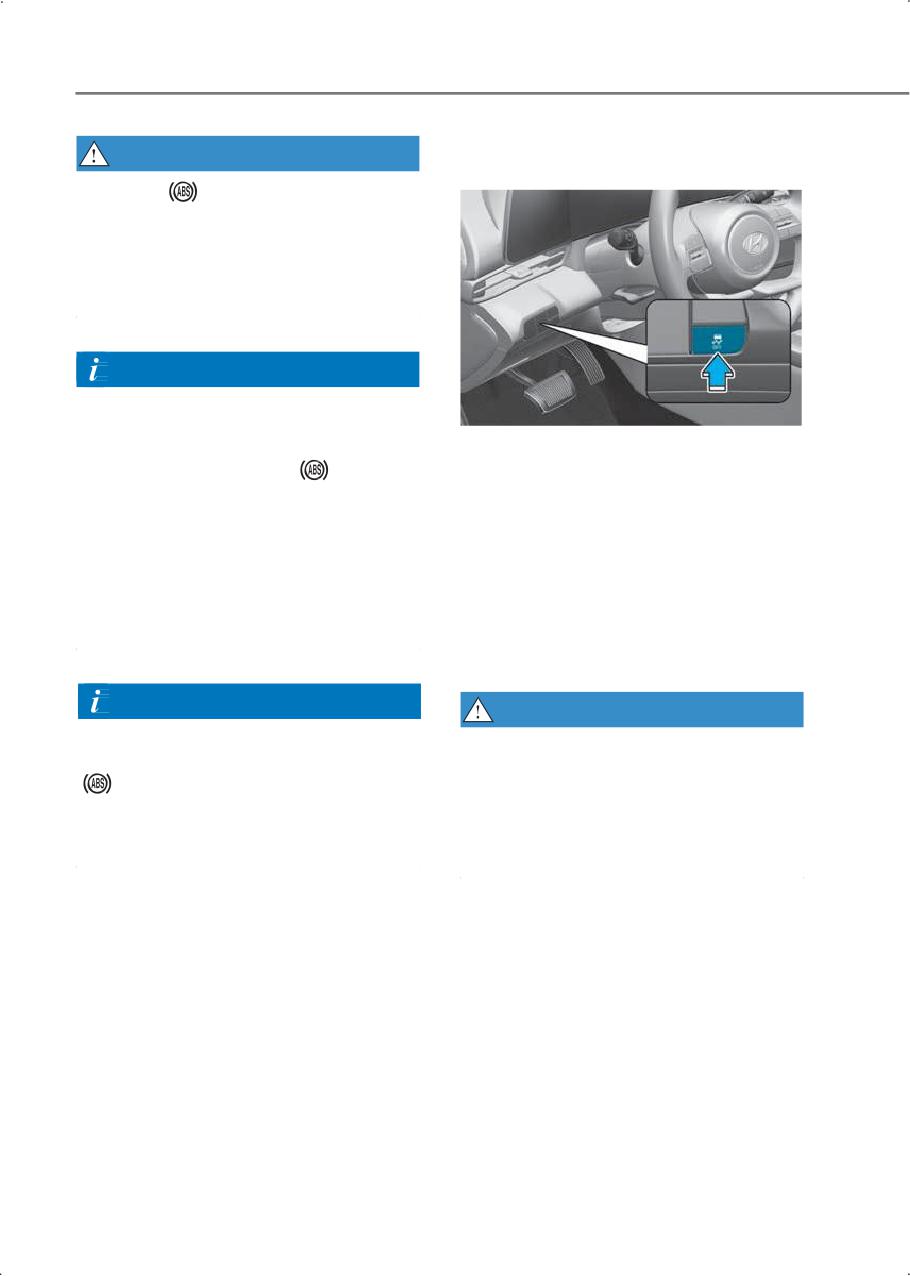
Driving your vehicle
Electronic Stability Control
WARNING
(ESC)
If the ABS (
) warning light is on and
stays on, you may have a problem with
the ABS. Your power brakes work
normally. To reduce the risk of serious
injury or death, contact your authorized
HYUNDAI dealer as soon as possible.
Information
When you drive on a road having poor
traction, such as an icy road, and apply
your brakes continuously, ABS is active
Electronic Stability Control helps stabilize
continuously and the ABS (
) warning
the vehicle during cornering maneuvers.
light may illuminate. Pull your vehicle
ESC checks where you are steering and
over to a safe place and turn off the
where the vehicle is actually going. ESC
vehicle.
applies braking pressure to any one of the
Restart the vehicle. If the ABS warning
vehicle's brakes and intervenes in the
light is off, your ABS system is normal.
engine management system to assist the
If not, contact an authorized HYUNDAI
driver with keeping the vehicle on the
dealer as soon as possible.
intended path. It is not a substitute for
safe driving practices. Always adjust your
speed and driving to the road conditions.
Information
WARNING
When you jump start your vehicle
Never drive too fast for the road
because of a drained battery, the ABS
conditions when cornering. ESC does not
(
) warning light may turn on at the
prevent a collision.
same time. It does not mean your ABS is
Excessive speed in turns, abrupt
malfunctioning. Have the battery
maneuvers, and hydroplaning on wet
recharged before driving the vehicle.
surfaces may result in severe collisions.
6-30
6
ESC operation
ESC OFF condition
ESC ON condition
When the ignition switch is in the ON
position, ESC and the ESC OFF indicator
To cancel ESC operation:
lights illuminate for about three seconds.
After both lights go off, ESC is enabled.
• State 1
Press the ESC OFF button briefly. The
When operating
ESC OFF indicator light and the
message, "Traction Control disabled"
illuminate.
The traction control function of ESC
(engine management) is disabled, but
When ESC is operating, the ESC indicator
the brake control function of ESC
light blinks:
(braking management) still operates.
• When you apply your brakes under
• State 2
conditions that may lock the wheels,
you may hear sounds from the brakes,
Press and hold the ESC OFF button
or feel a corresponding sensation in the
continuously for more than 3 seconds.
brake pedal.
The ESC OFF indicator light and the
message, "Traction & Stability Control
• If Cruise Control has been used when
disabled" illuminate and a warning
ESC activates, Cruise Control
chime sounds. Both the traction control
automatically disengages. Refer to the
function of ESC (engine management)
"Cruise Control (CC)" section in chapter
and the brake control function of ESC
7 (if equipped).
(braking management) are disabled.
• When moving out of the mud or driving
If the ignition switch is moved to the
on a slippery road, the engine RPM
LOCK/OFF position when ESC is off,
(revolutions per minute) may not
ESC remains off. Upon restarting the
increase even if you depress the
vehicle, ESC automatically turns on
accelerator pedal all the way. This is to
again.
maintain the stability and traction of
the vehicle and does not indicate a
problem.
6-31
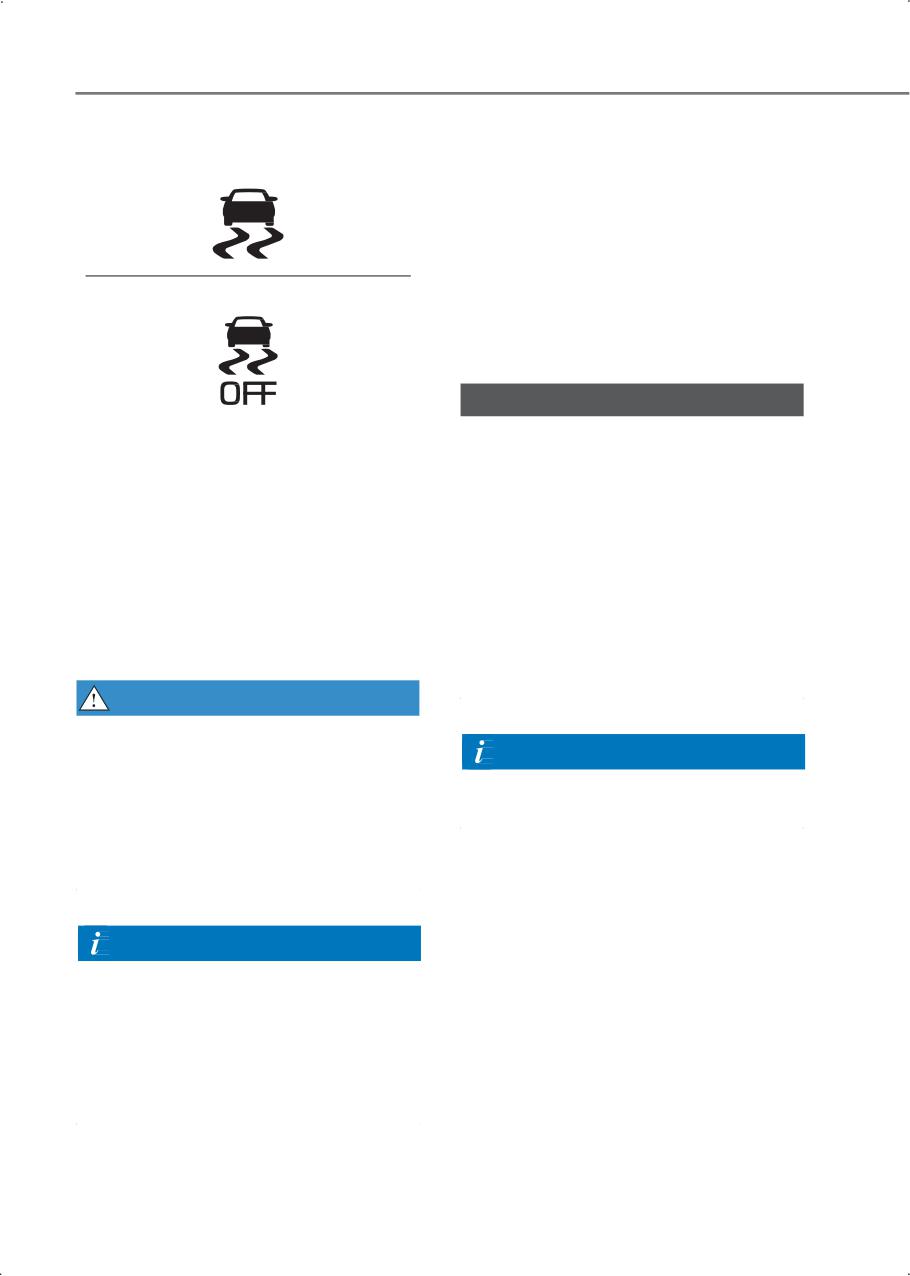
Driving your vehicle
Indicator lights
ESC OFF usage
■ ESC indicator light (blinks)
When Driving
The ESC OFF mode should only be used
briefly to help free the vehicle if stuck in
snow or mud, by temporarily stopping
operation of ESC, to maintain wheel
■ ESC OFF indicator light (comes on)
torque.
To turn off ESC while driving, press the
ESC OFF button while driving on a flat
road surface.
NOTICE
When the ignition switch is in the ON
To prevent damage to the transmission:
position, the ESC indicator light
• Do not allow wheel(s) of one axle to
illuminates, then goes off if the ESC
spin excessively while the ESC, ABS,
system is operating normally.
and Parking Brake warning lights
The ESC indicator light blinks whenever
appear. The repairs would not be
ESC is operating.
covered by the vehicle warranty.
If the ESC indicator light stays on, have
Reduce engine power and do not spin
your vehicle inspected by an authorized
the wheel(s) excessively while these
HYUNDAI dealer as soon as possible.
lights appear.
The ESC OFF indicator light comes on
• When operating the vehicle on a
when ESC is turned off.
dynamometer, make sure ESC is turned
off (ESC OFF light illuminated).
WARNING
When ESC is blinking, this indicates ESC is
active:
Information
• Drive slowly and Never attempt to
Turning ESC off does not affect ABS or
accelerate.
standard brake system operation.
• Never turn off ESC while the ESC
indicator light is blinking. You may lose
control of the vehicle and collide.
Information
Driving with wheels and tires with
different sizes may cause the ESC system
to malfunction. Before replacing tires,
make sure all four tires and wheels are the
appropriate size for your vehicle. Never
drive the vehicle with different sized
wheels and tires installed.
6-32
6
Tire chains
Winter driving
Since the sidewalls of radial tires are
thinner than other types of tires, they may
Snow or icy conditions
be damaged by mounting some types of
tire chains on them. Therefore, the use of
You need to keep sufficient distance
snow tires is recommended
between your vehicle and the vehicle in
front.
instead of tire chains. If tire chains must
be used, use genuine HYUNDAI Parts and
Apply the brakes gently. Speeding, rapid
install the tire chains after reviewing the
acceleration, sudden brake applications,
instructions provided with the tire chains.
and sharp turns are very hazardous
Damage to your vehicle caused by
practices. When decelerating, use engine
improper tire chain use is not covered by
braking to the fullest extent. Sudden
your vehicle manufacturer’s warranty.
brake applications on snowy or icy roads
may cause the vehicle to skid.
When using tire chains, attach them to
the front wheels.
To drive your vehicle in deep snow, it may
be necessary to use snow tires or to install
WARNING
tire chains on your tires.
The use of tire chains may adversely
Always carry emergency equipment. You
affect vehicle handling:
may want to carry tire chains, tow straps
or chains, a flashlight, emergency flares,
• Drive less than 20 mph (30 km/h) or the
sand, a shovel, jumper cables, a window
chain manufacturer’s recommended
scraper, gloves, ground cloth, coveralls, a
speed limit, whichever is lower.
blanket, etc.
• Drive carefully and avoid bumps, holes,
sharp turns, and other road hazards,
which may cause the vehicle to
Snow tires
bounce.
WARNING
• Avoid sharp turns or locked wheel
braking.
Snow tires should be equivalent in size
and type to the vehicle’s standard tires.
• Install tire chains only in pairs and on
Otherwise, the safety and handling of
the front tires. Installing tire chains on
your vehicle may be adversely affected.
the tires provides a greater driving
force, but does not prevent side skids.
Use snow tires when the road
temperature is below 45 °F (7 °C). If you
CAUTION
mount snow tires on your vehicle, be sure
to use the same inflation pressure as the
If your vehicle has 235/40R18 size tires,
original tires. Mount snow tires on all four
do not use tire chain; they can damage
wheels to balance your vehicle’s handling
your vehicle (wheel, suspension and
in all weather conditions. The traction
body).
provided by snow tires on dry roads may
not be as high as your vehicle’s original
equipment tires. Check with the tire
dealer for maximum speed
Information
recommendations.
Do not install studded tires without first
checking local and municipal regulations
for possible restrictions against their use.
6-33
Driving your vehicle
Chain installation
Trailer towing
When installing tire chains, follow the
Do not use this vehicle for trailer towing.
manufacturer’s instructions and mount
them as tightly possible. Drive slowly (less
than 20 mph (30 km/h) or the chain
manufacturer’s recommended speed
limit) with chains installed. If you hear the
chains contacting the body or chassis,
stop and tighten them. If they still make
contact, slow down until the noise stops.
Remove the tire chains as soon as you
begin driving on cleared roads.
When mounting snow chains, park the
vehicle on level ground away from traffic.
Turn on the vehicle's Hazard Warning
Flasher and place a triangular emergency
warning device behind the vehicle (if
available). Always place the vehicle in P
(Park), apply the parking brake, and turn
off the engine before installing snow
chains.
NOTICE
When using tire chains:
• Wrong size chains or improperly
installed chains may damage your
vehicle’s brake lines, suspension, body,
and wheels.
• Use SAE "S" class wire chains.
• If you hear noise caused by chains
contacting the body, retighten the
chains to prevent contact with the
vehicle body.
• To prevent body damage, retighten the
chains after driving 0.3-0.6 mi. (0.5-1.0
km).
• Do not use tire chains on vehicles
equipped with aluminum wheels. If
unavoidable, use a wire type chain.
• Use wire chains less than 0.47 in. (12
mm) thick to prevent damage to the
chain’s connection.
6-34
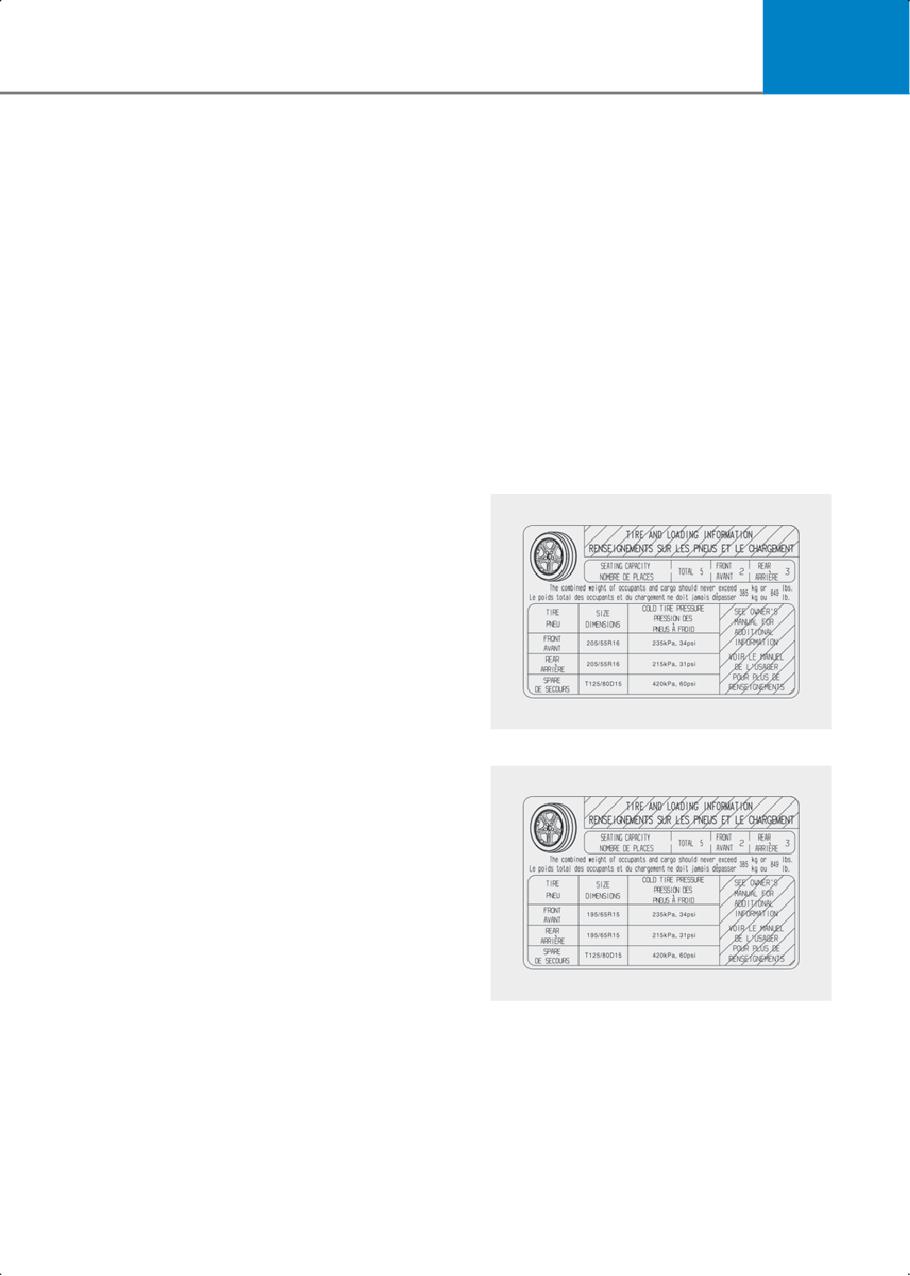
6
GVW (Gross Vehicle Weight)
Vehicle load limit
This is the Base Curb Weight plus
Two labels on your driver’s door sill
actual Cargo Weight plus passengers.
show how much weight your vehicle
was designed to carry: the Tire and
GVWR (Gross Vehicle Weight
Loading Information Label and the
Rating)
Certification Label.
This is the maximum allowable
Before loading your vehicle,
weight of the fully loaded vehicle
familiarize yourself with the following
(including all options, equipment,
terms for determining your vehicle’s
passengers and cargo). The GVWR is
weight ratings, from the vehicle’s
shown on the Certification Label
specifications and the Certification
located on the driver’s door sill.
Label:
Base Curb Weight
The loading information label
This is the weight of the vehicle
Type A
including a full tank of fuel and all
standard equipment. It does not
include passengers, cargo, or
optional equipment.
Vehicle Curb Weight
This is the weight of your new vehicle
when you picked it up from your
dealer plus any aftermarket
equipment.
Cargo Weight
Type B
This figure includes all weight added
to the Base Curb Weight, including
cargo and optional equipment.
GAW (Gross Axle Weight)
This is the total weight placed on
each axle (front and rear) - including
vehicle curb weight and all payload.
GAWR (Gross Axle Weight Rating)
This is the maximum allowable
weight that can be carried by a single
axle (front or rear). These numbers
are shown on the Certification Label.
The total load on each axle must
never exceed its GAWR.
6-35
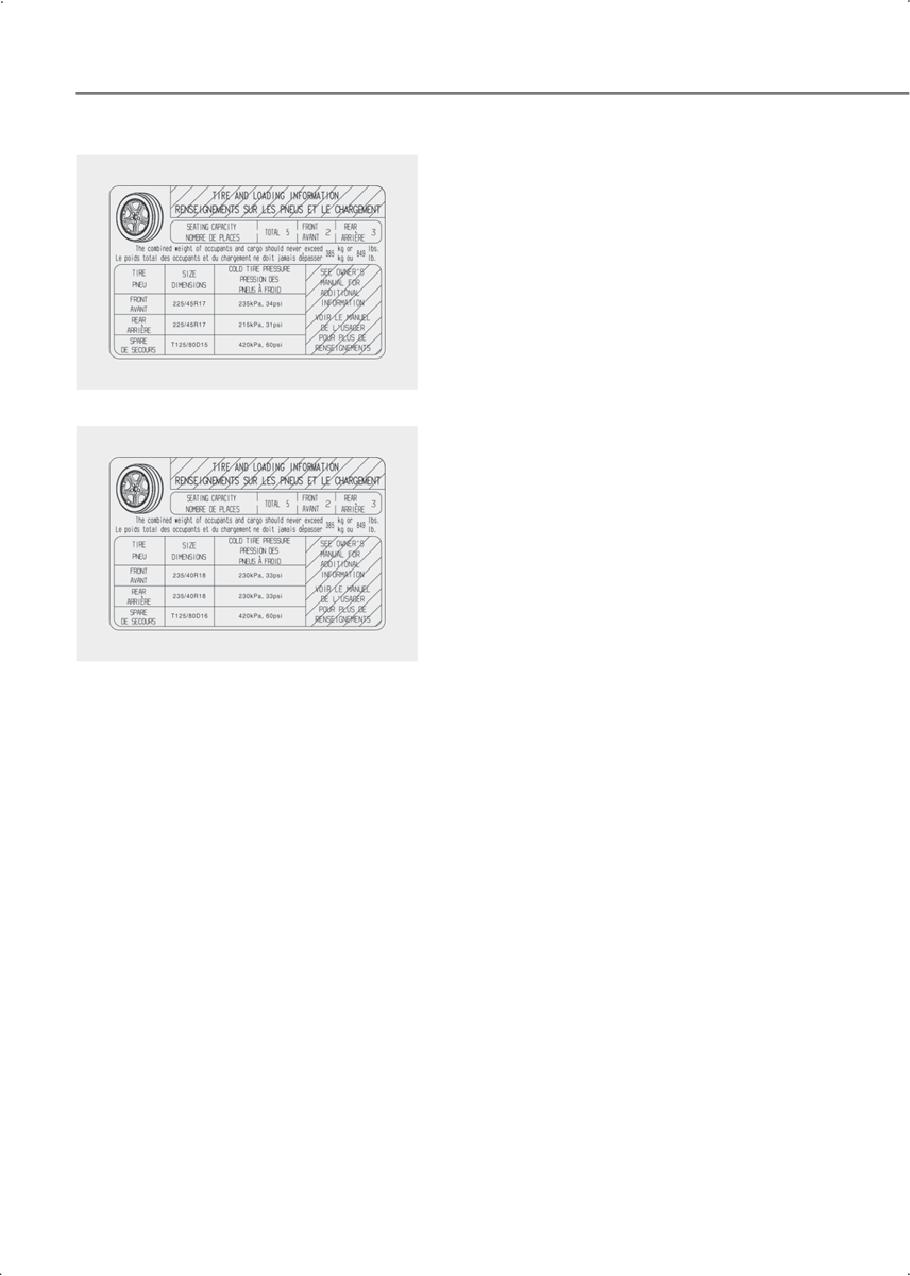
Driving your vehicle
Type C
Occupants and cargo - Maximum
Load
5 persons: 849 lbs (385 kg)
The combined weight of occupants
and cargo should never exceed the
maximum load limit shown on the
Loading Information Label. Note that
when towing a trailer, the combined
weight must include the tongue load.
Seating capacity
Type D
Total: 5 persons (Front seat: 2
persons, Rear seat: 3 persons)
Seating capacity is the maximum
number of occupants including a
driver that your vehicle may carry.
However, the seating capacity may
be reduced based upon the weight of
all of the occupants, and the weight
of the cargo being carried or towed.
Do not overload the vehicle because
there is a limit to the total weight, or
load limit including occupants and
The label located on the driver’s door
cargo that the vehicle can carry.
jamb shows the original tire size, cold
tire pressures recommended for your
vehicle, the number of people that
Towing capacity
can be in your vehicle and vehicle
Do not use this vehicle for trailer
capacity weight.
towing.
Cargo capacity
The cargo capacity of your vehicle
increases or decreases depending on
the weight, the number of occupants,
and the tongue load, if your vehicle is
equipped with a trailer.
6-36
6
Steps for determining correct load
limit
1. Locate the statement "The
combined weight of occupants and
cargo should never exceed XXX kg
or XXX lbs." on your vehicle's
placard.
2. Determine the combined weight of
the driver and passengers that will
be riding in your vehicle.
3. Subtract the combined weight of
the driver and passengers from XXX
kg or XXX lbs.
4. The resulting figure equals the
available amount of cargo and
luggage load capacity. For
example, if the "XXX" amount
equals 1400 lbs. and there will be
five 150 lb passengers in your
vehicle, the amount of available
cargo and luggage load capacity is
650 lbs. (1400 - 750 (5 x 150) = 650
lbs.)
5. Determine the combined weight of
luggage and cargo being loaded on
the vehicle. That weight may not
safely exceed the available cargo
and luggage load capacity
calculated in Step 4.
6. If your vehicle will be towing a
trailer, load from your trailer will be
transferred to your vehicle. Consult
this manual to determine how this
reduces the available cargo and
luggage load capacity of your
vehicle.
6-37
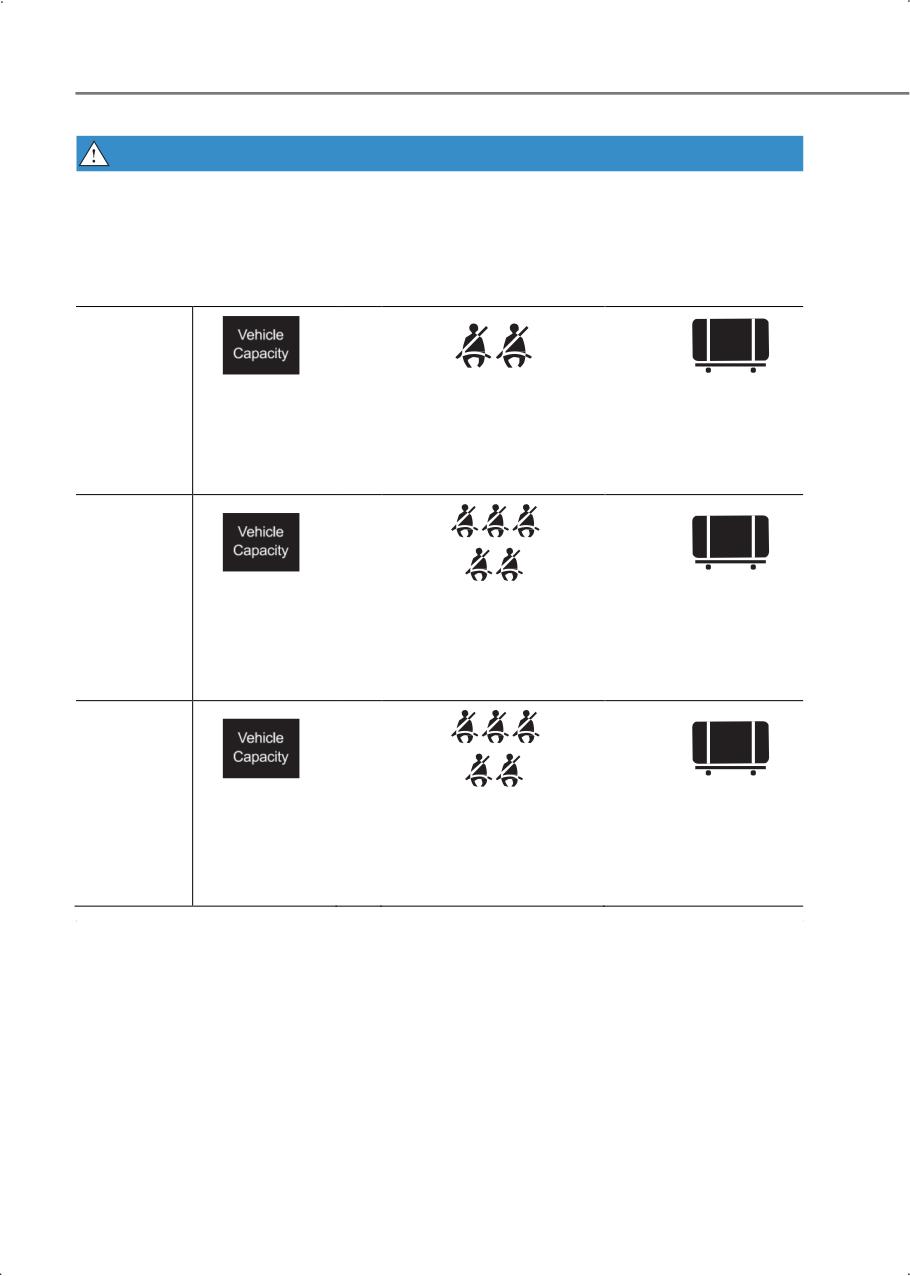
Driving your vehicle
WARNING
Do not overload the vehicle because there is a limit to the total weight, or load
limit, including occupants and cargo that the vehicle can carry. Overloading
may shorten the life of the vehicle. If the GVWR or the GAWR is exceeded, parts
on the vehicle may break, and it may change the handling of your vehicle. These
may cause you to lose control and result in an accident.
≥
+
Example 1
Passenger Weight
Maximum
Cargo Weight
(150 lbs. × 2= 300
Load (1400
(1100 lbs.)
lbs.) (68 kg × 2= 136
lbs.) (635 kg)
(499 kg)
kg)
≥
+
Example 2
Passenger Weight
Maximum
Cargo Weight
(150 lbs. × 5 = 750
Load (1400
(650 lbs.)
lbs.) (68 kg × 5 = 340
lbs.) (635 kg)
(295 kg)
kg)
≥
+
Example 3
Passenger Weight
Maximum
Cargo Weight
(172 lbs. × 5 = 860
Load (1400
(540 lbs.)
lbs.) (78 kg × 5 = 390
lbs.) (635 kg)
(245 kg)
kg)
6-38
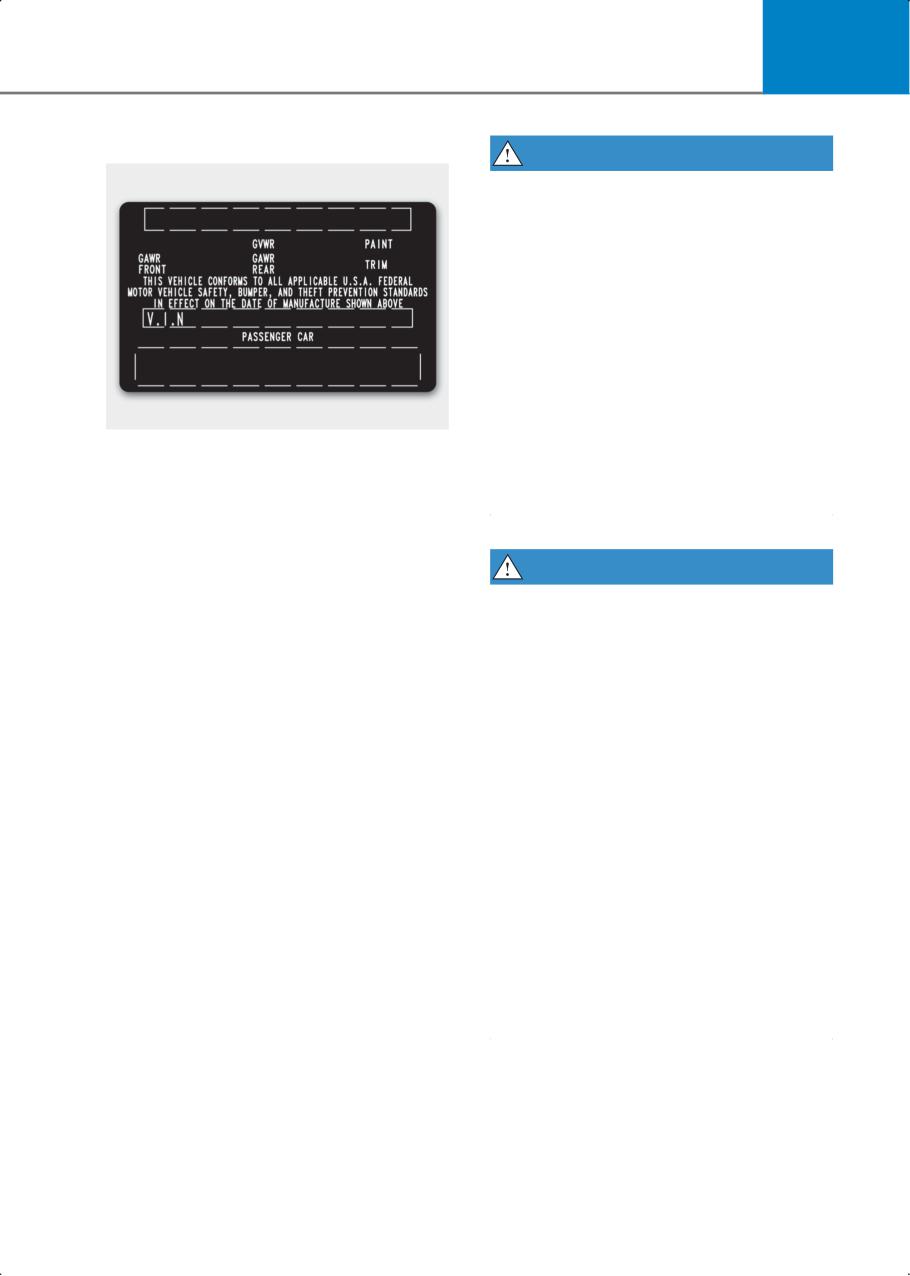
6
Certification label
WARNING
• Never exceed the GVWR for your
vehicle, the GAWR for the front or
rear axle and the vehicle capacity
weight. Exceeding these ratings
may affect your vehicle's handling
and braking ability, and cause a
collision.
• Do not overload your vehicle.
Overloading your vehicle may
cause heat buildup in your vehicle's
tires, possible tire failure, increased
stopping distances, and poor
The certification label is located on
vehicle handling. All of which may
the driver's door sill at the center
result in a collision.
pillar and shows the maximum
allowable weight of the fully loaded
vehicle. This is called the GVWR
WARNING
(Gross Vehicle Weight Rating). The
GVWR includes the weight of the
If you carry items inside your vehicle
vehicle, all occupants, fuel, and
(e.g., suitcases, tools, packages, or
cargo.
anything else), they are moving as
This label also tells you the maximum
fast as the vehicle. If you have to stop
weight that can be supported by the
or turn quickly, or if there is a
front and rear axles, called Gross Axle
collision, the items may cause an
Weight Rating (GAWR).
injury if they strike the driver or a
passenger.
The total weight of the vehicle,
including all occupants, accessories,
• Put items in the cargo area of your
cargo, and trailer tongue load must
vehicle. Try to spread the weight
not exceed the Gross Vehicle Weight
evenly.
Rating (GVWR) or the Gross Axle
• Do not stack items like suitcases
Weight Rating (GAWR). To find out
inside the vehicle above the top of
the actual loads on your front and
the seats.
rear axles, you need to go to a weigh
• Do not leave an unsecured child
station and weigh your vehicle. Be
restraint in your vehicle.
sure to spread out your load equally
• When you carry cargo inside the
on both sides of the centerline.
vehicle, secure it.
6-39
7. Driver assistance system
Before using driver assistance system
Driver assistance system settings
Forward Collision-Avoidance Assist (FCA) (Front view camera only)
7-5
Forward Collision-Avoidance Assist settings
Forward Collision-Avoidance Assist operation
Forward Collision-Avoidance Assist malfunction and limitations
7-8
Forward Collision-Avoidance Assist (FCA) (Sensor fusion)
7-1
Forward Collision-Avoidance Assist settings
Forward Collision-Avoidance Assist operation
Forward Collision-Avoidance Assist malfunction and limitations
7-24
Lane Keeping Assist (LKA)
Lane Keeping Assist settings
Lane Keeping Assist operation
Lane Keeping Assist malfunction and limitations
Blind-Spot Collision-Avoidance Assist (BCA)
Blind-Spot Collision-Avoidance Assist settings
Blind-Spot Collision-Avoidance Assist operation
Blind-Spot Collision-Avoidance Assist malfunction and limitations
7-41
Safe Exit Warning (SEW)
Safe Exit Warning settings
7
Safe Exit Warning operation
Safe Exit Warning malfunction and limitations
Manual Speed Limit Assist (MSLA)
Manual Speed Limit Assist operation
Intelligent Speed Limit Assist (ISLA)
Intelligent Speed Limit Assist settings
Intelligent Speed Limit Assist operation
Intelligent Speed Limit Assist malfunction and limitations
7-54
Driver Attention Warning (DAW)
Driver Attention Warning settings
Driver Attention Warning operation
Driver Attention Warning malfunction and limitations
7-5
Cruise Control (CC)
Cruise Control operation
Smart Cruise Control (SCC)
Smart Cruise Control settings
Smart Cruise Control operation
Smart Cruise Control malfunction and limitations
7-
Navigation-based Smart Cruise Control (NSCC)
Navigation-based Smart Cruise Control settings
7
Navigation-based Smart Cruise Control operation
7-
Limitations of Navigation-based Smart Cruise Control
7-81
Lane Following Assist (LFA)
Lane Following Assist operation
Lane Following Assist malfunction and limitations
7-
Highway Driving Assist (HDA)
Highway Driving Assist settings
Highway Driving Assist operation
Highway Driving Assist malfunction and limitations
7-9
Rear View Monitor (RVM)
Rear View Monitor settings
7
Rear View Monitor operation
Rear View Monitor malfunction and limitations
7
Rear Cross-Traffic Collision-Avoidance Assist (RCCA)
7-9
Rear Cross-Traffic Collision-Avoidance Assist settings
7-94
Rear Cross-Traffic Collision-Avoidance Assist operation
7-95
Rear Cross-Traffic Collision-Avoidance Assist malfunction and limitations
7-98
Driver assistance system sensors
Cameras
Radars
Ultrasonic sensors
7
Limitations of driver assistance
Before using driver
system
assistance system
Nearby vehicles, road conditions, or other
factors may delay the response from
WARNING
Driver Assistance system or cause these
systems not to function, including:
Always maintain a safe distance from the
•
Lane-restricted driving situations
vehicles ahead and adjust your vehicle
(tollbooths, construction zones, etc.)
speed to the road conditions. Driver
Assistance system may not operate in all
•
Curves, hills, or other road features that
situations and cannot avoid all collisions.
may detect vehicles in adjacent lanes or
To prevent serious injury or death:
not detect vehicles ahead in the
roadway
• Control your vehicle at all times. In
some cases, the Driver Assistance
•
If other vehicles, pedestrians, or
system may provide unanticipated
cyclists are not detected
braking or steering.
•
Driving in inclement weather, such as
• Never attempt to activate any Driver
heavy rain, snow or icy conditions
Assistance system by intentionally
•
Interference from strong
driving toward people, animals,
electromagnetic waves
objects, or other vehicles.
•
Streets with railroad tracks or other
• The steering, braking, and acceleration
embedded metal objects
inputs from you may override the
•
If anything is blocking or covering a
responses from driver assistance
sensor
system.
•
If any camera, radar, or sensor is
• Do not use Driver Assistance system
damaged
when towing a trailer or using a hitch
mounted carrier.
• Do not use Driver Assistance system if
you believe the sensors or the systems
may not be functioning properly.
Information
Due to the infotainment software version,
the description of each function of the
driver assistance system may differ from
the owner's manual.
7-3
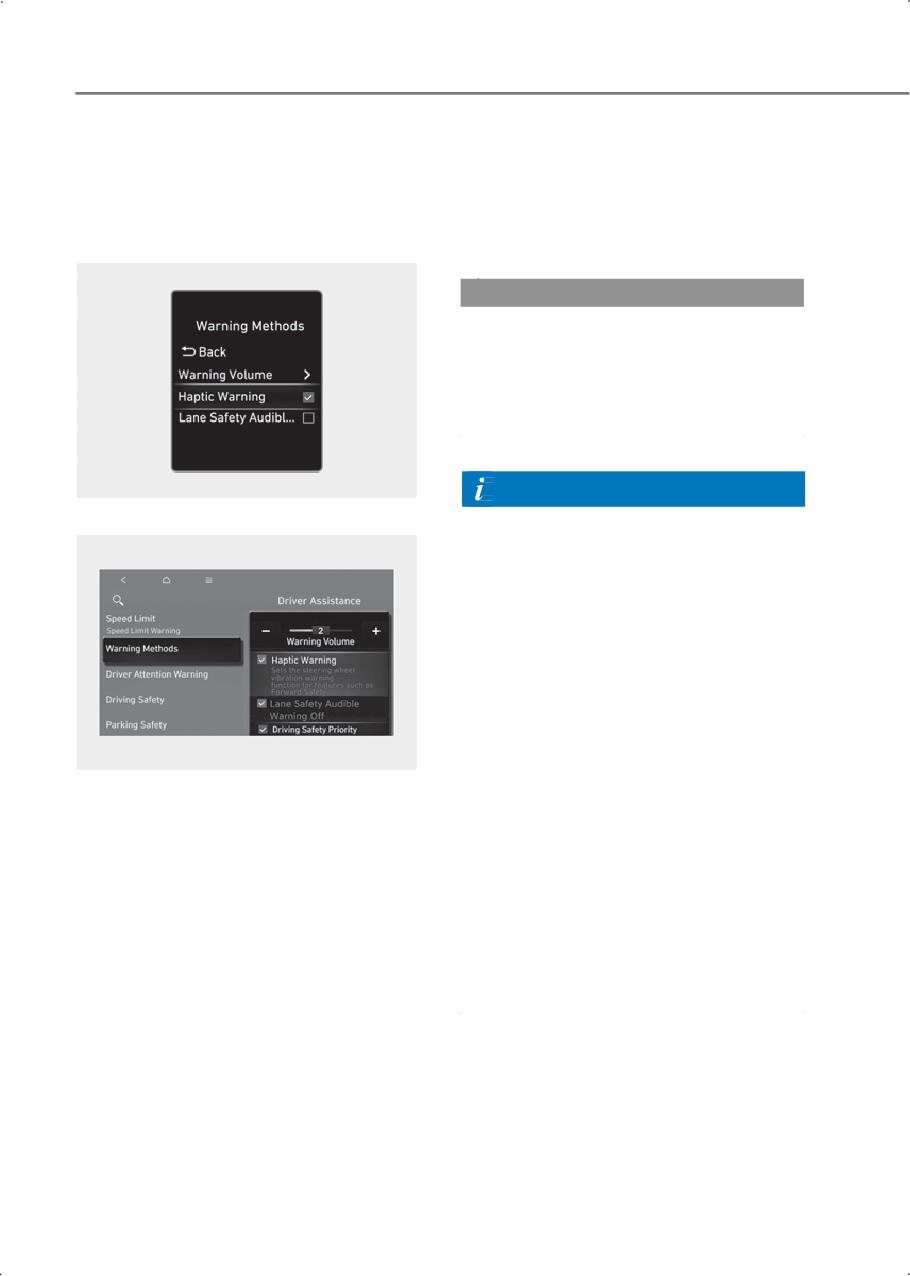
Driver assistance system
Driver assistance system
• Driving Safety Priority: Lowers all other
audio volumes when the Driving Safety
settings
system sounds a warning.
• Parking Safety Priority: Lowers all
Warning Methods
other audio volumes when the Parking
Type A
Assist view is active.
CAUTION
For safety, the warning method is
different depending on each function of
the driver assistance system.
Please check how each function warns
you.
Information
Type B
•
If you change the Warning Methods, it
can be applied to each function of the
driver assistance system. Please check
and change it in each function.
•
If the vehicle is restarted, Warning
Methods will maintain the last setting.
•
The setting menu may not exist based
on vehicle specification.
•
If you turn off the Warning Volume, for
your safety, the function may warn you
with a low volume, except Lane
Keeping Assist, Blind-Spot
The Warning Methods can be set with the
Collision-Avoidance Assist and Rear
vehicle on. Select User Settings > Driver
Cross-Traffic Collision-Avoidance
Assistance > Warning Methods from the
Assist.
settings menu in the instrument cluster or
•
The Warning Volume and Haptic
Press Settings and select Vehicle > Driver
Warning cannot be turned off at the
Assistance > Warning Methods from the
same time. When one of the warning is
infotainment system to change the
turned off the other is activated.
following settings:
•
The Lane Safety Audible Warning Off
• Warning Volume: Adjusts the volume
can be set when both the Warning
of the warning sound.
Volume and the Haptic Warning are on.
• Haptic Warning: Activate the steering
wheel vibration warning.
• Lane Safety Audible Warning Off:
Turns off the Lane Safety Audible
Warning, even when both warning
volume and haptic warning are on.
7-4
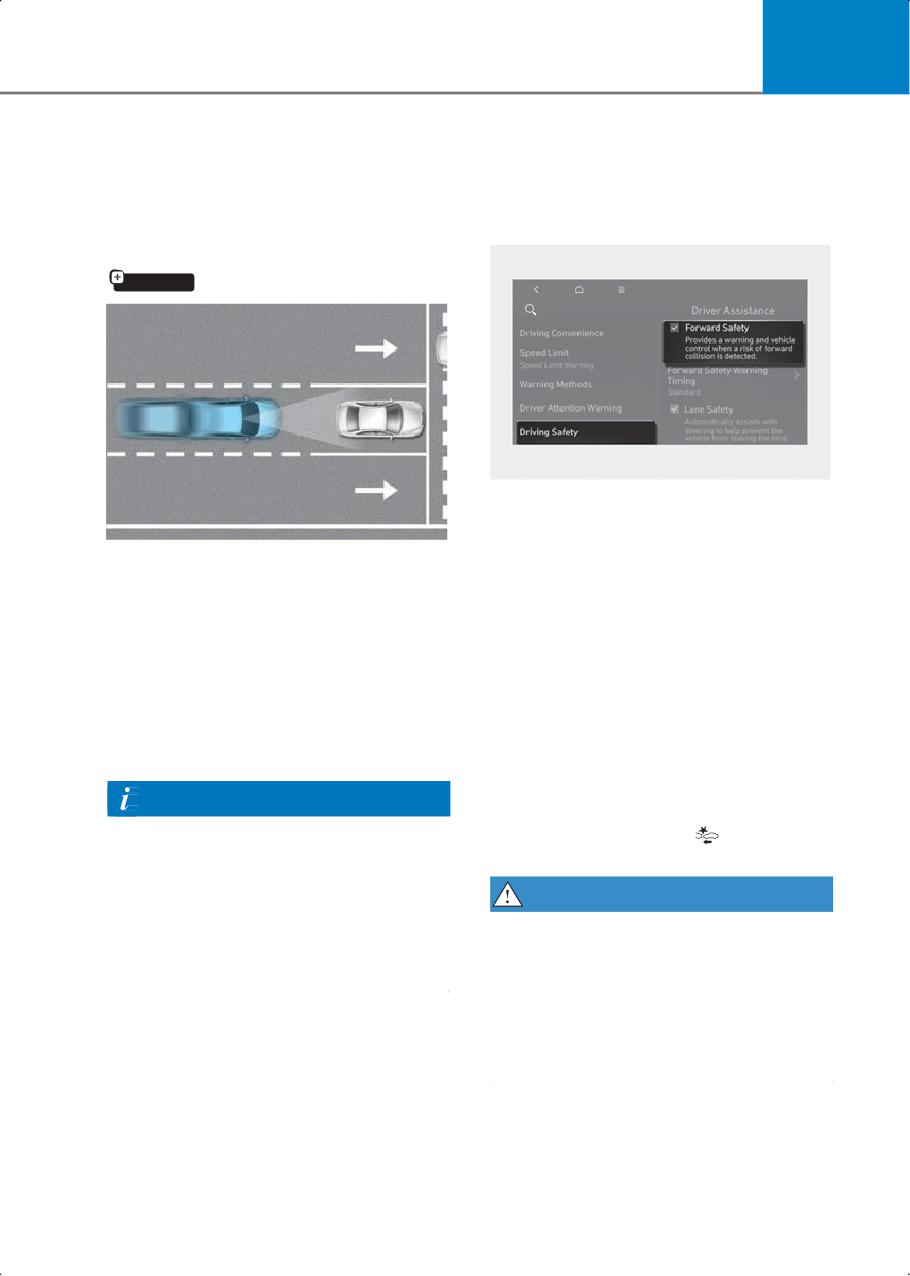
7
Forward
Forward Collision-Avoidance
Assist settings
Collision-Avoidance
Assist (FCA) (Front view
Forward Safety
camera only)
if equipped
With the ignition switch ON, go to User
Settings > Driver Assistance > Driving
Safety from the settings menu in the
Forward Collision-Avoidance Assist uses
instrument cluster or Settings > Vehicle >
the front view camera to help detect a
Driver Assistance > Driving Safety from
vehicle, a pedestrian ahead on the road.
the settings menu in the infotainment
The function may warn you with a
system to select the following:
warning message on the instrument
• If Forward Safety is selected, Forward
cluster and an audible warning if a
Collision-Avoidance Assist will warn the
collision is imminent. If necessary, it may
driver with a warning message, an
assist with braking your vehicle to help
audible warning depending on the
reduce collision speed and avoid a
collision risk levels. Braking assist will
collision.
be applied depending on the collision
risk levels. If Forward Safety is
Information
deselected, Forward Safety will turn
Forward Collision-Avoidance Assist
off. The warning light (
) will
(Front view camera only) uses the
illuminate on the cluster.
following sensor:
• Front view camera
WARNING
Refer to the "Driver assistance system
Each time the engine is restarted,
sensors" section in this chapter for the
Forward Collision-Avoidance Assist turns
location.
on.
If Forward Safety is selected after the
engine is restarted, the function does
NOT brake your vehicle to help avoid a
collision.
7-5
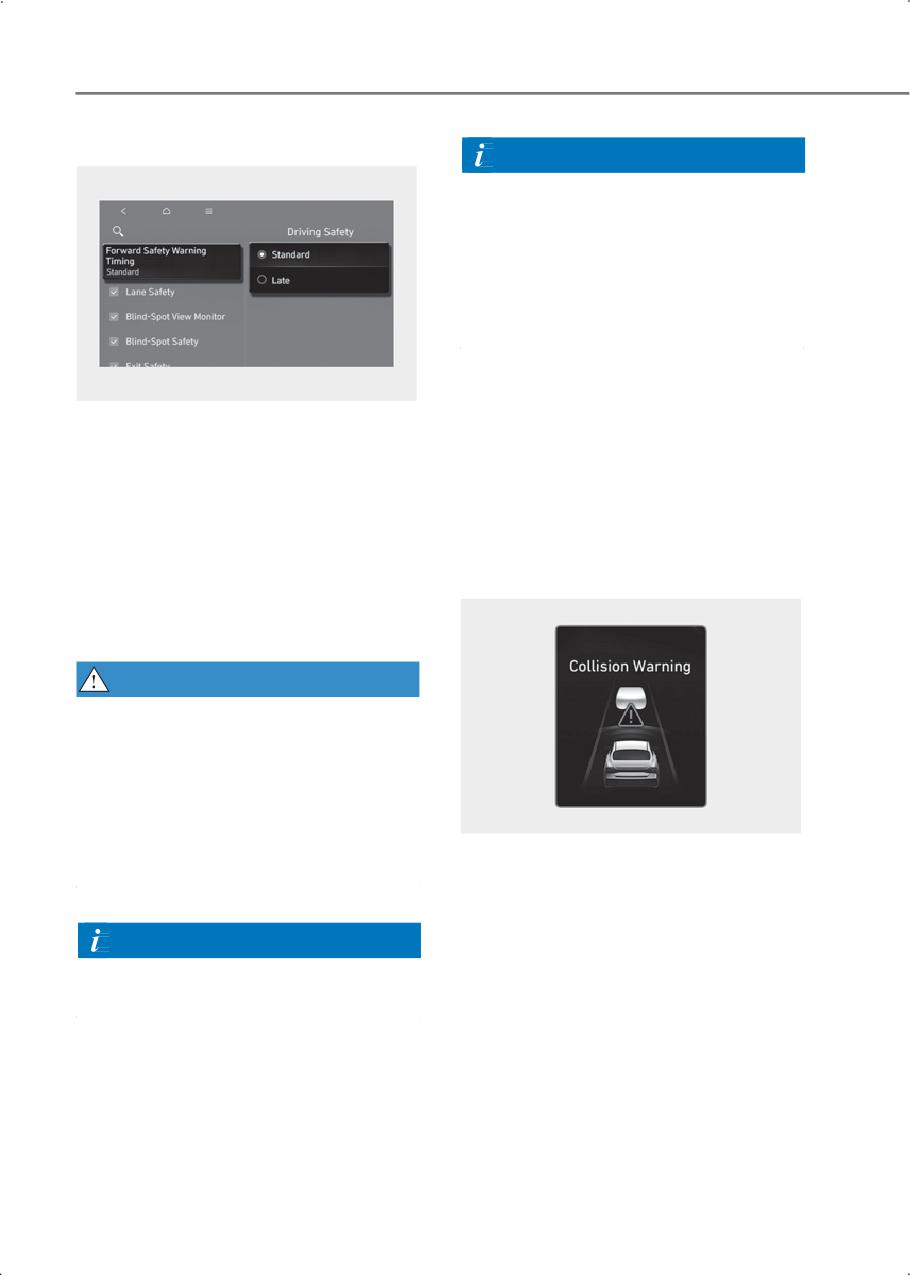
Driver assistance system
Forward Safety Warning Timing
Information
You can set the following Warning
Methods:
• Warning Volume/Haptic
Warning/Driving Safety Priority
For more information, refer to the "Driver
assistance system settings" section in this
chapter.
Forward Collision-Avoidance
Assist operation
With the ignition switch ON, go to User
Forward Collision-Avoidance Assist may
Settings > Driver Assistance > Driving
warn and brake your vehicle depending
Safety > Forward Safety Warning
on the collision risk level.
Timingfrom the settings menu in the
instrument cluster or Settings > Vehicle >
Driver Assistance > Driving Safety >
Basic function
Forward Safety Warning Timing settings
menu in the infotainment system to
Collision Warning
change the initial warning activation time.
Warning Timing is set to Standard at the
factory.
WARNING
• Even though Standard is selected for
Forward Safety Warning Timing if the
vehicle ahead of you suddenly stops,
the initial warning activation time may
not seem late.
• Select Late for Forward Safety Warning
Timing when traffic is light and your
vehicle speed is slow.
If Forward Collision-Avoidance Assist
judges that a collision may occur, the
message may appear on the instrument
cluster, an audible warning is heard and
Information
the steering wheel may vibrate when:
When the engine is restarted, the
• A vehicle or powered two-wheeler is
Warning Timing maintains its last setting.
detected, and your vehicle speed is
about 6-112 mph (10-180 km/h).
• A pedestrian or cyclist is detected, and
your vehicle speed is about 6-50 mph
(10-80 km/h).
7-6
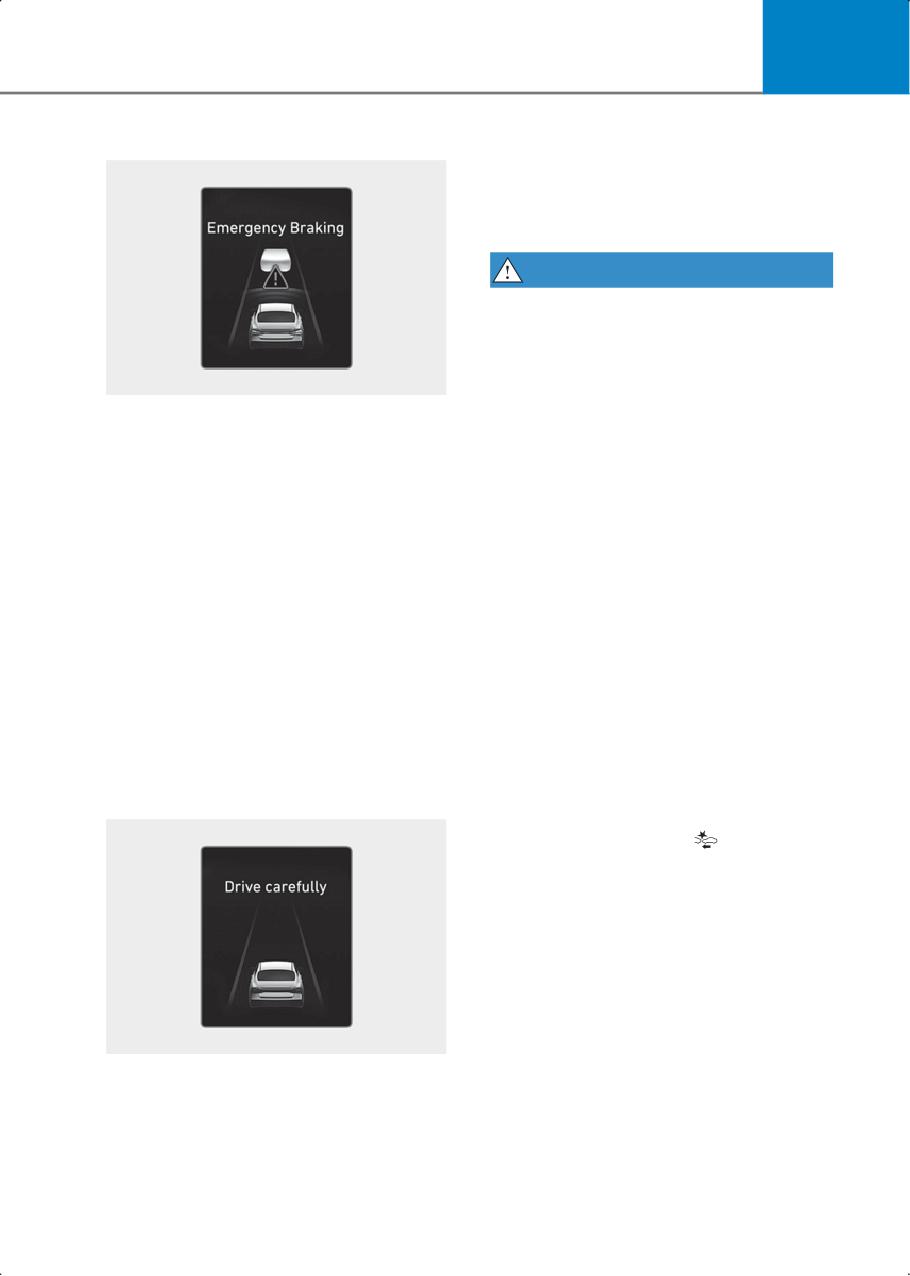
7
Emergency Braking
Depress the brake pedal immediately and
check the surroundings.
• Braking control ends about 2 seconds
after your vehicle is stopped following
an Emergency Braking event.
WARNING
Forward Collision-Avoidance Assist may
not operate in all situations and cannot
avoid all collisions.
To prevent serious injury or death:
•
Only change the settings after parking
your vehicle at a safe location.
If Forward Collision-Avoidance Assist
judges avoiding a collision may be
•
Control your vehicle at all times. Do not
difficult, it applies higher brake force that
depend on Forward
may help avoid a collision with the
Collision-Avoidance Assist to avoid a
vehicle, pedestrian or cyclist detected
collision. Always maintain a safe
ahead.
distance from the vehicles ahead and
reduce your vehicle speed as needed.
The warning message may appear on the
instrument cluster and an audible
•
Forward Collision-Avoidance Assist
warning is heard and the steering wheel
may stop operating, or may not
may vibrate when:
operate, or operate unnecessarily
depending on the road conditions and
• A vehicle or powered two-wheeler is
surroundings.
detected, and your vehicle speed is
about 6-37 mph (10-60 km/h).
•
When Active Assist or Warning Only is
selected and ESC is turned off by
• A pedestrian or cyclist is detected, and
pressing and holding the ESC OFF
your vehicle speed is about 6-37 mph
button, Forward Collision-Avoidance
(10-60 km/h).
Assist turns off automatically. Then the
Forward Collision-Avoidance Assist
Stopping vehicle and ending brake control
settings cannot be changed using the
settings menu and the warning light
illuminates on the instrument cluster. If
ESC is turned on again by pressing the
ESC OFF button, Forward
Collision-Avoidance Assist maintains its
last setting.
•
Never attempt to activate Forward
Collision-Avoidance Assist by
intentionally driving toward people,
animals, objects, or other vehicles.
•
Forward Collision-Avoidance Assist
After your vehicle has stopped following
may not assist braking your vehicle if
an Emergency Braking event, the "Drive
you depress the brake pedal sufficiently
carefully" warning message may appear
in response to the potential hazard
on the instrument cluster.
detected by the function to avoid all
collisions.
7-7