Hyundai Tucson Plug-in Hybrid (2024 year). Manual in english - page 22
 

  Index      Manuals     Hyundai Tucson Plug-in Hybrid (2024 year). Manual in english


Search            copyright infringement  


Content      ..     20      21      22     


Hyundai Tucson Plug-in Hybrid (2024 year). Manual in english - page 22


09

9-49

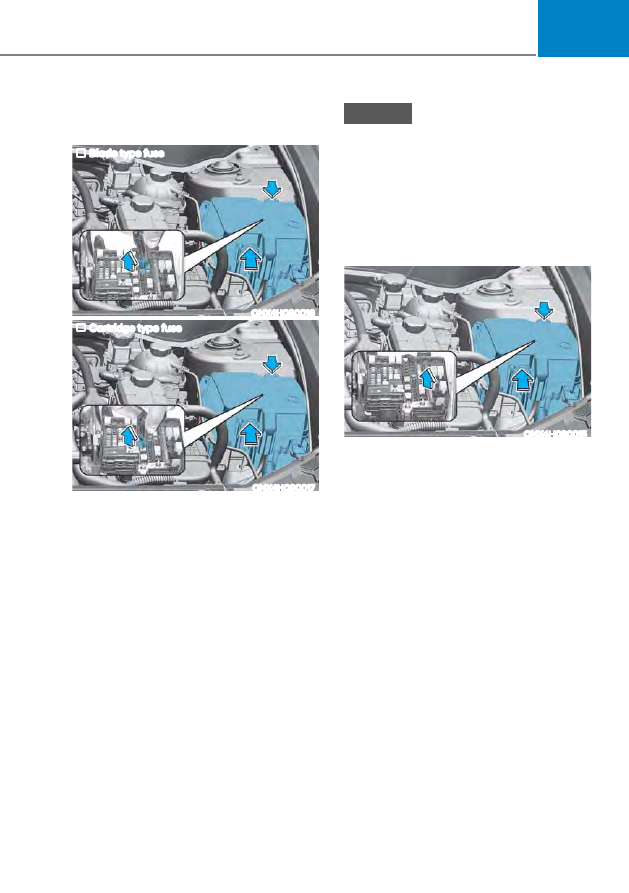
Engine Compartment Panel Fuse 

Replacement

„

Blade type fuse

ONX4H090016

„

Cartridge type fuse

ONX4H090017

1.  Turn the vehicle off.
2.  Turn all other switches off.
3.  Remove the fuse panel cover by 

pressing the tap and pulling up.

4.  Check the removed fuse; replace it if it 

is blown. To remove or insert the fuse, 

use the removal tool in the engine 

compartment fuse panel cover.

5.  Push in a new fuse of the same 

rating, and make sure it fits tightly in 

the clips. If it fits loosely, consult an 

authorized HYUNDAI dealer.

NOTICE

After checking the fuse panel in the 

engine compartment, securely
install the fuse panel cover. You may 

hear a clicking sound if the cover is 

securely latched. If it is not securely 

latched, electrical failure may occur 

from water contact.

Multi fuse

ONX4H090015

If the multi fuse is blown, consult an 

authorized HYUNDAI dealer.

Maintenance

9-50

Fuse/Relay Panel Description

Instrument panel fuse panel (Hybrid 

vehicle/Plug-in hybrid vehicle) 

ONX4090019

Inside the fuse/relay box cover, you can 

find the fuse/relay label describing fuse/

relay names and ratings.

 Information

Not all fuse panel descriptions in this 
manual may be applicable to your vehicle; 
the information is accurate at the time of 
printing. When you inspect the fuse box on 
your vehicle, refer to the fuse box label.

ONX4H090023N

09

9-51

Instrument panel fuse panel

Fuse Name

Fuse rating

Circuit Protected

DR Lock

20A

Dead Lock Relay, Data Link Connector, Door Unlock/Lock 

Relay

P/WDW RH

25A

Power Window Main Switch, Passenger Power Window 

Switch (LHD)

P/WDW LH

25A

Power Window Main Switch, Passenger Power Window 

Switch (RHD)

Seat Warmer 

(RR)

20A

Rear Seat Warmer Control Module

Seat Warmer 

(DR/PS)

20A

Front Seat Warmer Control Module, Front Air Ventilation 

Seat Control Module

P/Seat(PS)

30A

Passenger Power Seat Switch, Passenger Seat Relay Unit

ECS

15A

ECS Unit

Safety 

Window RH

25A

Driver(LHD)/Passenger(RHD) Safety Power Window Module, 

Rear Safety Power Window Module RH

Sunroof1

20A

Sunroof Control Unit (Blind)

P/Seat(DR)

30A

Driver Power Seat Switch, Driver IMS Control Module

A/BAG2

10A

SRS Control Module

AMP

25A

AMP

Module17

10A

"Driver/Passenger Smart Key Outside Handle, Crash Pad 

Switch, Hazard Switch, UIP Sensor 

UIP Siren, Data Link Connector, Rain Sensor"

Sunroof1

20A

Sunroof Control Unit (Glass)

IBU2

10A

IBU, Ignition Switch

Safety 

Window LH

25A

Driver(RHD)/Passenger(LHD) Safety Power Window Module, 

Rear Safety Power Window Module LH

10A

10A

Outside Mirror Folding/Unfolding Relay, ROA Sensor, Driver 

IMS Control Module, Power Liftgate Unit, Driver/Passenger 

Door Mood Lamp, A/C Control Module, Console Mood 

Lamp, Instrument Cluster, Mood Lamp Unit, A/C Control 

Switch, Crash Pad Mood Lamp

Brake Switch

10A

IBU, Stop Lamp Switch

Maintenance

9-52

Fuse Name

Fuse rating

Circuit Protected

Module7

7.5A

IBU

PTG

10A

Liftgate Relay

Multi Media

20A

Audio, A/V & Navigation Head Unit

Washer

15A

Multifunction Switch

Module8

7.5A

Front/Rear Seat Warmer Control Module, Front Air 

Ventilation Seat Control Module

A/BAG1

15A

SRS Control Module

A/C

7.5A

Electronic A/C Compressor, Front/Rear A/C Control Switch 

A/C Control Module, E/R Junction Block (RLY.10, RLY.13)

Module2

15A

Front USB Charge Connector, Rear USB Charge Connector

Module1

10A

E-Call Unit, Audio, A/V & Navigation Head Unit, AMP, Audio 

Keyboard, A/V & Navigation Keyboard, IBU, BMS, ADAS 

Parking ECU Unit, Power Outside Mirror Switch

Module6

10A

Front Console Switch, EPB Switch

IBU1

7.5A

IBU

Module5

10A

Front/Rear Seat Warmer Control Module, E-Call Unit, AMP, 

Driver IMS Control Module, Front/Rear A/C Control Switch, 

Audio, A/V & Navigation Head Unit, Wireless Charger 

Unit, Front Air Ventilation Seat Control Module, Data Link 

Connector, A/C Control Module, Heat Lamp LH/RH, Electro 

Chromic Mirror 

A/BAG IND.

7.5A

Instrument Cluster, Overhead Console Lamp

IG3 4

10A

HPCU

IG3 2

10A

Electronic Water Pump (HEV)

Module4

7.5A

Front View Camera, IBU, AWD ECM, VESS Unit, Crash Pad 

Switch, ECS Unit, ADAS Parking ECU

E-Shifter

7.5A

Electronic Shift Switch, SCU

09

9-53

Fuse Name

Fuse rating

Circuit Protected

IG3 3

10A

BMS, E/R Junction Block (RLY.2)

Cluster

7.5A

Instrument Cluster

Module3

7.5A

Stop Lamp Switch, Overhead Console Lamp, Multifunction 

Switch (R-MDPS)

MDPS 

7.5A

MDPS Unit (Column Type)

Maintenance

9-54

Engine compartment fuse panel 

(Hybrid vehicle/Plug-in hybrid 

vehicle) 

ONX4H090014

Inside the fuse/relay box cover, you can 

find the fuse/relay label describing fuse/

relay names and ratings.

 Information

Not all fuse panel descriptions in this 
manual may be applicable to your vehicle; 
the information is accurate at the time of 
printing. When you inspect the fuse panel 
in your vehicle, refer to the fuse panel 
label.

„

Hybrid vehicle

ONX4PH091024N

09

9-55

„

Plug-in hybrid vehicle

ONX4PH091030N

Maintenance

9-56

Engine compartment fuse panel

Fuse Name

Fuse rating

Circuit Protected

MDPS *

1

80A/100A

MDPS Unit (Column Type-80A)  / MDPS Unit (Rack Type-

100A) 

C/FAN

80A

Cooling Fan Motor

B+1

60A

ICU Junction Block (IPS01, IPS02, IPS03, IPS04, IPS05)

B+3

60A

ICU Junction Block (Power Window Main Relay, Fuse : F2, 

F3, F5, F6, F8, F9, F11, F12, F18, F15)

CVVD

50A

CVVD Actuator

Bower

40A

E/R Junction Block (RLY.10)

IEB3

40A

IEB Unit

Rear Defogger

40A

E/R Junction Block (RLY.14)

Trailer1

50A

Trailer Connector Unit

B+4

50A

ICU Junction Block (Long Term Load Latch Relay, Fuse : F1, 

F4, F14, F17, F20, F21, F24, F27)

IEB2

60A

IEB Unit

IEB1

60A

IEB Unit

B+2

50A

ICU Junction Block (IPS06, IPS07, IPS08, IPS10, IPS11)

PTC Heater

50A

E/R Junction Block (RLY.13)

PTG

40A

Power Liftgate Unit

E-Shifter1

30A

SCU

Fuel Pump

20A

E/R Junction Block (RLY.7)

AWD

20A

AWD ECM

ECU4

10A

ECM

*1 : 

MDPS (Motor Driven Power Steering) is the same as EPS (Electric Power Steering)

09

9-57

Fuse Name

Fuse rating

Circuit Protected

IG3

20A

E/R Junction Block (RLY.3)

OPCU

20A

OPU

BATT C/FAN

15A

E/R Junction Block (RLY.2)

E-Shifter2

10A

SCU, Electronic Shift Switch (SBW)

HPCU1

10A

HPCU

Trailer2

20A

Trailer Connector Unit

RR HTD

10A

Driver Power Outside Mirror, Passenger Power Outside 

Mirror

IG1

30A

PCB Block (PDM(IG1) Relay)

IG2

30A

PCB Block (PDM(IG2) Relay)

ECU3

10A

CVVD Actuator, ECM

TCU2

15A

TCM, OPU

IEB4

10A

IEB Unit

Module

7.5A

Electronic Water Pump (Engine)

AEB

10A

Front Radar

HPCU2

10A

HPCU

Sensor1

20A

Ignition Coil #1~#4

Sensor2

15A

Oxygen Sensor (Up/Down)

ECU1

20A

ECM

Sensor4

10A

E/R Junction Block (RLY.7)

Sensor3

10A

Oil Control Valve #1~#2, Purge Control Solenoid Valve, 

RCV Control Solenoid Valve, Variable Oil Pump, Cooling 

Fan Motor

Maintenance

9-58

Fuse Name

Fuse rating

Circuit Protected

B/Horn

15A

PCB Block (Burglar Alarm Horn Relay)

MDPS2 *

1

10A

MDPS Unit (Rack Type)

Sensor5

15A

Active Purge Pump

Horn

15A

PCB Block (Horn Relay)

Wiper(FR)2

7.5A

IBU

Wiper(RR)

15A

ICU Junction Block (Rear Wiper Relay)

Wiper(FR)1

25A

PCB Block (Front Wiper(Low) Relay), Front Wiper Motor

P/Outlet1

20A

Luggage Power Outlet

P/Outlet2

20A

Front Power Outlet

ACC

20A

ICU Junction Block (Fuse : F33, F36)

TCU1

15A

TCM

EWP

10A

Electronic Water Pump (Engine)

BMS

10A

BMS

ECU2

15A

ECM

*1 : 

MDPS (Motor Driven Power Steering) is the same as EPS (Electric Power Steering)

09

9-59

Consult an authorized HYUNDAI dealer 

to replace most vehicle light bulbs. It is 

difficult to replace vehicle light bulbs 

because other parts of the vehicle must 

be removed before you can get to the 

bulb. This is especially true for removing 

the headlight assembly to get to the 

bulb(s).
Removing/installing the headlight 

assembly can result in damage to the 

vehicle.

 WARNING

ś

Prior to working on a light, depress 

the foot brake, shift to P (Park), apply 

the parking brake, set the ignition 

switch to the LOCK/OFF position 

and take the key with you when 

leaving the vehicle to avoid sudden 

movement of the vehicle and to 

prevent possible electric shock.

ś

Be aware the bulbs may be hot and 

may burn your fingers.

NOTICE

Be sure to replace the burned-out bulb 

with one of the same wattage rating. 

Otherwise, it may cause damage to the 

fuse or electrical wiring system.

NOTICE

To prevent damage, do not clean the 

headlight lens with chemical solvents 

or strong detergents.

 Information

The headlight and tail lamp lenses could 
appear frosty if the vehicle is washed after 
driving or the vehicle is driven at night in 
wet weather. This condition is caused by 
temperature difference between the lamp 
inside and outside and, it does not indicate 
a problem with your vehicle. When 
moisture condenses in the lamp, it will be 
removed after driving with the headlight 
on. The removable level may differ 
depending on lamp size, lamp position 
and environmental condition. However, if 
moisture is not removed, have your vehicle 
inspected by an authorized HYUNDAI 
dealer.

 Information

ś

A normally functioning lamp may 
flicker momentarily to stabilize the 
vehicle’s electrical control system. 
However, if the lamp goes out after 
flickering momentarily, or continues to 
flicker, have the system checked by an 
authorized HYUNDAI dealer.

ś

The position lamp may not turn on 
when the position lamp switch is turned 
on, but the position lamp and headlight 
switch may turn on when the headlight 
switch is turned on. This may be caused 
by network failure or vehicle electrical 
control system malfunction. If this 
occurs, have the system checked by an 
authorized HYUNDAI dealer.

 Information

The headlight aiming should be adjusted 
after an accident or after the headlight 
assembly is reinstalled at an authorized 
HYUNDAI dealer.

LIGHT BULBS

Maintenance

9-60

Headlight, Position Lamp, Turn 

Signal Lamp, Daytime Running 

Light (DRL) Replacement

„

Type A

ONX4090022N

„

Type B (N line)

ONX4N091003N

(1) Headlight (Low)
(2) Headlight (High)
(3)  Daytime running light/Position light
(4)  Turn signal lamp
(5) Side marker

ś

Always handle them carefully, and 

avoid scratches and abrasions. If 

the bulbs are lit, avoid contact with 

liquids.

ś

Never touch the glass with bare 

hands. Residual oil may cause the 

bulb to overheat and burst when lit.

ś

A bulb should be operated only when 

installed in a headlight.

ś

If a bulb becomes damaged or 

cracked, replace it immediately and 

carefully dispose of it.

Lamps

If the LED lamp does not operate, have 

the vehicle checked by an authorized 

HYUNDAI dealer.

Side Repeater Lamp 

Replacement

ONX4090024

If the LED lamp (1) does not operate, 

have the system inspected by an 

authorized HYUNDAI dealer.
The LED lamps cannot be replaced as 

a single unit because it is an integrated 

unit. The LED lamps has to be replaced 

with the unit.
A skilled technician should check or 

repair the LED lamp, for it may damage 

related parts of the vehicle.

09

9-61

Rear Combination Lamp 

Replacement

Type A

ONX4090025N

(1) Tail lamp
(2) Tail/Stop lamp
(3)  Turn signal lamp
(4) Backup lamp
(5)  Rear side marker

ONX4090026

Stop/Tail lamp (Outside), Reverse lamp

1.  Turn off the engine.
2.  Open the liftgate.
3.  Loosen the lamp assembly retaining 

screws with a cross-tip screwdriver.

4.  Remove the rear combination lamp 

assembly from the body of the 

vehicle.

5.  Remove the socket from the 

assembly by turning the socket 

counterclockwise until the tabs on 

the socket align with the slots on the 

assembly.

ONX4090045

6.  Remove the bulb from the socket 

by pressing it in and rotating it 

counterclockwise until the tabs on the 

bulb align with the slots in the socket. 

Pull the bulb out of the socket.

7.  Insert a new bulb by inserting it into 

the socket and rotating it until it locks 

into place.

8.  Install the socket into the assembly by 

aligning the tabs on the socket with 

the slots in the assembly. Push the 

socket into the assembly and turn the 

socket clockwise.

9.  Reinstall the lamp assembly to the 

body of the vehicle.

Maintenance

9-62

ONX4090027

Tail lamp (Inside)

1.  Turn off the engine.
2.  Open the liftgate.
3.  Remove the service cover using a  

flat-blade screwdriver.

4.  Remove the socket from the 

assembly by turning the socket 

counterclockwise until the tabs on 

the socket align with the slots on the 

assembly.

ONX4090028

5.  Remove the bulb from the socket 

by pressing it in and rotating it 

counterclockwise until the tabs on the 

bulb align with the slots in the socket. 

Pull the bulb out of the socket.

6.  Insert a new bulb by inserting it into 

the socket and rotating it until it locks 

into place.

7.  Install the socket into the assembly by 

aligning the tabs on the socket with 

the slots in the assembly. Push the 

socket into the assembly and turn the 

socket clockwise.

8.  Reinstall the lamp assembly to the 

body of the vehicle.

09

9-63

Turn signal lamp, Reverse lamp 

1.  Disconnect the (-) battery terminal 

(For plug-in hybrid vehicle) or battery 

connector (For hybrid vehicle).

2.  Loosen the retaining clips under the 

bumper and screws on the wheel 

house trim.

3.  Prey trim under the bumper toward 

the vehicle.

„

Turn signal lamp

ONX4090029

„

Rear fog lamp / Reverse lamp

ONX4090030

4.  Remove the socket from the 

assembly by turning the socket 

counterclockwise until the tabs on 

the socket align with the slots on the 

assembly.

5.  Remove the bulb by pulling it straight 

out.

6.  Insert a new bulb in the socket.
7.  Reinstall the light assembly to the 

body of the vehicle.

Type B

ONX4090031N

Type C (N Line)

ONX4N091004N

(1) Tail lamp
(2) Tail/Stop lamp
(3)  Turn signal lamp
(4) Backup lamp
(5)  Rear side marker

Tail / Stop lamp, Tail lamp

If these lamps do not operate, have 

the vehicle checked by an authorized 

HYUNDAI dealer.

Maintenance

9-64

High Mounted Stop Lamp 

Replacement

ONX4090032

If the LED lamp (1) does not operate, 

have the system inspected by an 

authorized HYUNDAI dealer.
The LED lamps cannot be replaced as 

a single unit because it is an integrated 

unit. The LED lamps has to be replaced 

with the unit.
A skilled technician should check or 

repair the LED lamp, for it may damage 

related parts of the vehicle.

License Plate Lamp Replacement

ONX4090033

1.  Using a flat-blade screwdriver, gently 

pry the lens cover from the lamp 

housing.

2.  Remove the bulb by pulling it straight 

out.

3.  Install a new bulb.
4.  Reinstall in the reverse order.

09

9-65

Interior Light Replacement

Map/Personal lamp (LED)

„

Map lamp (LED type)

ONX4H090025N

„

Room lamp (Personnal lamp)

OLF077071

If the LED lamp does not operate, have 

the system inspected by an authorized 

HYUNDAI dealer.
The LED lamps cannot be replaced as 

a single unit because it is an integrated 

unit. The LED lamps has to be replaced 

with the unit.
A skilled technician should check or 

repair the LED lamp, for it may damage 

related parts of the vehicle.

Room lamp, Sunvisor lamp and 

Luggage compartment lamp (Bulb 

type)

„

Map lamp 

ODN8A089035

„

Room lamp (Personnal lamp)

ODN8089036

Maintenance

9-66

„

Sunvisor lamp

OJS078041

„

Luggage compartment lamp

ONX4090035

1.  Using a flat-head screwdriver, gently 

pry the lens from the interior light 

housing.

2.  Remove the bulb by pulling it straight 

out.

3.  Install a new bulb into the socket.
4.  Align the lens tabs with the interior 

light housing notches and snap the 

lens into place.

NOTICE

Be careful not to damage the cover, tab, 

and plastic housing.

09

9-67

APPEARANCE CARE

Exterior Care

NOTICE

If you park your vehicle near a stainless 

steel sign or glass facade building, the 

vehicle’s exterior plastic parts such 

as a bumper, spoiler, garnish, lamp 

or outside rearview mirror might be 

damaged due to sunlight reflected from 

the sign or building. To prevent damage 

of the exterior plastic parts, you should 

avoid parking in areas where light may 

be reflected or use a car cover. (The 

exterior plastic parts applied to your 

vehicle may vary.)

Exterior general caution

It is very important to follow the label 

directions when using any chemical 

cleaner or polish. Read all warning and 

caution statements that appear on the 

label.

Finish maintenance

Washing

To help protect your vehicle’s finish from 

rust and deterioration, wash it thoroughly 

and frequently at least once a month 

with lukewarm or cold water.
If you use your vehicle for off-road 

driving, you should wash it after each 

off-road trip. Pay special attention to the 

removal of any accumulation of salt, dirt, 

mud, and other foreign materials. Make 

sure the drain holes in the lower edges 

of the doors and rocker panels are kept 

clear and clean.
Insects, tar, tree sap, bird droppings, 

industrial pollution and similar deposits 

can damage your vehicle’s finish if not 

removed immediately.
Even prompt washing with plain water 

may not completely remove all these 

deposits. A mild soap, safe for use on 

painted surfaces, should be used.
After washing, rinse the vehicle 

thoroughly with lukewarm or cold water. 

Do not allow soap to dry on the finish.

High-pressure washing

ś

When using high-pressure washers, 

make sure to maintain sufficient 

distance from the vehicle.
Insufficient clearance or excessive 

pressure can lead to component 

damage or water penetration.

ś

Do not spray the camera, sensors or 

its surrounding area directly with a 

high pressure washer. Shock applied 

from high pressure water may cause 

the device to not operate normally.

ś

Do not bring the nozzle tip close to 

boots (rubber or plastic covers) or 

connectors as they may be damaged 

if they come into contact with high 

pressure water.

 WARNING

After washing the vehicle, test the 

brakes while driving slowly to see 

if they have been affected by water 

before getting on the road. If braking 

performance is impaired, dry the 

brakes by applying them lightly while 

maintaining a slow forward speed.

NOTICE

ś

Do not use strong soap, chemical 

detergents or hot water, and do not 

wash the vehicle in direct sunlight 

or when the body of the vehicle is 

warm.

ś

Be careful when washing the side 

windows of your vehicle.

ś

Especially, with high-pressure water, 

water may leak through the windows 

and wet the interior.

ś

To prevent damage to the plastic 

parts, do not clean with chemical 

solvents or strong detergents.

ś

To prevent damage to the charging 

door, make sure to close and lock the 

vehicle doors when washing (high-

pressure washing, automatic car 

washing, etc.) the vehicle.

Maintenance

9-68

NOTICE

ONX4090036

ś

Water washing in the engine 

compartment including high 

pressure water washing may cause 

the failure of electrical circuits 

located in the engine compartment.

ś

Never allow water or other liquids 

to come in contact with electrical/

electronic components inside the 

vehicle as this may damage them.

NOTICE

Matte paint finish vehicle (if equipped)
Automatic car wash which uses rotating 

brushes should not be used as this can 

damage the surface of your vehicle. A 

steam cleaner which washes the vehicle 

surface at high temperature may result 

the oil to adhere and leave stains that is 

difficult to remove. 
Use a soft cloth (for example, microfiber 

towel or sponge) when washing your 

vehicle and dry with a microfiber towel. 

When you hand wash your vehicle, you 

should not use a cleaner that finishes 

with wax. If the vehicle surface is too 

dirty (sand, dirt, dust, contaminant, 

etc.), clean the surface with water 

before washing the car.

Waxing

A good coat of wax is a barrier between 

your paint and contaminate. Keeping 

a good coat of wax on your vehicle will 

help protect it.
Wax the vehicle when water will no 

longer bead on the paint.
Always wash and dry the vehicle before 

waxing. Use a good quality liquid or 

paste wax, and follow the manufacturer’s 

instructions. Wax all metal trim to protect 

it and to maintain its luster.
Removing oil, tar, and similar materials 

with a spot remover will usually strip the 

wax from the finish. Be sure to re-wax 

these areas even if the rest of the vehicle 

does not yet need waxing.

NOTICE

ś

Wiping dust or dirt off the body with 

a dry cloth will scratch the finish.

ś

Do not use steel wool, abrasive 

cleaners, or strong detergents 

containing highly alkaline or 

caustic agents on chrome-plated or 

anodized aluminum parts. This may 

result in damage to the protective 

coating and cause discoloration or 

paint deterioration.

NOTICE

Matte paint finish vehicle (if equipped)
Do not use any polish protector such as 

a detergent, an abrasive and a polish. 

In case wax is applied, remove the wax 

immediately using a silicon remover 

and if any tar or tar contaminant is on 

the surface use a tar remover to clean. 

However, be careful not to apply too 

much pressure on the painted area.

09

9-69

Finish damage repair

Deep scratches or stone chips in the 

painted surface must be repaired 

promptly. Exposed metal will quickly 

rust and may develop into a major repair 

expense.

NOTICE

If your vehicle is damaged and requires 

any metal repair or replacement, 

be sure the body shop applies anti-

corrosion materials to the parts 

repaired or replaced.

NOTICE

Matte paint finish vehicle (if equipped)
In case of matte paint finish vehicles, 

it is impossible to modify only the 

damaged area and repair of the whole 

part is necessary. If the vehicle is 

damaged and painting is required, have 

your vehicle maintained and repaired 

by an authorized HYUNDAI dealer. Take 

extreme care, as it is difficult to restore 

the quality after the repair.

Bright-metal maintenance

ś

To remove road tar and insects, use 

a tar remover, not a scraper or other 

sharp object.

ś

To protect the surfaces of brightmetal 

parts from corrosion, apply a coating 

of wax or chrome preservative and rub 

to a high luster.

ś

During winter weather or in coastal 

areas, cover the bright metal parts 

with a heavier coating of wax or 

preservative. If necessary, coat the 

parts with non-corrosive petroleum 

jelly or other protective compound.

Underbody maintenance

Corrosive materials used for ice and 

snow removal and dust control may 

collect on the underbody. If these 

materials are not removed, accelerated 

rusting can occur on underbody parts 

such as the fuel lines, frame, floor pan 

and exhaust system, even though they 

have been treated with rust protection.
Thoroughly flush the vehicle underbody 

and wheel openings with lukewarm or 

cold water once a month, after off-road 

driving and at the end of each winter. Pay 

special attention to these areas because 

it is difficult to see all the mud and dirt. 

It will do more harm than good to wet 

down the road grime without removing 

it. The lower edges of doors, rocker 

panels, and frame members have drain 

holes that should not be allowed to clog 

with dirt; trapped water in these areas 

can cause rusting.

 WARNING

After washing the vehicle, test the 

brakes while driving slowly to see if 

they have been affected by water. If 

braking performance is impaired, dry 

the brakes by applying them lightly 

while maintaining a slow forward 

speed.

Maintenance

9-70

Aluminum wheel maintenance

The aluminum wheels are coated with a 

clear protective finish.

NOTICE

ś

Do not use abrasive cleaner, 

polishing compound, solvent, or wire 

brushes on aluminum wheels.

ś

Clean the wheel when it has cooled.

ś

Use only a mild soap or neutral 

detergent, and rinse thoroughly with 

water. Also, clean the wheels after 

driving on salted roads.

ś

Do not wash the wheels with high-

speed car wash brushes.

ś

Do not use any cleaners containing 

acid or alkaline detergents.

Corrosion protection

Protecting your vehicle from corrosion

By using the most advanced design 

and construction practices to combat 

corrosion, HYUNDAI produces vehicles 

of the highest quality. However, this is 

only part of the job. To achieve the long-

term corrosion resistance your vehicle 

can deliver, the owner’s cooperation and 

assistance is also required.

Common causes of corrosion

The most common causes of corrosion 

on your vehicle are:

ś

Road salt, dirt and moisture that is 

allowed to accumulate underneath 

the vehicle.

ś

Removal of paint or protective 

coatings by stones, gravel, abrasion 

or minor scrapes and dents which 

leave unprotected metal exposed to 

corrosion.

High-corrosion areas

If you live in an area where your vehicle is 

regularly exposed to corrosive materials, 

corrosion protection is particularly 

important. Some of the common causes 

of accelerated corrosion are road salts, 

dust control chemicals, ocean air and 

industrial pollution.

Moisture breeds corrosion

Moisture creates the conditions in 

which corrosion is most likely to occur. 

For example, corrosion is accelerated 

by high humidity, particularly when 

temperatures are just above freezing. In 

such conditions, the corrosive material is 

kept in contact with the vehicle surfaces 

by moisture that is slow to evaporate.
Mud is particularly corrosive because 

it is slow to dry and holds moisture in 

contact with the vehicle. Although the 

mud appears to be dry, it can still retain 

moisture and promote corrosion.
High temperatures can also accelerate 

corrosion of parts that are not properly 

ventilated so the moisture can be 

dispersed. For all these reasons, it is 

particularly important to keep your 

vehicle clean and free of mud or 

accumulations of other materials. This 

applies not only to the visible surfaces 

but particularly to the underside of the 

vehicle.

09

9-71

To help prevent corrosion

Keep your vehicle clean
The best way to prevent corrosion is 

to keep your vehicle clean and free of 

corrosive materials. Attention to the 

underside of the vehicle is particularly 

important.

ś

If you live in a high-corrosion area — 

where road salts are used, near the 

ocean, areas with industrial pollution, 

acid rain, etc.—, you should take extra 

care to prevent corrosion. In winter, 

hose off the underside of your vehicle 

at least once a month and be sure to 

clean the underside thoroughly when 

winter is over.

ś

When cleaning underneath the 

vehicle, pay particular attention to the 

components under the fenders and 

other areas that are hidden from view. 

Do a thorough job; just dampening 

the accumulated mud rather than 

washing it away will accelerate 

corrosion rather than prevent it. Water 

under high pressure and steam are 

particularly effective in removing 

accumulated mud and corrosive 

materials.

ś

When cleaning lower door panels, 

rocker panels and frame members, be 

sure that drain holes are kept open so 

that moisture can escape and not be 

trapped inside to accelerate corrosion.

Keep your garage dry

Don’t park your vehicle in a damp, 

poorly ventilated garage. This creates 

a favorable environment for corrosion. 

This is particularly true if you wash your 

vehicle in the garage or drive it into the 

garage when it is still wet or covered with 

snow, ice or mud. Even a heated garage 

can contribute to corrosion unless it is 

well ventilated so moisture is dispersed.

Keep paint and trim in good condition

Scratches or chips in the finish should 

be covered with “touch-up” paint as 

soon as possible to reduce the possibility 

of corrosion. If bare metal is showing 

through, the attention of a qualified body 

and paint shop is recommended.
Bird droppings are highly corrosive and 

may damage painted surfaces in just a 

few hours. Always remove bird droppings 

as soon as possible.

Interior Care

Interior general precautions

Prevent caustic solutions such as 

perfume and cosmetic oil, from 

contacting the interior parts because 

they may cause damage or discoloration. 

If they do contact the interior parts, 

wipe them off immediately. See the 

instructions for the proper way to clean 

vehicle interior surfaces.

Maintenance

9-72

NOTICE

ś

Never allow water or other liquids 

to come in contact with electrical/

electronic components inside the 

vehicle as this may damage them.

ś

When cleaning leather products 

(steering wheel, seats etc.), use 

neutral detergents or low alcohol 

content solutions. If you use high 

alcohol content solutions or acid/

alkaline detergents, the color of the 

leather may fade or the surface may 

get stripped off.

Cleaning the upholstery and interior 

trim

Vehicle interior surfaces (if equipped)

Remove dust and loose dirt from interior 

surfaces with a whisk broom or a vacuum 

cleaner.
If necessary, clean interior surfaces with 

a mixture of warm water and mild non-

detergent cleaner (test all cleaners on a 

concealed area before use).

Fabric (if equipped)

Remove dust and loose dirt from 

fabric with a whisk broom or vacuum 

cleaner. Clean with a mild soap solution 

recommended for upholstery or carpets. 

Remove fresh spots immediately with 

a fabric spot cleaner. If fresh spots do 

not receive immediate attention, the 

fabric can be stained and its color can be 

affected. Also, its fire-resistant properties 

can be reduced if the material is not 

properly maintained.

NOTICE

Using anything but recommended 

cleaners and procedures may affect the 

fabric’s appearance and fire-resistant 

properties.

Leather (if equipped)

ś

Features of seat leather


- Leather is made from the outer skin 

of an animal, which goes through a 

special process to be available for 

use. Since it is a natural product, 

each part differs in thickness or 

density.
Wrinkles may appear as a natural 

result of stretching and shrinking 

depending on the temperature and 

humidity.


- The seat is made of stretchable 

fabric to improve comfort.


- The parts contacting the body are 

curved and the side supporting 

area is high which provides driving 

comfort and stability.


- Wrinkles may appear naturally 

from usage. It is not a fault of the 

products.

NOTICE

ś

Wrinkles or abrasions which appear 

naturally from usage are not covered 

by warranty.

ś

Belts with metallic accessories, 

zippers or keys inside the back 

pocket may damage the seat fabric.

ś

Make sure not to wet the seat. It may 

change the nature of natural leather.

ś

Jeans or clothes which could bleach 

may contaminate the surface of the 

seat covering fabric.

09

9-73

ś

Caring for the leather seats


- Vacuum the seat periodically to 

remove dust and sand on the seat. It 

will prevent abrasion or damage of 

the leather and maintain its quality.


- Wipe the natural leather seat cover 

often with dry or soft cloth.


- Use of proper leather protector may 

prevent abrasion of the cover and 

helps maintain the color. Be sure to 

read the instructions and consult 

a specialist when using leather 

coating or protective agent.


- Light colored (beige, cream beige) 

leather is easily contaminated and 

the stain is noticeable. Clean the 

seats frequently.


- Avoid wiping with wet cloth. It may 

cause the surface to crack.

ś

Cleaning the leather seats


- Remove all contaminations 

instantly. Refer to instructions below 

for removal of each contaminant.


- Cosmetic products (sunscreen, 

foundation, etc.)
Apply cleansing cream on a cloth 

and wipe the contaminated spot. 

Wipe off the cream with a wet cloth 

and remove water with a dry cloth.


- Beverages (coffee, soft drink, etc.)

Apply a small amount of neutral 

detergent and wipe until 

contaminations do not smear.


- Oil

Remove oil instantly with 

absorbable cloth and wipe with 

stain remover used only for natural 

leather.


- Chewing gum

Harden the gum with ice and 

remove gradually.

Cleaning the seat belt webbing

Clean the belt webbing with any 

mild soap solution recommended for 

cleaning upholstery or carpet. Follow 

the instructions provided with the soap. 

Do not bleach or re-dye the webbing 

because this may weaken the seat belt.

Cleaning the interior window glass

If the interior glass surfaces of the 

vehicle become fogged (that is, covered 

with an oily, greasy or waxy film), they 

should be cleaned with glass cleaner. 

Follow the directions on the glass cleaner 

container.

NOTICE

Do not scrape or scratch the inside of 

the rear window. This may result in 

damage to the rear window defroster 

grid.

Maintenance

9-74

EMISSION CONTROL SYSTEM

The emission control system of your 

vehicle is covered by a written limited 

warranty. Please see the warranty 

information contained in the Owner’s 

Handbook & Warranty Information 

booklet in your vehicle.
Your vehicle is equipped with an 

emission control system to meet all 

applicable emission regulations. There 

are three emission control systems, as 

follows.

(1)  Crankcase emission control system
(2)  Evaporative emission control system
(3)  Exhaust emission control system

In order to ensure the proper function 

of the emission control systems, it 

is recommended that you have your 

vehicle inspected and maintained 

by an authorized HYUNDAI dealer in 

accordance with the maintenance 

schedule in this manual.

NOTICE

For the Inspection and Maintenance 

Test (with Electronic Stability Control 

(ESC) system)

ś

To prevent the vehicle from misfiring 

during dynamometer testing, turn 

the Electronic Stability Control 

(ESC) system off by pressing the ESC 

switch (ESC OFF light illuminated).

ś

After dynamometer testing is 

completed, turn the ESC system back 

on by pressing the ESC switch again.

1.  Crankcase Emission Control 

System

The positive crankcase ventilation system 

is employed to prevent air pollution 

caused by blow-by gases being emitted 

from the crankcase. This system supplies 

fresh filtered air to the crankcase through 

the air intake hose. Inside the crankcase, 

the fresh air mixes with blow-by gases, 

which then pass through the PCV valve 

into the induction system.

2. Evaporative Emission Control 

System Including Onboard 

Refueling Vapor Recovery 

(ORVR)

The Evaporative Emission Control System 

is designed to prevent fuel vapors from 

escaping into the atmosphere. The 

ORVR system is designed to allow the 

vapors from the fuel tank to be loaded 

into a canister while refueling at the gas 

station, preventing the escape of fuel 

vapors into the atmosphere.

Canister

Fuel vapors generated inside the fuel 

tank are absorbed and stored in the 

onboard canister. When the engine is 

running, the fuel vapors absorbed in the 

canister are drawn into the surge tank 

through the purge control solenoid valve.

Purge Control Solenoid Valve (PCSV)

The purge control solenoid valve 

is controlled by the Engine Control 

Module (ECM); when the engine coolant 

temperature is low during idling, the 

PCSV closes so that evaporated fuel 

is not taken into the engine. After the 

engine warms-up during ordinary 

driving, the PCSV opens to introduce 

evaporated fuel to the engine.

09

9-75

3. Exhaust Emission Control 

System

The Exhaust Emission Control System is 

a highly effective system which controls 

exhaust emissions while maintaining 

good vehicle performance.
When the engine starts or fails to start, 

excessive attempts to restart the engine 

may cause damage to the emission 

system.

Engine exhaust (carbon monoxide) 

precautions

ś

Carbon monoxide can be present 

with other exhaust fumes. If you smell 

exhaust fumes of any kind in your 

vehicle, drive with all the windows 

fully open. Have your vehicle checked 

and repaired immediately.

 WARNING

Engine exhaust gases contain carbon 

monoxide (CO). Though colorless and 

odorless, it is dangerous and could be 

lethal if inhaled. Follow the instructions 

on this page to avoid CO poisoning.

 WARNING

CALIFORNIA PROPOSITION 65 

WARNING
Engine exhaust and a wide variety of 

automobile components and parts, 

including components found in the 

interior furnishings in a vehicle, contain 

or emit chemicals known to the State 

of California to cause cancer and birth 

defects and reproductive harm.
In addition, certain fluids contained 

in vehicles and certain products of 

component wear contain or emit 

chemicals known to the State of 

California to cause cancer and birth 

defects or other reproductive harm.

ś

Do not operate the engine in confined 

or closed areas (such as garages) any 

more than what is necessary to move 

the vehicle in or out of the area.

ś

When the vehicle is stopped in an 

open area for more than a short time 

with the engine running, adjust the 

ventilation system (as needed) to draw 

outside air into the vehicle.

ś

Never sit in a parked or stopped 

vehicle for any extended time with the 

engine running.

ś

When the engine stalls or fails to 

start, excessive attempts to restart 

the engine may cause damage to the 

emission control system.

Maintenance

9-76

Operating precautions for catalytic 

converters (if equipped)

 WARNING

The exhaust system and catalytic 

system are very hot while the engine is 

running or immediately after the engine 

is turned off.  To avoid SERIOUSINJURY 

or DEATH:

ś

Do not park, idle, or drive the vehicle 

over or near flammable objects, such 

as grass, vegetation, paper, leaves, 

etc. A hot exhaust system can ignite 

flammable items under your vehicle.

ś

Keep away from the exhaust system 

and catalytic converter or you may 

get burned.
Also, Do not remove the heat sink 

around the exhaust system, do not 

seal the bottom of the vehicle, and 

do not coat the vehicle for corrosion 

control. It may present a fire risk 

under certain conditions.

Your vehicle is equipped with a catalytic 

converter emission control device. 

To prevent damage to the catalytic 

converter and to your vehicle, take the 

following precautions:

ś

Use only UNLEADED FUEL for 

gasoline engines.

ś

Do not operate the vehicle when 

there are signs of engine malfunction, 

such as misfire or a noticeable loss of 

performance.

ś

Do not misuse or abuse the engine. 

Examples of misuse are coasting with 

the hybrid system off and descending 

steep grades in gear with the hybrid 

system off.

ś

Do not operate the engine at high 

idle speed for extended periods (5 

minutes or more).

ś

Do not modify or tamper with any 

part of the engine or emission control 

system. Have all inspections and 

adjustments made by an authorized 

HYUNDAI dealer.

ś

Avoid driving with an extremely low 

fuel level.
Running out of fuel could cause the 

engine to misfire, damaging the 

catalytic converter.

09

9-77

CALIFORNIA PERCHLORATE NOTICE

Perchlorate Material-special handling may apply, See: https://dtsc.ca.gov/perchlorate
Notice to California Vehicle Dismantlers: Perchlorate containing materials, such as 

air bag inflators, seatbelt pretensioners and keyless remote entry batteries, must be 

disposed of according to Title 22 California Code of Regulations Section 67384.10 (a).


Content      ..     20      21      22