Hyundai Veloster N (2022 year). Manual in english - page 7
■ Example
3
OJS088008N
OHYK059001
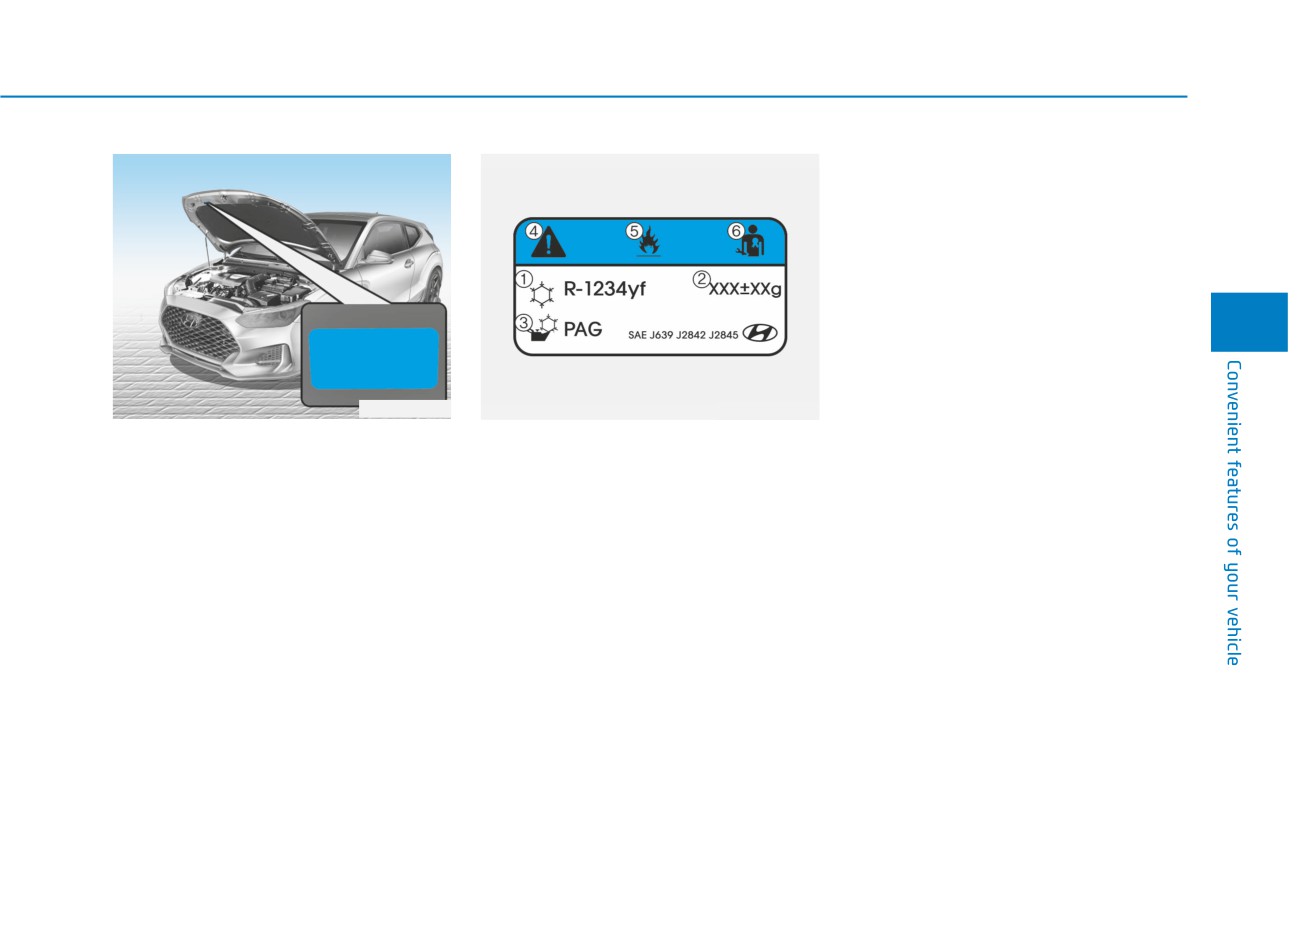
Air Conditioning refrigerant label
Each symbols and specification on
You can find out which air condition-
the
ing refrigerant is applied to your vehi-
air conditioning refrigerant label is
cle on the label located inside of the
represented as below:
hood.
1. Classification of refrigerant
2. Amount of refrigerant
3. Classification of compressor lubri-
cant
4. Caution
5. Flammable refrigerant
6. To require registered technician to
service air conditioning system
7. Service manual
3-99
Convenient features of your vehicle
WINDSHIELD DEFROSTING AND DEFOGGING
•
For maximum defrost perform-
Manual Climate Control System
WARNING
ance, set the temperature control
knob to the highest temperature
Windshield heating
setting (rotated all the way to the
right) and the fan speed control to
Do not use the
or
posi-
tion during cooling operation in
the highest setting.
extremely humid weather. The
•
If warm air to the floor is desired
difference between the temper-
while defrosting or defogging, set the
ature of the outside air and that
mode to the floor-defrost position.
of the windshield could cause
•
Before driving, clear all snow and
the outer surface of the wind-
ice from the windshield, rear win-
shield to fog up, causing loss of
dow, side view mirrors, and all side
visibility could cause an acci-
windows.
OJS048307N
dent resulting in serious injury
•
Clear all snow and ice from the
or death. In this case, set the
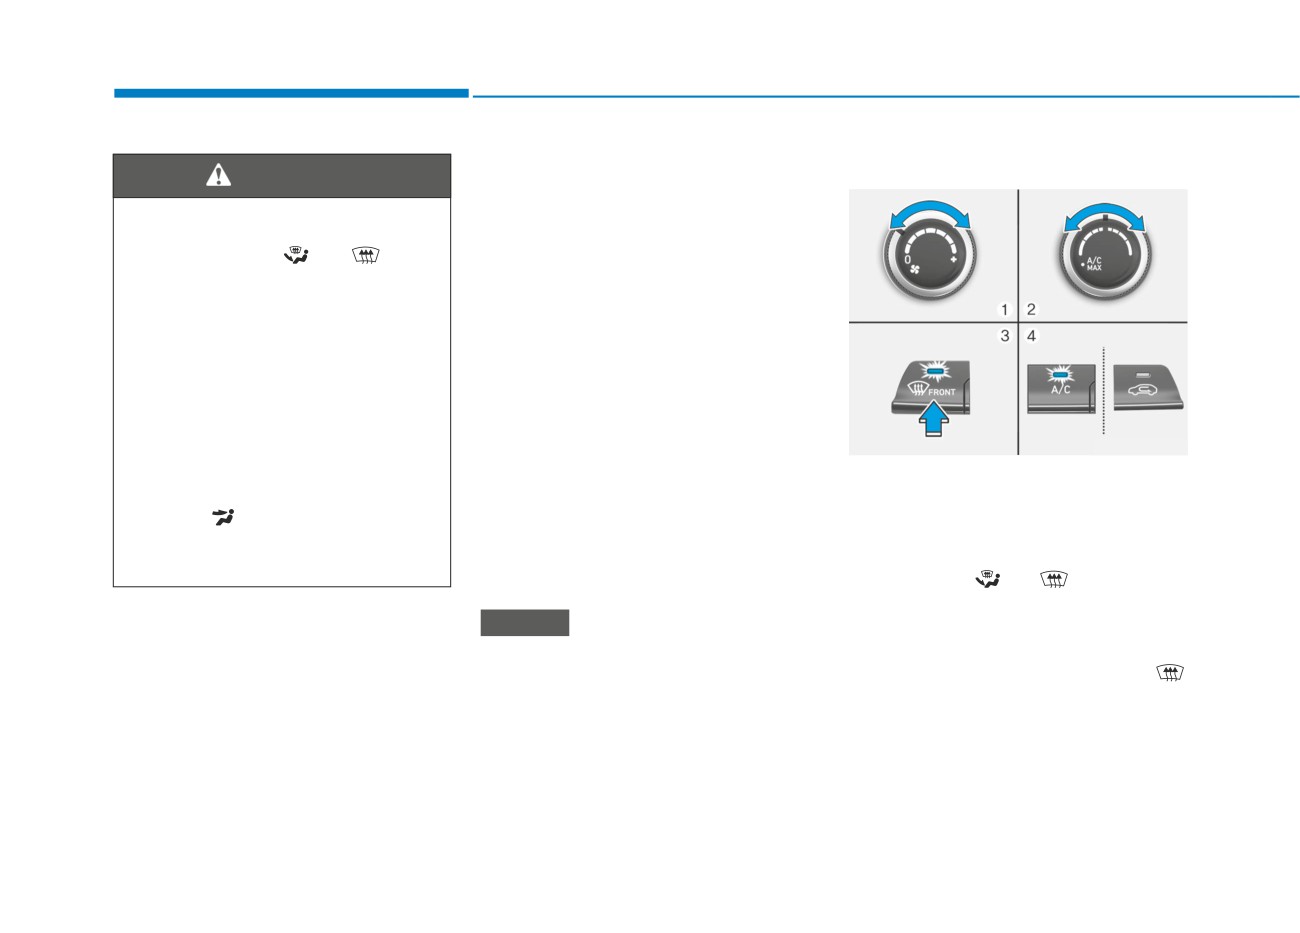
To defog inside windshield
hood and air inlet in the cowl grill to
mode selection knob or button
improve heater and defroster effi-
1. Select any fan speed except "0"
to the
position and fan
position.
ciency and to reduce the probability
speed control knob or button to
of fogging up the inside of the wind-
2. Select the desired temperature.
a lower speed.
shield.
3. Select the
or
position.
4. Fresh mode will be selected auto-
NOTICE
matically. Additionally, the air condi-
tioning will automatically operate if
If the engine temperature is still
the mode is selected to the
cold after starting, then a brief
position.
engine warm up period may be
required for the vented air flow to
Check to make sure the A/C is ON. If
become warm or hot.
the A/C ON LED is not illuminated,
press the A/C button once to turn the
air conditioner ON.
3-100
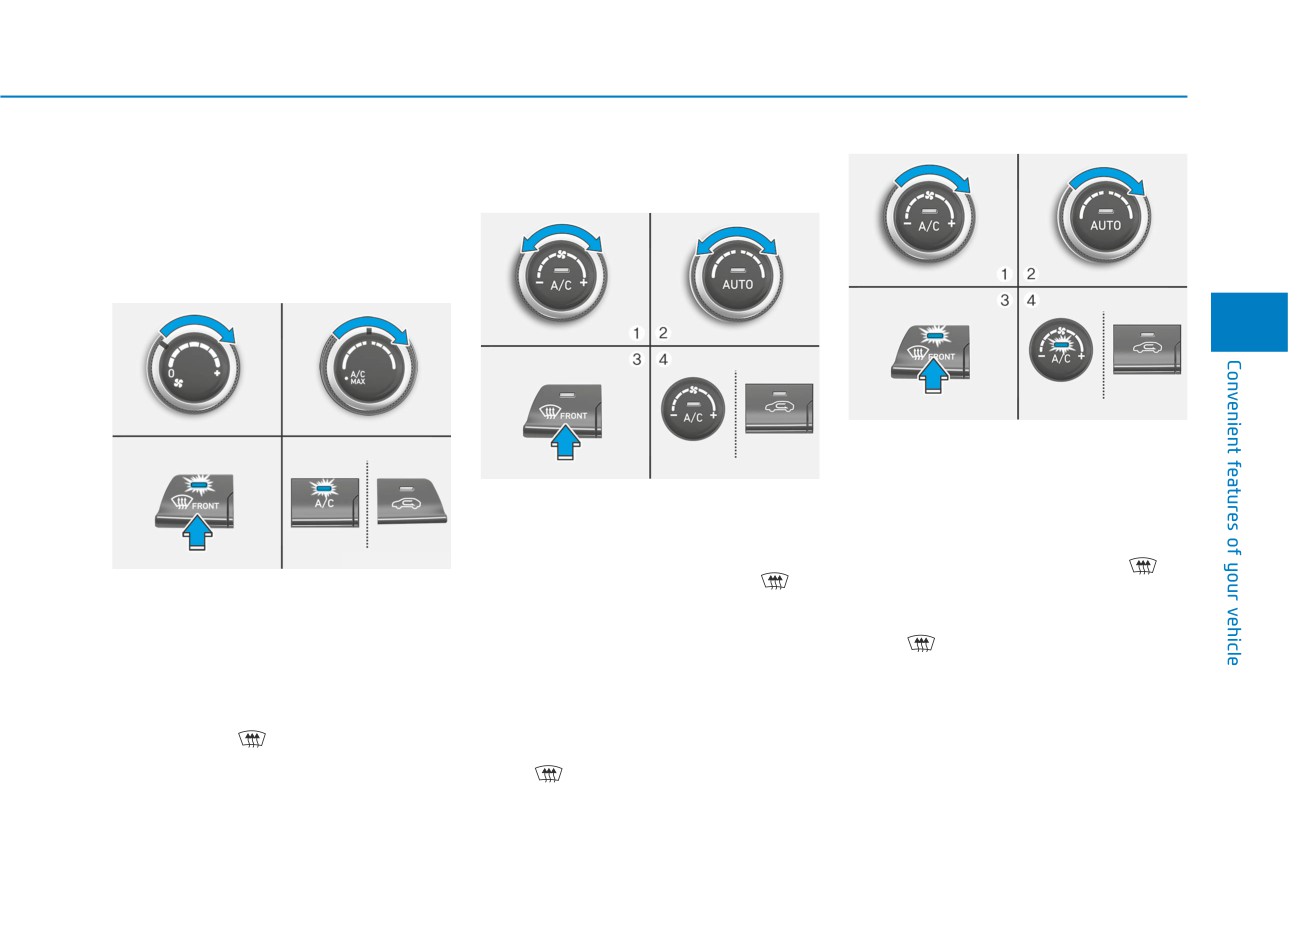
Check to make sure the air intake
Automatic Temperature Control
control is in Fresh mode. If the air
System (if equipped)
intake control LED is illuminated,
press the button once to enable
Fresh mode (LED OFF).
3
OJS048310
To defrost outside windshield
OJS048309
1. Set the fan speed to the highest
(extreme right) position.
To defog inside windshield
2. Set the temperature to the extreme
1. Select the desired fan speed.
hot (HI) position.
2. Select the desired temperature.
OJS048308N
3. Press the defroster button (
).
3. Press the defroster button (
).
To defrost outside windshield
4. The outside (fresh) air position will
4. Fresh mode will be selected auto-
1. Set the fan speed to the highest
be selected automatically.
matically.
setting (knob rotated all the way to
If the
position is selected, lower
the right).
Check to make sure the air intake
fan speed is adjusted to a higher fan
control is in Fresh mode. If the air
2. Set the temperature control to the
speed.
intake control LED is illuminated,
highest temperature setting.
press the button once to enable
3. Select the
position.
Fresh mode (LED OFF).
4. Fresh mode (Recirculation OFF)
If the
position is selected, the fan
and A/C ON will automatically be
speed is automatically increased.
selected.
3-101
Convenient features of your vehicle
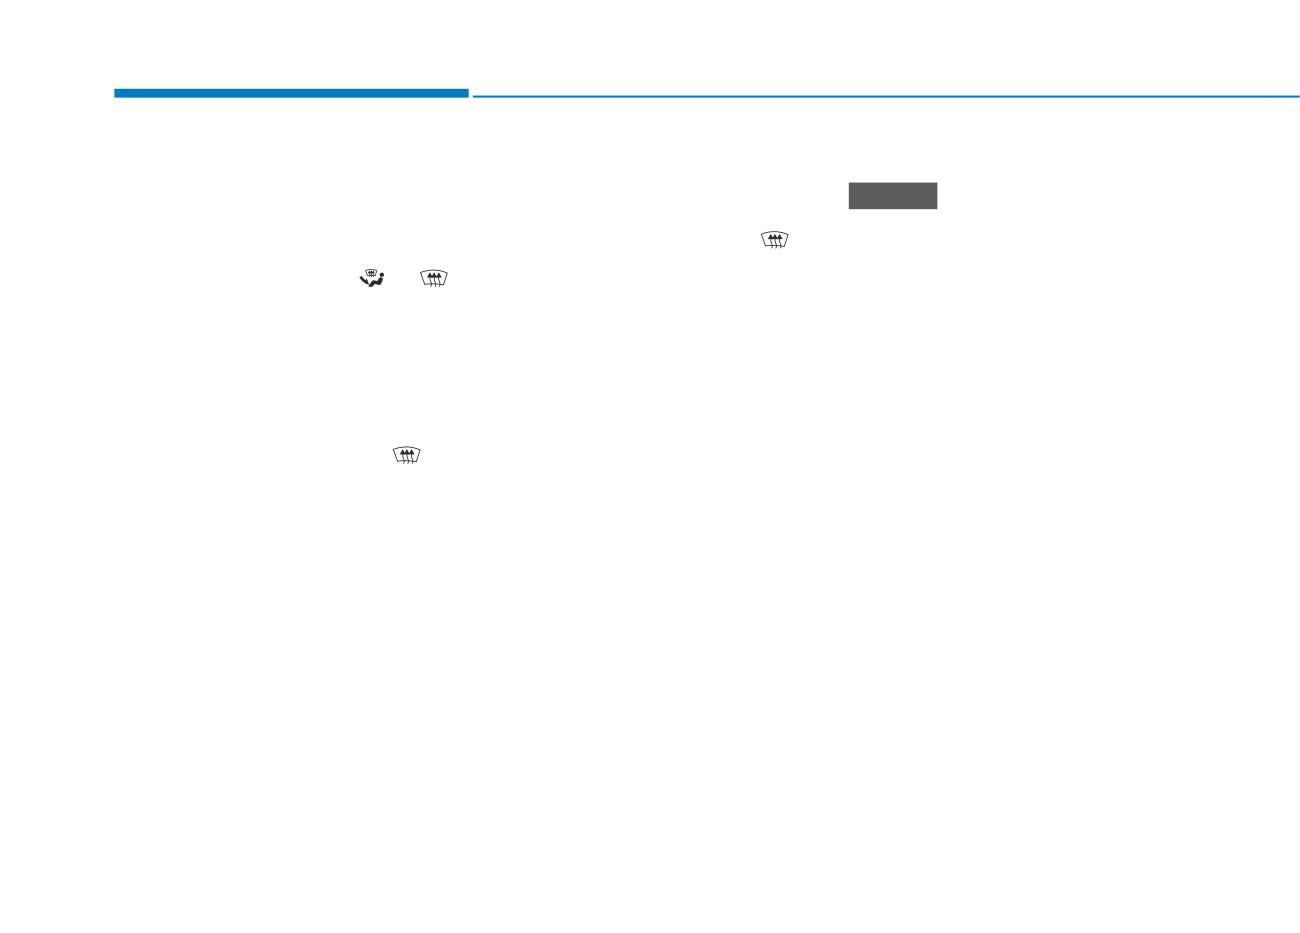
Defogging logic
Automatic climate control system
Rear Window Defroster
To reduce the probability of fogging
1. Turn the ignition switch to the ON
NOTICE
up the inside of the windshield, the
position.
air intake or air conditioning are con-
To prevent damage to the rear
2. Press the defroster button (
).
trolled automatically according to
window defroster conducting ele-
3. While pressing the air conditioning
certain conditions such as
or
ments bonded to the inside sur-
button (A/C), press the air intake
positions. To cancel or reset the
face of the rear window, never use
control button at least 5 times with-
defogging logic, do the following.
sharp instruments or window
in 3 seconds.
cleaners containing abrasives to
The Automatic Temperature Control
clean the window.
Manual climate control system
information screen will blink 3 times
1. Turn the ignition switch to the ON
to indicate that the defogging logic
If you want to defrost and defog
position.
has been disabled.
the front windshield, refer to the
2. Press the defroster button (
).
Repeat the steps again to re-enable
"Windshield Defrosting and
the defogging logic.
Defogging" section in this chapter.
3. Press the air intake control button
at least 5 times within 3 seconds.
The LED indicator on the A/C ON
If the battery has been discharged or
button will blink 3 times to indicate
disconnected, it resets to the defog
that the defogging logic has been
logic status.
disabled.
Repeat the steps again to re-enable
the defogging logic.
If the battery has been discharged or
disconnected, it resets to the defog
logic status.
3-102
CLIMATE CONTROL
■ Manual climate control system
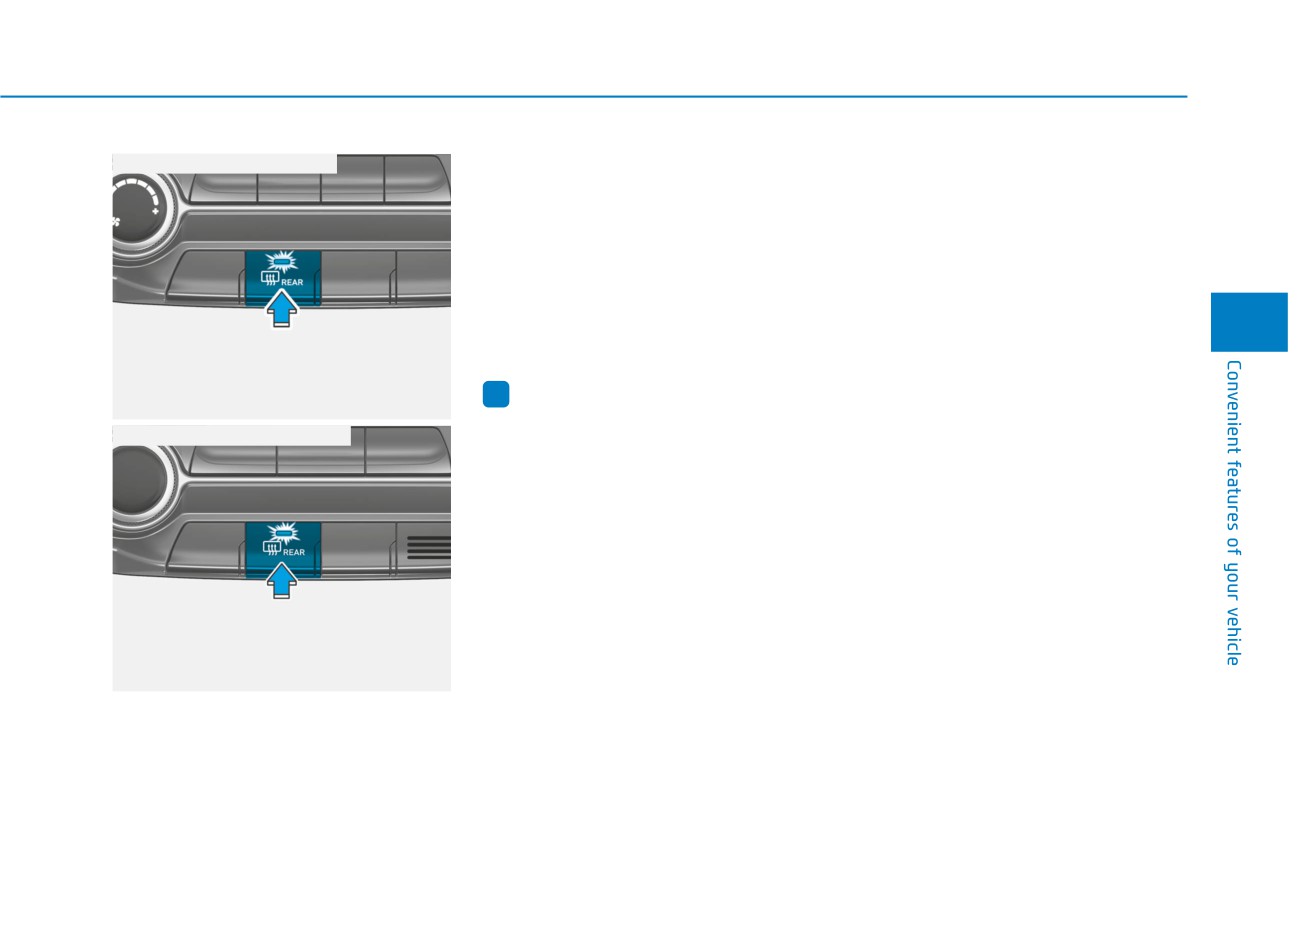
• To activate the rear window
ADDITIONAL FEATURES
defroster, press the rear window
(IF EQUIPPED)
defroster button located on the cli-
mate control instrument panel dis-
Automatic Ventilation
play. The indicator on the rear win-
When the ignition switch is in the ON
dow defroster button illuminates
position or when the engine is run-
when the defroster is ON.
ning and temperature is below 15°C
• To turn off the defroster, press the
(59°F) with the recirculation mode
3
rear window defroster button again.
selected more than five minutes, the
air intake position will automatically
change to fresh mode.
i
Information
OJS048302N
• If there is heavy accumulation of
■ Automatic climate control system
To cancel or reset the Automatic
snow on the rear window, brush it off
Ventilation
before operating the rear defroster.
When the air conditioning system is
• The rear window defroster automat-
on, press the mode selection button
ically turns off after approximately
and the recirculation mode button
20 minutes or when the ignition
five times within three seconds.
switch is in the LOCK/OFF position.
When the Automatic Ventilation fea-
ture is enabled, the Recirculation
Side view mirror defroster
button LED indicator will blink
6
If your vehicle is equipped with the
times.
side view mirror defrosters, they will
OJS048303
When the Automatic Ventilation fea-
operate at the same time you turn on
ture is disabled, the Recirculation
The defroster heats the window to
the rear window defroster.
button LED indicator will blink
3
remove frost, fog and thin ice from
times.
the interior and exterior of the rear
window, while the engine is running.
3-103
Convenient features of your vehicle
STORAGE COMPARTMENT
Center Console Storage
Glove Box
WARNING
Never store cigarette lighters,
propane cylinders, or other
flammable/explosive materials
in the vehicle. These items may
catch fire and/or explode if the
vehicle is exposed to hot tem-
peratures for extended periods.
WARNING
OJSN048040
OJS048041
ALWAYS keep the storage com-
partment covers closed secure-
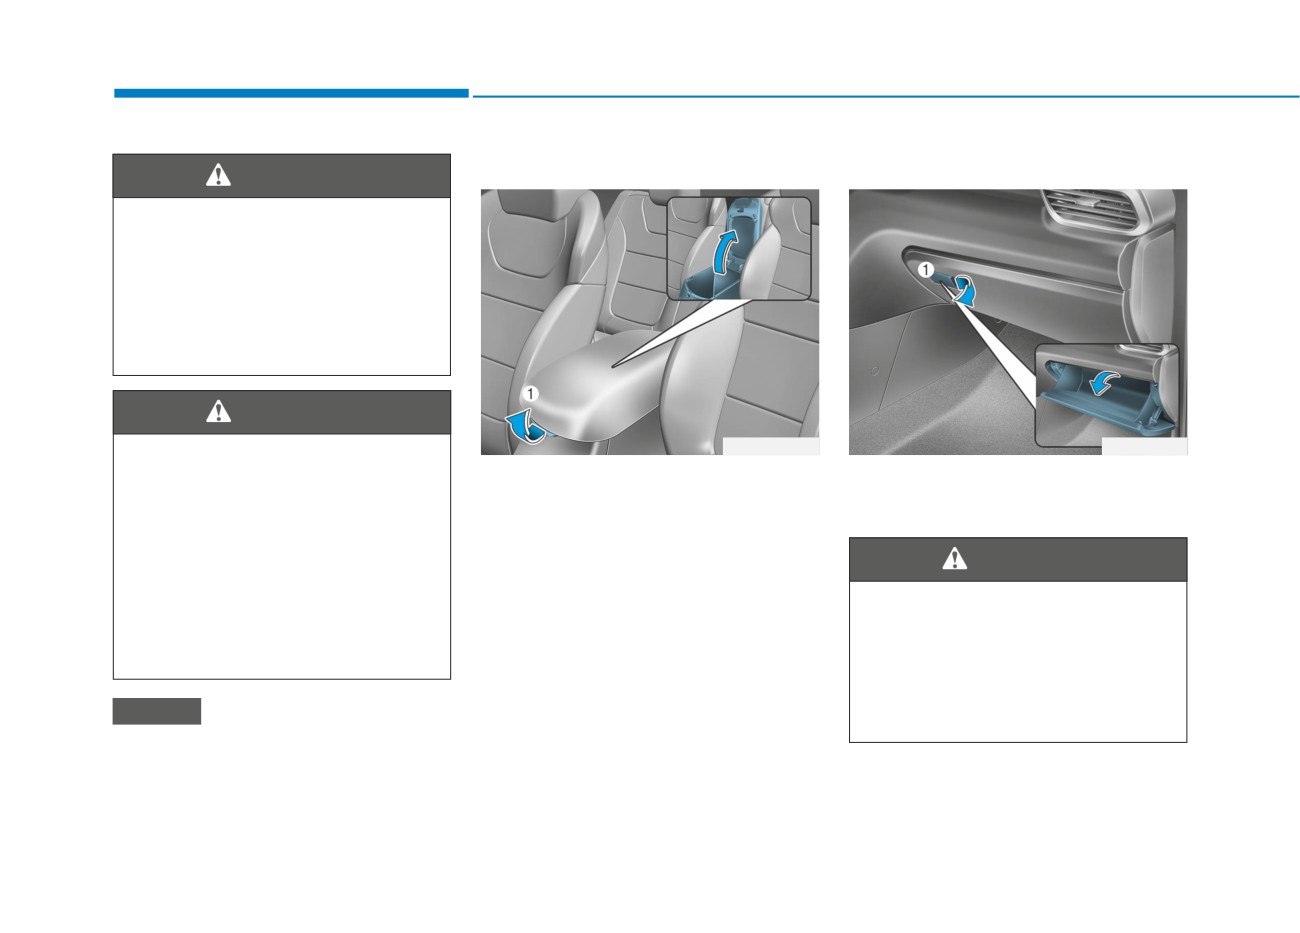
To open :
To open:
ly while driving. Items inside
Grab and hold the latch (1) on the
Pull the lever (1).
your vehicle are moving as fast
arm rest then lift the lid.
as the vehicle. If you have to
WARNING
stop or turn quickly, or if there
is a crash, the items may fly out
ALWAYS close the glove box
of the compartment and may
door after use.
cause an injury if they strike the
driver or a passenger.
An open glove box door can
cause serious injury to the pas-
senger in an accident, even if the
NOTICE
passenger is wearing a seat belt.
To avoid possible theft, do not
leave valuables in the storage
compartments.
3-104
Sunglass Holder
WARNING
•
Do not keep objects except
sunglasses inside the sun-
glass holder. Such objects can
be thrown from the holder in
the event of a sudden stop or
3
an accident, possibly injuring
the passengers in the vehicle.
•
Do not open the sunglass
holder while the vehicle is
moving. The rear view mirror
OOS047058
of the vehicle can be blocked
by an open sunglass holder.
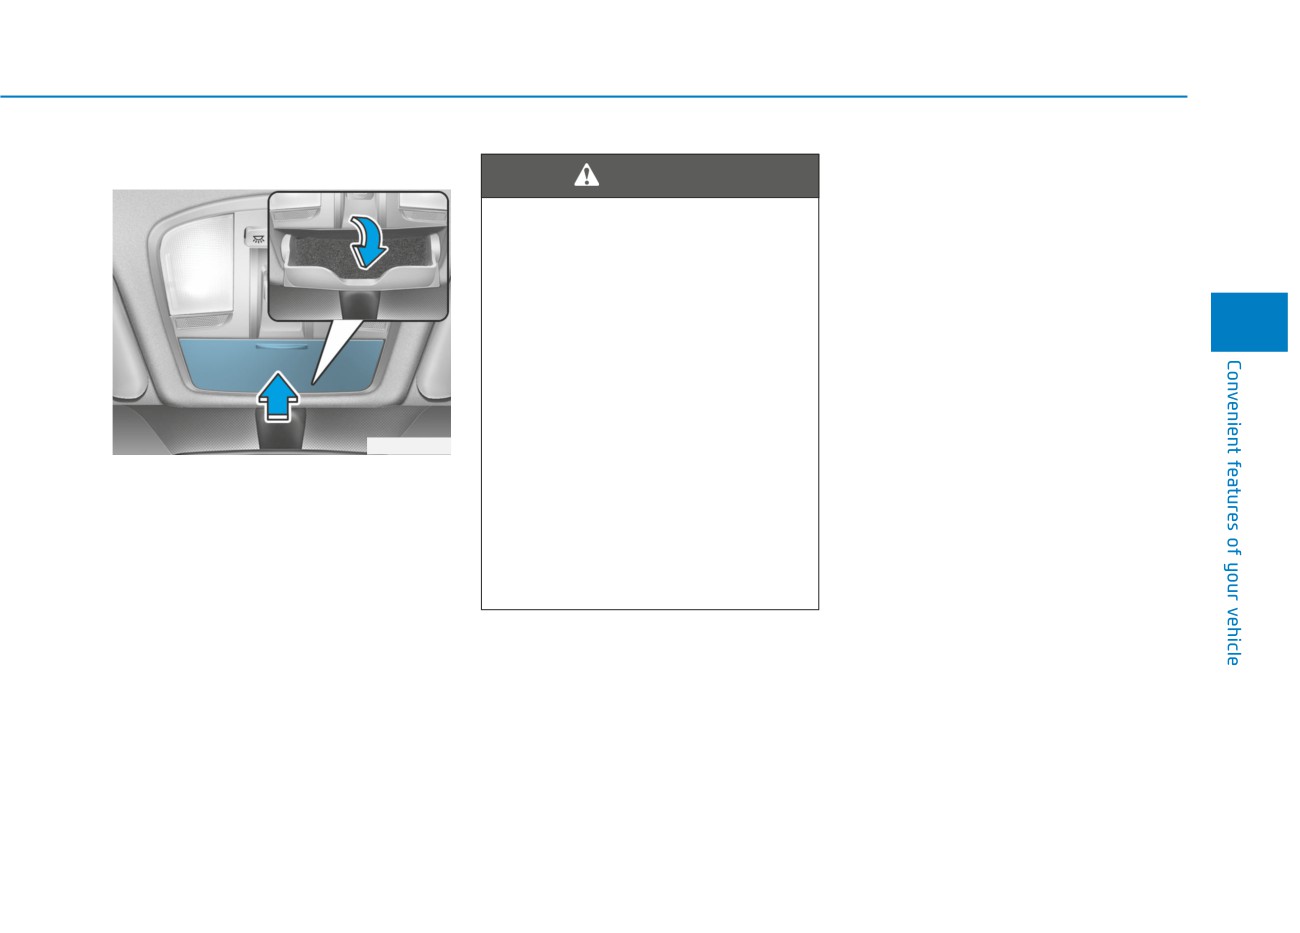
To open:
•
Do not put the glasses forcibly
Push and release the cover and the
into a sunglass holder. It may
holder will slowly open. Place your
cause personal injury if you
sunglasses in the compartment door
try to open it forcibly when the
with the lenses facing out.
glasses are jammed in holder.
To close:
Push back into position.
Make sure the sunglass holder is
closed while driving.
3-105
Convenient features of your vehicle
INTERIOR FEATURES
Cup Holder
NOTICE
WARNING
■ Front
•
Keep your drinks sealed while
•
Avoid abrupt starting and
driving to prevent spilling your
braking when the cup holder
drink. If liquid spills, it may get
is in use to prevent spilling
into the vehicle's electrical/elec-
your drink. If hot liquid spills,
tronic system and damage elec-
you could be burned. Such a
trical/electronic parts.
burn to the driver could cause
•
When cleaning spilled liquids do
loss of vehicle control result-
not use hot air to blow out or dry
ing in an accident.
the cup holder. This may dam-
•
Do not place uncovered or
age the interior.
unsecured cups, bottles,
OJSN048042
cans, etc., in the cup holder
■ Rear
containing hot liquid while the
vehicle is in motion. Injuries
may result in the event of a
sudden stop or collision.
•
Only use soft cups in the cup
holders. Hard objects can
injure you in an accident.
WARNING
OJSN048043
Keep cans or bottles out of
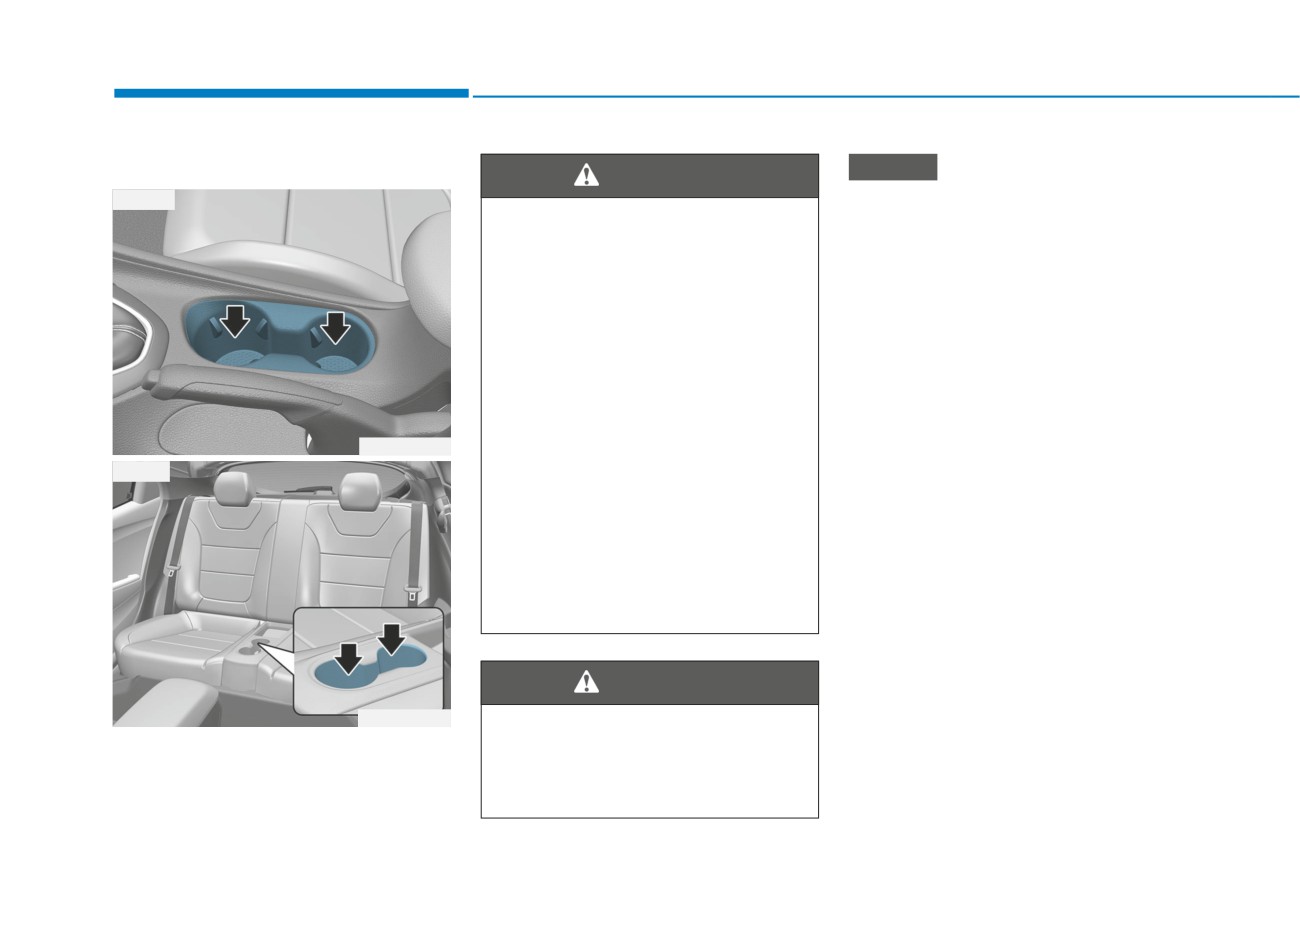
Cups or small beverages cups may
direct sun light and do not put
be placed in the cup holders.
them in a hot vehicle. It may
explode.
3-106
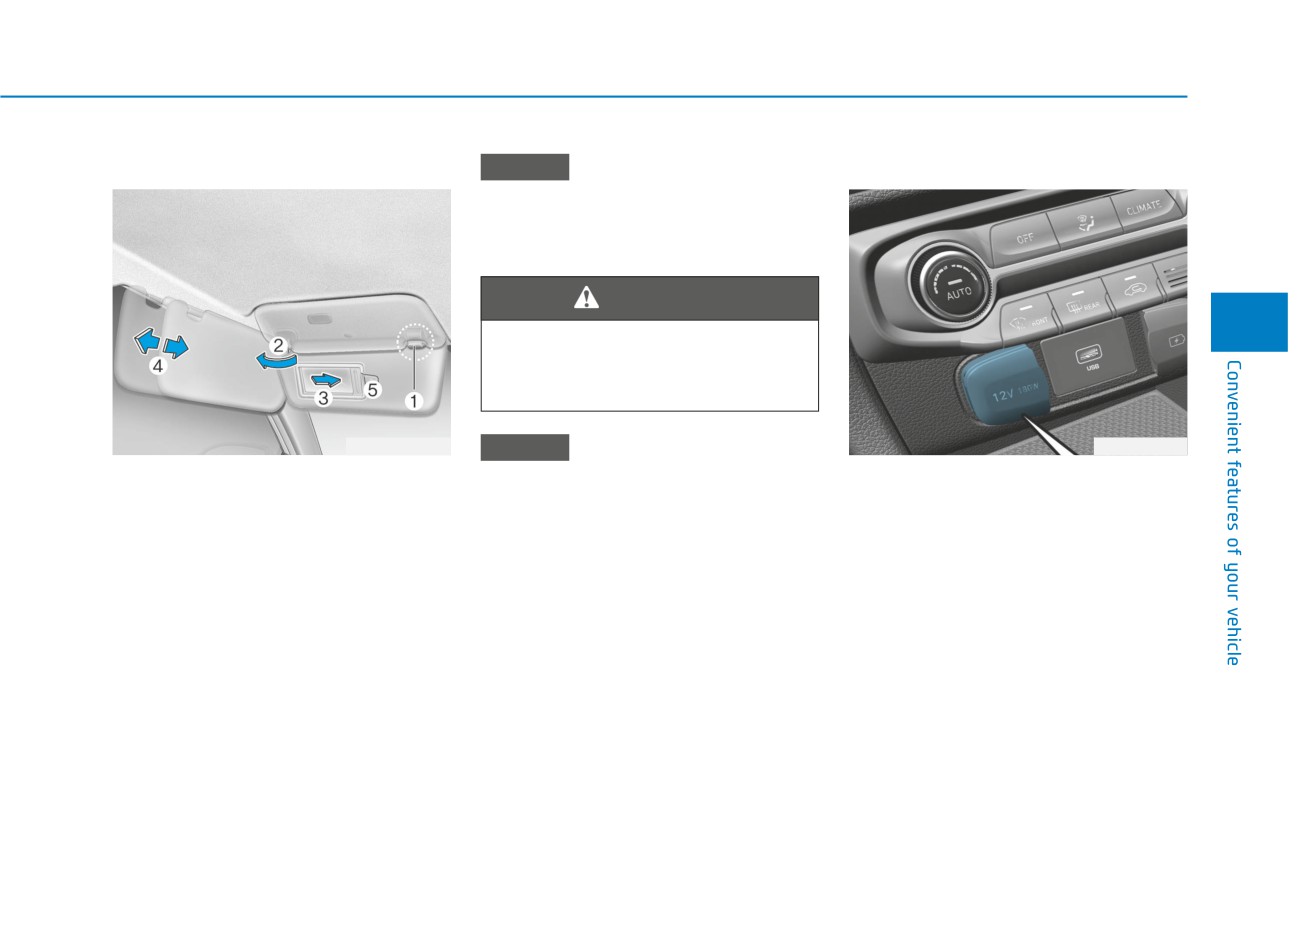
Sunvisor
NOTICE
Power Outlet
Close the vanity mirror cover
securely and return the sunvisor
to its original position after use.
WARNING
3
For your safety, do not block
your view when using the sunvi-
sor.
OAEE046511N
NOTICE
OBU040045
To use the sunvisor, pull it down-
Do not put multiple tickets in the
The power outlet is designed to pro-
ward.
ticket holder at one time. This
vide power for mobile telephones or
To use the sunvisor to block the sun
could cause damage to the ticket
other devices designed to operate
holder.
with vehicle electrical systems. The
from the side window, pull it down-
devices should draw less than 180 W
ward, release it from the bracket (1)
with the engine running.
and swing it to the side (2) towards
the window.
To use the vanity mirror, pull down
the sunvisor and slide the mirror
cover (3).
Adjust the sunvisor forward or back-
ward (4) as needed (if equipped).
Use the ticket holder (5) to hold tick-
ets (if equipped).
3-107
Convenient features of your vehicle
•
Some electronic devices can
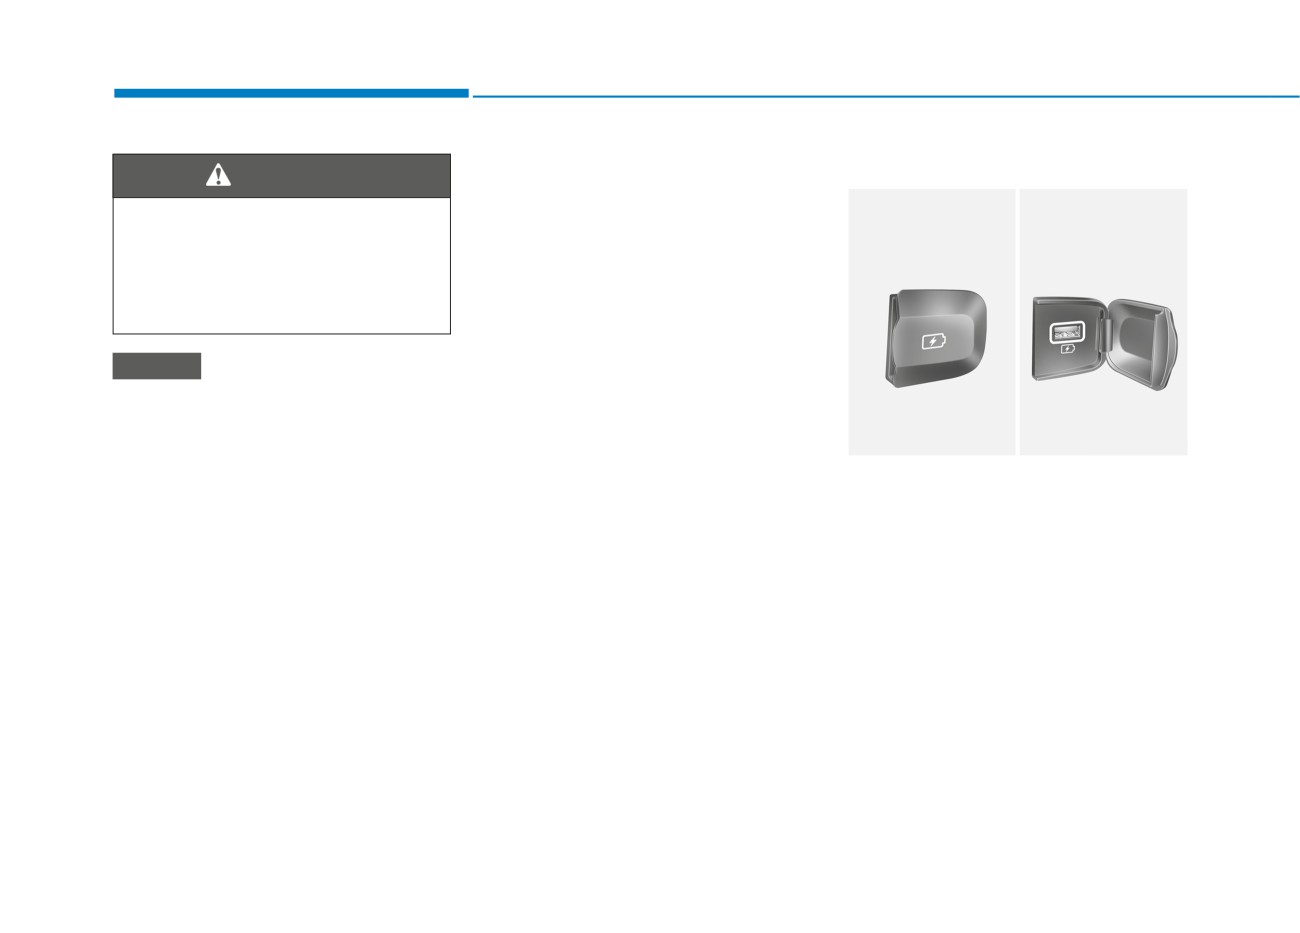
USB charger
WARNING
cause electronic interference
when plugged into a vehicle's
Avoid electrical shocks. Do not
power outlet. These devices may
place your fingers or foreign
cause excessive audio static
objects (pin, etc.) into a power
and malfunctions in other elec-
outlet or touch the power outlet
tronic systems or devices used
with a wet hand.
in your vehicle.
•
Push the plug in as far as it will
NOTICE
go. If good contact is not made,
the plug may overheat and the
To prevent damage to the Power
fuse may open.
Outlets :
• Plug in battery equipped electri-
OJSN048046
• Use the power outlet only when
cal/electronic devices with
the engine is running and
reverse current protection. The
The USB charger is designed to
remove the accessory plug after
recharge batteries of small size elec-
current from the battery may
use. Using the accessory plug
trical devices using a USB cable.
flow into the vehicle's electri-
for prolonged periods of time
cal/electronic system and cause
The electrical devices can be
with the engine off could cause
system malfunction.
recharged when the ignition switch
the battery to discharge.
is in the ACC/ON position.
• Only use
12V electric acces-
Insert the USB charger into the USB
sories which are less than 180 W
port, and re-charge a smart phone or
in electric capacity.
a tablet PC.
• Adjust the air-conditioner or
The battery charging state may be
heater to the lowest operating
monitored on the electrical device.
level when using the power outlet.
Disconnect the USB cable from the
• Close the cover when not in use.
USB port after use.
3-108
•
A smart phone or a tablet PC may
Clock
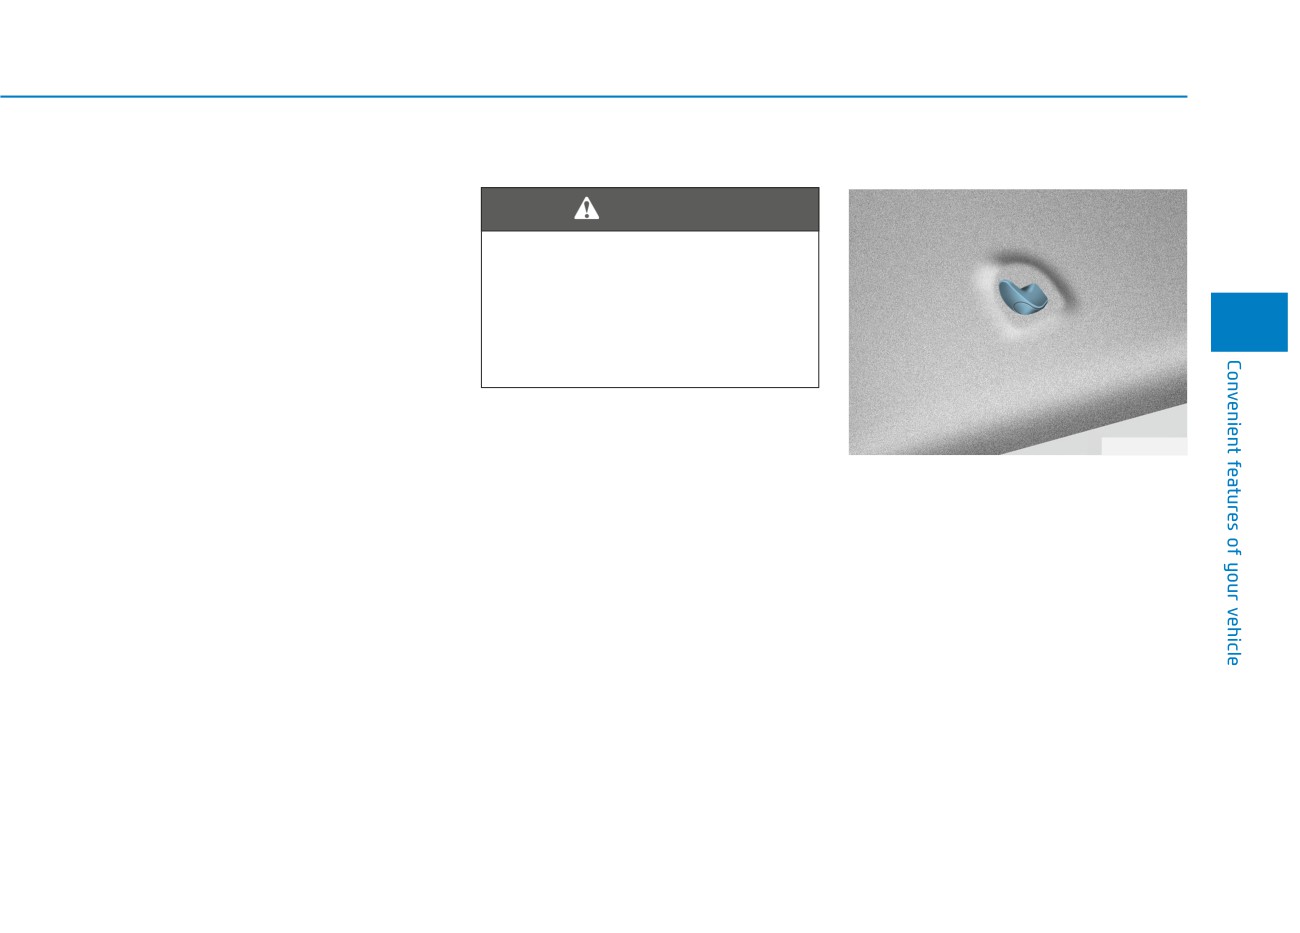
Clothes Hanger
get warmer during the re-charging
process. It does not indicate any
WARNING
malfunction with the charging sys-
tem.
Do not attempt to adjust the
•
A smart phone or a tablet PC,
clock while driving. Doing so
which adopts a different re-charg-
may result in distracted driving
ing method, may not be properly
which may lead to an accident
3
re-charged. In this case, use an
involving personal injury or
exclusive charger of your device.
death.
•
The charging terminal is only to
recharge a device. Do not use the
Vehicles with display audio
charging terminal either to turn ON
system
OJS048056
an audio or to play media in the
Select the [SETUP] button on the
infotainment system
These hangers are not designed to
audio system ➟ Select [Date/Time].
hold large or heavy items.
• Set time: Set the time displayed on
the audio screen.
• Time format: Choose between 12-
hour and 24-hour time formats.
3-109
Convenient features of your vehicle
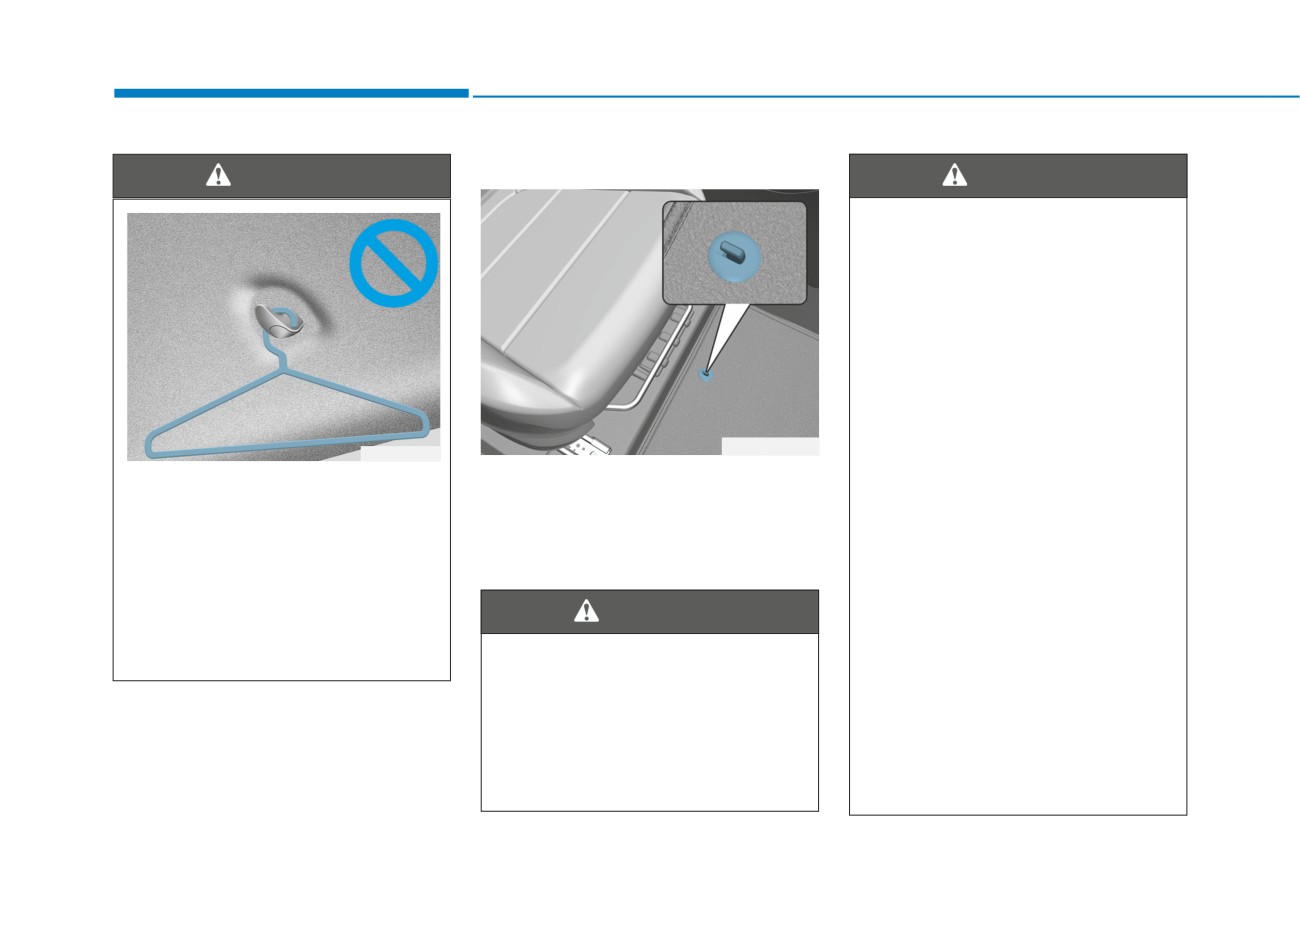
Floor Mat Anchor(s)
WARNING
WARNING
The following must be observed
when installing ANY floor mat
to the vehicle.
• Ensure that the floor mats are
securely attached to the vehi-
cle's floor mat anchor(s)
before driving the vehicle.
• Do not use ANY floor mat that
cannot be firmly attached to
the vehicle's floor mat anchors.
OJSN048138
OJS048057
• Do not stack floor mats on top
Do not hang other objects such
ALWAYS use the Floor Mat Anchors
of one another (e.g. all-weath-
as hangers or hard objects
to attach the front floor mats to the
er rubber mat on top of a car-
except clothes. Also, do not put
vehicle. The anchors on the front
peted floor mat). Only a single
heavy, sharp or breakable
floor carpet keep the floor mats from
floor mat should be installed
objects in the clothes pockets.
sliding forward.
in each position.
In an accident or when the cur-
IMPORTANT - Your vehicle was
tain air bag is inflated, it may
WARNING
manufactured with driver's side
cause vehicle damage or per-
floor mat anchors that are
sonal injury.
Do not overlay additional mats
designed to securely hold the
or liners over the floor mats. If
floor mat in place. To avoid any
using All Weather mats, remove
interference with pedal opera-
the carpeted floor mats before
tion, HYUNDAI recommends
installing them. Only use floor
that the HYUNDAI floor mat
mats designed to connect to the
designed for use in your vehicle
anchors.
be installed.
3-110
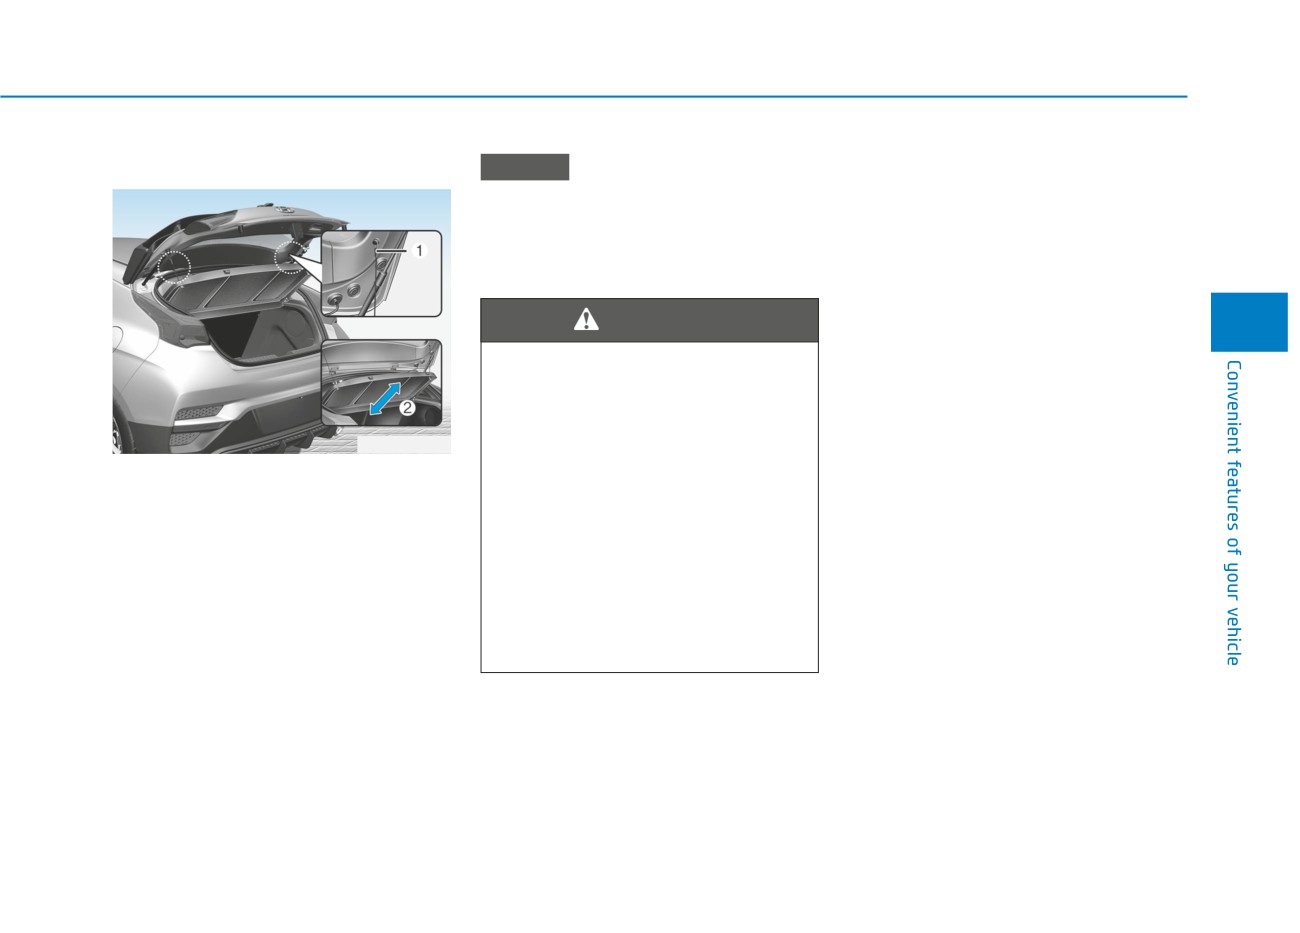
Cargo Area Cover
NOTICE
Since the cargo area cover may be
damaged or deformed, do not put
luggage on it when it is being
used.
WARNING
3
•
Do not place objects on the
cargo area cover while driv-
ing. Such objects may be
thrown about inside the vehi-
OBU048049N
cle and possibly injure vehicle
Use the cover to hide items stored in
occupants during an accident
the cargo area.
or when braking.
The cargo area cover will lift when
•
Never allow anyone to ride in
the tailgate is opened.
the luggage compartment. It
is designed for luggage only.
Disconnect the strap
(1) from the
holder if you want to return the cover
•
Maintain balance of the vehi-
to the original position. To remove the
cle and locate the weight as
cargo area cover completely, lift the
far forward as possible.
cover to a 50-degree angle and pull it
out (2).
3-111
Infotainment System
Infotainment System
4-2
USB Port
4-2
Antenna
4-2
Steering Wheel Audio Control
4-3
Bluetooth® Wireless Technology Hands-Free
4-4
Display audio system
4-4
4
Infotainment System
INFOTAINMENT SYSTEM
NOTICE
USB Port
Antenna
• If you install an aftermarket HID
head lamp, your vehicle's audio
and electronic devices may not
function properly.
• Prevent chemicals such as per-
fume, cosmetic oil, sun cream,
hand cleaner, and air freshener
from contacting the interior
parts because they may cause
damage or discoloration.
OJSN040055
OJSN048050
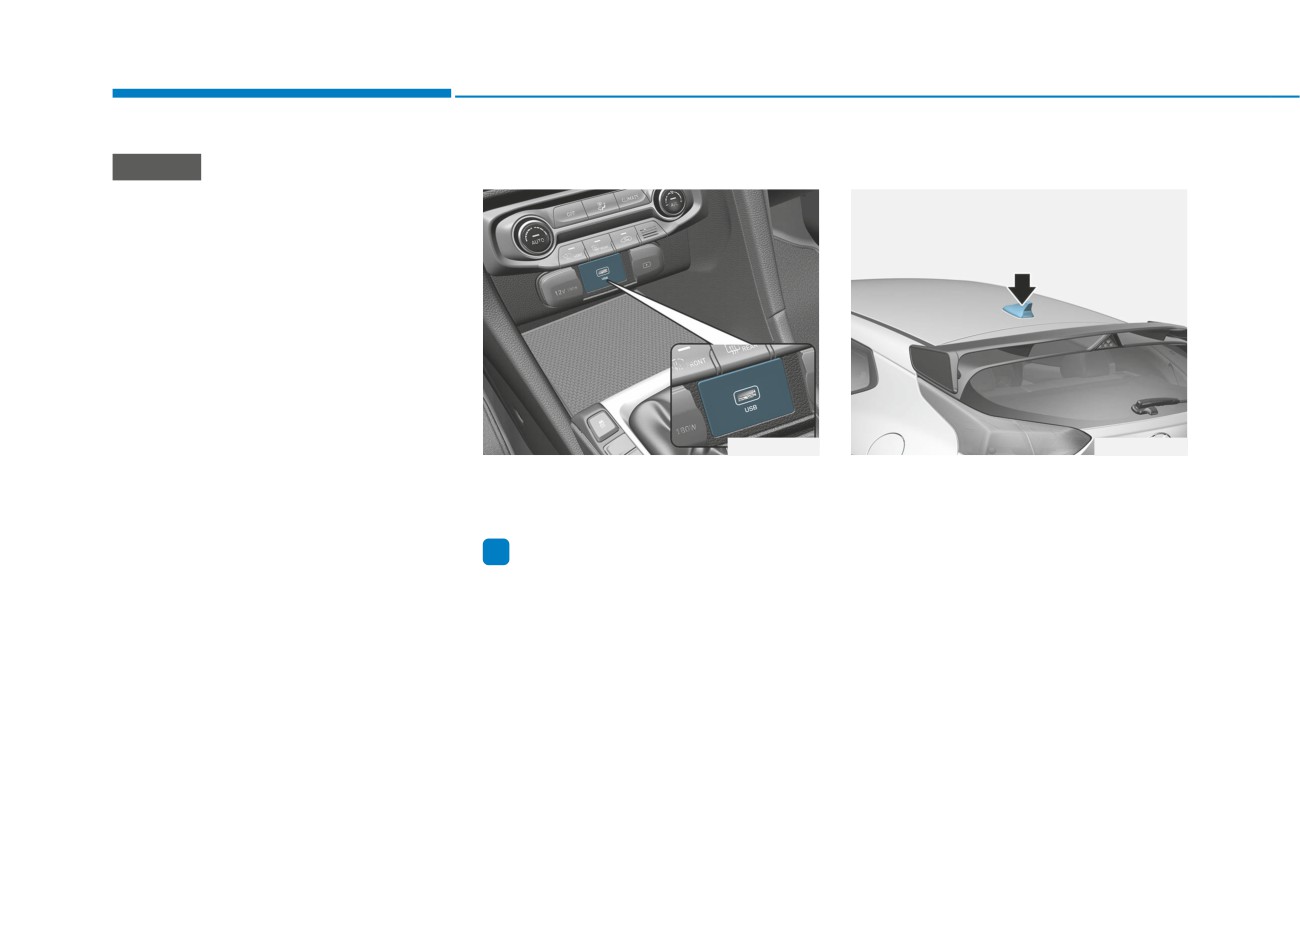
You can use a USB port to plug in a
The roof antenna receives transmit-
USB.
ted data. (For example : AM/FM)
i Information
When using a portable audio device
connected to the power outlet, noise
may occur during playback. If this
happens, use the portable audio
device's power source.
4-2
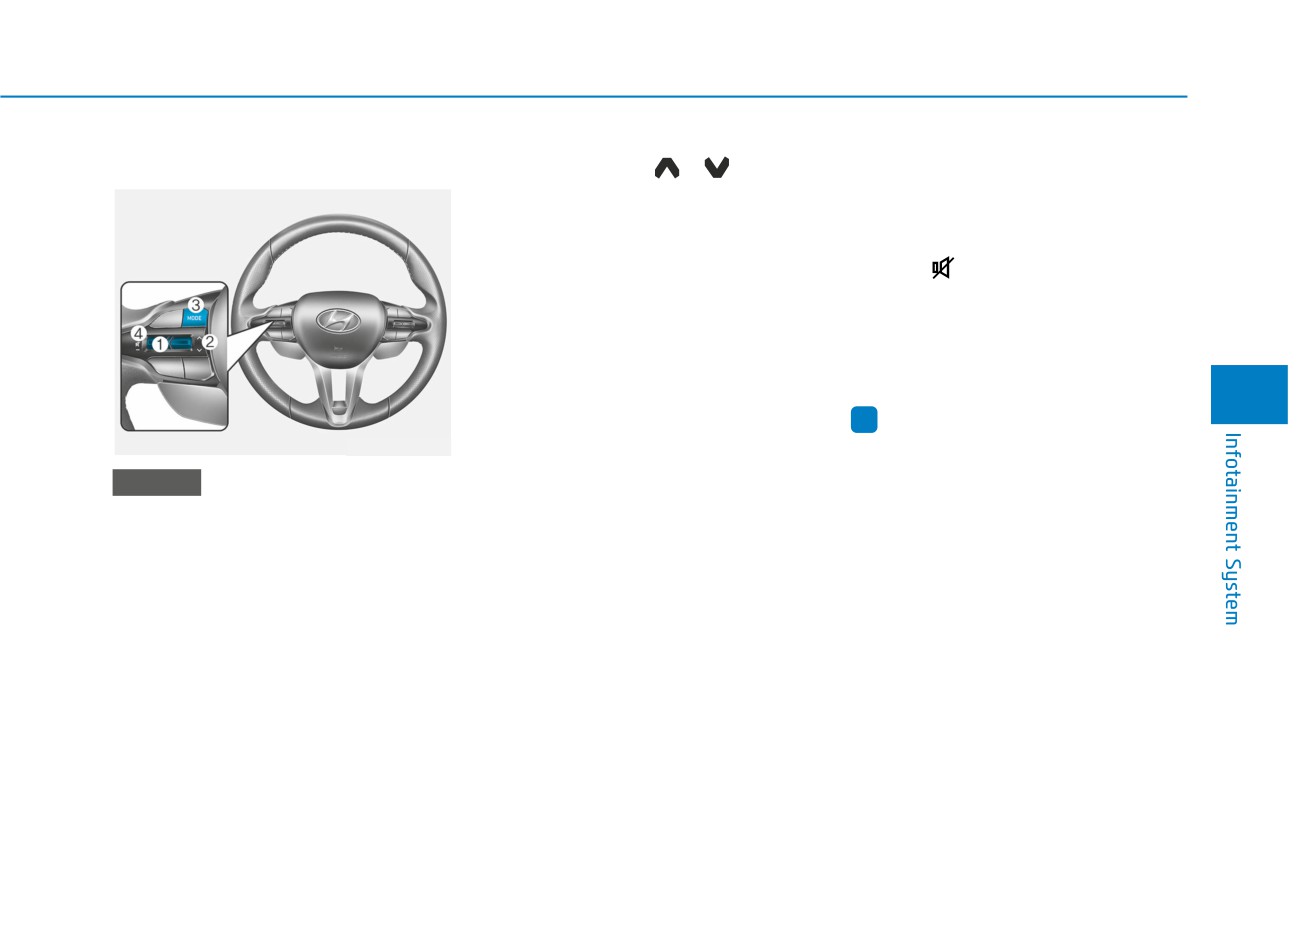
Steering Wheel Audio Control
SEEK/PRESET (
/
) (2)
MODE (3)
If the SEEK/PRESET switch is
Press the MODE button to toggle
pressed up or down and held for 0.8
through Radio, SXM, or AUX modes.
second or more, it will function in the
following modes:
MUTE (
) (4)
RADIO mode
• Press the MUTE button to mute the
It will function as the AUTO SEEK
sound.
select button. It will SEEK until you
• Press the MUTE button again to
release the button.
activate the sound.
4
MEDIA mode
i
Information
It will function as the FF/RW button.
OJSN048052
Detailed information for audio control
If the SEEK/PRESET switch is
buttons are described in the separately
NOTICE
pressed up or down, it will function
supplied manual with the vehicle.
Do not operate multiple audio
in the following modes:
remote control buttons simultane-
RADIO mode
ously.
It will function as the PRESET STA-
TION UP/DOWN button.
VOLUME (VOL + / - ) (1)
MEDIA mode
• Press the VOLUME switch up to
increase volume.
It will function as the TRACK UP/
DOWN button.
• Press the VOLUME switch down to
decrease volume.
4-3
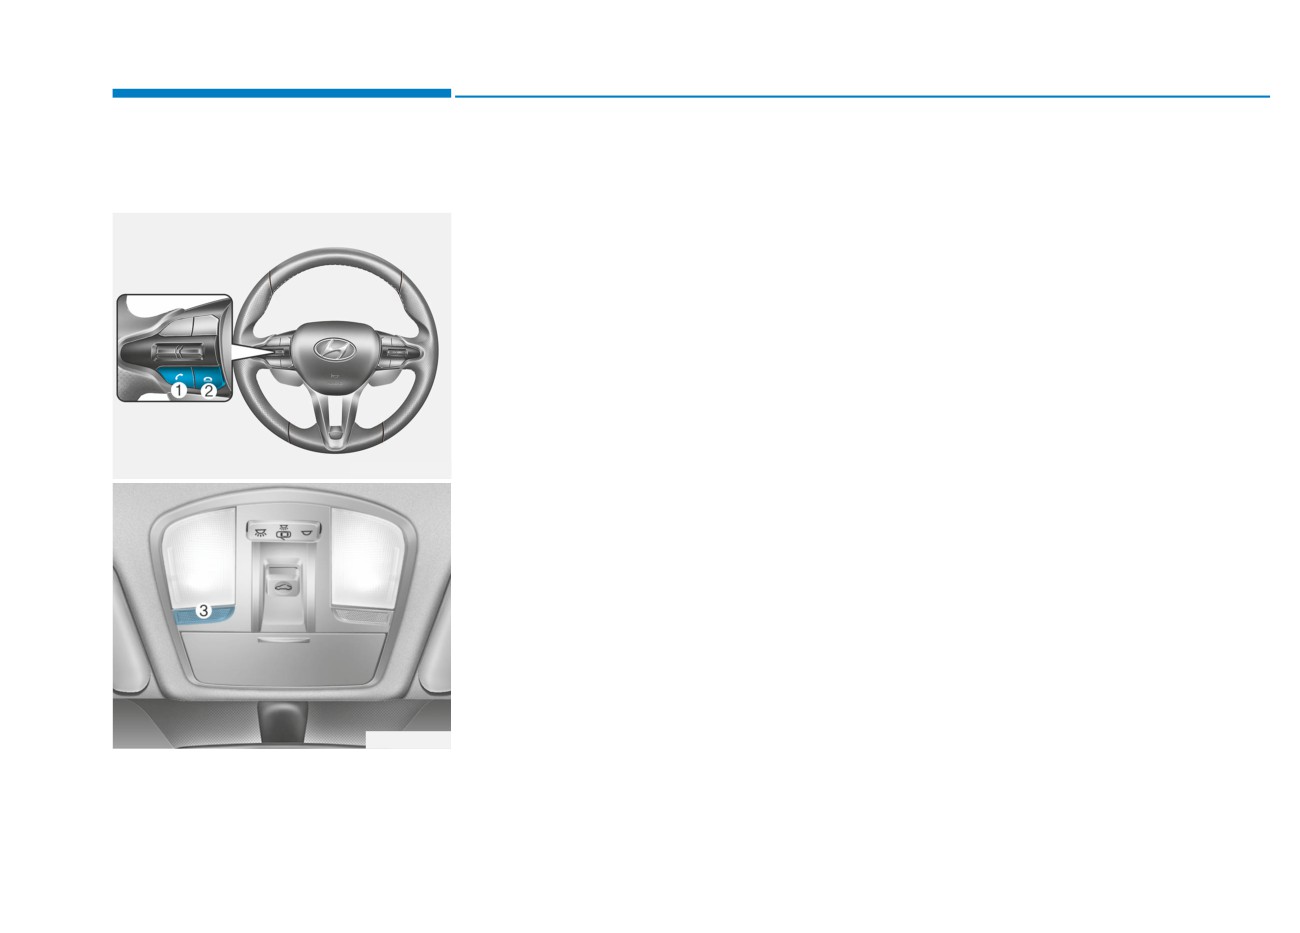
Infotainment System
Bluetooth® Wireless
(1) Call / Answer button
Display audio system
Technology Hands-Free
(2) Call end button
Detailed information for the display
(3) Microphone
audio system is described in the Car
Multimedia User's Manual.
Detailed information for the Bluetooth®
Wireless Technology hands-free is
described in the Car Multimedia
User's Manual.
OPDEN047422
OOS047076
With the Bluetooth® Wireless
Technology in the vehicle, you can
use the phone wireless.
4-4
Driving your vehicle
Before driving
5-4
Electronic control suspension (ECS)
5-44
Before Entering the Vehicle
5-4
Electronic limited slip differential
5-45
Before Starting
5-4
Warning Messages
5-46
Ignition switch
5-5
Drive Mode Integrated Control System
5-47
Engine Start/Stop Button
5-5
DRIVE MODE Button
5-47
Manual transmission
5-11
N Button
5-49
Manual Transmission Operation
5-11
NGS (N Grin Shift)
5-50
Good Driving Practices
5-13
Vehicle characteristic
5-52
Rev Matching
5-14
Performance option
5-54
Dual clutch transmission
5-18
Performance option settings
5-54
Dual clutch transmission operation
5-18
Launch Control
5-54
DCT warning messages
5-20
Shift Indicator
5-57
Parking
5-27
N Track Sense Shift
5
Good driving practices
5-28
(For Dual Clutch Transmission)
5-59
Braking system
5-30
N Power Shift (For Dual Clutch Transmission)
5-60
Power Brakes
5-30
Declaration of conformity
5-61
High Performance Brake
5-31
Forward Collision-Avoidance Assist (FCA)
Disc Brakes Wear Indicator
5-31
(Front view camera only)
5-62
Parking Brake
5-32
System settings
5-63
Anti-lock Brake System (ABS)
5-33
System operation
5-65
Electronic Stability Control (ESC)
5-35
System malfunction and limitations
5-68
Vehicle Stability Management (VSM)
5-40
Hill-Start Assist Control (HAC)
5-41
Good Braking Practices
5-42
Lane Keeping Assist (LKA)
5-75
Special driving conditions
5-118
System settings
5-75
Hazardous Driving Conditions
5-118
System operation
5-77
Rocking the Vehicle
5-118
System malfunction and limitations
5-79
Smooth Cornering
5-119
Blind-Spot Collision Warning (BCW)
5-82
Driving at Night
5-119
System settings
5-83
Driving in the Rain
5-119
System operation
5-85
Driving in Flooded Areas
5-120
System malfunction and limitations
5-87
Highway Driving
5-120
Driver Attention Warning (DAW)
5-92
Winter driving
5-121
System settings
5-93
Snow or Icy Conditions
5-121
System operation
5-94
Winter Precautions
5-122
System malfunction and limitations
5-96
Vehicle load limit
5-124
Cruise Control (CC)
5-100
Tire Loading Information Label
5-125
5
System operation
5-100
Trailer Towing
5-129
Temporary speed increase
5-101
Lane Following Assist (LFA)
5-105
System settings
5-105
System operation
5-106
System malfunction and limitations
5-109
Rear Cross-Traffic Collision
Warning (RCCW)
5-110
System settings
5-111
System operation
5-112
System malfunction and limitations
5-114

WARNING
Carbon monoxide (CO) gas is toxic. Breathing CO can cause unconsciousness and death.
Engine exhaust contains carbon monoxide which cannot be seen or smelled.
Do not inhale engine exhaust.
If at any time you smell engine exhaust inside the vehicle, open the windows immediately. Exposure to CO can cause
unconsciousness and death by asphyxiation.
Be sure the exhaust system does not leak.
The exhaust system should be checked whenever the vehicle is raised to change the oil or for any other purpose. If
you hear a change in the sound of the exhaust or if you drive over something that strikes the underneath side of the
vehicle, have the exhaust system checked as soon as possible by an authorized HYUNDAI dealer.
5
Do not run the engine in an enclosed area.
Letting the engine idle in your garage, even with the garage door open, is a hazardous practice. Run the engine only
long enough to start the engine and to move the vehicle out of the garage.
Avoid idling the engine for prolonged periods with people inside the vehicle.
If it is necessary to idle the engine for a prolonged period with people inside the vehicle, be sure to do so only in an
open area with the air intake set at "Fresh" and fan control set to high so fresh air is drawn into the interior.
Keep the air intakes clear.
To assure proper operation of the ventilation system, keep the ventilation air intakes located in front of the windshield
clear of snow, ice, leaves, or other obstructions.
If you must drive with the tailgate open:
Close all windows.
Open instrument panel air vents.
Set the air intake control at "Fresh", the air flow control at "Floor" or "Face", and the fan control set to high.
5-3

Driving your vehicle
BEFORE DRIVING
Before Entering the Vehicle
• Check the gauges and indicators in
WARNING
the instrument panel and the mes-
• Be sure all windows, outside mir-
sages on the instrument display
ror(s), and outside lights are clean
NEVER drink or take drugs and
when the ignition switch is in the
and unobstructed.
drive. Drinking or taking drugs
ON position.
• Remove frost, snow, or ice.
and driving is dangerous and may
• Check that any items you are car-
result in an accident and SERI-
• Visually check the tires for uneven
rying are stored properly or fas-
OUS INJURY or DEATH.
wear and damage.
tened down securely.
Drunk driving is the number
• Check under the vehicle for any
one contributor to the highway
sign of leaks.
WARNING
death toll each year. Even a
• Be sure there are no obstacles
small amount of alcohol will
behind you if you intend to back up.
To reduce the risk of SERIOUS
affect your reflexes, percep-
INJURY or DEATH, take the fol-
tions and judgment. Just one
lowing precautions:
drink can reduce your ability to
Before Starting
•
ALWAYS wear your seat belt.
respond to changing conditions
•
Make sure the hood, the tailgate,
All passengers must be prop-
and emergencies and your reac-
and the doors are securely closed
erly belted whenever the vehi-
tion time gets worse with each
and locked.
cle is moving. For more
additional drink.
•
Adjust the position of the seat and
details, refer to "Seat Belts" in
Driving while under the influ-
steering wheel.
chapter 2.
ence of drugs is as dangerous
•
Adjust the inside and side view mir-
•
Always drive defensively.
or more dangerous than driving
rors.
Assume other drivers or pedes-
under the influence of alcohol.
trians may be careless and
You are much more likely to have
•
Verify all the lights work.
make mistakes.
a serious accident if you drink or
•
Fasten your seatbelt. Check that all
•
Stay focused on the task of
take drugs and drive. If you are
passengers have fastened their
driving. Driver distraction can
drinking or taking drugs, don't
seatbelts.
drive. Do not ride with a driver
cause accidents.
who has been drinking or taking
•
Leave plenty of space between
drugs. Choose a designated driv-
you and the vehicle in front of
er or call a taxi.
you.
5-4
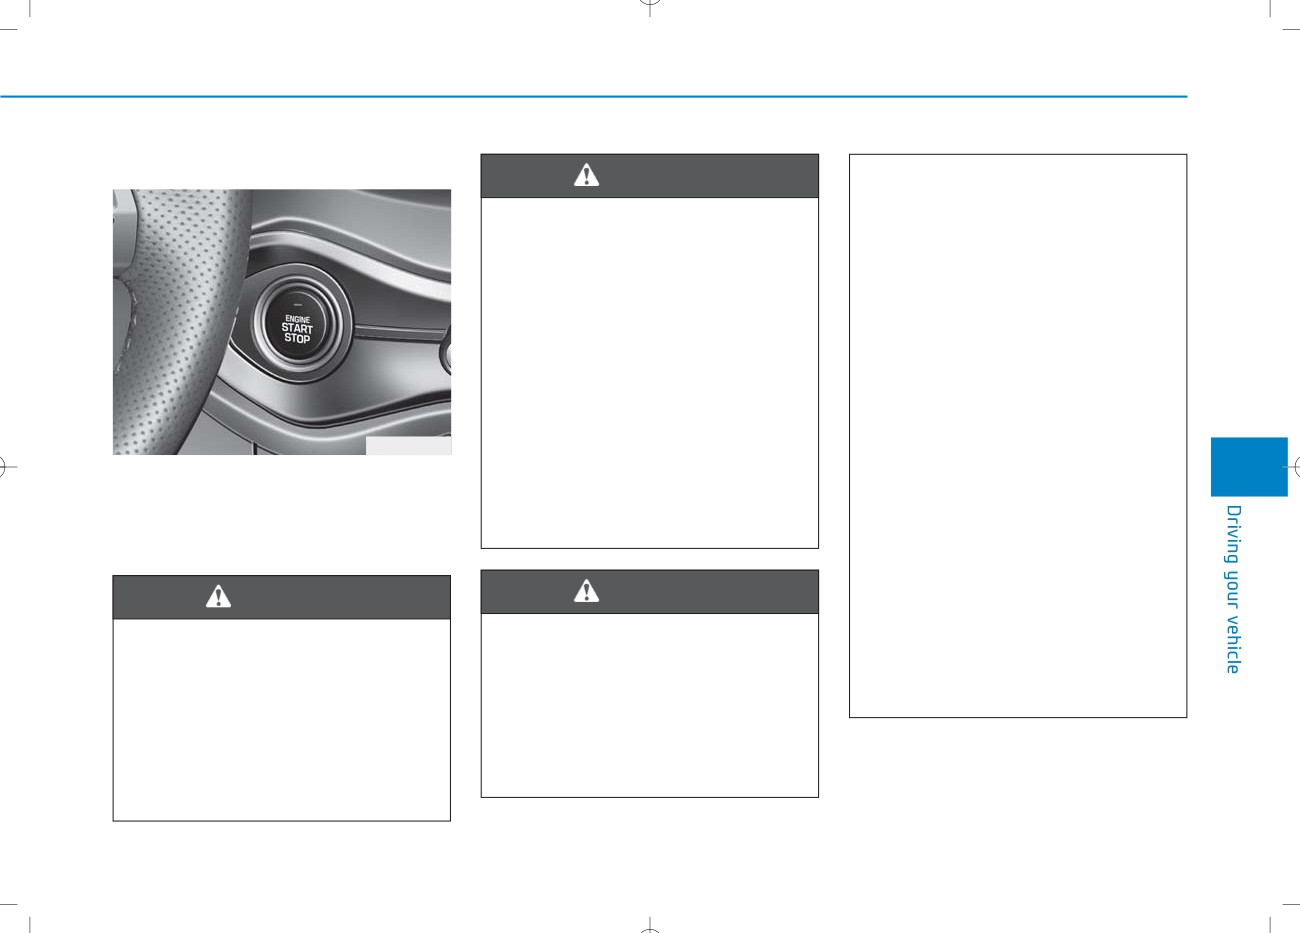
IGNITION SWITCH
Engine Start/Stop Button
WARNING
This may lead to loss of direc-
tional control and braking
To turn the engine off in an
function, which could cause
emergency:
an accident.
Press and hold the Engine
•
Before leaving the driver's
Start/Stop button for more than
seat, always make sure the
two seconds OR rapidly press
shift lever is in the 1st gear
and release the Engine Start/
when the vehicle is parked on
Stop button three times (within
a uphill and in R (Reverse) on
three seconds).
a downhill, set the parking
brake, press the Engine Start/
If the vehicle is still moving, you
Stop button to the OFF posi-
can restart the engine without
OJS058001
tion, and take the Smart Key
depressing the brake pedal by
with you. Unexpected vehicle
pressing the Engine Start/Stop
5
Whenever the front door is opened,
movement may occur if these
button with the shift lever in the
the Engine Start/Stop button will illu-
precautions are not followed.
minate and will go off 30 seconds
N (Neutral) position.
•
NEVER reach through the
after the door is closed.
steering wheel for the Engine
Start/Stop button or any other
WARNING
WARNING
control while the vehicle is in
motion. The presence of your
To reduce risk of serious injury
• NEVER press the Engine
hand or arm in this area may
or death, NEVER allow children
Start/Stop button while the
cause a loss of vehicle control
or any person who is unfamiliar
vehicle is in motion except in
resulting in an accident.
with the vehicle to touch the
an emergency. This will result
Engine Start/Stop button or
in the engine turning off and
related parts. Unexpected and
loss of power assist for the
sudden vehicle movement can
steering and brake systems.
occur.
5-5
Driving your vehicle
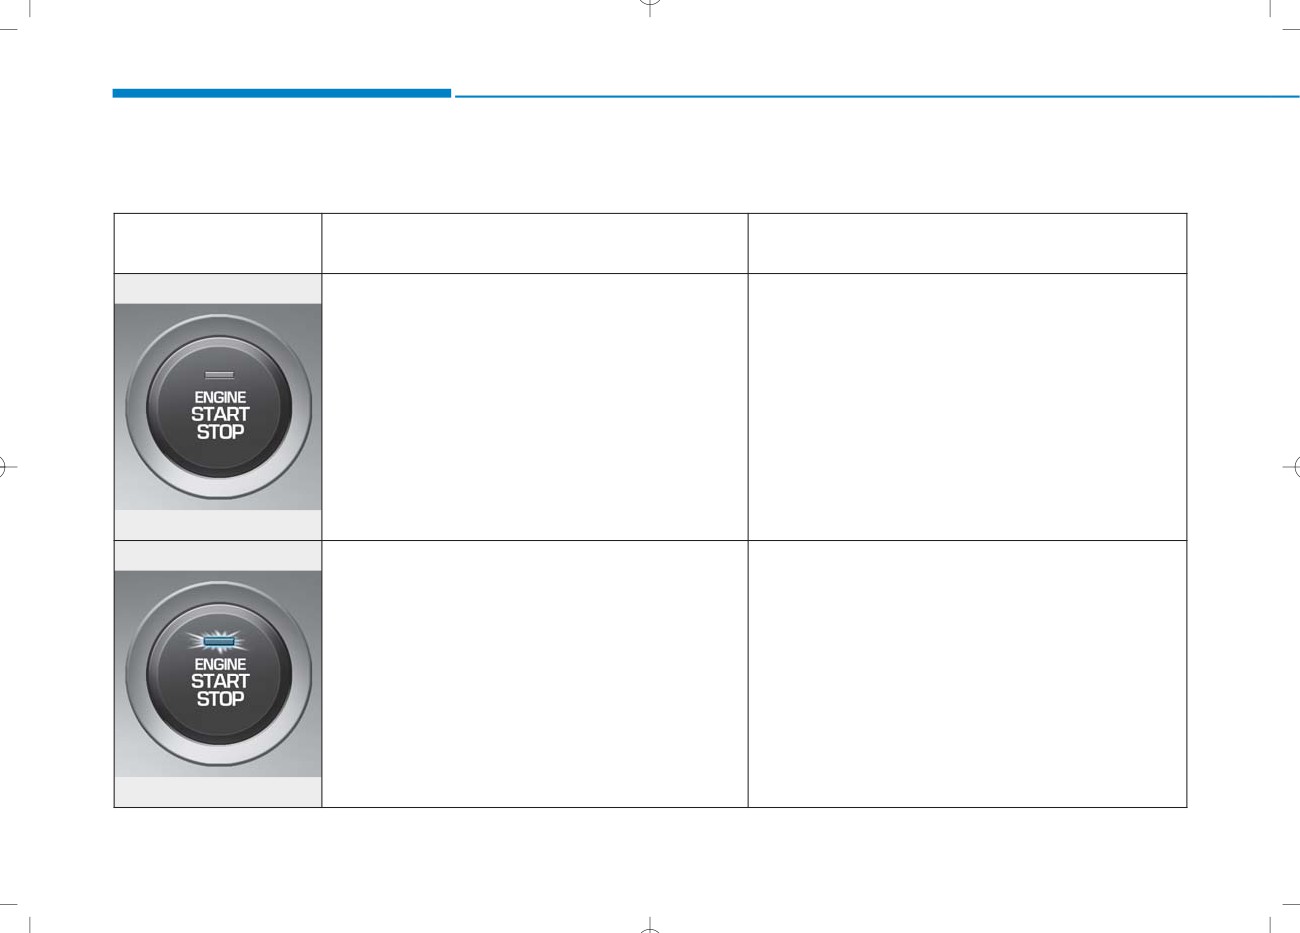
Engine Start/Stop button positions
- Vehicle with manual transmission
Button Position
Action
Notice
OFF
To turn off the engine, stop the vehicle and
then press the Engine Start/Stop button.
Not illuminated
ACC
Press the Engine Start/Stop button when the
If you leave the Engine Start/Stop button in the
button is in the OFF position without depress-
ACC position for more than one hour, the bat-
ing the clutch pedal.
tery power will turn off automatically to prevent
the battery from discharging.
Electrical accessories are usable.
Orange indicator
5-6
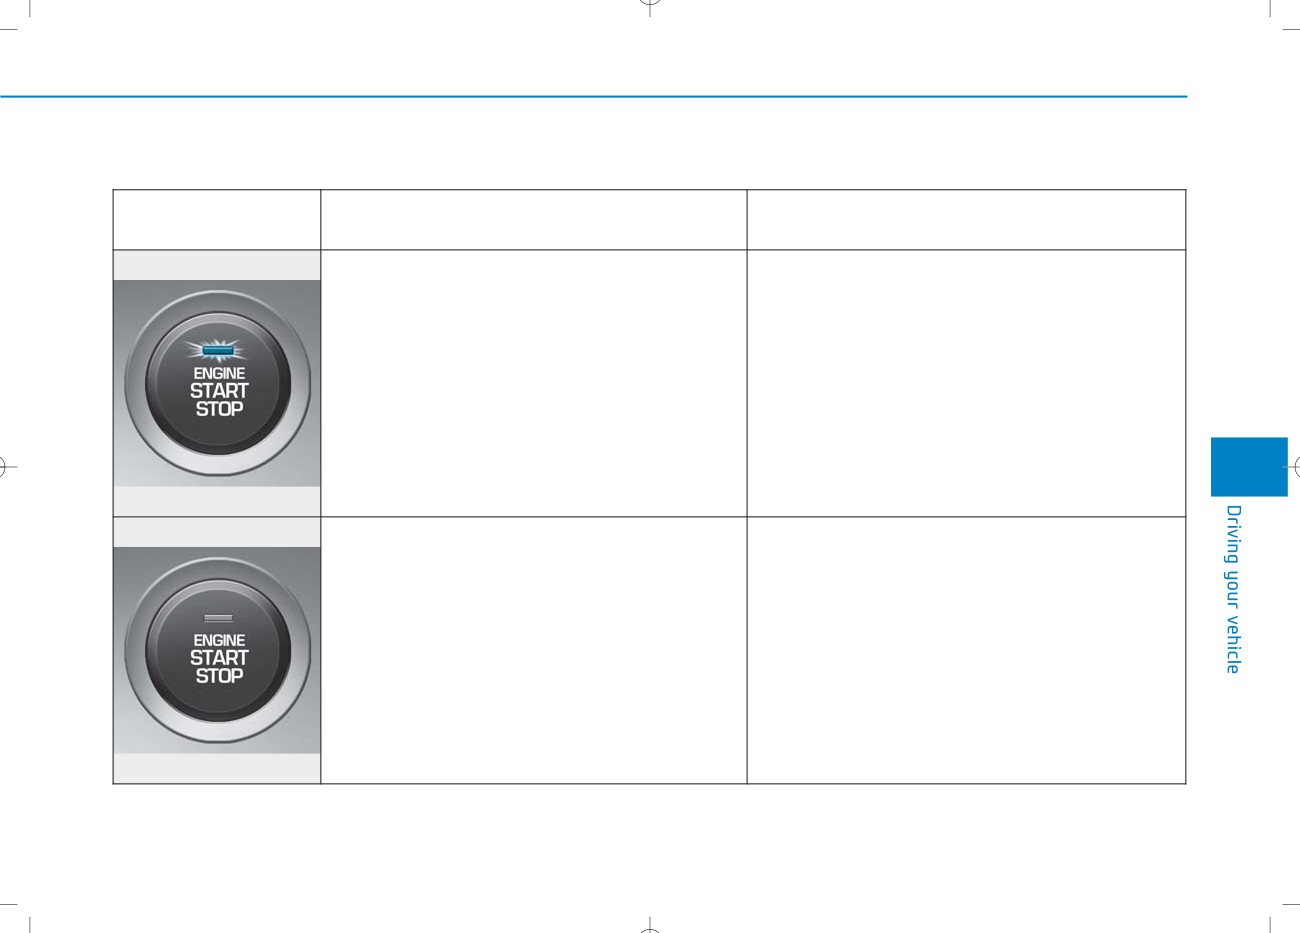
- Vehicle with manual transmission
Button Position
Action
Notice
ON
Press the Engine Start/Stop button while it is
If you leave the Engine Start/Stop button in
in the ACC position without depressing the
the ON position for more than one hour, the
clutch pedal.
battery power will turn off automatically to
prevent the battery from discharging.
The warning lights can be checked before
the engine is started.
5
Blue indicator
START
To start the engine, depress the clutch and
If you press the Engine Start/Stop button
brake pedals and press the Engine Start/
without depressing the clutch pedal, the
Stop button with the shift lever in neutral.
engine does not start and the Engine
Start/Stop button changes as follows:
OFF → ACC → ON → OFF
Not illuminated
5-7
Driving your vehicle
Starting the engine
Vehicle with manual transmission:
i
Information
1. Always carry the smart key with
•
The engine will start by pressing the
WARNING
you.
Engine Start/Stop button, only when
the smart key is in the vehicle.
2. Make sure the parking brake is
•
Always wear appropriate shoes
applied.
•
Even if the smart key is in the vehi-
when operating your vehicle.
3. Make sure the shift lever is in neu-
cle, if it is far away from the driver,
Unsuitable shoes, such as
tral.
the engine may not start.
high heels, ski boots, sandals,
4. Depress the clutch and brake ped-
•
When the Engine Start/Stop button
flip-flops, etc., may interfere
als.
is in the ACC or ON position, if any
with your ability to use the
door is open, the system checks for
5. Press the Engine Start/Stop but-
brake and accelerator pedals.
the smart key. If the smart key is not
ton.
•
Do not start the vehicle with the
in the vehicle, the "
" indicator
accelerator pedal depressed.
will blink and the warning "Key not
The vehicle can move and lead
i
Information
in vehicle" will come on and if all
to an accident.
doors are closed, the chime will also
Depress the brake pedal and clutch
•
Wait until the engine rpm is
sound for about 5 seconds. Keep the
pedal until the engine starts.
normal. The vehicle may sud-
smart key in the vehicle when using
denly move if the brake pedal
the ACC position or if the vehicle
is released when the rpm is
engine is ON.
high.
5-8
NOTICE
Starting and stopping the engine
i Information
for turbocharger intercooler
• Do not wait for the engine to warm
To prevent damage to the vehicle:
1. Do not race or accelerate the
up while the vehicle remains station-
When the stop lamp switch fuse is
engine immediately after starting
ary. Start driving at moderate
blown, you can't start the engine
the engine.
engine speeds. (Aggressive accelerat-
normally. Replace the fuse with a
ing and decelerating should be
If the engine is cold, idle for sever-
new one. If you are not able to
al seconds before sufficient lubri-
avoided.)
replace the fuse, you can start the
cation is ensured in the tur-
• Always start the vehicle with your
engine by pressing and holding
bocharger.
foot on the brake pedal. Do not
the Engine Start/Stop button for
depress the accelerator while start-
10 seconds with the Engine Start/
2. After high speed or extended driv-
ing that requires heavy engine
ing the vehicle. Do not rev the
Stop button in the ACC position.
engine while warming it up.
load, idle the engine about
1
Do not press the Engine Start/Stop
minute before turning the engine
button for more than 10 seconds
off. This idle time will allow the tur-
5
NOTICE
except when the stop lamp switch
bocharger to cool prior to shutting
fuse is blown.
To prevent damage to the vehicle:
the engine off.
For your safety always depress
• If traffic and road conditions
the brake pedal before starting the
permit, you may put the shift
NOTICE
engine.
lever in the N (Neutral) position
Do not turn off the engine immedi-
while the vehicle is still moving
ately after it has been subjected to
and press the Engine Start/Stop
a heavy load. Doing so may cause
button in an attempt to restart
severe damage to the engine or
the engine.
turbocharger.
• Do not push or tow your vehicle
to start the engine.
5-9
Driving your vehicle
Turning off the engine
1. Stop the vehicle and depress the
clutch and brake pedals at the
same time.
2. With the clutch and brake pedals
depressed, put the shift lever in
neutral.
3. Press the Engine Start/Stop but-
ton to the off position and apply
the parking brake.
OJS058005
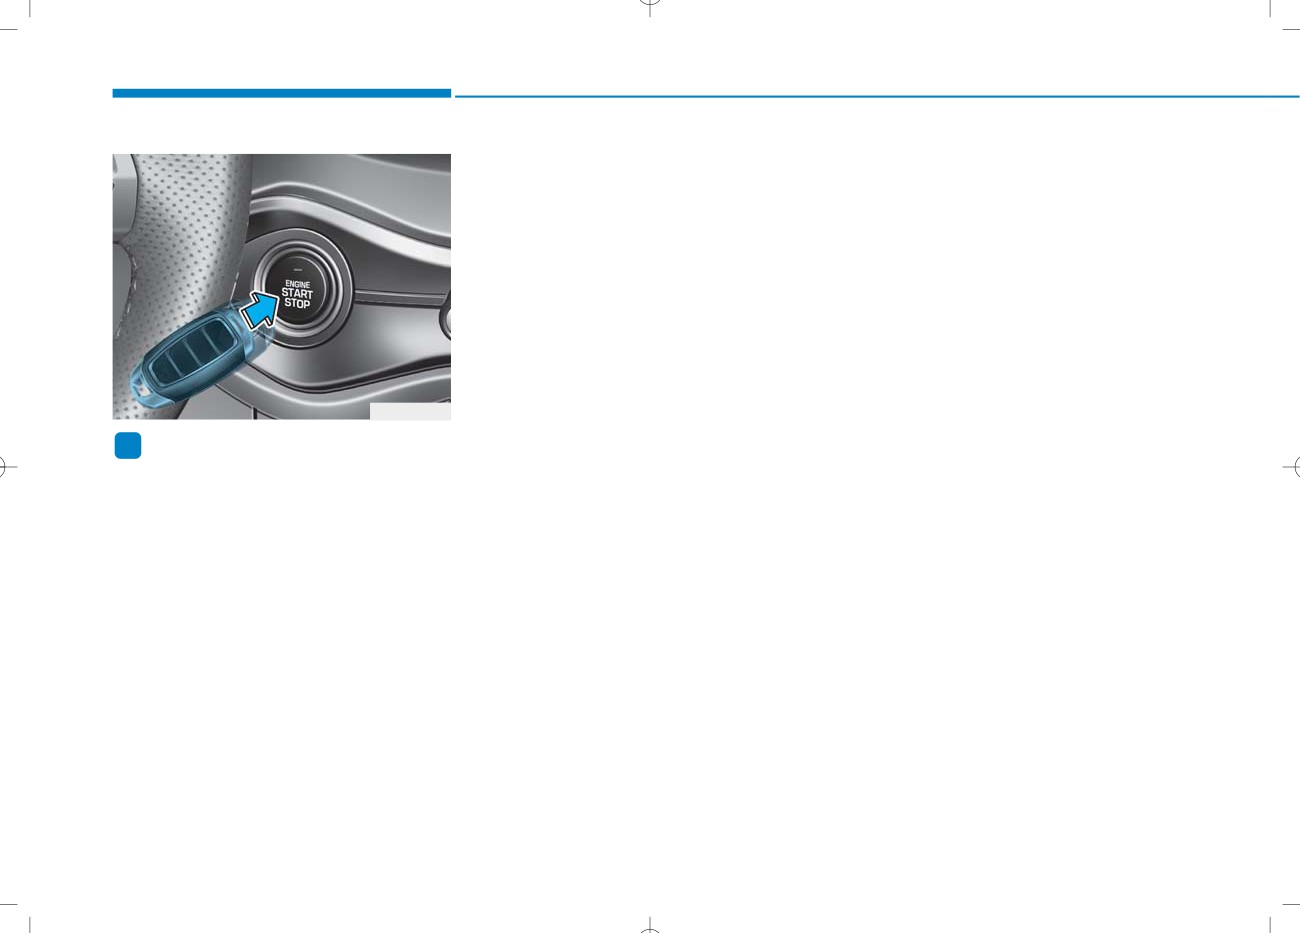
i Information
If the smart key battery is weak or the
smart key does not work correctly,
you can start the engine by pressing
the Engine Start/Stop button with the
smart key in the direction of the pic-
ture above.
5-10
MANUAL TRANSMISSION
Manual Transmission
To shift to R (Reverse), make sure
Operation
the vehicle has completely stopped,
and then move the shift lever to neu-
The manual transmission has 6 for-
tral before moving into R (Reverse).
ward gears. The transmission is fully
synchronized in all forward gears so
shifting to either a higher or a lower
When you've come to a complete
gear is easily accomplished.
stop and it's hard to shift into 1st gear
or R (Reverse):
WARNING
1. Put the shift lever in neutral and
release the clutch pedal.
Before leaving the driver's seat,
2. Depress the clutch pedal, and
always make sure the shift lever
then shift into
1
(First) or R
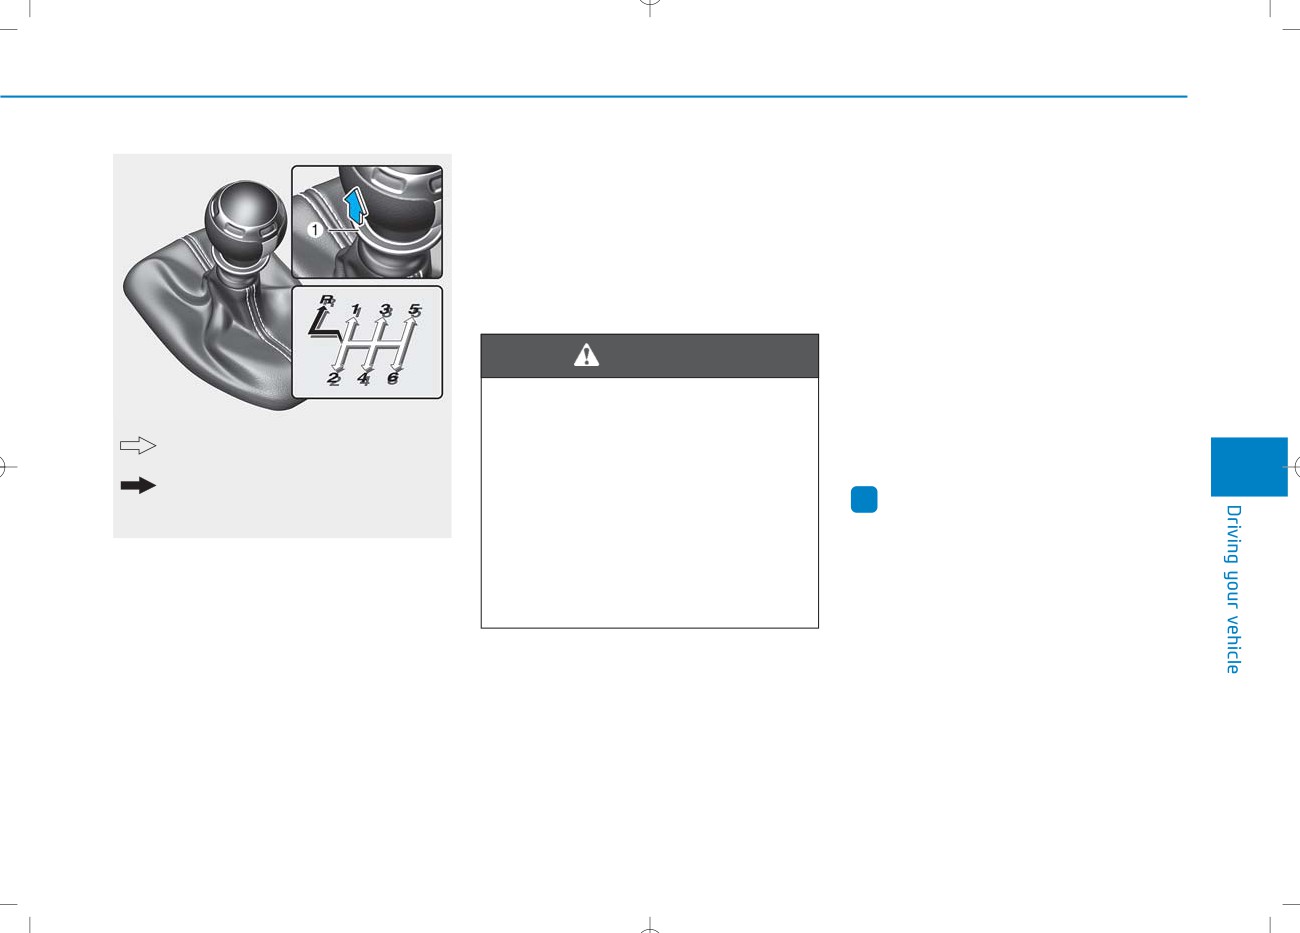
The shift lever can be moved without
is in 1st gear when the vehicle is
(Reverse) gear.
Pulling the ring (1).
parked on a uphill and in R
5
The ring (1) must be pulled up while
(Reverse) on a downhill, set the
moving the shift lever.
i
Information
parking brake, and place the
OBU058120
ignition switch in the LOCK/OFF
During cold weather, shifting may be
position. Unexpected vehicle
difficult until the transmission lubri-
movement may occur if these
cant has warmed up.
precautions are not followed.
5-11
Driving your vehicle
Using the clutch
NOTICE
Downshifting
The clutch pedal should be
Down shift to a lower gear when
To prevent unnecessary wear or
depressed all the way before:
slowing down in heavy traffic or driv-
damage to the clutch:
ing up a steep hill to prevent high
- Starting the engine
•
Do not rest your foot on the
engine loads.
The engine will not start without
clutch pedal while driving.
Also, downshifting reduces the
depressing the clutch pedal.
•
Do not hold the vehicle with the
chance of stalling and helps reaccel-
- Shifting into gear, up shifting to the
clutch on an incline, while wait-
erate the vehicle when you need to
next higher gear, or down shifting
ing for the traffic light, etc.
increase your speed.
to the next lower gear.
•
Always depress the clutch pedal
When the vehicle is going downhill,
down fully to prevent noise or
downshifting helps maintain safe
When releasing the clutch pedal,
damage.
speed by providing engine braking
release it slowly. The clutch pedal
•
Do not depress the clutch pedal
(brake power from the engine) and
should always be fully released while
again until it is fully released.
results in less wear on the brakes.
driving.
•
Do not start with the 2nd gear
engaged except when you start
on a slippery road.
•
Do not drive with cargo loaded
more than required loading
capacity.
5-12
NOTICE
Good Driving Practices
• Exercise extreme caution when
driving on a slippery surface. Be
•
Never take the vehicle out of gear
To prevent damage to the engine,
especially careful when braking,
and coast down a hill. This is
clutch and transmission:
accelerating or shifting gears. On a
extremely dangerous.
•
When downshifting from
5th
slippery surface, an abrupt change
•
Don't "ride" the brakes. This can
gear to 4th gear, be careful not to
in vehicle speed can cause the
inadvertently push the shift
cause the brakes and related parts
drive wheels to lose traction and
to overheat and malfunction.
lever sideways engaging the 2nd
may cause loss of vehicle control
gear. A drastic downshift may
When you are driving down a long
resulting in an accident.
cause the engine speed to
hill, slow down and shift to a lower
increase to the point the
gear. Engine braking will help slow
WARNING
tachometer will enter the red-
down the vehicle.
zone and may cause engine
•
Slow down before shifting to a
Do not use aggressive engine
damage.
lower gear. This will help avoid
braking (shifting from a higher
•
Do not downshift more than two
over-revving the engine, which can
5
gear to a lower gear) on slip-
gear at a time or downshift the
cause damage.
pery roads. This could cause
gear when the engine is running
•
Slow down when you encounter
the tires to slip and may result
at high speed
(5,000 RPM or
cross winds. This gives you much
in an accident.
higher).
better control of your vehicle.
Such down shifting may damage
•
Be sure the vehicle is completely
the engine, clutch and the trans-
stopped before you shift into R
mission.
(Reverse) to prevent damage to
the transmission.
5-13