Hyundai Veloster N (2022 year). Manual in english - page 5
If the brake fluid level in the reser-
Also, the vehicle will not stop in as
Anti-lock Brake System
voir is low:
short a distance with only a portion
(ABS) Warning Light
of the brake system working.
1. Drive carefully to the nearest safe
location and stop your vehicle.
If the brakes fail while you are driv-
ing, shift to a lower gear for addition-
2. With the engine stopped, check the
This warning light illuminates:
al engine braking and stop the vehi-
brake fluid level immediately and
•
When you place the ignition switch
cle as soon as it is safe to do so.
add fluid as required (For more
to the ON position.
details, refer to "Brake Fluid" in
3
- The ABS warning light illuminates
chapter
7). After adding brake
WARNING
for about
3 seconds and then
fluid, check all brake components
for fluid leaks. If a brake fluid leak is
Parking Brake & Brake Fluid
turns off.
found, or if the warning light
Warning Light
•
Whenever there is a malfunction
remains on, or if the brakes do not
with the ABS.
Driving the vehicle with a warn-
operate properly, do not drive the
Note that the hydraulic braking
ing light ON is dangerous. If the
vehicle. Have the vehicle inspected
system will still be operational even
Parking Brake & Brake Fluid
by an authorized HYUNDAI dealer.
if there is a malfunction with the
Warning Light illuminates with
ABS.
the parking brake released, it
Dual-diagonal braking system
indicates that the brake fluid
level is low.
Your vehicle is equipped with dual-
diagonal braking systems. This
In this case, have the vehicle
means you still have braking on two
inspected by an authorized
wheels even if one of the dual sys-
HYUNDAI dealer.
tems should fail.
With only one of the dual systems
working, more than normal pedal
travel and greater pedal pressure is
required to stop the vehicle.
3-39
Convenient features of your vehicle
Electronic Brake Force
Electric Power Steering
Have the vehicle inspected by
Distribution (EBD)
(EPS) Warning Light
an authorized HYUNDAI dealer
System Warning Light
as soon as possible.
This warning light illuminates:
i
Information - Electronic
•
When you place the ignition switch
Brake Force Distribution
to the ON position.
These two warning lights illuminate
(EBD) System Warning Light
at the same time while driving:
- The Electric Power Steering
When the ABS Warning Light is on or
Warning light illuminates for
• When the ABS and regular brake
both ABS and Parking Brake & Brake
about 3 seconds and then goes
system may not work normally.
Fluid Warning Lights are on, the
off.
In this case, have the vehicle inspect-
speedometer, odometer, or tripmeter
•
Whenever there is a malfunction
ed by an authorized HYUNDAI dealer.
may not work. Also, the EPS Warning
with the EPS.
Light may illuminate and the steering
effort may increase or decrease.
If this occurs, have
the vehicle
WARNING
inspected by an
authorized
In this case, have the vehicle inspected
HYUNDAI dealer.
by an authorized HYUNDAI dealer as
Electronic Brake Force
soon as possible.
Distribution (EBD) System
Warning Light
When both ABS and Parking
Brake & Brake Fluid Warning
Lights are on, the brake system
will not work normally and you
may experience an unexpected
and dangerous situation during
sudden braking.
In this case, avoid high speed
driving and abrupt braking.
3-40
Malfunction Indicator
NOTICE
Engine Oil Pressure
Lamp (MIL)
Warning Light
If the Malfunction Indicator Lamp
(MIL) illuminates, potential catalyt-
ic converter damage is possible
This indicator light illuminates:
which could result in loss of
This warning light illuminates:
• When you place the ignition switch
engine power.
• When the engine oil pressure is low.
to the ON position.
In this case, have the vehicle
3
- The malfunction indicator light
inspected by an authorized
If the engine oil pressure is low:
illuminates for about 3 seconds
HYUNDAI dealer as soon as possi-
1. Drive carefully to the nearest safe
and then goes off.
ble.
location and stop your vehicle.
• Whenever there is a malfunction
2. Turn the engine off and check the
with either the emission control
Charging System
engine oil level (For more details,
system or the engine or the vehicle
Warning Light
refer to "Engine Oil" in chapter 7).
powertrain.
If the level is low, add oil as required.
If this occurs, have the vehicle
If the warning light remains on
inspected by an authorized
When this warning light illuminates
after adding oil or if oil is not avail-
HYUNDAI dealer.
while the engine is running, the bat-
able, have the vehicle inspected
tery is not being charged. Immediately
by an authorized HYUNDAI dealer
NOTICE
turn OFF all electrical accessories.
as soon as possible.
Try not to use electrically operated
Driving with the Malfunction
Indicator Lamp
(MIL) on may
controls, such as the power windows.
Keep the engine running.
cause damage to the emission
control system which could affect
Have the vehicle inspected by an
drivability and/or fuel economy.
authorized HYUNDAI dealer as soon
as possible.
3-41
Convenient features of your vehicle
NOTICE
Low Fuel Level
Master Warning Light
Warning Light
•
If the engine does not stop
immediately after the Engine Oil
Pressure Warning Light is illumi-
nated, severe damage could
This warning light illuminates:
This warning light illuminates:
result.
• When the fuel tank is nearly empty.
•
When there is a malfunction in
•
If the warning light stays on
Add fuel as soon as possible.
operation in any of the following
while the engine is running, it
systems:
indicates that there may be seri-
NOTICE
- Low washer fluid
ous engine damage or malfunc-
- Exterior lamp malfunction
tion. In this case:
Driving with the Low Fuel Level
(if equipped)
warning light on or with the fuel
1. Stop the vehicle as soon as it
level below "E" can cause the
To identify the details of the warn-
is safe to do so.
ing, look at the LCD display.
engine to misfire and damage the
2. Turn off the engine and check
catalytic converter.
the oil level. If the oil level is
low, fill the engine oil to the
proper level.
3. Start the engine again. If the
warning light stays on after
the engine is started, turn the
engine off immediately. In this
case, have the vehicle
inspected by an authorized
HYUNDAI dealer.
3-42
Electronic Stability
Electronic Stability
ECS SPORT Indicator
(6&
Control (ESC) Indicator
Control (ESC) OFF
Light
63257
Light
Indicator Light
This indicator light illuminates:
This indicator light illuminates:
This indicator light illuminates:
• When you place the ignition switch
• When ESC SPORT is activated.
• When you place the ignition switch
to the ON position.
to the ON position.
For more details, refer to “Electronic
3
- It illuminates for approximately
- The Electronic Stability Control
Stability Control” in chapter 5.
indicator light illuminates for
3 seconds and then goes off.
about 3 seconds and then goes
• When you deactivate the ESC sys-
off.
tem by pressing the ESC OFF but-
• Whenever there is a malfunction
ton.
with the ESC system.
For more details, refer to
If this occurs, have the vehicle
"Electronic Stability Control (ESC)"
inspected by an authorized
in chapter 5.
HYUNDAI dealer.
This indicator light blinks:
• While the ESC is operating.
For more details, refer to
"Electronic Stability Control (ESC)"
in chapter 5.
3-43
Convenient features of your vehicle
Immobilizer Indicator
This indicator light illuminates for
Turn Signal Indicator
Light
2 seconds and goes off:
Light
• If the smart key is in the vehicle
and the Engine Start/Stop button is
ON, but the vehicle cannot detect
This indicator light illuminates for
This indicator light blinks:
the smart key.
up to 30 seconds:
• When you operate the turn signal
In this case, have the vehicle inspect-
• When the vehicle detects the
indicator stalk.
ed by an authorized HYUNDAI deal-
smart key in the vehicle with the
er.
Engine Start/Stop button in the
If any of the following occur, there may
ACC or ON position.
be a malfunction with the turn signal
- Once the smart key is detected,
This indicator light blinks:
system.
you can start the engine.
•
When the battery voltage of the
- The turn signal indicator light illumi-
- The indicator light goes off after
smart key is low.
nates but does not blink
starting the engine.
- If this occurs, you will not be able
- The turn signal indicator light blinks
to start the engine by simply
rapidly
pressing the Start/Stop button.
This indicator light blinks for a few
- The turn signal indicator light does
However, you can still start the
seconds:
not illuminate at all
engine by pressing the Start/Stop
• When the smart key is not in the
button directly with the smart key.
If any of these conditions occur, have
vehicle.
(Refer to "Starting the Engine"
your vehicle inspected by an author-
- If the smart key is not detected,
in chapter 5.)
ized HYUNDAI dealer.
you cannot start the engine.
•
When there is a malfunction with
the immobilizer system.
In this case, have the vehicle
inspected by an authorized
HYUNDAI dealer.
3-44
High Beam Indicator
LED Headlight Warning
High Beam Assist
Light
Light (if equipped)
(HBA) indicator light
(if equipped)
This warning light illuminates:
This indicator light illuminates :
This indicator light illuminates:
• When you place the ignition switch
• When the high-beam is on with the
• When the headlights are on and in
to the ON position.
light switch in the AUTO light posi-
the high beam position
3
• When there is a malfunction with
tion.
• When the turn signal lever is pulled
the LED headlight.
• If your vehicle detects oncoming or
into the Flash-to-Pass position.
If this occurs, have the vehicle
preceding vehicles, High Beam
Assist (HBA) will switch the high
inspected by an authorized
Light ON Indicator
beam to low beam automatically.
HYUNDAI dealer.
Light
For more details, refer to "High
Beam Assist (HBA)" in this chap-
This warning light blinks:
ter.
When there is a malfunction with a
This indicator light illuminates:
LED headlight related part.
• When the tail lights or headlights
are on.
In this case, have the vehicle inspect-
ed by an authorized HYUNDAI dealer.
NOTICE
Continuous driving with the LED
Headlight Warning Light on or
blinking can reduce LED headlight
life.
3-45
Convenient features of your vehicle
Icy Road Warning Light
Cruise Indicator Light
SMART Mode Indicator
(if equipped)
(if equipped)
Light (if equipped)
60$57
This indicator light illuminates:
This warning light is to warn the driver
This indicator light illuminates:
the road may be icy.
• When Cruise Control is enabled.
• When you select ''SMART" mode
When the outside temperature
For more details, refer to "Cruise
as drive mode.
gauge reads below 4°C (40°F), the
Control (CC)" in chapter 5.
Icy Road Warning Light and Outside
For more details, refer to "Drive
Temperature Gauge blinks and then
Mode Integrated Control System''
illuminates. Also, the warning chime
SPORT Mode Indicator
in chapter 5.
sounds 1 time.
Light
i Information
This indicator light illuminates:
If the icy road warning light illumi-
nates while driving, it means that the
• When you select "SPORT" mode
outside temperature has reduced and
as drive mode.
that the road conditions may be icy.
For more details, refer to "Drive
As a precaution you should reduce
Mode Integrated Control System"
your speed and drive more carefully
in chapter 5.
and with greater attention to the road
conditions.
3-46
ECO Mode Indicator
CUSTOM Mode
CREEP OFF Indicator
&5((3
Light
Indicator Light
&86720
Light (if equipped)
2))
When Creep Start is set to OFF in
This indicator light illuminates:
This indicator light illuminates:
custom mode, vehicle will not auto-
• When you select "CUSTOM" mode
matically move and CREEP OFF
• When you select "ECO" mode as
as drive mode.
indicator will turn on even if you take
drive mode.
3
your foot off the brake pedal while
For more details, refer to "Drive
For more details, refer to "Drive
vehicle is stopped at D (Drive) or M
Mode Integrated Control System"
Mode Integrated Control System"
(Manual mode) driving position of
in chapter 5.
in chapter 5.
dual clutch transmission.
For more details, refer to “N button”
REV (Rev Matching)
N Mode Indicator Light
in chapter 5.
Indicator Light
5(9
CREEP OFF operation and indicator
This indicator light illuminates:
lighting conditions
This indicator light illuminates:
• When you select "N" mode as drive
• Driving mode : Custom
[White] When Rev Matching is turned
mode.
on in NORMAL mode.
• Creep start setting : OFF
For more details, refer to "Drive
[Yellow] When Rev Matching is
• Vehicle status : Stopping
Mode Integrated Control System"
turned on in SPORT mode.
in chapter 5.
[Red] When Rev Matching is turned
on in N mode.
For more details, refer to "Rev
Matching" in chapter 5.
3-47
Convenient features of your vehicle
LCD Display Messages
Key not detected
WARNING
Low key battery
This warning message is displayed if
the smart key is not detected when you
CREEP START OFF allows the
This warning message is displayed if
press the Engine Start/Stop button.
vehicle to stop without depress-
the battery of the smart key is dis-
ing the brake pedal on a flat sur-
charged while changing the Engine
face and accelerate immediately
Start/Stop button to the OFF position.
Press START button again
when the accelerator pedal is
This message is displayed if you
depressed.
Press clutch pedal to start
were unable to start the vehicle when
When using this function,
the Engine Start/Stop button was
engine
always be careful as the vehicle
pressed.
This warning message is displayed if
may move depending on
the
If this occurs, attempt to start the
the Engine Start/Stop button
incline and road conditions.
engine by pressing the Engine Start/
changes to the ACC position twice
Stop button again.
by pressing the button repeatedly
without depressing the clutch pedal.
If the warning message appears
You can start the engine by depress-
each time you press the Engine
ing the clutch pedal to.
Start/Stop button, have your vehicle
inspected by an authorized
HYUNDAI dealer.
Key not in vehicle
This warning message is displayed if
the smart key is not in the vehicle
when you press the Engine Start/
Stop button.
When attempting to start the vehicle,
always have the smart key with you.
3-48
Battery discharging due to
Press START button with key
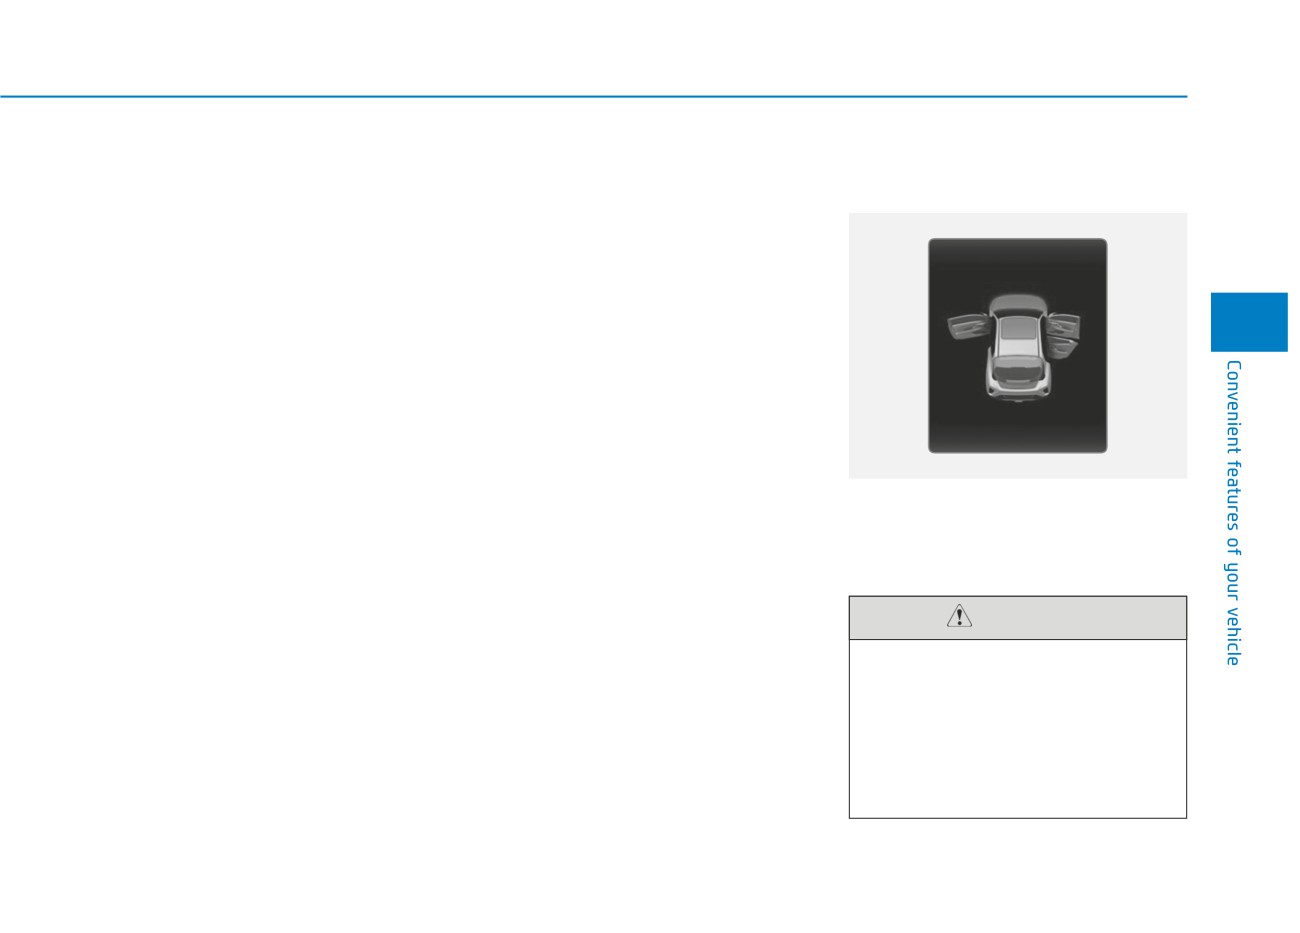
Door, Hood, Tailgate Open
external electrical devices
This warning message is displayed if
Indicator
This message is displayed if the bat-
you press the Engine Start/Stop but-
tery voltage is weak due to any non-
ton while the warning message "Key
factory electrical accessories
(ex.
not detected" is displayed.
dashboard camera) while parking.
At this time, the immobilizer indicator
Be careful that the battery is not dis-
light blinks.
charged.
3
If the warning message appears
Check BRAKE SWITCH fuse
after removing the non-factory elec-
trical accessories, we recommend
This warning message is displayed if
that you have the vehicle inspected
the brake switch fuse is disconnected.
by an authorized HYUNDAI dealer.
You need to replace the fuse with a
new one before starting the engine.
OJS048111
If that is not possible, you can start
This warning is displayed if any door
the engine by pressing the Engine
or the hood or the tailgate is left
Start/Stop button for 10 seconds in
open. The warning will indicate
the ACC position.
which door is open in the display.
CAUTION
Before driving the vehicle, you
should confirm that the door/
hood/tailgate is fully closed.
Also, check there is no door/
hood/tailgate open warning light
or message displayed on the
instrument cluster.
3-49
Convenient features of your vehicle
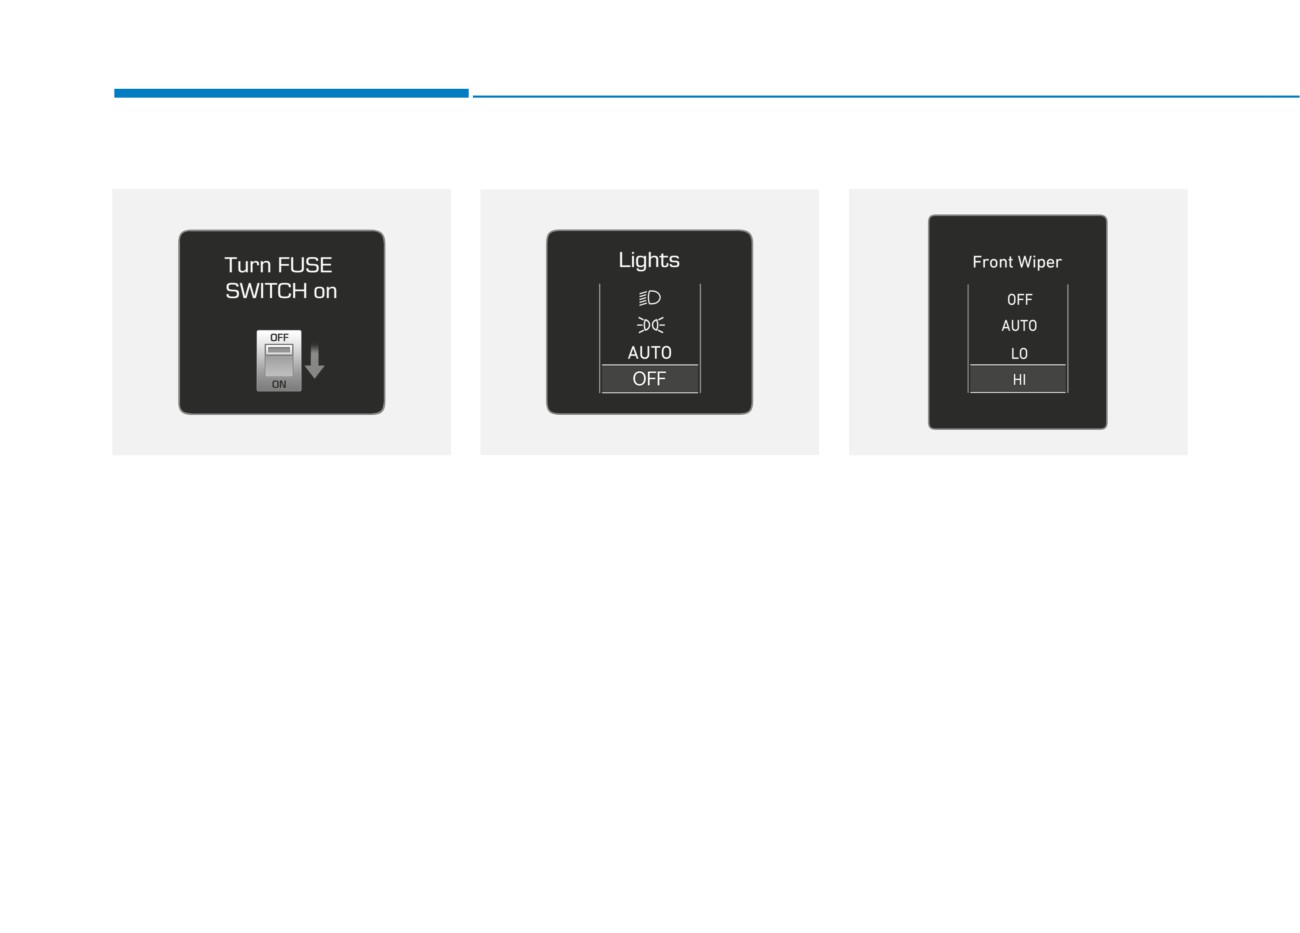
Turn FUSE SWITCH on
Lights Mode
Wiper
OOS047142L
OPD047120L
OIK047146L
This warning message is displayed if
This indicator displays which exterior
This indicator displays which wiper
the fuse switch located on the fuse
light is selected using the lighting
speed is selected using the wiper
box under the steering wheel is OFF.
control.
control.
The fuse switch is turned OFF to
minimize battery draw when the
vehicle is in storage or in transporta-
tion where the vehicle will not be
operated for some time.
Under normal conditions, the fuse
switch should be set to the ON posi-
tion.
For more details, refer to "Fuses"
in chapter 7.
3-50
Low washer fluid
Engine overheated
Tire size mismatch.
This warning message is displayed
This warning message is displayed
Check all tire sizes
if the washer fluid level in the reser-
when the engine coolant tempera-
This warning message is displayed
voir is nearly empty.
ture is above
120°C (248°F). This
when different tires (size, type, etc.)
Have the washer fluid reservoir refilled.
means that the engine is overheated
are detected between front and rear.
and may be damaged.
To use the Electronic Limited Slip
Differential, equip the vehicle with
Low fuel
If your vehicle is overheated, refer
the same tires on front and rear.
3
to "If the Engine Overheats" in
This warning message is displayed if
chapter 6.
For more details, refer to
the fuel tank is almost out of fuel.
"Electronic Limited Slip Differential"
When this message is displayed, the
in chapter 5.
low fuel level warning light in the
Check headlight
cluster will come on.
This warning message is displayed if
It is recommended to look for the
the headlights are not operating
nearest fueling station and refuel as
properly. A headlight bulb may need
soon as possible.
to be replaced.
Add fuel as soon as possible.
i
Information
Make sure to replace the burned out
bulb with a new one of the same
wattage rating.
3-51
Convenient features of your vehicle
Check limited slip differential
Check Electronic Suspension
Downshift Alert. Downshifting at
This warning message is displayed if
This warning message is displayed if
high RPMs may result in engine
there is a problem with the Limited
there is a problem with the Electronic
damage
Slip Differential system.
Control Suspension (ECS) system.
If transmission input rpm is too high
In this case, have your vehicle
In this case, have your vehicle
(over rev limit) due to shifting, a
inspected by an authorized dealer of
inspected by an authorized dealer of
warning message will appear and a
HYUNDAI.
HYUNDAI.
warning chime will sound.
For more details, refer to
For more details, refer to
For more details, refer to "Rev
"Electronic Limited Slip Differential"
"Electronic Control Suspension
Matching" in chapter 5.
in chapter 5.
(ECS)" in chapter 5.
3-52
LCD DISPLAY
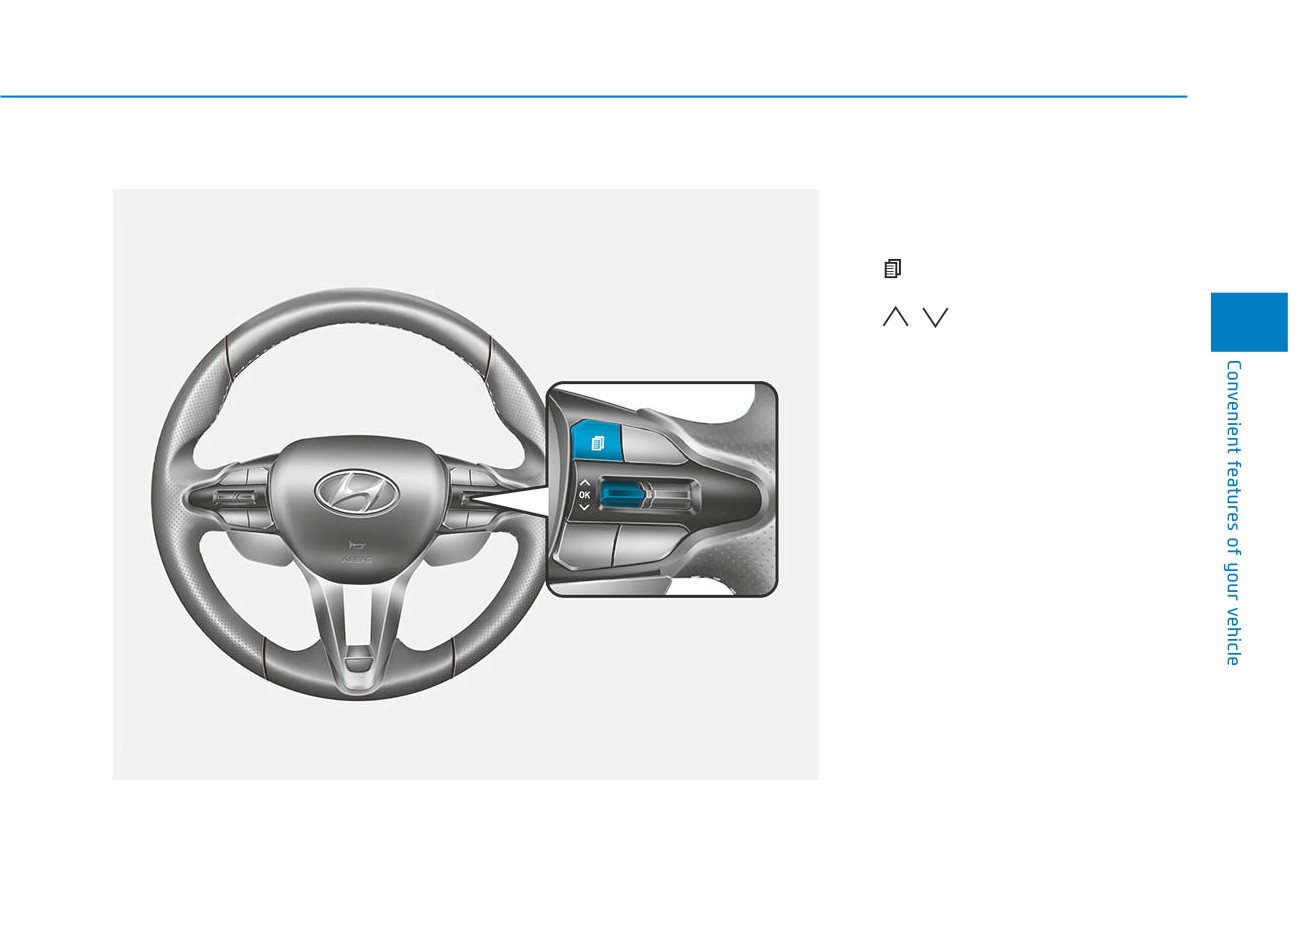
LCD Display Control
The LCD display modes can be
changed by using the control buttons.
(1)
: MODE button for changing
modes
(2)
,
: MOVE switch for chang-
3
ing items
(3) OK : SELECT/RESET button for
setting or resetting the select-
ed item
OPDEN047404
3-53
Convenient features of your vehicle
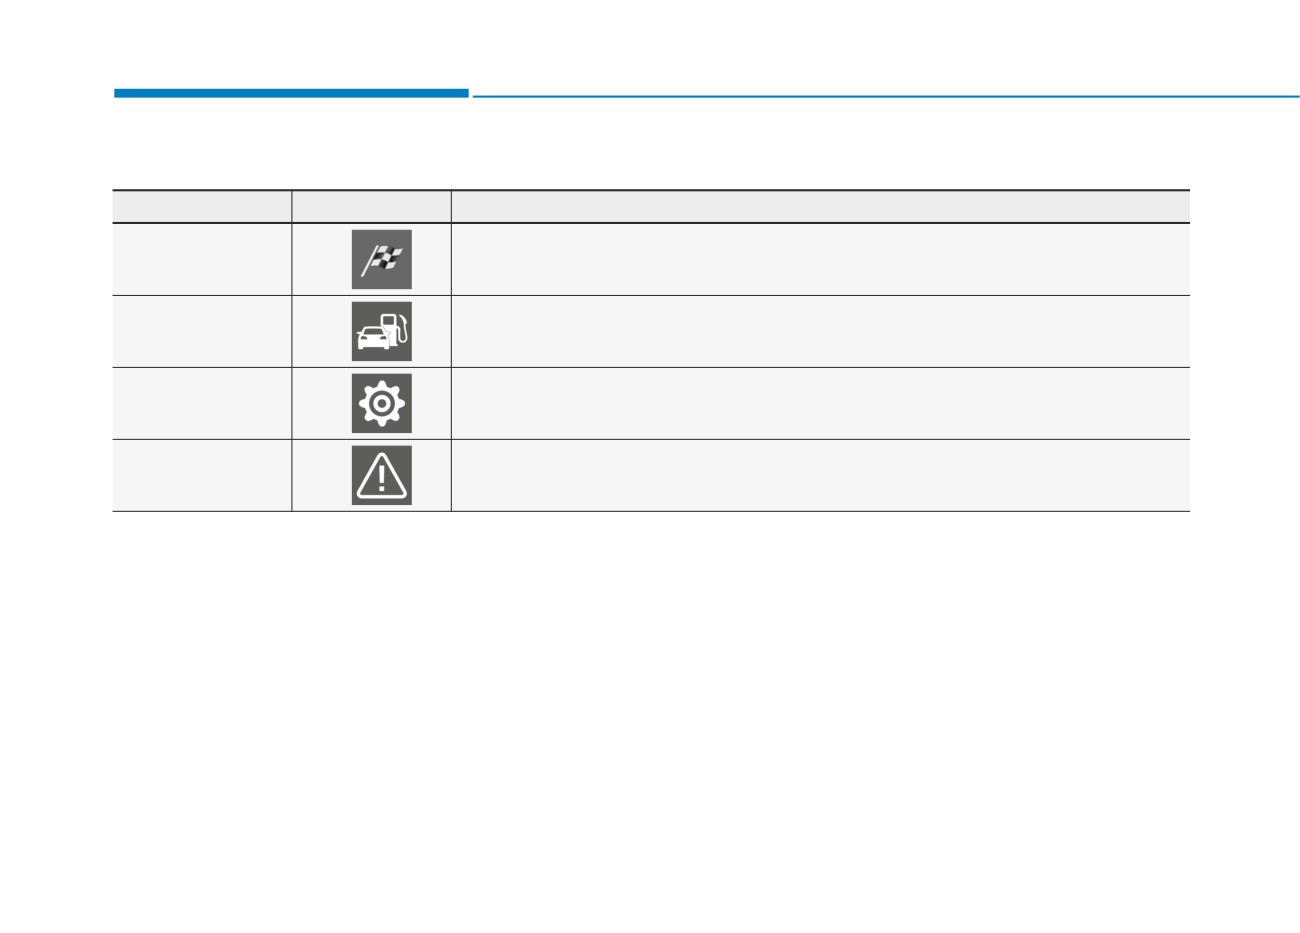
LCD Display Modes
Modes
Symbol
Explanation
The Sport menu displays Gauge, Lap Timer and G-Force.
Sport
For more details, refer to the following pages.
The Trip Computer menu displays driving information such as the tripmeter,
Trip Computer
fuel economy, etc. For more details, refer to "Trip Computer" in this chapter.
The User Settings menu provides user options for a variety of settings including door
User Settings
lock/unlock features, convenience features, driver assistance settings, etc.
The Master Warning mode displays warning messages related to the vehicle when one or
Master Warning
more systems is not operating normally.
The information provided may differ depending on which functions are applicable to your vehicle.
3-54
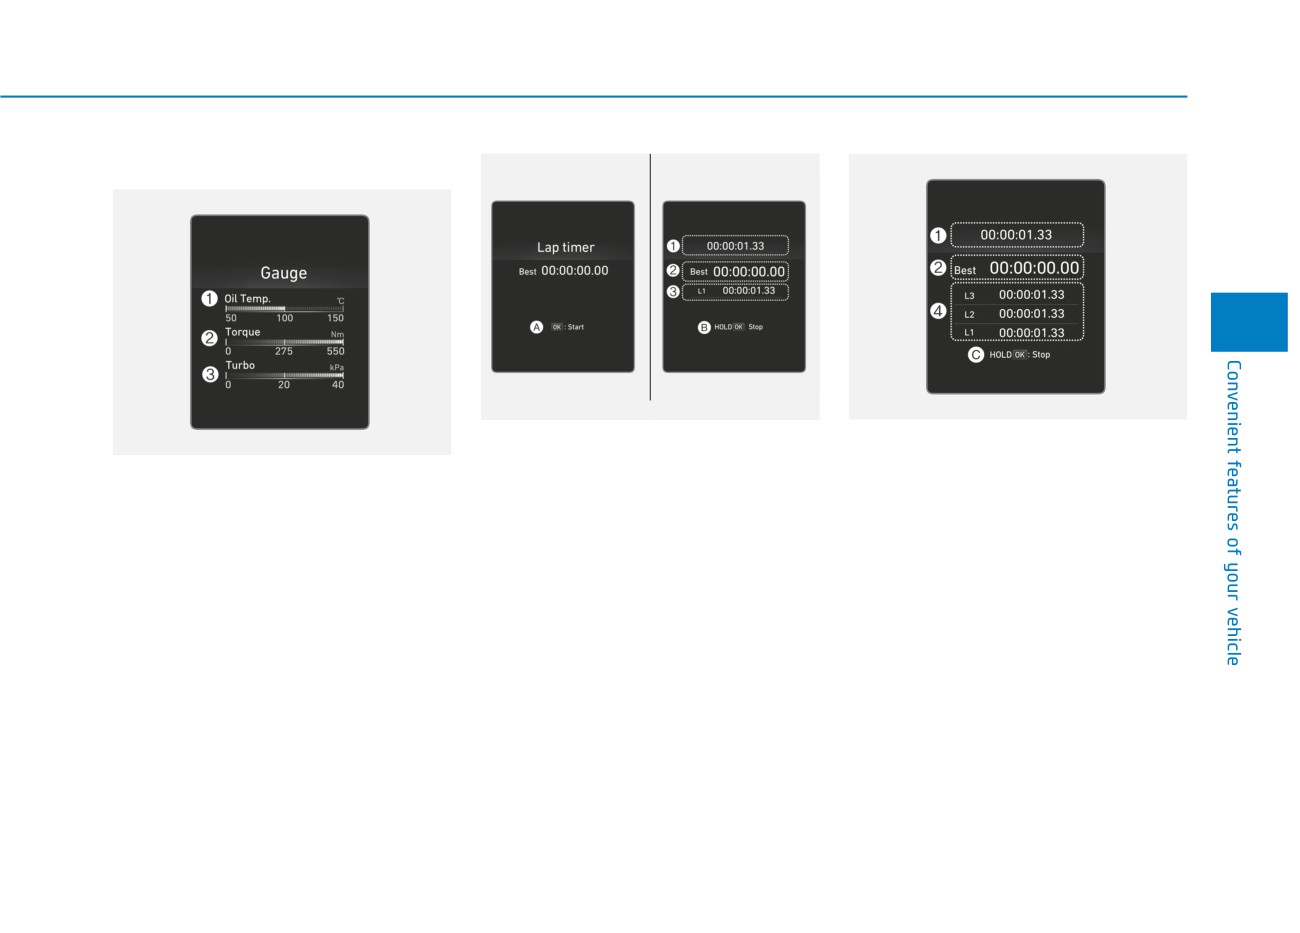
Sport mode
3
OIK047168L/OIK047169L
OIK047170L
Lap timer
To reset (C):
OIK047167N
(1) Total time
Press and hold the OK button for
Gauges
more than 1 second on the steering
(2) Best lap
This mode displays information relat-
wheel when the lap timer has
ed to your engine such as engine oil
(3) Current lap
stopped counting the current lap (3).
temperature (1), current torque (2)
If the OK button is pressed shortly,
and turbo boost pressure (3).
To start (A):
the lap timer will continue counting
Press the OK button shortly on the
from the time it has been stopped.
steering wheel. The lap timer will
start counting the current lap (3).
To stop (B):
Press and hold the OK button for
more than 1 second on the steering
wheel while the lap timer is counting
the current lap (3).
3-55
Convenient features of your vehicle
To save laps:
Trip computer mode
Press the OK button shortly on the
steering wheel while the lap timer is
counting the current lap (3).
The timer can save L1~ L3 (4).
The best lap (2) will be displayed
automatically.
The saved laps can be reset when
the current lap is reset.
To start a new lap press the OK but-
ton when the current lap is reset.
OIK047131
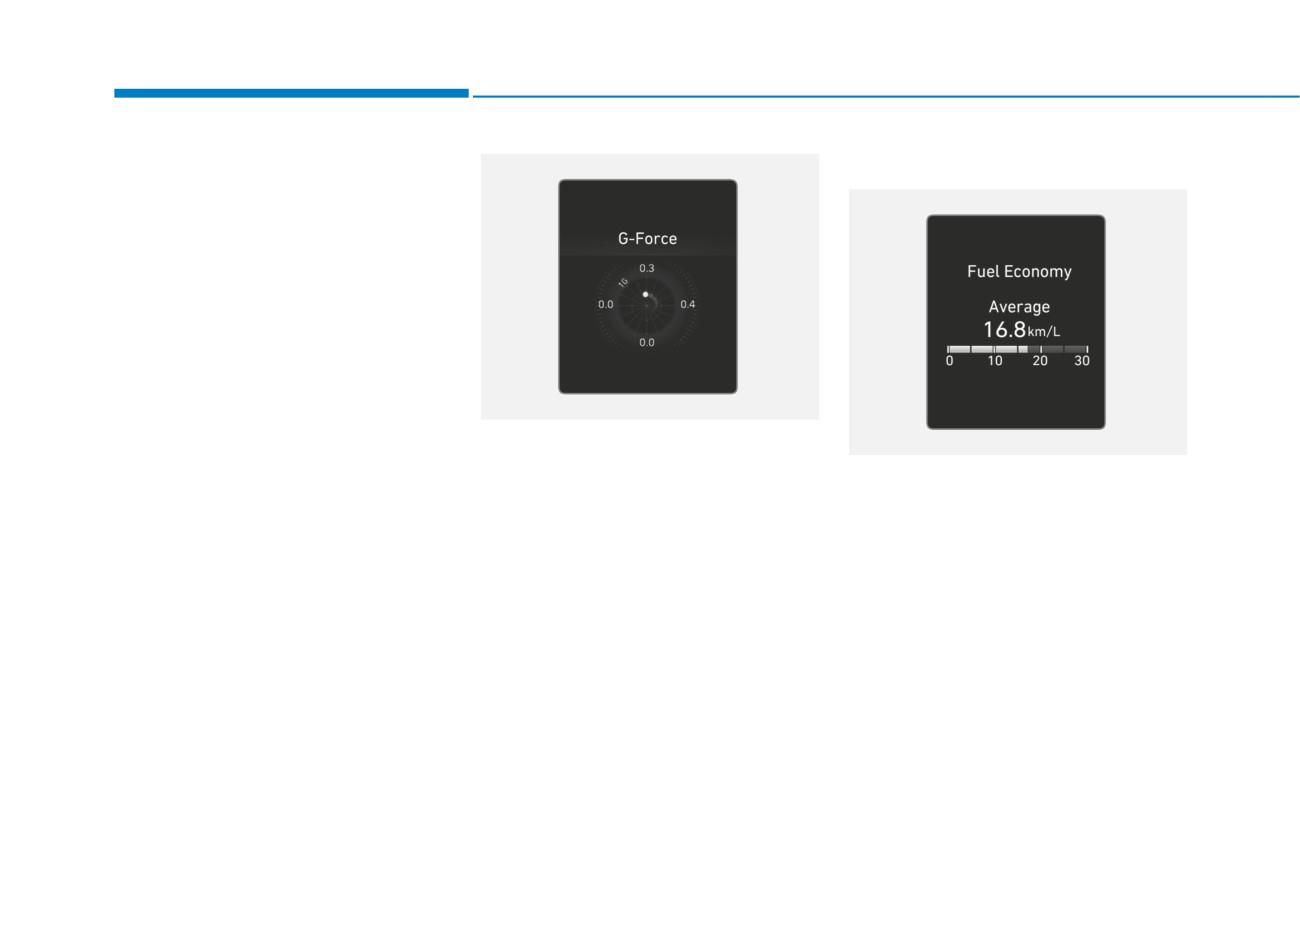
G-Force
OIK047124L
This mode displays the force deliv-
The trip computer mode displays
ered to the vehicle laterally while the
information related to vehicle driving
vehicle is in motion.
parameters including fuel economy,
tripmeter information and vehicle
speed.
For more details, refer to "Trip
Computer" in this chapter.
3-56
Master warning mode
User settings mode
i
Information
This warning light informs the driver
In this mode, you can change the
Settings only available with parking
the following situations.
settings of the instrument cluster,
brake engaged and gear in neutral.
doors, lamps, etc.
- Lamp malfunction
This warning message illuminates if you
1. Door
The Master Warning Light illumi-
try to select an item from the User
nates if one or more of the above
2. Lights
Settings mode while driving.
warning situations occur. At this time,
3. Sound
For your safety, change the User
3
the LCD Modes Icon will change
4. Convenience
Settings after engaging the parking
from (
) to (
).
brake and shifting the gear to neutral.
5. Service interval
If the warning situation is solved, the
master warning light will be turned
6. Other
off and the LCD Modes Icon will be
7. Language
changed back to its previous icon
8. Reset
(
).
The information provided may dif-
fer depending on which functions
are applicable to your vehicle.
3-57
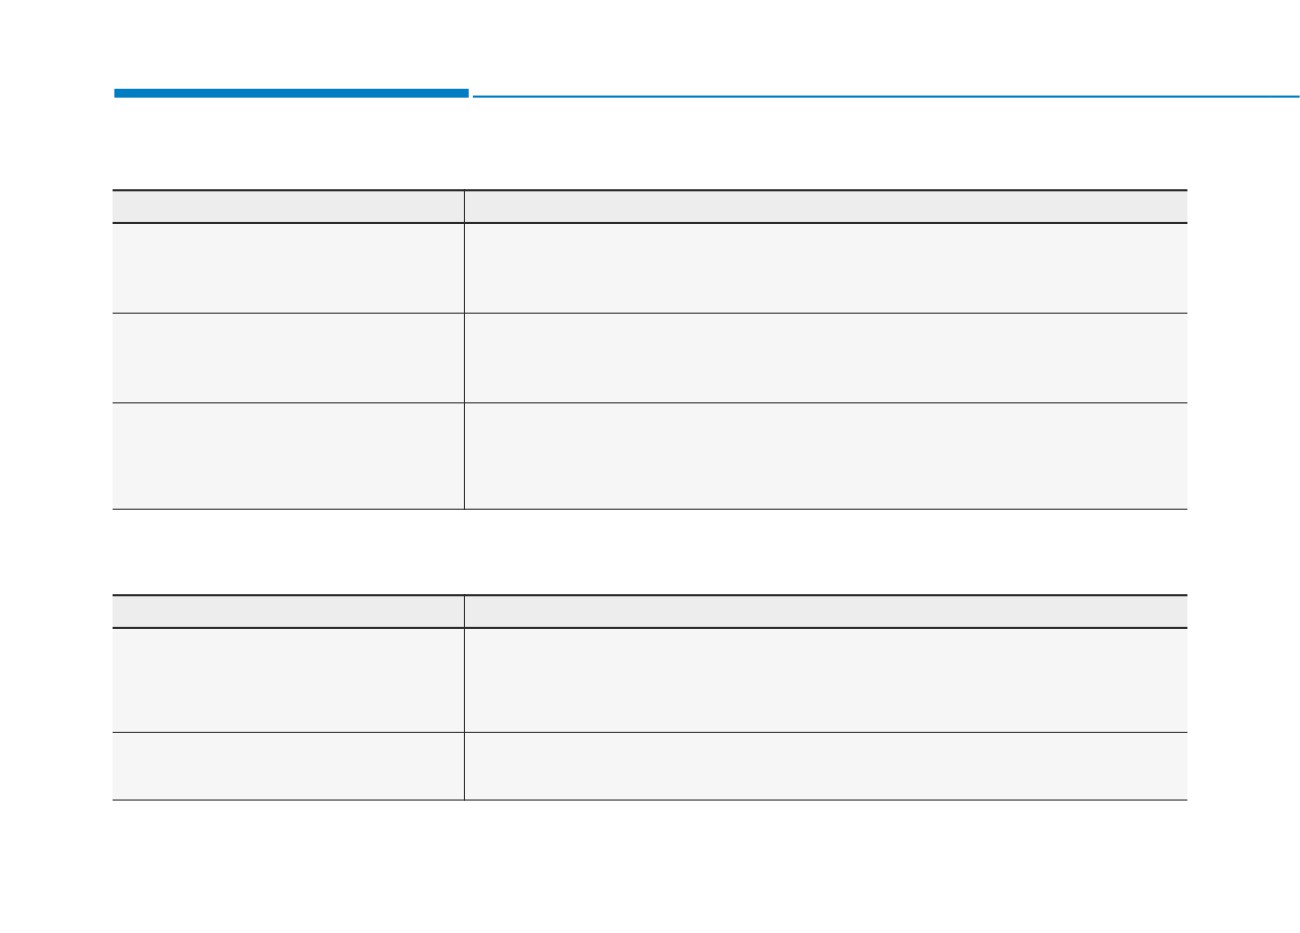
Convenient features of your vehicle
1. Door
Items
Explanation
- Disable: The auto door lock operation will be canceled.
Auto Lock
- Enable on speed: All doors will be automatically locked when the vehicle speed exceeds
15 km/h (9.3 mph).
- Disable: The auto door unlock operation will be canceled.
Auto Unlock
- Vehicle Off: All doors will be automatically unlocked when the Engine Start/Stop button is set
to the OFF position.
- Off: The two press unlock function will be deactivated. Therefore, all doors will unlock if the
door unlock button is pressed.
Two Press Unlock
- On: Only the driver's door will unlock if the door unlock button is pressed. When the door
unlock button is pressed again within 4 seconds, the remaining doors will unlock.
2. Lights
Items
Explanation
- Off: The one touch turn signal function will be deactivated.
- 3, 5, 7 Flashes: The turn signal indicator will blink 3, 5, or 7 times when the turn signal lever is
One Touch Turn Signal
moved slightly.
For more details, refer to "Lighting" in this chapter.
To activate or deactivate the headlight delay function.
Headlight Delay
For more details, refer to "Lighting" in this chapter.
3-58
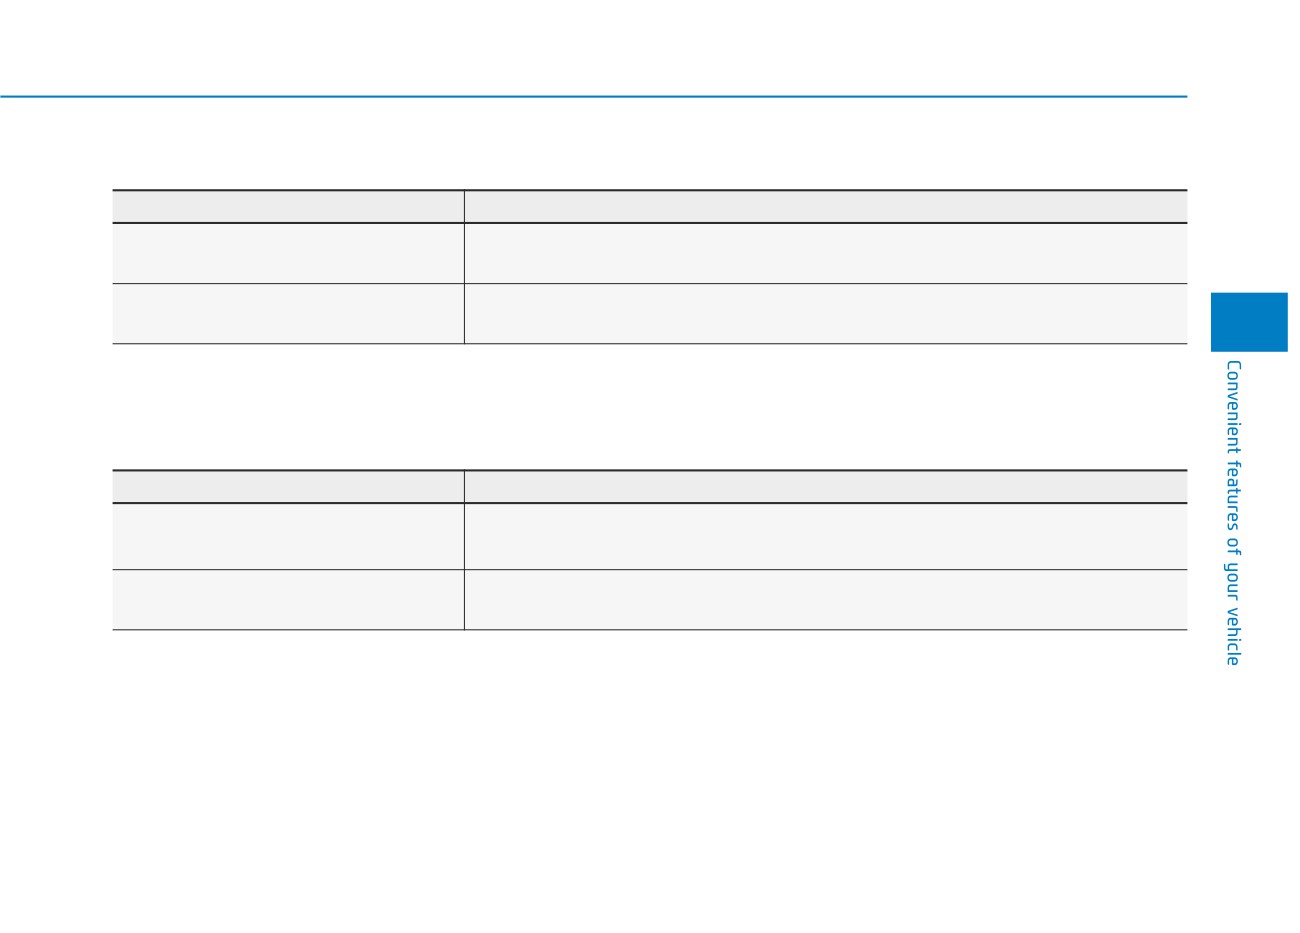
3. Sound
Items
Explanation
To adjust the Cluster Voice Guidance volume.
Cluster Voice Guidance Volume
- Level 1 / Level 2 / Level 3
Welcome Sound
To activate or deactivate the welcome sound function.
3
4. Convenience
Items
Explanation
To activate or deactivate the Wiper/Light mode.
Wiper/Lights Display
When activated, the LCD display shows the selected Wiper/Light mode whenever you change
the mode.
To activate or deactivate the rear wiper while the vehicle is in reverse with the front wiper ON.
Auto Rear Wiper (in R)
For more details, refer to "Wipers and Washers" in this chapter.
3-59
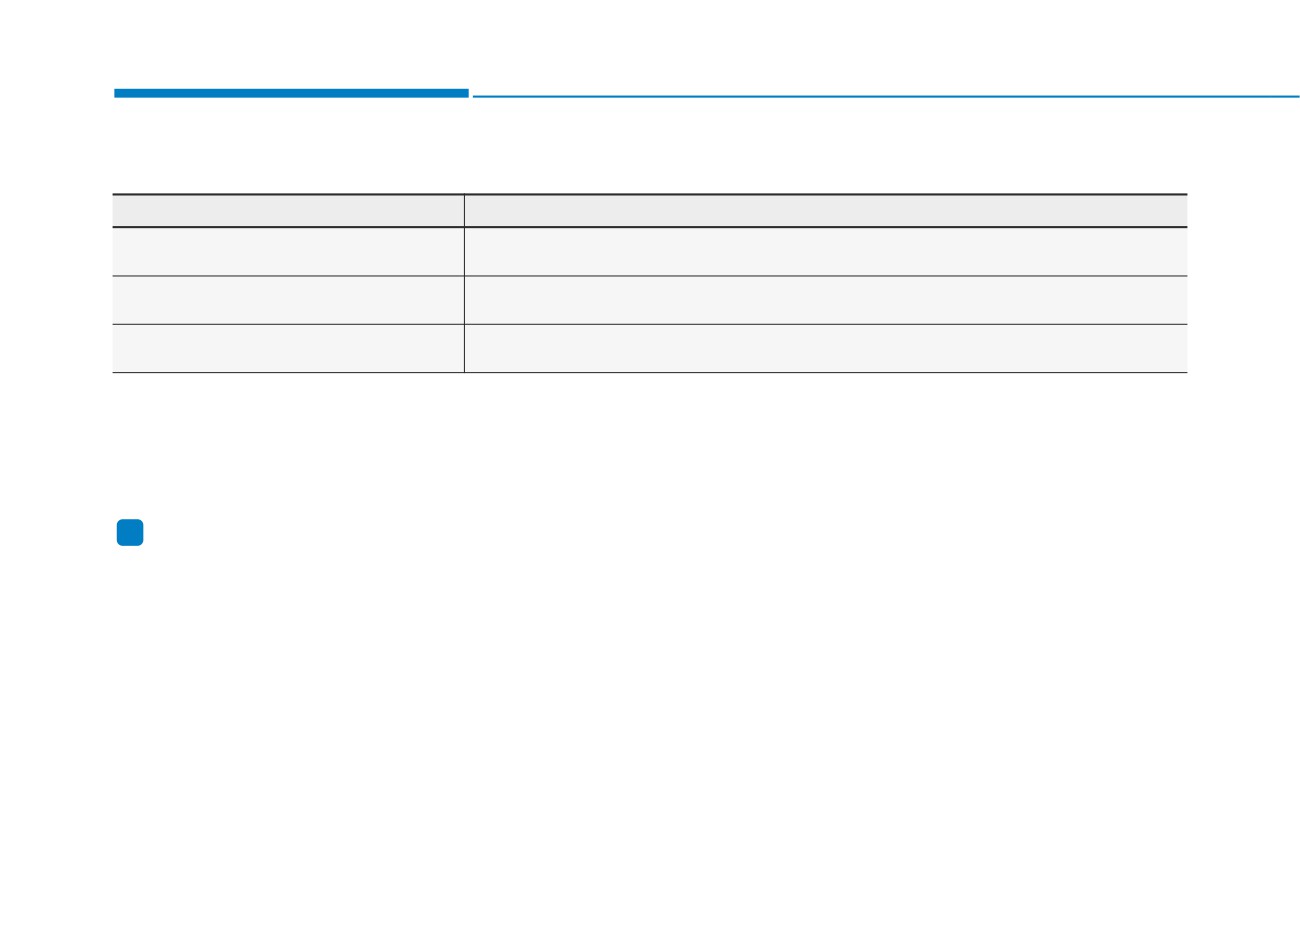
Convenient features of your vehicle
5. Service interval
Items
Explanation
Service Interval
To activate or deactivate the service interval function.
Adjust Interval
If the service interval menu is activated, you may adjust the time and distance.
Reset
To reset the service interval.
If the service interval is activated and the time and distance is adjusted, messages are displayed in the following
situations each time the vehicle is turned on.
- Service in: Displayed to inform the driver the remaining mileage and days to service.
- Service required: Displayed when the mileage and days to service has been reached or passed.
i Information
If any of the following conditions occur, the mileage and number of days to service may be incorrect.
- The battery cable is disconnected.
- The fuse switch is turned off.
- The battery is discharged.
3-60
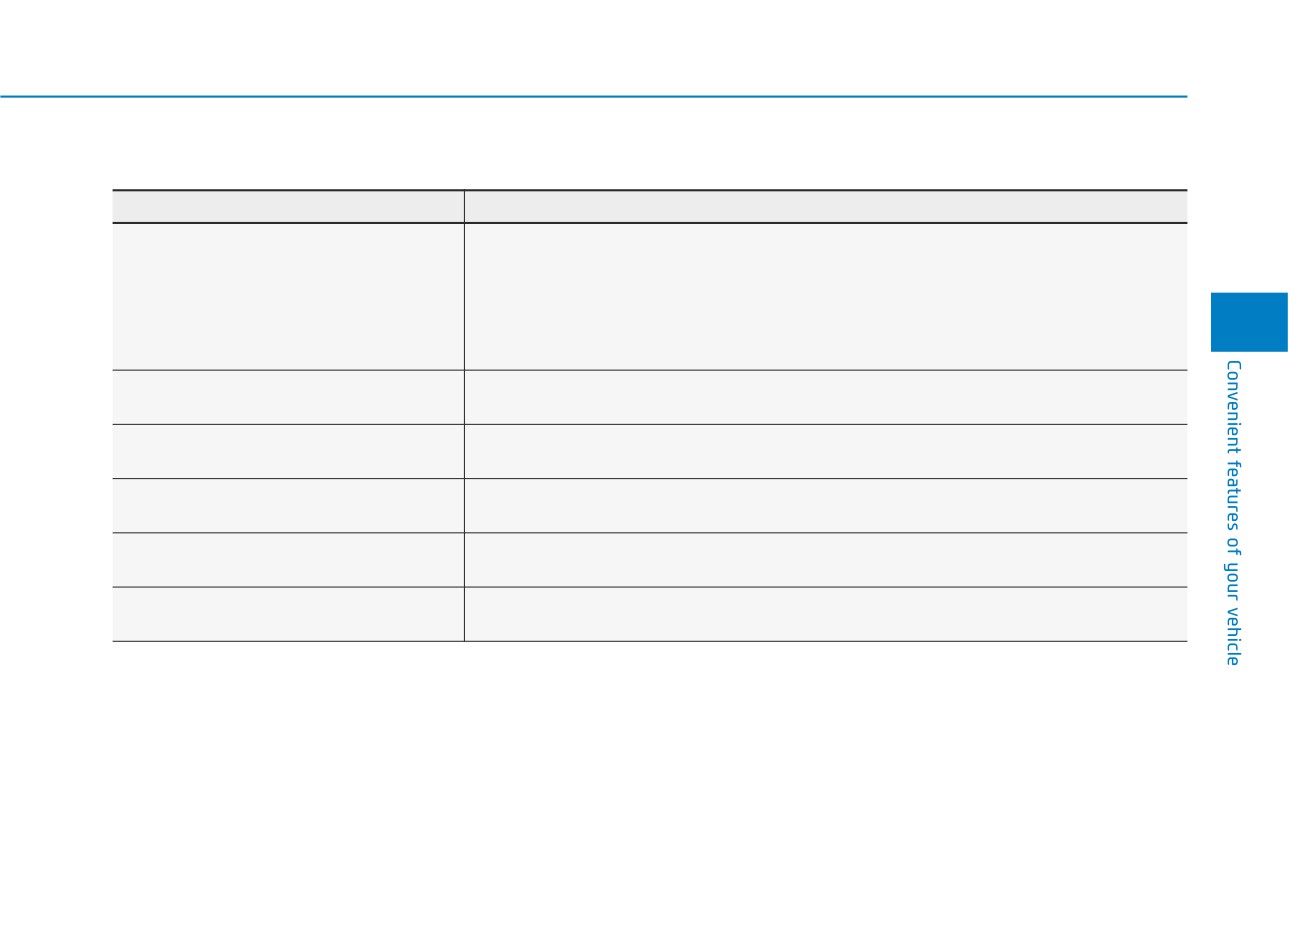
6. Other
Items
Explanation
- Off: The average fuel economy will not reset automatically whenever refueling.
- After ignition: When the engine has been OFF for 4 hours or longer the average fuel economy
will reset automatically.
Fuel Economy Reset
- After refueling: The average fuel economy will reset automatically after adding 6 liters (1.6 gal-
lons) of fuel or more and after driving speed exceeds 1 km/h (1 mph).
3
For more details, refer to "Trip Computer" in this chapter.
To select the speed unit.
Speed Unit
- km / mile
To select the fuel economy unit.
Fuel Economy Unit
- km/L, (L/100 km)
To select the temperature unit.
Temperature Unit
- °C / °F
To select the torque unit.
Torque Unit
- Nm / lb·ft
To select the turbo boost pressure unit.
Turbo Boost Pressure Unit
- psi / kPa / bar
3-61
Convenient features of your vehicle
7. Language
Items
Explanation
Language
To select language.
8. Reset
Items
Explanation
You can reset the menus in the User Settings mode. All menus in the User Settings mode are
Reset
reset to factory settings, except language and service interval.
3-62
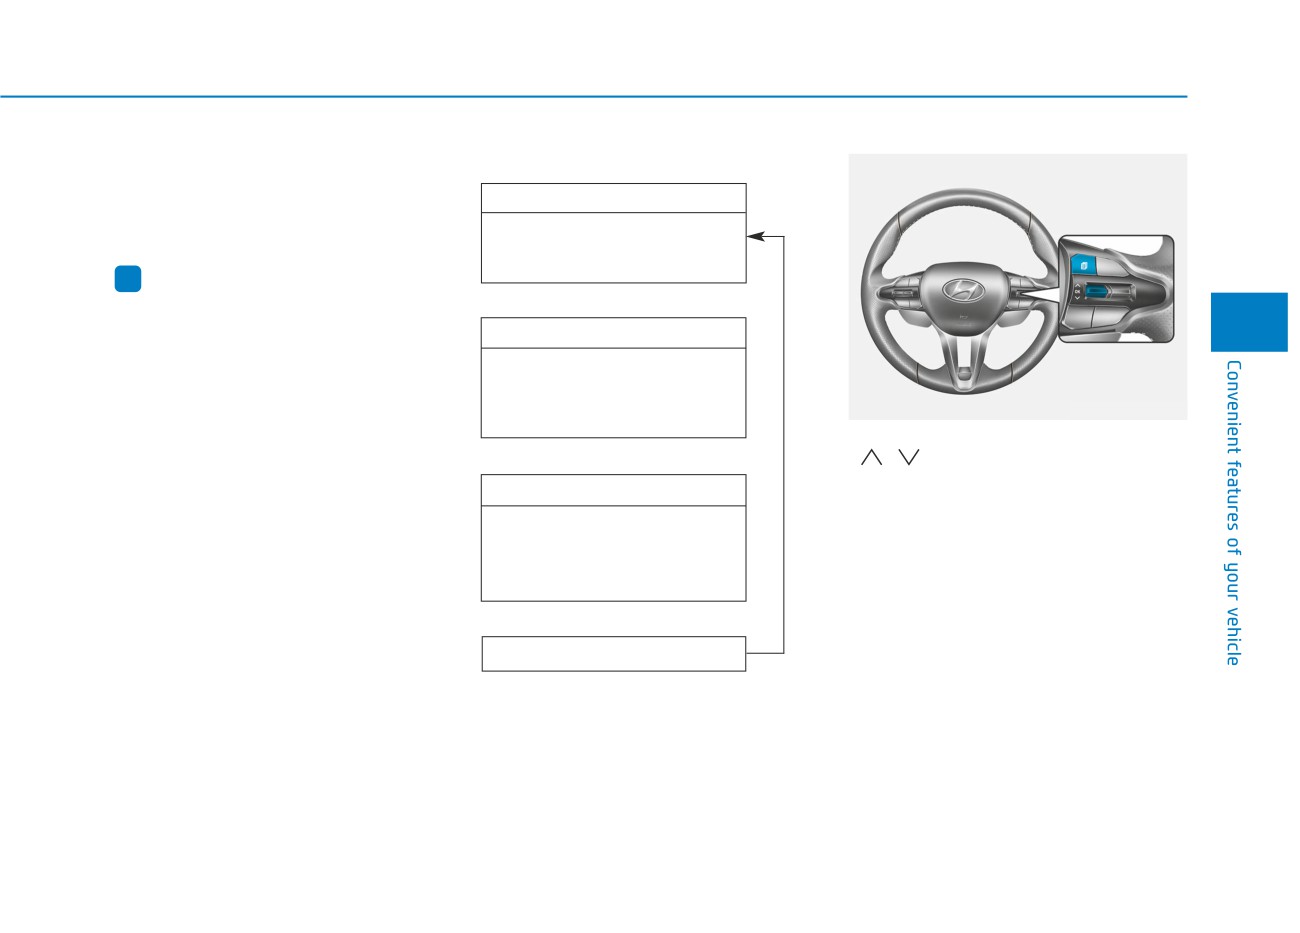
TRIP COMPUTER
The trip computer is a microcomput-
Trip modes
er-controlled driver information sys-
Fuel Economy
tem that displays information related
to driving.
• Average Fuel Economy
• Instant Fuel Economy
i Information
↕
Some driving information stored in
3
the trip computer
(for example
Drive Info
Average Vehicle Speed) resets if the
• Tripmeter
battery is disconnected.
• Fuel Economy
OPDEN047404
• Timer
To change the trip mode, toggle the
↕
"
,
" switch on the steering
wheel.
Accumulated Info
• Tripmeter
• Fuel Economy
• Timer
↕
Digital Speedometer
3-63
Convenient features of your vehicle
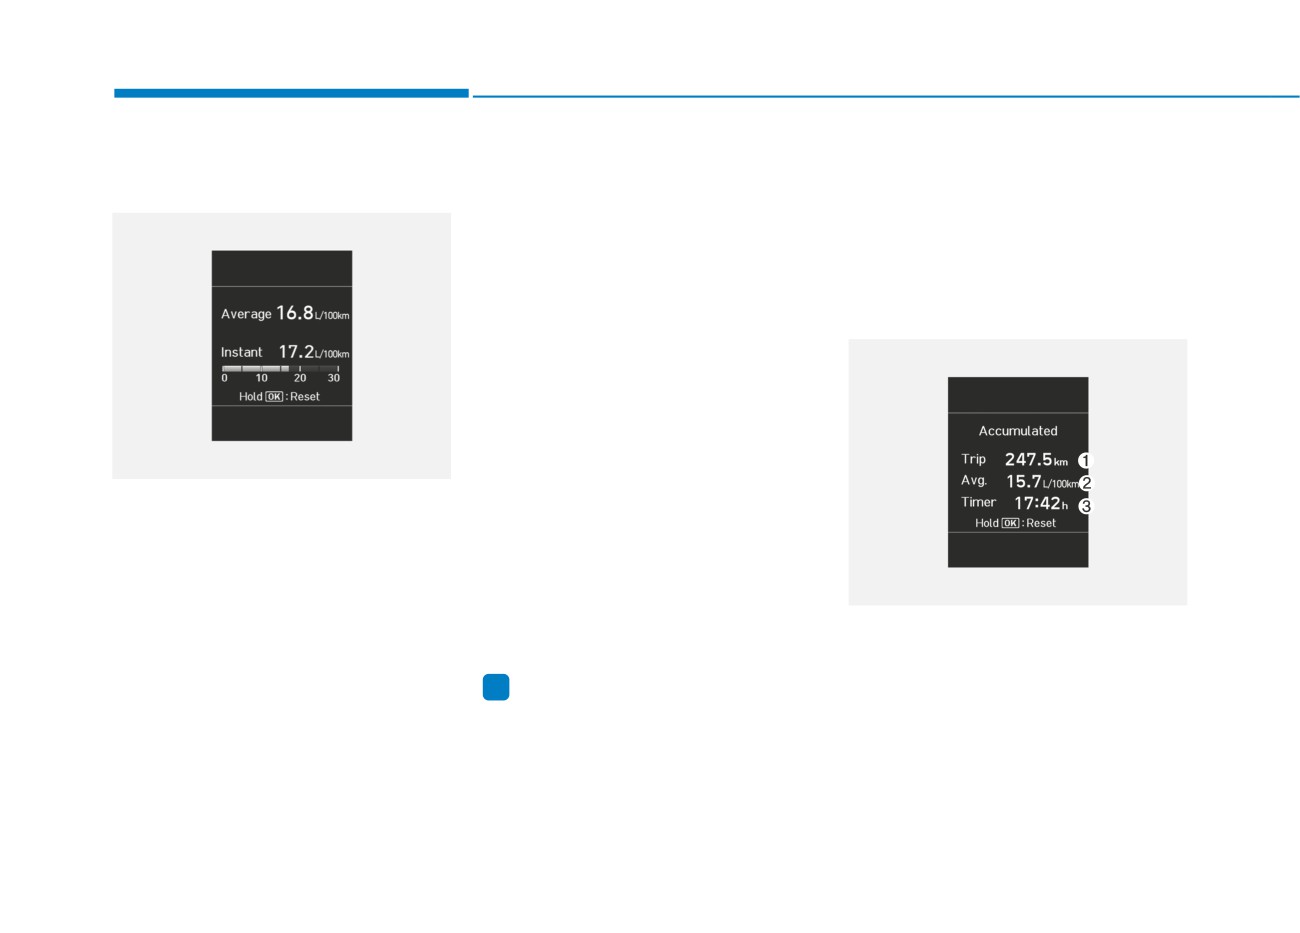
Average fuel economy/
Manual reset
Instant Fuel Economy
Instant fuel economy
To clear the average fuel economy
• The instantaneous fuel economy is
manually, press the OK button on the
displayed according to the bar
steering wheel for more than 1 sec-
graph in the LCD display while
ond when the average fuel economy
driving.
is displayed.
Automatic reset
Accumulated Info display
To automatically reset the average
fuel economy, select between "After
Ignition" or "After Refueling" in the
User Settings mode on the LCD dis-
play.
- After Ignition: When the engine has
OPDE046131
been OFF for 4 hours or longer the
Average Fuel Economy
average fuel economy will reset
automatically.
• The average fuel economy is calcu-
lated by the total driving distance
- After Refueling: The average fuel
and fuel consumption since the last
economy will reset automatically
average fuel economy reset.
after adding 6 liters (1.6 gallons) of
OPD047466C
fuel or more and after driving speed
• The average fuel economy can be
This display shows the accumulated
reset both manually and automati-
exceeds 1 km/h (1 mph).
trip distance
(1), the average fuel
cally.
economy (2), and the total driving
i Information
time (3).
The vehicle must be driven for a min-
The information is accumulated start-
imum of 300 meters (0.19 miles) since
ing from the last reset.
the last ignition key cycle before the
average fuel economy will be recalcu-
lated.
3-64
To reset the information, press and
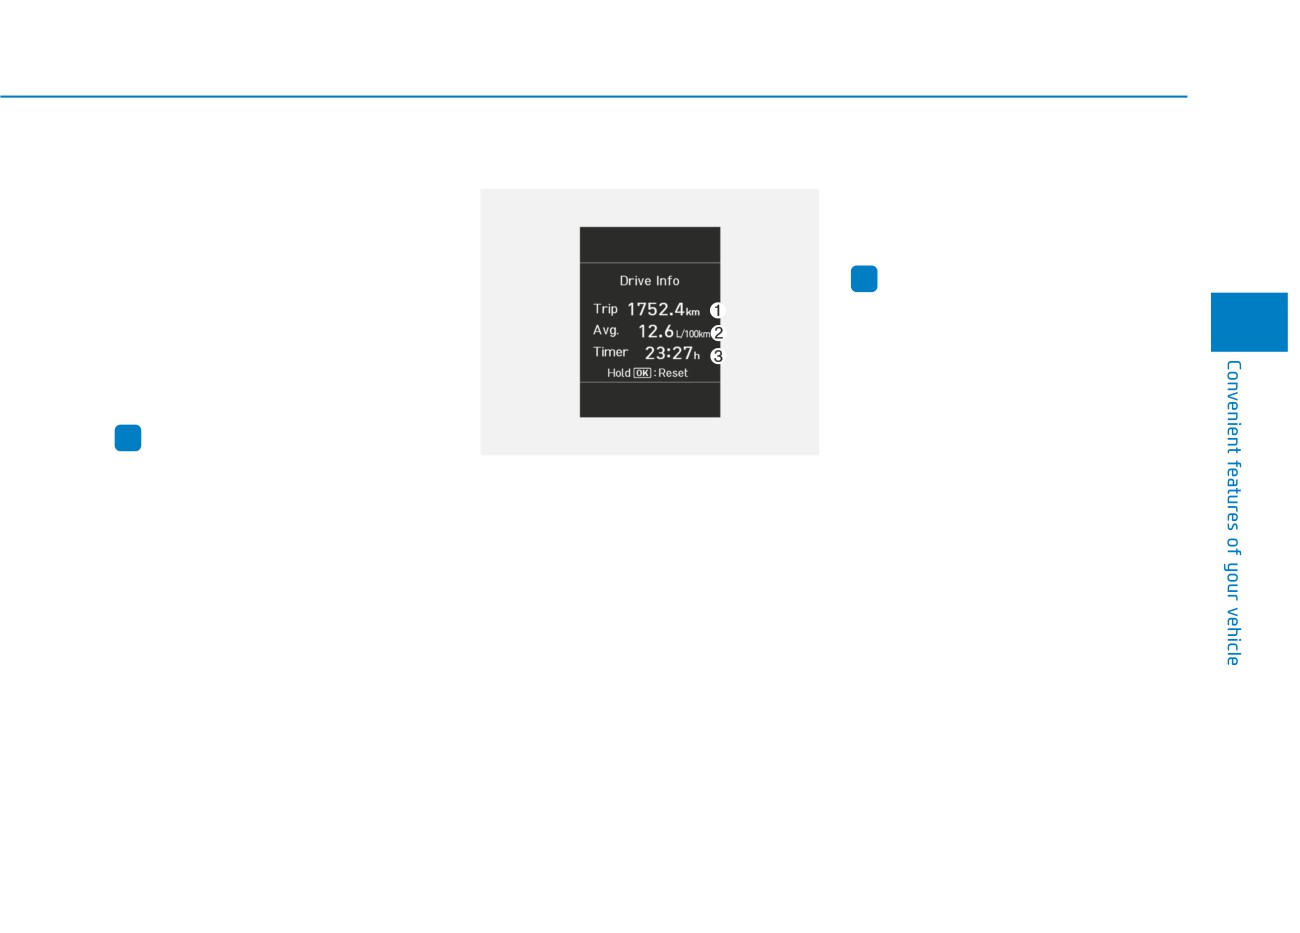
Drive Info display
The driving information will continue to
hold the OK button when viewing the
be counted while the engine is still run-
Accumulated driving info. The trip
ning (for example, when the vehicle is
distance, the average fuel economy,
in traffic or stopped at a stop light).
and total driving time will reset simul-
taneously.
i
Information
The accumulated driving information
The vehicle must be driven for a mini-
will continue to be counted while the
3
mum of 300 meters (0.19 miles) since the
engine is still running (for example,
last ignition key cycle before the average
when the vehicle is in traffic or
fuel economy will be recalculated.
stopped at a stop light).
i
Information
OPD047468C
The vehicle must be driven for a min-
This display shows the trip distance
imum of 300 meters (0.19 miles) since
(1), the average fuel economy (2),
the last ignition key cycle before the
and the total driving time (3).
average fuel economy will be recalcu-
The information is combined for each
lated.
ignition cycle. However, when the
engine has been OFF for 4 hours or
longer the Drive Info screen will reset.
To manually reset the information,
press and hold the OK button when
viewing the Drive Info. The trip dis-
tance, the average fuel economy, and
total driving time will reset simultane-
ously.
3-65
Convenient features of your vehicle
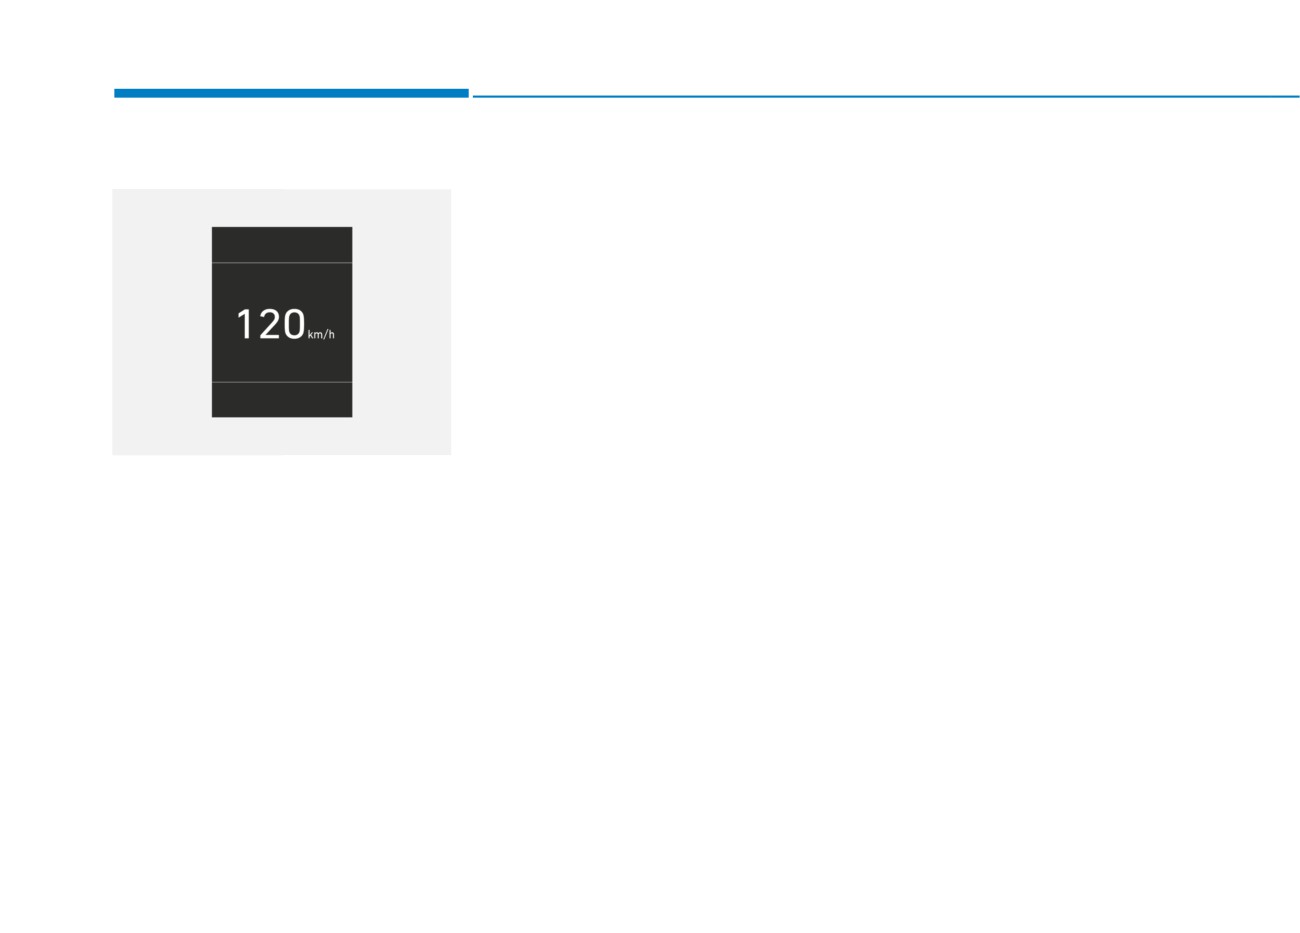
Digital speedometer
OPDE046145
The digital speedometer display
shows the speed of the vehicle.
3-66
LIGHTING
Exterior Lights
NOTICE
Lighting control
•
Do not cover or spill anything on
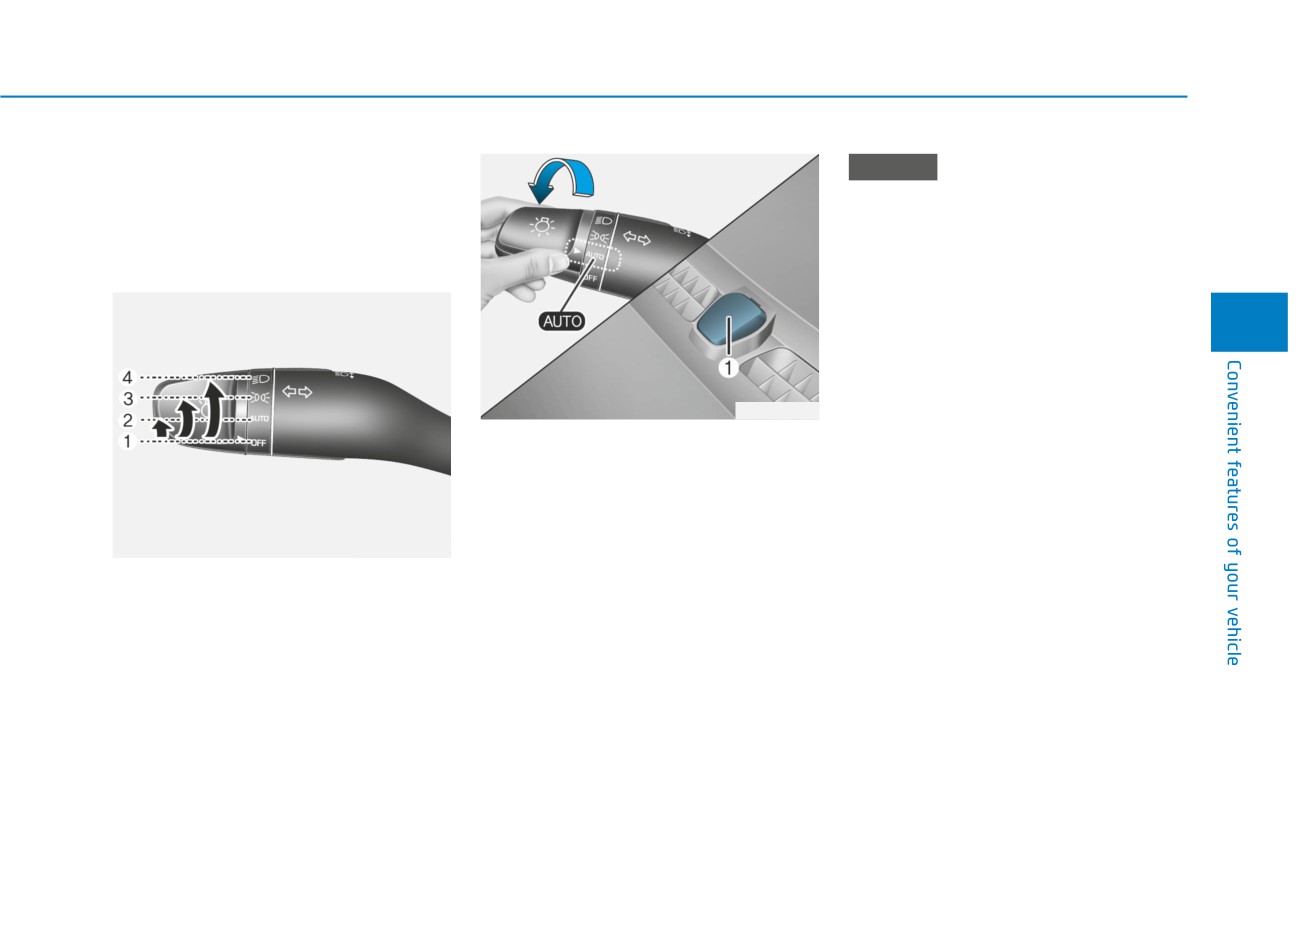
To operate the lights, turn the knob at
the sensor (1) located in front of
the end of the control lever to one of
the instrument panel.
the following positions:
•
Do not clean the sensor using a
window cleaner, the cleanser may
leave a light film which could
3
interfere with sensor operation.
•
If your vehicle has window tint
or other types of metallic coat-
OJS048036
ing on the front windshield, the
AUTO headlamp system may not
AUTO light position
work properly.
The parking lamp and headlamp will
be turned ON or OFF automatically
depending on the amount of daylight
as measured by the ambient light
OOS047404N
sensor on the center dash.
1. OFF position
2. AUTO headlamp position
Even with the AUTO headlamp fea-
3. Parking lamp position
ture in operation, it is recommended
to manually turn ON the headlamps
4. Headlamp position
when driving at night or in a fog, driv-
ing in the rain, or when you enter
dark areas, such as tunnels and
parking facilities.
3-67
Convenient features of your vehicle
High beam operation
OOS047405N
OOS047406N
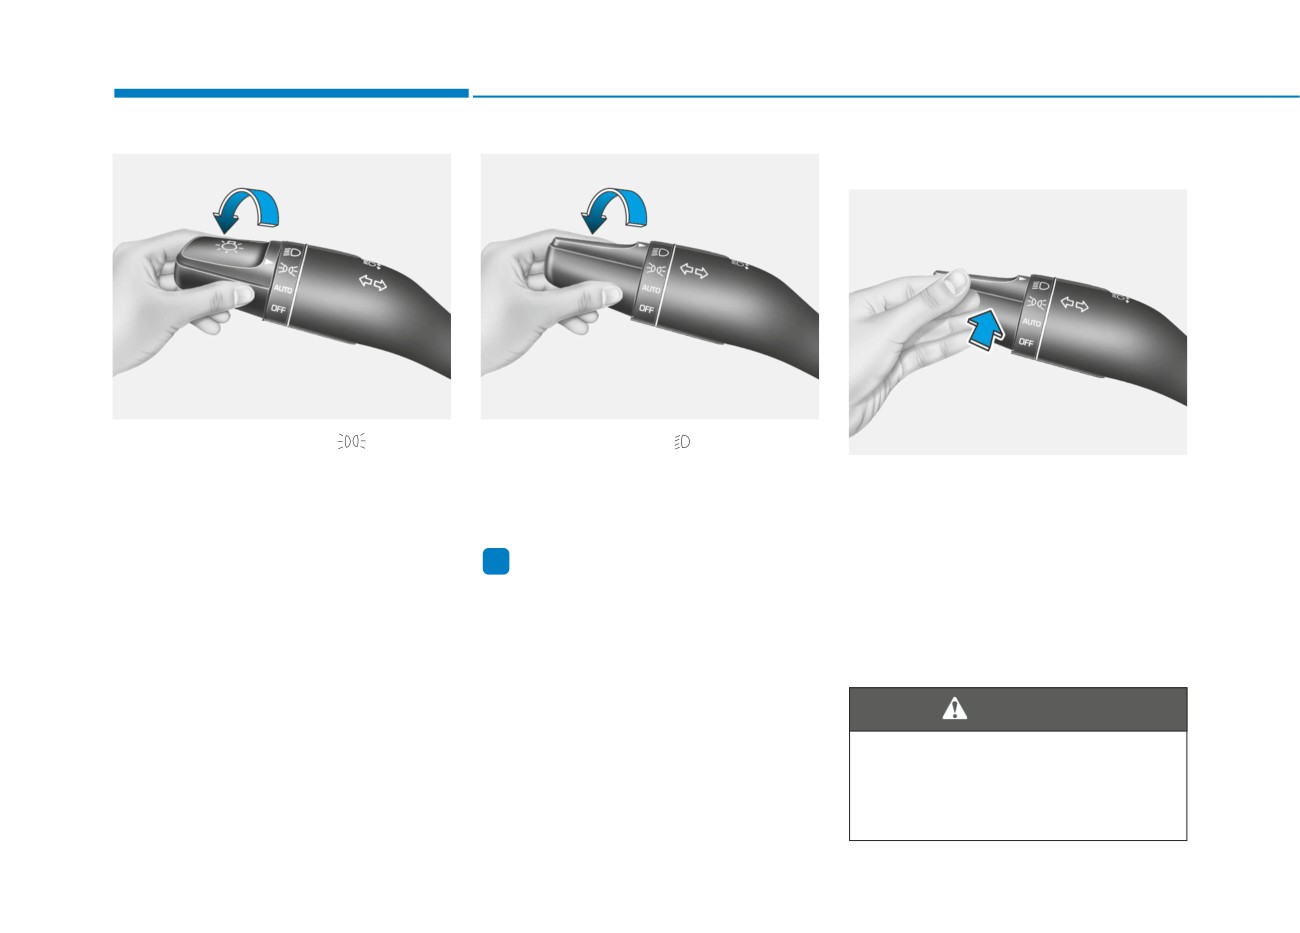
Parking lamp position (
)
Headlamp position (
)
OOS047407N
The parking lamp, license plate lamp
The headlamp, parking lamp, license
To turn on the high beam headlamp,
and instrument panel lamp are turned
plate lamp and instrument panel lamp
push the lever away from you. The
ON.
are turned ON.
lever will return to its original position.
The high beam indicator will light
i Information
when the headlamp high beams are
The ignition switch must be in the ON
switched on.
position to turn on the headlamp.
To turn off the high beam headlamp,
pull the lever towards you. The low
beams will turn on.
WARNING
Do not use high beam when there
are other vehicles approaching
you. Using high beam could
obstruct the other driver's vision.
3-68