Hyundai Tucson (2022 year). Manual in english - page 7
Convenient features
THEFT-ALARM SYSTEM
This system helps to protect your vehicle
Information
and valuables. The horn will sound and
the hazard warning lights will blink
•
Do not lock the doors until all
continuously if any of the following
passengers have left the vehicle. If the
occur:
remaining passenger leaves the vehicle
when the system is armed, the alarm
--
A door is opened without using the
will be activated.
smart key.
•
If the vehicle is not disarmed with the
--
The liftgate is opened without using
smart key, open the doors by using the
the smart key.
mechanical key and start the engine by
--
The engine hood is opened.
directly pressing the Engine Start/Stop
The alarm continues for 30 seconds, then
button with the smart key.
the system resets. To turn off the alarm,
•
If the system is disarmed by unlocking
unlock the doors with the smart key.
the vehicle, but neither a door or the
The Theft Alarm System automatically
liftgate is opened within 30 seconds, the
sets 30 seconds after you lock the
doors will relock and the system will
doors and the liftgate. For the system to
rearm automatically.
activate, you must lock the doors and
the liftgate from outside the vehicle with
the smart key or by touching the touch
Information
sensor on the outside of the door handle
with the smart key in your possession.
The hazard warning lights will blink and
the chime will sound once to indicate the
system is armed.
Once the security system is set, opening
any door, the liftgate, or the hood
without using the smart key will cause
the alarm to activate.
The Theft Alarm System will not set if the
hood, the liftgate, or any door is not fully
OHI038181L
closed. If the system will not set, check
the hood, the liftgate, or the doors are
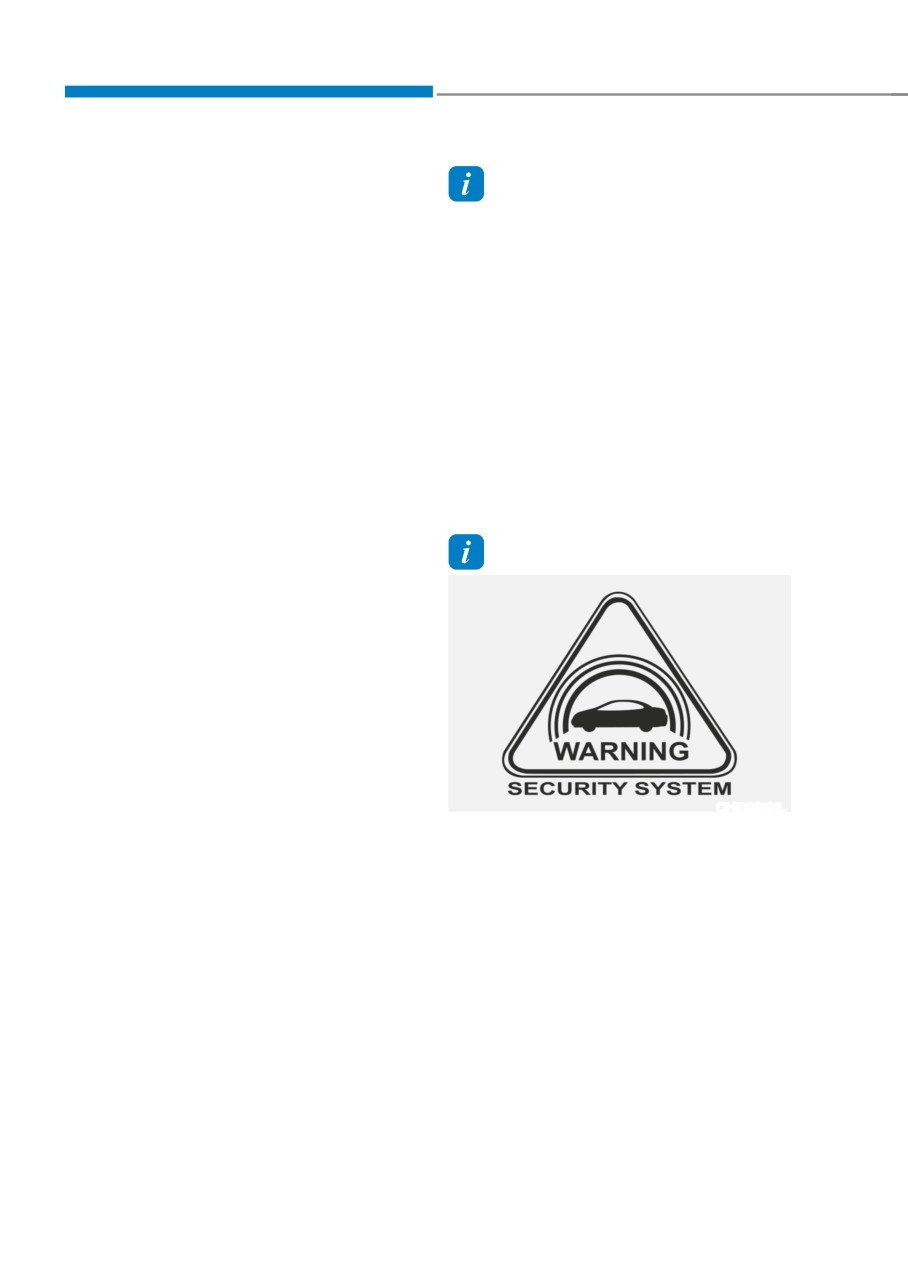
Vehicles equipped with a theft alarm
fully closed.
system will have a label attached to the
vehicle with the following words:
Do not attempt to alter this system or
add other devices to it.
1. WARNING
2. SECURITY SYSTEM
5-36
05
INTEGRATED MEMORY SYSTEM (IF EQUIPPED)
Information
• If the battery is disconnected, the
memory settings will be erased.
• If the Integrated Memory System does
not operate normally, we recommend
that you have the system inspected by
an authorized HYUNDAI dealer.
Storing memory positions
1. Make sure that the vehicle is in the ON
ONX4050007
position and the vehicle drives below
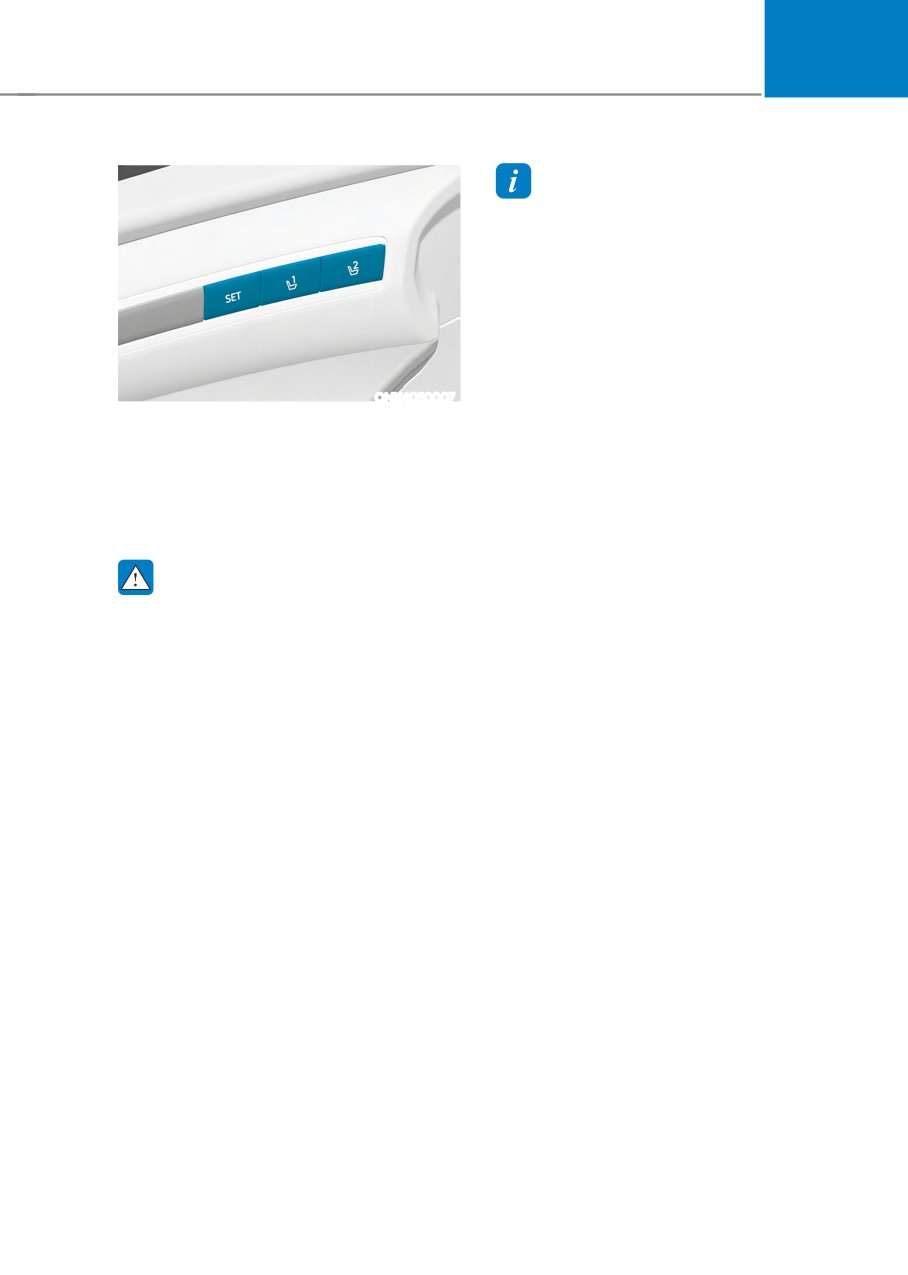
The IMS, or Integrated Memory System,
1.86mph.
for the driver’s seat is equipped on some
2. Adjust the driver’s seat to the desired
models. This feature allows the driver
fore/aft position, seat height, and
to store and recall the following position
reclining position.
settings with a simple button operation:
3. Press the SET button. The system
• Driver’s seat position
will beep once and notify you ‘Press
button to save settings’ on the cluster
WARNING
LCD display.
4. Press one of the memory buttons (1
Never attempt to operate the
or 2) within 4 seconds. The system
integrated memory system while the
will beep twice when the memory has
vehicle is moving.
been successfully stored.
This could result in loss of control, and
5. ‘Driver 1 (or 2) settings saved’ will
an accident causing death, serious
appear on the cluster LCD display. The
injury, or property damage.
message appears only for the driver’s
seat position memory setting.
5-37
Convenient features
Recalling memory positions
Resetting the system
1.
Make sure that the vehicle is in the ON
Follow the below procedures to reset the
position and the gear selector is in P
Integrated Memory System (IMS) if it is
(Park).
not operating properly:
2.
Press the desired button (1 or 2). The
system will beep once and the driver’s
Resetting the Integrated Memory
seat position and side view mirror
System (IMS)
position will be automatically adjusted
1. Make sure that the vehicle is in Park
to the stored positions.
(P) and the engine is ON. Open the
3.
‘Driver 1 (or 2) settings applied’ will
driver’s door.
appear on the cluster LCD display.
2. Adjust the driver’s seat and seatback
angle to the most forward positions.
3. Press the SET button and push
Information
forward the driver’s seat movement
•
Note that while the memory settings
switch over 2 seconds simultaneously.
are being recalled, if you press the
SET button or the corresponding IMS
While resetting integrated memory
memory button (1 or 2) for which the
system
settings are being recalled, the IMS will
1. Resetting starts with a notification
temporarily deactivate. If you select
the alternate IMS memory button (1 or
sound.
2), the IMS will activate according to
2. The driver’s seat and seatback is
the settings of the alternate button.
adjusted to the rearward position with
the notification sound.
For example, if you press the SET
button or the number 1 button with the
3. The driver’s seat and seatback is
number 1 setting in operation, the IMS
re-adjusted to the default position
will temporarily deactivate.
(central position) with the notification
If you press the number 2 button, then
sound.
the IMS memory settings according to
number 2 will activate.
However, in the following cases, the
resetting procedure and the notification
•
If you adjust the driver seat settings
sound may stop.
while the IMS is recalling the stored
positions, the memory settings will not
• The memory button is pressed.
be applied.
• The seat control switch is operated.
• The gear is shifted out of P (Park).
• The driving speed exceeds
2 mph (3km/h).
• The driver’s door is closed.
5-38
05
NOTICE
Seat Easy Access Operation (if
•
While integrated memory system
equipped)
is being reset, if the resetting
The system will move the driver’s seat
and notification sound stops
automatically as follows:
incompletely, restart the resetting
• Vehicles equipped with Driver’s Power
procedure again.
Seat and Smart Key
•
Before performing the IMS memory
--
The driver’s seat will move rearward
reset operation, make sure there are
when the Engine Start/Stop button
no objects on or around the driver’s
is pressed to turn the engine OFF.
seat.
--
The driver’s seat will move forward
when the Engine Start/Stop button
is pressed to the ACC or engine
START position.
Note that Seat Easy Access operation
may be limited when the driver’s seat
position setting is already close to the
maximum rearward travel position.
You can enable or disable the Seat Easy
Access feature in the User Settings menu
on the LCD display or the navigation
infotainment screen on some models.
‘Convenience → Seat Easy Access → Off/
Normal/Extended’.
For more details, refer to “LCD Display”
In chapter 4.
CAUTION
The driver should be aware and be
cautious to avoid injury or damage
when using this feature if there are
objects or passengers in the driver’s
side rear seat or seat floor.
In case of emergency or to stop
movement of the front seat when the
Seat Easy Access is operating, press the
SET button or any of the driver’s seat
control switches.
5-39
Convenient features
STEERING WHEEL
Electric Power Steering (EPS)
Information
The system assists you with steering the
The following symptoms may occur during
vehicle. If the vehicle is turned off or
normal vehicle operation:
if the power steering system becomes
•
The steering effort may be high
inoperative, you may still steer the
immediately after pressing the Engine
vehicle, but it will require increased
Start/Stop button to the ON position.
steering effort.
This happens as the system performs
Should you notice any change in the
the EPS system diagnostics. When the
effort required to steer during normal
diagnostics are completed, the steering
vehicle operation, we recommend that
wheel effort will return to its normal
you have the system checked by an
condition.
authorized HYUNDAI dealer.
•
When the battery voltage is low, you
might have to put more steering effort.
CAUTION
However, it is a temporary condition so
If Electric Power Steering does not
that it will return to normal condition
operate normally, the
warning light
after charging the battery.
and the message ‘Check motor driven
•
A click noise may be heard from the
power steering’ will illuminate on the
EPS relay after the Engine Start/Stop
instrument cluster. You may steer the
button is in the ON or OFF position.
vehicle, but it will require increased
•
Motor noise may be heard when the
steering efforts. We recommend that
vehicle is at a stop or at a low driving
you take your vehicle to an authorized
speed.
HYUNDAI dealer or to a service station
and have the system checked as soon as
•
When you operate the steering wheel
in low temperatures, abnormal noise
possible.
may occur. If the temperature rises, the
noise will disappear. This is a normal
condition.
•
When an error is detected from EPS,
the steering effort assist function will
not be activated in order to prevent
fatal accidents. Instrument cluster
warning lights may be on or the
steering effort may be high. If these
symptoms occur, drive the vehicle
to a safe area as soon as it is safe to
do so. We recommend that you have
the system checked by an authorized
HYUNDAI dealer as soon as possible.
5-40
05
Tilt / Telescopic steering
Information
When adjusting the steering wheel to a
Sometimes the lock release lever may not
comfortable position, adjust the steering
engage completely. This may occur when
wheel so that it points toward your chest,
the gears of the locking mechanism do not
not toward your face. Make sure you can
completely mesh. If this occurs, pull down
see the instrument cluster warning lights
on the lock-release lever, readjust the
and gauges. After adjusting, push the
steering wheel again, and then pull back
steering wheel both up and down to be
up on the release lever to lock the steering
certain it is locked in position.
wheel in place.
Always adjust the position of the steering
wheel before driving.
Heated steering wheel
(if equipped)
WARNING
Type A
NEVER adjust the steering wheel while
driving. This may cause loss of vehicle
control resulting in an accident.
ONX4050008
Type B
ONX4050070
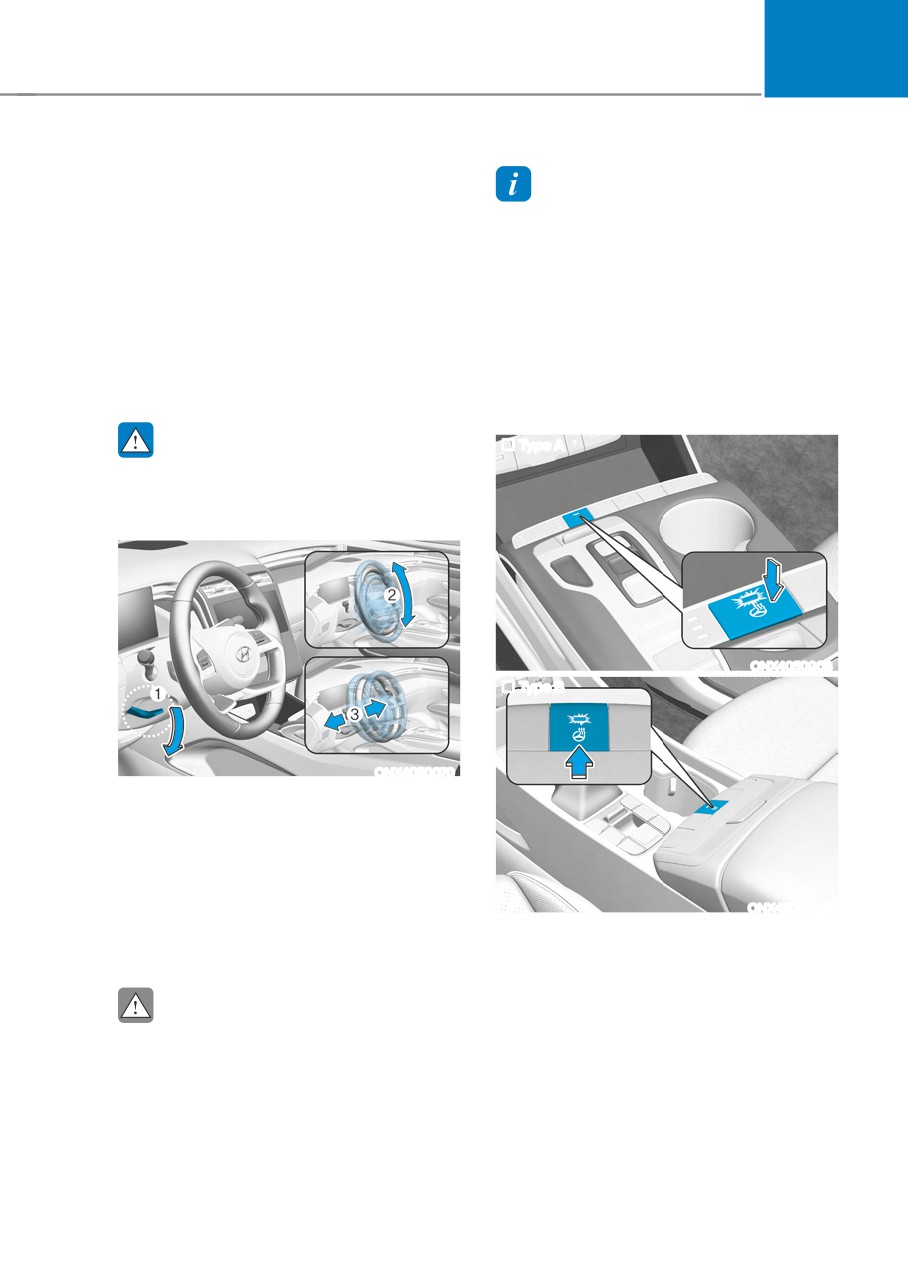
To adjust the steering wheel angle and
height:
1. Pull down the lock-release lever (1).
2. Adjust the steering wheel to the
desired angle (2) and distance
forward/back (3).
ONX4E050139
3. Pull up the lock-release lever to lock
When the ignition switch is in the ON
the steering wheel in place.
position or when the engine is running,
press the heated steering wheel button
to warm the steering wheel.
CAUTION
The indicator on the button will
While adjusting the steering wheel
illuminate.
angle and height, please do not push
To turn the heated steering wheel off,
or pull it hard since the fixture can be
press the button again. The indicator on
damaged.
the button will turn off.
5-41
Convenient features
•
Auto Comfort Control for Driver (if
Horn
equipped)
The Automatic Comfort Control
feature can control the steering
wheel heater operation according
to the ambient temperature and
the set climate control temperature
while the engine is running.
If the heated steering wheel switch
is pressed while the Automatic
Comfort Control feature is
operating, then the heated steering
wheel operation will be controlled
OCN7050016
manually.
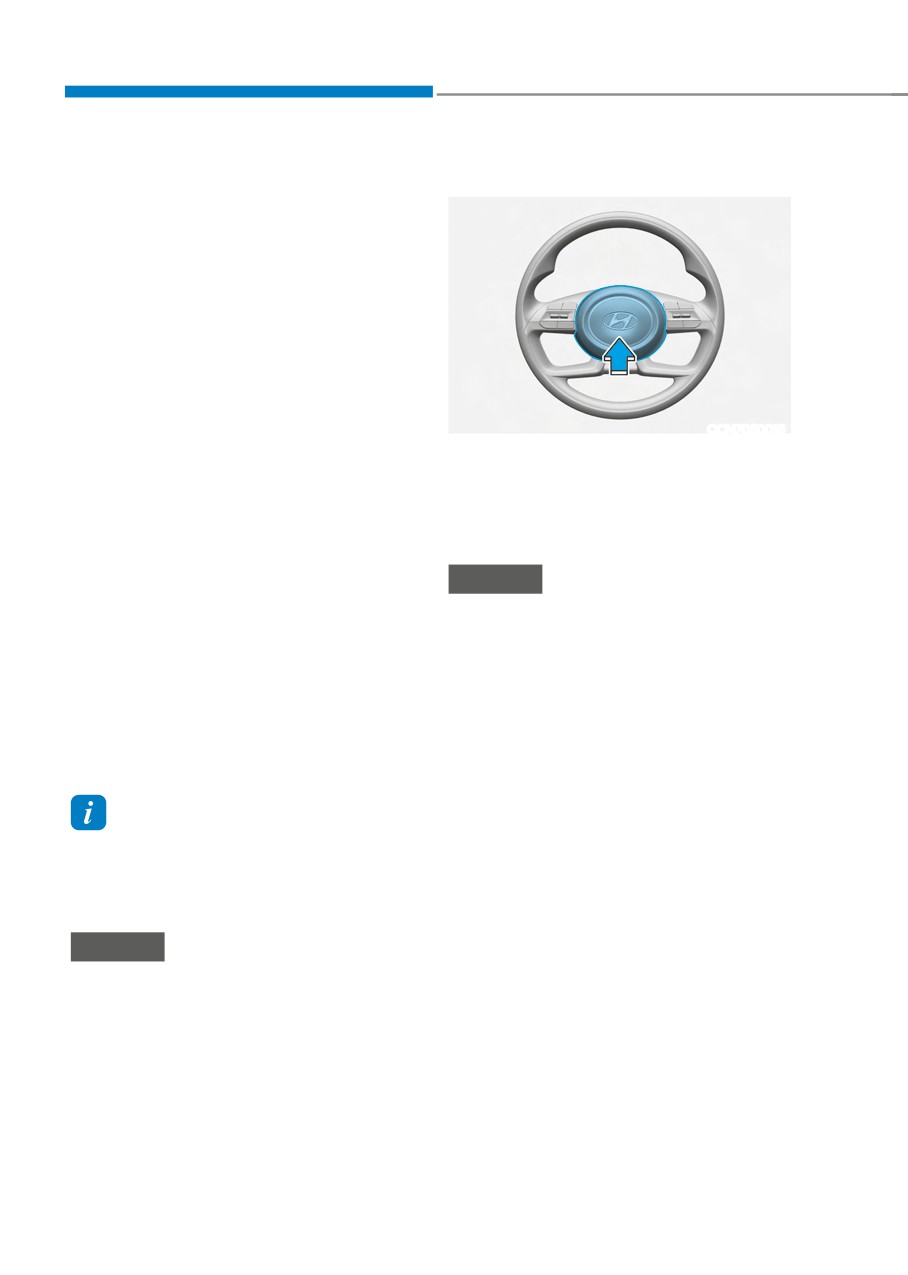
To sound the horn, press the area
The Auto Comfort Control feature
indicated by the horn symbol on your
is enabled from the Vehicle
steering wheel (see illustration). The
Settings menu on the navigation
horn will operate only when this area is
infotainment screen.
pressed.
--
The heated steering wheel defaults
to the OFF position whenever the
NOTICE
ignition switch is ON. However, if
Do not strike the horn severely to
the Auto Comfort Control function
operate it, or hit it with your fist. Do not
is ON, the heated steering wheel
press on the horn with a sharp-pointed
will turn on and off depending on
object.
the ambient temperature and the
set climate control temperature.
For more details, we recommend that
you contact an authorized HYUNDAI
dealer.
Information
The heated steering wheel will turn off
automatically approximately 30 minutes
after the heated steering wheel is turned
on.
NOTICE
Do not install any cover or accessory
on the steering wheel. This cover or
accessory could cause damage to the
heated steering wheel system.
5-42
05
MIRRORS
Inside rearview mirror
Day/night rearview mirror
(if equipped)
Before driving your vehicle, check to
see that your inside rearview mirror is
properly positioned. Adjust the rearview
mirror so that the view through the rear
window is properly centered.
WARNING
Make sure your line of sight is not
obstructed. Do not place objects in the
rear seat, cargo area, or behind the rear
headrests which could interfere with
your vision through the rear window.
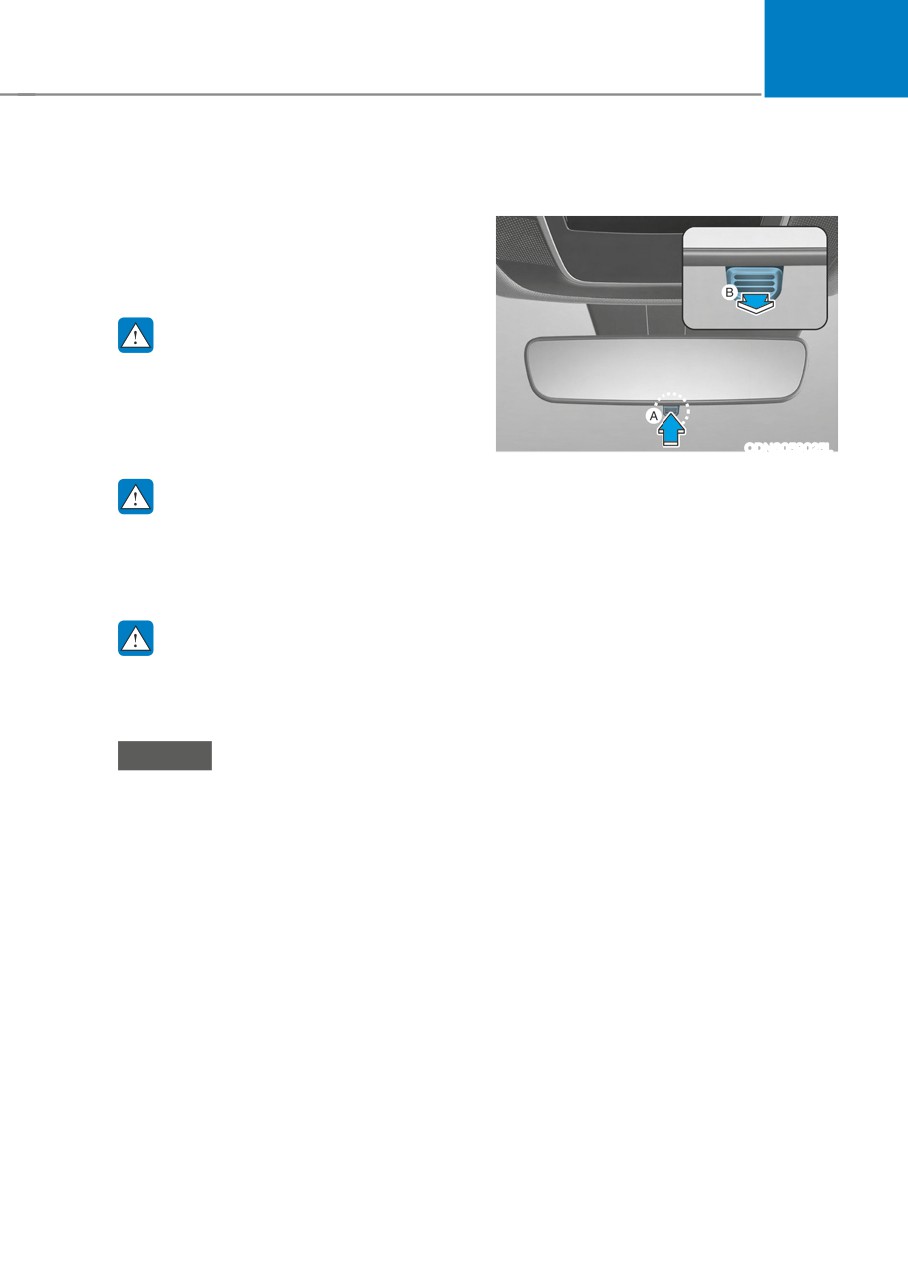
ODN8059025L
[A]: Day, [B]: Night
WARNING
Make this adjustment before you start
driving and while the day/night lever is in
To prevent serious injury during an
the day position.
accident or deployment of the air bag,
Pull the day/night lever towards you to
do not modify the rearview mirror and
reduce glare from the headlamps of the
do not install a wide mirror.
vehicles behind you during night driving.
Remember that you lose some rearview
WARNING
clarity in the night position.
NEVER adjust the mirror while driving.
This may cause loss of vehicle control
resulting in an accident.
NOTICE
When cleaning the mirror, use a paper
towel or similar material dampened
with glass cleaner. Do not spray glass
cleaner directly on the mirror as this
may cause the liquid cleaner to enter
the mirror housing.
5-43
Convenient features
Electrochromic Mirror
Electrochromic Mirror with
(if equipped)
Homelink System (if equipped)
Your vehicle may be equipped with
a Gentex Automatic-Dimming Mirror
with an Integrated HomeLink® Wireless
Control System.
During nighttime driving, this feature
will automatically detect and reduce
rearview mirror glare. The HomeLink®
Universal Transceiver allows you to
activate your garage door(s), electric
gate, home lighting, etc.
ODN8059023L
The electric rearview mirror
automatically controls the glare from the
headlamp of the vehicle behind you in
nighttime or low light driving conditions.
When the engine is running, the glare is
automatically controlled by the sensor
mounted in the rearview mirror. The
sensor detects the light level around the
vehicle, and automatically adjusts to
control the headlamp glare from vehicles
behind you.
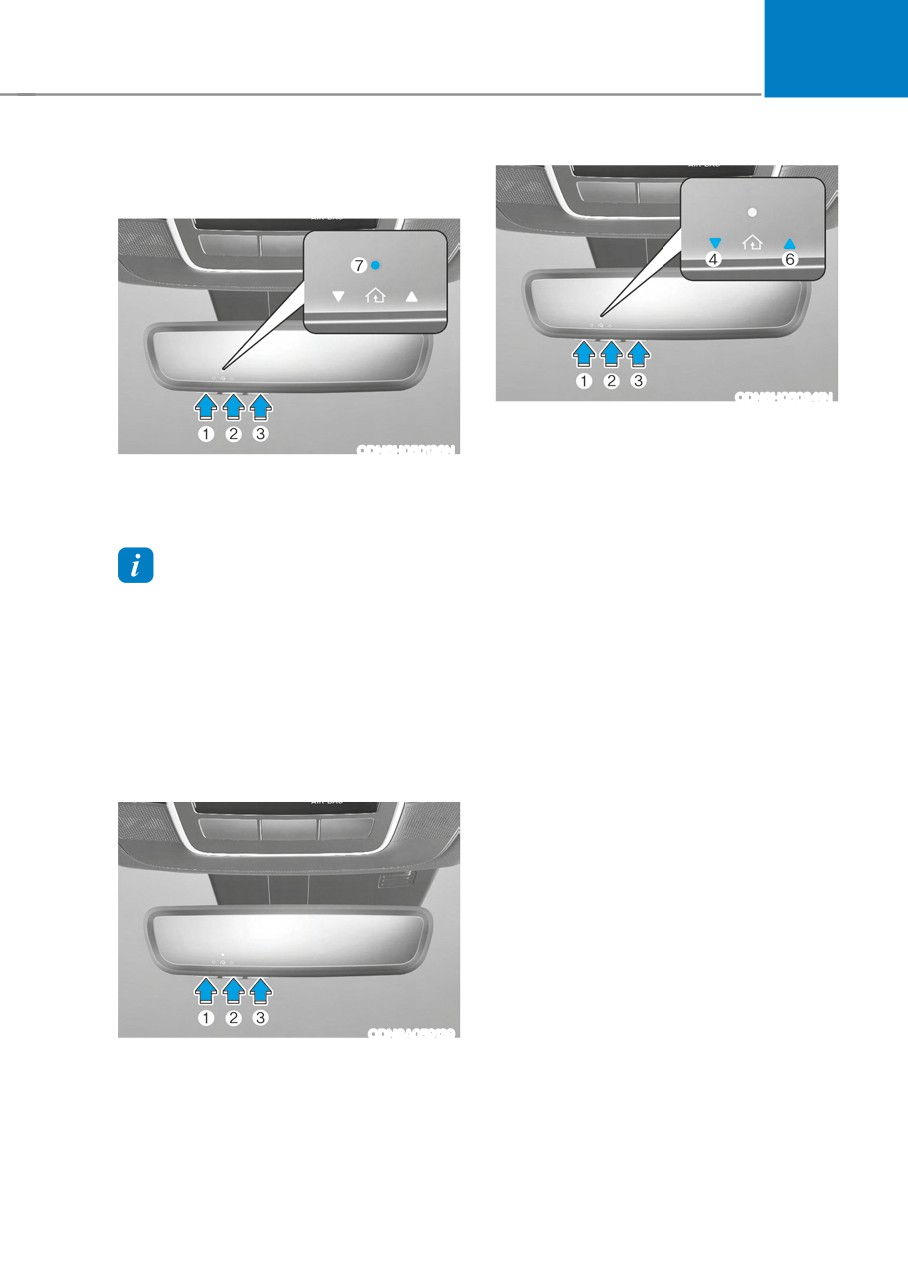
ODN8A059135
Whenever the the transmission is
(1) HomeLink Channel 1
shifted to R (Reverse), the mirror will
(2) HomeLink Channel 2
automatically go to the brightest setting
(3) HomeLink Channel 3
in order to improve the driver’s view
behind the vehicle.
(4) Garage Door Opener Status Indicator:
Closing or Closed
(5) HomeLink Operation Indicator
(6) Garage Door Opener Status Indicator:
Opening or Opened
(7) HomeLink User Interface Indicator
5-44
05
Integrated HomeLink® Wireless Control
1. Programming HomeLink®
System
The following steps show how to
The HomeLink® Wireless Control System
program HomeLink. If you have any
provides a convenient way to replace
questions or are having difficulty
up to three hand held radio-frequency
programming your HomeLink buttons,
transmitters used to activate compatible
refer to the HomeLink website or call the
devices such as gate operators, garage
HomeLink customer support toll-free
door openers, entry door locks, security
number. Do this before going back to the
systems, and home lighting.
dealer who sold you the car.
•
Visit the HomeLink website at: www.
NOTICE
homelink.com. Then at the top of the
page, choose your vehicle make. Then
HomeLink® operates while the ignition
watch the You Tube video, and/or
switch is in the ACC or ON position
access additional website information.
for safety reasons. It is to prevent
unintentional security problems from
•
If you choose to access the website
via your cell phone, scan the QR code.
happening when the vehicle is parked
outside the garage.
WARNING
Before programming HomeLink® to a
garage door opener or gate operator,
•
Or call HomeLink customer support
make sure people and objects are out
at 1-800-355-3515 (Please have the
of the way of the device to prevent
vehicle make/model and the opener
potential harm or damage. Do not
device make/model readily available.)
use the HomeLink® with any garage
door opener that lacks the safety
stop and reverse features required
by U.S. federal safety standards (this
includes any garage door opener model
manufactured before April 1, 1982).
A garage door that cannot detect an
object - signaling the door to stop and
reverse - does not meet current U.S.
federal safety standards. Using a garage
door opener without these features
increases the risk of serious injury or
death.
For more information, contact
HomeLink® at www.homelink.com, or
call Home-Link customer support at
1-800-355-3515.
It is also recommended that a new
battery be replaced in the handheld
transmitter of the device being trained
to HomeLink® for quicker training and
accurate transmission of the radio
frequency.
5-45
Convenient features
1) Programming Preparation
ODN8H050339N
ODN8H050340N
2.
Position the garage door opener
remote 1 - 3 inches (2 - 8cm) away
1.
When programming a garage door
from the HoleLink buttons.
opener, it is advised to park the
vehicle outside of the garage.
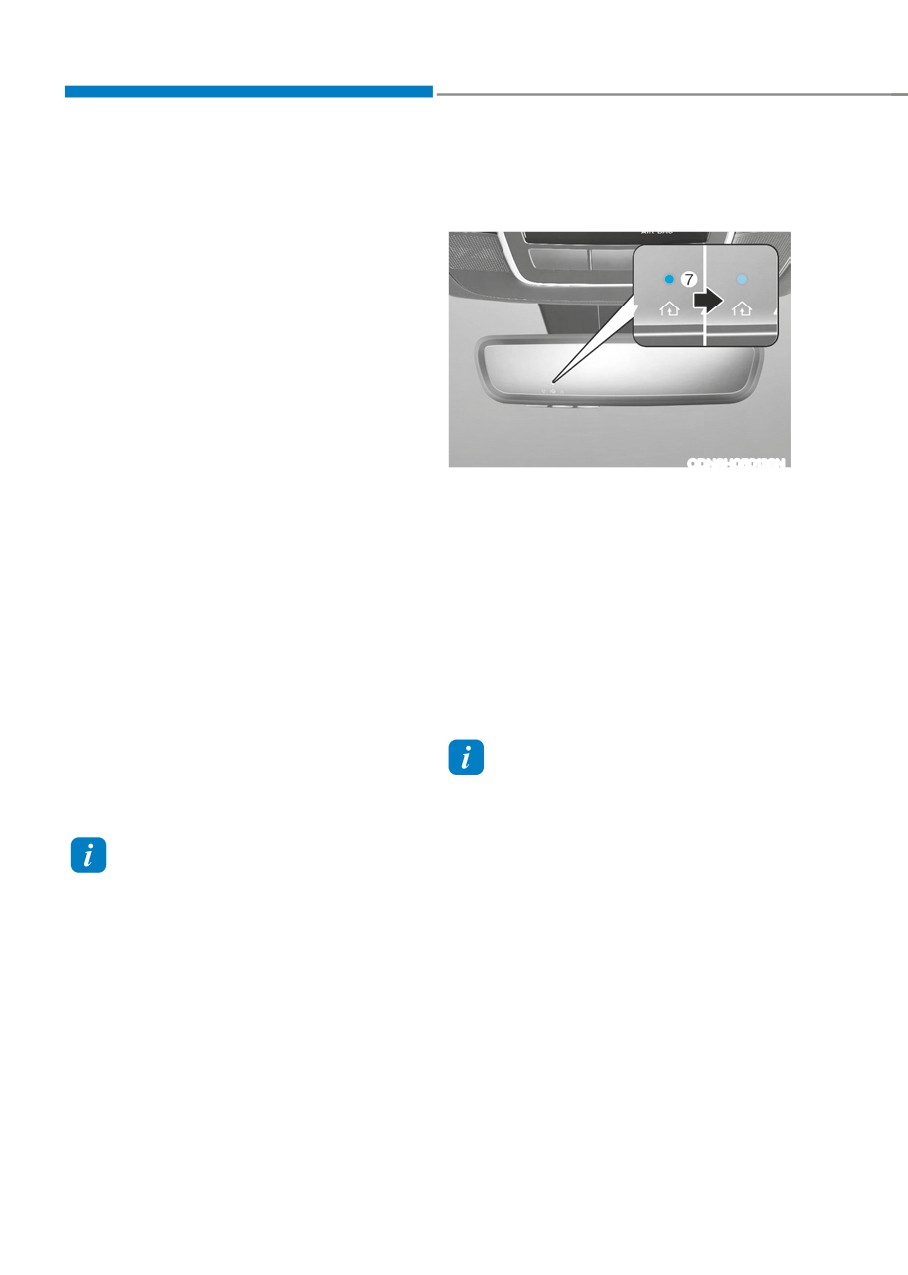
3.
While the HomeLink indicator light (7)
is flashing orange, press and hold the
2.
It is recommended that a new battery
hand-held remote button. Continue
be placed in the handheld transmitter
pressing the handheld remote button
of the device being programmed to
until the HomeLink indicator light (7)
HomeLink for quicker training and
changes from orange to green. You
accurate transmission of the radio-
may now release the handheld remote
frequency signal.
button.
3.
Place the ignition switch to the ACC
4.
Wait until your garage door comes
(Accessory) position for programming
to a complete stop, regardless of
of HomeLink.
position, before proceeding to the
next steps.
2)
Programming a New HomeLink®
5.
Press and release the HomeLink
button you are programming and
observe the indicator light.
• If the indicator light remains solid
green, your device should operate
when the HomeLink button is
pressed. At this point, if your device
operates, programming is complete.
• If the indicator light rapidly
flashes green, firmly press, hold
for two seconds and release the
ODN8H050136N
HomeLink button up to three times
in a row slowly to complete the
1.
Press and release the HomeLink
programming process. Do not press
button (1), (2) or (3), you would like
the HomeLink button rapidly. At
to program. The HomeLink indicator
this point if your device operates,
light (7) will flash orange slowly (if
programming is complete. If the
not, perform the steps of “Erasing
device does not operate, continue
HomeLink Buttons” section, and start
with step 6.
over).
5-46
05
6. At the garage door opener motor,
3) Two-Way Communication
(security gate motor, etc.) locate the
Programming (For select garage door
“Learn”, “Smart”, “Set” or “Program”
openers)
button. This can usually be found
If your garage door opener has the
where the hanging antenna wire is
‘myQ’ logo on its side, your opener
attached to the motor-head unit (see
likely has Two-Way Communication
the device’s manual to identify this
capability. HomeLink has the capability
button). The name and color of the
to establish Two-Way Communication
button may vary by manufacturer.
with your garage door opener. HomeLink
can receive and display “closing”
or “opening” status messages from
compatible garage door openers. At
any time, Home-Link can also recall
and display the last recorded status
communicated by the garage door
opener to indicate your garage door
being “closed” or “opened”.
To check if your garage door opener is
compatible with this feature, refer to
way-Communication. If your garage
door opener has this functionality, AND
ODL3A040504
the Two-Way Communication indicators
(4), (6) in the mirror appear while the
ÃÃ
A ladder and/or second person may
garage door is opening/closing, then
simplify the following steps.
no further steps are needed. Two-Way
7. Firmly press and release the “Learn”,
Communication Programming is already
“Smart”, “Set” or “Program” button.
complete. However, if your garage door
You now have up to 30 seconds in
opener has this functionality, AND the
which to complete the next step.
Two-Way Communication indicators (4),
8. Return to the vehicle and firmly press,
(6) in the mirror DO NOT appear while
hold for two seconds and release,
the garage door is opening/closing, use
the HomeLink button up to three
the following instructions to enable this
times in a row slowly. Do not press
functionality.
the HomeLink button rapidly. As soon
1. In your vehicle, press and hold the
as you see the garage door start to
programmed HomeLink button for 2
move, stop pressing any buttons
seconds, then release. Confirm that
until a few seconds after the garage
the garage door is moving. AFTER it
door has come to a complete stop,
stops, you will have one minute to
regardless of position. At this point,
complete the following steps:
programming is complete and your
ÃÃ
A ladder and/or second person may
device should operate when the
simplify the following steps.
HomeLink button is pressed and
released.
5-47
Convenient features
2.
On your garage door opener in your
4) Canadian Programming
garage, locate the “Learn” button
Canadian radio-frequency laws require
(usually near where the hanging
transmitter remote signals to “time-
antenna wire is attached to the garage
out” (or quit) after a couple seconds of
door opener). If there is difficulty
transmission, which may not be long
locating this button, reference the
enough for HomeLink to pick up the signal
device’s owner’s manual.
during programming.
3.
Press and release the “Learn” button.
If you live in Canada or you are having
4.
A light on your garage door opener
difficulties programming a gate operator
may flash, and your Two-Way
or garage door opener by using the
Communication indicators (4), (6) in
programming procedures, replace
your vehicle may flash, confirming
“Programming a New HomeLink Button”
completion of the process.
step 3 with the following:
5.
Return to the vehicle and firmly
While the HomeLink indicator light (7) is
press and release the programmed
flashing orange, press and release (“cycle”)
HomeLink button to activate
your device’s handheld remote every two
your garage door. The Two-Way
seconds until the HomeLink indicator light
Communication indicators (4), (6)
(7) changes from orange to green. You may
flash in orange when the door is
now release the hand-held remote button.
moving. Do not make any additional
Then proceed with “Programming a New
button presses until AFTER the garage
HomeLink Button” step 4.
door has come to a complete stop.
6. Your Two-Way Communication
programming is now complete.
Information
If your garage door opener has Two-
Way Communication functionality,
it is possible for HomeLink to stop
functioning the garage door shortly
after initial programming, IF the Two-
Way Communication Programming
wasn’t properly completed. This
usually happens after the first 10 times
a programmed HomeLink button is
pressed. If you experience this, completing
the “Programming a New HomeLink
Button” and “Two-Way Communication
Programming” will restore door
operation.
5-48
05
2. Operating HomeLink®
1) Operating HomeLink®
ODN8H050341N
2.
The indicator (4) and (6) operates as
below, if your garage door opener
ODN8H050136N
has Two-Way Communication
1. Press and release the desired
functionality.
programmed HomeLink button (1, 2
•
If the indicator (4) flashes in Orange,
or 3).
it indicates that the garage door is
“Closing”.
Information
•
The indicator (4) turns solid green
The HomeLink indicator (7) should
once the garage door has closed.
light green, solid or flashing, and your
•
If the indicator (6) flashes in Orange,
programmed device should operate.
it indicates that the garage door is
If your device does not operate, the
“Opening”.
HomeLink programming was not
•
The indicator (6) turns solid green
successful, and you’ll need to reprogram
once the garage door has fully
the button.
opened.
•
If the indicator (4) or (6) does not
2) Two-Way Communication Display
turn to green, it indicates that the
Behavior
last status of garage door was not
received properly. The HomeLink
mirror tries to receive the last known
status of the garage door for a few
seconds.
ODN8A059139
1. Press and release one of the
programmed HomeLink buttons (1, 2
or 3).
5-49
Convenient features
3) Recalling Garage Door Status
2) The following instructions will erase
ALL HomeLink® programming from
HomeLink mirror with Two-Way
ALL buttons:
Communication provides a way to view
the last stored message from the garage
door opener. In order to recall the last
known status of the last activated device,
press the buttons “1 and 2” OR “2 and 3”
simultaneously.
• If the indicator (4) appears solid
Green, it indicates that the last
activated device was “closed”
properly.
• If the indicator (6) appears solid
Green, it indicates that the last
ODN8H050138N
activated device was “open” properly.
1.
Press and hold the buttons (1) and (3)
simultaneously.
3. Erasing HomeLink® Buttons
2.
The HomeLink indicator light (7) will
1) Erasing and Reprogramming a Single
illuminate solid Orange for about 10
HomeLink® Button:
seconds.
1. Press and hold the desired HomeLink
3.
Release the buttons once the
button you want to re-program. DO
HomeLink indicator light (7) changes
NOT release the button.
to Green and flashes rapidly.
2. The HomeLink indicator light (7) will
4.
Now all three HomeLink buttons
illuminate solid green. Release the
(1), (2) and (3) are cleared of any
button as soon as the HomeLink
programming.
indicator light (7) begins to flash
orange, usually about 20 seconds.
3. Proceed with the steps in the
Information
“Programming a New HomeLink
HomeLink® and the HomeLink® House
Button” section.
logo are registered trademarks of Gentex
Corporation.
Information
The myQ logo is a registered trademark of
The Chamberlain Group, Inc.
If you do not complete the re-
programming of a new device to the
button, it will revert to the previously
stored programming.
5-50
05
FCC (USA) and ISED (Canada)
FCC (Htats-Unis) et ISED (Canada)
This device complies with FCC rules
Cet appareil est conforme aux
part 15 and Innovation, Science, and
règlements de la FCC, section 15, et
Economic Development Canada RSS-
au CNR-210 d’Innovation, Sciences et
210. Operation is subject to the following
Dhveloppement économique Canada. Le
two conditions: (1) This device may not
fonctionnement est assujetti aux deux
cause harmful interference, and (2) This
conditions suivantes : (1) cet appareil ne
device must accept any interference that
doit pas causer d’interférences nuisibles
may be received including interference
et (2) cet appareil doit accepter toute
that may cause undesired operation.
interférence reçue, y compris celle qui
WARNING: The transmitter has been
pourrait entraîner un dysfonctionnement.
tested and complies with FCC and
MISE EN GARDE : L’émetteur a subi des
ISED rules. Changes or modifications
tests et est conforme aux règlements de
not expressly approved by the party
la FCC et d’ISDE. Les changements ou
responsible for compliance could void
modifications non approuvés explicitement
the user’s authority to operate the
par la partie responsable de la conformité
device.
pourraient rendre caduque l’autorisation de
l’utilisateur de se servir du dispositif.
This equipment complies with FCC
and ISED radiation exposure limits set
Cet appareil est conforme aux limites
forth for an uncontrolled environment.
d’exposition aux radiations de la FCC et
End Users must follow the specific
d’ISDE établies pour un environnement
operating instructions for satisfying RF
non contrôlé. Les utilisateurs finaux doivent
exposure compliance. This transmitter
respecter les instructions d’utilisation
must be at least 20cm from the user and
spécifiques pour satisfaire aux exigences
must not be co-located or operating in
de conformité aux expositions de RF.
conjunction with any other antenna or
L’émetteur doit se trouver à 20 cm au
transmitter.
minimum de l’utilisateur et ne doit pas
être situé au même endroit que tout autre
émetteur ou antenne ni fonctionner avec
un autre émetteur ou antenne.
Méjico
La operación de este equipo está sujeta
a las siguientes dos condiciones: (1) es
posible que este equipo o dispositivo
pueda no causar interferencia dañina, y
(2) este dispositivo o dispositivos deben
aceptar cualquier interferencia, que
incluye la interferencia que puede causar
su operación no deseada.
5-51
Convenient features
HomeLink 5 Programing Flow Chart
OOS040475N
5-52
05
Side View mirrors
WARNING
Do not adjust or fold the side view
mirrors while driving. This may cause
loss of vehicle control resulting in an
accident.
NOTICE
•
Do not scrape ice off the mirror face;
this may damage the surface of the
glass.
•
If the mirror is jammed with ice, do
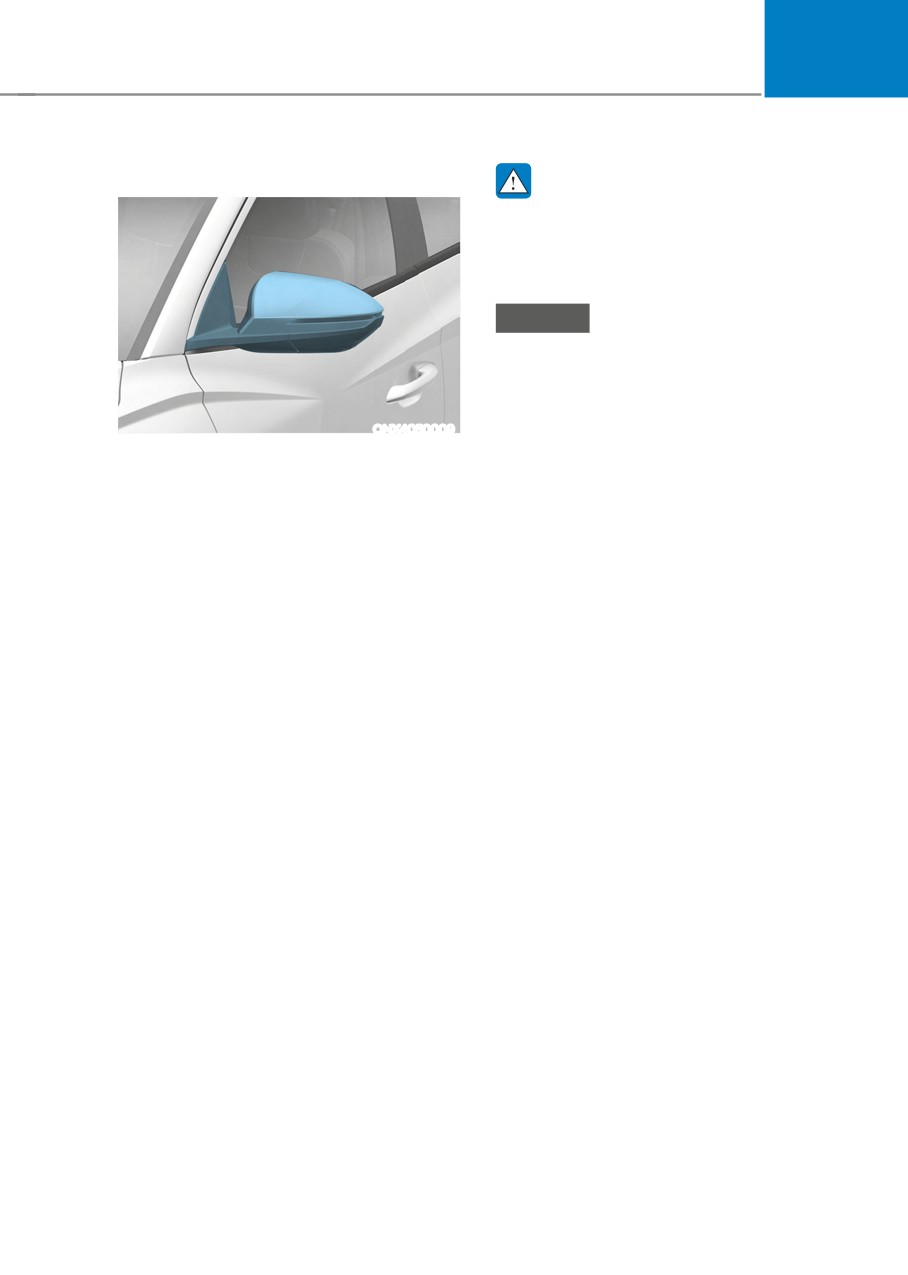
ONX4050009
not adjust the mirror by force. Use an
Your vehicle is equipped with both left-
approved spray de-icer (not radiator
hand and right-hand side view mirrors.
antifreeze) spray, or a sponge or soft
The mirrors can be adjusted remotely
cloth with very warm water, or move
with the mirror adjustment control
the vehicle to a warm place and
switch. The side view mirrors can be
allow the ice to melt.
folded manually to help prevent damage
•
Do not clean the mirror with harsh
when going through an automatic car
abrasives, fuel or other petroleum
wash or when passing through a narrow
based cleaning products.
street.
The right side view mirror is convex.
Objects seen in the mirror are closer than
they appear.
Use the inside rear view mirror or look
back directly to determine the actual
distance of other vehicles prior to
changing lanes.
Make sure to adjust the side view mirrors
to your desired position before you begin
driving.
5-53
Convenient features
Adjusting the side view mirrors
Folding the side view mirror
ONX4050010N
ONX4E050009
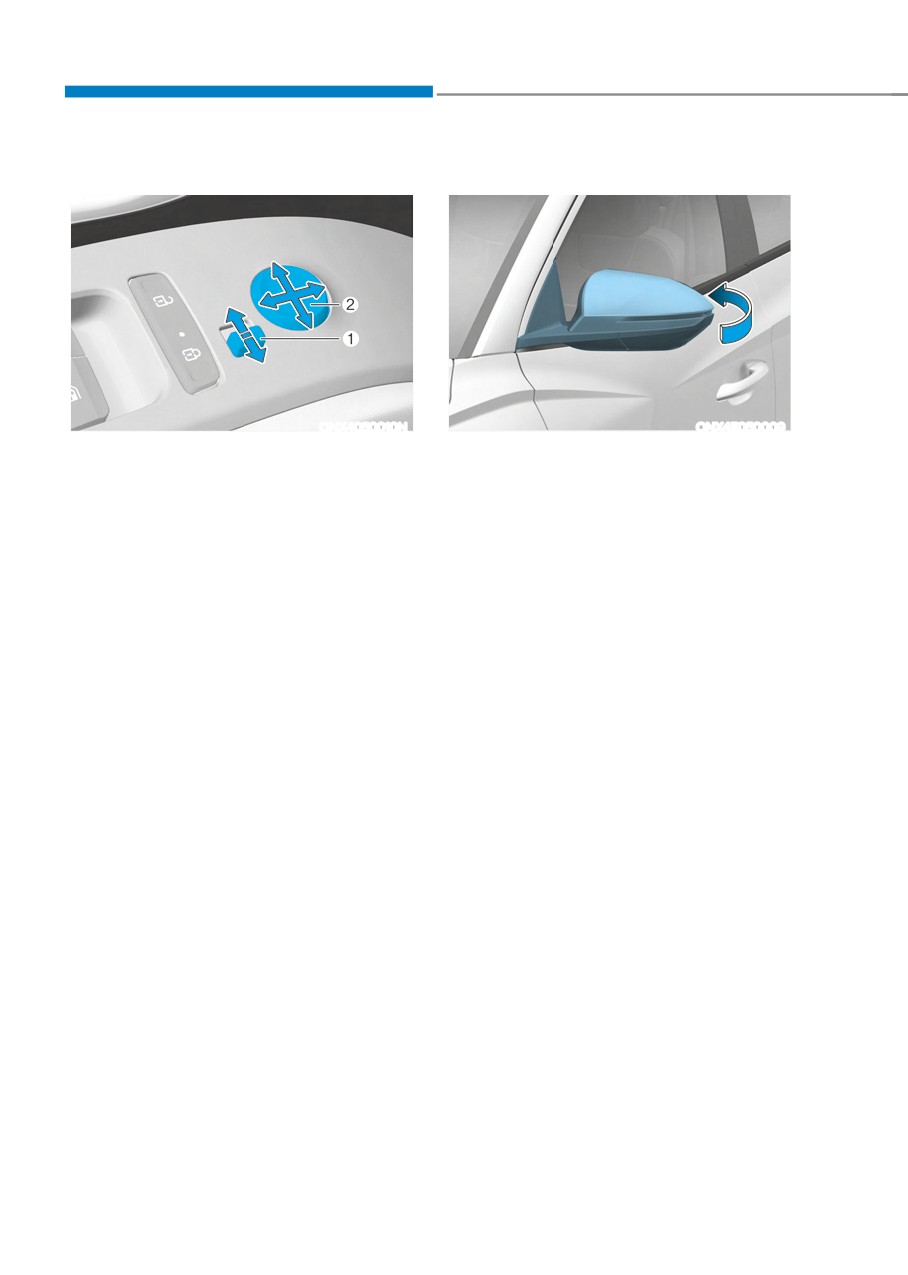
1. Move the lever (1) either to the L (left
To fold the side view mirror, grasp the
side) or R (right side) to select the side
housing of the mirror and then fold it
view mirror you would like to adjust.
toward the rear of the vehicle.
2. Use the mirror adjustment control (2)
to position the selected mirror up,
down, left or right.
3. After adjustment, move the lever (1)
to the middle to prevent inadvertent
adjustment.
5-54
05
WINDOWS
ONX4050013N
(1) Driver’s door power window switch
(5) Window opening and closing
(2) Front passenger’s door power
(6) Automatic power window*
window switch
(7) Power window lock switch
(3) Rear door (left) power window switch
(4) Rear door (right) power window
* : if equipped
switch
5-55
Convenient features
Power windows
Auto down window
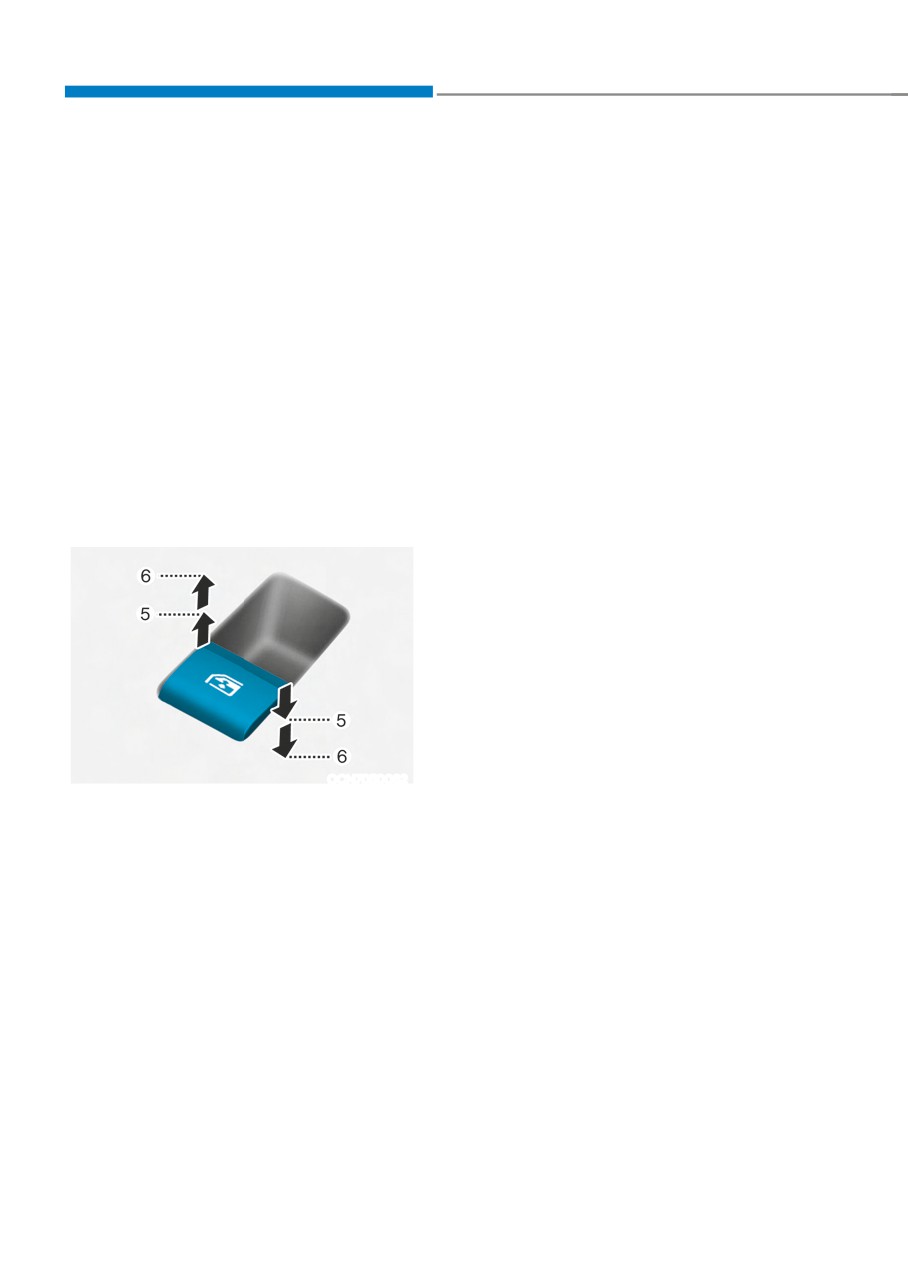
The ignition switch must be in the ON
Pressing the power window switch
position to be able to raise or lower
momentarily to the second detent
the windows. Each door has a Power
position (6) completely lowers the
Window switch to control that door’s
window even when the switch is
window. The driver has a Power Window
released.
Lock switch which can block the
To stop the window at the desired
operation of passenger windows. The
position while the window is in
power windows will operate for about
operation, pull up or press down and
3 minutes after the ignition is turned
release the switch.
OFF or if the ignition is placed in the
ACC position, as long as the front doors
Auto up/down window (if equipped)
remain closed.
Pressing or pulling up the power window
If the front doors are opened, battery
switch momentarily to the second
power is turned OFF and the Power
detent position (6) completely lowers or
Windows will not operate.
lifts the window even when the switch
is released. To stop the window at the
Window opening and closing
desired position while the window is in
operation, pull up or press down and
release the switch.
Resetting the power windows
If the power windows do not operate
normally, the automatic power window
system must be reset as follows:
1. Press the ignition switch to the ON
position.
2. Close the window and continue
pulling up on the power window
OCN7050082
switch for at least one second.
To open:
If the power windows do not operate
Press the window switch down to the
properly after resetting, we recommend
first detent position (5). Release the
that the system be inspected by an
switch when you want the window to
authorized HYUNDAI dealer.
stop.
To close:
Pull the window switch up to the first
detent position (5). Release the window
switch when you want the window to
stop.
5-56
05
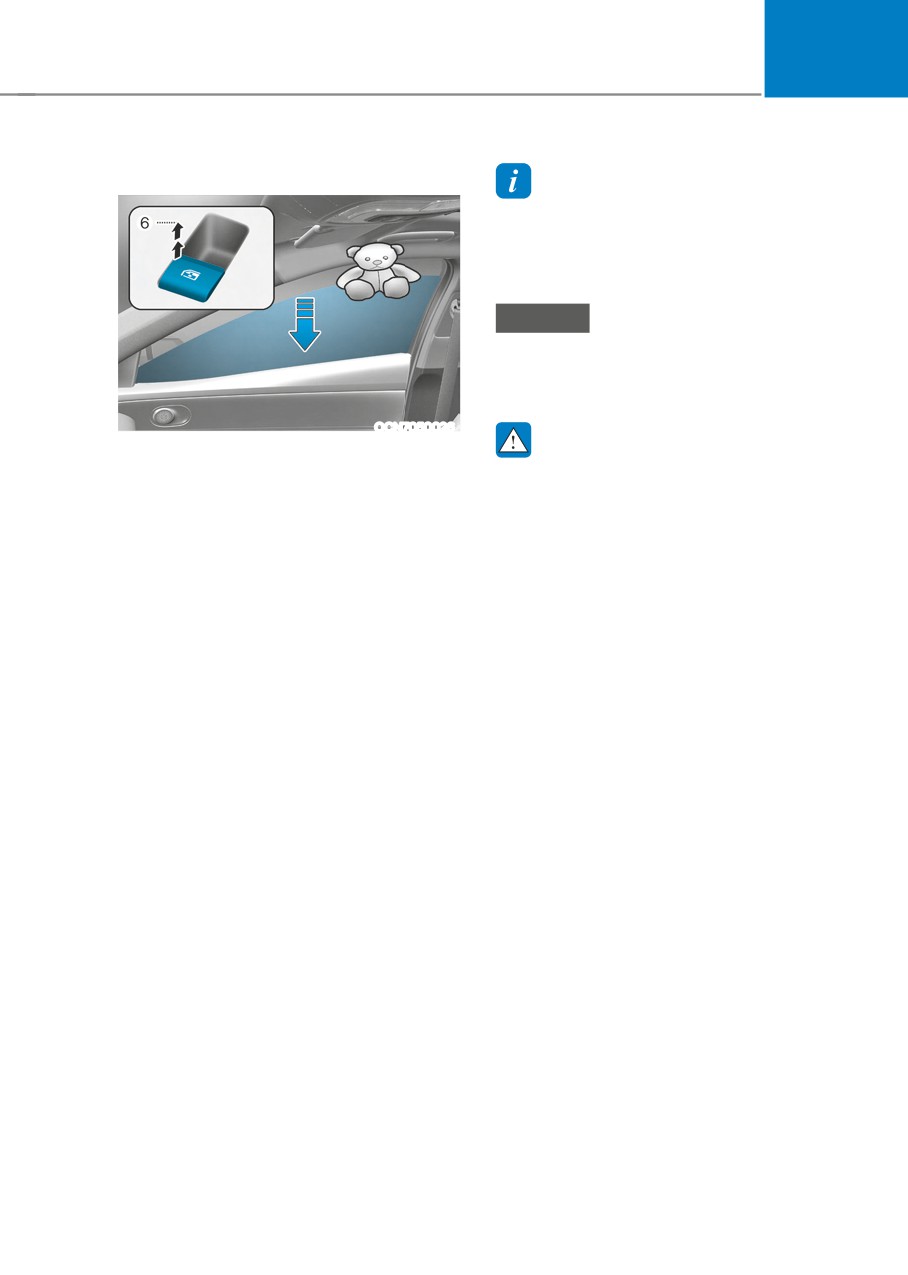
Automatic reverse
Information
The automatic reverse feature is only
active when the “Auto Up” feature is used
by fully pulling up the switch to the second
detent.
NOTICE
Do not install any accessories on the
windows. The automatic reverse
feature may not operate.
OCN7050026
WARNING
If a window senses any obstacle while it
is closing automatically, it will stop and
Make sure body parts or other objects
lower approximately 12 in. (30 cm) to
are safely out of the way before closing
allow the object to be cleared.
the windows to avoid injuries or vehicle
damage.
If the window detects the resistance
while the power window switch is
Objects less than 0.16 in (4 mm) in
pulled up continuously, the window
diameter caught between the window
will stop upward movement then lower
glass and the upper window channel
approximately 1 in. (2.5 cm).
may not be detected by the automatic
reverse window and the window will
If the power window switch is pulled
not stop and reverse direction.
up continuously again within 5 seconds
after the window is lowered by the
automatic window reverse feature,
the automatic window reverse will not
operate.
5-57
Convenient features
Power window lock button
WARNING
Do not allow children to play with the
power windows. Keep the driver’s
door power window lock button in the
LOCK position. Serious injury or death
can result from unintentional window
operation by a child.
NOTICE
• To prevent possible damage to the
power window system, do not open
OCN7050027
or close two windows or more at the
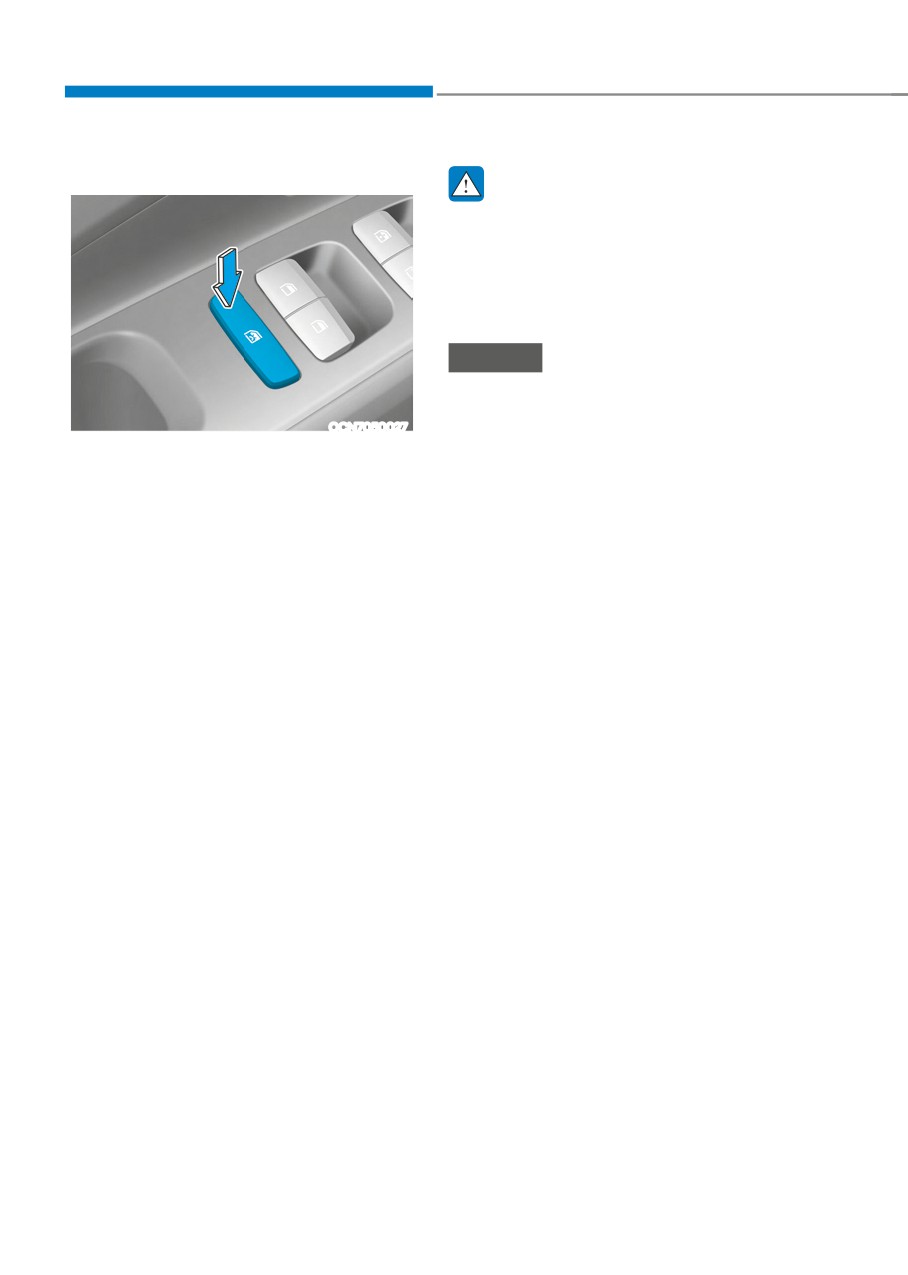
The driver can disable the power window
same time. This will also ensure the
switches on the rear passenger doors by
longevity of the fuse.
pressing the power window lock button.
• Never try to operate the main
When the power window lock button is
switch on the driver’s door and the
individual door window switch in
pressed:
opposite directions at the same time.
• The driver’s master control can
If this is done, the window will stop
operate all the power windows.
and cannot be opened or closed.
• The front passenger’s control can
operate the front passenger’s power
window.
• The rear passenger’s control cannot
operate the rear passengers’ power
window.
5-58
05
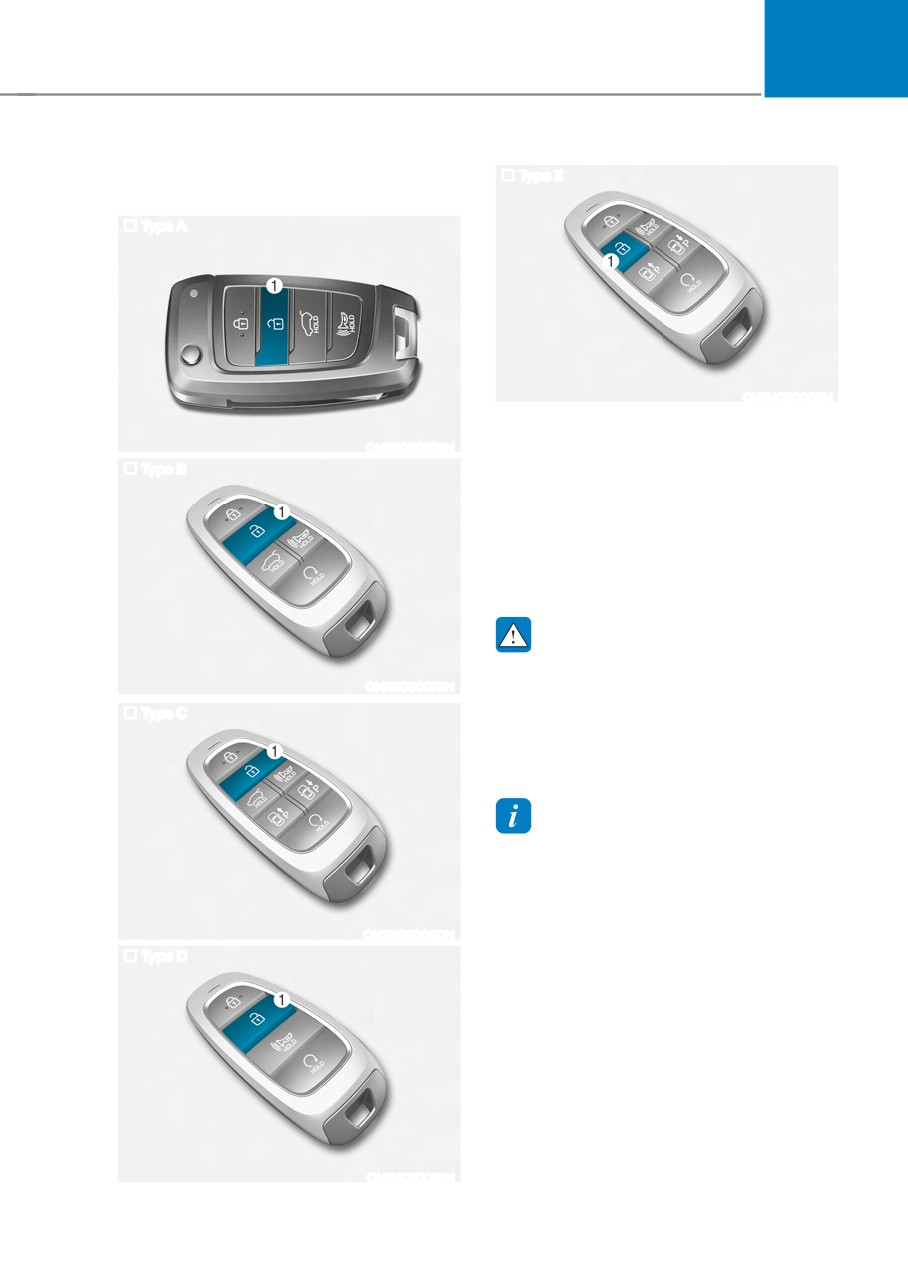
Remote window opening function (if
Type E
equipped)
Type A
ONX4050082N
You can still control the window
ONX4050078N
movement with the engine turned off.
Type B
Press the Door Unlock button (1) for more
than 3 seconds. The window moves
down after the doors are unlocked, as
long as you press the door unlock button.
The window movement stops, when you
release the door unlock button.
WARNING
If you stay on the function after
ONX4050079N
operating the Remote window opening
function, it is likely to cause a theft.
Type C
In addition, please use caution there
might be a malfunction due to the
inflow of water while raining.
Information
• The remote window opening function
may abruptly stop, when you move
away from your vehicle during
operation. Stay in close proximity from
your vehicle, while monitoring the
ONX4050080N
window movement.
Type D
• One of the windows may stop
operating, when the window is
interrupted by certain force. However,
the other windows will keep operating.
Thus, you should make sure that all
windows are opened.
• Please be aware that the doors unlock
when the windows are opened using the
remote window opening function.
ONX4050081N
5-59
Convenient features
PANORAMIC SUNROOF (IF EQUIPPED)
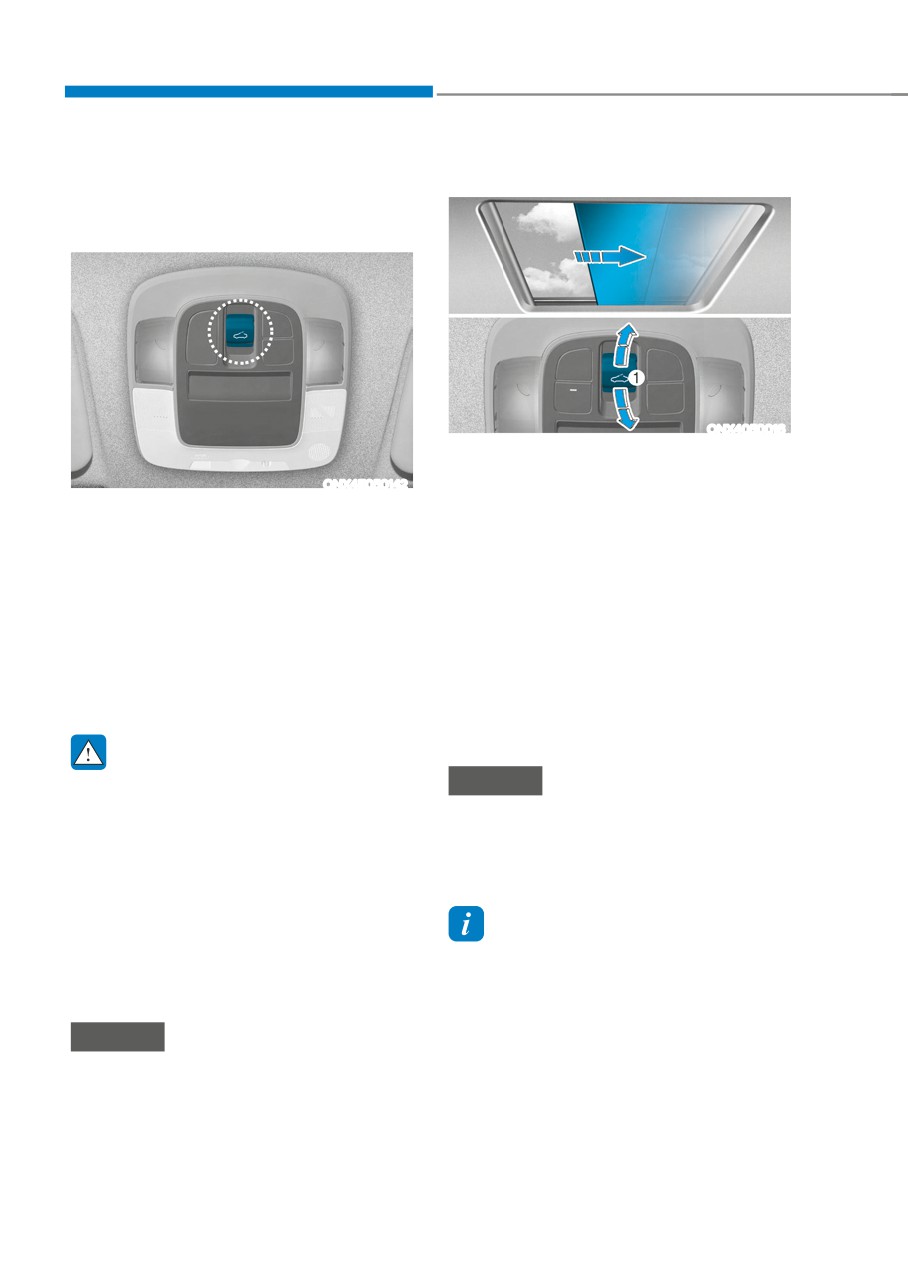
If your vehicle is equipped with a
Power sunshade
sunroof, you can slide or tilt your sunroof
with the sunroof switch located on the
overhead console.
ONX4050016
Use the power sunshade to block direct
sunlight coming through the sunroof
ONX4E050142
glass.
The sunroof can only be operated when
--
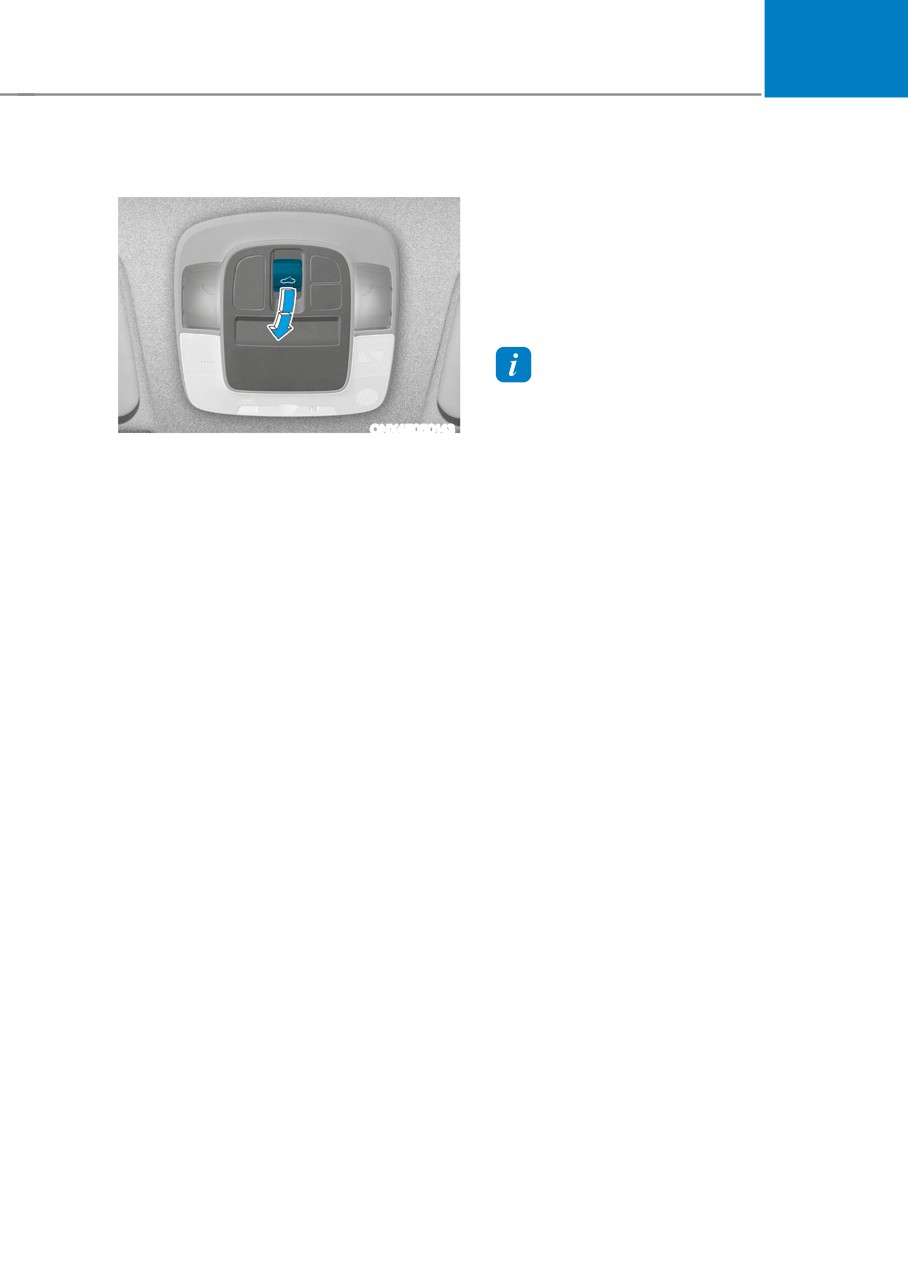
Push the sunroof switch rearward to
the ignition switch or Engine Start/Stop
the first detent position, the power
button is in the ON or START position.
sunshade automatically slides open.
The sunroof can be operated for
--
Push the sunroof switch forward to
approximately 3 minutes after the
the first detent position, the power
ignition switch or Engine Start/Stop
sunshade automatically closes.
button is in the ACC or LOCK/OFF
However, if the sunroof glass is open,
position. However, if the front door is
the glass will close first.
open, the sunroof cannot be operated
even within the 3 minutes period.
To stop the power sunshade at any point,
push the sunroof switch in any direction.
WARNING
• Never adjust the sunroof or sunshade
NOTICE
while driving. This could result in loss
Do not pull or push the power sunshade
of control and an accident that may
by hand as such action may damage
cause injury, or property damage.
the power sunshade or cause it to
• Do not leave the engine running
malfunction.
and the key in your vehicle with
unsupervised children. Unattended
children could operate the sunroof,
Information
which could result in serious injury.
Wrinkles formed on the power sunshade
• Do not sit on the top of the vehicle. It
are normal due to material characteristic.
may cause injury or vehicle damage.
NOTICE
Do not operate the sunroof when the
roof bars are installed on the vehicle or
when there is luggage on the roof.
5-60
05
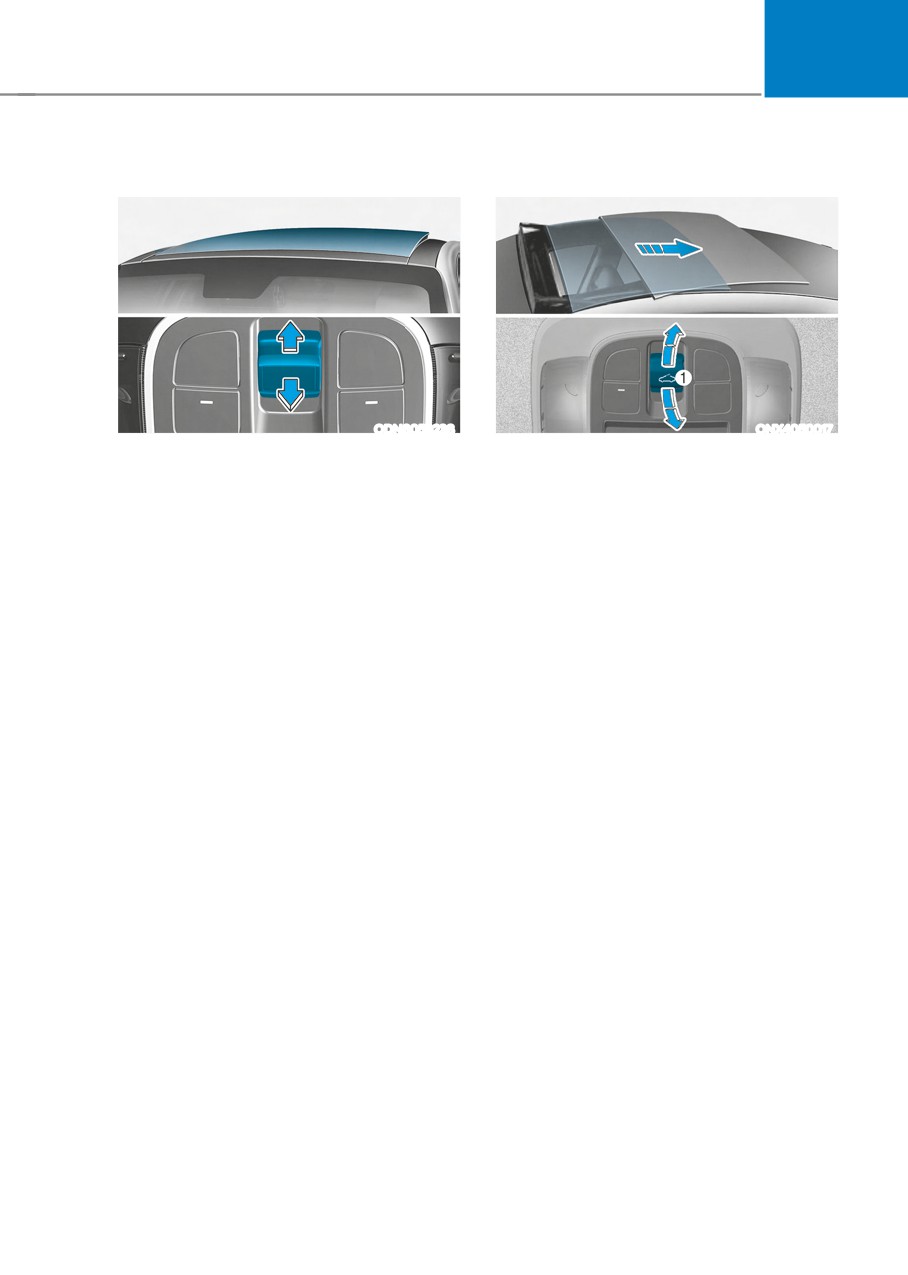
Tilt open/close
Slide open/close
ODN8059238
ONX4050017
• Push the sunroof switch upward, the
• Push the sunroof switch rearward, the
sunroof glass tilts open. However,
sunroof glass slides open. However,
if the power sunshade is close, the
if the power sunshade is close, the
sunshade will open first.
power sunshade will open first.
• Push the sunroof switch forward, the
Push the sunroof switch forward, the
sunroof glass automatically closes.
sunroof glass closes.
• Push the sunroof switch forward or
To stop the sunroof movement at any
rearward to the first detent position,
point, push the sunroof switch in any
the sunroof glass moves until the
direction.
switch is released.
• Push the sunroof switch forward
or rearward to the second detent
position, the sunroof glass operates
automatically (auto slide feature).
To stop the sunroof movement at any
point, push the sunroof switch in any
direction.
5-61
Convenient features
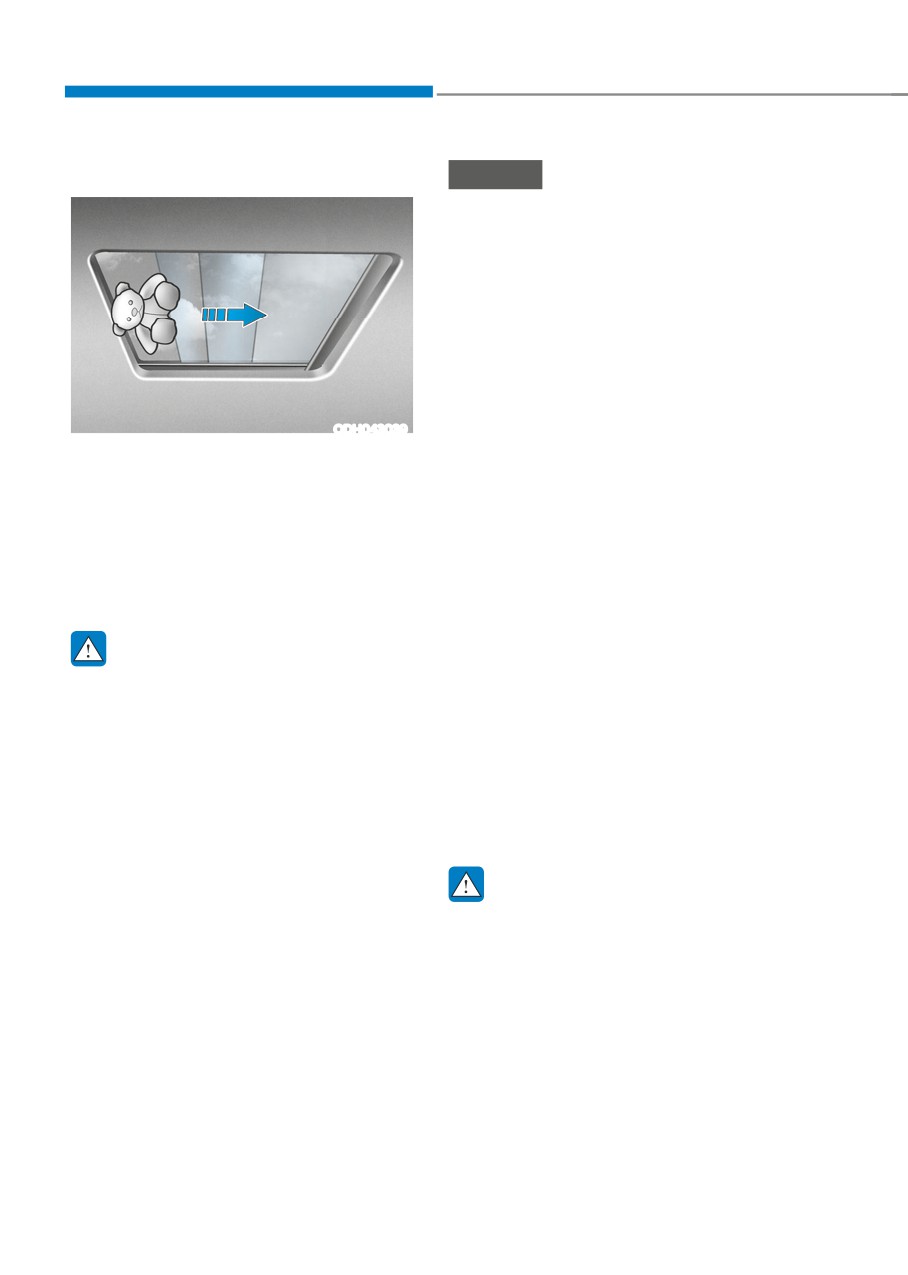
Automatic reversal
NOTICE
•
Do not continue to push the sunroof
switch after the sunroof is fully
opened, closed, or tilted. Damage to
the sunroof motor could occur.
•
Continuous operations such as slide
open/close, tilt open/close, etc. may
cause the motor or sunroof system to
malfunction.
•
Regularly remove any accumulated
dust on the sunroof rail.
•
Using the sunroof for a long time
ODH043039
can make noise caused by dust in
If the power sunshade or sunroof glass
accumulated between the sunroof
senses any obstacle while it is closing
and vehicle body. Open the sunroof
automatically, it will reverse direction
and remove dust regularly using a
then stop at a certain position.
clean cloth.
The auto reverse function may not
•
Do not try to open the sunroof when
work if an object thin or soft is caught
the temperature is below freezing
between the sliding power sunshade or
or when the sunroof is covered with
sunroof glass and sunroof sash.
snow or ice, otherwise the motor
could be damaged. In cold and wet
climates, the sunroof may not work
WARNING
properly.
• Make sure heads, hands, arms or
•
Do not open or drive with the sunroof
any other body parts or objects are
glass open immediately after rain or
out of the way before operating the
washing the vehicle. Water may wet
sunroof. Body parts or objects may
the interior of the vehicle.
get caught causing injuries or vehicle
damage.
•
Do not extend any luggage outside
the sunroof while driving. Vehicle
• Never deliberately use your body
damage may occur if the vehicle
parts to test the automatic reversal
suddenly stops.
function. The power sunshade or
sunroof glass may reverse direction,
but there is a risk of injury.
WARNING
Do not extend your head, arms, body
parts or objects outside the sunroof
while driving. Injuries may occur if the
vehicle suddenly stops.
5-62
05
Resetting the sunroof
5. Once again push and hold the sunroof
switch forward until the power
sunshade and sunroof glass slide open
and close. Do not release the switch
until the operation is completed.
If you release the switch during
operation, start the procedure again
from step 2.
Information
If the sunroof is not reset when the vehicle
battery is disconnected or discharged, or
ONX4E050143
the sunroof fuse is blown, the sunroof may
In some circumstances resetting the
not operate normally.
sunroof operation may need to be
performed. Some instances where
resetting the sunroof may be required
include:
• When the 12-volt battery is either
disconnected or discharged
• When the sunroof fuse is replaced
• If the sunroof one-touch AUTO OPEN/
CLOSE operation is not functioning
properly
Sunroof resetting procedure:
1. It is recommended to perform the
reset procedure with the vehicle
engine running. Start the vehicle in P
(Park).
2. Make sure the power sunshade and
sunroof glass are in the fully closed
position. If the power sunshade
and sunroof glass are open, push
the switch forward until the power
sunshade and sunroof glass are fully
closed.
3. Release the switch when the power
sunshade and sunroof glass are fully
closed.
4. Push the switch forward until the
power sunshade and sunroof glass
move slightly. Then release the switch.
5-63
Convenient features
Sunroof open warning
ONX4040010
If the driver turns off the engine
when the sunroof is not fully closed, the
warning chime will sound for several
seconds and the sunroof open warning
will appear on the cluster LCD display.
Close the sunroof securely when leaving
your vehicle.
CAUTION
Make sure the sunroof is closed fully
when leaving your vehicle.
If the sunroof is left open, rain or snow
may wet the interior of the vehicle.
Also, leaving the sunroof open when the
vehicle is unattended may invite theft.
5-64
05
EXTERIOR FEATURES
Hood
Opening the hood
ONX4050022
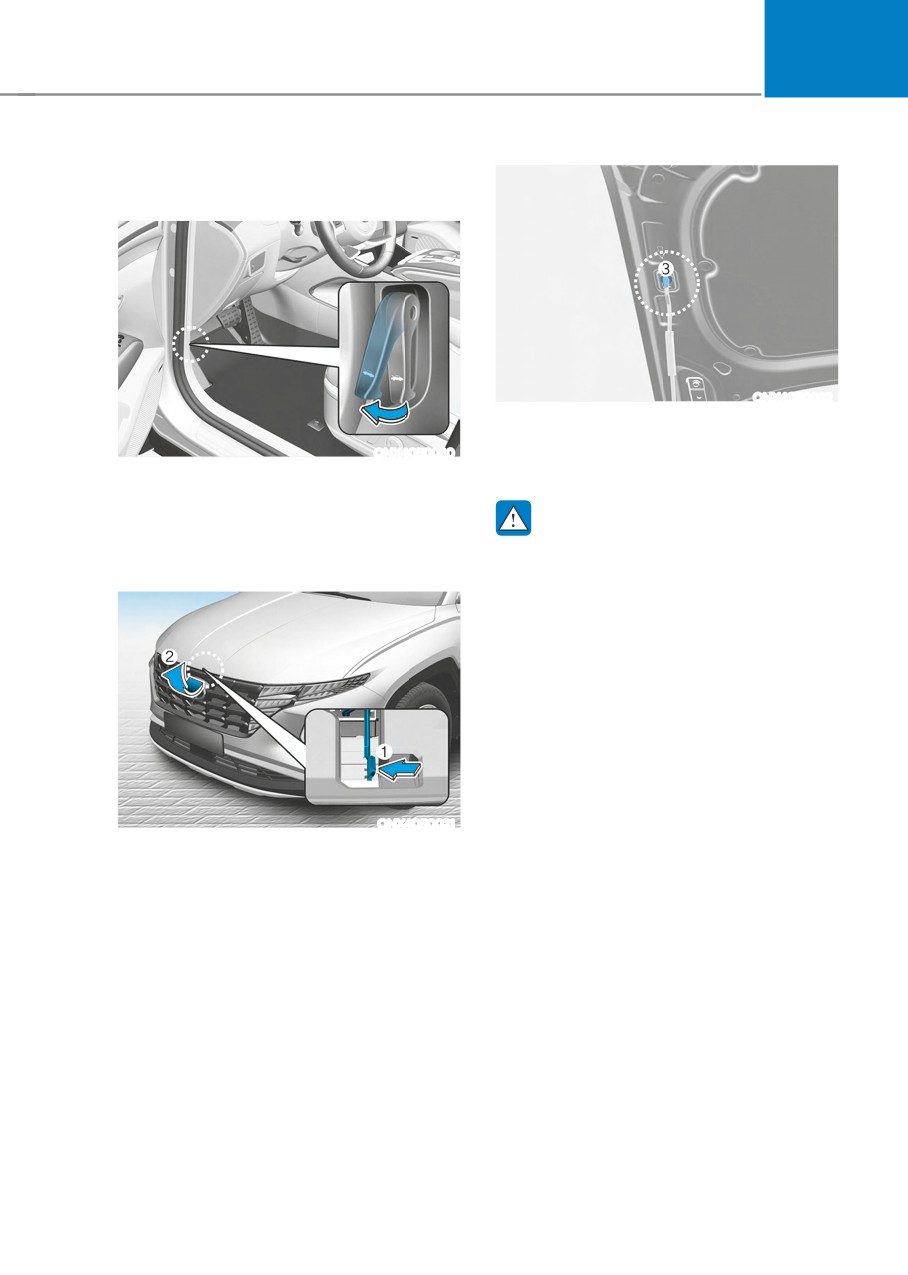
4. Pull up on the hood support rod.
ONX4050020
5. Install the end of the hood support rod
into the slot located on the hood (3).
1. Park the vehicle and set the parking
brake.
2. Pull the release lever to unlatch the
WARNING
hood. The hood should pop open
• Grasp the hood support rod in the
slightly.
area wrapped in rubber when the
engine is hot. The rubber portion will
insulate the heat and protect you
from burn or injury.
• The end of the hood support rod
must be inserted fully into the hood
slot whenever you inspect the engine
compartment. This will prevent
the hood from falling and possibly
injuring you.
ONX4050021
3. Go to the front of the vehicle, raise the
hood slightly, push up the secondary
latch (1) inside of the hood center and
lift the hood.
5-65