Hyundai Sonata (2022 year). Manual in english - page 16
Emergency Situations
hazarD WarnIng flasher
In Case of an emergenCy
WhIle DrIvIng
If the Engine Stalls While Driving
• Reduce your speed gradually, keeping
a straight line. Move cautiously off the
road to a safe place.
• Turn on your hazard warning flasher.
• Try to start the engine again. If your
vehicle will not start, contact an
authorized HYUNDAI dealer or seek
other qualified assistance.
ODN8079001
The hazard warning flasher serves as
If the Engine Stalls at a Crossroad
a warning to other drivers to exercise
or Crossing
extreme caution when approaching,
overtaking, or passing your vehicle.
If the engine stalls at a crossroads or
crossing, if safe to do so, move the shift
It should be used whenever emergency
button to the N (Neutral) position and
repairs are being made or when the
then push the vehicle to a safe location.
vehicle is stopped near the edge of a
roadway.
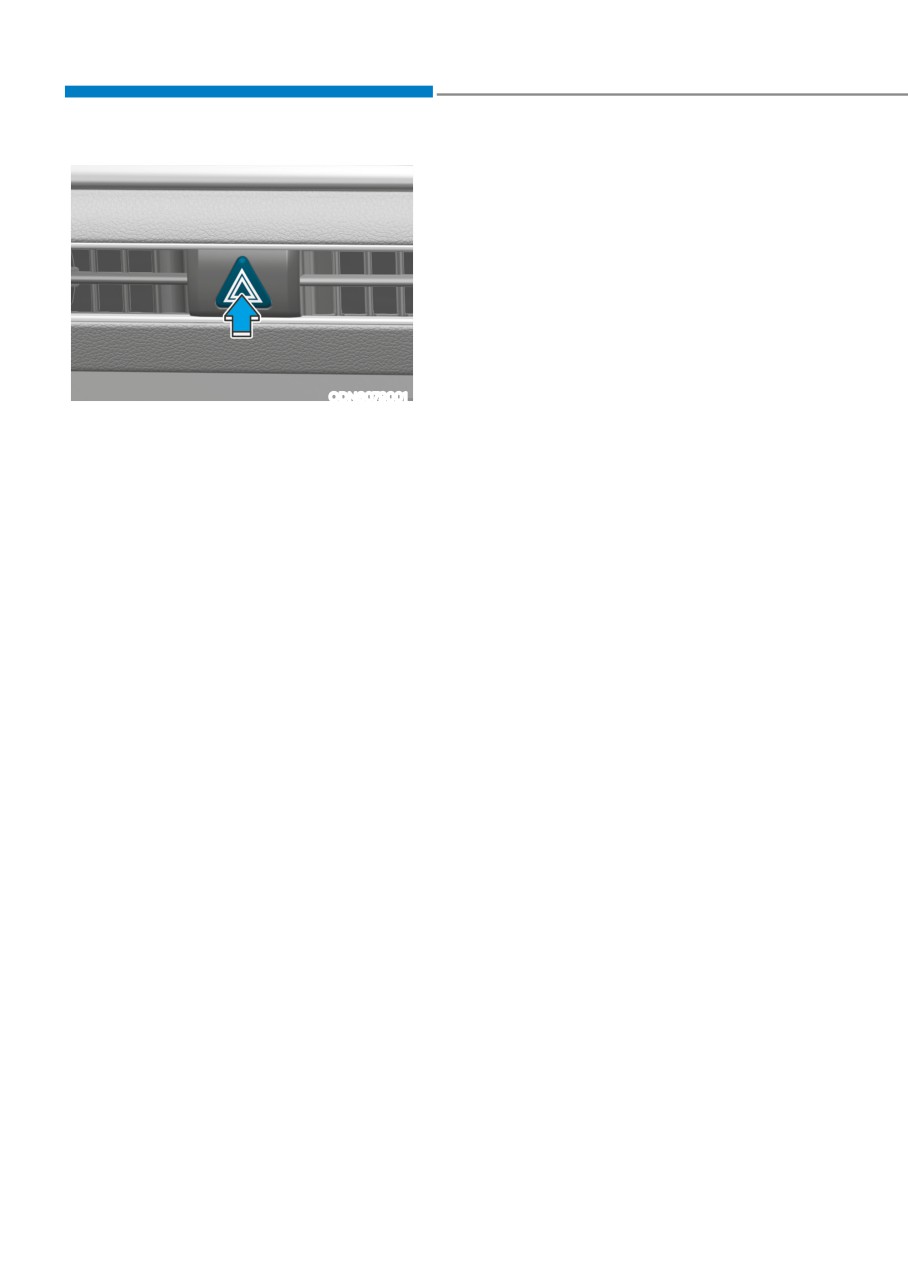
To turn the hazard warning flasher
on or off, press the hazard warning
flasher button. The button is located
in the center fascia panel. Both the left
and right turn signal lights will flash
simultaneously.
• The hazard warning flasher operates
whether your vehicle is running or not.
• The turn signals do not work when the
hazard flasher is on.
7-2
07
If the engIne WIll not
If you Have a Flat Tire While
start
Driving
If the Engine Doesn’t Turn Over
If a tire goes flat while you are driving:
or Turns Over Slowly
•
Take your foot off the accelerator
• Be sure the shift button is in N
pedal and let the vehicle slow down
(Neutral) or P (Park). The engine starts
while driving straight ahead. Do not
only when the shift button is in N
apply the brakes immediately or
(Neutral) or P (Park).
attempt to pull off the road as this
• Check the battery connections to be
may cause loss of vehicle control
sure they are clean and tight.
resulting in an accident. When the
vehicle has slowed to such a speed
• Turn on the interior light. If the light
that it is safe to do so, brake carefully
dims or goes out when you operate
and pull off the road. Drive off the
the starter, the battery is drained.
road as far as possible and park on
Do not push or pull the vehicle to start it.
firm, level ground. If you are on a
This could cause damage to your vehicle.
divided highway, do not park in the
See instructions for “Jump Starting”
median area between the two traffic
provided in this chapter.
lanes.
•
When the vehicle is stopped, press the
CAUTION
hazard warning flasher button, move
the shift button into P (Park), and
Push or pull starting the vehicle may
apply the parking brake, and place
cause the catalytic converter to
the ignition switch in the LOCK/OFF
overload which can lead to damage to
position.
the emission control system.
•
Have all passengers get out of the
vehicle. Be sure they all get out on the
If the Engine Turns Over
side of the vehicle that is away from
Normally but Doesn’t Start
traffic.
Check the fuel level and add fuel if
•
When changing a flat tire, follow the
necessary.
instructions provided later in this
If the engine still does not start, have
chapter.
your vehicle checked by an authorized
HYUNDAI dealer.
7-3
Emergency Situations
Jump startIng
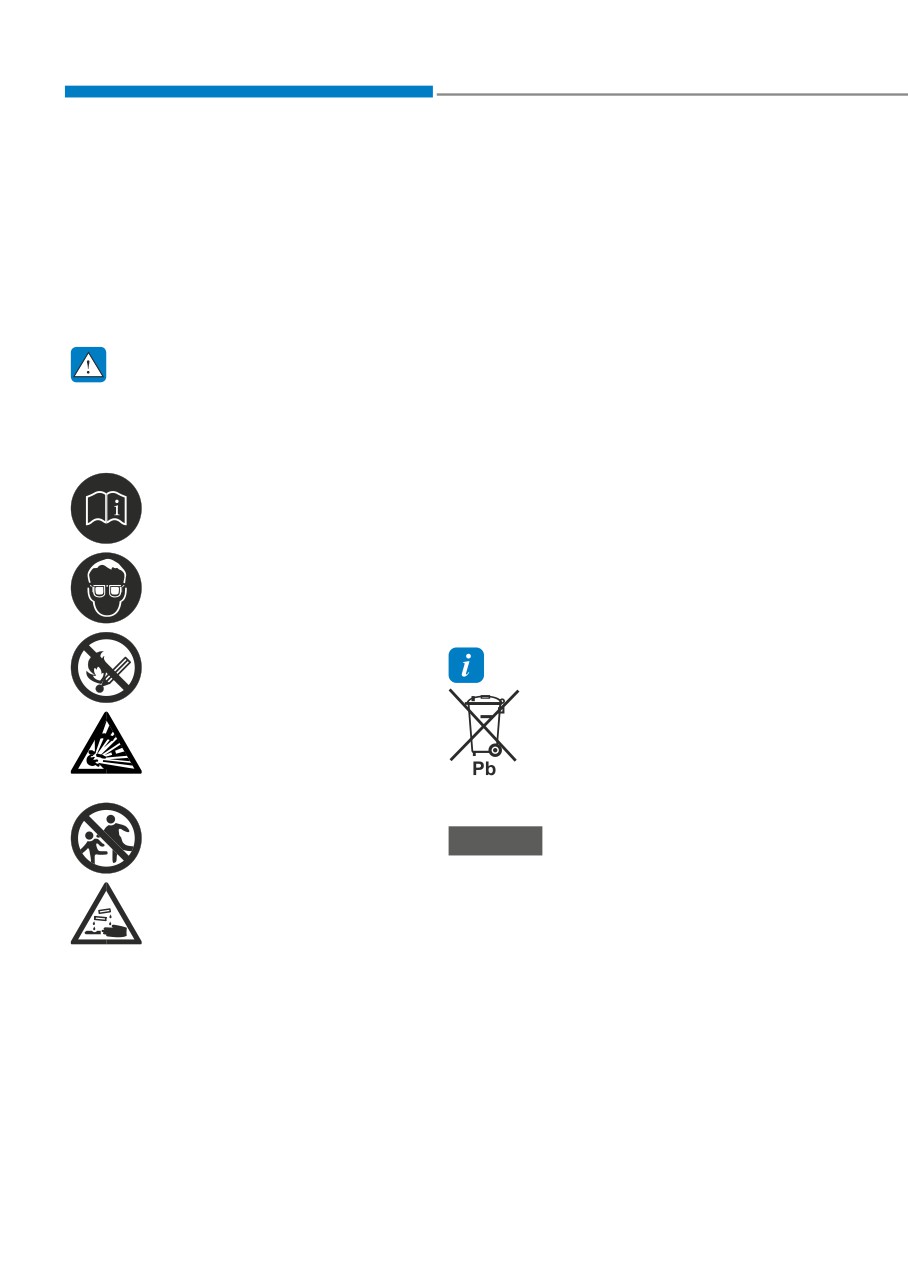
Jump starting can be dangerous if done
If acid gets into your eyes, flush your
incorrectly. Follow the jump starting
eyes with clean water for at least 15
procedure in this section to avoid serious
minutes and get immediate medical
injury or damage to your vehicle. If in
attention. If acid gets on your skin,
doubt about how to properly jump start
thoroughly wash the area. If you feel
your vehicle, we strongly recommend
pain or a burning sensation, get medical
that you have a service technician or
attention immediately.
towing service do it for you.
•
When lifting a plastic-cased battery,
excessive pressure on the case may
cause battery acid to leak. Lift with a
WARNING
battery carrier or with your hands on
To prevent SERIOUS INJURY or DEATH
opposite corners.
to you or bystanders, always follow
•
Do not attempt to jump start your
these precautions when working near
vehicle if your battery is frozen.
or handling the battery:
•
NEVER attempt to recharge the
Always read and follow
battery when the vehicle’s battery
instructions carefully when
cables are connected to the battery.
handling a battery.
•
The electrical ignition system works
Wear eye protection designed
with high voltage. NEVER touch
these components with the engine
to protect the eyes from acid
splashes.
running or when the ignition switch
is in the ON position.
Keep all flames, sparks, or
smoking materials away from
Information
the battery.
An inappropriately disposed
battery can be harmful to
Hydrogen is always present
in battery cells, is highly
the environment and human
health. Dispose of the battery
combustible, and may explode
if ignited.
according to your local law(s) or
regulations.
Keep batteries out of reach of
children.
NOTICE
To prevent damage to your vehicle:
Batteries contain sulfuric acid
• Only use a 12-volt power supply
which is highly corrosive. Do
(battery or jumper system) to jump
not allow acid to contact your
start your vehicle.
eyes, skin or clothing.
• Do not attempt to jump start your
vehicle by push-starting.
7-4
07
Jump starting procedure
8. Start the engine of the assisting
vehicle and let it run at approximately
1. Position the vehicles close enough
2,000 rpm for a few minutes. Then
that the jumper cables will reach, but
start your vehicle.
do not allow the vehicles to touch.
If your vehicle will not start after a few
2. Avoid fans or any moving parts in the
attempts, it probably requires servicing.
engine compartment at all times, even
In this event please seek qualified
when the vehicles are turned off.
assistance. If the cause of your battery
3. Turn off all electrical devices such as
discharging is not apparent, have your
radios, lights, air conditioning, etc.
vehicle checked by an authorized
Put the vehicles in P (Park) and set
HYUNDAI dealer.
the parking brakes. Turn both vehicles
OFF.
Disconnect the jumper cables in the
exact reverse order you connected them:
1. Disconnect the jumper cable from the
black, negative (-) chassis ground of
your vehicle (4).
2. Disconnect the other end of the
jumper cable from the black, negative
(-) battery/chassis ground of the
assisting vehicle (3).
3. Disconnect the second jumper cable
from the red, positive (+) battery/
jumper terminal of the assisting
ODN8A079022
vehicle (2).
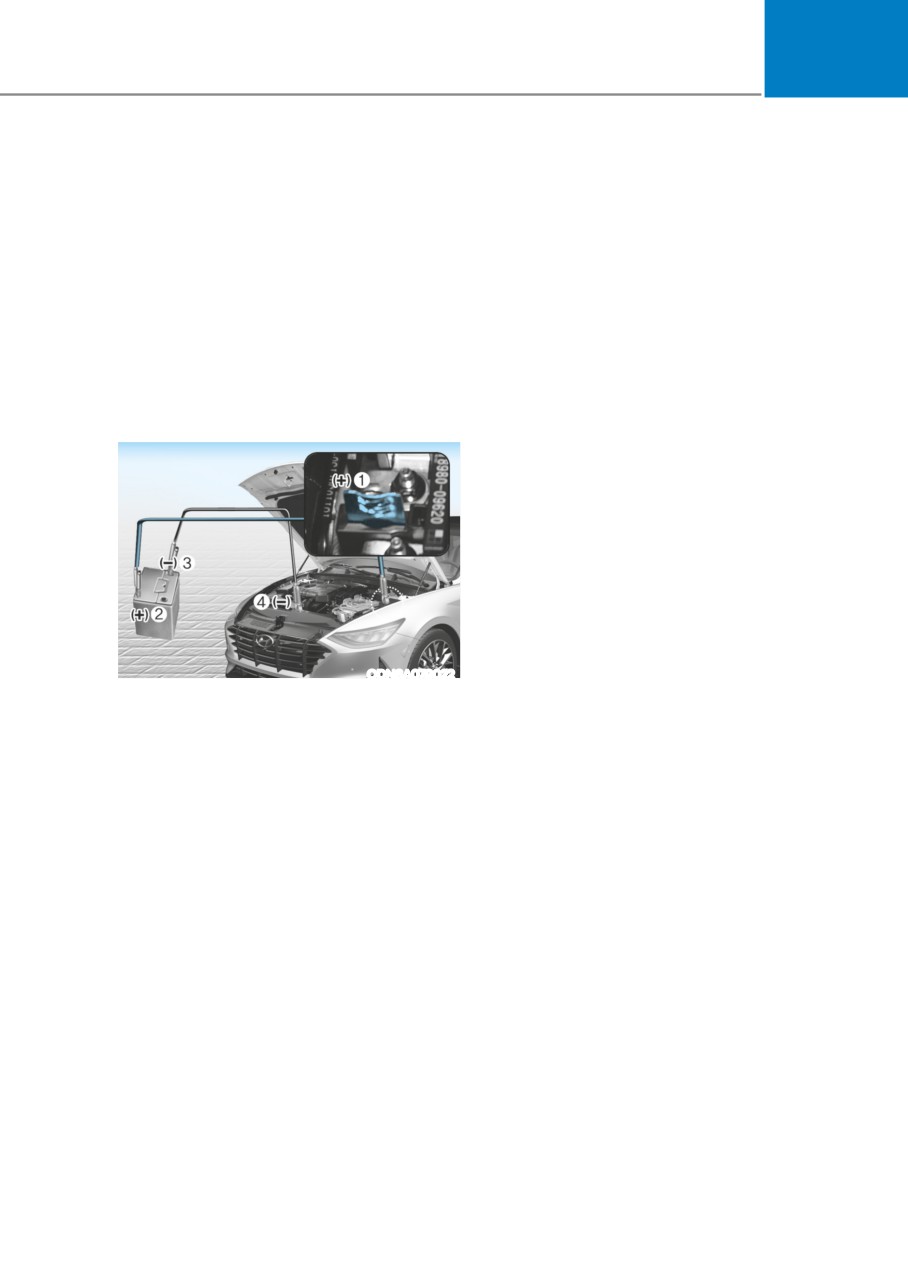
4. Connect the jumper cables in
4. Disconnect the other end of the
the exact sequence shown in the
jumper cable from the red, positive (+)
illustration. First connect one jumper
jumper terminal of your vehicle (1).
cable to the red, positive (+) jumper
terminal of your vehicle (1).
5. Connect the other end of the jumper
cable to the red, positive (+) battery/
jumper terminal of the assisting
vehicle (2).
6. Connect the second jumper cable to
the black, negative (-) battery/chassis
ground of the assisting vehicle (3).
7. Connect the other end of the second
jumper cable to the black, negative (-)
chassis ground of your vehicle (4).
Do not allow the jumper cables to
contact anything except the correct
battery or jumper terminals or the
correct ground. Do not lean over the
battery when making connections.
7-5

Emergency Situations
If the engIne overheats
If your temperature gauge indicates
WARNING
overheating, you experience a loss of
power, or hear loud pinging or knocking,
While the engine is running,
the engine may be overheating. If this
keep hands, clothing and tools
happens, you should:
away from the moving parts
such as the cooling fan and
1. Pull off the road and stop as soon as it
drive belt to prevent serious
is safe to do so.
injury.
2. Place the shift button in P (Park)
and set the parking brake. If the air
conditioning is ON, turn it OFF.
4. Check for coolant leaking from the
3. If engine coolant is running out under
radiator, hoses or under the vehicle. (If
the vehicle or steam is coming out
the air conditioning had been in use, it
from the hood, stop the engine. Do
is normal for cold water to be draining
not open the hood until the coolant
from it when you stop.)
has stopped running or the steaming
5. If engine coolant is leaking out, stop
has stopped. If there is no visible
the engine immediately and call the
loss of engine coolant and no steam,
nearest authorized HYUNDAI dealer
leave the engine running and check
for assistance.
to be sure the engine cooling fan is
operating. If the fan is not running,
turn the engine off.
7-6

07
NOTICE
WARNING
•
Serious loss of coolant indicates a
Your vehicle is equipped
leak in the cooling system and we
with a pressurized coolant
recommend the system be checked
reserve tank. NEVER remove
by an authorized HYUNDAI dealer.
the engine coolant reservoir
tank/radiator cap or the drain
•
When the engine overheats from
plug while the engine and
low engine coolant, suddenly adding
radiator are HOT. Hot coolant
engine coolant may cause cracks
and steam may blow out under
in the engine. To prevent damage,
pressure, causing serious
add engine coolant slowly in small
injury.
quantities.
Turn the engine off and wait until the
•
If there is overheating, park your
engine cools down. Use extreme care
vehicle in a safe place and do not
when removing the engine coolant
turn off the engine until the cooling
reservoir tank/radiator cap. Wrap
fan stops. The engine might get stuck
a towel or thick rag around it, and
due to sudden increase of water
turn it counterclockwise slowly to
temperature.
release some of the pressure from the
•
Turn off the engine if the cooling fan
system. Step back while the pressure is
does not rotate.
released.
When you are sure all the pressure has
been released, continue turning the cap
counterclockwise to remove it.
6. If you cannot find the cause of the
overheating, wait until the engine
temperature has returned to normal.
Then, if coolant has been lost,
carefully add coolant to the reservoir
to bring the fluid level in the reservoir
up to the halfway mark.
7. Proceed with caution, keeping alert
for further signs of overheating. If
overheating happens again, call
an authorized HYUNDAI dealer for
assistance.
7-7
Emergency Situations
Tire Pressure MoniToring sysTeM (TPMs) (if equiPPed)
Check Tire Pressure
ODN8079002
ODN8049022L
•
You can check the tire pressure in the
Assist mode on the cluster.
Refer to the “LCD Display Mode”
section in chapter 4.
•
A “Drive to display” message will
appear for the first few minutes of
driving after initial engine start up.
If the tire pressure is not displayed
after a few minutes of driving, check
ODN8049030L
the tire pressures.
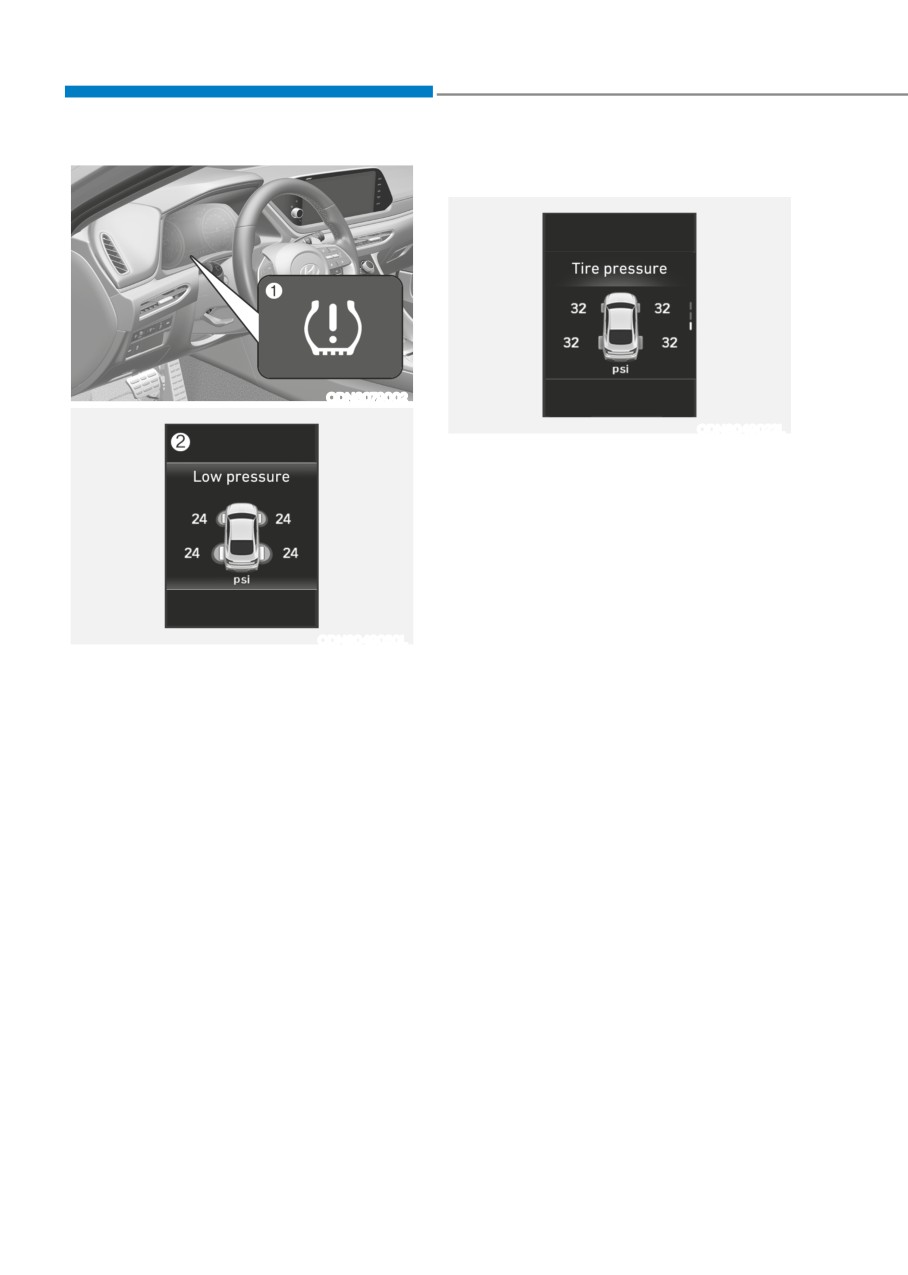
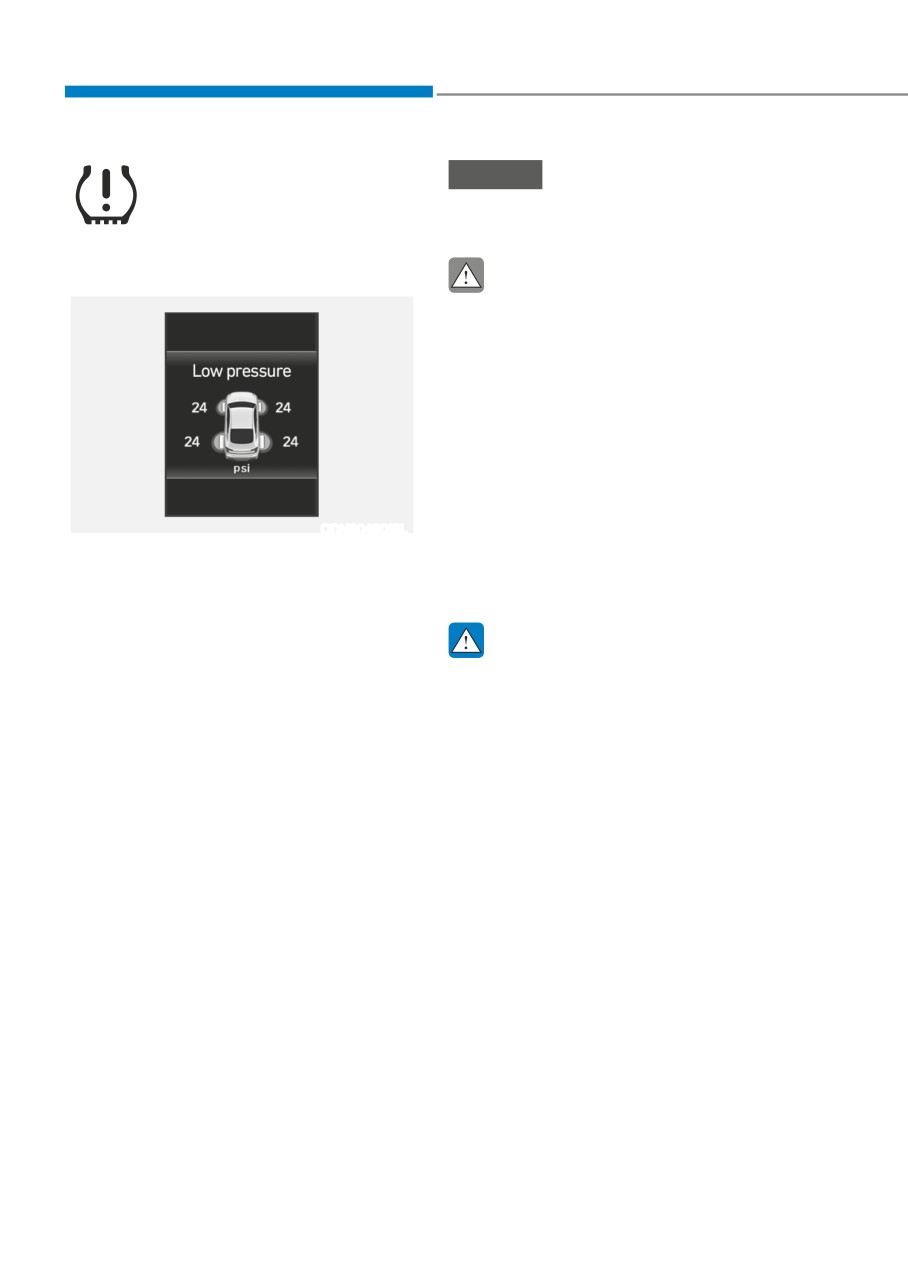
(1) Low Tire Pressure / TPMS Malfunction
•
The displayed tire pressure values may
Indicator Lamp
differ from those measured with a tire
(2) Low Tire Pressure / Tire Pressure
pressure gauge.
Monitor / TPMS Malfunction Display
•
You can change the tire pressure unit
(shown on the cluster LCD display)
in the User Settings mode on the
cluster.
- psi, kpa, bar (Refer to the “User
Settings Mode” section in chapter
4).
7-8
07
Tire Pressure Monitoring System
Please note that the TPMS is not a
substitute for proper tire maintenance,
and it is the driver’s responsibility to
WARNING
maintain correct tire pressure, even if
Over-inflation or under-inflation can
under-inflation has not reached the level
reduce tire life, adversely affect vehicle
to trigger illumination of the TPMS low
handling, and lead to sudden tire failure
tire pressure telltale.
that may cause loss of vehicle control
Your vehicle has also been equipped with
resulting in an accident.
a TPMS malfunction indicator to indicate
when the system is not operating
Each tire, including the spare (if
properly. The TPMS malfunction
provided), should be checked monthly
indicator is combined with the low
when cold and inflated to the inflation
tire pressure telltale. When the system
pressure recommended by the vehicle
detects a malfunction, the telltale will
manufacturer on the vehicle placard
flash for approximately one minute and
or tire inflation pressure label. If your
then remain continuously illuminated.
vehicle has tires of a different size than
This sequence will continue upon
the size indicated on the vehicle placard
subsequent vehicle start-ups as long as
or tire inflation pressure label, you should
the malfunction exists.
determine the proper tire inflation
When the malfunction indicator is
pressure for those tires.
illuminated, the system may not be able
As an added safety feature, your
to detect or signal low tire pressure as
vehicle has been equipped with a tire
intended. TPMS malfunctions may occur
pressure monitoring system (TPMS)
for a variety of reasons, including the
that illuminates a low tire pressure
installation of replacement or alternate
telltale when one or more of your tires is
tires or wheels on the vehicle that
significantly under-inflated. Accordingly,
prevent the TPMS from functioning
when the low tire pressure telltale
properly.
illuminates, you should stop and check
Always check the TPMS malfunction
your tires as soon as possible, and inflate
telltale after replacing one or more tires
them to the proper pressure. Driving on
or wheels on your vehicle to ensure that
a significantly under-inflated tire causes
the replacement or alternate tires and
the tire to overheat and can lead to tire
wheels allow the TPMS to continue to
failure.
function properly.
Under-inflation also reduces fuel
efficiency and tire tread life, and may
NOTICE
affect the vehicle’s handling and
stopping ability.
If any of the below happens, have
the system checked by an authorized
HYUNDAI dealer.
1. The Low Tire Pressure TPMS
Malfunction Indicator does not
illuminate for 3 seconds when the
ignition switch is placed to the ON
position or engine is running.
2. The TPMS Malfunction Indicator
remains illuminated after blinking for
approximately 1 minute.
3. The Low Tire Pressure LCD display
remains illuminated
7-9
Emergency Situations
Low Tire Pressure Telltale
NOTICE
The spare tire is not equipped with a
tire pressure sensor.
Low Tire Pressure LCD Display
with Position Indicator
CAUTION
In winter or cold weather, the Low Tire
Pressure Telltale may be illuminated if
the tire pressure was adjusted to the
recommended tire inflation pressure
in warm weather. It does not mean
your TPMS is malfunctioning because
the decreased temperature leads to a
proportional lowering of tire pressure.
When you drive your vehicle from a
warm area to a cold area or from a cold
area to a warm area, or the outside
ODN8049019L
temperature is greatly higher or lower,
you should check the tire inflation
When the tire pressure monitoring
pressure and adjust the tires to the
system warning indicators are
recommended tire inflation pressure.
illuminated and the warning message
is displayed on the cluster LCD
display, one or more of your tires is
WARNING
significantly under-inflated. The LCD
position indicator will indicate which
Low pressure damage
tire is significantly under-inflated by
Significantly low tire pressure makes
illuminating the corresponding position
the vehicle unstable and can contribute
light.
to loss of vehicle control and increased
braking distances.
If any of your tire pressures are indicated
as being low, immediately reduce
Continued driving on low pressure tires
your speed, avoid hard cornering, and
can cause the tires to overheat and fail.
anticipate increased stopping distances.
You should stop and check your tires
as soon as possible. Inflate the tires to
the proper pressure as indicated on the
vehicle’s placard or tire inflation pressure
label located on the driver’s side center
pillar outer panel.
If you cannot reach a service station or
if the tire cannot hold the newly added
air, replace the low pressure tire with the
spare tire. (if equipped)
The Low Tire Pressure LCD position
indicator will remain on and the TPMS
Malfunction Indicator may blink for one
minute and then remain illuminated until
you have the low pressure tire repaired
and replaced on the vehicle.
7-10
07
TPMS Malfunction
Changing a Tire with TPMS
Indicator
If you have a flat tire, the Low Tire
Pressure and LCD position indicator will
The TPMS Malfunction Indicator
come on. Have the flat tire repaired by an
will illuminate after it blinks for
authorized HYUNDAI dealer as soon as
approximately one minute when there
possible or replace the flat tire with the
is a problem with the Tire Pressure
spare tire. (if equipped)
Monitoring System.
Have the system checked by an
CAUTION
authorized HYUNDAI dealer as soon as
possible.
It is recommended that you do not use a
puncture-repairing agent not approved
by HYUNDAI dealer to repair and/or
NOTICE
inflate a low pressure tire. Tire sealant
If there is a malfunction with the
not approved by HYUNDAI dealer may
TPMS, the individual tire pressures
damage the tire pressure sensor.
in the cluster LCD display will not be
available. Have the system checked by
The spare tire does not come with a
an authorized HYUNDAI dealer as soon
tire pressure monitoring sensor. When
as possible.
the low pressure tire or the flat tire is
replaced with the spare tire, the Low
NOTICE
Tire Pressure LCD position indicator will
remain on. Also, the TPMS Malfunction
The TPMS Malfunction Indicator may
Indicator will illuminate after blinking
illuminate after blinking for one minute
for one minute if the vehicle is driven
if the vehicle is near electric power
at speed above 25 km/h (15.5 mph) for
supply cables or radio transmitters
approximately 20 minutes. Once the
such as police stations, government
original tire equipped.
and public offices, broadcasting
Once the original tire equipped with
stations, military installations, airports,
a tire pressure monitoring sensor is
transmitting towers, etc.
reinflated to the recommended pressure
Additionally, the TPMS Malfunction
and reinstalled on the vehicle, the Low
Indicator may illuminate if snow chains
Tire Pressure LCD position indicator and
are used or electronic devices such as
TPMS Malfunction Indicator will go off
computers, chargers, remote starters,
within a few minutes of driving.
navigation, etc. This may interfere with
If the indicators do not disappear after a
normal operation of the TPMS.
few minutes, please visit an authorized
HYUNDAI dealer.
7-11
Emergency Situations
Each wheel is equipped with a tire
WARNING
pressure sensor mounted inside the tire
behind the valve stem (except for the
Tampering with, modifying, or disabling
spare tire). You must use TPMS specific
the Tire Pressure Monitoring System
wheels. It is recommended that you
(TPMS) components may interfere
always have your tires serviced by an
with the system’s ability to warn the
authorized HYUNDAI dealer.
driver of low tire pressure conditions
and/or TPMS malfunctions. Tampering
You may not be able to identify a tire
with, modifying, or disabling the Tire
with low pressure by simply looking at it.
Pressure Monitoring System (TPMS)
Always use a good quality tire pressure
components may void the warranty for
gauge to measure the tire’s inflation
that portion of the vehicle.
pressure. Please note that a tire that is
hot (from being driven) will have a higher
pressure measurement than a tire that is
Information
cold.
This device complies with Industry
A cold tire means the vehicle has been
Canada RSS-210 standard.
sitting for 3 hours and driven for less
Operation is subject to the following three
Than 1.6 km (1 mile) in that 3 hour period.
conditions:
Allow the tire to cool before measuring
1. This device may not cause harmful
the inflation pressure. Always be sure
interference.
the tire is cold before inflating to the
2. This device must accept any
recommended pressure.
interference received, including
interference that may cause undesired
operation.
WARNING
3. Changes or modifications not expressly
• The TPMS cannot alert you to severe
approved by the party responsible
and sudden tire damage caused by
for compliance could void the user’s
external factors such as nails or road
authority to operate the device.
debris.
• If you feel any vehicle instability,
immediately take your foot off
the accelerator, apply the brakes
gradually with light force, and slowly
move to a safe position off the road.
7-12
07
if you Have a flaT Tire (WiTH sPare Tire)
WARNING
Changing a tire can be dangerous.
Follow the instructions in this section
when changing a tire to reduce the risk
of serious injury or death.
CAUTION
Be careful as you use the jack handle to
stay clear of the flat end. The flat end
has sharp edges that could cause cuts.
OLF064031N
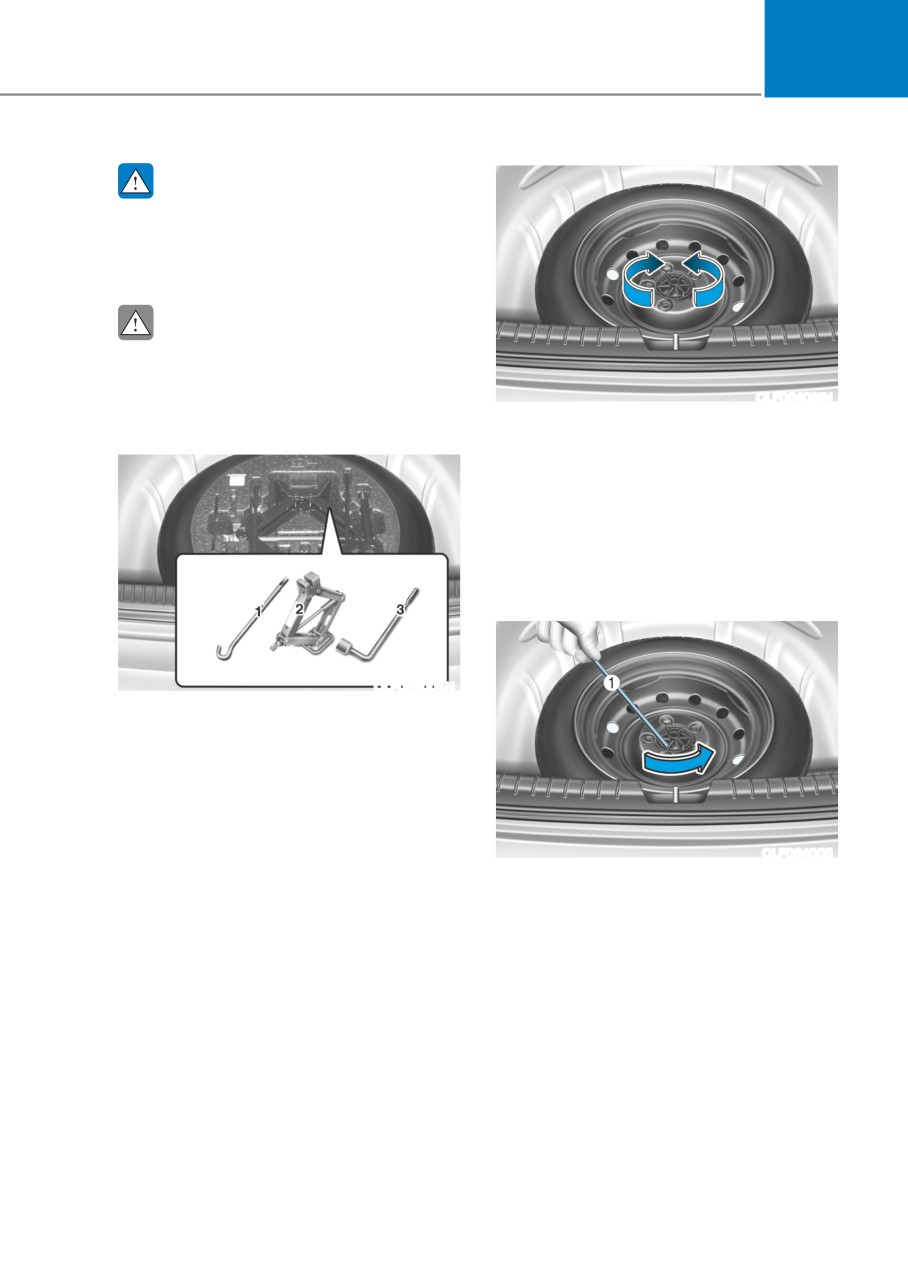
Turn the winged hold down bolt
Jack and Tools
counterclockwise to remove the spare
tire.
Store the spare tire in the same
compartment by turning the winged hold
down bolt clockwise.
To prevent the spare tire and tools from
“rattling”, store them in their proper
location.
OLF064004N
(1) Jack handle
(2) Jack
(3) Wheel lug nut wrench
The jack, jack handle, and wheel lug
nut wrench are stored in the luggage
compartment under the luggage box
OLF064005
cover.
If it is hard to loosen the tire hold-down
The jack is provided for emergency tire
wing bolt by hand, you can loosen it
changing only.
easily using the jack handle.
1. Put the jack handle (1) inside of the
tire hold-down wing bolt.
2. Turn the tire hold-down wing bolt
counterclockwise with the jack
handle.
7-13
Emergency Situations
Changing Tires
Follow these steps to change your
vehicle’s tire:
WARNING
1. Park on a level, firm surface.
A vehicle can slip or roll off of a jack
2. Move the shift button into P (Park)
causing serious injury or death to you or
apply the parking brake, and place
those nearby. Take the following safety
the ignition switch in the LOCK/OFF
precautions:
position.
•
Never place any portion of your body
3. Press the hazard warning flasher
under a vehicle that is supported by
button.
a jack.
4. Remove the wheel lug nut wrench,
•
NEVER attempt to change a tire in
jack, jack handle, and spare tire from
the lane of traffic. ALWAYS move the
the vehicle.
vehicle completely off the road on
level, firm ground away from traffic
before trying to change a tire. If you
cannot find a level, firm place off
the road, call a towing service for
assistance.
•
Be sure to use the jack provided with
the vehicle.
•
ALWAYS place the jack on the
designated jacking positions on the
vehicle and NEVER on the bumpers
or any other part of the vehicle for
ODN8A069089
jacking support.
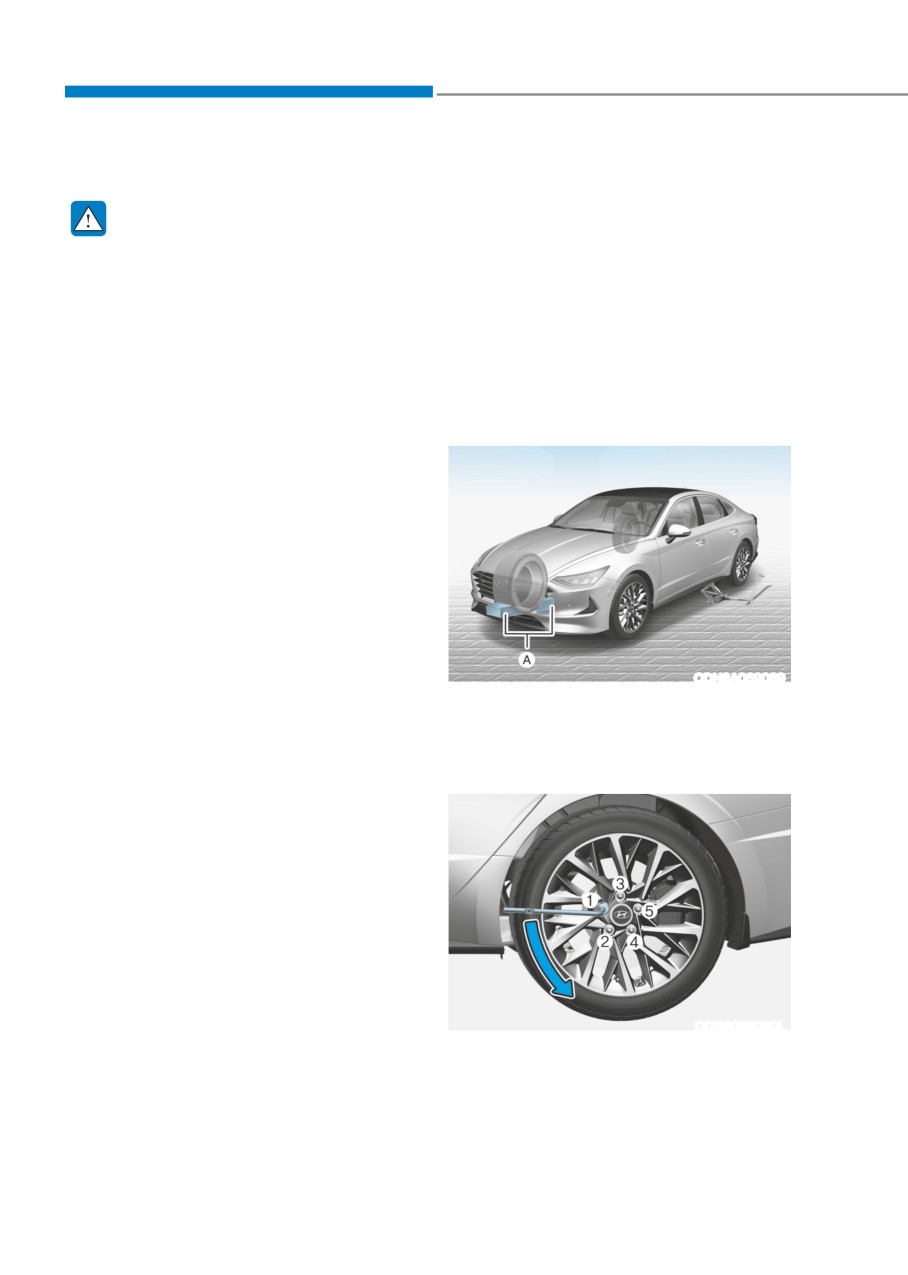
[A] : Block
•
Do not start or run the engine while
5. Block both the front and rear of the
the vehicle is on the jack.
tire diagonally opposite of the tire you
•
Do not allow anyone to remain in the
are changing.
vehicle while it is on the jack.
•
Keep children away from the road
and the vehicle.
ODN8069090L
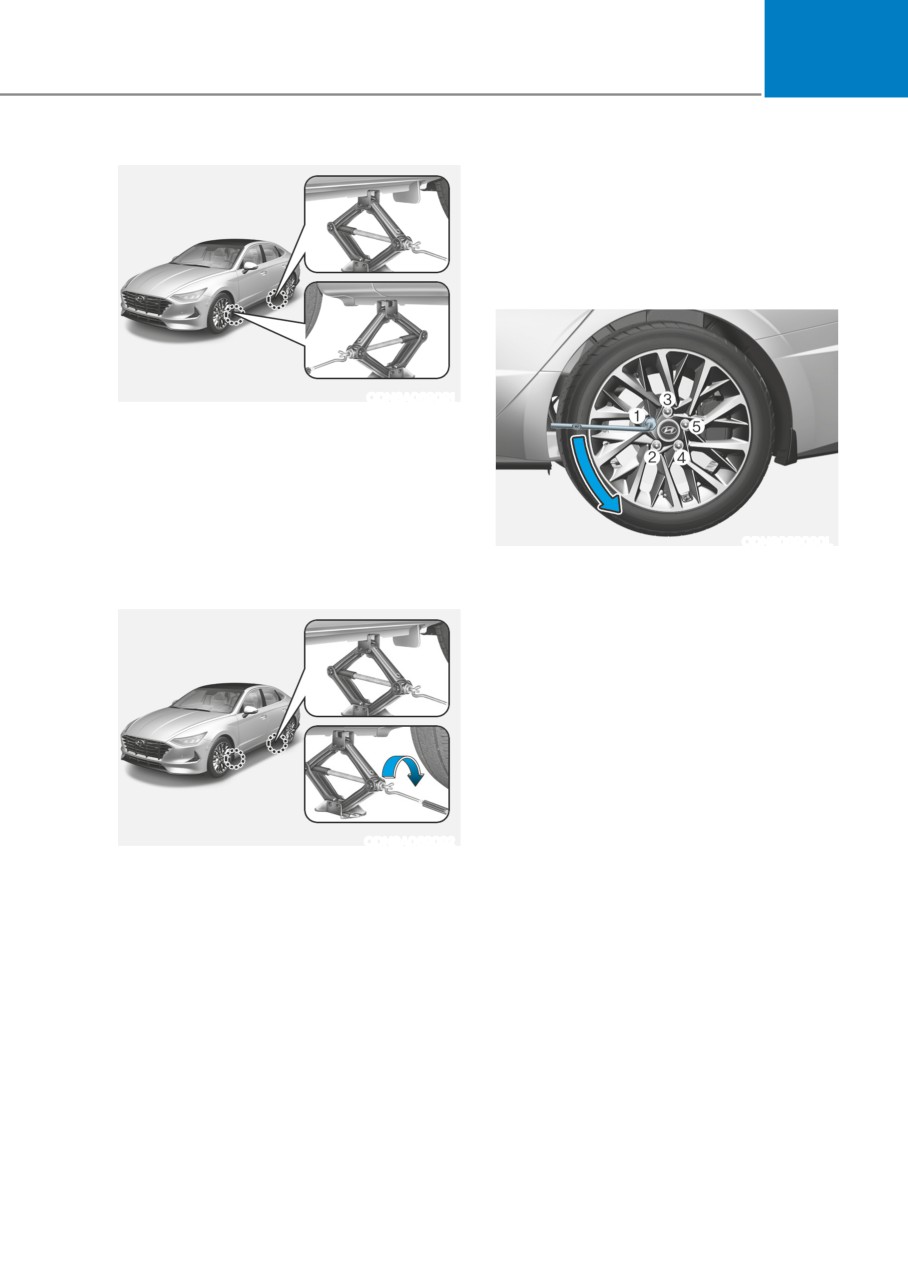
6. Loosen the wheel lug nuts
counterclockwise one turn each in
the order shown above, but do not
remove any lug nuts until the tire has
been raised off of the ground.
7-14
07
11. Tighten the lug nuts with your fingers
onto the studs with the smaller end of
the lug nuts closest to the wheel.
12. Lower the vehicle to the ground
by turning the jack handle
counterclockwise.
ODN8A069091
7. Place the jack at the designated
jacking position under the frame
closest to the tire you are changing.
The jacking positions are plates
welded to the frame with two
notches. Never jack at any other
position or part of the vehicle. Doing
ODN8069090L
so may damage the sill seal molding
13. Use the wheel lug nut wrench to
or other parts of the vehicle.
tighten the lug nuts in the order
shown. Double-check each lug nut
until they are tight. After changing
tires, have an authorized HYUNDAI
dealer tighten the lug nuts to their
proper torque as soon as possible. The
wheel lug nut should be tightened to
11~13 kgf·m (79~94 lbf·ft).
ODN8A069092
8. Insert the jack handle into the jack
and turn it clockwise, raising the
vehicle until the tire clears the ground.
Make sure the vehicle is stable on the
jack.
9. Loosen the lug nuts with the wheel
lug nut wrench and remove them with
your fingers. Remove the wheel from
the studs and lay it flat on the ground
out of the way. Remove any dirt or
debris from the studs, mounting
surfaces, and wheel.
10. Install the spare tire onto the studs of
the hub.
7-15
Emergency Situations
If you have a tire gauge, check the tire
CAUTION
pressure (see “Tires and Wheels” in
chapter 2 for tire pressure instructions.).
Your vehicle has metric threads on the
If the pressure is lower or higher than
studs and lug nuts. Make certain during
recommended, drive slowly to the
tire changing that the same nuts that
nearest service station and adjust it to
were removed are reinstalled. If you
the recommended pressure. Always
have to replace your lug nuts make
reinstall the valve cap after checking
sure they have metric threads to avoid
or adjusting tire pressure. If the cap
damaging the studs and ensure the
is not replaced, air may leak from the
wheel is properly secured to the hub.
tire. If you lose a valve cap, buy another
Consult an authorized HYUNDAI dealer
and install it as soon as possible. After
for assistance.
changing tires, secure the flat tire and
return the jack and tools to their proper
If any of the equipment such as the jack,
storage locations. If it is hard to secure
lug nuts, studs, or other equipment is
the flat tire, put the flat tire in the
damaged or in poor condition, do not
luggage compartment.
attempt to change the tire and call for
assistance.
NOTICE
Use of compact spare tires (if equipped)
•
Check the tire pressure as soon
Compact spare tires are designed for
as possible after installing a spare
emergency use only. Drive carefully on
tire. Adjust it to the recommended
the compact spare tire and always follow
pressure.
the safety precautions.
•
Check and tighten the wheel lug nuts
after driving over 50 km (30 miles) if
tires are replaced. Recheck the tire
WARNING
wheel lug nuts after driving over
To prevent compact spare tire failure
1,000 km (620 miles).
and loss of control possibly resulting in
an accident:
• Use the compact spare tire only in an
emergency.
• NEVER operate your vehicle over 80
km/h (50 mph).
• Do not exceed the vehicle’s
maximum load rating or the load
carrying capacity shown on the
sidewall of the compact spare tire.
• Do not use the compact spare tire
continuously. Repair or replace the
original tire as soon as possible to
avoid failure of the compact spare
tire.
7-16
07
When driving with the compact spare tire
CAUTION
mounted to your vehicle:
To prevent damaging the compact
• Check the tire pressure after installing
spare tire and your vehicle:
the compact spare tire. The compact
spare tire should be inflated to 420
•
Drive slowly enough for the road
kPa (60 psi).
conditions to avoid all hazards, such
as a potholes or debris.
• Do not take this vehicle through
an automatic car wash while the
•
Avoid driving over obstacles. The
compact spare tire is installed.
compact spare tire diameter is
smaller than the diameter of a
• Do not use the compact spare tire on
conventional tire and reduces the
any other vehicle because this tire
ground clearance approximately 25
has been designed especially for your
mm (1 inch).
vehicle.
•
Do not use the compact spare tire
• The compact spare tire’s tread life is
on any other wheels, nor should
shorter than a regular tire. Inspect
standard tires, snow tires, wheel
your compact spare tire regularly and
covers or trim rings be used with the
replace worn compact spare tires with
compact spare wheel.
the same size and design, mounted on
the same wheel.
• Do not use more than one compact
spare tire at a time.
NOTICE
When the original tire and wheel are
repaired and reinstalled on the vehicle,
the lug nut torque must be set correctly.
The correct lug nut tightening torque is
11~13 kgf·m (79~94 lbf·ft).
7-17
Emergency Situations
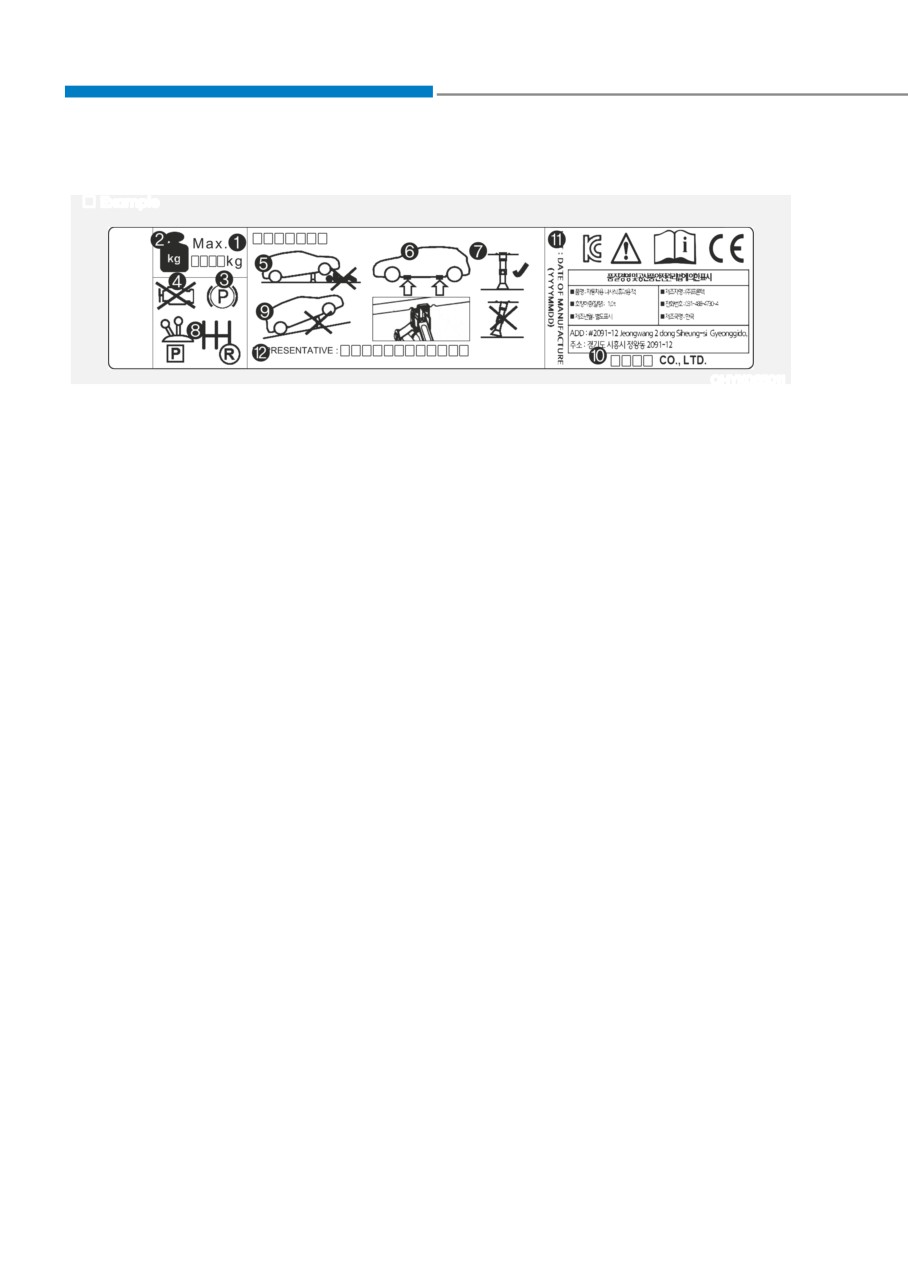
Jack label
Example
OHYK065011
The actual Jack label in the vehicle may differ from the illustration.
For more detailed specifications, refer to the label attached to the jack.
1. Model Name
8. Shift into Reverse gear on vehicles
2. Maximum allowable load
with manual transmission or move the
shift button to the P (Park) position on
3. When using the jack, set your parking
vehicles with automatic transmission.
brake.
9. The jack should be used on firm level
4. When using the jack, stop the engine.
ground.
5. Do not get under a vehicle that is
10. Jack manufacture
supported by a jack.
11. Production date
6. The designated locations under the
12. Representative company and address
frame
7. When supporting the vehicle, the base
plate of jack must be vertical under
the lifting point.
7-18
07
toWIng
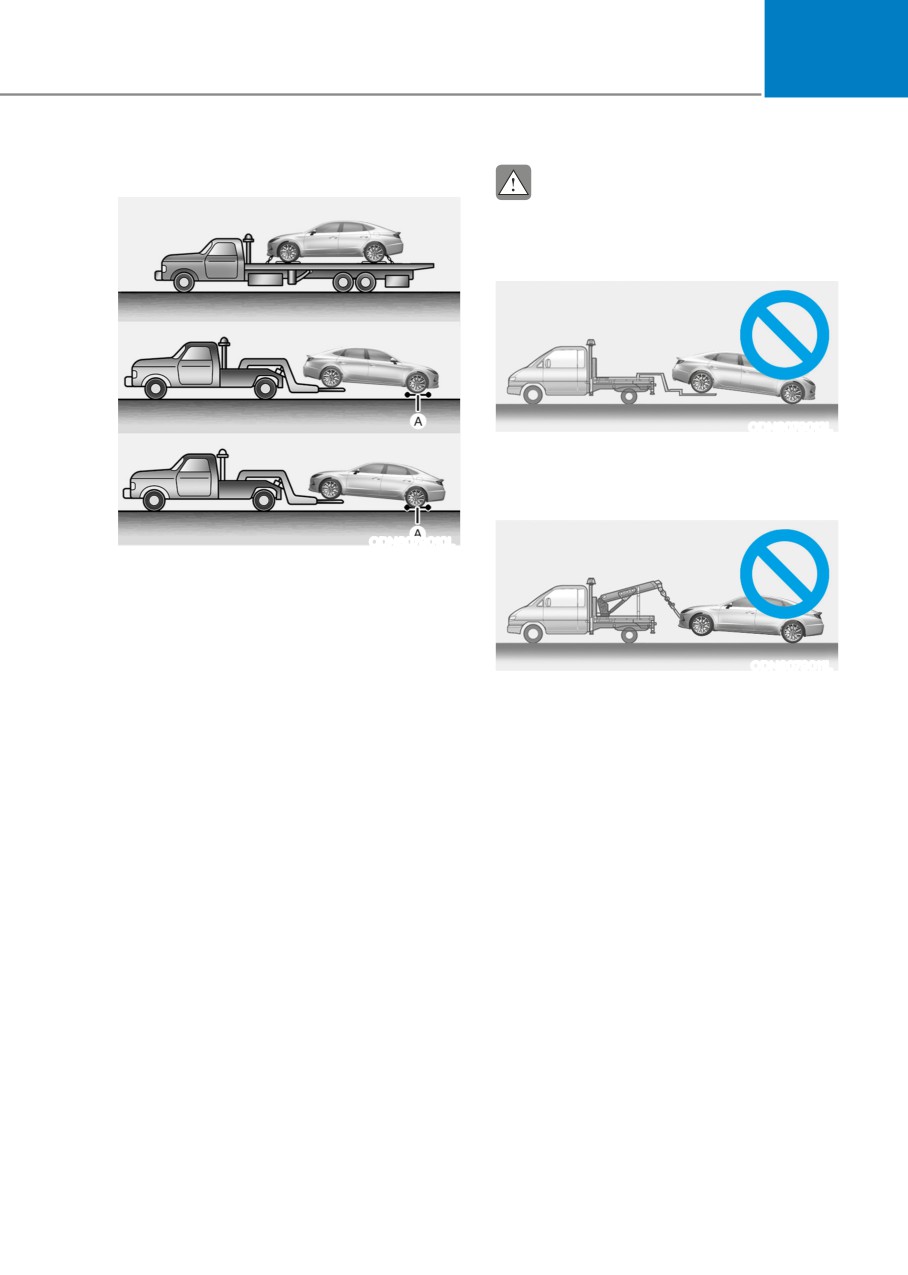
Towing Service
CAUTION
• Do not tow the vehicle with the front
wheels on the ground as this may
cause damage to the vehicle.
ODN8079012L
•
Do not tow with sling-type
equipment. Use a wheel lift or
flatbed equipment.
ODN8079010L
[A] : Dollies
If emergency towing is necessary,
we recommend having it done by
an authorized HYUNDAI dealer or a
commercial tow-truck service. Proper
lifting and towing procedures are
ODN8079011L
necessary to prevent damage to the
vehicle. The use of wheel dollies or
flatbed is recommended.
On 2WD vehicles, it is acceptable to
tow the vehicle with the rear wheels
on the ground (without dollies) and
the front wheels off the ground. If any
of the loaded wheels or suspension
components are damaged or the vehicle
is being towed with the front wheels on
the ground, use a towing dolly under the
front wheels.
When being towed by a commercial tow
truck and wheel dollies are not used,
the front of the vehicle should always be
lifted, not the rear.
7-19
Emergency Situations
Emergency Towing
WARNING
If towing is necessary, we recommend
If your vehicle is equipped with a
you have it done by an authorized
rollover sensor, place the ignition
HYUNDAI dealer or a commercial tow
switch in the LOCK/OFF or ACC position
truck service.
when the vehicle is being towed.
The side impact and curtain air bag
may deploy if the sensor detects the
situation as a rollover.
When towing your vehicle in an
emergency without wheel dollies:
1. Place the ignition switch in the ACC
position.
2. Place the shift button in N (Neutral).
3. Release the parking brake.
CAUTION
Failure to place the shift button in N
(Neutral) when being towed with the
front wheels on the ground can cause
internal damage to the transmission.
7-20
07
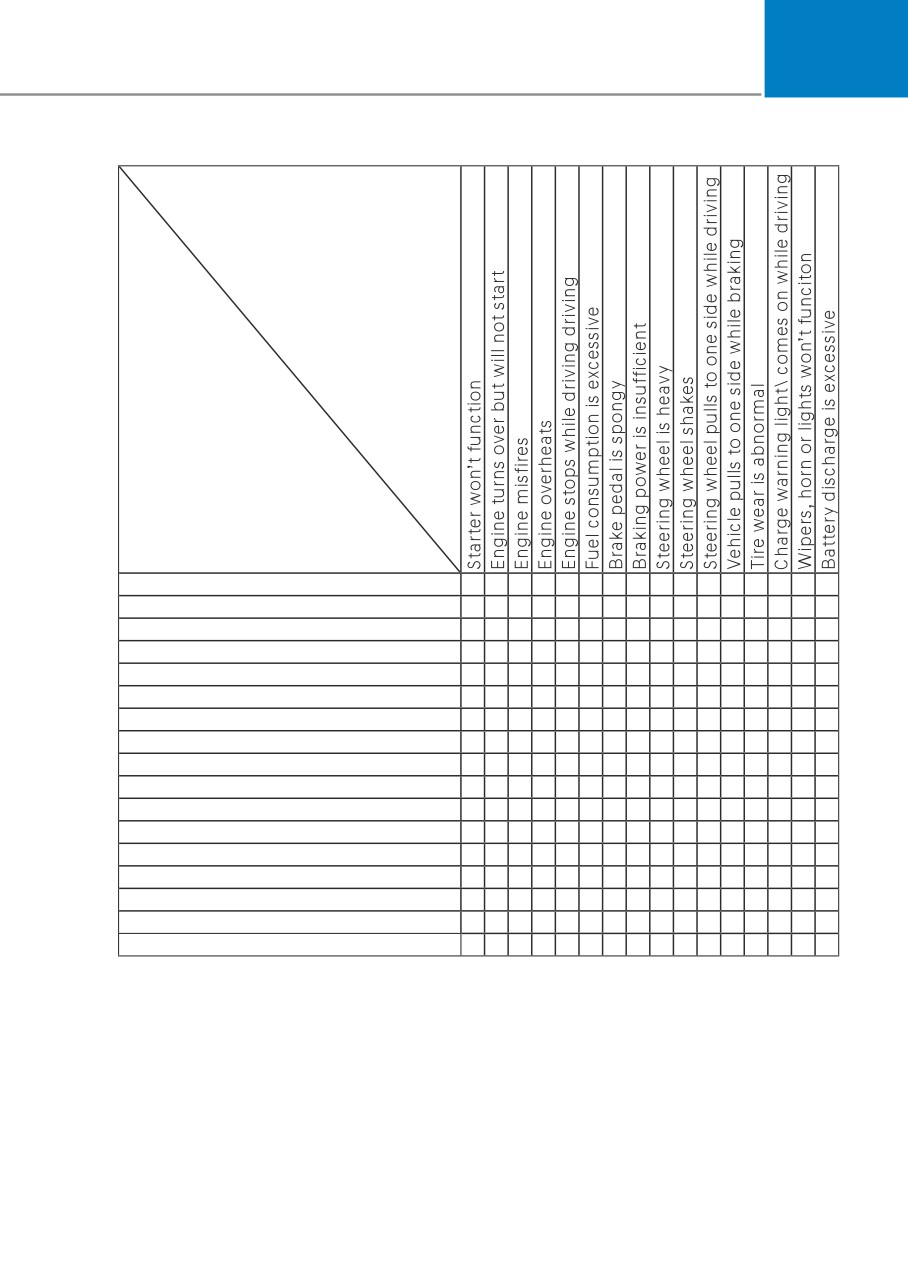
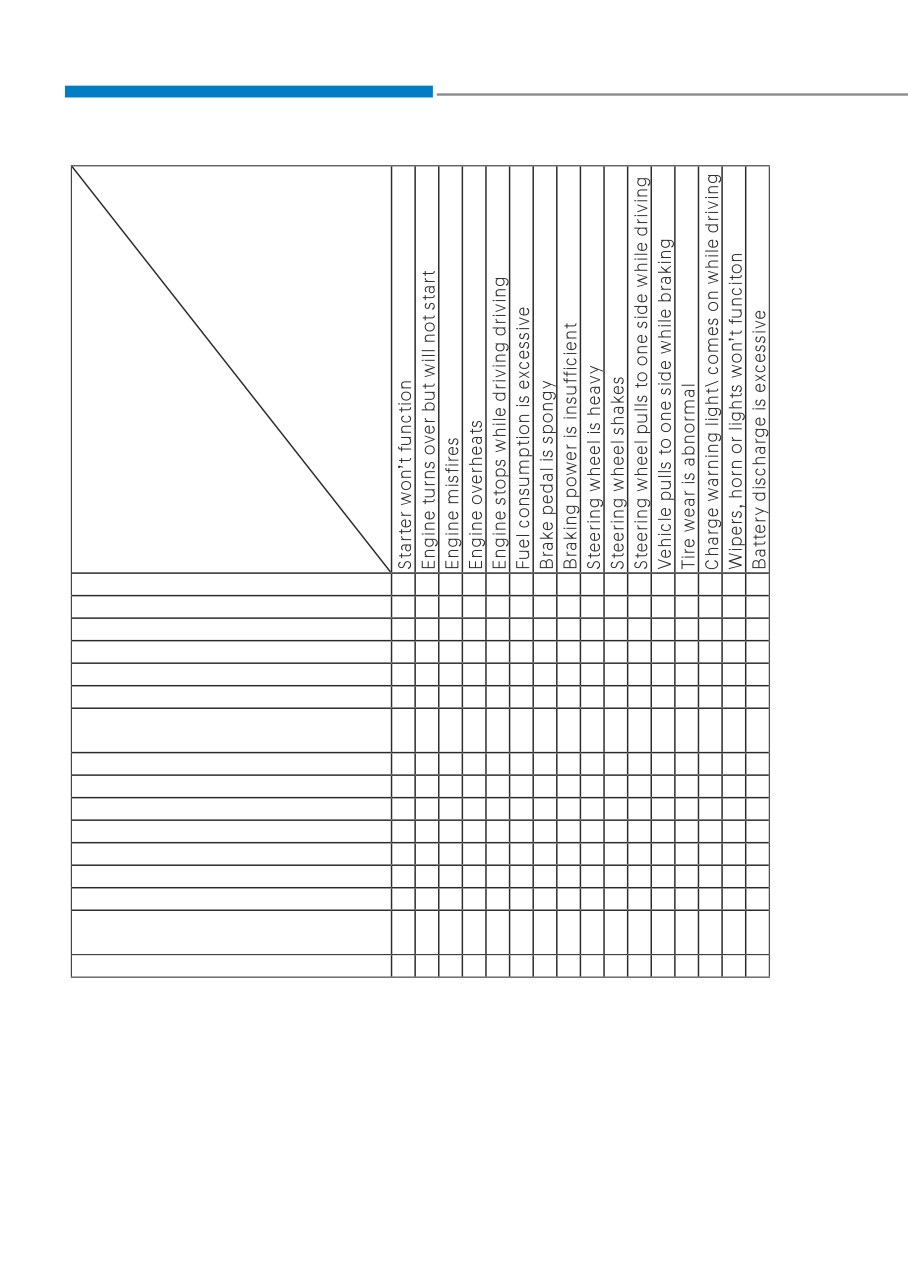
BasIC trouBleshootIng guIDe
SYMPTOM
PROBABLE CAUSE
Engine overheating
O
Low fuel level
O
O
Fuel lines clogged
O
O
Fuel pump defective
O
O
Strainer clogged
O
O
Rich mixture
O
O
O
Water intrusion into fuel
O
O
O
Coolant leakage
O
High idle speed
O
Engine oil insufficient or defective
O
O
Battery fluid shortage
O
O
Battery discharged
O
O
O
Battery terminal poor contact
O
O
Starter or ignition switch malfunction
O
Ignition timing incorrect
O
O
O
Spark plugs deteriorated
O
O
Spark plugs defective
O
7-21
Emergency Situations
SYMPTOM
PROBABLE CAUSE
Ignition circuit faulty
O
O
Ignition coil or condensor faulty
O
O
O
Distributor faulty
O
Alternator belt loose
O
O
O
O
O
Check fuses, bulbs or wiring
O
Brake dragging
O
O
Shift lever not positioned in
O
"P" or "N" range
Frequent driving in lower gear
O
Air intrusion into brake lines
O
Brake fluid insufficient
O
Brake disc and pads wet
O
O
Brake pad wear
O
O
Wheel alignment incorrect
O
O
O
O
O
O
Wheel balance incorrect
O
O
Tire pressure incorrect
O
O
O
O
(too low or high)
Tire size incorrect
O
7-22
8.Maintenance
Engine Compartment
8-3
Maintenance Services
8-5
Owner’s Responsibility
8-5
Owner Maintenance Precautions
8-5
Owner Maintenance
8-6
Owner Maintenance Schedule
8-6
Scheduled Maintenance Services
8-8
Maintenance Schedule (Smartstream G1.6 T-GDI)
8-8
Maintenance Schedule (Smartstream G2.5 GDI)
8-12
Maintenance Schedule (Smartstream G2.5 T-GDI)
8-16
Explanation of Scheduled Maintenance Items
8-20
Engine Oil
8-23
Checking the Engine Oil Level
8-23
Checking the Engine Oil and Filter
8-25
Engine Coolant
8-26
Checking the Engine Coolant Level
8-26
Changing Engine Coolant
8-28
Brake Fluid
8-29
Checking the Brake Fluid Level
8-29
Washer Fluid
8-30
Checking the Washer Fluid Level
8-30
Air Cleaner
8-31
Filter Replacement
8-31
Climate Control Air Filter
8-33
Filter Inspection
8-33
Filter Replacement
8-33
Wiper Blades
8-34
Blade Inspection
8-34
8
Blade Replacement
8-34
Battery
8-36
For Best Battery Service
8-36
Battery Recharging
8-37
Reset Features
8-37
Tires and Wheels
8-38
Tire Care
8-38
Recommended Cold Tire Inflation Pressures
8-38
Check Tire Inflation Pressure
8-39
Tire Rotation
8-40
Wheel Alignment and Tire Balance
8-40
Tire Replacement
8-41
Wheel Replacement
8-42
Tire Traction
8-42
Tire Maintenance
8-42
Tire Sidewall Labeling
8-42
Tire Terminology and Definitions
8-45
All Season Tires
8-48
Summer Tires
8-48
Snow Tires
8-48
Radial-Ply Tires
8-48
Fuses
8-50
Instrument Panel Fuse Replacement
8-51
Engine Compartment Panel Fuse Replacement
8-52
Fuse/Relay Panel Description
8-53
Light Bulbs
8-58
Headlamp, Parking Lamp, Daytime Running Light, Turn Signal Lamp,
Cornering Lamp and Side Marker
8-58
Side Repeater Lamp Replacement
8-59
Rear Combination Light Bulb Replacement
8-59
High Mounted Stop Lamp Replacement
8-61
License Plate Light Bulb Replacement
8-61
Interior Light Bulb Replacement
8-62
Appearance Care
8-64
Exterior Care
8-64
8
Interior Care
8-68
Emission Control System
8-70
08
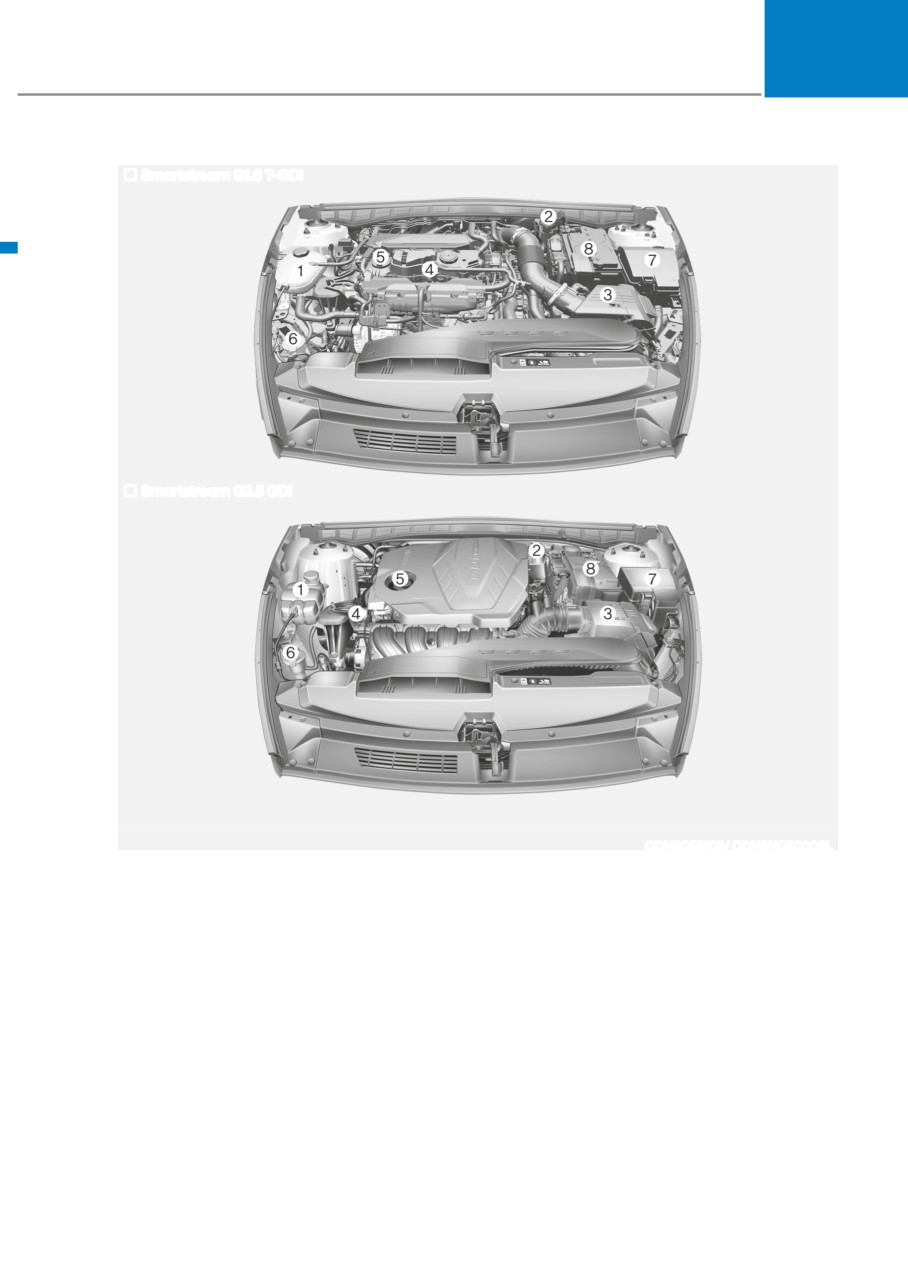
EnginE CompartmEnt
Smartstream G1.6 T-GDI
Smartstream G2.5 GDI
The actual engine room in the vehicle may differ from the illustration.
ODN8089103/ ODN8N080008L
1. Engine coolant reservoir
5. Engine oil filler cap
2. Brake fluid reservoir
6. Windshield washer fluid reservoir
3. Air cleaner
7. Fuse box
4. Engine oil dipstick
8. Battery
8-3
Maintenance
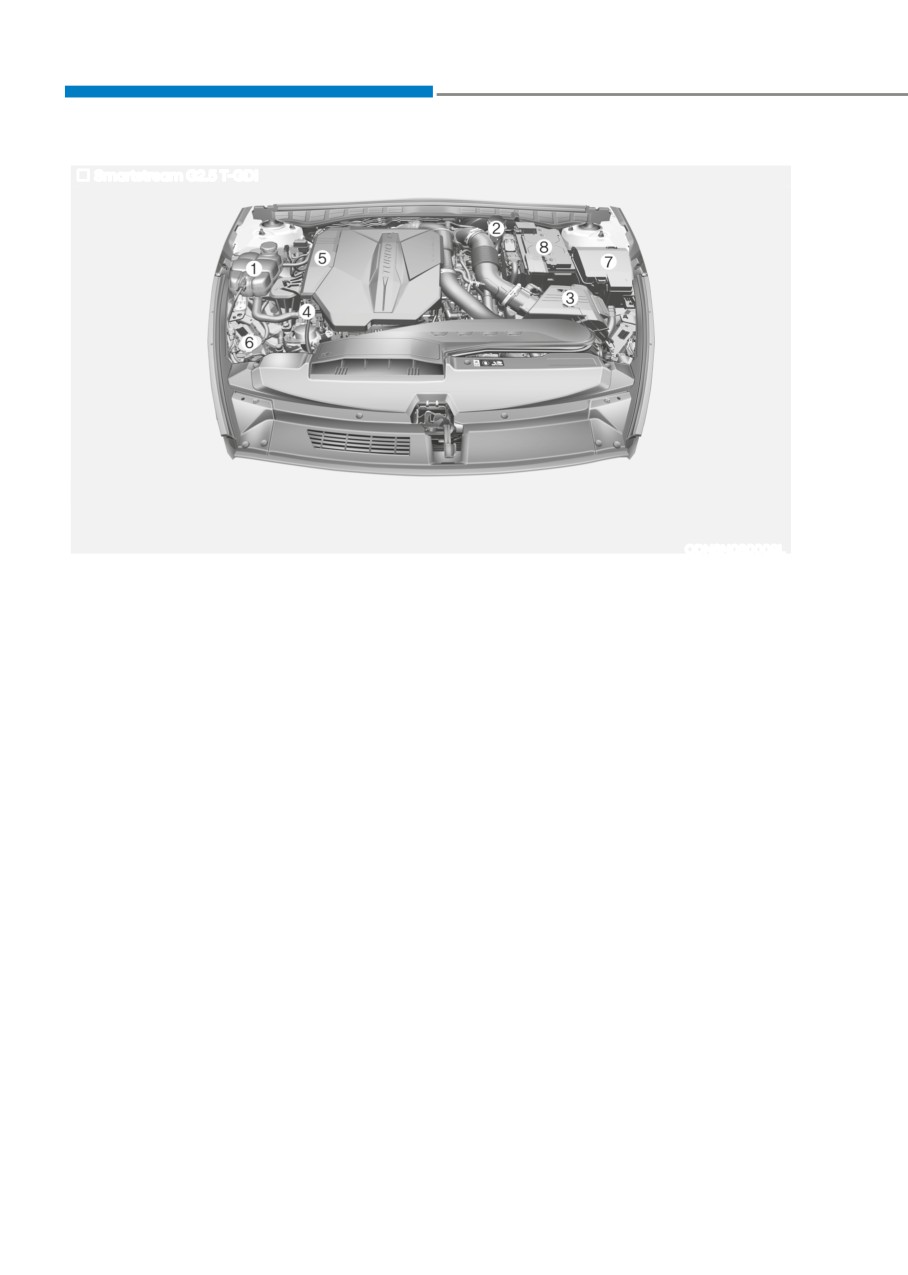
Smartstream G2.5 T-GDI
The actual engine room in the vehicle may differ from the illustration.
ODN8N080009L
1. Engine coolant reservoir
5. Engine oil filler cap
2. Brake fluid reservoir
6. Windshield washer fluid reservoir
3. Air cleaner
7. Fuse box
4. Engine oil dipstick
8. Battery
8-4
08
maintEnanCE SErviCES
You should exercise the utmost care
Owner Maintenance Precautions
to prevent damage to your vehicle and
Inadequate, incomplete or insufficient
injury to yourself whenever performing
servicing may result in operational
any maintenance or inspection
problems with your vehicle that could
procedures.
lead to vehicle damage, an accident, or
We recommend you have your
personal injury. This chapter provides
vehicle maintained and repaired by
instructions only for the maintenance
an authorized HYUNDAI dealer. An
items that are easy to perform. Several
authorized HYUNDAI dealer meets
procedures can be done only by an
HYUNDAI’s high service quality
authorized HYUNDAI dealer with special
standards and receives technical support
tools.
from HYUNDAI in order to provide you
Your vehicle should not be modified
with a high level of service satisfaction.
in any way. Such modifications may
adversely affect the performance, safety
Owner’s Responsibility
or durability of your vehicle and may, in
Maintenance service and record
addition, violate conditions of the limited
retention are the owner’s responsibility.
warranties covering the vehicle.
You should retain documents that show
proper maintenance has been performed
NOTICE
on your vehicle in accordance with
Improper owner maintenance during
the scheduled maintenance service
the warranty period may affect
charts shown on the following pages.
warranty coverage. For details, read
You need this information to establish
the separate Service Passport provided
your compliance with the servicing
with the vehicle. If you’re unsure about
and maintenance requirements of your
any service or maintenance procedure,
vehicle warranties.
have it done by an authorized HYUNDAI
Detailed warranty information is
dealer.
provided in your Service Passport.
Repairs and adjustments required as a
result of improper maintenance or a lack
of required maintenance are not covered.
8-5
Maintenance
ownEr maintEnanCE
The following lists are vehicle checks and
WARNING
inspections that should be performed
Performing maintenance work on a
by the owner or an authorized HYUNDAI
vehicle can be dangerous. If you lack
dealer at the frequencies indicated to
sufficient knowledge and experience or
help ensure safe, dependable operation
the proper tools and equipment to do
of your vehicle.
the work, have it done by an authorized
Any adverse conditions should be
HYUNDAI dealer.
brought to the attention of your dealer as
ALWAYS follow these precautions for
soon as possible.
performing maintenance work:
These Owner Maintenance vehicle
• Park your vehicle on level ground,
checks are generally not covered by
move the shift button into the P
warranties and you may be charged for
(Park) position, place the ignition
labor, parts and lubricants used.
switch in the LOCK/OFF position.
• Block the tires (front and back) to
Owner Maintenance Schedule
prevent the vehicle from moving.
When you stop for fuel:
Remove loose clothing or jewelry
• Check the coolant level in the engine
that can become entangled in
coolant reservoir.
moving parts.
• Check the windshield washer fluid
• If you must run the engine during
level.
maintenance, do so out doors or in
• Check the for low or under-inflated
an area with plenty of ventilation.
tires.
• Keep flames, sparks, or smoking
materials away from the battery and
fuel-related parts.
WARNING
Be careful when checking your engine
coolant level when the engine is hot.
This may result in coolant being blown
out of the opening and cause serious
burns and other injuries.
8-6
08
While operating your vehicle:
At least twice a year:
(i.e., every Spring and Autumn)
•
Note any changes in the sound of the
exhaust or any smell of exhaust fumes
• Check radiator, heater and air
in the vehicle.
conditioning hoses for leaks or
•
Check for vibrations in the steering
damage.
wheel. Notice if there is any increased
• Check windshield washer spray and
steering effort or looseness in the
wiper operation. Clean wiper blades
steering wheel, or change in its
with a clean cloth dampened with
straight-ahead position.
washer a fluid.
•
Notice if your vehicle constantly turns
• Check headlamp alignment.
slightly or “pulls” to one side when
• Check muffler, exhaust pipes, shields
traveling on smooth, level road.
and clamps.
•
When stopping, listen and check for
• Check the seat belts for wear and
unusual sounds, pulling to one side,
function.
increased brake pedal travel or “hard-
to-push” brake pedal.
At least once a year:
•
If any slipping or changes in the
•
Clean body and door drain holes.
operation of your transmission occurs,
check the transmission fluid level.
•
Lubricate door hinges and hood
hinges.
•
Check the automatic transmission P
(Park) function.
•
Lubricate door and hood locks and
latches.
•
Check the parking brake.
•
Lubricate door rubber weather strips.
•
Check for fluid leaks under your
vehicle (water dripping from the air
•
Lubricate door checker.
conditioning system during or after
•
Check the air conditioning system.
use is normal).
•
Inspect and lubricate automatic
transmission linkage and controls.
At least monthly:
•
Clean the battery and terminals.
• Check coolant level in the engine
•
Check the brake fluid level.
coolant reservoir.
• Check the operation of all exterior
lights, including the brake lights, turn
signals and hazard warning flashers.
• Check the inflation pressures of all
tires including the spare for tires that
are worn, show uneven wear, or are
damaged.
• Check for loose wheel lug nuts.
8-7
SCHEDULED maintEnanCE SErviCES
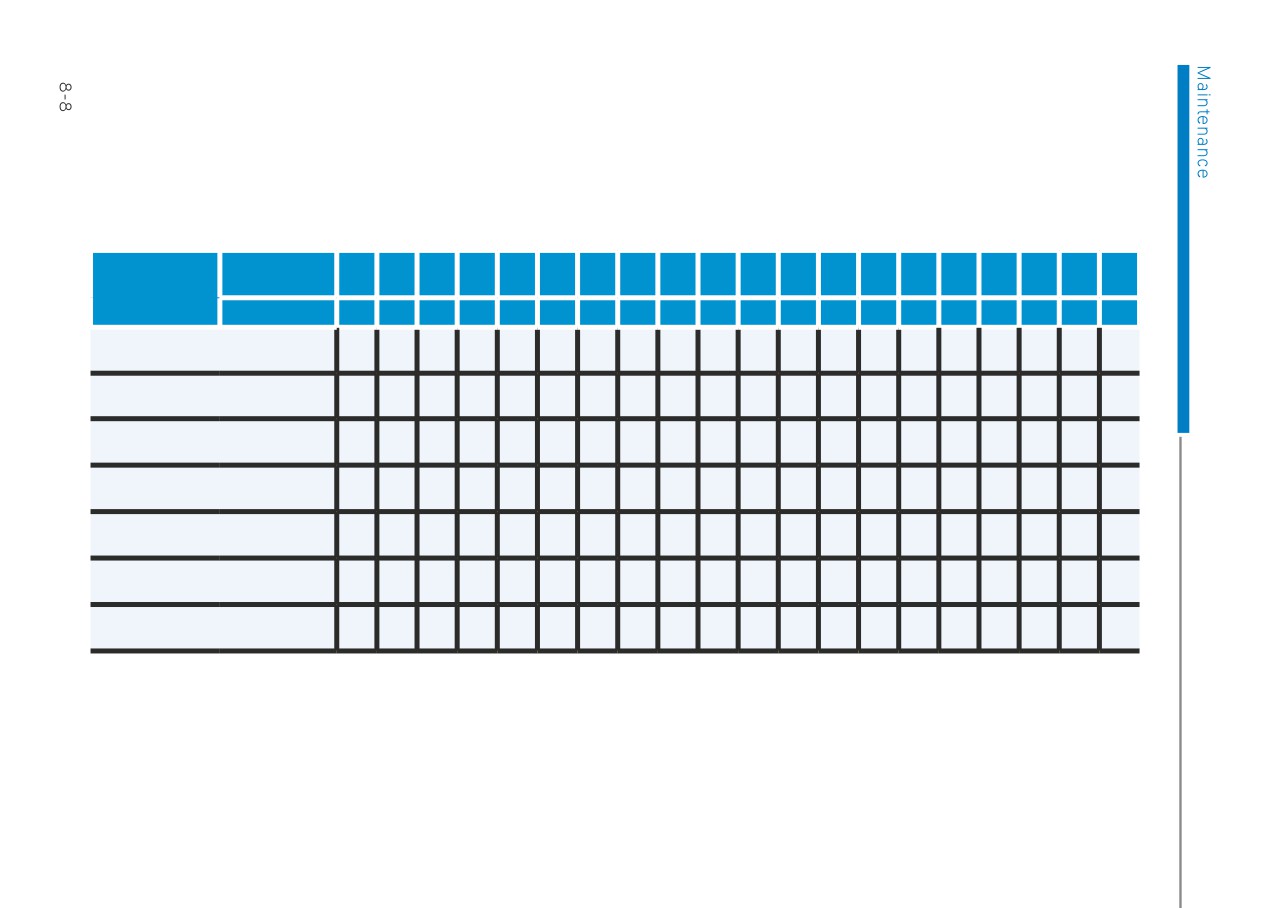
Maintenance Schedule (Smartstream G1.6 T-GDI)
The following maintenance services must be performed to ensure good emission control and performance. Keep
receipts for all vehicle emission services to protect your warranty. Where both mileage and time are shown, the frequency
of service is determined by whichever occurs first.
R : Replace
A : Add
S : Service
I : Inspect
L : Lubricate
r : Rotate
KILOMETERS X
8
16
24
32
40
48
56
64
72
80
88
96
104
112
120
128
136
144
152
160
1000
DESCRIPTION
MONTHS
6
12
18
24
30
36
42
48
54
60
66
72
78
84
90
96
102
108
114
120
Engine Oil And Filter
R
R
R
R
R
R
R
R
R
R
R
R
R
R
R
R
R
R
R
R
Replacement (Synthetic oil)
Steering gear box, linkage and
I
I
I
I
I
I
I
I
I
I
I
I
I
I
I
I
I
I
I
I
boots
Drive shafts and boots
I
I
I
I
I
I
I
I
I
I
I
I
I
I
I
I
I
I
I
I
Vacuum Hose
I
I
I
I
I
I
I
I
I
I
I
I
I
I
I
I
I
I
I
I
All Latch, Hinges and Locks
L
L
L
L
L
L
L
L
L
L
L
L
L
L
L
L
L
L
L
L
Rotate tire or perform seasonal
r
r
r
r
r
r
r
r
r
r
tire change
Fuel Injector Cleaner *1
A
A
A
A
A
A
A
A
A
A
*1 :
If TOP TIER Detergent Gasoline is not available, one bottle of Fuel Injector Cleaner is recommended. Fuel Injector Cleaners are
available from your authorized HYUNDAI dealer along with information on how to use them. Do not mix other Fuel Injector
Cleaners.
Maintenance Schedule (Smartstream G1.6 T-GDI) (CONT)
R : Replace
A : Add
S : Service
I : Inspect
L : Lubricate
r : Rotate
KILOMETERS X
8
16
24
32
40
48
56
64
72
80
88
96
104
112
120
128
136
144
152
160
DESCRIPTION
1000
MONTHS
6
12
18
24
30
36
42
48
54
60
66
72
78
84
90
96
102
108
114
120
Brake Inspection (front disc/
pads & calipers
and rear disc/pads & calipers/
shoes,
I
S
I
S
I
S
I
S
I
S
includes tire rotation)
Brake Service (includes parking
brake
inspection and tire rotation)
Brake Lines, Hoses and
I
I
I
I
I
I
I
I
I
I
Connections
Battery Condition
I
I
I
I
I
I
I
I
I
I
Suspension Mounting Bolts
I
I
I
I
I
I
I
I
I
I
Air Conditioning Refrigerant
I
I
I
I
I
I
I
I
I
I
Cooling System Hoses and
I
I
I
I
I
I
I
I
I
I
Connections
Exhaust Pipe and Muffler
I
I
I
I
I
I
I
I
I
I
Air intake hose
I
I
I
I
I
I
I
I
I
I
Climate Control Air Filter
R
R
R
R
R
R
R
R
R
R