Hyundai Santa Fe (2019 year). Instruction - part 4

Safety system of your vehicle
ISOFIX anchorage and top-teth-
WARNING
er anchorage (ISOFIX anchorage
system) for children
Do not attempt to install a Child
The ISOFIX system holds a Child
Restraint System using ISOFIX
Restraint System during driving and in
anchorages in the rear centre
an accident.This system is designed to
seating position. There are no
make installation of the Child Restraint
ISOFIX anchorages provided for
System easier and reduce the possi-
this seat. Using the outboard seat
bility of improperly installing your
anchorages, for the CRS installa-
Child Restraint System. The ISOFIX
tion on the rear centre seating
system uses anchors in the vehicle
position, can damage the anchor-
and attachments on the Child
* : if equipped
OTM038090R
ages.
Restraint System. The ISOFIX sys-
ISOFIX anchorages have been pro-
tem eliminates the need to use seat
vided in the left and right outboard
belts to secure the Child Restraint
rear seating positions. In addition,
System to the rear seats.
ISOFIX anchorages have been pro-
ISOFIX anchorages are metal bars
vided in the right outboard front pas-
built into the vehicle. There are two
senger seating position(if equipped).
lower anchors for each ISOFIX seat-
Their locations are shown in the illus-
ing position that will accommodate a
tration.
Child Restraint System with lower
attachments.
To use the ISOFIX system in your vehi-
cle, you must have a Child Restraint
System with ISOFIX attachments.
The Child Restraint System manu-
facturer will provide you with instruc-
tions on how to use the Child
Restraint System with its attach-
ments for the ISOFIX anchorages.
2-44

■ Front passenger seat
ISOFIX anchorages are located
Securing a Child Restraint
between the seatback and the seat
System with the “ISOFIX
cushion of the rear seat left and right
Anchorage System”
outboard seating positions, indicated
To install an i-Size or ISOFIX-compat-
by the symbols.
2
ible Child Restraint System in either of
In addition, ISOFIX anchorages are
the rear outboard seating positions
located between the seatback and
and the front passenger outboard
the seat cushion of the front passen-
seating positions (if equipped) :
ger seat outboard seating posi-
1. Move the seat belt buckle away
tions.(if equipped)
from the ISOFIX anchorages.
Their locations are shown in the illus-
2. Move any other objects away from
OTM038091L
tration.
the anchorages that could prevent
■ Rear passenger seat (2nd row)
To use the ISOFIX anchorages, push
a secure connection between the
the upper portion of the ISOFIX
Child Restraint System and the
anchorage cover.
ISOFIX anchorages.
3. Place the Child Restraint System
on the vehicle seat, then attach the
seat to the ISOFIX anchorages
according to the instructions provid-
ed by the Child Restraint System
manufacturer.
4. Follow the instructions of the Child
OTM038048L
Restraint System's manufacturer
for proper installation and connec-
[1] : ISOFIX Anchorage Position Indicator
(Type A-
,Type B-
),
tion of the ISOFIX attachments on
the Child Restraint System to the
[2] : ISOFIX Anchorage
ISOFIX anchorages.
2-45

Safety system of your vehicle
Securing a Child Restraint
• Type B
WARNING
System seat with “Top-tether
Anchorage” system
Take the following precautions
■ Front passenger seat
when using the ISOFIX system:
•
Read and follow all installation
instructions provided with
your Child Restraint System.
•
To prevent the child from reach-
ing and taking hold of unre-
tracted seat belts, buckle all
unused rear seat belts and
OTM038032L
retract the seat belt webbing
Top-tether anchorages for Child
behind the child. Children can
Restraint Systems are located on the
be strangled if a shoulder belt
OTM038093L
rear of the seatbacks and on the rear
becomes wrapped around their
■ 2nd row passenger seat
of the front passenger seatback (if
neck and the seat belt tightens.
• Type A
equipped).
•
NEVER attach more than one
Child Restraint System to a
single anchorage. This could
cause the anchor or attach-
ment to come loose or break.
•
Always have the ISOFIX sys-
tem inspected by your dealer
after an accident. An accident
can damage the ISOFIX system
and may not properly secure
OTM038032
the Child Restraint System.
2-46

WARNING
Take the following precautions
when installing the top-tether:
2
•
Read and follow all installation
instructions provided with
your Child Restraint System.
•
NEVER attach more than one
Child Restraint System to a
single ISOFIX top-tether
OTM038047
anchorage. This could cause
the anchorage or attachment
1. Route the Child Restraint System
to come loose or break.
top-tether strap over the seatback.
•
Do not attach the top-tether to
Placing the top tether strap, please
follow the instructions of the Child
anything other than the cor-
rect top-tether anchorage. It
Restraint System manufacturer.
may not work properly if
2. Connect the top-tether strap to the
attached to something else.
top-tether anchorage, then tighten
•
Child Restraint System anchor-
the top-tether strap according to the
ages are designed to withstand
instructions of your Child Restraint
only those loads imposed by
System's manufacturer to firmly
correctly fitted Child Restraint
attach the Child Restraint System to
System.
the seat.
Under no circumstances are
they to be used for adult seat
belts or harnesses or for attach-
ing other items or equipment to
the vehicle.
2-47

Safety system of your vehicle
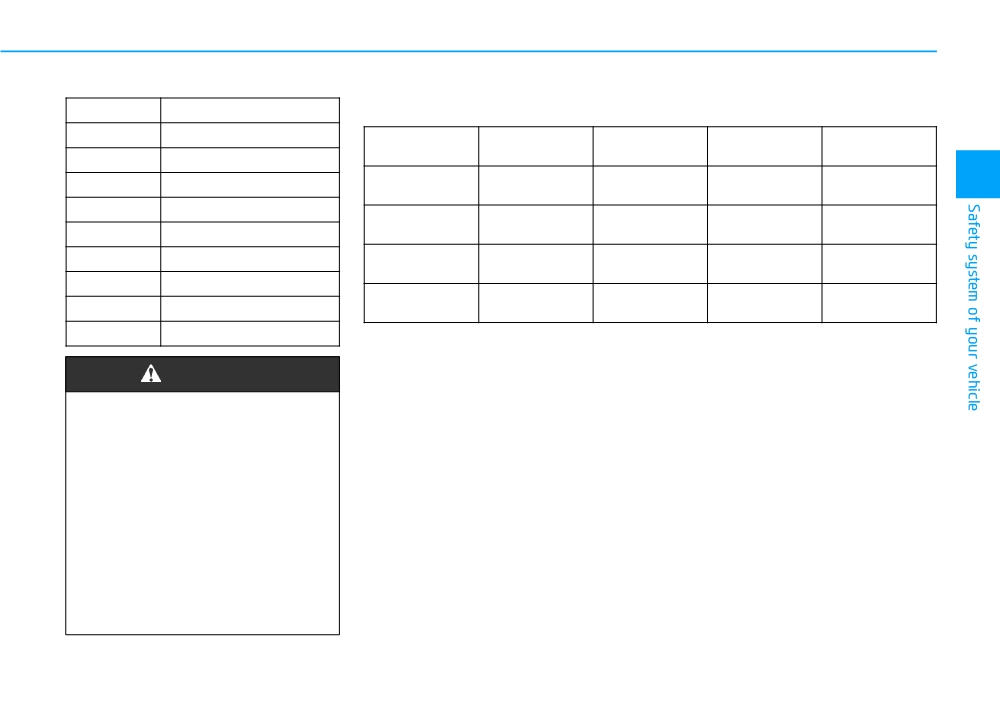
Suitability of each seating position for belted & ISOFIX Child Restraint Systems according to UN
regulations
(Information for vehicle users and CRS manufacturers)
• Yes : Suitable for fitment of the designated category of CRS
• No : Not suitable for fitment of the designated category of CRS
• ''-'' : Not applicable
Seating position
CRS categories
Seating position
1
2
3
4
5
6
7
8
9
Yes1)
Yes
Yes
Yes
Yes2)
Yes2)
F : Forward facing
Universal belted CRS
-
-
-
F, R
F, R
F, R
F, R
F, R
F, R
R : Rearward facing
Yes
Yes
Yes
i-size CRS
-
-
NO
NO
-
NO
F, R
F, R
F, R
ISOFIX infant CRS
ISOFIX
Yes
Yes
Yes
-
-
NO
NO
-
NO
(i.e. CRS for a baby)
(R1)
R
R
R
Carry cot
ISOFIX
-
-
NO
No
NO
No
NO
-
NO
(ISOFIX lateral facing CRS)
(L1,L2)
ISOFIX
Yes
Yes
Yes
ISOFIX toddler CRS - small
-
-
NO
NO
-
NO
(F2,F2X,R2,R2X)
F, R
F, R
F, R
ISOFIX toddler CRS -
ISOFIX
Yes
Yes
Yes
-
-
NO
NO
-
NO
large* (* : not booster seats)
(F3, R3)
F, R
F, R
F, R
Booster Seat - reduced
ISO CRF : B2
-
-
Yes
Yes
No
Yes
No
-
NO
Width
Booster Seat - full Width
ISO CRF : B3
-
-
No
No
No
No
No
-
NO
OTM038094R
Note 1) : You should adjust seatback or seat pumping (if equipped) properly.
Note 2) : The seating positions (number 7,9) are not suitable for fitment of child restraint system with support leg.
When placing CRS in seating position (number 7, 9), the 2nd row seat should be moved forward to allow installation and to avoid interference.
2-48
Seat number
Position in the vehicle
Recommended Child Restraint Systems
1
Front right
ECE-R44/R129
Mass group
Name
Manufacturer
Type of Fixation
Approval No.
2
Front centre
Cabriofix &
2
3
Front left
Group 0+
Maxi Cosi
ISOFIX
E4 04443907
Familyfix
4
2nd row left
ISOFIX and
Group I
Duo Plus
Britax Römer
E1 04301133
5
2nd row centre
top-tether
ISOFIX and
6
2nd row right
Group II
KidFix II XP
Britax Römer
E1 04301323
vehicle Belt
7
3nd row left
Group III
Dream
Nania/OSANN
vehicle Belt
E2 04 03011
8
3nd row centre
9
3nd row right
CRS Manufacturer information
Maxi Cosi Cabriofix & Familyfix http://www.maxi-cosi.com
WARNING
Britax Römmer http://www.britax.com
•
Never place a rearward facing
Osann https://www.osann.de
Child Restraint System on the
front passenger seat.
•
For semi-universal or vehicle
specific CRS (ISOFIX or belted
CRS), please see the vehicle
list provided in the manual of
CRS.
•
It is recommended to remove
the head restraint, when CRS
is unstable due to head
restraint.
2-49

Safety system of your vehicle
Securing a Child Restraint
System with a lap/shoulder belt
When not using the ISOFIX system,
all Child Restraint Systems must be
secured to a rear seat with the lap
part of a lap/shoulder belt.
OLMB033044
ODH033063
2. Fasten the lap/shoulder belt latch
with a lap/shoulder belt
into the buckle. Listen for the dis-
tinct “click” sound.
To install a Child Restraint System
on the rear seats, do the following:
1. Place the Child Restraint System
i
Information
on a rear seat and route the lap/
Position the release button so that it is
shoulder belt around or through
easy to access in case of an emergency.
the Child Restraint System, follow-
ing the Child Restraint System
manufacturer’s instructions. Make
sure the seat belt webbing is not
twisted.
2-50

If your Child Restraint System manu-
facturer recommends the use of a
top-tether with the lap/shoulder belt,
see page 2-46.
2
To remove the Child Restraint System,
press the release button on the buckle
and then pull the lap/shoulder belt out
of the Child Restraint System and
allow the seat belt to retract fully.
OLMB033046
3. Remove as much slack from the
belt as possible by pushing down
on the Child Restraint System
whilst feeding the shoulder belt
back into the retractor.
4. Push and pull on the Child Restraint
System to confirm that the seat belt
is holding it firmly in place.
2-51

Safety system of your vehicle
AIR BAG - SUPPLEMENTAL RESTRAINT SYSTEM
1. Driver’s front air bag
2. Passenger’s front air bag
3. Side air bag
4. Curtain air bag
5. Front passenger air bag ON/OFF
switch
The actual air bags in the vehicle may differ from the illustration.
OTM038049R
2-52

The vehicles are equipped with a
WARNING
Supplemental Air Bag System for the
driver’s seat and front passenger’s
AIR BAG SAFETY PRECAUTIONS
seats.
2
The front air bags are designed to
ALWAYS use seat belts and Child Restraint Systems - every trip,
supplement the three-point seat
every time, everyone! Even with air bags, you can be seriously injured
belts. For these air bags to provide
or killed in a collision if you are improperly belted or not wearing your
protection, the seat belts must be
seat belt when the air bag inflates.
worn at all times when driving.
NEVER place a child in any Child Restraint System or booster seat in
You can be severely injured or killed
the front passenger seat, unless the air bag is deactivated.
in an accident if you are not wearing
An inflating air bag could forcefully strike the infant or child causing
a seat belt. Air bags are designed to
serious or fatal injuries.
supplement seat belts, but do not
ABC - Always Buckle Children under age 13 in the back seat. It is the
replace them. Also, air bags are not
safest place for children of any age to ride. If a child age 13 or older
designed to deploy in every collision.
must be seated in the front seat, he or she must be properly belted
In some accidents, the seat belts are
and the seat should be moved as far back as possible.
the only restraint protecting you.
All occupants should sit upright with the seatback in an upright posi-
tion, centred on the seat cushion with their seat belt on, legs com-
fortably extended and their feet on the floor until the vehicle is parked
and the engine is turned off. If an occupant is out of position during
an accident, the rapidly deploying air bag may forcefully contact the
occupant causing serious or fatal injuries.
You and your passengers should never sit or lean unnecessarily
close to the air bags or lean against the door or centre console.
Move your seat as far back as possible from front air bags, whilst still
maintaining control of the vehicle.
2-53

Safety system of your vehicle
Where are the air bags?
Your vehicle is equipped with a
• Move your seat as far back as
Supplemental Restraint System
Driver’s and passenger’s front
possible from front air bags,
(SRS) and lap/shoulder belts at both
air bags
whilst still maintaining control
the driver and passenger seating
of the vehicle.
■ Driver’s front air bag
positions.
• Never lean against the door or
The SRS consists of air bags which
centre console.
are located in the centre of the steer-
ing wheel, in the driver’s side lower
• Do not allow the front passen-
crash pad below the steering wheel,
ger to place their feet or legs on
and the passenger's side front panel
the dashboard.
pad above the glove box.
•
No objects (such as crash pad
The air bags are labelled with the let-
cover, mobile phone holder,
ters “AIR BAG” embossed on the pad
cup holder, perfume or stickers)
covers.
should be placed over or near
the air bag modules on the
The purpose of the SRS is to provide
OTM038050R
steering wheel, instrument
the vehicle's driver and front passen-
■ Passenger’s front air bag
panel, windscreen glass, and
gers with additional protection than
the front passenger's panel
that offered by the seat belt system
above the glove box. Such
alone in case of a frontal impact of
objects could cause harm if the
sufficient severity.
vehicle is in a crash severe
enough to cause the air bags to
WARNING
deploy.
•
Do not attach any objects on
To reduce the risk of serious
the front windscreen and inside
injury or death from inflating front
mirror.
air bags, take the following pre-
cautions:
OTM038051R
• Seat belts must be worn at all
times to help keep occupants
positioned properly.
2-54

2
OTM038095E
OTM038053E
OTM038096E
Passenger’s front air bag ON/OFF
To deactivate the passenger’s front
To reactivate the passenger’s front
switch (if equipped)
air bag:
air bag:
The purpose of the switch is to dis-
Insert the key or a similar rigid device
Insert the key or a similar rigid device
able the passenger’s front air bag in
into the passenger’s front air bag
into the passenger’s front air bag
order to transport occupants who are
ON/OFF switch and turn it to the
ON/OFF switch and turn it to the ON
at increased risk for air bag-related
OFF position. The passenger air bag
position. The passenger air bag ON
injury due to age, size, or medical
OFF indicator (
) will illuminate and
indicator (
) will illuminate and stay
condition.
stay on until the passenger’s front air
on for 60 seconds.
bag is reactivated.
i
Information
The passenger’s front air bag ON/OFF
indicator illuminates for about 4 sec-
onds after the ignition switch is placed
in the ON position.
2-55

Safety system of your vehicle
Side air bags
WARNING
WARNING
Never allow an adult passenger
If the passenger’s front air bag
to ride in the front passenger
ON/OFF switch malfunctions,
seat when the passenger air
the following conditions may
bag OFF indicator is illuminat-
occur:
ed. During a collision, the air
•
The air bag warning light (
)
bag will not inflate if the indica-
on the instrument cluster will
tor is illuminated. Turn on the
illuminate.
passenger’s front air bag or
•
The passenger air bag OFF
have your passenger move to
indicator (
) will not illumi-
the rear seat.
nate and the ON indicator (
)
OTM038056
will come on and go off after
approximately
60 seconds.
The passenger’s front air bag
will inflate in a frontal impact
even though the passenger’s
front air bag ON/OFF switch is
set to the OFF position.
•
We recommend that a
HYUNDAI authorised repairer
inspect the passenger’s front
air bag ON/OFF switch and the
SRS air bag system as soon as
possible.
OTM038057
2-56

Your vehicle is equipped with a side air
•
Do not allow passengers to
•
Do not place any objects
bag in each front seat. The purpose of
lean their heads or bodies onto
between the door and the
the air bag is to provide the vehicle’s
doors, put their arms on the
seat. They may become dan-
driver and the front passenger with
doors, stretch their arms out of
gerous projectiles if the side
additional protection than that offered
2
the window, or place objects
air bag inflates.
by the seat belt alone.
between the doors and seats.
•
Do not install any accessories
The side air bags are designed to
•
Hold the steering wheel at the 9
on the side or near the side air
deploy during certain side impact col-
o’clock and 3 o’clock positions,
bags.
lisions, depending on the crash
to minimise the risk of injuries
severity, angle, speed and point of
•
Do not cause impact to the
to your hands and arms.
impact.
doors when the ignition switch
•
Do not use any accessory
is in the ON position as this
The side air bags on both sides of the
seat covers. This could reduce
may cause the side air bags to
vehicle are designed to deploy when a
or prevent the effectiveness
inflate.
rollover is detected by a rollover sen-
of the system.
•
If the seat or seat cover is
sor.
•
Do not hang other objects
damaged, we recommend that
The side air bags are not designed to
except clothes. In an accident
the system be serviced by a
deploy in all side impact or rollover
it may cause vehicle damage
HYUNDAI authorised repairer.
situations.
or personal injury especially
when air bag is inflated.
WARNING
•
Do not place any objects over
the air bag or between the air
To reduce the risk of serious
bag and yourself. Also, do not
injury or death from an inflating
attach any objects around the
side air bag, take the following
area the air bag inflates such
precautions:
as the door, side door glass,
• Seat belts must be worn at all
front and rear pillar.
times to help keep occupants
positioned properly.
2-57

Safety system of your vehicle
Curtain air bags
They are designed to help protect
•
Properly secure Child Restraint
the heads of the front seat occupants
System as far away from the
and the rear outboard seat occu-
door as possible.
pants in certain side impact colli-
sions.
•
Do not place any objects over
the air bag. Also, do not attach
The curtain air bags are designed to
any objects around the area the
deploy during certain side impact
air bag inflates such as the
collisions, depending on the crash
door, side door glass, front and
severity, angle, speed and impact.
rear pillar, roof side rail.
The curtain air bags on both sides of
•
Do not hang other objects
the vehicle are designed to deploy
except clothes, especially
when a rollover is detected by a
hard or breakable objects.
rollover sensor.
OTM038058
In an accident, it may cause
The curtain air bags are not
vehicle damage or personal
designed to deploy in all side impact
injury.
or rollover situations.
•
Do not allow passengers to
lean their heads or bodies
WARNING
onto doors, put their arms on
the doors, stretch their arms
To reduce the risk of serious
out of the window, or place
injury or death from an inflating
objects between the doors
curtain air bag, take the follow-
and seats.
ing precautions:
• All seat occupants must wear
•
Do not open or repair the side
curtain air bags.
OTM038059
seat belts at all times to help
keep occupants positioned
Curtain air bags are located along
properly.
both sides of the roof rails above the
front and rear doors.
2-58

How does the air bags system
(10) Side pressure sensors
SRS warning light
operate?
(11) Retractor pre-tensioner (rear)
(if equipped)
(12) Passenger’s front air bag OFF
2
indicator (front passenger's seat
only)
The SRS (Supplemental Restraint
(13) Passenger’s front air bag
System) air bag warning light on the
ON/OFF switch
instrument panel displays the air bag
symbol depicted in the illustration.
The SRSCM continually monitors all
The system checks the air bag elec-
SRS components whilst the ignition
trical system for malfunctions. The
switch is ON to determine if a crash
light indicates that there is a potential
impact is severe enough to require
problem with your air bag system,
OTM038084E
air bag deployment or pre-tensioner
which could include your side and/or
The SRS consists of the following
seat belt deployment.
curtain air bags used for rollover pro-
tection.
components:
(1) Driver's front air bag module
(2) Passenger's front air bag module
(3) Side air bag modules
(4) Curtain air bag modules
(5) Retractor pre-tensioner (front)
(6) Air bag warning light
(7) SRS control module (SRSCM)/
Rollover sensor
(8) Front impact sensors
(9) Side impact sensors
2-59
Safety system of your vehicle
During a moderate to severe frontal
•
Air bag deployment depends on a
WARNING
collision, sensors will detect the vehi-
number of factors including vehicle
cle’s rapid deceleration. If the rate of
speed, angles of impact and the
If your SRS malfunctions, the
deceleration is high enough, the con-
density and stiffness of the vehicles
air bag may not inflate properly
trol unit will inflate the front air bags,
or objects which your vehicle
during an accident increasing
at the time and with the force needed.
impacts during a collision. The
the risk of serious injury or
determining factors are not limited
The front air bags help protect the driv-
death.
er and front passenger by responding
to those mentioned above.
If any of the following condi-
to frontal impacts in which seat belts
•
The front air bags will completely
tions occur, your SRS is mal-
alone cannot provide adequate
inflate and deflate in an instant. It is
functioning:
restraint. When needed, the side air
virtually impossible for you to see
• The light does not turn on for
bags help provide protection in the
the air bags inflate during an acci-
approximately six seconds
event of a side impact or rollover by
dent. It is much more likely that you
when the ignition switch is in
supporting the side upper body area.
will simply see the deflated air bags
the ON position.
hanging out of their storage com-
• Air bags are activated (able to inflate
partments after the collision.
• The light stays on after illumi-
if necessary) only when the ignition
nating for approximately six
switch is in the ON position.
•
In addition to inflating in serious
seconds.
side collisions, vehicles equipped
• Air bags inflate in the event of certain
• The light comes on whilst the
frontal or side collisions to help pro-
with a rollover sensor, side and/or
curtain air bags will inflate if the
vehicle is in motion.
tect the occupants from serious
sensing system detects a rollover.
• The light blinks when the
physical injury.
When a rollover is detected, curtain
engine is running.
• There is no single speed at which the
air bags will inflate. Generally, air bags
air bags will remain inflated longer
We recommend that a HYUNDAI
to help provide protection from ejec-
authorised repairer inspect the
are designed to inflate based upon
the severity of a collision and its direc-
tion, especially when used in con-
SRS as soon as possible if any
junction with the seat belts.
of these conditions occur.
tion. These two factors determine
whether the sensors produce an elec-
tronic deployment/inflation signal.
2-60