Hyundai Equus (2016 year). Instruction - part 21

What to do in an emergency
06
This device complies with Part
WARNING
15 of the FCC rules.
- Protecting TPMS
Operation is subject to the following
two conditions:
Arbitral handling, modification
and disabling of the TPMS may
1. This device may not cause harmful
undermine the TPMS perform-
interference, and
ance to warn the driver of the
2. This device must accept any inter-
low tire pressures or the TPMS
ference received, including inter-
malfunction. Arbitral handling,
ference that may cause undesired
modification and disabling of
operation.
the TPMS components may
invalidate your warranty of that
NOTICE
part.
Changes or modifications not
expressly approved by the party
responsible for compliance could
void the user’s authority to oper-
ate the equipment.
6-11

What to do in an emergency
IF YOU HAVE A FLAT TIRE
Jack and tools
WARNING
- Changing tires
•
Never attempt to change tires
in the traffic lanes of a road or
highway.
•
Always drive the vehicle com-
pletely off the road or onto the
shoulder before changing a
tire. The jack should be used
on a level and firm ground.
When you cannot find this
OVI065004N
level and firm place off the
road, call a towing service
The jack, jack handle, and wheel lug
company for assistance.
nut wrench are stored in the luggage
compartment. Pull up the luggage
•
Always check the jack direc-
box cover to find those equipment.
tion - in the correct front and
rear positions. Never use the
bumper or any other parts of
(1) Jack handle
the vehicle for additional jack-
(2) Jack
ing-up support.
(3) Wheel lug nut wrench
•
The vehicle may roll off the
jack, causing a serious injury
Jacking instructions
or death. Never place any part
of a person's body under-
The jack is provided for emergent tire
neath a vehicle, while jacking
changing only.
up the vehicle; use vehicle
To prevent the jack from “rattling”
support stands.
inside while driving, store it properly.
•
Do not start or run the engine,
Follow jacking instructions to prevent
while jacking up the vehicle.
a possible personal injury.
•
Do not allow anyone to remain
inside, while jacking up the
vehicle.
•
Keep all children in a safe
place away from the road and
from the vehicle to be jacked
up.
6-12
What to do in an emergency
06
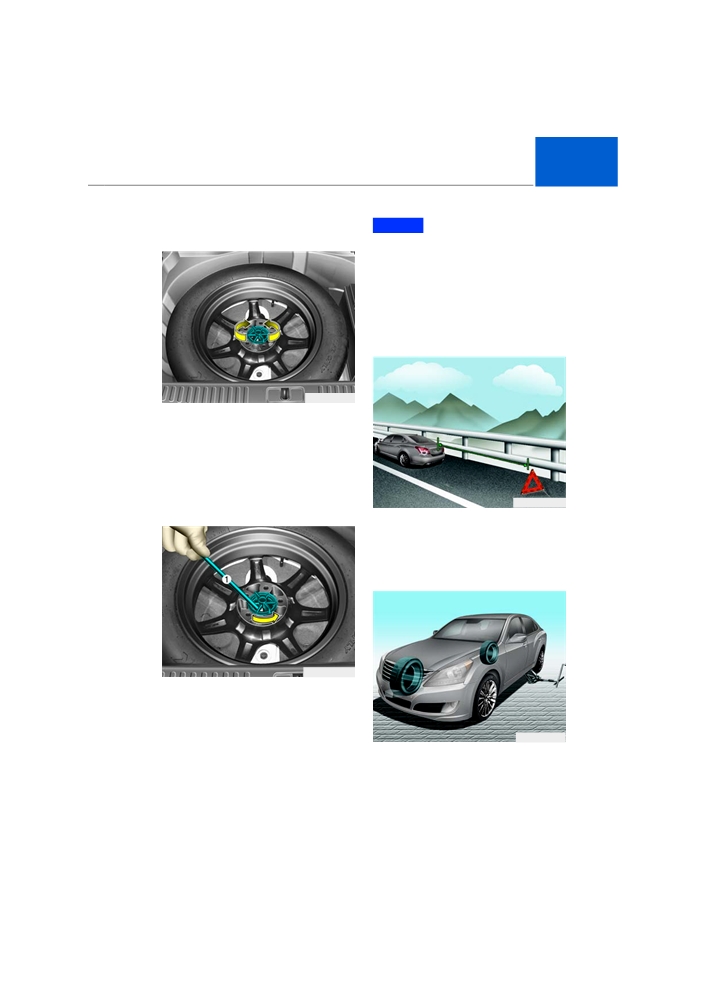
Removing and storing the
NOTICE
spare tire
When you remove or store the
spare tire, do not touch or hit the
battery with the spare tire.
Touching or hitting of the battery
may cause failure of electrical cir-
cuits.
Changing tires
OVI065005N
Unscrew the hold-down wing bolt in
a counterclockwise direction to
remove the tire.
Screw it in the clockwise direction to
store the spare tire.
To prevent the spare tire and tools
from “rattling” inside while driving,
OVI065001N
properly store them.
1.Park the vehicle on a level surface,
and firmly set the parking brake.
2.Set the shift lever in P(Park).
3.Press ON the hazard warning
flasher.
OVI065033N
When it is too tight to loosen the
hold-down wing bolt by hand, you
can easily loosen it, using the Jack
handle.
OVI065007N
1.Put the Jack handle (1) in the hold-
down wing bolt.
4.Take out the wheel lug nut wrench,
jack, jack handle, and spare tire
2.Unscrew the hold-down wing bolt
from the vehicle.
in a counterclockwise direction
with the Jack handle, utilizing the
principles of the lever and fulcrum.
6-13

What to do in an emergency
5.Block both the front and rear parts
of the wheel by putting a prop in
the diagonal position.
WARNING
- Changing a tire
• To prevent vehicle movement
while changing a tire, always
fully set the parking brake,
and block the wheel by put-
ting a prop in the diagonal
OVI065010N
direction.
7.Place the jack in the front or rear
• We recommend that the
jacking positions, closest to a tire,
wheels be blocked, and that
which is to be replaced. Place the
no person remain, while jack-
jack under the intended place.
ing up a vehicle.
Those intended places should be
the plates welded to the frame with
two tabs. a raised dot to index with
the jack.
WARNING
- Jack location
To reduce a possible injury, only
use the jack provided in the
vehicle and in the correct jack
position. Never use any other
parts of the vehicle for addition-
al jacking-up support.
OVI065009N
6.Loosen the wheel lug nuts in a
NOTICE
counterclockwise direction, in the
numerical order, as shown in the
Carefully place the jack, not to
illustration. Do not remove any nut
damage the plastic guard. When
until the tire has been raised off the
you place the jack under the plas-
ground.
tic guard and jack up the vehicle,
the plastic guard may be dam-
aged.
6-14

What to do in an emergency
06
WARNING
Wheels may have sharp edges.
Carefully handle them to avoid a
possible severe injury. Before
installing wheels into place,
dust off any substances from
the hub or wheel (i.e. mud, tar,
gravel, etc., which may stick
solid against the hub).
When a wheel is unsecurely or
OVI065101N
loosely installed on the hub, the
8.Insert the jack handle into the jack,
wheel nuts may become loose,
turn it in a clockwise direction, and
causing loss of a wheel. Loss of
raise the vehicle until the tire just
a wheel may result in loss of
lifts above the ground. This would
vehicle control, causing a seri-
be approximately 30 mm (1.2 in).
ous injury or death.
Before removing the wheel lug
nuts, make sure that the vehicle is
stationary without a possibility of
10. To reinstall a wheel, fit its hole
any movement or skid.
onto the studs, screw the wheel
nuts, and tighten them. The nuts
9.Loosen the wheel nuts and then
should be screwed with a small-
remove them with your fingers.
diameter end in an inward direc-
Slide the wheel off the studs and
tion. Lightly jiggle the tire to
lay it on a flat ground to prevent
check its secure installment. If
rolling away. To install the wheel on
necessary, tighten the nuts with
the hub, pick up the spare tire, fit
your fingers again.
the studs into the holes, and screw
them. When it is difficult, slightly tip
11. Lower the vehicle onto the
the wheel, fitting the top wheel hole
ground by rotating the wheel nut
with its top stud. Then, shake the
wrench in a counterclockwise
wheel back and forth until the
direction.
wheel slide off other studs.
6-15

What to do in an emergency
After changing a wheel, always put
the flat tire in place and place the
jack and other tools in the proper
storage locations.
CAUTION
When your vehicle uses metric
threads for the wheel studs and
nuts, the same nuts should be
used after removal
- or, if
OVI065011N
replaced, the nuts of the same
Put the wrench as shown in the
metric threads and the chamfer
above illustration, and tighten the
configuration
are
used.
wheel nuts. Make sure the sockets
Tightening a non-metric thread
are completely tightened over the
nut on a metric stud or vice
nuts. Do not step on the wrench han-
versa may lead to a loose wheel
dle, neither use an extension pipe
securement to the hub, damag-
over the wrench handle. Go around
ing the stud and requiring
the wheel nuts to securely tight.
another stud/nut replacement.
Then, double-check the tightness of
Note that most lug nuts do not
each nut. After changing wheels by
have metric threads. Pay
yourself, immediately have an
extreme attention to the thread
authorized EQUUS dealer tighten
type when installing the lug
the wheel nuts with a proper torque.
nuts or wheels, which are not
yet authorized. When in doubt,
consult an authorized EQUUS
Wheel nut tightening torque:
dealer.
Steel wheel & aluminum alloy wheel:
65~79 lb·ft (9~11 kg·m)
WARNING
When you have a tire gauge, remove
the valve cap and check the air pres-
- Wheel studs
sure. When it is under-inflated than
When a stud is damaged, it may
recommended, slowly drive to the
lose its ability to retain a wheel.
nearest service station and inflate
This may lead to loss of the
the tire to the correct pressure. When
wheel and a collision, resulting
it is over-inflated, deflate the tire to
in a serious injury.
the proper pressure. Always close
the valve cap after checking or
adjusting a tire pressure. When the
cap is not closed, air may leak out
from the tire. When you lose a valve
cap, immediately buy a new one and
close the valve.
6-16

What to do in an emergency
06
To prevent the jack, jack handle,
wheel lug nut wrench and spare tire
WARNING
from rattling inside a vehicle while
A compact spare tire is for
driving, store them in a proper place.
emergency use only. Do not
drive your vehicle on this com-
WARNING
pact spare at a speed over 50
mph (80 km/h). Replacement
- Inadequate spare tire pressure
with a proper regular tire should
Immediately check the inflation
immediately be done to avoid
pressures of a spare tire after
failure of the spare tire, possibly
installment. If necessary, adjust
leading to a personal injury or
it to the recommended pres-
death.
sure. Refer to
“Tires and
wheels” in the chapter 8.
A compact spare tire should be inflat-
ed to 60 psi (420 kPa).
Important - use of compact
spare tire
i
Information
Your vehicle is equipped with a com-
pact spare tire. This compact spare
Check the inflation pressure after
tire takes up less space than an orig-
installing a spare tire. Adjust its pres-
inal one. This tire is smaller than an
sure to the recommended level, if nec-
original one, and is designed for tem-
essary.
porary use only.
When using a compact spare tire,
NOTICE
take the following precautions:
• You should carefully drive when
• Under no circumstances should a
a compact spare tire is in use.
driving speed exceed 50 mph (80
The compact spare tire should
km/h). A higher speed may dam-
immediately be replaced with a
age the tire.
proper regular tire.
• You should drive slowly enough to
• Driving on more than one com-
avoid all hazards in accordance of
pact spare tire is not recom-
road conditions. Any road hazard,
mended.
such as a pothole or debris, may
seriously damage a compact
spare.
• Any continuous driving on a spare
tire may result in tire failure, loss of
vehicle control, and a possible per-
sonal injury.
• Do not exceed the vehicle’s maxi-
mum weight capacity or the load
capacity, which is detailed on a
side of a compact spare tire.
6-17
What to do in an emergency
•
Avoid driving over obstacles. A
NOTICE
compact spare tire diameter is
When a tire or a wheel is repaired
smaller than one of an original tire,
and the ground clearance is short-
or reinstalled, the wheel nut
torque must be correctly set to
er by approximately
1 inch
(25
mm). This may damage you vehi-
prevent any wheel vibrations. The
correct wheel nut torque is 65 ~ 79
cle.
lb-ft (9 ~ 11 kg.m).
•
Do drive through an automatic car
wash while the compact spare tire
is installed.
•
Do not use tire chains on a com-
pact spare tire. Because of the size
difference, a tire chain will not tight-
ly fit. This may result in loss of the
chain and damage the vehicle.
•
Do not use your compact spare tire
on any other vehicles. This com-
pact spare tire is designed exclu-
sively for your vehicle.
•
The tread life of a compact spare
tire is shorter than other regular
tires. Inspect your compact spare
tire on a regular basis, and, if worn
out, replace it with the one of the
same size and the same design.
•
A compact spare tire should not be
used on any other wheels, nor
should a compact spare wheel be
used for standard tires, snow tires,
snow tire wheel covers or snow tire
trim rings. This attempt may dam-
age the above items or other com-
ponents.
•
Do not use more than one compact
spare tire at the same time.
•
Do not tow a trailer while the com-
pact spare tire is installed.
6-18

What to do in an emergency
06
Jack label
■ Example
• Type A
OHYK065010
• Type B
OHYK065011
• Type C
OHYK064002
❈ The actual Jack label may differ from the illustration. For more detailed
information, check the label on the jack.
1. Model Name
8. Set the shift lever in R(Reverse)
2. Maximum allowable load
for the manual transmission, or set
the shift lever in P(Park) for the
3. When using the jack, set your
automatic transmission.
parking brake.
9. The jack should be used on a firm
4. When using the jack, stop the
level ground.
engine.
10. Jack manufacturing information
5. Do not go under a vehicle while
11. Production date
jacking up the vehicle.
12. Representative company and
6. The correct jack position under the
address
frame
7. The base plate of jack must be
vertical under the lifting point,
while jacking up the vehicle.
6-19

What to do in an emergency
TOWING
Towing service
A
B
dolly
OVI065022L
C
i
Information
When you tow the vehicle as shown in
the illustration (A), the cable should
be secured to the vehicle towing hook
OVI065012N
as shown in the illustration (1).
If necessary, we recommend towing
When you use chains or cables to lash
your vehicle by an authorized
down your vehicle, the lashing angle
EQUUS dealer or a commercial tow-
must be 45°, as shown in the illustra-
truck service. Proper lifting and tow-
tion (2).
ing procedures are necessary to pre-
Do not over-tighten the lashing strap
vent damage to your vehicle. The use
or cables. Otherwise, this may damage
of wheel dollies or flatbed is recom-
your vehicle.
mended.
It is acceptable to tow the vehicle
with the rear wheels off the ground,
while dragging the front wheels
(without a dolly).
When any of the loaded wheels or
suspension components is dam-
aged, or when the rear wheels have
the possibility of dragging on the
ground, use a towing dolly under the
rear wheels.
When the wheel dolly is not
equipped in a tow truck, must lift the
rear wheels, not the front wheel.
6-20

What to do in an emergency
06
OVI065014N
OVI065102N
NOTICE
When the ECS malfunction indica-
tor illuminates with no air in the
suspension, the vehicle height is
very low. Thus, do not drive the
vehicle to protect it from any pro-
OVI065013N
jections on the ground. Tow your
vehicle to an authorized EQUUS
CAUTION
dealer and have the system
• Do not tow the vehicle, drag-
checked. You should tow the vehi-
ging the rear wheels on the
cle as shown in the illustration.
ground. This may damage the
vehicle.
• Do not tow with a sling-type
equipment. Use a wheel lift or
a flatbed.
When emergently towing your vehi-
cle without a wheel dolly:
1.Set the Engine Start/Stop Button in
the ACC position.
2.Place the shift lever in N (Neutral).
OVI065103N
3.Release the parking brake.
When loading the vehicle onto the
tow truck, the loading slope angle (1)
should be less than 6°.
CAUTION
Failure to set the shift lever in
N(Neutral) may cause internal
damage of the transmission.
6-21

What to do in an emergency
Removable towing hook
Emergency towing
(if equipped)
■ Front
■ Front
OVI065018N
OVI065016N
■ Rear
■ Rear
OVI065019N
OVI065017N
If necessary, we recommend tow-
1.Open the trunk, and take the tow-
ing your vehicle by an authorized
ing hooks out from the tool case.
EQUUS dealer or a commercial
tow truck service.
2.Open the cover by pressing the
lower part on the front or rear
bumper.
When towing service is unavailable
3.Install the towing hook by rotating it
in an emergency, your vehicle may
in a clockwise wise until it is
be temporarily towed using a cable
securely installed.
or chain secured to the emergency
towing hook under the front (or the
4.After use, remove the towing hook
rear) part of the vehicle. Use extreme
and close the cover.
caution when towing the vehicle. A
driver must be in the vehicle to steer
the direction and operate the brakes.
6-22

What to do in an emergency
06
Towing in this manner may be done
only on a solid ground for a short dis-
WARNING
tance and at a low speed. Also, the
Use extreme caution when tow-
wheels, axles, power train, steering
ing the vehicle.
and brakes must all be in good con-
dition.
•
Avoid a sudden start or abrupt
driving maneuvers, which
• Do not use the tow hooks to pull a
may excessively stress the
vehicle out of mud, sand or others,
emergency towing hooks,
from which the vehicle cannot drive
cables or chains. The towing
out with its own power.
hooks, cables or chains may
• Avoid towing a vehicle heavier than
break and cause a serious
a towing vehicle.
injury or damage.
• The two drivers of the both vehi-
•
When you cannot move your
cles should frequently communi-
damaged or disabled vehicle,
cate each other.
do not forcibly try to tow the
vehicle. Contact an authorized
NOTICE
EQUUS dealer or a commer-
cial tow truck service for
• Attach a towing strap to the tow
assistance.
hook.
•
Tow the vehicle in a straight
• Using other parts of the vehicle
line.
than the towing hooks while
towing may damage the vehicle.
•
Keep a distance away from
the vehicle while towing.
• Use only the authorized cables
or chains for towing. Securely
fasten the cables or chains to
the towing hook.
• Before emergency towing, check
that the hook is not broken or dam-
aged.
• Securely fasten the towing cable or
chain to the hook.
• Do not jerk the hook. Maintain a
steady and even force.
• To avoid damaging the hook, do
not pull the hook at a diagonal or
vertical angle. Always pull it
straight out.
6-23

What to do in an emergency
NOTICE
- Automatic transmission
•
When the car is towed, dragging
all four wheels on the ground, it
should be done only in a forward
direction. Be sure to set the shift
lever in N(Neutral). Unlock the
steering wheel by pressing the
Engine Start/Stop button to the
ACC position. A driver must be
in the towed vehicle to operate
OVI065020N
both the steering wheel and
• Use a towing strap, which is 16 feet
brakes.
(5 m) or shorter. Tie a white or red
•
To avoid a serious damage to
cloth
(about
12 inches
(30 cm)
the automatic transmission
wide) in the middle of the strap for
while towing, limit the vehicle
the better visibility.
speed to 10 mph (15 km/h) and
• Drive carefully not to loosen the
drive shorter than
1 mile (1.5
towing strap, while towing.
km).
•
Before towing, check any fluid
i
Information
lick of the automatic transmis-
Emergency towing is illegal in some
sion. When it leaks, flatbed
states. Contact an authorized EQUUS
equipment or a towing dolly
dealer and tow the vehicle.
must be used.
Emergency towing precautions
• Set the shift lever in N (Neutral).
• Release the parking brake.
• Depress the brake pedal with extra
force, because the brake perform-
ance may be reduced.
• Put extra force into the steering
wheel operation, because the
power steering system may be dis-
abled.
• Driving down a long slope may
overheat the brakes, reducing the
brake performance. Stop driving at
intervals and cool off the brake
system.
6-24
Maintenance
Engine compartment
7-4
Maintenance services
7-5
Owner's responsibility
7-5
Owner's maintenance precautions
7-6
Owner's maintenance
7-7
Owner's maintenance schedule
7-7
Scheduled maintenance service
7-8
Normal maintenance schedule
7-9
Maintenance under severe usage conditions
7-22
Explanation of scheduled maintenance
items
7-23
Engine oil
7-25
Checking the engine oil level
7-25
Changing the engine oil and filter
7-26
Engine coolant
7-27
Checking the coolant level
7-27
Changing the coolant
7-29
Brake fluid
7-30
Checking the brake fluid level
7-30
Power steering fluid
7-31
Checking the power steering fluid level
7-31
Checking the power steering hose
7-31
Washer fluid
7-32
Checking the washer fluid level
7-32
Air cleaner
7-33
Filter replacement
7-33
Maintenance
Climate control air filter
7-35
Filter inspection
7-35
Filter replacement
7-35
Wiper blades
7-36
Blade inspection
7-36
Blade replacement
7-36
Battery
7-39
For best battery service
7-39
Battery recharging by battery charger
7-41
Battery recharging by vehicle
7-41
Reset items
7-42
Tires and wheels
7-42
Tire care
7-42
Recommended cold tire inflation pressures
7-42
Checking tire inflation pressure
7-44
Tire rotation
7-45
Wheel alignment and tire balance
7-45
Tire replacement
7-46
Wheel replacement
7-47
Tire traction
7-47
Tire maintenance
7-48
Tire sidewall labeling
7-48
Low aspect ratio tire
7-51
Tire terminology and definitions
7-52
All season tires
7-54
Summer tires
7-54
Snow tires
7-54
Tire chains
7-55
Radial-ply tires
7-55
Fuses
7-56
Inner panel fuse replacement
7-57
Engine compartment fuse replacement
7-59
Fuse/relay panel description
7-60
Light bulbs
7-69
Headlight, position light, turn signal light,
side marker light and front fog light bulb
replacement
7-70
Side repeater light bulb replacement
7-74
Rear combination light bulb replacement
7-75
High mounted stop light
7-75
License plate lamp replacement
7-79
Interior light bulb replacement
7-82
Appearance care
7-83
Exterior care
7-83
Interior care
7-88
Emission control system
7-89
Crankcase emission control system
7-89
Evaporative emission control system
7-89
Exhaust emission control system
7-90
California perchlorate notice
7-92