Hyundai Santa Fe (2006 year). Manual - part 780


  Index      Hyundai     Hyundai Santa Fe - service repair manual 2006 year


Search            


Content   ..  778  779  780  781   ..


Hyundai Santa Fe (2006 year). Manual - part 780


FRONT SUSPENSION SYSTEM

SS -27

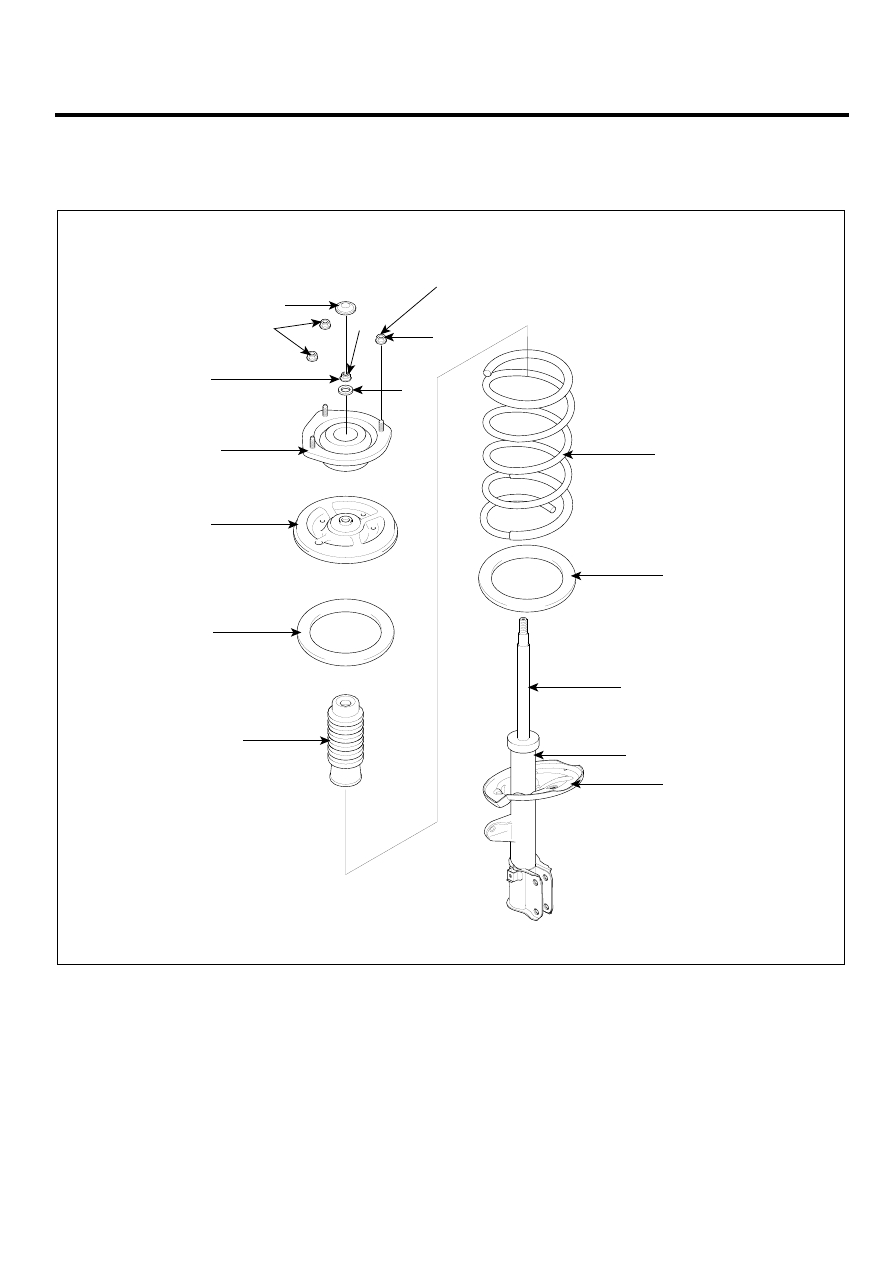
FRONT STRUT ASSEMBLY

COMPONENTS

E41E65D1

1. Dust cover
2. Upper mounting nut
3. Self-locking nut
4. Spacer
5. Insulator
6. Spring upper seat
7. Spring upper pad

  8. Strut dust cover and bumper rubber 
  9. Coil spring
10. Spring lower pad
11. Piston rod
12. Strut assembly
13. Spring lower seat

9

11

10

12

13

8

7

6

5

2

1

3

2

4

44.1~58.8(4.5 ~ 6.0, 32.5~43.4)

58.8~68.6

(6 ~7, 43.4~50.6)

TORQUE : Nm (kgf.m, lb-ft)

SCMSS6501L

SS -28

SUSPENSION SYSTEM

REMOVAL

EDC68431

1.

Loosen the wheel nuts slightly.
Raise the vehicle, and make sure it is securely sup-
ported.

2.

Remove the front wheel and tire (A) from the front hub
(B).

B

C

A

SCMSS6502D

CAUTION

Be careful not to damage to the hub bolts (C) when
removing the front wheel and tire (A).

3.

Remove the front stabilizer link (A) from the strut as-
sembly.

A

SCMSS6503D

4.

Remove the strut upper mounting nuts (A).

A

SCMSS6001D

5.

Remove the wheel speed sensor cable (A) and strut
lower mounting bolts (B), then remove the strut as-
sembly.

A

B

SCMSS6030D

FRONT SUSPENSION SYSTEM

SS -29

DISASSEMBLY

ECD04DAF

1.

Remove the dust cover (A).

A

SCMSS6525D

2.

Using the special tool (09546-26000), compress the
coil spring (A).

A

B

C

09546-26000

KHQE110C

3.

Remove the self-locking nut (C) from the strut assem-
bly(B).

4.

Remove the insulator, spring seat, coil spring and dust
cover from the strut assembly.

INSPECTION

E1755BFA

1.

Check the strut insulator for wear or damage.

2.

Check rubber parts for damage or deterioration.

3.

Compress and extend the piston rod (A) and check
that there is no abnormal resistance or unusual sound
during operation.

A

KHQE120A

DISPOSAL

1.

Fully extend the piston rod.

2.

Drill a hole on the A section to remove gas from the
cylinder.

A

KHQE121A

CAUTION

The gas coming out is harmless, but be careful of
chips that may fly when drilling.
Be sure to wear safety goggles or eye protection
when performing this task.

SS -30

SUSPENSION SYSTEM

REASSEMBLY

EEA17FEF

1.

Install the spring lower pad (D) so that the protru-
sions(A) fit in the holes (C) in the spring lower seat
(B).

D

A

C

B

A

C

KHQE130A

2.

Compress coil spring using special tool (09546-
26000).

Install compressed coil spring into shock

absorber.

NOTE

a.

Indicated identification color marks on the coil
spring. Pay attention to identification mark and
then install them.

b.

Install the coil spring with the identification mark
directed toward the knuckle.

A

B

C

09546-26000

KHQE110C

3.

After fully extending the piston rod, install the spring
upper seat and insulator assembly.

4.

After seating the upper and lower ends of the coil
spring (A) in the upper and lower spring seat grooves
(B) correctly, tighten new self-locking nut temporarily.

A

B

KSMSS44B

5.

Remove the special tool (09546-26000).

6.

Tighten the self-locking nut to the specified torque.

Tightening torque Nm (kgf-m, lb-ft) :
58.8~68.6 (6~7, 43.4~50.6)


Content   ..  778  779  780  781   ..