Hummer H2. Manual - part 2552


  Index      Hummer     Hummer H2 - service repair manual 2004 year


Search            


Content   ..  2550  2551  2552  2553   ..


Hummer H2. Manual - part 2552


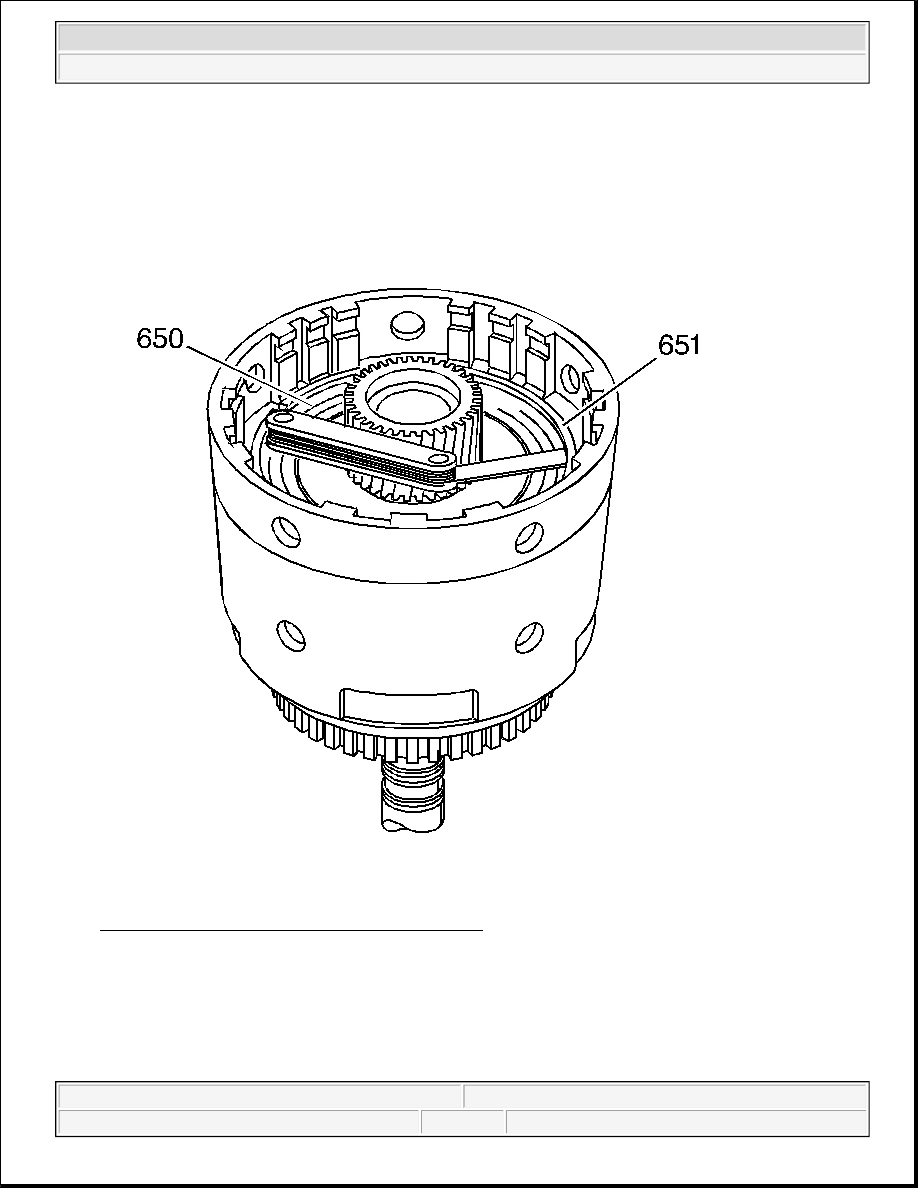
6. Install the forward clutch backing plate retainer ring (651).  

FORWARD CLUTCH PISTON TRAVEL CHECK 

Fig. 178: Measuring Forward Clutch Plate Travel 
Courtesy of GENERAL MOTORS CORP. 

1. Use feeler gauges to check the forward clutch plate travel. Check travel between the forward clutch 

backing plate retainer ring (651) and the forward clutch selective backing plate (650). 

The forward clutch plate travel should be:


2004 Hummer H2 

2004 TRANSMISSION/TRANSAXLE Automatic Transmission - Overhaul - 4L60-E/4L65-E


Specification:  

z

245 mm Torque Converter- 0.766-1.756 mm (0.030-0.069 in)  

z

298 mm/300 mm Torque Converter- 0.866-1.876 mm (0.034-0.074 in)  

2. Select the proper forward clutch selective backing plate (650) to obtain the correct travel. Refer to 

Forward Clutch Backing Plate Selection .  

3-4 CLUTCH ASSEMBLE 

Fig. 179: View Of Inspection Areas On Clutch Apply Plates 
Courtesy of GENERAL MOTORS CORP. 

IMPORTANT: The part 654A may have 5, 6 or 7 plates.


2004 Hummer H2 

2004 TRANSMISSION/TRANSAXLE Automatic Transmission - Overhaul - 4L60-E/4L65-E


1. Inspect the 3rd and 4th clutch apply plate (653), the fiber plate assemblies (654A), the steel plates (654B) 

and the selective backing plate (655) for the following conditions: 

z

Damaged tangs  

z

Delamination  

z

Excessive wear  

z

Heat damage or wear  

z

Surface finish  

z

Flatness  

Fig. 180: Installing Clutch Apply Plates Into Input Housing 
Courtesy of GENERAL MOTORS CORP. 

2. Install the 3rd and 4th clutch apply plate (653) into the input housing. Index each leg of the apply plate 

into the apply ring legs. 


2004 Hummer H2 

2004 TRANSMISSION/TRANSAXLE Automatic Transmission - Overhaul - 4L60-E/4L65-E


3. Install the 3rd and 4th clutch plates starting with a fiber plate assembly (654A) and alternate with a steel 

plate (654B). 

Fig. 181: Illustrating Clutch Plate Assembly

NOTE:

The correct number of fiber plates must be used to avoid damage to the 
transmission. An incorrect stack up height can cause either excessive 
clutch slippage or insufficient release, resulting in burned clutch plates.

IMPORTANT: The first steel plate (654B) has the same spline configuration as the 3rd 

and 4th clutch apply plate (653).

IMPORTANT: The 3rd and 4th clutch plate stack is model specific. Clutch plate stack up 

could be either 6 or 7 plates.


2004 Hummer H2 

2004 TRANSMISSION/TRANSAXLE Automatic Transmission - Overhaul - 4L60-E/4L65-E


Content   ..  2550  2551  2552  2553   ..