Hummer H1 (2006+). Manual - part 247
8-4
Steering System
______________________________________________________________
10. Install the drive line protection.
11. Lubricate the pitman arm and lower the vehicle.
CENTER LINK REPLACEMENT
Removal
1.
Raise and support the front of the vehicle.
2.
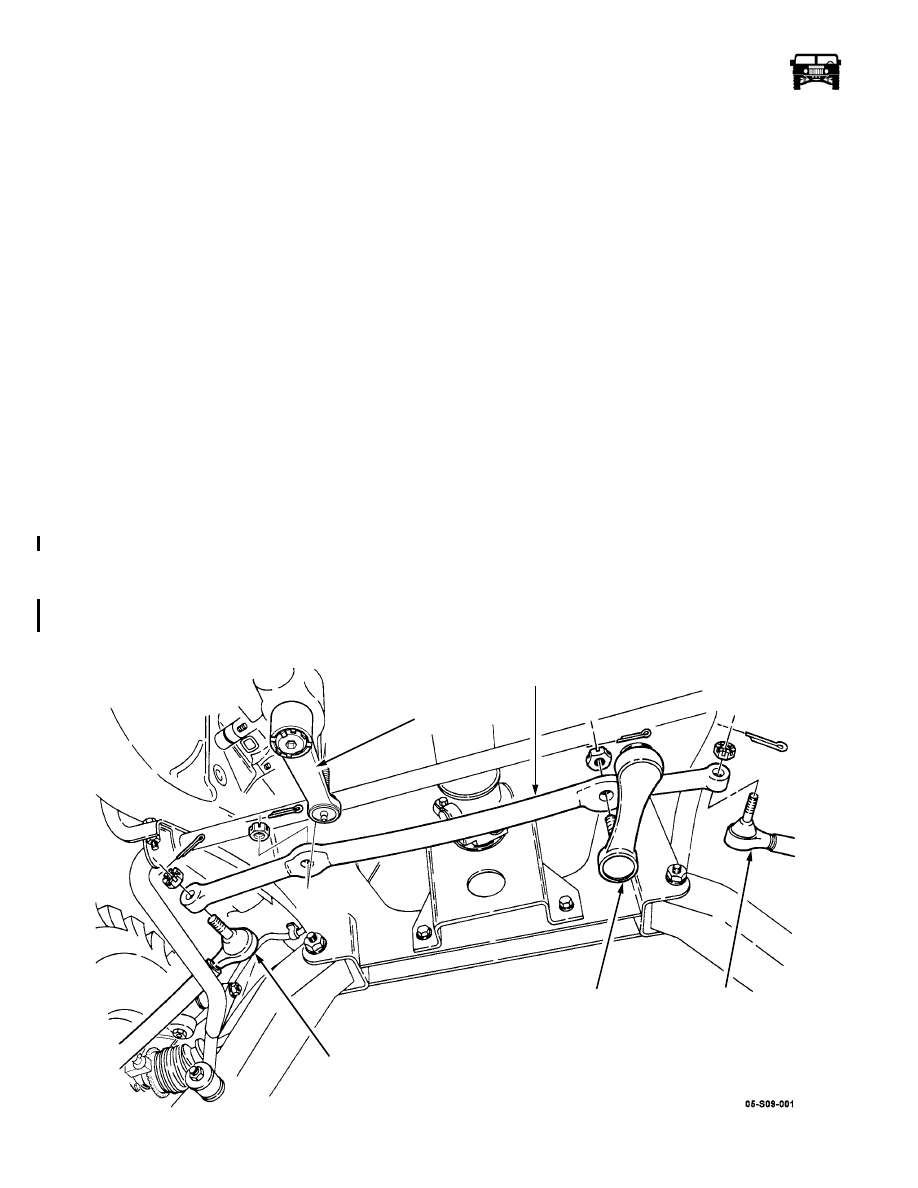
Remove the cotter pin and the slotted nut securing the pitman arm to the center link (Figure 8-3).
3.
Remove the cotter pin and the slotted nut securing the idler arm to the center link.
4.
Loosen, but do not remove, the bolts and locknuts securing the idler arm to the frame.
5.
Remove the two cotter pins and slotted nuts securing the right and left tie rods to the center link.
6.
Using puller J-24319-B remove the center link from both tie rods.
7.
Using puller CH-47975 remove the idler arm and the pitman arm from the center link.
Installation
NOTE: Refer to torque adapter in section 8 for proper use of tool J-45764-2.
1.
Secure the center link to the pitman arm and the idler arm with two slotted nuts and tighten to 110 - 130 lb-ft (149-176 N•m)
using torque adapter J-45764-2 and an extension (Figure 8-5).
2.
Install a cotter pin in each slotted nut. If necessary, tighten the slotted nuts to align the holes for cotter pin insertion. DO NOT
back off the slotted nuts to align the cotter pin holes.
3.
Secure the right and left tie rods to the center link with two slotted nuts and tighten to 63-77 lb-ft (85-104 N•m).
4.
Install a cotter pin in each slotted nut. If necessary, tighten the slotted nuts to align the holes for cotter pin insertion. DO NOT
back off the slotted nuts to align the cotter pin holes.
5.
Place the front wheels in the straight ahead position and tighten the idler arm to frame bolts and locknuts to 90-100 lb-ft (122-
136 N•m).
6.
Lower the vehicle.
Figure 8-3: Center Link Removal
STEERING (PITMAN) ARM
CENTER LINK
TIE ROD
IDLER ARM
TIE ROD
6-1-05