Hummer H1 (2002+). Manual - part 30
____________________________________________________________________
Engine 2-81
®
05745159
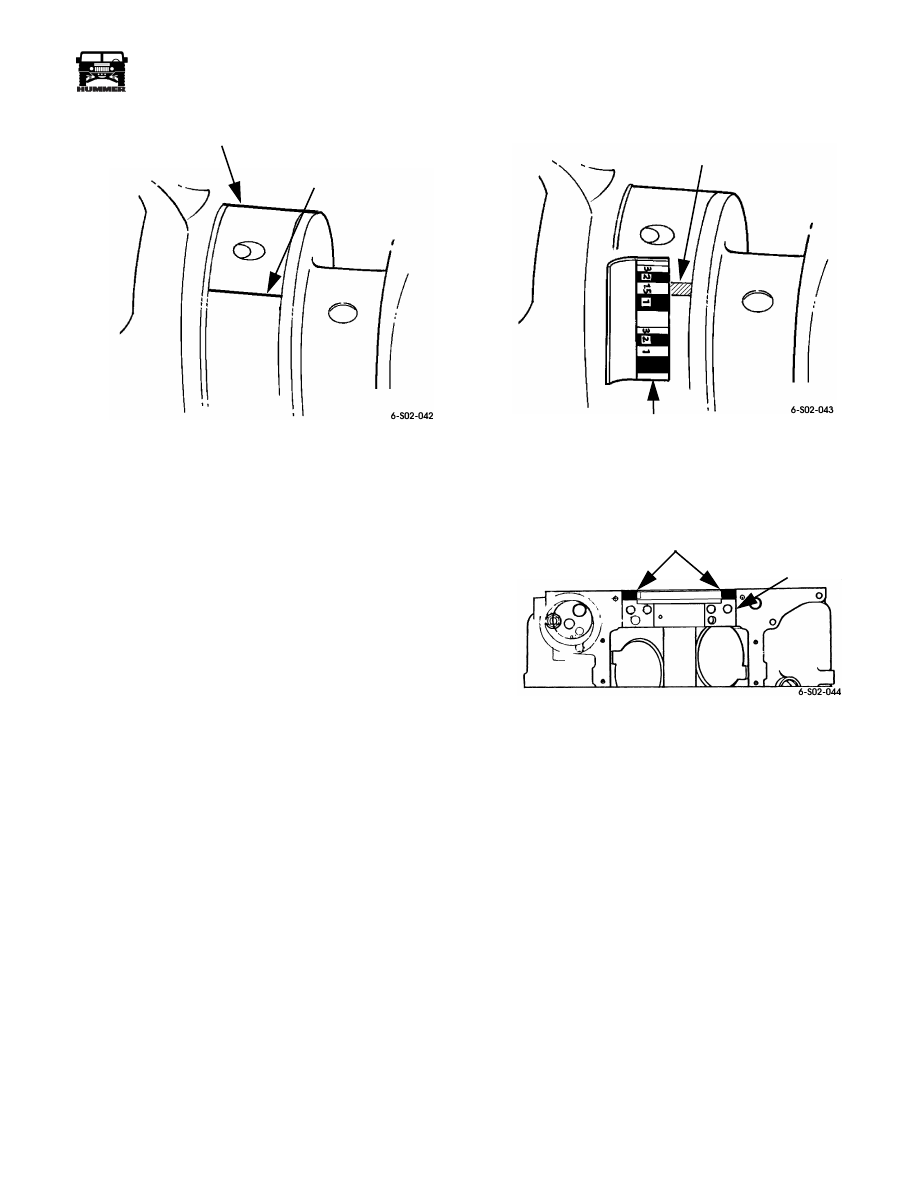
Figure 2-155: Gauging Plastic Position on
Crankshaft Main journal
7.
Install main bearing caps and old bolts retained from
disassembly operations. Tighten inner cap bolts to 55 lb-ft
(75 N•m), outer bolts on main caps 1 and 5 to 48 lb-ft (65
N•m) and main caps 2, 3, and 4 to 30 lb-ft (40 N•m) to
compress gauging plastic.
8.
Remove main bearing caps and measure plastigauge with
graduated scale on gauge envelope (Figure
2-156).
Measure widest point of compressed plastic.
•
If clearances are correct, proceed to next step.
•
If clearances are insufficient, try standard bearings.
Or, if clearances are too large, try undersize bearings.
In some cases, a combination of standard and under-
size bearings will be needed to obtain required clear-
ance. Note that under size bearings refer to crankshaft
diameter.
9.
Carefully remove crankshaft and clean plastic off journals.
Then lubricate main bearings and crankshaft with 40W
engine oil or a quality assembly lube, and reinstall
crankshaft.
10. Reinstall main bearing caps. Be sure caps are properly
aligned. Bearing notches should be aligned and direction
arrows toward front.
11. Apply Permatex High Temp silicone sealer to rear main
bearing cap seat in block (Figure 2-157).
12. Install new inner and outer bearing cap bolts finger tight
only. Bolts will not be tightened until after crankshaft end
play check.
Figure 2-156: Measuring Gauging Plastic to
Determine Bearing Clearance
Figure 2-157: Sealer Application Points in Rear Main
Bearing Cap Seat
CRANKSHAFT END PLAY CHECK
1.
Tighten bolts in main cap number 3 to approximately 10
lb-ft (14 N•m) torque.
2.
Tap crankshaft rearward then forward to align thrust
bearing. Use lead hammer or rawhide mallet to tap
crankshaft.
3.
Tighten long inner number 3 main cap bolts to 55 lb-ft (75
N•m) and shorter outer bolts to 30 lb-ft (40 N•m) torque.
4.
Verify that crankshaft can be rotated freely without bind
or drag.
5.
Pry and hold crankshaft forward. Measure clearance
between crankshaft and number 3 main bearing with feeler
gauge (Figure 2-158). Clearance should be 0.004-0.010 in.
(0.10-0.25 mm). If clearance is incorrect, thrust bearing is
incorrect size or not seated, or crankshaft thrust surface is
worn. Correct as necessary. If clearance is OK, continue
with assembly.
CRANKSHAFT MAIN
BEARING JOURNAL
GAUGING
PLASTIC
COMPRESSED
GAUGING
PLASTIC
ENVELOPE SCALE
APPLY RTV-TYPE
SEALER HERE
REAR MAIN
BEARING CAP SEAT
(IN BLOCK)