Honda Odyssey (2024 year). Manual in english - page 8
 

  Index      Manuals     Honda Odyssey (2024 year). Manual in english


Search            copyright infringement  


Content      ..     6      7      8      9     ..


Honda Odyssey (2024 year). Manual in english - page 8


259

uu

Audio System

u

USB Ports

Continued

Features

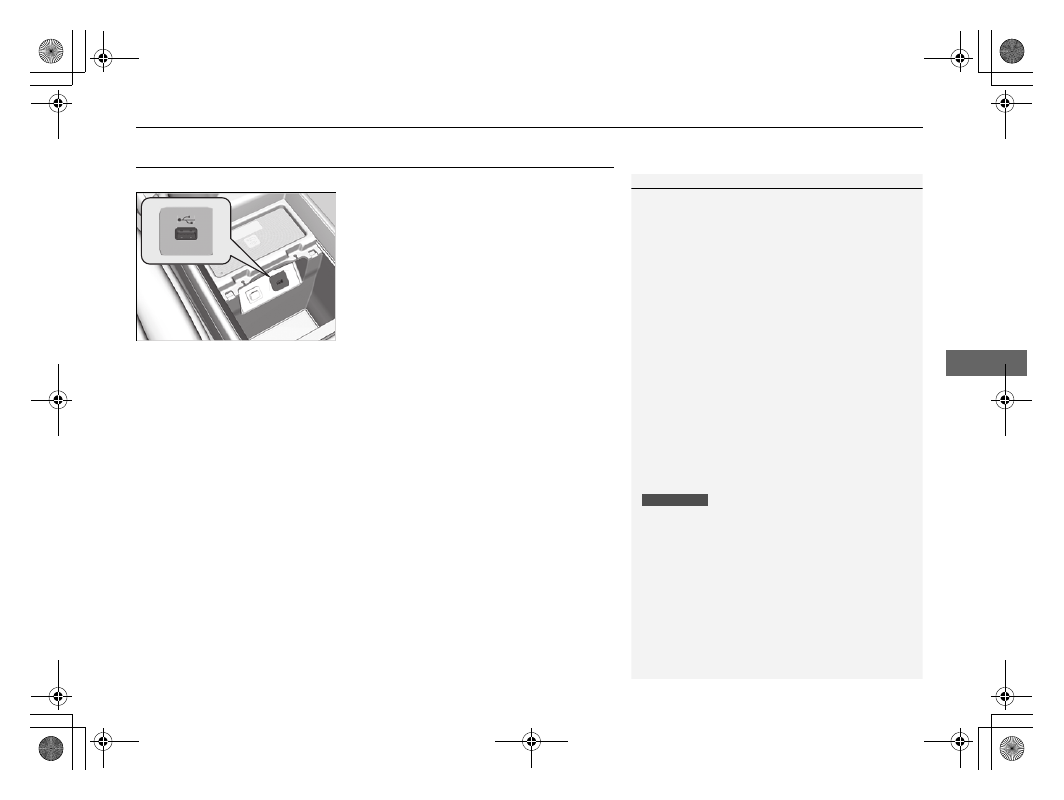
USB Ports

Install the USB connector or the USB flash drive to the USB port.

In the console compartment

The USB port (2.5A) is for charging devices, 
playing audio files and connecting compatible 
phones with Apple CarPlay or Android Auto.

u

To prevent any potential issues, be sure 
to use an Apple MFi Certified Lightning 
Connector for Apple CarPlay, and for 
Android Auto, the USB cables should be 
certified by USB-IF to be compliant with 
USB 2.0 Standard.

1

USB Ports

Do not leave the iPod or USB flash drive in the 
vehicle. Direct sunlight and high temperatures may 
damage it.

We recommend that you use a USB cable if you are 
attaching a USB flash drive to the USB port.

Do not connect the iPod or USB flash drive using a 
hub.

Do not use a device such as a card reader or hard 
disk drive, as the device or your files may be 
damaged.

We recommend backing up your data before using 
the device in your vehicle.

Displayed messages may vary depending on the 
device model and software version.

If the audio system does not recognize the iPod, try 
reconnecting it a few times or reboot the device. To 
reboot, follow the manufacturer’s instructions 
provided with the iPod or visit 

www.apple.com/ipod

.

The USB port can supply up to 2.5A of power. It does 
not output 2.5A unless the device requests.
For amperage details, read the operating manual of 
the device that needs to be charged.

Under certain conditions, a device connected to the 
port may generate noise to the radio station you are 
listening to.

USB charge

260

uu

Audio System

u

USB Ports

Features

On the console panel

The USB port (2.5A) is only for charging 
devices.

u

You cannot play music even if you have 
connected music players to them.

On the back of the console 
compartment

*

The USB ports (2.5A) are only for charging 
devices.

u

You cannot play music even if you have 
connected music players to them.

On the left side of the third row seats

*

The USB port (2.5A) is only for charging 
devices.

u

You cannot play music even if you have 
connected music players to them.

* Not available on all models

261

uu

Audio System

u

Auxiliary Input Jack

Features

Auxiliary Input Jack

Use the jack to connect standard audio 
devices.

1.

Open the 

AUX

 cover.

2.

Connect a standard audio device to the 
input jack using a 1/8 inch (3.5 mm) stereo 
miniplug.

u

The audio system automatically switches 
to the AUX mode.

Audio System Theft Protection

The audio system is disabled when it is disconnected from the power source, such as 
when the battery is disconnected or goes dead. In certain conditions, the system 
may display a code entry screen. If this occurs, reactivate the audio system.

Reactivating the audio system

1.

Set the power mode to ON.

2.

Turn on the audio system.

3.

Press and hold the audio system power knob for more than two seconds.

u

The audio system is reactivated when the audio control unit establishes a 
connection with the vehicle control unit. If the control unit fails to recognize 
the audio unit, you must go to a dealer and have the audio unit checked.

1

Auxiliary Input Jack

You can return to AUX mode by selecting the audio 
source icon on the audio/information screen.

You cannot use the auxiliary input jack if you replace 
the audio system.

262

uu

Audio System

u

Audio Remote Controls

Features

Audio Remote Controls

Allow you to operate the audio system while driving. The information is shown on 
the driver information interface.

(

+

/

(

-

 (Volume) Bar

Press 

(

+

To increase the volume.

Press 

(

-

To decrease the volume.

1

Audio Remote Controls

Some modes appear only when an appropriate 
device or medium is used.

Depending on the 

Bluetooth

®

 device you connect, 

some functions may not be operated.

Press the 

 (back) button to go back to the 

previous screen or cancel a command.

Press the 

 (home) button to go back to the home 

screen of the driver information interface.

You can show or hide the audio mode icons, or 
change the order of the icons.

2

Show/Hide Apps

 P. 139

2

Arrange Apps

 P. 140

ENTER

 Button

(

+

/

(

-


Bar

/

/

/


Buttons

3 4

263

uu

Audio System

u

Audio Remote Controls

Features

/

/

/

/ENTER Buttons

When selecting the audio mode
Press  

or  

to 

select 

Now Playing

 on the home screen of the driver 

information interface, and then press the 

ENTER

 button.

Press  

or : 

To cycles through the audio modes as follows:

Android Auto/Apple CarPlay

SiriusXM

®

*

Rear Entertainment

*

AUX 

Input

AM

Bluetooth

®

 Audio

Social Playlist

FM

My Honda Music

USB/

iPod

When listening to the radio

Press : 

To select the next preset radio station.

Press : 

To select the previous preset radio station.

Press and hold 

To select the next strong station.

Press and hold 

To select the previous strong station.

When listening to an iPod, USB flash drive, My Honda Music, or 

Bluetooth

®

 Audio

Press : 

To skip to the next song.

Press : 

To go back to the beginning of the current or previous song.

When listening to an iPod, USB flash drive, My Honda Music, 

Bluetooth

®

 Audio, 

or Apple CarPlay

Press and hold 

/

To move rapidly within a song.

3 4

3

4

3

4

* Not available on all models

264

Features

Audio System Basic Operation

To use the audio system function, the power mode must be in ACCESSORY or ON.

: Select to go to the home screen.

2

Switching the Display

 P. 265

: Select to go back to the previous display 

when it is displayed.

: Select to change the audio/information 

screen brightness.
Select 

 once and select 

 or 

 to make 

an adjustment.

u

Each time you select 

, the mode 

switches among the daytime mode, 
nighttime mode and off mode.

 (Day/Night) Icon

 (Home) Icon

 (Back) Icon

265

uu

Audio System Basic Operation

u

Audio/Information Screen

Continued

Features

Audio/Information Screen

Displays the audio status and wallpaper. From this display, you can go to various 
setup options.

Using the audio/information screen

Select 

 to go to the home screen.

Select the following icons on the home screen or after selecting 


All Apps

.

Switching the Display

1

Audio/Information Screen

Touchscreen Operation

Use simple gestures - including touching, swiping, 
and scrolling - to operate certain audio functions.

Some items may be grayed out during driving to 
reduce the potential for distraction.

You can select them when the vehicle is stopped or 
use voice commands.

Wearing gloves may limit or prevent touchscreen 
response.

You can change the touchscreen sensitivity setting.

2

Customized Features

 P. 413

Home Screen

 (Home) Icon


All Apps

266

uu

Audio System Basic Operation

u

Audio/Information Screen

Features

Phone

Displays the HFL information.

2

Bluetooth

®

 HandsFreeLink

®

 P. 429

Trip Computer

Displays the trip computer information.

Current Drive

 tab: Displays the current trip information.

Trip A

/

Trip B

 tab: Displays information for the current and three previous drives. 

The information is stored every time you reset Trip A/B.
To reset Trip A/B, select 

Reset

.

To change the setting of how to reset Trip A/B, select 

Settings

, then select 

Trip 

A Reset Method

 or 

Trip B Reset Method

.

Clock

Displays the clock.

System Updates

Updates the software version of the audio system.

2

System Updates

 P. 279

FM/AM/Sirius XM

*

/USB/Bluetooth Audio/AUX Input/My Honda Music/

Social Playlist

Displays the each audio information.

Settings

Enters the customizing menu screen.

2

Customized Features

 P. 413

* Not available on all models

267

uu

Audio System Basic Operation

u

Audio/Information Screen

Continued

Features

Navigation

*

Displays the navigation screen.

2

Refer to the Navigation System Manual

HondaLink

Displays the HondaLink

®

 screen.

2

HondaLink

®

 P. 324

Apple CarPlay/Android Auto

Displays the 

Apple CarPlay

 or 

Android Auto

.

2

Apple CarPlay

 P. 332

2

Android Auto

TM

 P. 335

Messages

Displays the text message screen.

2

Bluetooth

®

 HandsFreeLink

®

 P. 429

CabinTalk

*

Displays the 

CabinTalk

 screen.

2

CabinTalk

®

*

 P. 455

CabinWatch

*

Displays the 

CabinWatch

 screen.

2

CabinWatch

®

*

 P. 454

Rear Entertainment

*

Displays the rear audio screen.

2

Blu-ray/DVD Rear Entertainment System

*

 P. 365

* Not available on all models

268

uu

Audio System Basic Operation

u

Audio/Information Screen

Features

AT&T Hotspot

*

Displays the AT&T Hotspot screen.

2

AT&T Hotspot

*

 P. 330

File Manager

Displays the file manager screen.

2

File Manager

 P. 285

* Not available on all models

Continued

269

uu

Audio System Basic Operation

u

Audio/Information Screen

Features

You can change, store, and delete the wallpaper on the audio/information screen.

Import wallpaper

1.

Connect the USB flash drive to the USB port 
in the console compartment.

2

USB Ports

 P. 259

2.

Select 

Clock

.

3.

Select 

Settings

.

4.

Select 

Clock Faces

.

5.

Select 

Add More

.

u

The 

File Manager

 screen is displayed.

6.

Import a desired picture.

2

How to Transfer a File

 P. 285

u

The display will return to the 

Clock Faces


screen.

Wallpaper Setup

1

Wallpaper Setup

The wallpaper you set up on 

Clock Faces

 cannot be 

displayed on the driver information interface.

The file name must be fewer than 255 characters.

The file format of the image that can be imported 
is BMP, GIF, JPEG, PNG, or WebP.

If the USB flash drive does not have any pictures, 
the 

No Data

 message appears.

270

uu

Audio System Basic Operation

u

Audio/Information Screen

Features

Select wallpaper

1.

Select 

Clock

.

2.

Select 

Settings

.

3.

Select 

Clock Faces

.

4.

Select a desired wallpaper.

u

The preview is displayed on the screen.

5.

Select 

Save

.

u

The display will return to the clock screen.

To view wallpaper once it is set

1.

Select .

2.

Select 

Clock

.

Delete wallpaper

1.

Select 

Clock

.

2.

Select 

Settings

.

3.

Select 

Clock Faces

.

4.

Select 

Delete Photos

.

u

The 

File Manager

 screen is displayed.

5.

Delete a picture.

2

How to Delete a File

 P. 288

u

The display will return to the 

Clock Faces

 screen.

Continued

271

uu

Audio System Basic Operation

u

Audio/Information Screen

Features

To move to the next screen

Selecting 

 or 

, or swiping the screen left or right changes to the next screen.

Home Screen

1

Home Screen

The home screen has 5 pages. You cannot add any 
more pages.

Select 

 to go directly back to the first page of the 

home screen from any page.

Swipe

 Icon

>

 Icon

<

Current page position

<

>

uu

Audio System Basic Operation

u

Audio/Information Screen

272

Features

To add app icons on the home screen

App icons can be added on the home screen.

1.

Select .

2.

Select  

All Apps

.

3.

Check the box of the app you want to add.

u

The app icon will be added on the home 
screen.

1

To add app icons on the home screen

Pre-installed apps may not start up normally. If this 
occurs, you need to reset the system.

2

Defaulting All the Settings

 P. 425

If you perform 

Factory Data Reset

, it may reset all 

the settings to their factory default.

2

Defaulting All the Settings

 P. 425

In case those apps still do not startup normally even 
after 

Factory Data Reset

, contact your dealer.

There is a possibility that a browser is shut down in 
the situation of the use. In that situation, the screen 
will return to before the browser startup.

Check Box


All Apps


Icon

Continued

273

uu

Audio System Basic Operation

u

Audio/Information Screen

Features

To move icons on the home screen

You can change location on the home screen.

1.

Select and hold an icon.

u

The screen switches to the customization 
screen.

2.

Drag and drop the icon to where you want 
it to be.

3.

Select 

Done

.

u

The screen will return to the home 
screen.

1

To move icons on the home screen

Select 

Tips

 to show tips. To hide them, select it again.

Select and hold.

Drag and drop.

uu

Audio System Basic Operation

u

Audio/Information Screen

274

Features

To remove icons on the home screen

You can delete the icons on the home screen.

1.

Select and hold an icon.

u

The screen switches to the customization 
screen.

2.

Drag and drop the icon you want to remove 
to the 

Hide

 icon.

u

The icon is removed from the home 
screen.

3.

Select 

Done

.

u

The screen will return to the home 
screen.

1

To remove icons on the home screen

Apps will not be deleted by deleting the icon on the 
home screen.

Select 

Tips

 to show tips. To hide them, select it again.

Select and hold.

Drag and drop to 

Hide

 icon.

Continued

275

uu

Audio System Basic Operation

u

Audio/Information Screen

Features

To preset icons on the home screen

You can store up to three icons on the upper left of the home screen.

1.

Select and hold an icon.

u

The screen switches to the customization 
screen.

2.

Drag and drop the icon you want to store to 
the upper left of the home screen.

u

The icon is preset.

3.

Select 

Done

.

u

The screen will return to the home 
screen.

1

To preset icons on the home screen

Select 

Tips

 to show tips. To hide them, select it again.

Select and hold.

Drag and 
drop to preset 
icon.

Preset 
Icons

276

uu

Audio System Basic Operation

u

Audio/Information Screen

Features

1.

Select the system status icon.

u

The status area appears.

2.

Select an item to see the details.

3.

Select 

 or the system status icon to close 

the area.

Status Area

System 
Status Icon

Status Area

Continued

277

uu

Audio System Basic Operation

u

Audio/Information Screen

Features

Some of the audio system’s apps can be updated wirelessly when connected via Wi-
Fi, or 

Bluetooth

®

 in conjunction with the HondaLink

®

 app installed on a compatible 

iOS or Android device. If an update is available, a notification is displayed at the top 
of the screen with the respective app’s update icon.

To update an app:

1.

A notification appears and notifies you of a 
update message on the header area.

2.

Select the system status icon, and then 
select the software update notification 
from the list.

Updating Apps

1

Updating Apps

The wireless updates are for the apps on the audio 
system only.

To update compatible apps on your iPhone or 
Android phone, please visit the App Store or Google 
Play Store, respectively.

278

uu

Audio System Basic Operation

u

Audio/Information Screen

Features

3.

Select 

Download

.

4.

Select 

OK

.

u

A notification appears on the screen if 
the update is successful. Select 

OK

.

u

Restart the engine for the update to be 
applied.

Later

Download

HondaLink Update

HondaLink service update is available.

Would you like to download it?

12:34

Phone

Navigation

FM

279

uu

Audio System Basic Operation

u

System Updates

Continued

Features

System Updates

The audio system’s firmware can be updated with a Wi-Fi connection or with a USB 
device.

Wireless connection mode setup

1.

Select .

2.

Select 

System Updates

.

3.

Select 

Settings

.

4.

Select 

Connection Setup

.

5.

Select 

Change Mode

.

6.

Select 

Network

, then 

Save

.

u

The display returns to the network list.

7.

Select an access point from the network list, 
then 

Connect

.

u

If the audio system requires a password, 
enter a password.

How to Update Wirelessly

1

Wireless connection mode setup

If your vehicle has a telematics control unit (TCU), you 
do not need the wireless connection mode setup.

280

uu

Audio System Basic Operation

u

System Updates

Features

How to update

When the audio system update is available, the notification is shown on the audio/
information screen. Use the following procedure to update the system.

1.

Select .

2.

Select 

System Updates

.

3.

Select 

via Wireless

.

4.

Select 

Download Now

.

u

A notification appears on the screen.

Notification

Continued

281

uu

Audio System Basic Operation

u

System Updates

Features

5.

Select 

Install Now

 or 

Install while 

Vehicle OFF

.

u

A notification appears on the screen if 
the update is successful.

1

How to update

If 

Install while Vehicle OFF

 is selected and the user 

turns the vehicle back on after the update has been 
completed, for 3 to 5 minutes the system will rebuild 
the applications, during which time the Honda logo 
will be displayed.

282

uu

Audio System Basic Operation

u

System Updates

Features

Automatic download settings

Use the following procedure to change to the automatic download setting.

1.

Select .

2.

Select 

System Updates

.

3.

Select 

Settings

.

4.

Select 

Auto Download

.

5.

Select the access point, then 

Allow

.

View an update result

Use the following procedure to confirm the update result.

1.

Select .

2.

Select 

System Updates

.

3.

Select 

Settings

.

4.

Select 

Update Result

.

Continued

283

uu

Audio System Basic Operation

u

System Updates

Features

Download the update files from the server

1.

Select .

2.

Select 

System Updates

.

3.

Select 

via USB

.

u

A notification appears on the screen.

4.

Connect a USB device into the USB port in 
the console compartment.

u

The inventory data is copied into the USB 
device.

2

USB Ports

 P. 259

5.

Remove the USB device from the USB port.

6.

Connect the USB device into your 
computer, and then download the update 
files.

u

Follow the link to download the required 
software update files. Refer to 

https://usb.honda.com

 for instructions.

How to Update with a USB Device

1

How to Update with a USB Device

A USB device with a minimum of 8 GB of free space 
or more is recommended.

Be sure to delete any previous inventory or update 
files from the USB before starting the USB update 
process.

uu

Audio System Basic Operation

u

System Updates

284

Features

Update the audio system

1.

Select .

2.

Select 

System Updates

.

3.

Select 

via USB

.

u

A notification appears on the screen.

4.

Connect the USB device with the update 
files into the USB port.

u

A notification appears on the screen.

2

USB Ports

 P. 259

5.

Select 

Install Now

 or 

Install while 

Vehicle OFF

.

u

A notification appears on the screen if 
the update is successful.

1

Update the audio system

If 

Install while Vehicle OFF

 is selected and the user 

turns the vehicle back on after the update has been 
completed, for 3 to 5 minutes the system will rebuild 
the applications, during which time the Honda logo 
will be displayed.

285

uu

Audio System Basic Operation

u

File Manager

Continued

Features

File Manager

Allows you to transfer image or audio files to the audio system with a USB device.

1.

Connect a USB device into the USB port in 
the console compartment.

2

USB Ports

 P. 259

2.

Select 

, then select 


All Apps

.

3.

Select 

File Manager

.

4.

Select 

Transfer Content

.

To transfer a selected file:

5.

Select 

Select Files to Transfer

.

How to Transfer a File

uu

Audio System Basic Operation

u

File Manager

286

Features

6.

Select the file or folder you want to 
transfer.

7.

Select 

OK

.

8.

Select 

Transfer

.

u

A confirmation message appears on the 
screen. Select 

Continue

.

u

A notification appears on the screen if 
the transfer is successful. Then, the 
display will return to the 

File Manager


screen.

1

How to Transfer a File

To switch the view method, select 

List

 or 

Thumbnail


on the upper right of the screen.

Continued

287

uu

Audio System Basic Operation

u

File Manager

Features

To transfer all files:

5.

Select 

Transfer All Content

.

6.

Select 

Transfer

.

u

A confirmation message appears on the 
screen. Select 

Continue

.

u

A notification appears on the screen if 
the transfer is successful. Then, the 
display will return to the 

File Manager


screen.

1

How to Transfer a File

To switch the view method, select 

List

 or 

Thumbnail


on the upper right of the screen.

288

uu

Audio System Basic Operation

u

File Manager

Features

1.

Select 

, then select 


All Apps

.

2.

Select 

File Manager

.

3.

Select 

Delete Content

.

To delete a selected file:

4.

Select 

Select Files to Delete

.

How to Delete a File

Continued

289

uu

Audio System Basic Operation

u

File Manager

Features

5.

Select the file or folder you want to delete.

6.

Select 

OK

.

7.

Select 

Delete

.

u

A notification appears on the screen if 
the deletion is successful. Then, the 
display will return to the 

File Manager


screen.

1

How to Transfer a File

To switch the view method, select 

List

 or 

Thumbnail


on the upper right of the screen.

uu

Audio System Basic Operation

u

File Manager

290

Features

To delete all files:

4.

Select 

Delete All Content

.

5.

Select 

Delete

.

u

A notification appears on the screen if 
the transfer is successful. Then, the 
display will return to the 

File Manager


screen.

1

How to Transfer a File

To switch the view method, select 

List

 or 

Thumbnail


on the upper right of the screen.


Content      ..     6      7      8      9     ..