Honda Odyssey (2024 year). Manual in english - page 7
 

  Index      Manuals     Honda Odyssey (2024 year). Manual in english


Search            copyright infringement  


Content      ..     5      6      7      8     ..


Honda Odyssey (2024 year). Manual in english - page 7


227

uu

Seats

u

Head Restraints

Co
ntrols

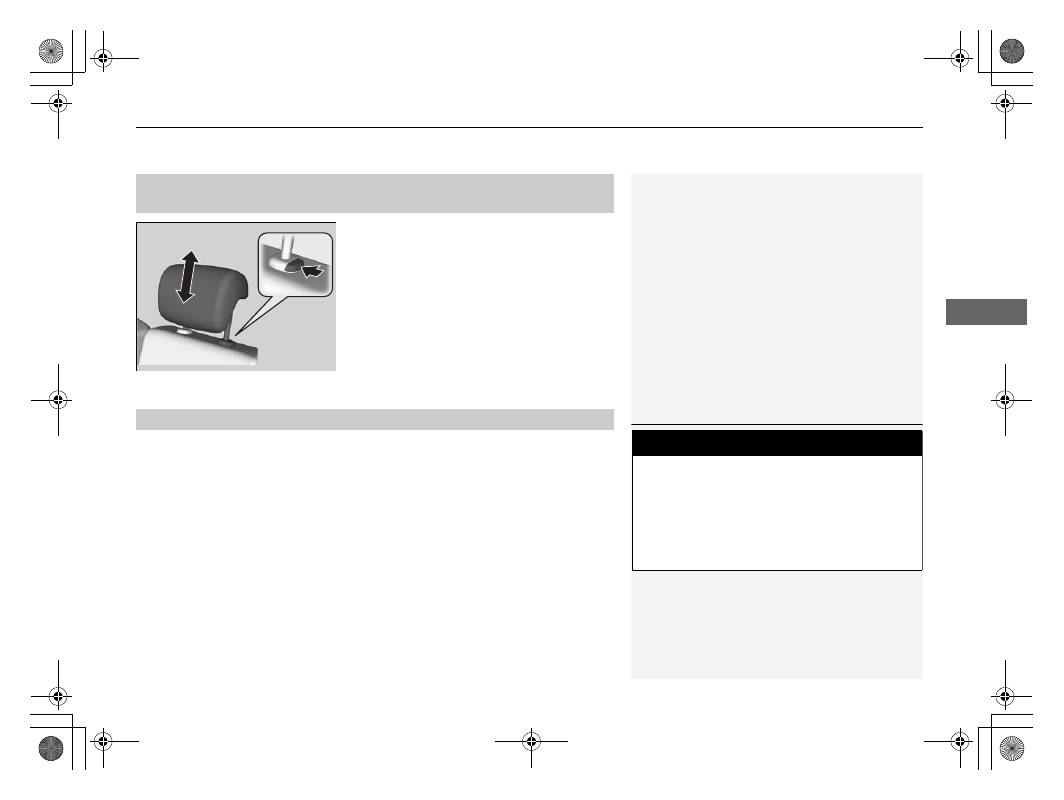
A passenger sitting in the second row/third 
row center seating position should adjust the 
height of their head restraint to an 
appropriate position before the vehicle begins 
moving.

To raise the head restraint:

Pull it upward.

To lower the head restraint:

Push it down while pressing the release 
button.

Head restraints can be removed for cleaning or repair.

To remove a head restraint:

Pull the restraint up as far as it will go. Then, push the release button and pull the 
restraint up and out.

To reinstall a head restraint:

Insert the legs back in place, then adjust the head restraint to an appropriate height 
while pressing the release button. Pull up on the restraint to make sure it is locked 
in position.

Changing the Second Row/Third Row Center Seat Head 

Restraint Positions

Removing and Reinstalling the Head Restraints

1

Removing and Reinstalling the Head Restraints

To remove the third row seat outer head restraints, 
fold down the seat-back first.

2

Third Row Seats

 P. 220

3

WARNING

Failure to reinstall, or correctly reinstall, the 
head restraints can result in severe injury 
during a crash.

Always replace the head restraints before 
driving.

228

uu

Seats

u

Armrest

Co
ntrols

Armrest

Pull down the armrest.

Pull the armrest all the way down, then pull it 
up to the desired angle.

Pull up the strap and fold down the center 
backrest to use as an armrest.

Using the Front and Second Row Outer Seat Armrest

Front seat with adjustable armrest

Using the Second Row Seat Armrest

229

Continued

Co
ntrols

Interior Convenience Items

Interior Lights

ON

The interior lights come on regardless of 
whether the doors or the tailgate are open or 
closed.

Door activated

The interior lights come on in the following 
situations:

Front:

When any of the doors or the tailgate are 
opened.

You unlock the driver’s door.

When the power mode is set to VEHICLE 
OFF.

Cargo area:

When the tailgate is open.

OFF

The interior lights remain off regardless of 
whether the doors or the tailgate are open or 
closed.

Interior Light Switches

1

Interior Light Switches

In the door activated position, the interior lights fade 
out and turn off about 30 seconds after the doors are 
closed.
The lights turn off after 30 seconds in the following 
situations:

When you unlock the driver’s door but do not open 
it.

When you set the power mode to VEHICLE OFF but 
do not open a door.

You can change the interior light dimming time.

2

Customized Features

 P. 413

The interior lights turn off immediately in the 
following situations:

When you lock the driver’s door.

When you set the power mode to ON.

When you close the driver’s door in ACCESSORY 
mode.

If you leave any of the doors open in VEHICLE OFF 
mode, the interior lights go off after about 15 
minutes.

If you leave the tailgate open in VEHICLE OFF mode, 
the cargo area light goes off after about 30 minutes.

To avoid draining the battery, do not leave the 
interior light on for an extended length of time when 
the engine is off.

Door 
Activated 
Position

Off

On

Front

Door Activated Position

Off

On

Cargo Area

uu

Interior Convenience Items

u

Interior Lights

230

Co
ntrols

Front

The map lights can be turned on and off by 
pressing the lenses.

Second and third row

The map lights can be turned on and off by 
pressing the lenses when the front interior 
light switch is in the door activated position.

Map Light Switches

1

Interior Light Switches

To avoid draining the battery, do not leave the 
interior light on for an extended length of time when 
the engine is off.

1

Map Light Switches

When the front interior light switch is in the door 
activated position and any door is open, the map 
light will not go off when you press the lens.

231

uu

Interior Convenience Items

u

Storage Items

Continued

Co
ntrols

Storage Items

Pull the handle to open the glove box. You 
can lock the glove box with the built-in key.

Glove Box

1

Glove Box

3

WARNING

An open glove box can cause serious injury 
to your passenger in a crash, even if the 
passenger is wearing the seat belt.

Always keep the glove box closed while 
driving.

232

uu

Interior Convenience Items

u

Storage Items

Co
ntrols

To open the console box, pull the handle and 
slide the box forward.

You can create more storage space by 
removing the divider.

Console Box

*

Handle

Divider

* Not available on all models

233

uu

Interior Convenience Items

u

Storage Items

Continued

Co
ntrols

To open the console compartment, press the 
knob to unlock the lid, and then slide it 
rearward.

Pull the handle to open the center pocket.

Console Compartment with Lid

Knob

Center Pocket

*

Handle

* Not available on all models

uu

Interior Convenience Items

u

Storage Items

234

Co
ntrols

Center console beverage holders

Front door beverage holders

Second row seat beverage holders

To use the beverage holder, fold the backrest.

2

Using the Second Row Seat Armrest


P. 228

Beverage Holders

1

Beverage Holders

NOTICE

Spilled liquids can damage the upholstery, carpeting, 
and electrical components in the interior.

Be careful when you are using the beverage holders. 
Hot liquid can scald you.

235

uu

Interior Convenience Items

u

Storage Items

Continued

Co
ntrols

Rear door beverage holders

Third row seat beverage holders

uu

Interior Convenience Items

u

Storage Items

236

Co
ntrols

There are coat hooks under the grab handles 
in the second row, and under the window 
frames in the third row. Pull it down to use it.

Coat Hooks

1

Coat Hooks

The coat hooks are not designed for large or heavy 
items.

Second row

Third row

237

uu

Interior Convenience Items

u

Storage Items

Continued

Co
ntrols

Use the cargo hooks to secure luggage in the 
cargo area.

Cargo Hooks

uu

Interior Convenience Items

u

Storage Items

238

Co
ntrols

Front

Rear

Grocery Bag Hooks

1

Grocery Bag Hooks

The hooks are designed to hold light items. Heavy 
objects may damage the hook.

Hook

Hooks

239

uu

Interior Convenience Items

u

Storage Items

Co
ntrols

To open the sunglasses holder, push and 
release the indent. To close, push it again until 
it latches.

You can store eyeglasses and other small 
items in this holder.

Conversation mirror

The sunglasses holder comes with a mirror. 
Open the sunglasses holder fully, then push it 
back to the first detent. You can use the 
mirror to view the rear seats.

Sunglasses Holder

1

Sunglasses Holder

Keep the holder closed while driving except when 
accessing stored items.

Push

240

uu

Interior Convenience Items

u

Other Interior Convenience Items

Co
ntrols

Other Interior Convenience Items

The accessory power sockets can be used when the power mode is in ACCESSORY 
or ON.

Accessory power socket (console panel)

Open the cover to use it.

Accessory Power Sockets

1

Accessory Power Sockets

NOTICE

Do not insert an automotive type cigarette lighter 
element. This can overheat the accessory power 
socket.

The accessory power socket is designed to supply 
power for 12 volt DC accessories that are rated 180 
watts (15 amps) or less.

To prevent battery drain, use the accessory power 
socket only when the engine is running.

When both sockets are being used, the combined 
power rating of the accessories should not exceed 
180 watts (15 amps).

When the accessory power socket is not in use, close 
the cover to prevent any small foreign objects from 
getting into the accessory power socket.

241

uu

Interior Convenience Items

u

Other Interior Convenience Items

Continued

Co
ntrols

Accessory power socket (third row 
seat)

*

Open the cover to use it.

Accessory power socket (cargo area)

Open the cover to use it.

* Not available on all models

uu

Interior Convenience Items

u

Other Interior Convenience Items

242

Co
ntrols

The AC power outlet can be used when the engine is running.

Open the cover to use it. Plug in the appliance 
slightly, turn it 90° clockwise, then push it all 
the way.

AC Power Outlet

*

1

AC Power Outlet

*

NOTICE

Do not use the AC power outlet for electric 
appliances that require high initial peak wattage, 
such as cathode-ray tube type televisions, 
refrigerators, electric pumps, etc. It is not suitable for 
devices that process precise data, such as medical 
equipment, and that require an extremely stable 
power supply, such as microcomputer-controlled 
electric blankets, touch sensor lamps, etc.

The AC power outlet is designed to supply power for 
up to 115 volt appliances that are rated 150 watts or 
less.

Continued use of any electric appliance/device 
exceeding these ratings may result in damage to the 
appliance/device.

When the AC power outlet is not in use, close the 
cover to prevent any small foreign objects from 
getting into the AC power outlet.

* Not available on all models

Continued

243

uu

Interior Convenience Items

u

Other Interior Convenience Items

Co
ntrols

To use the wireless charger, the power mode must be in ACCESSORY or ON.
Charge a compatible device on the area indicated by the 

 mark as follows:

1.

Place the device you want to charge on the 
charging area.

u

The system will automatically start 
charging the device, and the green 
indicator light will come on.

u

Make sure that the device is compatible 
with the system and placed with the 
chargeable side in the center of the 
charging area.

2.

When charging is completed, the green 
indicator light will go off.

u

If the device is not located on the charge 
area correctly, the green indicator light 
will blink.

Wireless Charger

*

1

Wireless Charger

*

FCC statement

This product complies with the appropriate 
requirements or the required standards of FCC 
(Federal Communication Commission), described 
below:
This device complies with Part 18 of the FCC rules. 
This equipment generates, uses, and can radiate 
radio frequency energy and, if not installed and used 
per the instructions, may cause harmful interference 
to radio communications.
In order to use safely:

Remove any metal objects from the charge pad 
before charging a device.

Do not open the charger case.

Do not use the charger if it malfunctions. Contact 
your dealer.

If the charger interferes with radio communications, 
attempt to correct the interference:

Press and hold the switch on the charger for a few 
seconds to turn off the charger.

Green Indicator

Charging Area

* Not available on all models

uu

Interior Convenience Items

u

Other Interior Convenience Items

244

Co
ntrols

When charging does not start

Perform one of the solutions in the following table.

Indicator

Cause

Solution

Slow Blink

There is an obstacle(s) between 
the charging area and the 
device.

Remove the 
obstacle(s).

The device is not within the 
charging area.

Move the device to the 
center of the charging 
area where 

 is 

located.

Fast Blink

The wireless charger is faulty.

Turn the vehicle off 
and back on. If the 
indicator still blinks, 
contact a dealer.

1

Wireless Charger

*

Using the audio/information screen, you can disable 
the wireless charger function.

2

Customized Features

 P. 413

This system consumes a lot of power. Do not use the system 
for a long time when the engine is not running. This may 
weaken the battery, making it difficult to start the engine.

When using the wireless charger, check the user’s manual 
that came with the compatible device you want to charge.

3

CAUTION

Metal objects between the charge pad and 
the device to be charged will get hot and 
can burn you.

Always remove foreign objects from the 
charge pad before charging the device.

Be sure the surface is clear of dust and 
other debris before charging.

Do not spill liquids (i. e. water, drinks, 
etc.) on the charger and the device.

Do not use oil, grease, alcohol, benzine or 
thinner for cleaning the charge pad.

Do not cover the system with towels, 
clothing, or other objects while charging 
etc.

Avoid spraying aerosols which may come 
in contact with the charge pad surface.

* Not available on all models

Continued

245

uu

Interior Convenience Items

u

Other Interior Convenience Items

Co
ntrols

1

Wireless Charger

*

NOTICE

Do not place any magnetic recording media or 
precision machines within the charging area while 
charging.
The data on your cards such as credit cards can be 
lost because of the magnetic effect. Also, precision 
machines such as watches may malfunction.

“Qi” and 

 marks are the registered trademarks 

owned by Wireless Power Consortium (WPC).
 

 mark is the registered trademark owned by 

Power Matters Alliance (PMA).

In the following cases, charging may stop or not start:

The device is already fully charged.

The temperature of the device is extremely high 

while charging.

You are at a place that emits strong 

electromagnetic waves or noises, such as a TV 

station, electric power plant, or gas station.

A device may not charge if the size or shape of its chargeable 

side is not appropriate for use with the charging area.

Not all devices are compatible with the system.

During the charging phase, it is normal for the 

charging area and device to heat up.

Charging may be briefly interrupted when:

All the doors and the tailgate are closed

- to avoid interference with the proper functioning 

of the keyless access system.

The position of the device is altered.

Do not charge more than one device at a time on a 

charging area.

* Not available on all models

uu

Interior Convenience Items

u

Other Interior Convenience Items

246

Co
ntrols

The heated steering wheel can be used when 
the power mode is in ON.

Press the button on the right side of the 
steering wheel.

When a comfortable temperature is reached, 
press the button again to turn it off.

The heated steering wheel is turned off every 
time you start the engine, even if you turned it 
on the last time you drove the vehicle.

Heated Steering Wheel

*

1

Heated Steering Wheel

*

Do not use the heated steering wheel continuously 
when the engine is off. Under such conditions, the 
battery may be weakened, making the engine 
difficult to start.

* Not available on all models

Continued

247

uu

Interior Convenience Items

u

Other Interior Convenience Items

Co
ntrols

The seat heaters can be used when the power 
mode is in ON.

Press the seat heater button:
Once - The HI setting (three indicators on)
Twice - The MID setting (two indicators on)
Three times - The LO setting (one indicator on)
Four times - The OFF setting (no indicators on)

When the power mode is turned on after it is 
turned off, the previously selected setting is 
maintained.

Front Seat Heaters

*

1

Front Seat Heaters

*

Do not use the seat heaters even in LO when the 
engine is off. Under such conditions, the battery may 
be weakened, making the engine difficult to start.

After a certain period of time, the strength setting for 
the seat heaters will automatically be reduced by one 
level at a time until the seat heater shuts off. The 
elapsed time varies according to the interior 
environment.

3

WARNING

Heat induced burns are possible when 
using seat heaters.

Persons with a diminished ability to sense 
temperature (e.g., persons with diabetes, 
lowerlimb nerve damage, or paralysis) or 
with sensitive skin should not use seat 
heaters.

* Not available on all models

uu

Interior Convenience Items

u

Other Interior Convenience Items

248

Co
ntrols

The seat heaters or ventilators can be used 
when the power mode is in ON.
The seat heaters: Use them to warm up the seat.
The seat ventilators: Use them when you want 
to ventilate the surface of the seats.
The lower you set the air conditioning 
temperature, the more you will feel the effect 
of the seat ventilation.

Press the seat heater or the seat ventilation 
button:
Once - The HI setting (three indicators on)
Twice - The MID setting (two indicators on)
Three times - The LO setting (one indicator on)
Four times - The OFF setting (no indicators on)

When the power mode is turned on after it is 
turned off, the previously selected setting is 
maintained.

Front Seat Heaters and Seat Ventilation

*

1

Front Seat Heaters and Seat Ventilation

*

Do not use the seat heaters and the seat ventilation 
even in LO when the engine is OFF. Under such 
conditions, the battery may be weakened, making 
the engine difficult to start.

After a certain period of time, the strength setting for 
the seat heaters will automatically be reduced by one 
level at a time until the seat heater shuts off. The 
elapsed time varies according to the interior 
environment.

3

WARNING

Heat induced burns are possible when 
using seat heaters.

Persons with a diminished ability to sense 
temperature (e.g., persons with diabetes, 
lowerlimb nerve damage, or paralysis) or 
with sensitive skin should not use seat 
heaters.

* Not available on all models

249

uu

Interior Convenience Items

u

Other Interior Convenience Items

Co
ntrols

Second row sunshades

Pull the tab and roll up the sunshade all the 
way. Use the hooks to hang it.

Third row sunshades

*

Pull the tab and roll up the sunshade all the 
way. Attach the tab to the anchor.

Integrated Sunshades

1

Integrated Sunshades

Use the sunshades only when the windows are fully 
closed. If a window is open while a shade is being 
used, the shade can blow off and unhook, hitting 
and hurting anyone sitting near the window.

Second row

Hooks

Tab

Third row

Anchor

Tab

* Not available on all models

250

Co
ntrols

Climate Control System

Using Automatic Climate Control

The automatic climate control system maintains the interior temperature you select. 
The system also selects the proper mix of heated or cooled air that raises or lowers 
the interior temperature to your preference as quickly as possible.

1

Using Automatic Climate Control

Press the 

FRONT CLIMATE

 button to display A/C, 

MODE, and fan control information on the audio/
information screen for several seconds. Select icon to 
turn on or off A/C, change the vent mode, or change 
the fan speed.

During idle-stops, air-conditioning is suspended, and 
only the blower remains active. If you do not want 
air-conditioning suspended, press Auto Idle Stop 

OFF


button to cancel idle-stop.

If any buttons are pressed while using the climate 
control system in auto, the function of the button 
that was pressed will take priority.
The 

AUTO

 indicator will go off, but functions 

unrelated to the button that were pressed will be 
controlled automatically.

To prevent cold air from blowing in from outside, the 
fan may not start immediately when the 

AUTO


button is pressed.

If the interior is very warm, you can cool it down 
more rapidly by partially opening the windows, 
turning the system on AUTO, and setting the 
temperature to low. Change the fresh mode to 
recirculation mode until the temperature cools down.

When you set the temperature to the lower or upper 
limit, 

Lo

 or 

Hi

 is displayed.

Continued

251

uu

Climate Control System

u

Using Automatic Climate Control

Co
ntrols

Use the system when the engine is running.

1.

Press the 

AUTO

 button.

2.

Adjust the interior temperature using the driver’s side or passenger’s side control 
switch.

3.

Press the 

 button to cancel.

1

Using Automatic Climate Control

Pressing the 

 button switches the climate control 

system between on and off. When turned on, the 
system returns to your last selection.

While ECON mode is active, the climate control 
system may have reduced cooling performance.

Mode Control Icon 
(Air flows from 
dashboard vents)

Mode Control Icon 
(Air flows from 
floor vents)

Mode Control Icon 
(Air flows from 
floor and 
windshield 
defroster vents)

Fan Control Icon

Mode Control Icon (Air flows from 
floor and dashboard vents)

A/C

 (Air Conditioning) 

Icon

 (On/Off) Button

 (Recirculation) Button

SYNC

 (Synchronized) Button

FRONT 
CLIMATE


Button

Driver’s Side 
Temperature 
Control switch

Fan Control Button

Passenger’s 
Side 
Temperature 
Control 
switch

AUTO

 Button

 (Windshield Defroster) 

Button

uu

Climate Control System

u

Using Automatic Climate Control

252

Co
ntrols

Switching between the recirculation and fresh air modes

Press the 

 button and switch the mode depending on environmental 

conditions.
Recirculation Mode (indicator on): Recirculates air from the vehicle’s interior through 
the system.
Fresh Air Mode (indicator off): Maintains outside ventilation. Keep the system in 
fresh air mode in normal situations.

Pressing the 

 button turns the air 

conditioner system on and automatically 
switches the system to fresh air mode.

To rapidly defrost the windows

1.

Press the 

 button.

2.

Press the 

 button.

Defrosting the Windshield and Windows

1

Defrosting the Windshield and Windows

For your safety, make sure you have a clear view 
through all the windows before driving.

Do not set the temperature near the upper or lower 
limit.
When cold air hits the windshield, the outside of the 
windshield may fog up.

If you press the 

 button during Auto Idle Stop, the 

engine restarts automatically.

1

To rapidly defrost the windows

After defrosting the windows, switch over to fresh air 
mode.
If you keep the system in recirculation mode, the 
windows may fog up from humidity. This impedes 
visibility.

253

uu

Climate Control System

u

Using Automatic Climate Control

Co
ntrols

You can set the temperature synchronously for the driver’s side, the passenger’s side 
and the rear passenger compartment in synchronization mode.

1.

Press the 

SYNC

 button.

u

The system switches to synchronization mode.

2.

Adjust the temperature using the driver’s side temperature control switch.

Press the 

SYNC

 button to return to tri-zone mode.

Synchronization Mode

1

Synchronization Mode

When the system is not in synchronization mode, the 
temperature for the driver’s side, passenger’s side, 
and rear passenger compartment can be set 
separately.

254

uu

Climate Control System

u

Rear Climate Control System

Co
ntrols

Rear Climate Control System

Use the system when the engine is running.

1.

Press the 

REAR CLIMATE

 button.

2.

Press the 

REAR CLIMATE

 button to display AUTO, MODE, temperature control, 

and fan control information on the audio/information screen for several seconds.

3.

Select the 

AUTO

 icon.

u

The rear system changes to AUTO mode.

u

The system automatically adjusts the fan speed and airflow levels to maintain 
the set rear temperature. Change the temperature if necessary.

u

To turn off the rear climate control system, select the 

ON/OFF

 icon.

Using the Rear Climate Control System From the Front Panel

1

Rear Climate Control System

LOCK

 appears on the rear control panel while the 

rear lock is on.

If the rear lock is on while in SYNC mode, the rear 
control panel is disabled. 

LOCK SYNC

 appears on the 

rear control panel.

1

Using the Rear Climate Control System From the Front Panel

Select the 

LOCK

 icon to turn the rear lock mode on 

and off.

While the rear lock mode is on, the rear control panel 
is disabled.

u

The color of 

LOCK

 icon on the audio/information 

screen changes from gray to blue.

LOCK

 Icon

REAR CLIMATE


Button

Rear 

AUTO

 Icon

Rear Fan Control 
Icon

Mode Control Icon 
(Rear floor vents)

Mode Control Icon 
(Rear ceiling vents and 
floor vents)

Mode Control Icon 
(Rear ceiling vents)

ON/OFF

 Icon

Rear 
Temperature 
Control Icon

255

uu

Climate Control System

u

Rear Climate Control System

Co
ntrols

Use the system when the engine is running.

1.

Press the 

AUTO

 button.

2.

Adjust the interior temperature using the rear temperature control bar.

3.

To turn off the rear climate control system, press 

 button.

Using the Rear Climate Control System From the Rear Panel

1

Using the Rear Climate Control System From the Front Panel

When the rear fan is set to maximum speed, Auto 
Idle Stop does not activate.

u

Auto Idle Stop may not activate under other 

conditions when the rear climate control system is 
in use.

1

Using the Rear Climate Control System From the Rear Panel

When the rear lock mode is off, the temperature of 
the rear passenger compartment can be controlled 
independently.

Rear ceiling 
vents

Rear floor 
vents

Rear ceiling vents 
and floor vents

 (Rear Fan 

Control) Bar

Rear Temperature 
Control Bar

 (On/Off) Button

Rear 

MODE

 Button

Rear 

AUTO

 Button

256

uu

Climate Control System

u

Automatic Climate Control Sensors

Co
ntrols

Automatic Climate Control Sensors

The automatic climate control system is 
equipped with sensors. Do not cover or spill 
any liquid on them.

Sensor

Sensor

257

Features

This chapter describes how to operate technology features.

Audio System

About Your Audio System................ 258
USB Ports ......................................... 259
Auxiliary Input Jack .......................... 261
Audio System Theft Protection ......... 261
Audio Remote Controls.................... 262

Audio System Basic Operation

........ 264

Audio/Information Screen ................ 265
System Updates ............................... 279
File Manager .................................... 285
Adjusting the Sound ........................ 291
Display Setup ................................... 292
Voice Control Operation .................. 294

Playing AM/FM Radio....................... 297
Playing SiriusXM

®

 Radio

*

................. 300

Playing an iPod ................................ 310
Playing a USB Flash Drive ................. 313
Playing My Honda Music.................. 316
Playing 

Bluetooth

®

 Audio................. 320

Playing Social Playlist........................ 322
HondaLink

®

..................................... 324

Wi-Fi Connection ............................. 329
AT&T Hotspot

*

................................ 330

Siri Eyes Free .................................... 331
Apple CarPlay .................................. 332
Android Auto

TM

................................ 335

Audio Error Messages

...................... 339

General Information on the Audio System

.. 341

Blu-ray/DVD Rear Entertainment System

*

... 365

Customized Features

........................ 413

HomeLink

®

 Universal Transceiver

*

.. 426

Bluetooth

®

 HandsFreeLink

®

............. 429

CabinWatch

®

*

................................... 454

CabinTalk

®

*

....................................... 455

* Not available on all models

258

Features

Audio System

About Your Audio System

The audio system features AM/FM radio and SiriusXM

®

 Radio

*

 service. It can also 

play audio CDs

*

, USB flash drives, iPod, iPhone, iPad and 

Bluetooth

®

 devices.

You can operate the audio system from the knob on the panel, the remote controls 
on the steering wheel, or the icons on the touchscreen interface.

1

About Your Audio System

State or local laws may prohibit the operation of 
handheld electronic devices while operating a 
vehicle.

Video CDs and 3-inch (8-cm) mini CDs are not 
supported.

SiriusXM

®

 Radio

*

 is available on a subscription basis 

only. For more information on SiriusXM

®

 Radio

*

contact a dealer.

2

General Information on the Audio System


P. 341

SiriusXM

®

 Radio

*

 is available in the United States and 

Canada, except Hawaii, Alaska, and Puerto Rico.

SiriusXM

®

*

 is a registered trademark of SiriusXM 

Radio

*

, Inc.

After you set the power mode to VEHICLE OFF, you 
can use the audio system for up to 30 minutes per 
driving cycle, or until opening the driver’s door. 
However, whether you can continue using the audio 
system depends on the battery condition. Repeatedly 
using this feature may drain the battery.

Models with Blu-ray

TM

 player

Remote Controls

iPod

USB Flash Drive

* Not available on all models


Content      ..     5      6      7      8     ..