Honda Accord (2024 year). Manual in english - page 15
 

  Index      Manuals     Honda Accord (2024 year). Manual in english (Хонда Аккорд - руководство на английском, 2024 год)


Search            copyright infringement  


Content      ..     13      14      15     


Honda Accord (2024 year). Manual in english - page 15


483

uu

Engine Does Not Start

u

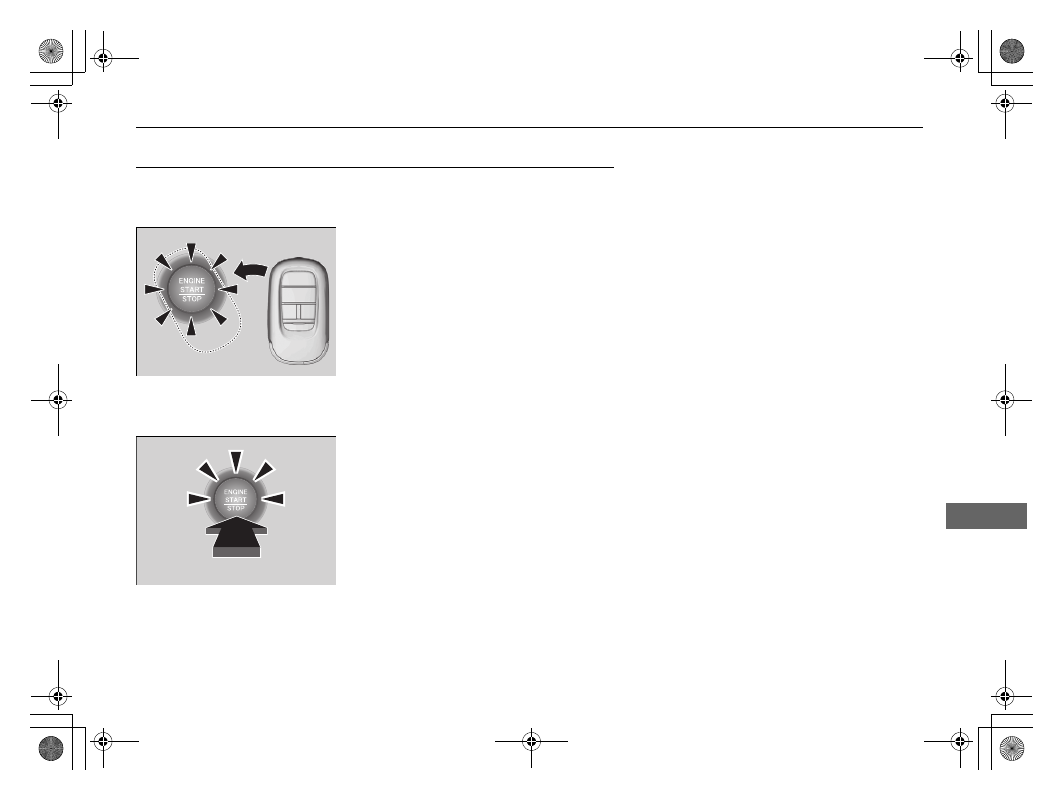
If the Keyless Remote Battery is Weak

Han
dlin

g the U

nexpected

If the Keyless Remote Battery is Weak

If the beeper sounds, the 

To start, touch start button with emblem side of 

remote

 message appears on the driver information interface, the 

ENGINE START/

STOP

 button flashes, and the engine won’t start, start the engine as follows:

1.

Press the 

ENGINE START/STOP

 button.

u

The beeper sounds and the 

ENGINE 

START/STOP

 button flashes for about 

30 seconds.

2.

Touch the center of the 

ENGINE START/

STOP

 button with the 

H

 logo on the keyless 

remote while the 

ENGINE START/STOP


button is flashing. The buttons on the 
keyless remote should be facing you.

u

The beeper sounds, and the 

ENGINE 

START/STOP

 button stays on for about 

10 seconds.

3.

Depress the brake pedal and press the 

ENGINE START/STOP

 button while the 

ENGINE START/STOP

 button is on.

u

The engine starts.

u

If you don’t depress the pedal, the mode 
will change to ACCESSORY.

484

uu

Engine Does Not Start

u

Emergency Engine Start

Han
dlin

g the U

nexpected

Emergency Engine Start

If the engine does not start using the normal starting procedure, you may be able to 
start it using the emergency starting procedure below.
Do not use this procedure if it is not an emergency.

1.

Make sure the parking brake is applied.

2.

Check that the transmission is in 

(

P

, then set the power mode to ACCESSORY.

3.

Firmly depress the brake pedal, then press and hold the 

ENGINE START/STOP


button for at least 15 seconds.

This should be considered a system malfunction even if you are able to start the 
engine using the above procedure.
Have your vehicle checked by a dealer immediately.

1

Emergency Engine Start

Refer to the following if you cannot move the shift 
lever out of the 

(

P

 position.

2

Shift Lever Does Not Move

 P. 488

485

uu

Engine Does Not Start

u

Emergency Engine Stop

Han
dlin

g the U

nexpected

Emergency Engine Stop

The 

ENGINE START/STOP

 button may be used to stop the engine due to an 

emergency situation even while driving. If you must stop the engine, do either of the 
following operations:

Press and hold the 

ENGINE START/STOP

 button for about two seconds.

Firmly press the 

ENGINE START/STOP

 button three times.

The steering wheel will not lock. However, because turning off the engine disables 
the power assist the engine provides to the steering and braking systems, it will 
require significantly more physical effort and time to steer and slow the vehicle. Use 
both feet on the brake pedal to slow down the vehicle and stop immediately in a 
safe place.

The power mode is in ACCESSORY when the engine is stopped.
To change the mode to VEHICLE OFF, put the transmission into 

(

P

 after the vehicle 

comes to a complete stop.

1

Emergency Engine Stop

NOTICE

Do not press the 

ENGINE START/STOP

 button while 

driving unless it is absolutely necessary for the engine 
to be turned off.
If you press the 

ENGINE START/STOP

 button while 

driving, the beeper sounds.

486

Han
dlin

g the U

nexpected

If the Battery Is Dead

Jump Starting Procedure

Turn off the power to electric devices, such as audio and lights. Turn off the engine, 
then open the hood.

1.

Open the cover on the positive 

+

 terminal.

2.

Connect the first jumper cable to your 
vehicle’s battery 

+

 terminal.

3.

Connect the other end of the first jumper 
cable to the booster battery 

+

 terminal.

u

Use a 12-volt booster battery only.

u

When using an automotive battery 
charger to boost your 12-volt battery, 
select a lower charging voltage than 
15-volt. Check the charger manual for 
the proper setting.

4.

Connect the second jumper cable to the 
booster battery 

-

 terminal.

5.

Connect the other end of the second 
jumper cable to the stud bolt as shown. Do 
not connect this jumper cable to any other 
part.

6.

If your vehicle is connected to another 
vehicle, start the assisting vehicle’s engine 
and increase its RPM slightly.

7.

Attempt to start your vehicle’s engine. If it 
turns over slowly, check that the jumper 
cables have good metal-to-metal contact.

1

Jump Starting Procedure

Securely attach the jumper cables clips so that they 
do not come off when the engine vibrates. Be careful 
not to tangle the jumper cables or allow the cable 
ends to touch each other while attaching or 
detaching the jumper cables.

Battery performance degrades in cold conditions and 
may prevent the engine from starting.

3

WARNING

A battery can explode if you do not follow 

the correct procedure, seriously injuring 

anyone nearby.

Keep all sparks, open flames, and smoking 

materials away from the battery.

Booster Battery

487

uu

If the Battery Is Dead

u

Jump Starting Procedure

Han
dlin

g the U

nexpected

Once your vehicle’s engine has started, remove the jumper cables in the following 
order.

1.

Disconnect the jumper cable from your vehicle’s ground.

2.

Disconnect the other end of the jumper cable from the booster battery 

-


terminal.

3.

Disconnect the jumper cable from your vehicle’s battery 

+

 terminal.

4.

Disconnect the other end of the jumper cable from the booster battery 

+


terminal.

Have your vehicle inspected by a nearby service station or a dealer.

What to Do After the Engine Starts

1

What to Do After the Engine Starts

The Vehicle Stability Assist

TM

 (VSA

®

) system, Adaptive 

Cruise Control (ACC) with Low Speed Follow, safety 
support, low tire pressure/TPMS

*

, and parking brake 

and brake system (amber) indicators may come on in 
amber along with a message in the driver information 
interface when you set the power mode to ON after 
reconnecting the battery.
Drive a short distance at more than 12 mph (20 km/h).
Each indicator should go off. If any do not, have your 
vehicle checked by a dealer.

* Not available on all models

488

Han
dlin

g the U

nexpected

Shift Lever Does Not Move

Follow the procedure below if you cannot move the shift lever out of the 

(

P


position.

1.

Set the parking brake.

2.

Set the power mode to VEHICLE OFF.

3.

Remove the built-in key from the keyless 
remote.

4.

Wrap a cloth around the tip of the built-in 
key. Put it into the shift lock release slot as 
shown in the image, and remove the cover.

5.

Insert the key into the shift lock release slot.

6.

While pushing the key down, press the shift 
lever release button, and place the shift 
lever into 

(

N

.

u

The lock is now released. Have the shift 
lever checked by a dealer as soon as 
possible.

Releasing the Lock

Slot

Cover

Release Button

Shift Lock Release Slot

489

Continued

Han
dlin

g the U

nexpected

Overheating

How to Handle Overheating

Overheating symptoms are as follows:

The temperature gauge is at the 

 mark or the engine suddenly loses power.

The 

Engine temperature too hot. Do not drive. Allow engine to cool.


message appears on the driver information interface.

Steam or spray comes out of the engine compartment.

First thing to do

1.

Immediately park the vehicle in a safe place.

2.

Turn off all accessories and turn on the hazard warning lights.

u

No steam or spray present:

 Keep the engine running and open the hood.

u

Steam or spray is present:

 Turn off the engine and wait until it subsides. 

Then, open the hood.

1

How to Handle Overheating

NOTICE

Continuing to drive with the temperature gauge at 
the 

 mark may damage the engine.

Continuing to drive with the 

Engine temperature 

too hot. Do not drive. Allow engine to cool.


message on the driver information interface may 
damage the engine.

3

WARNING

Steam and spray from an overheated 

engine can seriously scald you.

Do not open the hood if steam is coming 

out.

H

H

uu

Overheating

u

How to Handle Overheating

490

Han
dlin

g the U

nexpected

Next thing to do

1.

Check that the cooling fan is operating and 
stop the engine once the temperature 
gauge goes down.

u

If the cooling fan is not operating, 
immediately stop the engine.

2.

Once the engine has cooled down, inspect 
the coolant level and check the cooling 
system components for leaks.

u

If the coolant level in the reserve tank is 
low, add coolant until it reaches the 

MAX

 mark.

u

If there is no coolant in the reserve tank, 
check that the radiator is cool. Cover the 
radiator cap with a heavy cloth and open 
the cap. If necessary, add coolant up to 
the base of the filler neck, and put the 
cap back on.

Last thing to do

Once the engine has cooled sufficiently, restart it and check the temperature gauge.
If the temperature gauge has gone down, resume driving. If it has not gone down, 
contact a dealer for repairs.

1

How to Handle Overheating

If the coolant is leaking, contact a dealer for repairs.

Use water as an emergency/temporary measure only. 
Have a dealer flush the system with proper antifreeze 
as soon as possible.

3

WARNING

Removing the radiator cap while the 

engine is hot can cause the coolant to spray 

out, seriously scalding you.

Always let the engine and radiator cool 

down before removing the radiator cap.

MAX

Reserve Tank

MIN

491

Han
dlin

g the U

nexpected

Indicator Coming On/Blinking

If the Engine oil pressure low Warning Appears

Reasons for the warning to appear

Appears when the engine oil pressure is low.

What to do as soon as the warning 
appears

1.

Immediately park the vehicle on level 
ground in a safe place.

2.

If necessary, turn the hazard warning lights 
on.

What to do after parking the vehicle

1.

Stop the engine and let it sit for 
approximately three minutes.

2.

Open the hood and check the oil level.

u

Add oil as necessary.

2

Oil Check

 P. 438

3.

Start the engine and check the 

Engine oil 

pressure low

 warning.

u

The warning disappears: Start driving 
again.

u

The warning does not disappear within 
10 seconds: Immediately stop the engine 
and contact a dealer for repairs.

If the Charging System Indicator Comes On

Reasons for the indicator to come on

Comes on when there is a problem with the charging system.

What to do when the indicator comes on

Stop in a safe place and have your vehicle checked by a dealer 
immediately.

1

If the 

Engine oil pressure low

 Warning Appears

NOTICE

Running the engine with low oil pressure can cause 
serious mechanical damage almost immediately.

1

If the Charging System Indicator Comes On

If you need to stop temporarily, do not turn off the 
engine. Restarting the engine may rapidly discharge 
the battery.

492

uu

Indicator Coming On/Blinking

u

If the Malfunction Indicator Lamp Comes On or Blinks

Han
dlin

g the U

nexpected

If the Malfunction Indicator Lamp Comes On or 
Blinks

Reasons for the indicator lamp to come on or blink

Comes on when there is a problem with the engine emissions control 
system.

Blinks when engine misfiring is detected.

What to do when the indicator lamp comes on

Avoid high speeds and immediately get your vehicle inspected at a 
dealer.

What to do when the indicator lamp blinks

Park the vehicle in a safe place with no flammable items and wait at least 
10 minutes or more with the engine stopped until it cools.

1

If the Malfunction Indicator Lamp Comes On or Blinks

NOTICE

If you drive with the malfunction indicator lamp on, 
the emissions control system and the engine could be 
damaged.

If the malfunction indicator lamp blinks again when 
restarting the engine, drive to the nearest dealer at 
31 mph (50 km/h) or less. Have your vehicle 
inspected.

493

uu

Indicator Coming On/Blinking

u

If the Brake System Indicator (Red) Comes On or Blinks

Han
dlin

g the U

nexpected

If the Brake System Indicator (Red) Comes On or 
Blinks

Reasons for the indicator to come on

The brake fluid is low.

There is a malfunction in the brake system.

What to do when the indicator comes on while driving

Depress the brake pedal lightly to check pedal pressure.

If normal, check the brake fluid level the next time you stop.

If abnormal, take immediate action. If necessary, downshift the 
transmission to slow the vehicle using engine braking.

Reasons for the indicator to blink

There is a problem with the electric parking brake system.

What to do when the indicator blinks

Avoid using the parking brake and have your vehicle checked by a dealer 
immediately.

1

If the Brake System Indicator (Red) Comes On or Blinks

Have your vehicle repaired immediately.
It is dangerous to drive with low brake fluid. If there 
is no resistance from the brake pedal, stop 
immediately in a safe place. If necessary, downshift 
the gears.

If the brake system indicator (red) and 

ABS

 indicator 

come on simultaneously, the electronic brake 
distribution system is not working. This can result in 
vehicle instability under sudden braking.
Have your vehicle inspected by a dealer immediately.

If the brake system indicator (red) blinks at the same 
time when the brake system indicator (amber) comes 
on, the parking brake may not work.
Avoid using the parking brake and have your vehicle 
checked by a dealer immediately.

2

If the Brake System Indicator (Red) Comes 
On or Blinks at the Same Time When the 
Brake System Indicator (Amber) Comes On


P. 494

U.S.

Canada

(Red)

494

uu

Indicator Coming On/Blinking

u

If the Brake System Indicator (Red) Comes On or Blinks at the Same Time When the Brake System Indicator (Amber) Comes On

Han
dlin

g the U

nexpected

If the Brake System Indicator (Red) Comes On or 
Blinks at the Same Time When the Brake System 
Indicator (Amber) Comes On

If the brake system indicator (red) comes on or blinks at the 
same time when the brake system indicator (amber) comes on, 
release the parking brake manually or automatically.

2

Parking Brake

 P. 399

If the brake system indicator (red) continuously comes on or blinks at 
the same time when the brake system indicator (amber) comes on, 
stop the vehicle in a safe place and have it inspected by a dealer 
immediately.

u

To prevent the vehicle from moving, put the transmission into 

(

P

.

If only the brake system indicator (red) is turned off, avoid using the 
parking brake and have your vehicle checked by a dealer immediately.

1

If the Brake System Indicator (Red) Comes On or Blinks at the Same 
Time When the Brake System Indicator (Amber) Comes On

If you apply the parking brake, you may not be able 
to release it.

If the brake system indicator (red) and the brake 
system indicator (amber) come on at the same time, 
the parking brake is working.

If the brake system indicator (red) blinks at the same 
time when the brake system indicator (amber) comes 
on, the parking brake may not work because it is 
checking the system.

If you repeatedly operate the electric parking brake in 
a short period of time, the brake stops operating to 
prevent heating of the system and the indicator 
blinks.
It returns to its original state in approximately one 
minute.

U.S.

Canada

(Red)

U.S.

Canada

(Amber)

495

uu

Indicator Coming On/Blinking

u

If the Electric Power Steering (EPS) System Indicator Comes On

Han
dlin

g the U

nexpected

If the Electric Power Steering (EPS) System Indicator 
Comes On

Reasons for the indicator to come on

Comes on when there is a problem with the EPS system.

What to do when the indicator comes on

Stop the vehicle in a safe place and restart the engine.
If the indicator comes on and stays on, immediately have your vehicle 
inspected by a dealer.

If 

Do not drive

 displays on the driver information interface, 

immediately stop in a safe place and contact a dealer.

496

uu

Indicator Coming On/Blinking

u

If the Low Tire Pressure/TPMS Indicator Comes On or Blinks

*

Han
dlin

g the U

nexpected

If the Low Tire Pressure/TPMS Indicator Comes On or 
Blinks

*

Reasons for the indicator to come on or blink

A tire pressure is significantly low, or the TPMS has not been calibrated. 
If there is a problem with the TPMS, the indicator blinks for about one 
minute, and then stays on.
If the compact spare tire is installed, the indicator will either come on or 
it will first blink for about one minute, then stay on. 

What to do when the indicator comes on

Drive carefully and avoid abrupt cornering and hard braking.
Stop your vehicle in a safe place. Check the tire pressure and adjust the 
pressure to the specified level. The specified tire pressure is on a label on 
the driver side doorjamb.

u

Calibrate the TPMS after the tire pressure is adjusted.

2

TPMS Calibration

 P. 318

If the compact spare tire causes the indicator to come on, change the 
tire to a regular tire. The indicator goes off after calibrating the TPMS.

What to do when the indicator blinks, then remains on

Have the tire inspected by a dealer as soon as possible. If the compact 
spare tire causes the indicator to first blink, and then stay on, change the 
tire to a regular tire. The indicator goes off after calibrating the TPMS.

2

TPMS Calibration

 P. 318

1

If the Low Tire Pressure/TPMS Indicator Comes On or Blinks

*

NOTICE

Driving on an extremely underinflated tire can cause 
it to overheat. An overheated tire can fail. Always 
inflate your tires to the prescribed level.

* Not available on all models

497

Continued

Han
dlin

g the U

nexpected

Fuses

Fuse Locations

If any electrical devices are not working, set the power mode to VEHICLE OFF and 
check to see if any applicable fuse is blown.

Located near the battery. Push the tabs to open the box.
Fuse locations are shown on the fuse box cover. Locate the fuse in question by the 
fuse number and box cover number.

Engine Compartment Fuse Box

Tab

498

uu

Fuses

u

Fuse Locations

Han
dlin

g the U

nexpected

Circuit protected and fuse rating

Circuit Protected

Amps

1

BATTERY

125 A

2

DC/DC2

(30 A)

40 A

F/BOX OPTION

60 A

40 A

F/BOX OPTION2

60 A

60 A

F/BOX MAIN

60 A

3

(30 A)

ST MAGNETIC SW

30 A

40 A

30 A

50 A

HTR MTR

40 A

RR DEFROSTER

40 A

4

ABS/VSA FSR

40 A

ABS/VSA MTR

40 A

40 A

EBB

40 A

IG MAIN

30 A

40 A

R/M2

30 A

5

DC/DC

(30 A)

WIPER

30 A

EPS

70 A

R/M1

30 A

40 A

MAIN FAN

30 A

F/BOX MAIN2

60 A

6

SUB FAN

30 A

7

IG MAIN2

30 A

8

9

BACK UP

15 A

10

WASHER

15 A

11

12

13

14

15

SHUTTER GRILLE

(10 A)

16

17

MG CLUTCH

10 A

18

HORN

10 A

19

20

21

Circuit Protected

Amps

22

DBW

15 A

23

HAZARD

15 A

24

BACKUP FI-ECU

10 A

25

IGP

15 A

26

TCU

15 A

27

LCM L

20 A

28

INJ

20 A

29

STOP

10 A

30

LCM R

20 A

31

IG COIL

15 A

32

33

34

35

36

IGPS [LAF]

10 A

37

BACKUP2

(30 A)

38

39

VBACT

10 A

40

IGPS FAN

7.5 A

41

42

MON2

7.5 A

Circuit Protected

Amps

499

uu

Fuses

u

Fuse Locations

Continued

Han
dlin

g the U

nexpected

Located under the dashboard.
Fuse locations are shown on the label under the steering column.
Locate the fuse in question by the fuse number and label number.

Interior Main Fuse Box

Main Fuse Box

Fuse Label

500

uu

Fuses

u

Fuse Locations

Han
dlin

g the U

nexpected

Circuit protected and fuse rating

Circuit Protected

Amps

1

P/W DR

20 A

2

P/W AS

20 A

3

P/W RR R

20 A

4

P/W RR L

20 A

5

OPTION

10 A

6

SRS

10 A

7

TRUNK LOCK ACT

10 A

8

9

FR ACC SOCKET

20 A

10

DOOR LOCK

20 A

11

METER

10 A

12

STARTER CUT

(10 A)

13

OPTION2

10 A

14

MISS SOL

10 A

15

DR DOOR UNLOCK

(10 A)

16

17

18

19

20

CGW

10 A

21

22

SMART

10 A

23

DR DOOR LOCK

(10 A)

24

25

26

SRS

10 A

27

ACG

10 A

28

VSA/ABS

10 A

29

FUEL PUMP

20 A

30

L SIDE DOOR UNLOCK

10 A

31

R SIDE DOOR UNLOCK

10 A

32

SUN ROOF

*

(20 A)

33

(7.5 A)

34

USB CHG

10 A

35

36

37

38

(20 A)

39

R SIDE DOOR LOCK

10 A

40

DR P/SEAT SLIDE

*

(20 A)

41

DR P/SEAT REC

*

(20 A)

Circuit Protected

Amps

42

(10 A)

43

A/C

10 A

44

DRL

10 A

45

ACC

10 A

46

ACC KEY LOCK

10 A

47

L SIDE DOOR LOCK

10 A

48

FR H/SEAT

*

(20 A)

49

(20 A)

50

P/LUMBAR DR

*

(10 A)

51

52

53

(20 A)

54

OPTION1

10 A

55

56

Circuit Protected

Amps

* Not available on all models

501

uu

Fuses

u

Fuse Locations

Han
dlin

g the U

nexpected

Located under the dashboard.
Fuse locations are shown on the label under 
the steering column.
Locate the fuse in question by the fuse 
number and label number.

Interior Sub Fuse Box

Sub Fuse Box

Fuse Label

Circuit protected and fuse rating

Circuit Protected

Amps

A

B

EOP

(10 A)

C

AUDIO VST

(15 A)

D

ACC VST

(10 A)

E

F

G

METER

(10 A)

H

OPTION

(10 A)

502

uu

Fuses

u

Inspecting and Changing Fuses

Han
dlin

g the U

nexpected

Inspecting and Changing Fuses

1.

Set the power mode to VEHICLE OFF. Turn 
headlights and all accessories off.

2.

Remove the fuse box cover.

3.

Check the main fuse in the engine 
compartment fuse box.

u

Look at the fuse through the hole.

u

If the fuse is blown, have it replaced by a 
dealer.

1

Inspecting and Changing Fuses

NOTICE

Replacing a fuse with one that has a higher rating 
greatly increases the chances of damaging the 
electrical system.

Use the charts to locate the fuse in question and 
confirm the specified amperage on the fuse label.

2

Fuse Locations

 P. 497

Replace with a fuse of the same specified amperage.

Main Fuse

Hole

503

uu

Fuses

u

Inspecting and Changing Fuses

Han
dlin

g the U

nexpected

4.

Check the combined fuses in the engine 
compartment fuse box.

u

Look into the space between the fuses.

u

If the fuse is blown, have it replaced by a 
dealer.

5.

Inspect the small fuses in the engine 
compartment and the vehicle interior.

u

If there is a blown fuse, remove it with 
the fuse puller and replace it with a new 
one.

1

Inspecting and Changing Fuses

There is a fuse puller on the back of the engine 
compartment fuse box cover.

Combined Fuse

Blown Fuse

Fuse Puller

504

Han
dlin

g the U

nexpected

Emergency Towing

Call a professional towing service if you need to tow your vehicle.

Flatbed equipment

The operator loads your vehicle on the back of a truck.

This is the best way to transport your vehicle.

Wheel lift equipment

The tow truck uses two pivoting arms that go under the front tires and lift them off 
the ground. The rear tires remain on the ground. 

This is an acceptable way to 

tow your vehicle.

1

Emergency Towing

NOTICE

Trying to lift or tow your vehicle by the bumpers will 
cause serious damage. The bumpers are not designed 
to support the vehicle’s weight.

Make sure the parking brake is released. If you 
cannot release the parking brake, your vehicle must 
be transported by the flatbed equipment.

2

Parking Brake

 P. 399

NOTICE

Improper towing such as towing behind a 
motorhome or other motor vehicle can damage the 
transmission.

Never tow your vehicle with just a rope or chain.
It is very dangerous since ropes or chains may shift 
from side to side or break.

505

Han
dlin

g the U

nexpected

If You Cannot Unlock the Fuel Fill Door

If you cannot unlock the fuel fill door, use the following procedure.

1.

Open the trunk.

2.

Pull the release cord as shown.

3.

Open the fuel fill door.

2

How to Refuel

 P. 418

What to Do If Unable to Unlock the Fuel Fill Door

1

What to Do If Unable to Unlock the Fuel Fill Door

After taking these steps, contact a dealer to have the 
vehicle checked.

Release Cord

506

Han
dlin

g the U

nexpected

If You Cannot Open the Trunk

If you cannot open the trunk, use the following procedure.

1.

Push the lower left side of the cover to 
remove it.

2.

Remove the built-in key from the keyless 
remote.

3.

Insert the key into the cylinder and turn it 
clockwise.

u

The trunk unlocks and opens.

What to Do If Unable to Open the Trunk

1

What to Do If Unable to Open the Trunk

Following up:
After taking these steps, contact a dealer to have the 
vehicle checked.

Cover

Key

Models with the cylinder in the cover

507

uu

If You Cannot Open the Trunk

u

Han
dlin

g the U

nexpected

2.

Pull the trunk release cord in the direction 
of the arrow in the image.

u

The trunk unlocks and opens.

Trunk Release Cord

Models without the cylinder in the cover

508

Han
dlin

g the U

nexpected

Refueling

Refueling From a Portable Fuel Container

If you have run out of fuel and need to refuel your vehicle from a portable fuel 
container, use the funnel provided with your vehicle.

1.

Turn off the engine.

2.

Open the fuel fill door.

2

How to Refuel

 P. 418

3.

Take the funnel out of the tool case in the 
trunk.

2

Types of Tools

 P. 474

4.

Place the end of the funnel on the lower 
part of filler opening, then insert it slowly 
and fully.

u

Make sure that the end of the funnel 
goes down along with the filler pipe.

5.

Fill the tank with fuel from the portable fuel 
container.

u

Pour fuel carefully so you do not spill any.

6.

Remove the funnel from the filler neck.

u

Wipe up any fuel from the funnel before 
storing it.

7.

Shut the fuel fill door by hand.

1

Refueling From a Portable Fuel Container

NOTICE

Do not insert the nozzle of a portable fuel container 
or any funnel other than the one provided with your 
vehicle. Doing so can damage the fuel system.
Do not try to pry open or push open the sealed fuel 
tank with foreign objects. This can damage the fuel 
system and its seal.

Make sure the fuel in the portable fuel container is 
gasoline before you refuel.

3

WARNING

Gasoline is highly flammable and explosive.

You can be burned or seriously injured 

when handling fuel.

Stop the engine, and keep heat, sparks, 

and flames away.

Handle fuel only outdoors.

Wipe up spills immediately.

Funnel

510

Info
rm

ation

Specifications

Vehicle Specifications

Air Conditioning

Model

ACCORD

No. of Passengers:
Front

2

Rear

3

Total

5

Weights:
Gross Vehicle 
Weight Rating 

See the certification label on the driver’s 
doorjamb

Gross Axle Weight 
Rating (Front)

See the certification label on the driver’s 
doorjamb

Gross Axle Weight 
Rating (Rear)

See the certification label on the driver’s 
doorjamb

Refrigerant Type

HFO-1234yf (R-1234yf)

Charge Quantity

15.3 – 17.1 oz (435 – 485 g)

Lubricant Type

RB100EV-01 (POE)

Quantity

6.71 – 7.5 cu-in (110 – 123 cm

3

)

Engine Specifications

Fuel

Washer Fluid

Displacement

91.38 cu-in (1,498 cm

3

)

Spark Plugs

NGK

DILKAR8P8SY

Type

Unleaded gasoline, pump octane number 
87 or higher

Fuel Tank Capacity

14.8 US gal (56 L)

Tank Capacity

U.S.: 1.6 US qt (1.5 L)
Canada: 4.8 US qt (4.5 L)

Light Bulbs

Headlights (Low Beam)

LED

Headlights (High Beam)

LED

Parking/Daytime Running Lights

LED

Front Turn Signal Lights

LED

Front Side Marker Lights

LED

Brake Lights

LED

Rear Turn Signal Lights

LED

Rear Side Marker/Taillights

LED

Taillights

LED

Back-Up Lights

LED

High-Mount Brake Light

LED

Rear License Plate Light

LED

Interior Lights

Map Lights

LED

Ceiling Light

LED

Ambient Lights

LED

Vanity Mirror Lights

LED

Center Console Light

LED

Trunk Light

LED

511

uu

Specifications

u

Info
rm

ation

Brake Fluid

Continuously Variable Transmission 

Fluid

Specified

Honda Heavy Duty Brake Fluid DOT 3

Specified

Honda HCF-2

Capacity

Change

3.9 US qt (3.7 L)

Engine Oil

Engine Coolant

Recommended

·Honda Genuine Motor Oil 0W-20
·API service SN or higher grade 0W-20

Capacity

Change

3.4 US qt (3.2 L)

Change 
including 
filter

3.7 US qt (3.5 L)

Specified

Honda Long-Life Antifreeze/Coolant Type 2

Ratio

50/50 with distilled water

Capacity

1.61 US gal (6.08 L)
(change including the remaining 
0.19 US gal (0.71 L) in the reserve tank)

Tire

Regular

Size

225/50R17 94V

Pressure
psi (kPa [kgf/cm

2

])

Front

33 (230 [2.3])

Rear

32 (220 [2.2])

Compact 
Spare

Size

T135/90D16 102M

Pressure
psi (kPa [kgf/cm

2

])

60 (420 [4.2])

Wheel Size

Regular

17 x 7 1/2J

Compact Spare

16 x 4T

512

Info
rm

ation

Identification Numbers

Vehicle Identification Number (VIN), Engine Number, 
and Transmission Number

Your vehicle has a 17-digit vehicle identification number (VIN) used to register your 
vehicle for warranty purposes, and for licensing and insuring your vehicle.
The locations of your vehicle’s VIN, engine number, and transmission number are 
shown as follows.

Vehicle Identification Number

Engine Number

Certification Label/Vehicle Identification Number

Continuously Variable 

Transmission Number

513

Info
rm

ation

Devices that Emit Radio Waves

Each radio frequency device installed in the vehicle conforms to the requirements 
and standards of the regulation listed below:

As required by the FCC:
This device complies with Part 15 of the FCC rules. Operation is 
subject to the following two conditions: (1) This device may not 
cause harmful interference, and (2) this device must accept any 
interference received, including interference that may cause 
undesired operation.

Changes or modifications not expressly approved by the party 
responsible for compliance could void the user's authority to 
operate the equipment.

This device complies with Industry Canada licence-exempt RSS standard(s). 
Operation is subject to the following two conditions: (1) this device may not cause 
interference, and (2) this device must accept any interference, including interference 
that may cause undesired operation of the device.

514

Info
rm

ation

Reporting Safety Defects

In the U.S.
If you believe that your vehicle has a defect which could cause a crash or could cause injury or death, you 
should immediately inform the National Highway Traffic Safety Administration (NHTSA) in addition to 
notifying American Honda Motor Co., Inc.

If NHTSA receives similar complaints, it may open an investigation, and if it finds that a safety defect exists 
in a group of vehicles, it may order a recall and remedy campaign. However, NHTSA cannot become involved 
in individual problems between you, your dealer, or American Honda Motor Co., Inc.

To contact NHTSA, you may call the Vehicle Safety Hotline toll-free at 1-888-327-4236 (TTY: 1-800-424-
9153); go to 

http://www.safercar.gov

; or write to: Administrator, NHTSA, 1200 New Jersey Avenue, SE., 

Washington, DC 20590. You can also obtain other information about motor vehicle safety from 

http://

www.safercar.gov

.

In Canada
If you believe that your vehicle has a defect which could cause a crash or could cause injury or death, you 
should immediately inform Honda Canada Inc. and you may also inform Transport Canada.

If Transport Canada receives similar complaints, it may open an investigation, and if it finds that a safety 
defect exists in a group of vehicles, it may lead to a recall and remedy campaign. However, Transport Canada 
cannot become involved in individual problems between you, your dealer, or Honda Canada Inc.

To contact Transport Canada’s Defect Investigations and Recalls Division, you may call 1-800-333-0510. For 
more information on reporting safety defects or about motor vehicle safety, go to 

http://www.tc.gc.ca/

roadsafety

.

515

Continued

Info
rm

ation

Emissions Testing

Testing of Readiness Codes

Your vehicle has readiness code as part of the onboard self diagnostic system.
Some states use these codes for testing to verify whether your vehicle’s emissions 
components are working properly.
The codes may not be read properly if testing is performed just after the battery has 
gone dead or been disconnected.

To check if they are set, set the power mode to ON, without starting the engine. The 
malfunction indicator lamp will come on for several seconds. If it then goes off, the 
readiness codes are set. If it blinks five times, the readiness codes are not set.

If you are required to have your vehicle tested before the readiness codes are ready, 
prepare the vehicle for retesting by doing the following:

1.

Fill the gas tank to approximately 3/4 full.

2.

Park the vehicle and leave the engine off for 6 hours or more.

3.

Make sure the ambient temperature is between 40°F and 95°F (4°C and 35°C).

4.

Start the engine without touching the accelerator pedal, and let it idle for 20 
seconds.

5.

Keep the vehicle in 

(

P

. Increase the engine speed to 2,000 rpm, and hold it there 

for about 3 minutes.

6.

Let the engine idle with your foot off the accelerator for 20 seconds.

1

Testing of Readiness Codes

The readiness codes are erased when the battery is 
disconnected, and set again only after several days of 
driving under a variety of conditions.

If a testing facility determines that the readiness 
codes are not set, you may be requested to return at 
a later date to complete the test.

If the testing facility determines the readiness codes 
are still not set, see a dealer.

516

uu

Emissions Testing

u

Testing of Readiness Codes

Info
rm

ation

7.

Select a nearby, lightly traveled major highway where you can maintain a speed 
of 50 to 60 mph (80 to 97 km/h) for at least 20 minutes. Drive on the highway in 

(

D

. Do not use cruise control. When traffic allows, drive for 90 seconds without 

moving the accelerator pedal. (Vehicle speed may vary slightly; this is okay.) If you 
cannot do this for a continuous 90 seconds because of traffic conditions, drive for 
at least 30 seconds, then repeat it two more times (for a total of 90 seconds).

8.

Drive in city or suburban traffic for at least 10 minutes. When traffic conditions 
allow, let the vehicle coast for several seconds without using the accelerator pedal 
or the brake pedal.

9.

Park the vehicle and leave the engine off for 40 minutes.

517

Continued

Info
rm

ation

Warranty Coverages

U.S. Owners

Your new vehicle is covered by these warranties:

New Vehicle Limited Warranty –

 covers your new vehicle, except for the 

emissions control systems and accessories, against defects in materials and 
workmanship.

Emissions Control Systems Defects Warranty and Emissions Performance 
Warranty –

 these two warranties cover your vehicle’s emissions control systems. 

Time, mileage, and coverage are conditional. Please read your warranty booklet for 
exact information.

Seat Belt Limited Warranty –

 a seat belt that fails to function properly is covered 

by a limited warranty. Please read your warranty booklet for details.

Rust Perforation Limited Warranty –

 all exterior body panels are covered against 

rusting from the inside out for the specified time period, regardless of mileage.

Accessory Limited Warranty –

 Honda accessories are covered under this 

warranty. Time and mileage limits depend on the type of accessory and other 
factors. Please read your warranty booklet for details.

Replacement Parts Limited Warranty –

 covers all Honda replacement parts 

against defects in materials and workmanship.

518

uu

Warranty Coverages

u

Info
rm

ation

Replacement Battery Limited Warranty –

 provides prorated coverage for a 

replacement battery purchased from your dealer.

Replacement Muffler Lifetime Limited Warranty –

 provides coverage for as 

long as the purchaser of the muffler owns the vehicle.

Restrictions and exclusions apply to all these warranties. Please read the Honda 
warranty information booklet that came with your vehicle for precise information on 
warranty coverages. Your vehicle’s original tires are covered by their manufacturer. 
Tire warranty information is in a separate booklet.

Statement on Warranty Coverage for Aftermarket and Recycled Parts

The Magnuson-Moss Warranty Act, 15 U.S.C. s.2301 et seq., makes it illegal for 
motor vehicle manufacturers to void a motor vehicle warranty or deny warranty 
coverage solely because an aftermarket or recycled part has been used to repair the 
vehicle or someone other than the authorized service provider performed service on 
the vehicle. This provision does not apply to a new motor vehicle purchased solely 
for commercial or industrial use.

Under federal law, a manufacturer may deny warranty coverage and charge for repairs 
to a vehicle if it is discovered that an aftermarket or recycled part installed on the 
vehicle is defective or was installed incorrectly and caused damage to another part of 
the vehicle otherwise covered under warranty. The Federal Trade Commission requires 
that a manufacturer demonstrate that an aftermarket or recycled part or service 
performed by a person other than an authorized service provider caused damage to 
another part of the vehicle otherwise covered under warranty before denying 
warranty coverage. Additionally, federal law allows a manufacturer to void a motor 
vehicle warranty or deny warranty coverage if the manufacturer provides the article or 
service to consumers free of charge under the warranty or the manufacturer has 
secured a waiver from the Federal Trade Commission.

519

uu

Warranty Coverages

u

Info
rm

ation

Canadian Owners

Please refer to the warranty manual that came with your vehicle.

EPA Contact Information

An owner may obtain further information concerning emission warranties or report 
violations of the terms of the emission warranties by contacting:

Director,
Light-Duty Vehicle Center,
U.S. Environmental Protection Agency,
Attention: Warranty Claim
2000 Traverwood Drive,
Ann Arbor, MI 48105;
complianceinfo@epa.gov

520

Info
rm

ation

Authorized Manuals

Service Express

For electronic copies of service publications, you can purchase a subscription to 
Service Express. Visit 

https://techinfo.honda.com/

 for pricing and options.

For U.S. Owners

Manuals can be purchased from Helm Incorporated. You can order a manual by 
phone at 1(800) 782-4356 (credit card orders only), or online at 

www.helminc.com

.

For Canadian Owners

Please contact a dealer to order any manuals that you may require.

521

Info
rm

ation

Customer Service Information

Honda dealership personnel are trained professionals able to deal with any problems 
you may encounter with your vehicle. If, however, you are faced with a problem that 
they cannot resolve to your satisfaction, contact Honda Customer Services.

U.S. Owners

American Honda Motor Co., Inc.
Honda Automobile Customer Service
Mail Stop CHI-5
1919 Torrance Blvd.
Torrance, CA 90501-2746
Tel: 1 (800) 999-1009

Canadian Owners

Honda Canada Inc.
Customer Relations
180 Honda Boulevard
Markham, ON
L6C 0H9
Tel: 1-888-9-HONDA-9
Fax: 1-877-939-0909
E-mail: Honda_cr@ch.honda.com

In Puerto Rico and the U.S. Virgin 
Islands

Bella International
P.O. Box 190816
San Juan, PR 00919-0816
Tel: 1 (787) 620-7546

In Guam

Triple J Autogroup
157 S. Marine Corps Drive
Tamuning, GU 96913
Tel: (671) 648-2277

In Saipan, Commonwealth of the 
Northern Mariana Islands

Joeten Motor Company, Inc.
P.O. Box 500680
Saipan, MP 96950
Tel: (670) 234-5562

1

Customer Service Information

When you call or write, please give us the following 
information:

Vehicle Identification Number

2

Vehicle Identification Number (VIN), 
Engine Number, and Transmission 
Number

 P. 512

Date of purchase

Odometer reading of your vehicle

Your name, address, and telephone number

A detailed description of the problem

Name of the dealer who sold the vehicle to you

522

Info
rm

ation

Open Source License

Meter Open Source License

QNX
The software embedded in this product includes open source software. Refer to the 
following website for details regarding the open source software.

https://www.denso.com/global/en/opensource/meter/honda/

TCU Open Source License

To obtain the source code under GPL, LGPL, MPL, and other open source licenses 
that have the obligations to disclose source code, that is contained in this product, 
and to access all referred license terms, copyright notices and other relevant 
documents please visit 

https://opensource.lge.com

. LG Electronics will also provide 

open source code to you on CD-ROM for a charge covering the cost of performing 
such distribution (such as the cost of media, shipping, and handling) upon email 
request to opensource@lge.com. This offer is valid to anyone in receipt of this 
information for a period of three years after our last shipment of this product.

523

uu

Open Source License

u

Front Sensor Camera Open Source License

Info
rm

ation

Front Sensor Camera Open Source License

“The product includes code under public domain : 

https://www.jonolick.com/uploads/7/9/2/1/7921194/jo_jpeg.cpp

The code is based on 

https://github.com/jpeg-js/jpeg-js/blob/master/lib/encoder.js

All rights reserved.

Redistribution and use in source and binary forms, with or without modification, are permitted provided that the following conditions are 
met:

* Redistributions of source code must retain the above copyright notice, this list of conditions and the following disclaimer.

* Redistributions in binary form must reproduce the above copyright notice, this list of conditions and the following disclaimer in the 
documentation and/or other materials provided with the distribution.

* Neither the name of Adobe Systems Incorporated nor the names of its contributors may be used to endorse or promote products derived 
from this software without specific prior written permission.

THIS SOFTWARE IS PROVIDED BY THE COPYRIGHT HOLDERS AND CONTRIBUTORS "AS IS" AND ANY EXPRESS OR IMPLIED WARRANTIES, 
INCLUDING, BUT NOT LIMITED TO, THE IMPLIED WARRANTIES OF MERCHANTABILITY AND FITNESS FOR A PARTICULAR PURPOSE ARE 
DISCLAIMED. IN NO EVENT SHALL THE COPYRIGHT OWNER OR CONTRIBUTORS BE LIABLE FOR ANY DIRECT, INDIRECT, INCIDENTAL, 
SPECIAL, EXEMPLARY, OR CONSEQUENTIAL DAMAGES (INCLUDING, BUT NOT LIMITED TO, PROCUREMENT OF SUBSTITUTE GOODS OR 
SERVICES; LOSS OF USE, DATA, OR PROFITS; OR BUSINESS INTERRUPTION) HOWEVER CAUSED AND ON ANY THEORY OF LIABILITY, 
WHETHER IN CONTRACT, STRICT LIABILITY, OR TORT (INCLUDING NEGLIGENCE OR OTHERWISE) ARISING IN ANY WAY OUT OF THE USE 
OF THIS SOFTWARE, EVEN IF ADVISED OF THE POSSIBILITY OF SUCH DAMAGE.
*/
/*


Content      ..     13      14      15