Honda Accord Hybrid (2022 year). Manual in english - page 5
 

  Index      Manuals     Honda Accord Hybrid (2022 year). Manual in english


Search            copyright infringement  


Content      ..     3      4      5      6     ..


Honda Accord Hybrid (2022 year). Manual in english - page 5


Continued

77

uu

Child Safety

u

Safety of Infants and Small Children

Safe 

Driving

4.

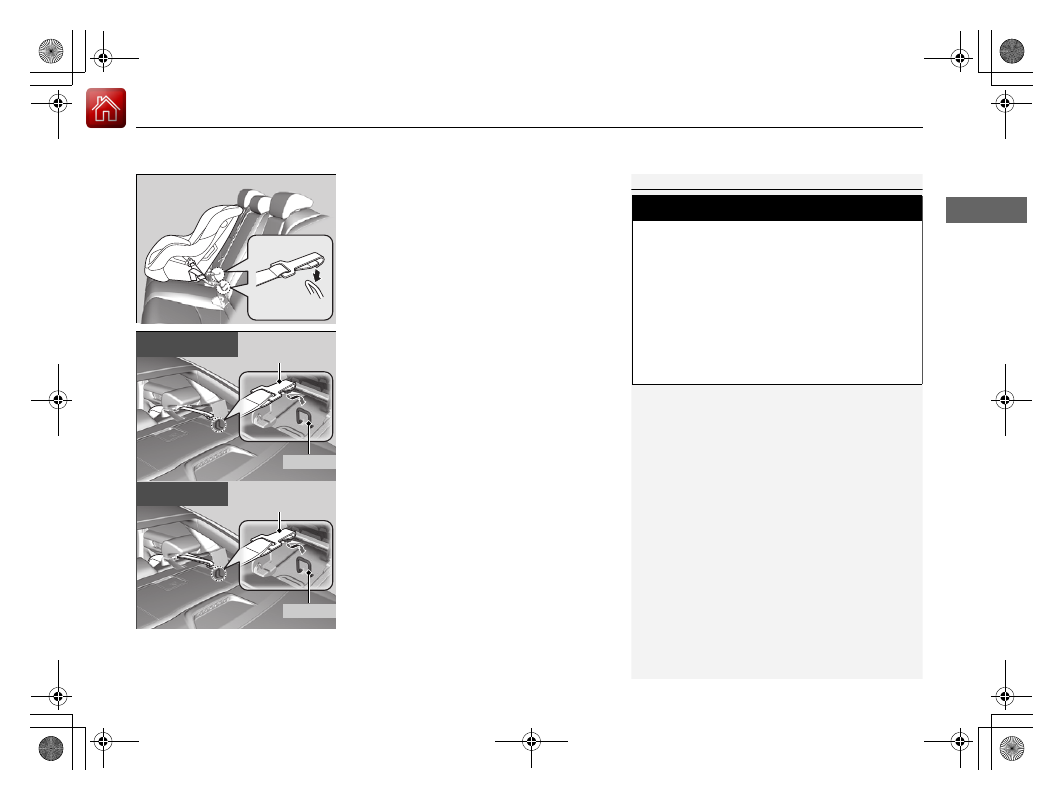
Open the tether anchor cover behind the 
head restraint.

5.

Raise the head restraint to its highest 
position, then route the tether strap 
between the head restraint legs, and secure 
the tether strap hook to the anchor.

6.

Tighten the tether strap as instructed by the 
child seat manufacturer.

7.

Make sure the child seat is firmly secured by 
rocking it forward and back and side to 
side; little movement should be felt.

8.

Make sure any unused seat belt that a child 
can reach is buckled, the lockable retractor 
is activated, and the belt is fully retracted 
and locked.

1

Installing a LATCH-Compatible Child Seat

Installing a LATCH-compatible child seat in the 
rear center seat

Each outer rear seat is equipped with a pair of lower 
anchors which are used to secure a LATCH-compatible 
child seat. The rear center seat, however, is not 
equipped with anchors of any kind. The inner and 
outer anchors are spaced apart at a standard distance 
of 11 inches (280 mm). The distance between the two 
inner anchors is 15.4 inches (390 mm).
LATCH-compatible restraint systems that are fitted 
with rigid-type attachments cannot be installed in the 
rear center seat. However, a system fitted with flexible-
type attachments can be installed in the center seat, 
provided that the manufacturer’s instructions for that 
system permit the use of the inner anchors with the 
stated spacing. Before seating a child, make sure that 
the system is properly attached to both the lower 
anchors and tether anchors.

3

WARNING

Using the outer rear seats’ inner anchors to 
secure a LATCH-compatible child seat in the 
center seating position may result in failure 
of the child seat, causing injury or death.

Only use the outer rear seats’ inner anchors 
to install a child seat in the center seating 
position if the manufacturer's instructions 
expressly permit.

Flexible Type

Anchor

Tether Strap 

Hook

Straight top tether 

type

Anchor

Tether Strap 

Hook

Other top tether 

type

uu

Child Safety

u

Safety of Infants and Small Children

78

Safe 

Driving

A child seat can be installed with a lap/shoulder belt in any rear seat or, if absolutely 
necessary, the front passenger seat.

1.

Place the child seat on the vehicle seat.

2.

Route the seat belt through the child seat 
according to the seat manufacturer’s 
instructions, and insert the latch plate into 
the buckle.

u

Insert the latch plate fully until it clicks.

3.

Slowly pull the shoulder part of the belt all 
the way out until it stops. This activates the 
lockable retractor.

4.

 Let the seat belt retract a few inches and 
check that the retractor has switched 
modes by pulling on the webbing. It should 
not pull out again until it is reset by 
removing the latch plate from the buckle.

u

If you are able to pull the shoulder belt 
out, the lockable retractor is not 
activated. Slowly pull the seat belt all the 
way out, and repeat steps 3 – 4.

Installing a Child Seat with a Lap/Shoulder Seat Belt

1

Installing a Child Seat with a Lap/Shoulder Seat Belt

A child seat that is not properly secured will not 
adequately protect a child in a crash and may cause 
injury to the child or other vehicle occupants.

Continued

79

uu

Child Safety

u

Safety of Infants and Small Children

Safe 

Driving

5.

Grab the shoulder part of the seat belt near 
the buckle, and pull up to remove any slack 
from the lap part of the belt.

u

When doing this, place your weight on 
the child seat and push it into the vehicle 
seat.

6.

Make sure the child seat is firmly secured by 
rocking it forward and back and side to 
side; less than one inch of movement 
should occur near the seat belt.

7.

Make sure any unused seat belt that a child 
can reach is buckled, the lockable retractor 
is activated, and the belt is fully retracted 
and locked.

1

Installing a Child Seat with a Lap/Shoulder Seat Belt

To deactivate a lockable retractor, release the buckle 
and allow the seat belt to wind up all the way.

uu

Child Safety

u

Safety of Infants and Small Children

80

Safe 

Driving

A tether anchor point is provided behind each 
rear seating position. If you have a child seat 
that comes with a tether but can be installed 
with a seat belt, the tether may be used for 
additional security.

Using an outer anchor

1.

Locate the appropriate tether anchor point 
and open the anchor cover.

2.

Raise the head restraint to its highest 
position, then route the tether strap 
through the head restraint legs. Make sure 
the strap is not twisted.

3.

Secure the tether strap hook to the anchor.

4.

Tighten the tether strap as instructed by the 
child seat manufacturer.

Adding Security with a Tether

1

Adding Security with a Tether

Always use a tether for forward-facing child seats 
whether using the seat belt or lower anchors.

Tether Anchor Points

Cover

Anchor

Anchor

Tether Strap 

Hook

Straight top tether 

type

Anchor

Tether Strap 

Hook

Other top tether 

type

81

uu

Child Safety

u

Safety of Infants and Small Children

Safe 

Driving

Using the center anchor

1.

Lower the head restraint to its lowest 
position.

2.

Open the anchor cover.

3.

Route the tether strap over the head 
restraint. Make sure the strap is not twisted.

Route the tether strap outside the head 
restraint. Make sure the strap is not twisted.

4.

Secure the tether strap hook to the anchor.

5.

Tighten the tether strap as instructed by the 
child seat manufacturer.

Anchor

Tether Strap 

Hook

Straight top tether 

type

Anchor

Tether Strap 

Hook

Other top tether 

type

Straight top tether type

Other top tether type

82

uu

Child Safety

u

Safety of Larger Children

Safe 

Driving

Safety of Larger Children

The following pages give instructions on how to check proper seat belt fit, what kind 
of booster seat to use if one is needed, and important precautions for a child who 
must sit in front.

When a child is too big for a child seat, secure the child in a rear seat using the lap/
shoulder seat belt. Have the child sit upright and all the way back, then answer the 
following questions.

Checklist

Do the child’s knees bend comfortably over 
the edge of the seat?

Does the shoulder belt cross between the 
child’s neck and arm?

Is the lap part of the seat belt as low as 
possible, touching the child’s thighs?

Will the child be able to stay seated like this 
for the whole trip?

If you answer yes to all these questions, the child is ready to wear the lap/shoulder 
seat belt correctly. If you answer no to any question, the child needs to ride on a 
booster seat until the seat belt fits properly without a booster seat.

Protecting Larger Children

Checking Seat Belt Fit

1

Safety of Larger Children

3

WARNING

Allowing a child age 12 or under to sit in 
front can result in injury or death if the 
passenger’s front airbag inflates.

If a larger child must ride in front, move the 
vehicle seat as far to the rear as possible, 
have the child sit up properly and wear the 
seat belt properly, using a booster seat if 
needed.

83

uu

Child Safety

u

Safety of Larger Children

Safe 

Driving

If a lap/shoulder seat belt cannot be used 
properly, position the child in a booster seat in 
the rear seat. For the child’s safety, check that 
the child meets the booster seat 
manufacturer’s recommendations.

Your vehicle has a rear seat where children can be properly restrained. If you ever 
have to carry a group of children, and a child must ride in front:

Make sure you read and fully understand the instructions and safety information 
in this manual.

Move the front passenger seat as far back as possible.

Have the child sit upright and well back in the seat.

Check that the seat belt is properly positioned so that the child is secure in the 
seat.

Monitoring child passengers

We strongly recommend that you keep an eye on child passengers. Even older, more 
mature children sometimes need to be reminded to fasten their seat belts and sit up 
properly.

Booster Seats

1

Booster Seats

When installing a booster seat, make sure to read the 
instructions that came with it, and install the seat 
accordingly.
There are high- and low-type booster seats. Choose a 
booster seat that allows the child to wear the seat 
belt correctly.

Some U.S. states and Canadian provinces and 
territories require children to use a booster seat until 
they reach a given age or weight (e.g. 6 years or 60 
lbs). Be sure to check current laws in the state or 
province, or territory where you intend to drive.

Protecting Larger Children - Final Checks

84

Safe 

Driving

Exhaust Gas Hazard

Carbon Monoxide Gas

The engine exhaust from this vehicle contains carbon monoxide, a colorless, 
odorless, and highly toxic gas. As long as you properly maintain your vehicle, carbon 
monoxide gas will not get into the interior.

Have the exhaust system inspected for leaks whenever

The exhaust system is making an unusual noise.

The exhaust system may have been damaged.

The vehicle is raised for an oil change.

When you operate a vehicle with the trunk open, airflow can pull exhaust gas into 
the interior and create a hazardous condition. If you must drive with the trunk open, 
open all the windows and set the climate control system as shown below.

1.

Select the fresh air mode.

2.

Select the 

 mode.

3.

Set the fan speed to high.

4.

Set the temperature control to a comfortable setting.

Adjust the climate control system in the same manner if you sit in your parked 
vehicle with the engine running.

1

Carbon Monoxide Gas

An enclosed area such as a garage can quickly fill up 
with carbon monoxide gas.
Do not turn the power system on with the garage 
door closed. Even when the garage door is open, 
drive out of the garage immediately after turning the 
power system on.

3

WARNING

Carbon monoxide gas is toxic.

Breathing it can cause unconsciousness and 
even kill you.

Avoid any enclosed areas or activities that 
expose you to carbon monoxide.

85

Safe 

Driving

Safety Labels

Label Locations

These labels are in the locations shown. They warn you of potential hazards that can cause serious injury or death. Read these labels 
carefully.

If a label comes off or becomes hard to read (except for the U.S. dashboard label which may be removed by the owner), contact a dealer 
for a replacement.

Radiator Cap

Dashboard
U.S. models only

Air Conditioner System

U.S. models

Canadian models

Inverter Coolant 
Filler Tank Cap

Sun Visor

U.S. models

Canadian models

High Voltage System Components

U.S. models

Canadian models

88

In

strum

ent Pa

nel

Indicators

Deceleration Paddle 
Selector Indicator

P.

97

Parking Brake and 
Brake System Indicator 
(Red)

Parking Brake and 
Brake System Indicator 
(Amber)

U.S.

Canada

U.S.

Canada

Automatic Brake Hold 
System Indicator

Automatic Brake Hold 
Indicator

U.S.

Canada

*1 : When you set the power mode to ON, these indicators come on to indicate that system checks are being performed. They go off a few seconds later or after the power 

system has started. If an indicator does not come on or turn off, there may be a malfunction in the corresponding system. To resolve the issue, follow the instructions in 
the owner’s manual. 

P.

89

*1

Malfunction Indicator 
Lamp

12-Volt Battery 
Charging System 
Indicator

Anti-lock Brake System 
(

ABS

) Indicator

Seat Belt Reminder 
Indicator

Low Fuel Indicator

Vehicle Stability Assist

TM


(VSA

®

) System Indicator

Vehicle Stability Assist

TM


(VSA

®

OFF

 Indicator

Supplemental Restraint 
System Indicator

Auto High-Beam 
Indicator

Low Tire Pressure/TPMS 
Indicator

Electric Power Steering 
(EPS) System Indicator

Turn Signal and Hazard 
Warning Indicators

Lights On Indicator

High Beam Indicator

Fog Light Indicator

*

ECON Mode Indicator

System Message 
Indicator

SPORT

 Mode Indicator

Adaptive Cruise Control 
(ACC) with Low Speed 
Follow Indicator 
(Amber)

Lane Keeping Assist 
System (LKAS) 
Indicator (Amber)

Safety Support 
Indicator (Amber)
Safety Support 
Indicator (Green/Gray)

P.

90

P.

95

P.

95

P.

96

P.

97

*1

*1

*1

*1

P.

103

*1

*1

Shift Position Indicator

P.

97

Transmission System 
Indicator

P.

98

READY

 Indicator

P.

94

POWER SYSTEM


Indicator

P.

93

P.

99

P.

100

P.

100

P.

100

P.

100

P.

101

*1

*1

*1

*1

P.

102

*1

P.

102

P.

104

P.

109

*1

P.

104

P.

104

P.

107

P.

104

P.

105

P.

106

P.

108

P.

110

P.

111

P.

114

*1

Adaptive Cruise Control 
(ACC) with Low Speed 
Follow Indicator 
(White/Green)

P.

109

Lane Keeping Assist 
System (LKAS) Indicator 
(White/Green)

P.

110

*1

*1

EV

 Indicator

P.

94

*1

EV

 Mode Indicator

P.

94

*1

*1

Immobilizer System 
Indicator 

P.

105

Security System Alarm 
Indicator 

Cruise Mode Indicator 
(White/Green)

P.

109

* Not available on all models

89

uu

Indicators

u

Continued

In

strum

ent Pa

nel

Indicator

Name

On/Blinking

Explanation

Message

Parking Brake 
and Brake 
System 
Indicator (Red)

Comes on when the parking brake 
is applied, and goes off when it is 
released.

Comes on when the brake fluid 
level is low.

Comes on if there is a problem with 
the brake system.

The beeper sounds and the 
indicator comes on if you drive with 
the parking brake applied.

Comes on for about 30 seconds 
when you apply the electric parking 
brake while the power mode is in 
ACCESSORY or VEHICLE OFF, then 
goes off.

Stays on for about 30 seconds 
when you set the power mode to 
VEHICLE OFF while the electric 
parking brake is applied, then goes 
off.

Comes on while driving 

- Make sure the 

parking brake is released. Check the brake fluid level.

2

What to do when the indicator 
comes on while driving

 P. 611

Comes on along with the Parking 
Brake and Brake System Indicator 
(Amber) 

- Immediately stop in a safe place. 

Contact a dealer for repair. The brake pedal 
becomes harder to operate. Depress the 
pedal further than you normally do.

2

If the Brake System Indicator (Red) 
Comes On or Blinks at the Same Time 
When the Brake System Indicator 
(Amber) Comes On

 P. 612

Comes on along with the ABS 
indicator 

- Have your vehicle checked by a dealer.

2

If the Brake System Indicator (Red) 
Comes On or Blinks

 P. 611

Blinks and the Parking Brake and 
Brake System Indicator (Amber) 
comes on at the same time 

- There is a 

problem with the electric parking brake 
system. The parking brake may not be set.
Avoid using the parking brake and have your 
vehicle checked by a dealer immediately.

2

If the Brake System Indicator (Red) 
Comes On or Blinks at the Same Time 
When the Brake System Indicator 
(Amber) Comes On

 P. 612

U.S.

Canada

(Red)

90

uu

Indicators

u

In

strum

ent Pa

nel

Indicator

Name

On/Blinking

Explanation

Message

Parking Brake 
and Brake 
System Indicator 
(Amber)

Comes on if there is a problem 
with a system related to braking 
other than the conventional brake 
system.

Comes on if there is a problem 
with the cooperative control with 
regenerative braking, the electric 
servo brake system, or the hill start 
assist system.

Comes on while driving 

- Avoid high 

speeds and sudden braking. Take the 
vehicle to a dealer immediately.

U.S.

Canada

(Amber)

U.S.

Canada

91

uu

Indicators

u

Continued

In

strum

ent Pa

nel

Indicator

Name

On/Blinking

Explanation

Message

Parking Brake 
and Brake 
System Indicator 
(Amber)

Comes on if there is a problem 
with the electric parking brake 
system and/or the automatic brake 
hold system.

Stays on constantly 

- Avoid using the 

parking brake and have your vehicle 
checked by a dealer immediately.

U.S.

Canada

(Amber)

U.S.

Canada

92

uu

Indicators

u

In

strum

ent Pa

nel

Indicator

Name

On/Blinking

Explanation

Message

Parking Brake 
and Brake 
System Indicator 
(Amber)

Comes on if there is a problem 
with the radar sensor.

Indicator may come on 
temporarily when the Maximum 
Load Limit is exceeded.

Make sure the total load is within the 
Maximum Load Limit.

2

Maximum Load Limit

 P. 413

Stays on constantly 

- Have your 

vehicle checked by a dealer.

U.S.

Canada

(Amber)

93

uu

Indicators

u

Continued

In

strum

ent Pa

nel

Indicator

Name

On/Blinking

Explanation

Message

POWER 
SYSTEM


Indicator

Comes on if there is a problem with 
the electric vehicle system.

Comes on when the High Voltage 
battery temperature becomes high.

Have your vehicle checked by a dealer.


Content      ..     3      4      5      6     ..