Honda Odyssey (2023 year). Manual in english - page 37
 

  Index      Manuals     Honda Odyssey (2023 year). Manual in english


Search            copyright infringement  


Content      ..     35      36      37      38     ..


Honda Odyssey (2023 year). Manual in english - page 37


592

uu

Maintenance Minder

TM

u

To Use Maintenance Minder

TM

Main

tenan

ce

To Use Maintenance Minder

TM

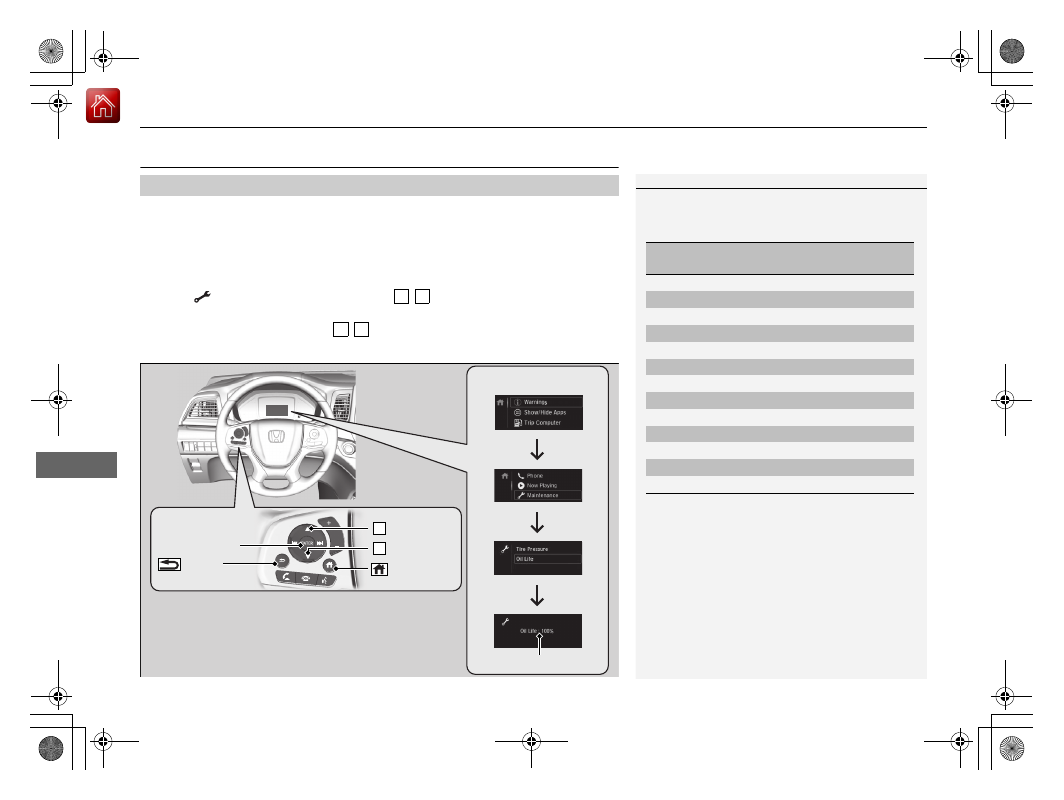
Maintenance items, which should be serviced at the same time that you replace the 
engine oil, appear on the driver information interface.
You can view them on the engine oil life screen at any time.

1.

Set the power mode to ON.

2.

Press the 

ENTER

 button repeatedly until home screen appears.

3.

Select  

Maintenance

 by pressing the 

/

 button repeatedly and press 

ENTER

.

4.

Select 

Oil Life

 by pressing the 

/

 button and press 

ENTER

.

5.

The engine oil life appears on the screen.

Displaying the Maintenance Minder Information

1

Displaying the Maintenance Minder Information

Based on the engine operating conditions, the 
remaining engine oil life is calculated and displayed 
as a percentage.

There is a list of maintenance main and sub items you 
can view on the driver information interface.

2

Maintenance Service Items

 P. 594

Displayed Engine Oil 

Life (%)

Calculated Engine Oil 

Life (%)

100

100 to 91

90

90 to 81

80

80 to 71

70

70 to 61

60

60 to 51

50

50 to 41

40

40 to 31

30

30 to 21

20

20 to 16

15

15 to 11

10

10 to 6

5

5 to 1

0

0

3 4

3 4

ENTER

 Button

Engine Oil Life

 (Back) 

Button

 Button

3

 Button

4

 (Home) 

Button

Home Screen

593

uu

Maintenance Minder

TM

u

To Use Maintenance Minder

TM

Continued

Main

tenan

ce

The system message indicator (

) comes on along with the Maintenance Minder message.

Maintenance Minder Messages on the Driver Information 

Interface

Maintenance Message

Oil Life Display

Explanation

Information

Maintenance Due Soon

15%

The remaining engine oil life is 15 to 6 
percent. Once you switch the display 
by pressing the 

, or 

 button, 

this message will go off.

The engine oil is approaching the end 
of its service life, and the maintenance 
items should be inspected and 
serviced soon.

Maintenance Due Now

5%

The remaining engine oil life is 5 to 1 
percent. Press the 

, or 

 button 

to switch to another display.

The engine oil has almost reached the 
end of its service life, and the 
maintenance items should be 
inspected and serviced as soon as 
possible.

Maintenance Past Due

Negative Distance

The remaining engine oil life has 
passed its service life, and a negative 
distance appears after driving over 10 
miles (U.S. models) or 10 km 
(Canadian models). Press the 

, or 

 button to switch to another 

display.

The engine oil life has passed.
The maintenance items must be 
inspected and serviced immediately.

594

uu

Maintenance Minder

TM

u

To Use Maintenance Minder

TM

Main

tenan

ce

Maintenance Service Items

1

Maintenance Service Items

Adjust the valves during services A, B, 1, 2, or 3 if 
they are noisy.

Maintenance Minder Message

System Message 
Indicator

Sub Items

Main Item

U.S. models

*1: If the message 

Maintenance Due Now

 does not appear more than 12 months after the display 

is reset, change the engine oil every year.

# : See information on maintenance and emissions warranty in the first column on page 

691

.

CODE

Maintenance Main Items

A

Replace engine oil

*1

B

Replace engine oil

*1

 and oil filter

Inspect front and rear brakes

Inspect tie rod ends, steering gearbox, and boots

Inspect suspension components

Inspect driveshaft boots

Inspect brake hoses and lines (Including ABS/VSA

®

)

Inspect all fluid levels and condition of fluids

Inspect exhaust system

#

Inspect fuel lines and connections

#

*2: If you drive in dusty conditions, replace the air cleaner element every 15,000 miles (24,000 km).
*3: If you drive primarily in urban areas that have high concentrations of soot in the air from industry and 

from diesel-powered vehicles, replace the dust and pollen filter every 15,000 miles (24,000 km).

*4: If you drive regularly in very high temperatures (over 110ºF, 43ºC), in very low temperatures (under -20

ºF, -29ºC), replace every 60,000 miles(100,000 km).

*5: If a Maintenance Minder message does not appear more than 36 months after the display for item 7 is 

reset, change the brake fluid every 3 years.

CODE

Maintenance Sub Items

1

Rotate tires

2

Replace air cleaner element

*2

Replace dust and pollen filter

*3

Inspect drive belt

3

Replace transmission fluid

4

Replace spark plugs

Replace timing belt and inspect water pump

*4

Inspect valve clearance

5

Replace engine coolant

7

Replace brake fluid

*5

595

uu

Maintenance Minder

TM

u

To Use Maintenance Minder

TM

Continued

Main

tenan

ce

1

Maintenance Service Items

Adjust the valves during services A, 0, 9, 1, 2, or 3 
if they are noisy.

Canadian models

*1: If the message 

Maintenance Due Now

 does not appear more than 12 months after the display 

is reset, change the engine oil every year.

*2: If you drive in dusty conditions, replace the air cleaner element every 24,000 km (15,000 miles).
*3: If you drive primarily in urban areas that have high concentrations of soot in the air from industry and 

from diesel-powered vehicles, replace the dust and pollen filter every 24,000 km (15,000 miles).

*4: If you drive regularly in very high temperatures (over 43ºC, 110ºF), in very low temperatures (under 

-29ºC, -20ºF), replace every 100,000 km (60,000 miles).

*5: If a Maintenance Minder message does not appear more than 36 months after the display for item 7 is 

reset, change the brake fluid every 3 years.

# : See information on maintenance and emissions warranty in the first column on page 

693

.

CODE

Maintenance Main Items

A

Replace engine oil

*1

0

Replace engine oil

*1

 and oil filter

CODE

Maintenance Sub Items

1

Rotate tires

2

Replace air cleaner element

*2

Replace dust and pollen filter

*3

Inspect drive belt

3

Replace transmission fluid

4

Replace spark plugs

Replace timing belt and inspect water pump

*4

Inspect valve clearance

5

Replace engine coolant

7

Replace brake fluid

*5

9

Service front and rear brakes

Inspect tie rod ends, steering gearbox, and boots

Inspect suspension components

Inspect driveshaft boots

Inspect brake hoses and lines (including ABS/VSA

®

)

Inspect all fluid levels and condition of fluids

Inspect exhaust system

#

Inspect fuel lines and connections

#

uu

Maintenance Minder

TM

u

To Use Maintenance Minder

TM

596

Main

tenan

ce

Reset the maintenance minder information display if you have performed the 
maintenance service.

1.

Set the power mode to ON.

2.

Display the engine oil life.

2

Displaying the Maintenance Minder Information

 P. 592

3.

Press and hold the 

ENTER

 button for about 10 seconds to enter the reset mode.

4.

Press the 

/

 button to select a maintenance item to reset, or to select 

All Due 

Items

 (You can also select 

Cancel

 to end the process).

5.

Press the 

ENTER

 button to reset the selected item.

6.

Repeat from step 5 for other items you wish to reset.

Resetting the Display

1

Resetting the Display

NOTICE

Failure to reset the Maintenance Minder

TM

 display 

after a maintenance service results in the system 
showing incorrect maintenance intervals, which can 
lead to serious mechanical problems.

The dealer will reset the Maintenance Minder

TM


display after completing the required maintenance 
service. If someone other than a dealer performs 
maintenance service, reset the Maintenance 
Minder

TM

 display yourself.

You can also reset the Maintenance Minder

TM

 display 

using the audio/information screen.

2

Customized Features

 P. 413

 Button

3

ENTER


Button

 Button

4

3 4

597

Main

tenan

ce

Maintenance Under the Hood

Maintenance Items Under the Hood

Engine Oil Dipstick 
(Orange)

Washer Fluid 
(Blue Cap)

Engine Coolant 
Reserve Tank

Radiator Cap

Brake Fluid 
(Black Cap)

Engine Oil Fill Cap

Battery

598

uu

Maintenance Under the Hood

u

Opening the Hood

Main

tenan

ce

Opening the Hood

1.

Park the vehicle on a level surface, and set 
the parking brake.

2.

Pull the hood release handle under the 
driver’s side lower corner of the dashboard.

u

The hood will pop up slightly.

3.

Pull up the hood latch lever (located under 
the front edge of the hood to the center) 
and raise the hood. Once you have raised 
the hood slightly, you can release the lever.

4.

Remove the support rod from the clamp 
using the grip. Mount the support rod in 
the hood.

When closing, remove the support rod, and 
stow it in the clamp, then gently lower the 
hood. Remove your hand at a height of 
approximately 12 inches (30 cm) and let the 
hood close.

1

Opening the Hood

NOTICE

Do not open the hood when the wiper arms are 
raised. The hood will strike the wipers, resulting in 
possible damage to the hood and/or the wipers.

NOTICE

Do not press the engine cover forcibly. This may 
damage the engine cover and component parts.

When closing the hood, check that the hood is 
securely latched.

If the hood latch lever moves stiffly, or if you can 
open the hood without lifting the lever, the latch 
mechanism should be cleaned and lubricated.

Do not open the hood while the Auto Idle Stop 
function is activated.

Hood Release Handle

Pull

Lever

Support Rod

Grip

Clamp

599

uu

Maintenance Under the Hood

u

Engine Compartment Cover

Main

tenan

ce

Engine Compartment Cover

The component parts in the engine compartment are protected by a cover.
You may need to remove the cover when you perform certain maintenance work.
Pull up on the engine compartment cover, remove it from the pins.

Engine Compartment Cover

600

uu

Maintenance Under the Hood

u

Recommended Engine Oil

Main

tenan

ce

Recommended Engine Oil

Oil is a major contributor to your engine’s 
performance and longevity. If you drive the 
vehicle with insufficient or deteriorated oil, 
the engine may fail or be damaged.

This seal indicates the oil is energy conserving 
and that it meets the American Petroleum 
Institute’s latest requirements.

Use Honda Genuine Motor Oil or another 
commercial engine oil of suitable viscosity for 
the ambient temperature as shown.

Synthetic oil

You may also use synthetic motor oil if it is labeled with the API Certification Seal 
and is the specified viscosity grade.

Honda Genuine Motor Oil

Premium-grade 0W-20 detergent oil with an API Certification Seal on the 
container.

1

Recommended Engine Oil

Engine Oil Additives
Your vehicle does not require oil additives. In fact, 
they may adversely affect the engine performance 
and durability.

Ambient Temperature

601

uu

Maintenance Under the Hood

u

Oil Check

Main

tenan

ce

Oil Check

We recommend that you check the engine oil level every time you refuel.
Park the vehicle on level ground.
Wait approximately three minutes after turning the engine off before you check the 
oil.

1.

Remove the dipstick (orange).

2.

Wipe the dipstick with a clean cloth or 
paper towel.

3.

Insert the dipstick back all the way into its 
hole.

4.

Remove the dipstick again, and check the 
level. It should be between the upper and 
lower marks. Add oil if necessary.

1

Oil Check

If the oil level is near or below the lower mark, slowly 
add oil, being careful not to overfill.

Upper Mark
Lower Mark

602

uu

Maintenance Under the Hood

u

Adding Engine Oil

Main

tenan

ce

Adding Engine Oil

1.

Unscrew and remove the engine oil fill cap.

2.

Add oil slowly.

3.

Reinstall the engine oil fill cap, and tighten 
it securely.

4.

Wait for three minutes and recheck the 
engine oil dipstick.

1

Adding Engine Oil

NOTICE

Do not fill the engine oil above the upper mark. 
Overfilling the engine oil may result in leaks and 
engine damage.

If any oil spills, wipe it away immediately. Spilled oil 
may damage the engine compartment components.

Engine Oil 
Fill Cap

603

uu

Maintenance Under the Hood

u

Changing the Engine Oil and Oil Filter

Continued

Main

tenan

ce

Changing the Engine Oil and Oil Filter

You must change the engine oil and oil filter regularly in order to maintain the 
engine’s lubrication. The engine may be damaged if they are not changed regularly.

Change the oil and filter in accordance with the maintenance message on the driver 
information interface.

1.

Run the engine until it reaches normal 
operating temperature, and then turn the 
engine off.

2.

Open the hood and remove the engine oil 
fill cap.

3.

Remove the drain bolt and washer from 
the bottom of the engine, and drain the 
oil into a suitable container.

1

Changing the Engine Oil and Oil Filter

NOTICE

You may damage the environment if you do not 
dispose of the oil in a suitable way. If you are 
changing the oil by yourself, appropriately dispose of 
the used oil. Put the oil in a sealed container and take 
it to a recycling center. Do not throw the oil away 
into a garbage can or onto the ground.

Washer

Drain Bolt

uu

Maintenance Under the Hood

u

Changing the Engine Oil and Oil Filter

604

Main

tenan

ce

4.

Remove the oil filter and dispose of the 
remaining oil.

5.

Check that the filter gasket is not stuck to 
the engine contact surface.

u

If it is stuck, you must detach it.

6.

Wipe away dirt and dust adhering to the 
contact surface of the engine block, and 
install a new oil filter.

u

Apply a light coat of new engine oil to 
the filter gasket.

7.

Put a new washer on the drain bolt, then 
reinstall the drain bolt.

u

Tightening torque:
29 lbf∙ft (40 N∙m, 4.0 kgf∙m)

8.

Pour the recommended engine oil into the 
engine.

u

Engine oil change capacity (including 
filter):
5.7 US qt (5.4 L)

9.

Reinstall the engine oil fill cap securely and 
start the engine.

10.

Run the engine for a few minutes, and 
then check that there is no leak from the 
drain bolt or oil filter.

11.

Stop the engine, wait for three minutes, 
and then check the oil level on the 
dipstick.

u

If necessary, add more engine oil.

1

Changing the Engine Oil and Oil Filter

You will need a special wrench to replace the oil 
filter. You can buy this wrench from a dealer.

When installing the new oil filter, follow the 
instructions supplied with the oil filter.

Reinstall the engine oil fill cap. Start the engine. If the 
low oil pressure warning appears, turn off the 
engine, and check your work.

Oil Filter

605

uu

Maintenance Under the Hood

u

Engine Coolant

Continued

Main

tenan

ce

Engine Coolant

This coolant is premixed with 50% antifreeze and 50% water. Do not add any 
straight antifreeze or water.

We recommend you check the engine coolant level every time you refuel. Check the 
reserve tank first. If it is completely empty, also check the coolant level in the 
radiator. Add the engine coolant accordingly.

1. Make sure the engine and radiator are 

cool.

2.

Check the amount of coolant in the reserve 
tank.

u

If the coolant level is below the 

MIN


mark, add the specified coolant until it 
reaches the 

MAX

 mark.

3.

Inspect the cooling system for leaks.

Specified coolant: Honda Long Life Antifreeze/Coolant Type 2

Reserve Tank

1

Engine Coolant

NOTICE

Genuine Honda engine coolant is a 50/50 mixture of 
antifreeze and water that can withstand freezing at 
temperatures as low as about -31°F (-35°C). If your 
vehicle is consistently subjected to temperatures 
below this, the concentration of antifreeze in the 
coolant should be increased. Consult a dealer for 
details.

If Honda antifreeze/coolant is not available, you may 
use another major brand of non-silicate coolant as a 
temporary replacement. Check that it is a high quality 
coolant recommended for aluminum engines. 
Continued use of any non-Honda coolant can result 
in corrosion, causing the cooling system to 
malfunction or fail. Have the cooling system flushed 
and refilled with Honda antifreeze/coolant as soon as 
possible.

Do not add rust inhibitors or other additives to your 
vehicle’s cooling system. They may not be compatible 
with the coolant or with the engine components.

3

WARNING

Removing the radiator cap while the 
engine is hot can cause the coolant to spray 
out, seriously scalding you.

Always let the engine and radiator cool 
down before removing the radiator cap.

Reserve 
Tank

MIN

MAX

uu

Maintenance Under the Hood

u

Engine Coolant

606

Main

tenan

ce

1. Make sure the engine and radiator are 

cool.

2.

Remove the engine compartment cover.

2

Engine Compartment Cover

 P. 599

3.

Turn the radiator cap 1/8 turn counter-
clockwise and relieve any pressure in the 
cooling system.

4.

Push down and turn the radiator cap 
counter-clockwise to remove it.

5.

The coolant level should be up to the base 
of the filler neck. Add coolant if it is low.

6.

Put the radiator cap back on, and tighten it 
fully.

Radiator

1

Radiator

NOTICE

Pour the fluid slowly and carefully so you do not spill 
any. Clean up any spills immediately; they can 
damage components in the engine compartment.

Radiator Cap

607

uu

Maintenance Under the Hood

u

Transmission Fluid

Main

tenan

ce

Transmission Fluid

Have a dealer check the fluid level and replace if necessary.

Do not attempt to check or change the automatic transmission fluid yourself.

Automatic Transmission Fluid

Specified fluid: Honda ATF-Type 2

1

Automatic Transmission Fluid

NOTICE

Honda ATF-Type 2 fluid must not be mixed with 
other transmission fluids.

Using a transmission fluid other than Honda ATF-
Type 2 may adversely affect the operation and 
durability of your vehicle’s transmission, and damage 
the transmission.
Any damage caused by using a transmission fluid that 
is not equivalent to Honda ATF-Type 2 is not covered 
by Honda’s new vehicle limited warranty.


Content      ..     35      36      37      38     ..