Honda HR-V (2023 year). Manual in english - page 14
 

  Index      Manuals     Honda HR-V (2023 year). Manual in english


Search            copyright infringement  


Content      ..     12      13      14      15     ..


Honda HR-V (2023 year). Manual in english - page 14


244

Features

Audio System Basic Operation

To use the audio system function, the power mode must be in ACCESSORY or ON.

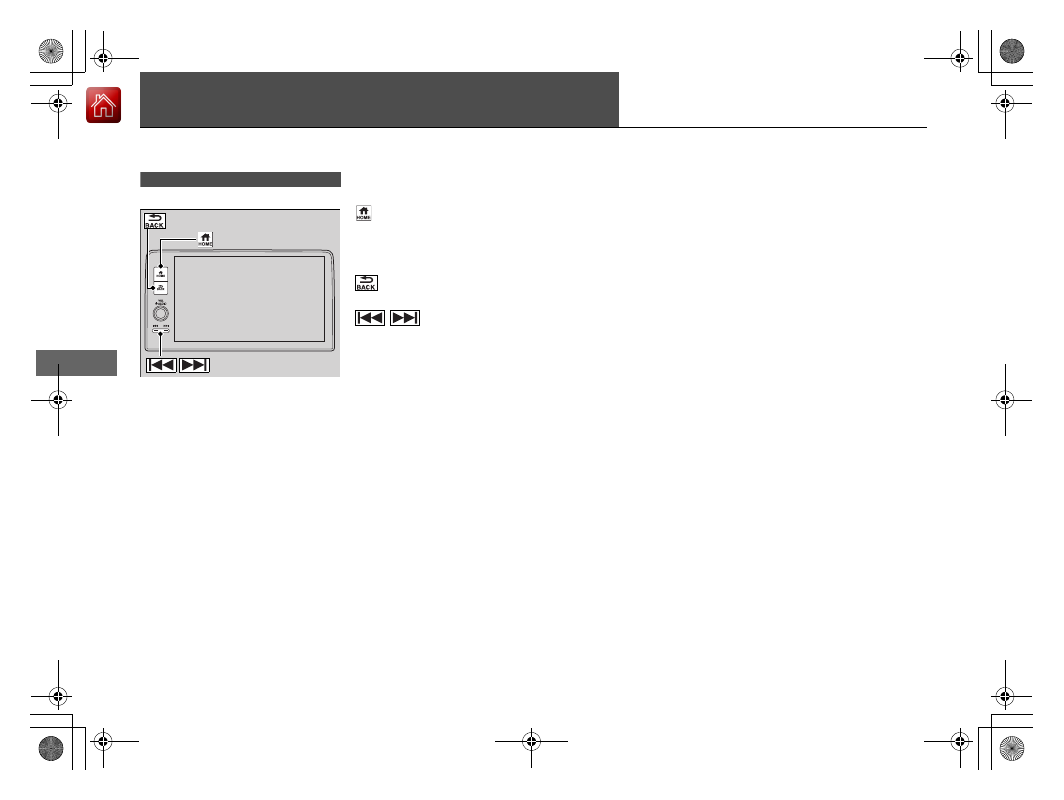
 (Home) button: 

Press to go to the home 

screen.

2

Using the audio/information screen


P. 246

 (Back) button: 

Press to go back to the 

previous screen.

/

 (Seek/Track) buttons:

 Press to 

change songs.

Models with 9-in. Color Touchscreen

 (Home) Button

 (Back) Button

/

 (Seek/Track) Buttons

245

uu

Audio System Basic Operation

u

Start Up

Features

Start Up

The 9-in. Color Touchscreen starts automatically when you set the power mode to 
ACCESSORY or ON. At start-up, the following screen about the data upload will be 
displayed.

Select 

OK

.

u

If you want to change the settings for 
data upload, select 

Data Sharing

, then 

select the ON/OFF settings on the 

Data 

Sharing Setting

 screen.

u

If you do not select 

OK

, the system will 

automatically be switched the home 
screen after a certain period of time.

u

If there is no registered device, select 

OK


and the 

Bluetooth

®

 pairing screen will be 

displayed.

To pair a cell phone (when there is no 
phone paired to the system)

1.

Make sure your phone is in search or 
discoverable mode.

2.

Select 

Honda HR-V

 from your phone.

u

If you want to pair a phone from this 
9-in. Color Touchscreen, select 

Search 

for Devices

, and then select your phone 

when it appears on the list.

u

If you check the box with 

Do not show 

this again

, this screen will not be 

displayed.

1

Start Up

Data Sharing Setting
ON

: Available the data communication.

OFF

: Not available the data communication.

246

uu

Audio System Basic Operation

u

Audio/Information Screen

Features

Audio/Information Screen

Displays the audio status and wallpaper. From this display, you can go to various 
setup options.

Using the audio/information screen

Press the 

 button to go to the home screen.

Select the following icons on the home screen or after selecting 


All Apps

.

Phone

Displays the HFL information.

2

Bluetooth

®

 HandsFreeLink

®

 P. 389

FM/AM/SiriusXM/USB/Bluetooth Audio

Displays the audio information for each.

Switching the Display

1

Using the audio/information screen

Touchscreen operation

Use simple gestures - including touching, swiping 
and scrolling - to operate certain audio functions.

Some items may be grayed out during driving to 
reduce the potential for distraction.

You can select them when the vehicle is stopped or 
use voice commands.

Wearing gloves may limit or prevent touchscreen 
response.

You can change the touchscreen sensitivity setting.

2

Customized Features

 P. 345

Home Screen

 Button

 All Apps

247

uu

Audio System Basic Operation

u

Audio/Information Screen

Continued

Features

General Settings

Enters the customizing menu screen.

2

Customized Features

 P. 345

Navigation

*

Displays the navigation screen.

2

Refer to the Navigation System Manual

HondaLink

®

Displays the HondaLink screen.

2

HondaLink

®

 P. 293

Apple CarPlay/Android Auto

Displays the Apple CarPlay or Android Auto.

2

Apple CarPlay

 P. 301

2

Android Auto

TM

 P. 308

Vehicle Settings

Displays the vehicle settings screen.

2

Customized Features

 P. 345

* Not available on all models

248

uu

Audio System Basic Operation

u

Audio/Information Screen

Features

Trip Computer

Displays the trip computer information.

Current Drive

 tab: Displays the current trip information.

Trip A

/

Trip B

 tab: Displays information for the current and three previous drives. 

The information is stored every time you reset Trip A/B. 
To reset the Trip A/B, select 

Settings

, then select 

Delete Trip History

.

To change the setting of how to reset Trip A/B, select 

Settings

, then select 

“Trip A” 

Reset Timing

 or 

“Trip B” Reset Timing

System Updates

Updates the software version of the audio system.

2

System Updates

 P. 257

Clock

Displays the clock.

Smart Shortcuts

Displays the 

Smart Shortcuts

 screen.

2

Smart Shortcuts

 P. 297

Display Mode

Displays the brightness bar.

Compass

*

Displays the compass screen.

* Not available on all models

Continued

249

uu

Audio System Basic Operation

u

Audio/Information Screen

Features

You can change, store, and delete the wallpaper on the audio/information screen.

Import wallpaper

You can import up to 11 images, one at a time, for wallpaper from a USB flash drive.

1.

Connect the USB flash drive to the USB 
port.

2

USB Ports

 P. 213

2.

Press the 

 button.

3.

Select 

Clock

.

4.

Select 

Settings

.

5.

Select 

Clock Faces

.

6.

Select 

Add More

.

u

The image of the pictures stored in the 
USB flash drive are displayed on the list.

7.

Select a desired picture to import.

u

Multiple pictures can be selected at the 
same time.

8.

Select 

OK

.

u

The selected pictures are displayed.

9.

Select 

Transfer

.

u

It will return to the clock wallpaper 
setting screen.

Wallpaper Setup

1

Wallpaper Setup

The wallpaper you set up on 

Clock Faces

 cannot be 

displayed on the driver information interface.

When importing wallpaper files, the image must be 
in the USB flash drive’s root directory.
Images in a folder cannot be imported.

The file name must be less than 64 bytes.

The file format of the image that can be imported 
is BMP (bmp) or JPEG (jpg).

The individual file size limit is 10 MB.

The maximum image size is 4,096 × 2,304 pixels. If 
the image size is less than 1,280 × 720 pixels, the 
image is displayed in the middle of the screen with 
the extra area appearing in black.

If the USB flash drive does not have any pictures, 
the 

No files detected

 message appears.

uu

Audio System Basic Operation

u

Audio/Information Screen

250

Features

Select wallpaper

1.

Press the 

 button.

2.

Select 

Clock

.

3.

Select 

Settings

.

4.

Select 

Clock Faces

.

5.

Select a desired picture to set.

u

The preview is displayed on the screen.

6.

Select 

Save

.

u

The clock screen which the wallpaper has been set is displayed.

To view wallpaper once it is set

1.

Press the 

 button.

2.

Select 

Clock

.

Delete wallpaper

1.

Press the 

 button.

2.

Select 

Clock

.

3.

Select 

Settings

.

4.

Select 

Clock Faces

.

5.

Select 

Delete Photos

.

6.

Select a desired picture to delete.

u

Multiple pictures can be selected at the same time.

7.

Select 

OK

.

u

The selected pictures are displayed.

8.

Select 

Delete

.

u

It will return to the clock wallpaper setting screen.

1

Wallpaper Setup

You cannot delete the initial imported wallpapers.

Continued

251

uu

Audio System Basic Operation

u

Audio/Information Screen

Features

To move to the next screen

Selecting 

 or 

, or swiping the screen left or right changes to the next screen.

Home Screen

1

Home Screen

The home screen has 3 pages. You can add up to 6 
pages.

Press the 

 button to go directly back to the first 

page of the home screen from any page.

Swipe

 Icon

>

 Icon

<

Current page position

<

>

uu

Audio System Basic Operation

u

Audio/Information Screen

252

Features

To add app icons on the home screen

App icons can be added on the home screen.

1.

Press the 

 button.

2.

Select 

All Apps

.

3.

Select the box checked on the desired apps.

1

To add app icons on the home screen

Pre-installed apps may not start up normally. If this 
occurs, you need to reset the system.

2

Defaulting All the Settings

 P. 368

If you perform 

Factory Data Reset

, it may reset all 

the settings to their factory default.

2

Defaulting All the Settings

 P. 368

In case those apps still do not startup normally even 
after 

Factory Data Reset

, contact your dealer.

Continued

253

uu

Audio System Basic Operation

u

Audio/Information Screen

Features

To move icons on the home screen

You can change location on the home screen.

1.

Press the 

 button.

2.

Select and hold an icon.

u

The screen switches to the customization 
screen.

3.

Drag and drop the icon to where you want 
it to be.

4.

Select 

Done

.

u

The screen will return to the home 
screen.

1

To move icons on the home screen

Select 

Tips

 to show tips. To hide them, select it again.

Select and hold.

Drag and drop.

uu

Audio System Basic Operation

u

Audio/Information Screen

254

Features

To remove icons on the home screen

You can delete the icons on the home screen.

1.

Press the 

 button.

2.

Select and hold an icon.

u

The screen switches to the customization 
screen.

3.

Drag and drop the icon you want to remove 
to the header area.

u

The icon is removed from the home 
screen.

4.

Select 

Done

.

u

The screen will return to the home 
screen.

1

To remove icons on the home screen

You cannot delete the 

All Apps

 icon.

Apps will not be deleted by deleting the icon on the 
home screen.

Select 

Tips

 to show tips. To hide them, select it again.

Select and 
hold.

Drag and drop to 
the header area.

Continued

255

uu

Audio System Basic Operation

u

Audio/Information Screen

Features

To shortcut icons on the home screen

You can store up to six icons on the bottom of the home screen.

1.

Press the 

 button.

2.

Select and hold an icon.

u

The screen switches to the customization 
screen.

3.

Drag and drop the icon you want to store to 
the bottom of the home screen.

u

The icon is a shortcut.

4.

Select 

Done

.

u

The screen will return to the home 
screen.

1

To shortcut icons on the home screen

Select 

Tips

 to show tips. To hide them, select it again.

Select and hold.

Drag and drop 
to shortcut 
icon.

Shortcut 
Icons

256

uu

Audio System Basic Operation

u

Audio/Information Screen

Features

1.

Select the system status icon.

u

The status area appears.

2.

Select an item to see the details.

3.

Press the 

 button or select the system 

status icon to close the area.

Status Area

Status Area

System Status 
Icon

257

uu

Audio System Basic Operation

u

System Updates

Continued

Features

System Updates

The audio system’s firmware can be updated with a Wi-Fi connection or with a USB 
device.

When the audio system update is available, the notification is shown on the status 
area. Use the following procedure to update the system.

1.

Press the 

 button.

2.

Select 

System Updates

.

u

If 

System Updates

 is not displayed on 

the home screen, select 


All Apps

.

u

The system will check for updates.

u

If the update icon appears on the home 
screen, select the status icon.

2

Status Area

 P. 256

3.

Select 

Download

.

u

A notification appears on the screen for 
the user to accept the download.

4.

Select 

Install Now

 or 

Install While 

Vehicle Off

.

u

A notification appears on the screen if 
the update is successful.

How to Update

1

How to Update

You can update the system via Wi-Fi, but cannot use 
the captive portal that require login or agreement the 
terms of use on the browser.

Your download will be canceled if:

Your Wi-Fi connection is severed.

You stop the engine when the battery is low on 
power. 

Your download will recommence the next time a Wi-
Fi connection is established. 

For the battery protection, 

Install While Vehicle Off


cannot be selected when the battery is low on power. 
If you want to install the updated data, recharge the 
battery or select 

Install Now

.

Notification

258

uu

Audio System Basic Operation

u

System Updates

Features

The following settings can be set.

Automatic Download

Version Status

Connection Setup

Automatic Update

*

Update History

Automatic download settings

Use the following procedure to change to the automatic download setting.

1.

Press the 

 button.

2.

Select 

System Updates

.

u

If 

System Updates

 is not displayed on the home screen, select 


All Apps

.

3.

Select 

Settings

.

4.

Select 

Automatic Download

.

5.

Select the access point, then select 

Allow

.

u

If you do not want to system update automatically, select 

Block

.

View a version and update status

Use the following procedure to confirm the version and update status.

1.

Press the 

 button.

2.

Select 

System Updates

.

u

If 

System Updates

 is not displayed on the home screen, select 


All Apps

.

3.

Select 

Settings

.

4.

Select 

Version Status

.

System Updates Settings

* Not available on all models

259

uu

Audio System Basic Operation

u

System Updates

Continued

Features

Connection setup

Use the following procedure to connect to the Internet via a Wi-Fi network.

1.

Press the 

 button.

2.

Select 

System Updates

.

u

If 

System Updates

 is not displayed on the home screen, select 


All Apps

.

3.

Select 

Settings

.

4.

Select 

Connection Setup

.

5.

Select 

OK

.

6.

Select an access point from the network list.

u

To connect to a hotspot that is not automatically detected, select 

Options


then 

Add Network

.

7.

Enter the password.

u

If you check the 

Use this network to automatically download system 

updates

 box, you can set the network to be used for system updates.

8.

Select 

Connect

.

Automatic update settings

*

Use the following procedure to change to the automatic update setting.

1.

Press the 

 button.

2.

Select 

System Updates

.

u

If 

System Updates

 is not displayed on the home screen, select 


All Apps

.

3.

Select 

Settings

.

4.

Select 

Automatic Update

.

5.

Select 

Accept

.

u

If you do not want to system update automatically, select 

Decline

.

* Not available on all models


Content      ..     12      13      14      15     ..