Honda Pilot (2022 year). Manual in english - page 33
 

  Index      Manuals     Honda Pilot (2022 year). Manual in english


Search            copyright infringement  


Content      ..     31      32      33      34     ..


Honda Pilot (2022 year). Manual in english - page 33


526

uu

Honda Sensing

®

u

Lane Keeping Assist System (LKAS)

Driving

Roadway conditions

Driving on a snowy or wet roadway (obscured lane marking, vehicle tracks, 
reflected lights, road spray, high contrast).

Driving on a road with temporary lane markings.

Faint, multiple, or varied lane markings are visible on the roadway due to road 
repairs or old lane markings.

The roadway has merging, split, or crossing lines (e.g., such as at an 
intersection or crosswalk).

The lane markings are extremely narrow, wide, or changing.

The vehicle in front of you is driving near the lane lines.

The road is hilly or the vehicle is approaching the crest of a hill.

Driving on rough or unpaved roads, or over bumpy surfaces. 

When objects on the road (curb, guard rail, pylons, etc.) are recognized as 
white lines (or yellow lines).

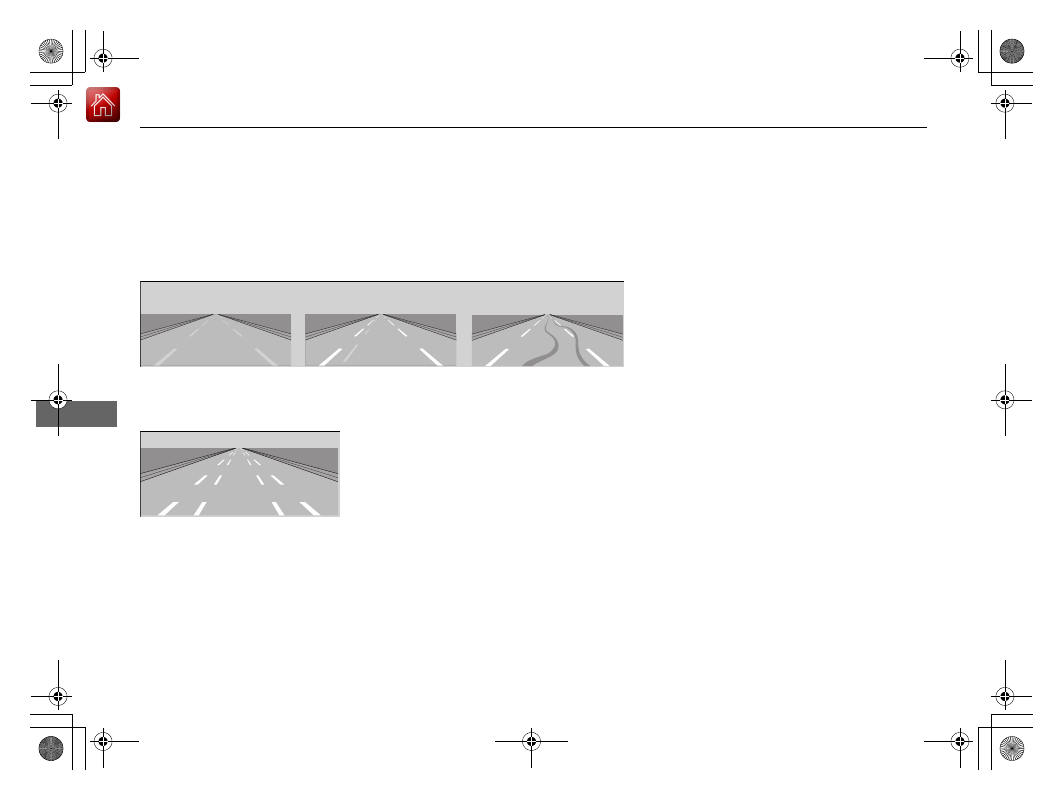
Faded lines

Duplicate lines

Tire tracks

Very wide or narrow traffic lane

527

uu

Honda Sensing

®

u

Lane Keeping Assist System (LKAS)

Driving

Driving on roads with double lines.

Vehicle conditions

Headlight lenses are dirty or the headlights are not properly adjusted.

The outside of the windshield is streaked or blocked by dirt, mud, leaves, wet 
snow, etc.

The inside of the windshield is fogged.

The camera temperature gets too high.

An abnormal tire or wheel condition (incorrect sizes, varied sizes or construction, 
improperly inflated, compact spare tire, etc.).

The vehicle is tilted due to a heavy load or suspension modifications.

The vehicle is towing a trailer.

Lane void of lines at exit or 

interchange

528

uu

Honda Sensing

®

u

Road Departure Mitigation (RDM) System

Driving

Road Departure Mitigation (RDM) System

Alerts and helps to assist you when the system detects a possibility of your vehicle 
unintentionally crossing over detected lane markings and/or leaving the roadway 
altogether.

The front camera behind the rearview mirror 
monitors left and right lane markings (in white or 
yellow). If your vehicle is getting too close to 
detected lane markings without a turn signal 
activated, the system, in addition to a visual 
alert, applies steering torque and alerts you with 
rapid vibrations on the steering wheel, to help 
you remain within the detected lane.

2

Customized Features

 P. 385

As a visual alert, the 

Lane Departure

 message 

appears on the driver information interface.

If the system determines that its steering input 
is insufficient to keep your vehicle on the 
roadway, it may apply braking.

u

Braking is applied only when the lane 
markings are solid continuous lines.

The system cancels assisting operations when you turn the steering wheel to avoid 
crossing over detected lane markings.

If the system operates several times without detecting driver response, the system 
beeps to alert you.

How the System Works

1

Road Departure Mitigation (RDM) System

Important Safety Reminder

Like all assistance systems, the RDM system has 
limitations.
Over-reliance on the RDM system may result in a 
collision. It is always your responsibility to keep the 
vehicle within your driving lane.

The RDM system only alerts you when lane drift is 
detected without a turn signal in use. The RDM 
system may not detect all lane markings or lane or 
roadway departures; accuracy will vary based on 
weather, speed and lane marker condition. It is 
always your responsibility to safely operate the 
vehicle and avoid collisions.

You can read about handling information for the 
camera equipped with this system.

2

Front Sensor Camera

 P. 533

The RDM system may not work properly or may work 
improperly under the certain conditions:

2

RDM Conditions and Limitations

 P. 531

There are times when you may not notice RDM 
functions due to your operation of the vehicle, or 
road surface conditions.

Continued

529

uu

Honda Sensing

®

u

Road Departure Mitigation (RDM) System

Driving

The system activates when all the following conditions are met:

The vehicle is traveling between about 45 and 90 mph (72 and 145 km/h).

The vehicle is on a straight or slightly curved road.

The turn signals are off.

The brake pedal is not depressed.

The wipers are not in continuous operation.

The system makes a determination that the driver is not actively accelerating, 
braking, or steering.

How the System Activates

1

How the System Activates

The RDM system may automatically shut off and the 

 indicator comes and stays on.

2

Indicators

 P. 80

RDM system function can be impacted when the 
vehicle is:

Not driven within a traffic lane.

Driven on the inside edge of a curve, or outside of 
a lane.

Driven in a narrow lane.

uu

Honda Sensing

®

u

Road Departure Mitigation (RDM) System

530

Driving

Press the RDM button to turn the system on 
and off.

u

The indicator in the button comes on and 
the message appears on the driver 
information interface when the system is 
on.

RDM On and Off

1

RDM On and Off

When you have selected 

Warning Only

 from the 

customized options using the audio/information 
screen, the system does not operate the steering 
wheel and braking.

2

Customized Features

 P. 385

RDM Button

Indicator

531

uu

Honda Sensing

®

u

Road Departure Mitigation (RDM) System

Continued

Driving

The system may not properly detect lane markings and the position of your vehicle 
under certain conditions. Some examples of these conditions are listed below.

Environmental conditions

Driving in bad weather (rain, fog, snow, etc.).

Sudden changes between light and dark, such as an entrance or exit of a tunnel.

There is little contrast between lane lines and the roadway surface.

Driving into low sunlight (e.g., at dawn or dusk).

Strong light is reflected onto the roadway.

Driving in the shadows of trees, buildings, etc.

Shadows of adjacent objects are parallel to lane markings.

Roadway objects or structures are misinterpreted as lane markers.

Reflections on the interior of the windshield.

Driving at night or in a dark condition such as a tunnel.

RDM Conditions and Limitations

532

uu

Honda Sensing

®

u

Road Departure Mitigation (RDM) System

Driving

Roadway conditions

Driving on a snowy or wet roadway (obscured lane marking, vehicle tracks, 
reflected lights, road spray, high contrast).

Driving on a road with temporary lane markings.

Faint, multiple, or varied lane markings are visible on the roadway due to road 
repairs or old lane markings.

The roadway has merging, split, or crossing lines (e.g., such as at an intersection 
or crosswalk).

The lane markings are extremely narrow, wide, or changing.

The vehicle in front of you is driving near the lane lines.

The road is hilly or the vehicle is approaching the crest of a hill.

Driving on rough or unpaved roads, or over bumpy surfaces. 

When objects on the road (curb, guard rail, pylons, etc.) are recognized as white 
lines (or yellow lines).

Driving on roads with double lines.

Vehicle conditions

Headlight lenses are dirty or the headlights are not properly adjusted.

The outside of the windshield is streaked or blocked by dirt, mud, leaves, wet 
snow, etc.

The inside of the windshield is fogged.

The camera temperature gets too high.

An abnormal tire or wheel condition (incorrect sizes, varied sizes construction, 
improperly inflated, compact spare tire, etc.).

The vehicle is tilted due to a heavy load or suspension modifications.

When tire chains are installed.

The vehicle is towing a trailer.

533

uu

Honda Sensing

®

u

Front Sensor Camera

Continued

Driving

Front Sensor Camera

The camera, used in systems such as LKAS, RDM, ACC, and CMBS

TM

, is designed to 

detect an object that triggers any of the systems to operate its functions.

This camera is located behind the rearview 
mirror.

To help reduce the likelihood that high interior 
temperatures will cause the camera’s sensing 
system to shut off, when parking, find a shady 
area or face the front of the vehicle away from 
the sun. If you use a reflective sun shade, do 
not allow it to cover the camera housing. 
Covering the camera can concentrate heat on 
it.

Camera Location and Handling Tips

1

Front Sensor Camera

Never apply a film or attach any objects to the 
windshield, the hood, or the front grille that could 
obstruct the camera’s field of vision and cause the 
system to operate abnormally.
Scratches, nicks, and other damage to the windshield 
within the camera’s field of vision can cause the 
system to operate abnormally. If this occurs, we 
recommend that you replace the windshield with a 
genuine Honda replacement windshield. Making 
even minor repairs within the camera’s field of vision 
or installing an aftermarket replacement windshield 
may also cause the system to operate abnormally.
After replacing the windshield, have a dealer 
recalibrate the camera. Proper calibration of the 
camera is necessary for the system to operate 
properly.

Do not place an object on the top of the instrument 
panel. It may reflect onto the windshield and prevent 
the system from detecting lane lines properly.

Front Sensor 
Camera

uu

Honda Sensing

®

u

Front Sensor Camera

534

Driving

1

Front Sensor Camera

If the 

Some Driver Assist Systems Cannot 

Operate:


Camera Temperature Too High


message appears:

Use the climate control system to cool down the 
interior and, if necessary, also use defroster mode 
with the airflow directed towards the camera.

Start driving the vehicle to lower the windshield 
temperature, which cools down the area around 
the camera.

If the 

Some Driver Assist Systems Cannot 

Operate:


Clean Front Windshield


message 

appears:

Park your vehicle in a safe place, and clean the 
windshield. If the message does not disappear after 
you have cleaned the windshield and driven for a 
while, have your vehicle checked by a dealer.

535

uu

Honda Sensing

®

u

Radar Sensor

Driving

Radar Sensor

The radar sensor is located behind the 
emblem.

1

Radar Sensor

Avoid strong impacts to the radar sensor cover.

For the CMBS

TM

 to work properly:

Always keep the radar sensor cover clean.

Never use chemical solvents or polishing powder for 
cleaning the sensor cover. Clean it with water or a 
mild detergent.

Do not put a sticker on the radar sensor cover or 
replace the radar sensor cover.

If you need the radar sensor to be repaired, or 
removed, or the radar sensor cover is strongly 
impacted, turn off the system by using the Collision 
Mitigation Braking System

TM

 (CMBS

TM

OFF

 button 

and take your vehicle to a dealer.

2

CMBS

TM

 On and Off

 P. 497

If the vehicle is involved in any of the following 
situations, the radar sensor may not work properly.
Have your vehicle checked by a dealer:

Your vehicle is involved in a frontal collision

Your vehicle drives through deep water or is 
submerged in deep water

Your vehicle strongly strikes a bump, curb, chock, 
or embankment that could jar the radar sensor

Radar Sensor

536

Driving

Braking

Brake System

Use the parking brake to keep the vehicle stationary when parking.

To apply:

Depress the parking brake pedal down with 
your foot.

To release:
1.

Depress the brake pedal.

2.

Depress the parking brake.

Parking Brake

1

Parking Brake

NOTICE

Release the parking brake fully before driving. The 
rear brakes and axle can be damaged if you drive 
with the parking brake applied.

If you start driving without fully releasing the parking 
brake, a buzzer sounds as a warning, and 

Release 

Parking Brake

 appears on the driver information 

interface.

Always apply the parking brake when parking.

537

uu

Braking

u

Brake System

Driving

Your vehicle is equipped with disc brakes at all four wheels. A vacuum power assist 
helps reduce the effort needed on the brake pedal. The brake assist system increases 
the stopping force when you depress the brake pedal hard in an emergency 
situation. The anti-lock brake system (ABS) helps you retain steering control when 
braking very hard.

2

Brake Assist System

 P. 539

2

Anti-lock Brake System (ABS)

 P. 538

Foot Brake

1

Foot Brake

Check the brakes after driving through deep water, 
or if there is a buildup of road surface water. If 
necessary, dry the brakes by lightly depressing the 
pedal several times.

If you hear a continuous metallic friction sound when 
applying the brakes, this is caused by the brake wear 
indicator rubbing on the brake rotor and indicates 
that the brake pads need to be replaced. Have the 
vehicle checked by a dealer. If you hear only an 
occasional squeak or squeal when you initially apply 
the brake pedal, this may be normal and caused by 
high frequency vibration of the brake pads against 
the rotating brake disc.

Constantly using the brake pedal while going down a 
long hill builds up heat, which reduces the brake 
effectiveness. Apply engine braking by taking your 
foot off the accelerator pedal and downshifting to a 
lower gear.

Do not rest your foot on the brake pedal while 
driving, as it will lightly apply the brakes and cause 
them to lose effectiveness over time and reduce pad 
life. It will also confuse drivers behind you.

538

uu

Braking

u

Anti-lock Brake System (ABS)

Driving

Anti-lock Brake System (ABS)

Helps prevent the wheels from locking up, and helps you retain steering control by 
pumping the brakes rapidly, much faster than you can.

The electronic brake distribution (EBD) system, which is part of the ABS, also 
balances the front-to-rear braking distribution according to vehicle loading.

You should never pump the brake pedal. Let the ABS work for you by always 
keeping firm, steady pressure on the brake pedal. This is sometimes referred to as 
“stomp and steer.”

ABS operation

The brake pedal may pulsate slightly when the ABS is working. Depress the brake 
pedal and keep holding the pedal firmly down. On dry pavement, you will need to 
press on the brake pedal very hard before the ABS activates. However, you may feel 
the ABS activate immediately if you are trying to stop on snow or ice.

ABS may activate when you depress the brake pedal when driving on:

Wet or snow covered roads.

Roads paved with stone.

Roads with uneven surfaces, such as potholes, cracks, manholes, etc.

When the vehicle speed goes under 6 mph (10 km/h), the ABS stops.

ABS

1

Anti-lock Brake System (ABS)

NOTICE

The ABS may not function correctly if you use a tire of 
the incorrect size or type.

If the ABS indicator comes on while driving, there 
may be a problem with the system.
While normal braking will not be affected, there is a 
possibility that the ABS will not be operating. Have 
your vehicle checked by a dealer immediately.

The ABS is not designed for the purpose of reducing 
the time or distance it takes for a vehicle to stop: It is 
designed to limit brake lockup which can lead to 
skidding and loss of steering control.

In the following cases, your vehicle may need more 
distance to stop than a vehicle without the ABS:

You are driving on rough or uneven road surfaces, 
such as gravel or snow.

The tires are equipped with snow chains.

The following may be observed with the ABS system:

Motor sounds coming from the engine

compartment when the brakes are applied, or when 
system checks are being performed after the engine 
has been started and while the vehicle accelerates.

Brake pedal and/or the vehicle body vibration when 
ABS activates.

These vibrations and sounds are normal to ABS 
systems and are no cause for concern.

539

uu

Braking

u

Brake Assist System

Driving

Brake Assist System

Designed to assist the driver by generating greater braking force when you depress 
the brake pedal hard during emergency braking.

Brake assist system operation

Press the brake pedal firmly for more powerful braking.

When brake assist operates, the pedal may wiggle slightly and an operating noise 
may be heard. This is normal. Keep holding the brake pedal firmly down.

540

Driving

Parking Your Vehicle

When Stopped

1.

Depress the brake pedal firmly.

2.

Apply the parking brake.

3.

Change the gear position to 

(

P

.

4.

Turn off the engine.

Always set the parking brake firmly, in particular if you are parked on an incline.

1

Parking Your Vehicle

Do not park your vehicle near flammable objects, 
such as dry grass, oil, or timber.
Heat from the exhaust can cause a fire.

3

WARNING

The vehicle can roll away if left unattended 
without confirming that Park is engaged.

A vehicle that rolls away could cause a crash 
resulting in serious injury or death.

Always keep your foot on the brake pedal 
until you have confirmed that 

(

P

 is shown 

on the gear position Indicator.

1

When Stopped

NOTICE

The following can damage the transmission:

Depressing the accelerator and brake pedals 
simultaneously.

Holding the vehicle in place when facing uphill by 
depressing the accelerator pedal.

Changing into 

(

P

 before the vehicle stops 

completely.

541

uu

Parking Your Vehicle

u

When Stopped

Driving

1

When Stopped

In extremely cold temperatures, the parking brake 
may freeze up if applied. If such temperatures are 
expected, do not apply the parking brake but, if 
parking on a slope, either turn the front wheels so 
they will contact the curb if the vehicle rolls down the 
slope or block the wheels to keep the vehicle from 
moving. If you do not take either precaution, the 
vehicle may roll unexpectedly, leading to a crash.


Content      ..     31      32      33      34     ..