Honda CR-V Hybrid (2022 year). Manual in english - page 37
 

  Index      Manuals     Honda CR-V Hybrid (2022 year). Manual in english


Search            copyright infringement  


Content      ..     35      36      37      38     ..


Honda CR-V Hybrid (2022 year). Manual in english - page 37


591

uu

Maintenance Under the Hood

u

Changing the Engine Oil and Oil Filter

Continued

Main

tenan

ce

Changing the Engine Oil and Oil Filter

You must change the engine oil and oil filter regularly in order to maintain the 
engine's lubrication. The engine may be damaged if they are not changed regularly.

Turning the power system on automatically starts the engine if the High Voltage 
battery charge level gauge shows two segments or less.

2

High Voltage Battery Charge Level Gauge

 P. 127

Change the oil and filter in accordance with the maintenance message on the driver 
information interface.

1.

Run the engine until it reaches normal 
operating temperature, and then turn the 
engine off.

2.

Open the hood and remove the engine oil 
fill cap.

3.

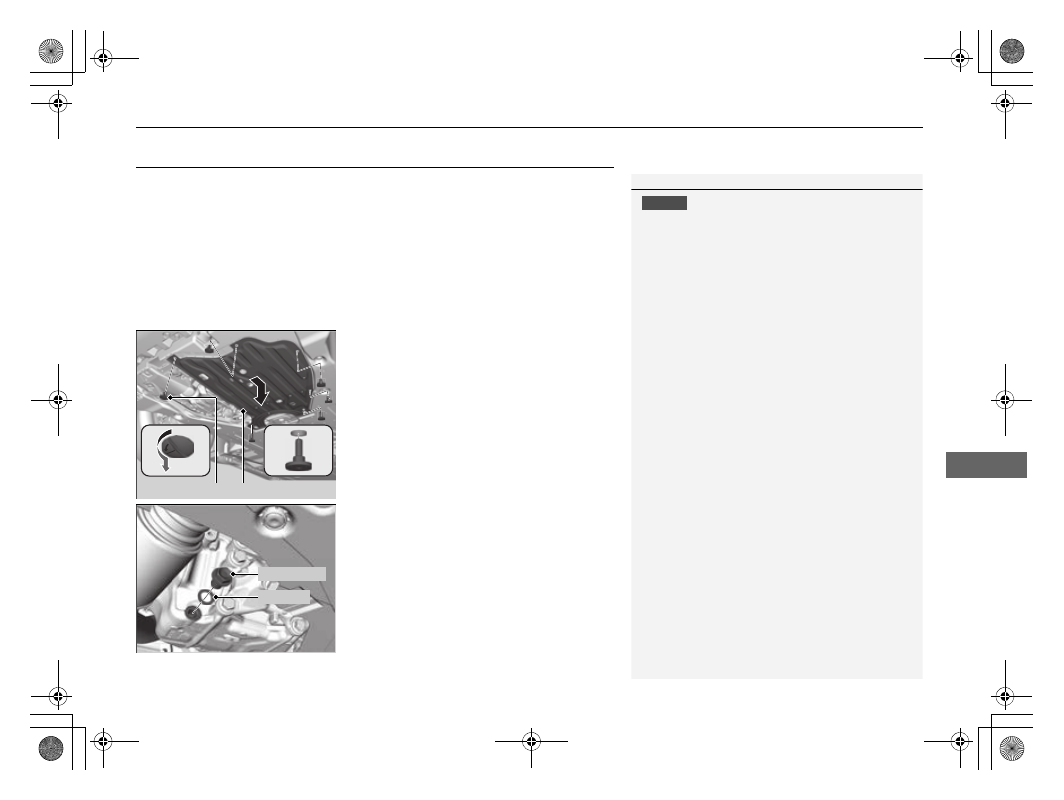
Remove the Phillips-head screws and 
slotted head screws by turning 90° 
counter-clockwise on the undercarriage 
and remove the under cover.

4.

Remove the drain bolt and washer from 
the bottom of the engine, and drain the 
oil into a suitable container.

1

Changing the Engine Oil and Oil Filter

NOTICE

You may damage the environment if you do not 
dispose of the oil in a suitable way. If you are 
changing the oil by yourself, appropriately dispose of 
the used oil. Put the oil in a sealed container and take 
it to a recycling center. Do not throw the oil away 
into a garbage can or onto the ground.

Screw

Under Cover

Drain Bolt

Washer

uu

Maintenance Under the Hood

u

Changing the Engine Oil and Oil Filter

592

Main

tenan

ce

5.

Remove the oil filter and dispose of the 
remaining oil.

6.

Check that the filter gasket is not stuck to 
the engine contact surface.

u

If it is stuck, you must detach it.

7.

Wipe away dirt and dust adhering to the 
contact surface of the engine block, and 
install a new oil filter.

u

Apply a light coat of new engine oil to 
the filter gasket.

8.

Put a new washer on the drain bolt, then 
reinstall the drain bolt.

u

Tightening torque: 
30 lbf∙ft (40 N∙m, 4.0 kgf∙m)

9.

Pour the recommended engine oil into the 
engine.

u

Engine oil change capacity (including filter):
4.0 US qt (3.8 L)

10.

Reinstall the engine oil fill cap securely and 
start the engine.

11.

Run the engine for a few minutes, and 
then check that there is no leak from the 
drain bolt or oil filter.

12.

Stop the engine, wait for three minutes, 
and then check the oil level on the 
dipstick.

u

If necessary, add more engine oil.

13.

Reinstall the under cover in the same order 
it was removed.

1

Changing the Engine Oil and Oil Filter

You will need a special wrench to replace the oil 
filter. You can buy this wrench from a dealer.

When installing the new oil filter, follow the 
instructions supplied with the oil filter.

Reinstall the engine oil fill cap. Start the engine. The 
low oil pressure indicator should go off within five 
seconds. If it does not, turn off the engine, and check 
your work.

Be sure to verify that the oil filter is designed for your 
vehicle. A genuine Honda oil filter is recommended 
for optimum lubrication flow and filtration properties 
to assure the reliability of the engine.

Oil Filter

593

uu

Maintenance Under the Hood

u

Cooling System

Continued

Main

tenan

ce

Cooling System

This coolant is premixed with 50% antifreeze and 50% water. Do not add any 
straight antifreeze or water.

We recommend you check the engine coolant level every time you refuel. Check the 
reserve tank first. If it is completely empty, also check the coolant level in the 
radiator. Add the engine coolant accordingly.

1. Make sure the engine and radiator are 

cool.

2.

Check the amount of coolant in the reserve tank.

u

If the coolant level is below the 

MIN


mark, add the specified coolant until it 
reaches the 

MAX

 mark.

3.

Inspect the cooling system for leaks.

Specified coolant: Honda Long Life Antifreeze/Coolant Type 2

Reserve Tank

1

Cooling System

NOTICE

Genuine Honda engine coolant is a 50/50 mixture of 
antifreeze and water that can withstand freezing at 
temperatures as low as about -31°F (-35°C). If your 
vehicle is consistently subjected to temperatures below 
this, the concentration of antifreeze in the coolant 
should be increased. Consult a dealer for details.

If Honda antifreeze/coolant is not available, you may use 
another major brand of non-silicate coolant as a 
temporary replacement. Check that it is a high quality 
coolant recommended for aluminum engines. 
Continued use of any non-Honda coolant can result in 
corrosion, causing the cooling system to malfunction or 
fail. Have the cooling system flushed and refilled with 
Honda antifreeze/coolant as soon as possible.

Do not add rust inhibitors or other additives to your 
vehicle's cooling system. They may not be compatible 
with the coolant or with the engine components.

3

WARNING

Removing the radiator cap while the 
engine is hot can cause the coolant to spray 
out, seriously scalding you.

Always let the engine and radiator cool 
down before removing the radiator cap.

Reserve 

Tank

MAX
MIN

uu

Maintenance Under the Hood

u

Cooling System

594

Main

tenan

ce

1. Make sure the engine and radiator are 

cool.

2.

Turn the radiator cap 1/8 turn counter-
clockwise and relieve any pressure in the 
cooling system.

3.

Push down and turn the radiator cap 
counter-clockwise to remove it.

4.

The coolant level should be up to the base 
of the filler neck. Add coolant if it is low.

5.

Put the radiator cap back on, and tighten it 
fully.

Radiator

1

Radiator

NOTICE

Pour the fluid slowly and carefully so you do not spill 
any. Clean up any spills immediately; they can 
damage components in the engine compartment.

Radiator Cap

595

uu

Maintenance Under the Hood

u

Transmission Fluid

Main

tenan

ce

Transmission Fluid

Have a dealer check the fluid level and replace if necessary.

Do not attempt to check or change the transmission fluid yourself. 

Specified fluid: Honda ATF DW-1

1

Transmission Fluid

NOTICE

Do not mix Honda ATF DW-1 with other 
transmission fluids.

Using a transmission fluid other than Honda ATF DW-1 
may adversely affect the operation and durability of 
your vehicle’s transmission, and damage the 
transmission.
Any damage caused by using a transmission fluid that 
is not equivalent to Honda ATF DW-1 is not covered 
by Honda’s new vehicle limited warranty.

596

uu

Maintenance Under the Hood

u

Brake Fluid

Main

tenan

ce

Brake Fluid

The fluid level should be between the 

MIN


and 

MAX

 marks on the side of the reserve 

tank.

Specified fluid: Honda Heavy Duty Brake Fluid DOT 3

Checking the Brake Fluid

1

Brake Fluid

NOTICE

Brake fluid marked DOT 5 is not compatible with your 
vehicle's braking system and can cause extensive 
damage.

If the specified brake fluid is not available, you should 
use only DOT 3 or DOT 4 fluid from a sealed 
container as a temporary replacement.

Using any non-Honda brake fluid can cause corrosion 
and decrease the longevity of the system. Have the 
brake system flushed and refilled with Honda Heavy 
Duty Brake Fluid DOT 3 as soon as possible.

If the brake fluid level is at or below the 

MIN

 mark, 

have a dealer inspect the vehicle for leaks or worn 
brake pads as soon as possible.

Reserve 

Tank

MIN

MAX

597

uu

Maintenance Under the Hood

u

Refilling Window Washer Fluid

Main

tenan

ce

Refilling Window Washer Fluid

Check the amount of window washer fluid by looking at the reservoir.

If the level is low, fill the washer reservoir.

Pour the washer fluid carefully. Do not overflow the reservoir.

1

Refilling Window Washer Fluid

NOTICE

Do not use engine antifreeze or a vinegar/water 
solution in the windshield washer reservoir.
Antifreeze can damage your vehicle's paint. A 
vinegar/water solution can damage the windshield 
washer pump.
Use only commercially available windshield washer 
fluid.
Avoid prolonged use of hard water to prevent lime 
scale buildup.

598

Main

tenan

ce

Replacing Light Bulbs

Headlights

Headlights are LED type. Have an authorized Honda dealer inspect and replace the 
light assembly.

Fog Lights

*

Fog lights are LED type. Have an authorized Honda dealer inspect and replace the 
light assembly.

Parking/Daytime Running Lights

Parking/daytime running lights are LED type. Have an authorized Honda dealer 
inspect and replace the light assembly.

Front Turn Signal/Front Side Marker Lights

Front turn signal lights/front side marker lights are LED type. Have an authorized 
Honda dealer inspect and replace the light assembly.

Side Turn Signal/Emergency Indicator Lights

*

Door mirror side turn signal lights are LED type. Have an authorized Honda dealer 
inspect and replace the light assembly.

Brake/Taillights, Rear Turn Signal Lights and Rear 
Side Marker Lights

Brake/taillights, rear turn signal lights and rear side marker lights are LED type. Have 
an authorized Honda dealer inspect and replace the light assembly.

1

Headlights

The headlight aim is set by the factory, and does not 
need to be adjusted. However, if you regularly carry 
heavy items in the cargo area, have the aiming 
readjusted at a dealer or by a qualified technician.

* Not available on all models

599

uu

Replacing Light Bulbs

u

Taillights and Back-Up Light Bulbs

Main

tenan

ce

Taillights and Back-Up Light Bulbs

When replacing, use the following bulbs.

1.

Remove the cover by prying on the edge 
using a flat-tip screwdriver.

u

Wrap the flat-tip screwdriver with a cloth 
to prevent scratches.

2.

Turn the socket counter-clockwise and 
remove it. Remove the old bulb.

3.

Insert a new bulb.

Taillight: LED
Back-Up Light: 16W

1

Taillights and Back-Up Light Bulbs

Taillights are LED type. Have an authorized Honda 
dealer inspect and replace the light assembly.

Cover

Bulb

Socket

600

uu

Replacing Light Bulbs

u

Rear License Plate Light

Main

tenan

ce

Rear License Plate Light

Rear license plate light is LED type. Have an authorized Honda dealer inspect and 
replace the light assembly.

High-Mount Brake Light

High-mount brake light is LED type. Have an authorized Honda dealer inspect and 
replace the light assembly.

601

Continued

Main

tenan

ce

Checking and Maintaining Wiper Blades

Checking Wiper Blades

If the wiper blade rubber has deteriorated, it will leave streaks, become noisy, and 
the hard surfaces of the blade may scratch the window glass.

Changing the Front Wiper Blade Rubber

1.

Set the power mode to VEHICLE OFF.

2.

While holding the wiper switch in the 

MIST

 position, set the power mode to ON, 

then to VEHICLE OFF.

u

Both wiper arms are set to the 
maintenance position as shown in the 
image.

3.

Lift the driver side wiper arm first, then the 
passenger side.

1

Changing the Front Wiper Blade Rubber

NOTICE

Avoid dropping the wiper arm onto the windshield, it 
may damage the wiper arm and/or the windshield.

602

uu

Checking and Maintaining Wiper Blades

u

Changing the Front Wiper Blade Rubber

Main

tenan

ce

4.

Press up on and hold the tab, then slide 
the holder off the wiper arm.

5.

Pull the end of the wiper blade in the 
direction of the arrow in the image until it 
is out of the holder’s end cap.

6.

Pull the wiper blade in the opposite 
direction to slide it out of the holder.

Tab

Wiper 

Blade

End Cap At 

The Bottom

Wiper Blade

Holder

603

uu

Checking and Maintaining Wiper Blades

u

Changing the Front Wiper Blade Rubber

Main

tenan

ce

7.

Slide the new wiper blade onto the holder 
from the bottom end.

u

The tab on the holder should fit in the 
indent of the wiper blade.

8.

Slide the holder onto the wiper arm, then 
push down the lock tab.

9.

Lower the passenger side wiper arm first, 
then the driver side.

10.

Set the power mode to ON and hold the 
wiper switch in the 

MIST

 position until 

both wiper arms return to the standard 
position.

Holder

Wiper 

Blade

Cap

604

uu

Checking and Maintaining Wiper Blades

u

Changing the Rear Wiper Blade Rubber

Main

tenan

ce

Changing the Rear Wiper Blade Rubber

1.

Raise the wiper arm off.

2.

Pivot the bottom end of the holder up until 
it comes off from the wiper arm.

3.

Slide the blade out of the holder.

4.

Remove the retainers from wiper blade and 
mount to a new rubber blade.

1

Changing the Rear Wiper Blade Rubber

NOTICE

Avoid dropping the wiper arm, it may damage the 
rear window.

Wiper Arm

Wiper Blade

Retainer

605

uu

Checking and Maintaining Wiper Blades

u

Changing the Rear Wiper Blade Rubber

Main

tenan

ce

5.

Slide the new wiper blade onto the holder.

u

Make sure it is engaged correctly, then 
install the wiper blade assembly onto the 
wiper arm.

Holder

606

Main

tenan

ce

Checking and Maintaining Tires

Checking Tires

To safely operate your vehicle, your tires must be of the proper type and size, in 
good condition with adequate tread, and properly inflated.

Inflation guidelines

Properly inflated tires provide the best combination of handling, tread life, and comfort. 
Refer to the driver’s doorjamb label or specifications page for the specified pressure.

Underinflated tires wear unevenly, adversely affect handling and fuel economy, and 
are more likely to fail from overheating.

Overinflated tires make your vehicle ride harshly, are more prone to road hazards, 
and wear unevenly.

Every day before you drive, look at each of the tires. If one looks lower than the 
others, check the pressure with a tire gauge.

At least once a month or before long trips, use a gauge to measure the pressure in 
all tires. Even tires in good condition can lose 1–2 psi 
(10–20 kPa, 0.1–0.2 kgf/cm

2

) per month.

Inspection guidelines

Every time you check inflation, also examine the tires and valve stems.
Look for:

Bumps or bulges on the side or in the tread. Replace the tire if you find any cuts, 
splits, or cracks in the side of the tire. Replace it if you see fabric or cord.

Remove any foreign objects and inspect for air leaks.

Uneven tread wear. Have a dealer check the wheel alignment.

Excessive tread wear.

2

Wear Indicators

 P. 611

Cracks or other damage around valve stem.

1

Checking Tires

Measure the air pressure when tires are cold. This 
means the vehicle has been parked for at least three 
hours, or driven less than 1 mile (1.6 km). If 
necessary, add or release air until the specified 
pressure is reached.

If checked when hot, tire pressure can be as much as 
4–6 psi (30–40 kPa, 0.3–0.4 kgf/cm

2

) higher than if 

checked when cold.

Whenever tire pressure is adjusted, you must 
calibrate the TPMS.

2

Tire Pressure Monitoring System (TPMS)


P. 493

Have a dealer check the tires if you feel a consistent 
vibration while driving. New tires and any that have 
been removed and reinstalled should be properly 
balanced.

3

WARNING

Using tires that are excessively worn or 
improperly inflated can cause a crash in 
which you can be seriously hurt or killed.

Follow all instructions in this owner’s 
manual regarding tire inflation and 
maintenance.


Content      ..     35      36      37      38     ..