Honda CR-V Hybrid (2022 year). Manual in english - page 17
 

  Index      Manuals     Honda CR-V Hybrid (2022 year). Manual in english


Search            copyright infringement  


Content      ..     15      16      17      18     ..


Honda CR-V Hybrid (2022 year). Manual in english - page 17


Continued

269

uu

Audio System Basic Operation

u

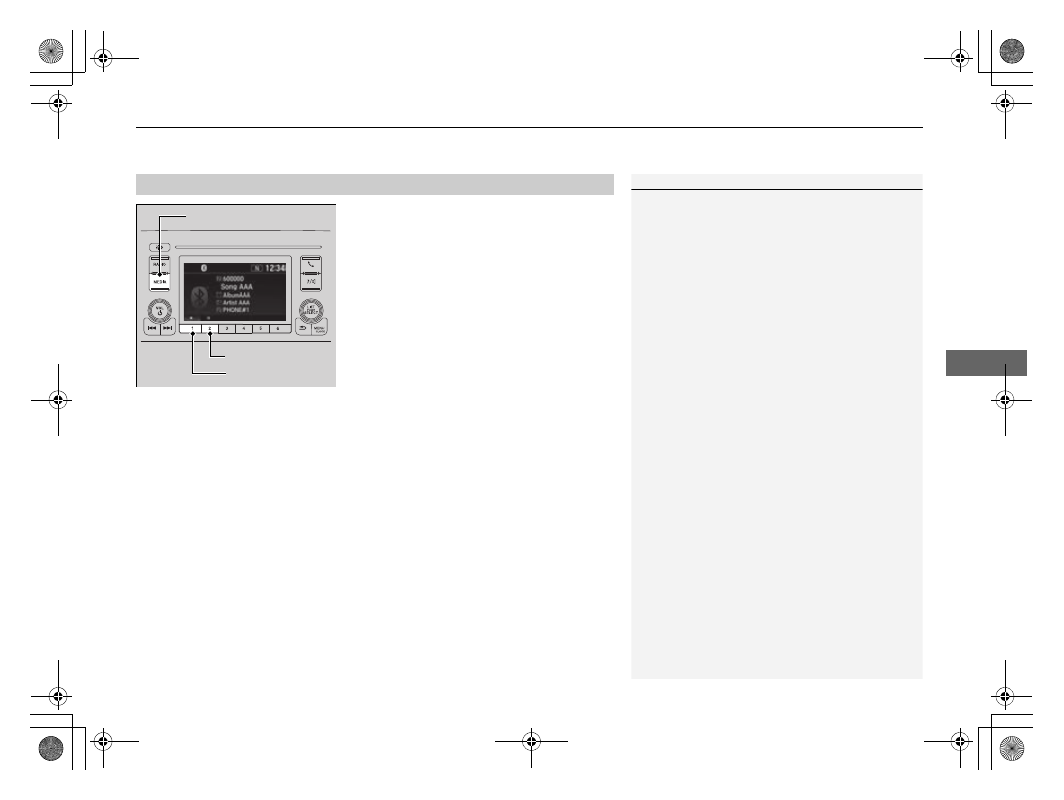
Playing 

Bluetooth

®

 Audio

Features

1.

Make sure that your phone is paired and 
connected to HFL.

2.

Press the 

MEDIA

 button until the 

Bluetooth

®

 Audio mode is selected.

If the phone is not recognized, another HFL-
compatible phone, which is not compatible 
for 

Bluetooth

®

 Audio, may already be 

connected.

To pause or resume a file

Press the 

Play

 or 

Pause

 button to select a mode.

To Play 

Bluetooth

®

 Audio Files

1

To Play 

Bluetooth

®

 Audio Files

To play the audio files, you may need to operate your 
phone. If so, follow the phone maker's operating 
instructions.

The pause function may not be available on some 
phones.

If any audio device is connected to the USB port, you 
may need to press the 

MEDIA

 button repeatedly to 

select the 

Bluetooth

®

 Audio system.

Switching to another mode pauses the music playing 
from your phone.

Play Button

Pause Button

MEDIA

 Button

uu

Audio System Basic Operation

u

Playing 

Bluetooth

®

 Audio

270

Features

1.

Press 

 to display the music search list.

2.

Rotate 

 to select a category.

3.

Press 

 to display a list of items in the 

category.

4.

Rotate 

 to select an item, then press 

.

u

Press 

 and rotate 

 repeatedly until a 

desired item you want to listen to is 
displayed.

How to Select a Song from the Music Search List with the 

Selector Knob

1

How to Select a Song from the Music Search List with the Selector 
Knob

Depending on the 

Bluetooth

®

 device you connect, 

some or all of the categories may not be displayed.

Item 

Selection

Category 

Selection

271

uu

Audio System Basic Operation

u

Siri

®

 Eyes Free

Features

Siri

®

 Eyes Free

You can talk to Siri using the 

 (Talk) button on the steering wheel when your 

iPhone is paired to the 

Bluetooth

®

 HandsFreeLink

®

 (HFL) system.

2

Phone Setup

 P. 404

Using Siri

®

 Eyes Free

1

Siri

®

 Eyes Free

Siri is a trademark of Apple Inc.

Check Apple Inc. website for features available for 
Siri.

We recommend against using Siri other than in Siri

®


Eyes Free while operating a vehicle.

1

Using Siri

®

 Eyes Free

Some commands work only on specific phone 
features or apps.

This audio system cannot operate the audio functions 
by using Siri

®

 Eyes Free.

 (Talk) Button 

Press and hold until the display changes as shown.

 (Hang-up/back) Button

Press to deactivate Siri

®

 Eyes Free.

While in Siri

®

 Eyes Free:

The display remains the same. 

No feedback or commands 

appear.

Appears 

when Siri is 

activated in 

Siri

®

 Eyes 

Free

272

Features

Audio System Basic Operation

To use the audio system function, the power mode must be in ACCESSORY or ON.

 (Home): Select to go to the home screen.

2

Switching the Display

 P. 273

 (Map)

*

: Select to display the map screen.

2

Refer to the Navigation System Manual

 (Audio): Select to display the audio screen.
 (Phone): Select to display the phone 

screen.

 (Back): Select to go back to the previous 

screen when the icon is illuminated.

 (Day/Night): Select to change the audio/

information screen brightness.
Select 

 once and select 

(

-

 or 

(

+

 to make 

an adjustment.

u

Each time you select 

, the mode 

switches among the daytime mode, 
nighttime mode and off mode.

1

Audio System Basic Operation

Audio Menu Items

2

Station List

 P. 302, 304

2

Music Search List

 P. 313, 322

2

Scan

 P. 303, 311, 323

2

Play Mode

 P. 314, 323

Models with Display Audio

 (Map) Icon

*

 (Phone) Icon

 (Back) Icon

 (Day/Night) Icon

 (Home) Icon

 (Audio) Icon

* Not available on all models

273

uu

Audio System Basic Operation

u

Audio/Information Screen

Continued

Features

Audio/Information Screen

Displays the audio status and wallpaper. From this display, you can go to various 
setup options.

Using the 

 (display/information) button

Press the 

 (display/information) button to change the display.

Switching the Display

1

Using the 

 (display/information) button

You can edit, add, and delete the contents shown on 
the driver information interface.

2

Customizing the Meter

 P. 278

Driver Information Interface

 (Display/Information) Button

uu

Audio System Basic Operation

u

Audio/Information Screen

274

Features

Using the audio/information screen

Select 

 to go to the home screen.

Select the following icons on the home screen.

Phone

Displays the HFL information.

2

Bluetooth

®

 HandsFreeLink

®

 P. 422

1

Using the audio/information screen

Touchscreen operation

Use simple gestures - including touching, swiping 
and scrolling - to operate certain audio functions.

Some items may be grayed out during driving to 
reduce the potential for distraction.

You can select them when the vehicle is stopped or 
use voice commands.

Wearing gloves may limit or prevent touchscreen 
response.

You can change the touchscreen sensitivity setting.

2

Customized Features

 P. 369

Home Screen

275

uu

Audio System Basic Operation

u

Audio/Information Screen

Continued

Features

Info

Displays 

Trip Computer

Voice Info

Clock/Wallpaper

, or 

System/Device 

Information

. Select 

MENU

 on the 

Info Menu

 screen to see all available options: 

Trip Computer

Voice Info

Clock/Wallpaper

 and 

System/Device Information

.

Trip Computer

:

Current Drive

 tab: Displays the current trip information.

History of Trip A

 tab: Displays information for the three previous drives. The 

information is stored every time you reset Trip A.
To delete the history manually, select 

Delete history

 on the 

History of Trip A


tab. The confirmation message appears on the screen, then select 

Yes

.

Voice Info

: Displays the All Commands list.

Clock/Wallpaper

: Displays the clock and wallpaper.

System/Device Information

:

System Info

: Displays the software version of the audio system.

USB Info

: Displays the memory usage of the USB device.

Audio

Displays the current audio information.

Settings

Enters the customizing menu screen.

2

Customized Features

 P. 369

Navigation

*

Displays the navigation screen.

2

Refer to the Navigation System Manual

* Not available on all models

276

uu

Audio System Basic Operation

u

Audio/Information Screen

Features

HondaLink

Displays the HondaLink

®

 screen.

2

HondaLink

®

 P. 326

Smartphone Connection

Displays the Apple CarPlay

TM

 or Android Auto

TM

.

2

Apple CarPlay

TM

 P. 333

2

Android Auto

TM

 P. 336

App List ( )

Adds or removes apps or widgets on the home screen.

2

Home Screen

 P. 284

Instrument Panel

Selects from three customizable settings for the driver information interface.

277

uu

Audio System Basic Operation

u

Audio/Information Screen

Continued

Features

1.

Select .

2.

Select and hold an icon.

u

The screen switches to the customization 
screen.

3.

Drag and drop the icon to where you want 
it to be.

4.

Select 

OK

.

u

The screen will return to the home 
screen.

Changing the Home Screen Icon Layout

uu

Audio System Basic Operation

u

Audio/Information Screen

278

Features

You can edit, add, or delete the meter contents on the driver information interface.

1.
2. Settings
3. System
4. Configuration of Instrument Panel

Customizing the Meter

1

Customizing the Meter

You can store up to three customized configurations. 
To select or customize a configuration, select 

Swap 

Config.

.

When you select 

Swap Config.

 during 

customization, the settings you changed will be 
saved.
When you select 

 during customization, the 

settings you changed will not be saved and you will 
be returned to the 

Instrument Panel

 screen.

Continued

279

uu

Audio System Basic Operation

u

Audio/Information Screen

Features

Editing order

To change the order of the icons on the driver information interface, first select:

1. Edit Order

2.

Select the icon you want to move.

u

You will see arrows on both sides of the 
selected icon.

3.

Select the left or right arrow repeatedly to 
move the icon to your desired position.

4.

Select 

OK

.

u

The screen will return to the 

Instrument 

Panel

 screen.

1

Editing order

You can use an alternative method to change the 
order of the icons. First select:
1.

Edit Order

2. Select and hold the icon you want to move.
3. Drag and drop the icon to where you want it to 

be.

4. Select 

OK

.

u

The screen will return to the 

Instrument Panel


screen.

Edit Order

Select

Arrow icons

OK

uu

Audio System Basic Operation

u

Audio/Information Screen

280

Features

Adding contents

You can add icons to the driver information interface. To add icons, first select:

1. Add

2.

Select an icon you want to add.

u

You will see a plus mark on the upper 
right hand corner of the selected icon.

3.

Select 

OK

.

u

The screen will return to the 

Instrument 

Panel

 screen.

1

Adding contents

Icons that are grayed out cannot be selected.

If an icon has a plus mark in the upper-right corner, it 
means that the icon has already been added.

Add

Select

OK

Continued

281

uu

Audio System Basic Operation

u

Audio/Information Screen

Features

Deleting contents

To delete contents on the driver information interface, first select:

1. Delete

2.

Select an icon you want to delete.

u

The icon with an X on the upper right 
hand corner can be deleted.

3.

Select 

OK

.

u

The screen will return to the 

Instrument 

Panel

 screen.

1

Deleting contents

You can also delete contents by selecting:
1.

Delete

 or 

Edit Order

2. Select and hold an icon you want to delete.
3. Drag and drop the icon to the trash icon.
4. Select 

OK

.

u

The screen will return to the 

Instrument Panel


screen.

Delete

Select

OK

uu

Audio System Basic Operation

u

Audio/Information Screen

282

Features

You can change, store, and delete the wallpaper on the audio/information screen.

Import wallpaper

You can import up to five images, one at a time, for wallpaper from a USB flash 
drive.

1.

Connect the USB flash drive to the USB 
port.

2

USB Port(s)

 P. 245

2.

Select 

Settings

.

3.

Select 

Clock

.

4.

Select 

Clock/Wallpaper Type

, select 

Next

, then open the 

Wallpaper

 tab.

5.

Select 

Add New

.

u

The picture name is displayed on the list.

6.

Select a desired picture.

u

The preview is displayed on the left side 
on the screen.

7.

Select 

Start Import

 to save the data.

u

The display will return to the wallpaper 
list.

Wallpaper Setup

1

Wallpaper Setup

The wallpaper you set up on 

Clock/Wallpaper Type


cannot be displayed on the driver information 
interface.

When importing wallpaper files, the image must be 
in the USB flash drive’s root directory.
Images in a folder cannot be imported.

The file name must be fewer than 256 bytes.

The file format of the image that can be imported 
is BMP (bmp) or JPEG (jpg).

The individual file size limit is 5 MB.

The maximum image size is 4,096 × 4,096 pixels. If 
the image size is less than 800 × 480 pixels, the 
image is displayed in the middle of the screen with 
the extra area appearing in black.

If the USB flash drive does not have any pictures, 
the 

No files detected

 message appears.

After changing the screen interface design, you can 
change the wallpaper by following procedure.
1. Select .
2. Select .
3. Select and hold empty space on the home screen.

The pop-up menu appears on the screen.

4. Select 

Change wallpaper

.

5. Select 

Gallery

Live wallpapers

, or 

Wallpapers

.

Continued

283

uu

Audio System Basic Operation

u

Audio/Information Screen

Features

Select wallpaper

1.

Select 

Settings

.

2.

Select 

Clock

.

3.

Select 

Clock/Wallpaper Type

, select 

Next

, then open the 

Wallpaper

 tab.

u

The screen changes to the wallpaper list.

4.

Select a desired wallpaper.

u

The preview is displayed on the left side on the screen.

u

The pop-up menu appears on the screen.

5.

Select 

Set

.

u

The display will return to the wallpaper list.

To view wallpaper once it is set

1.

Select .

2.

Select 

Info

.

3.

Select 

MENU

.

4.

Select 

Clock/Wallpaper

.

Delete wallpaper

1.

Select 

Settings

.

2.

Select 

Clock

.

3.

Select 

Clock/Wallpaper Type

, select 

Next

, then open the 

Wallpaper

 tab.

u

The screen changes to the wallpaper list.

4.

Select a wallpaper that you want to delete.

u

The preview is displayed on the left side on the screen.

u

The pop-up menu appears on the screen.

5.

Select 

Delete

.

u

A confirmation message appears on the screen.

6.

Select 

Yes

 to delete completely.

u

The display will return to the wallpaper list.

1

Wallpaper Setup

From the pop-up menu, select 

Preview

 to see a 

preview at full-size screen.

To go back to the previous screen, select 

OK

, or 

select .

When the file size is large, it takes a while to be 
previewed.

To delete all wallpapers you add, select 

Delete All

then 

Yes

.

uu

Audio System Basic Operation

u

Audio/Information Screen

284

Features

To move to the next screen

Selecting   or  , or swiping the screen left or right changes to the next screen.

Home Screen

1

Home Screen

The home screen has 5 pages (fixed). You cannot add 
any more pages.

Select 

 to go directly back to the first page of the 

home screen from any page.

Swipe

 Icon

 Icon

Current page position


Content      ..     15      16      17      18     ..