Honda CR-V (2022 year). Manual in english - page 40
 

  Index      Manuals     Honda CR-V (2022 year). Manual in english


Search            copyright infringement  


Content      ..     38      39      40      41     ..


Honda CR-V (2022 year). Manual in english - page 40


638

uu

Parking Your Vehicle

u

Parking Sensor System

*

Driving

Parking Sensor System

*

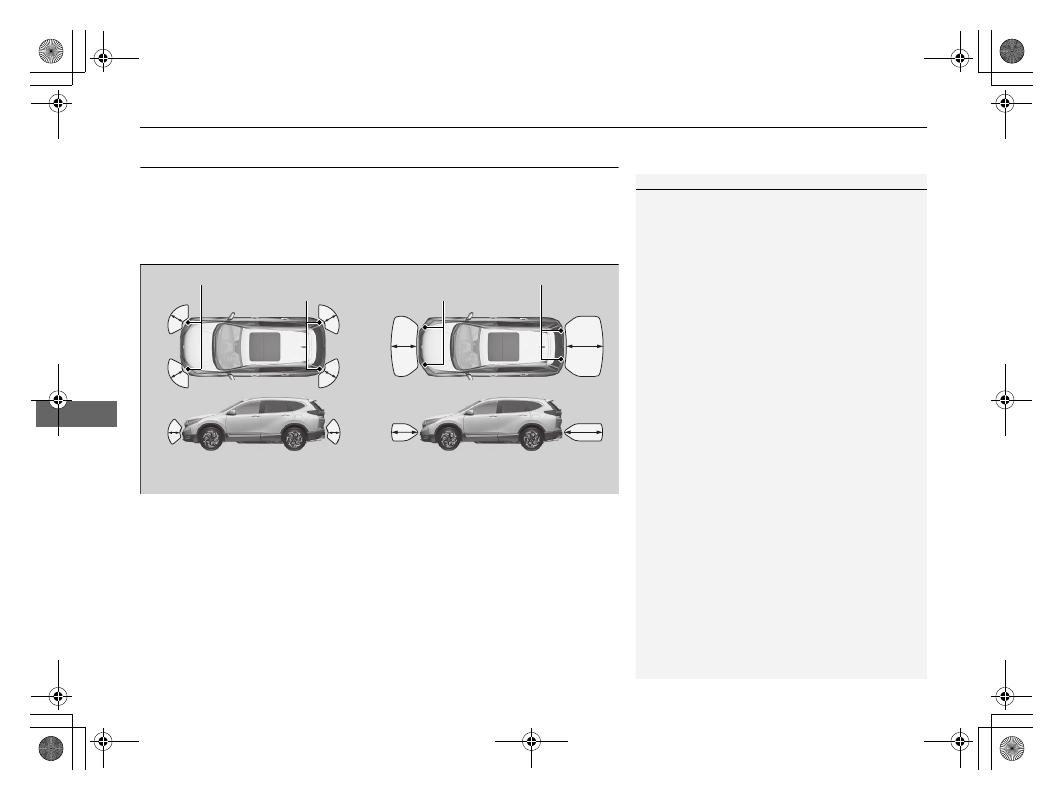
The corner and centre sensors monitor obstacles around your vehicle, and the 
beeper, driver information interface and audio/information screen let you know the 
approximate distance between your vehicle and the obstacle.

The sensor location and range

1

Parking Sensor System

*

Even when the system is on, always confirm if there is 
no obstacle near your vehicle before parking.

The system may not work properly when:

The sensors are covered with snow, ice, mud or 
dirt.

The vehicle is on uneven surface, such as grass, 
bumps, or a hill.

The vehicle has been out in hot or cold weather.

The system is affected by devices that emit 
ultrasonic waves.

Driving in bad weather.

The system may not sense:

Thin or low objects.

Sonic-absorptive materials, such as snow, cotton, 
or sponge.

Objects directly under the bumper.

Do not put any accessories on or around the sensors.

Front: Within about 60 cm or less
Rear: Within about 70 cm or less

Front Corner Sensors

Rear Corner Sensors

Rear Centre Sensors

Front: Within about 100 cm or less
Rear: Within about 110 cm or less

Front Centre Sensors

* Not available on all models

Continued

639

uu

Parking Your Vehicle

u

Parking Sensor System

*

Driving

Parking sensor system on and off

With the ignition switch is ON 

(

w

*1

, press the 

parking sensor system button to turn on or off 
the system. The indicator in the button comes 
on when the system is on.

The front corner, rear centre and corner 
sensors start to detect an obstacle when the 
transmission is in 

(

R

, and the vehicle speed is 

less than 8 km/h (5 mph).

The front centre and corner sensors start to 
detect an obstacle when the transmission is 
not in 

(

P

 or 

(

R

, and the vehicle speed is less 

than 8 km/h (5 mph).

You also need to release the parking brake.

*1: Models with the keyless access system have an 

ENGINE START/STOP

 button instead of an 

ignition switch.

1

Parking sensor system on and off

When you set the power mode to ON, the system will 
be in the previously selected condition.

Manual transmission models

uu

Parking Your Vehicle

u

Parking Sensor System

*

640

Driving

Screen Operation

You can switch the display to normal display 
or split display by touching the tab vicinity or 
on the camera display.

1

Screen Operation

If the parking sensor system is off or there is a 
malfunction in the system, the tab disappears, and 
the split display returns to the normal display.

You can also switch the display to normal display or 
split display using the audio/information screen.

2

Customized Features

 P. 408

Touch

Touch

Touch

Touch

Camera 
display

Tab

Normal display

Split display

641

uu

Parking Your Vehicle

u

Parking Sensor System

*

Continued

Driving

When the distance between your vehicle and obstacles behind becomes shorter

*1:At this stage, only the centre sensors detect obstacles.

Length of the 

intermittent beep

Distance between the Bumper and Obstacle

Indicator

Driver information interface/

Audio/information screen

Corner Sensors

Centre Sensors

Moderate

Front: About 100-60 cm

Rear: About 110-60 cm

Blinks in Yellow

*1

Short

Front: About 60-45 cm

Rear: About 70-45 cm

About 60-50 cm 

Blinks in Amber

Very short

About 45-35 cm 

About 50-40 cm 

Continuous

About 35 cm or less

About 40 cm or less

Blinks in Red

Indicators light where the 
sensor detects an obstacle.

Indicators light where the 
sensor detects an obstacle.

uu

Parking Your Vehicle

u

Parking Sensor System

*

642

Driving

1.

Make sure that the parking sensor system is not activated. Turn the ignition 
switch to LOCK 

(

0

*1

.

2.

Press and hold the parking sensor system button, and set the power mode to ON.

3.

Keep pressing the button for 10 seconds. Release the button when the indicator 
in the button flashes.

4.

Press the button again. The indicator in the button goes off.

u

The beeper sounds twice. The rear sensors are now turned off.

To turn the rear sensors on again, follow the above procedure. The beeper sounds 
three times when the rear sensors come back on.

*1: Models with the keyless access system have an 

ENGINE START/STOP

 button instead of an 

ignition switch.

Turning off All Rear Sensors

1

Turning off All Rear Sensors

When you shift to 

(

R

, the indicator in the parking 

sensor system button blinks as a reminder that the 
rear sensors have been turned off.

643

uu

Parking Your Vehicle

u

Cross Traffic Monitor

*

Continued

Driving

Cross Traffic Monitor

*

Monitors the rear corner areas using the radar sensors when reversing, and alerts 
you if a vehicle approaching from a rear corner is detected.

The system is convenient especially when you are getting out of a parking space 
backwards.

1

Cross Traffic Monitor

*

The parking sensor system’s alerting buzzer overrides 
the cross traffic monitor buzzer when the sensors are 
detecting obstacles at the closest range.

3

WARNING

Cross traffic monitor cannot detect all 
approaching vehicles and may not detect 
an approaching vehicle at all.

Failure to visually confirm that it is safe to 
back up the vehicle before doing so may 
result in a collision.

Do not solely rely on the system when 
reversing; always also use your mirrors, and 
look behind and to the sides of your vehicle 
before reversing.

* Not available on all models

uu

Parking Your Vehicle

u

Cross Traffic Monitor

*

644

Driving

The system activates when:

Turn the ignition switch to ON 

(

w

*1

.

The Cross Traffic Monitor is turned on.

2

Cross Traffic Monitor On and Off

 P. 647

2

Customized Features

 P. 408

The transmission is in 

(

R

.

Your vehicle is moving at 5 km/h (3 mph) or 
lower.

When a vehicle is detected approaching from a rear corner, Cross Traffic Monitor 
alerts you with a buzzer and a displayed warning.

*1: Models with the keyless access system have an 

ENGINE START/STOP

 button instead of an 

ignition switch.

How the System Works

1

Cross Traffic Monitor

*

Cross traffic monitor may not detect or may delay 
detecting an approaching vehicle, or may alert 
detection without an approaching vehicle under the 
following conditions:

An obstacle, such as another vehicle and a wall, 
near your vehicle’s rear bumper, is blocking the 
radar sensor’s scope.

Your vehicle is moving at the speed of about 5 
km/h (3 mph) or higher.

A vehicle is approaching at the speed other than 
between about 10 km/h (6 mph) and 25 km/h (16 
mph).

The system picks up external interference such as 
other radar sensors from another vehicle or strong 
radio wave transmitted from a facility nearby.

Either corner of the rear bumper is covered with 
snow, ice, mud or dirt.

When there is bad weather.

Your vehicle is on an incline.

Your vehicle is tilted due to a heavy load in the rear.

Your vehicle is reversing towards a wall, a pole, a 
vehicle, and so on.

The rear bumper or the sensors have been 
improperly repaired or the rear bumper has been 
deformed.

u

Have your vehicle checked by a dealer.

Radar sensors:
Underneath the rear bumper 
corners

* Not available on all models

Continued

645

uu

Parking Your Vehicle

u

Cross Traffic Monitor

*

Driving

The system will not detect a vehicle that approaches from directly behind your 
vehicle, nor will it provide alerts about a detected vehicle when it moves directly 
behind your vehicle.

The system does not detect or provide alerts for a vehicle that is moving away from 
your vehicle, and it may detect or alert for pedestrians, bicycles, or stationary 
objects.

1

Cross Traffic Monitor

*

For proper operation, always keep the rear bumper 
corner area clean.
Do not cover the rear bumper corner area with labels 
or stickers of any kind.

* Not available on all models

uu

Parking Your Vehicle

u

Cross Traffic Monitor

*

646

Driving

An arrow icon appears on the side a vehicle is approaching on the audio/information 
screen.

When the System Detects a Vehicle

1

When the System Detects a Vehicle

If the 

 on the lower right changes to 

 in amber 

when the transmission is in 

(

R

, mud, snow, ice and 

other debris may have accumulated in the vicinity of 
the sensor. The system is temporarily cancelled. 
Check the bumper corners for any obstructions, and 
thoroughly clean the area if necessary.

If the 

 comes on when the transmission is in 

(

R

there may be a problem with the Cross Traffic 
Monitor system. Do not use the system and have your 
vehicle checked by a dealer.

If the display remains the same with the transmission 
in 

(

R

, there may be a problem with the rear camera 

system and the Cross Traffic Monitor system.
Do not use the system and have your vehicle checked 
by a dealer.

Arrow Icon

Wide View

Normal View

Top Down View

647

uu

Parking Your Vehicle

u

Cross Traffic Monitor

*

Driving

Tap to turn the system on and off. The 
indicator (green) comes on with the system 
on.
You can also switch on and off the system 
using the audio/information screen.

2

Customized Features

 P. 408

Cross Traffic Monitor On and Off

 Icon

648

Driving

Multi-View Rear Camera

*

About Your Multi-View Rear Camera

The audio/information screen can display your vehicle’s rear view. The display 
automatically changes to the rear view when the transmission is put into 

(

R

.

Multi-View Rear Camera Display Area

1

About Your Multi-View Rear Camera

The rear camera view is restricted. You cannot see 
the corner ends of the bumper or what is underneath 
the bumper. Its unique lens also makes objects 
appear closer or farther than they actually are.

Visually confirm that it is safe to drive before backing 
up. Certain conditions (such as weather, lighting, and 
high temperatures) may also restrict the rear view. Do 
not rely on the rearview display which does not give 
you all information about conditions at the back of 
your vehicle.

If the camera lens is covered with dirt or moisture, 
use a soft, moist cloth to keep the lens clean and free 
of debris.

Bumper
Guidelines

Tailgate Open Range

Camera

Approx. 3 m 
(118 inches)

Approx. 2 m 
(79 inches)

Approx. 1 m 
(39 inches)

Top Down View Mode

Normal View Mode

Wide View Mode

* Not available on all models

649

uu

Multi-View Rear Camera

*

u

About Your Multi-View Rear Camera

Driving

You can view three different camera modes on the audio/information screen.

Touch the appropriate icon to switch the mode.

: Wide view mode
: Normal view mode
: Top down view mode

If the last used viewing mode was Wide or Normal, the same view mode is 
selected the next time you put the transmission into 

(

R

.

If Top down view mode was last used before you turned off the engine, Wide 
View mode is selected next time you turn the ignition switch to ON 

(

w

*1

 and put 

the transmission into 

(

R

.

If Top down view mode was last used more than 10 seconds after you put the 
transmission out of 

(

R

, Wide View mode is selected the next time you put the 

transmission into 

(

R

.

*1: Models with the keyless access system have an 

ENGINE START/STOP

 button instead of an 

ignition switch.

1

About Your Multi-View Rear Camera

You can change the 

Fixed Guideline

 and 

Dynamic 

Guideline

 settings.

2

Customized Features

 P. 408

Fixed Guideline
On: 

Guidelines appear when you put the 

transmission into 

(

R

.

Off: 

Guidelines do not appear.

Dynamic Guideline
On: 

Guidelines move according to the steering wheel 

direction.

Off: 

Guidelines do not move.

650

Driving

Refueling

Fuel Information

Fuel recommendation

Your vehicle is designed to operate on premium unleaded petrol with a research 
octane of 95 or higher.
If this octane grade is unavailable, regular unleaded petrol with a research octane of 
91 or higher may be used temporarily.
The use of regular unleaded petrol can cause metallic knocking noises in the engine 
and will result in decreased engine performance. The long-term use of regular-grade 
petrol can lead to engine damage.

Fuel tank capacity: 57 L

EN 228 standards petrol/gasohol fuel
Unleaded premium petrol/gasohol up to E10 (90% petrol and 10% 
ethanol), research octane number 95 or higher

1

Fuel Information

NOTICE

Use of petrol that contains lead presents the 
following risks:

Damage to the exhaust system including the 
catalytic converter

Damage to the engine and fuel system

Detrimental effects on the engine and other 
systems

Oxygenated Fuels

Oxygenated fuels are blended with petrol and 
ethanol or other compounds. Your vehicle is also 
designed to operate on oxygenated fuels containing 
up to 10% ethanol by volume and up to 22% ETBE 
by volume, based on the EN 228 standards. For more 
information, ask your dealer.

651

uu

Refueling

u

How to Refuel

Driving

How to Refuel

1.

Stop your vehicle with the service station 
pump on the left side of the vehicle in the 
rear.

2.

Turn off the engine.

3.

Pull on the fuel fill door release handle 
under the driver’s side lower outside corner 
of the dashboard.

u

The fuel fill door opens.

4.

Remove the fuel fill cap slowly. If you hear a 
release of air, wait until this stops, then turn 
the knob slowly to open the fuel fill cap.

5.

Place the fuel fill cap in the holder.

6.

Insert the fuel filler nozzle fully.

u

When the tank is full, the filler nozzle will 
click off automatically. This leaves space 
in the fuel tank in case the fuel expands 
with a change in the temperature.

7.

After filling, replace the fuel fill cap, 
tightening it until you hear it click at least 
once.

u

Shut the fuel fill door by hand.

1

How to Refuel

Do not continue to add fuel after the filler nozzle has 
automatically stopped. Additional fuel can exceed 
the full tank capacity.

The filler nozzle automatically stops to leave space in 
the fuel tank so that fuel does not overflow as a result 
of changes in air temperature.

3

WARNING

Petrol is highly flammable and explosive. 
You can be burned or seriously injured 
when handling fuel.

Stop the engine, and keep heat, sparks, 
and flame away.

Handle fuel only outdoors.

Wipe up spills immediately.

Pull

Cap

Cap

Holder

652

Driving

Fuel Economy and CO

2

 Emissions

Improving Fuel Economy and Reducing CO

2


Emissions

Achieving fuel economy and reducing CO

2

 emissions is dependent on several 

factors, including driving conditions, load weight, idling time, driving habits, and 
vehicle condition. Depending on these and other factors, you may not achieve the 
rated fuel economy of this vehicle.

You can optimize your fuel economy with proper maintenance of your vehicle. 
Follow the maintenance schedule and, if necessary, consult your warranty booklet.
On vehicles without service reminder system, follow the Maintenance schedule.

2

Maintenance Schedule

*

 P. 670

Use engine oil with the viscosity recommended.

2

Recommended Engine Oil

 P. 681

Maintain the specified tyre pressure.

Do not load the vehicle with excess luggage.

Keep your vehicle clean. A buildup of snow or mud on your vehicle’s underside 
adds weight and increases wind resistance.

Maintenance and Fuel Economy

1

Improving Fuel Economy and Reducing CO

2

 Emissions

Direct calculation is the recommended method to 
determine actual fuel consumed while driving.

100

Litres of 

fuel

Kilometres 

driven

L per 100 km

Miles 

driven

Miles per 

Gallon

Gallons of 

fuel

* Not available on all models

653

Driving

Turbo Engine Vehicle

Handling Precautions

The turbocharger is a high-precision device to obtain greater horsepower by 
delivering a large volume of compressed air into the engine using a turbine driven by 
the engine’s exhaust gas pressure.

When the engine is cold just after starting, avoid revving the engine or sudden 
acceleration.

Always replace the engine oil and engine oil filter according to the maintenance 
schedule. The turbine rotates at very high speeds over 100,000 rpm and its 
temperature reaches over 700°C. It is lubricated and cooled by engine oil. If you 
fail to replace the engine oil and filter at the scheduled distance or interval, 
deteriorated engine oil may cause failure such as sticking and abnormal noise of 
the turbine bearing.

1

Turbo Engine Vehicle

The scheduled maintenance intervals for replacing 
the engine oil and filter is indicated on the driver 
information interface. Follow the information of 
when to replace them.

2

Service Reminder System

*

 P. 660

2

Oil Monitor System

*

 P. 665

2

Maintenance Schedule

*

 P. 670

2

Recommended Engine Oil

 P. 681

The temperature gauge is at upper level when you 
restart the engine after driving under high load 
conditions such as at high speed or in hilly terrain. 
This is normal. The temperature gauge goes down 
after you idle or drive the vehicle for about one 
minute.

* Not available on all models


Content      ..     38      39      40      41     ..