Honda e (2021 year). Manual in english - page 14
 

  Index      Manuals     Honda e (2021 year). Manual in english


Search            copyright infringement  


Content      ..     12      13      14      15     ..


Honda e (2021 year). Manual in english - page 14


210

uu

Operating the Switches Around the Steering Wheel

u

Wipers and Washers

Co
ntrols

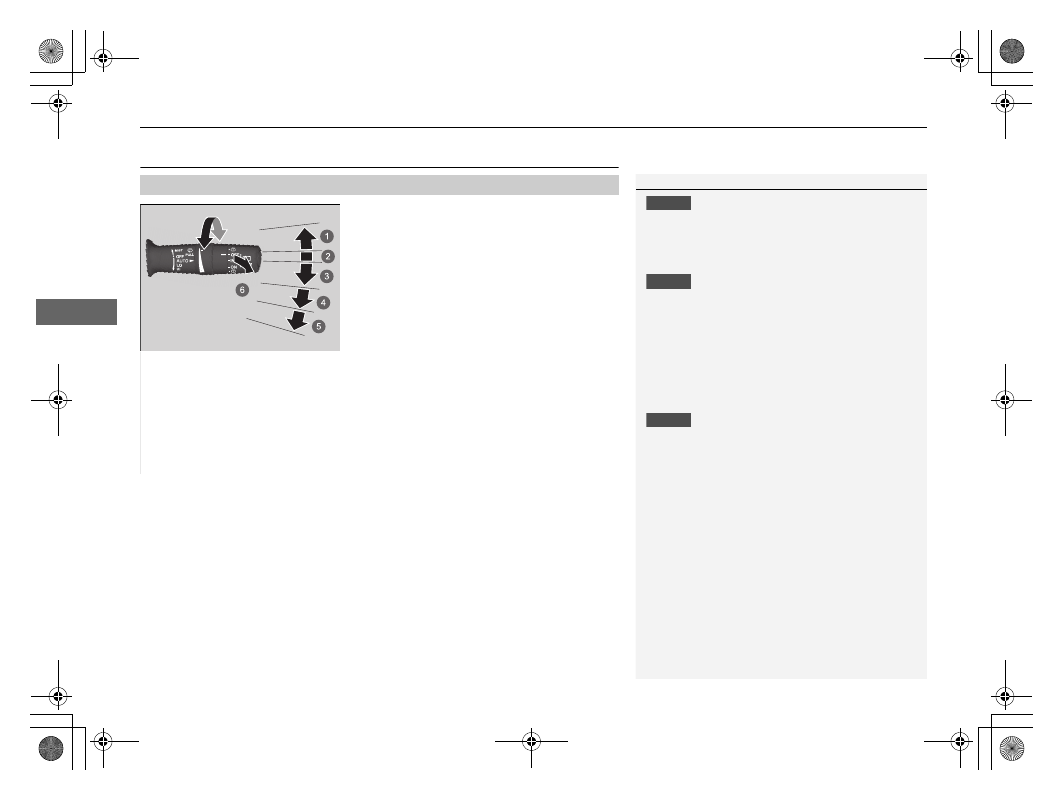
Wipers and Washers

The windscreen wipers and washers can be 
used when the power mode is in ON.

MIST

The wipers run at high speed until you release 
the lever.

Wiper switch (OFF, AUTO, LO, HI)

Move the lever up or down to change the 
wiper settings.

Washer

Sprays while you pull the lever towards you.
When you release the lever for more than one 
second, the spray stops, the wipers sweep two 
or three more times to clear the windscreen, 
then stop.

Windscreen Wipers/Washers

1

Wipers and Washers

NOTICE

Do not use the wipers when the windscreen is dry.
The windscreen will get scratched, or the rubber 
blades will get damaged.

NOTICE

Turn the washers off if no washer fluid comes out.
The pump may get damaged.

The wiper motor may stop motor operation 
temporarily to prevent an overload. Wiper operation 
will return to normal within a few minutes, once the 
circuit has returned to normal.

NOTICE

In cold weather, the blades may freeze to the 
windscreen.
Operating the wipers in this condition may damage 
the wipers. Use the demister to warm the 
windscreen, then turn the wipers on.

If the wipers stop operating due to an obstacle such 
as the build-up of snow, park the vehicle in a safe 
place. Rotate the wiper switch to 

OFF

, and set the 

power mode to ACCESSORY or VEHICLE OFF, then 
remove the obstacle.

a

MIST

b

OFF

c

AUTO

d

LO

: Low speed wipe

e

HI

: High speed wipe

f

Washer

Continued

211

uu

Operating the Switches Around the Steering Wheel

u

Wipers and Washers

Co
ntrols

When you push the lever down to 

AUTO

, the 

windscreen wipers sweep once, and go into 
the automatic mode.

The wipers operate intermittently, at low 
speed, or at high speed and stops in 
accordance with the amount of rainfall the 
rainfall sensor detects.

AUTO sensitivity adjustment

When the wiper function is set to 

AUTO

you can adjust the sensitivity of the rainfall 
sensor (using the adjustment ring) so that 
wipers will operate in accordance with your 
preference.

Sensor sensitivity

Automatic Intermittent Wipers

1

Automatic Intermittent Wipers

The rainfall sensor is in the location shown below.

NOTICE

AUTO

 should always be turned 

OFF

 before the 

following situations in order to prevent severe 
damage to the wiper system:

Cleaning the windscreen

Driving through a car wash

No rain present

a

Adjustment Ring

Low Sensitivity

High Sensitivity

212

uu

Operating the Switches Around the Steering Wheel

u

Wipers and Washers

Co
ntrols

The rear wiper and washer can be used when 
the power mode is in ON.

Wiper switch (OFF, INT, ON)

Change the wiper switch setting according to 
the amount of rain.

Washer (

)

Sprays while you rotate the switch to this 
position.
Hold it to activate the rear wiper and to spray 
the washer. Once released, the washer spray 
will stop and the rear wiper will return to its 
selected switch setting after a few sweeps.

Operating in reverse

When you shift the transmission to 

(

R

 with the windscreen wipers activated, the 

rear wiper operates automatically as follows even if its switch is off.

Rear Wiper/Washer

a

INT

 (Intermittent)

b

ON

 (Continuous wipe)

c

OFF

d

Washer

Front Wiper Position

Rear Wiper Operation

AUTO

 (Intermittent)

Intermittent

LO

 (Low speed wipe)

HI

 (High speed wipe)

Continuous

213

uu

Operating the Switches Around the Steering Wheel

u

Rear Demister Button

Co
ntrols

Rear Demister Button

Press the rear demister button to demist the rear window when the power mode is 
in ON.

The rear demister automatically switches off 
after 10-30 minutes depending on the outside 
temperature. However, if the outside 
temperature is 0°C or below, it does not 
automatically switch off.

1

Rear Demister Button

This system consumes a lot of power, so turn it off 
when the window has been demisted. Also, do not 
use the system for a long time while the power 
system is stopped. This may weaken the 12-volt 
battery, making it difficult to turn the power system 
on.

214

uu

Operating the Switches Around the Steering Wheel

u

Adjusting the Steering Wheel

Co
ntrols

Adjusting the Steering Wheel

The steering wheel height and distance from your body can be adjusted so that you 
can comfortably grip the steering wheel in an appropriate driving posture.

1.

Push the steering wheel adjustment lever 
down.

u

The steering wheel adjustment lever is 
lower left side of the steering column.

2.

Move the steering wheel up or down, and 
in or out.

u

Make sure you can see the instrument 
panel gauges and indicators.

3.

Pull the steering wheel adjustment lever up 
to lock the steering wheel in position.

u

After adjusting the position, make sure 
you have securely locked the steering 
wheel in place by trying to move it up, 
down, in, and out.

1

Adjusting the Steering Wheel

3

WARNING

Adjusting the steering wheel position while 
driving may cause you to lose control of the 
vehicle and be seriously injured in a crash.

Adjust the steering wheel only when the 
vehicle is stopped.

a

Release

b

Adjust

c

Lock

215

Continued

Co
ntrols

Adjustment of Each Type of Mirror

Adjust each mirror before driving so you can check the rear in the correct driving 
position.

Centre Camera Mirror System

*

By displaying video on the rearview mirror from a camera in the rear of the vehicle, 
it is possible to check your rear view without blocking by the headrest or passengers. 
It can also be used as a mirror without the video display by moving the lever position.

If you move the lever to the monitor mode position while the power mode is in ON, 
video will be displayed. When you move the lever, the direction of the mirror will 
change, so adjustments to the position of the mirror should be made in mirror 
mode.

1

Centre Camera Mirror System

*

When driving, visually check for other vehicles and 
confirm the safety of your surroundings.
Depending on ambient conditions, the following may 
appear on the image.

The area around bright objects like the sun or the 
headlights of following vehicles blurs white.

The image flickers due to ambient light.

Depending on conditions, it may take some time for 
your eyes to focus on the image. Make sure you can 
see it clearly before use.

Monitor mode and mirror mode appear differently. If 
it is hard to see the image in monitor mode, use 
mirror mode instead.

Using the monitor mode for a long time may cause 
the rearview mirror to get hot.

This icon 

 displays in monitor mode.

a

Lever

b

Mirror mode

c

Monitor mode

* Not available on all models

uu

Adjustment of Each Type of Mirror

u

Centre Camera Mirror System

*

216

Co
ntrols

1

Centre Camera Mirror System

*

The camera is located inside the rear glass.

Do not cover the rear glass with a film or stickers 
where they can block the field of view of the camera.

If a camera unit receives a strong impact or repairing 
of the area near the camera is required, consult a 
dealer.

If there are foreign objects or dirt around the camera, 
have your vehicle checked by a dealer.
If the mirror becomes dirty, use a soft cloth to keep it 
clean.

Camera position

* Not available on all models

Continued

217

uu

Adjustment of Each Type of Mirror

u

Centre Camera Mirror System

*

Co
ntrols

1.

Change to monitor mode

2.

Use the menu button to select the setting

3.

Change the setting via button 1 or 2

Adjusting the Brightness and Field of View

1

Adjusting the Brightness and Field of View

Adjust settings before driving.

When you adjust the settings of field of view too 
much, the image may appear skewed.

If the ambient lighting is high, the brightness of the 
image may not change when you adjust setting of 
the brightness.

When the automatic brightness setting is turned ON, 
the brightness of the image will be automatically 
adjusted based on ambient lighting. In order to keep 
the sensor working correctly, do not touch or cover it.

If the ambient lighting becomes low, the image will 
also darken even if automatic brightness settings are 
set to OFF.

a

Sensor

a

Icon

b

Setting Value

c

Menu Button

d

Button 1

e

Button 2

uu

Adjustment of Each Type of Mirror

u

Centre Camera Mirror System

*

218

Co
ntrols

When the indicator turns on, quickly change 
to mirror mode.

If the mirror becomes too hot or cold, this icon 

 will display on the image in addition to 

the indicator.

If only the indicator continues to stay on, it is 
most likely a system problem so have your 
vehicle checked by a dealer.

Setting

Icon

Button 1

Button 2

Brightness

Low

High

Automatic brightness 

(On/Off)

Off

On

Field of view 

(up/down)

Down

Up

Field of view 

(left/right)

Left

Right

Field of view 

(rotation)

Counter-
clockwise

Clockwise

Indicators

1

Indicators

If the mirror becomes hot, the image may darken, 
and if it becomes too hot the image may no longer 
display. If the mirror becomes cold, there may be 
after-images on the display, and if it becomes too 
cold the image may no longer display.

When the indicator is on, the image may stop 
automatically adjusting brightness or may no longer 
display.

a

Indicator

219

uu

Adjustment of Each Type of Mirror

u

Centre Camera Mirror System

*

Co
ntrols

If you press and hold the PLS button while in monitor mode, the image will darken 
and glare from bright objects like the headlights of following vehicles will be 
minimized. It will return to normal brightness if you press the PLS button again.

PLS Mode

1

PLS Mode

This icon 

 will display on top of the image 

in PLS mode.

a

PLS Button

220

uu

Adjustment of Each Type of Mirror

u

Interior Rearview Mirror

*

Co
ntrols

Interior Rearview Mirror

*

Flip the tab to switch the position.
The night position will help to reduce the glare 
from headlights behind you when driving 
after dark.

Rearview Mirror with Day and Night Positions

*

1

Interior Rearview Mirror

*

Keep the mirrors clean and adjusted for best visibility.

Adjust the mirrors before you start driving.

2

Front Seats

 P. 227

a

Daytime Position

b

Night Position

* Not available on all models

221

uu

Adjustment of Each Type of Mirror

u

Side Camera Mirror System

Continued

Co
ntrols

Side Camera Mirror System

Using cameras mounted on the left and right sides of the vehicle, video of the rear 
view of the vehicle will be displayed on in-vehicle displays. The displays will turn on 
when one of the front doors is opened or the power mode is set to ON.

1

Side Camera Mirror System

When driving, visually check for other vehicles and 
confirm the safety of your surroundings.
Depending on ambient conditions, the following may 
appear on the image.

The area around bright objects like the sun or the 
headlights of following vehicle blurs white.

The image flickers due to ambient light conditions.

The left and right side of the image differ in 
brightness or colour due to ambient light 
conditions or reflected objects.

Depending on conditions, it may take some time for 
your eyes focus on the display. Make sure you can see 
it clearly before use.

The screens will turn off in the following situations:

The security system alarm is set via locking 
mechanism.

Nothing had been operated for two minutes while 
the power mode is not in ON.

The screens' brightness will gradually be adjusted 
darker automatically as ambient light decreases. You 
can adjust the brightness of the screens when the 
ambient light is low. The screens can also be adjusted 
in high ambient light, but the screens' brightness will 
not change.

2

Changing the Screen Brightness

 P. 278

a

Left Camera Lens

b

Right Camera Lens

c

Left Screen

d

Right Screen

Camera units and in-vehicle displays

uu

Adjustment of Each Type of Mirror

u

Side Camera Mirror System

222

Co
ntrols

When the power mode is in ON, you can adjust the display's field of view.

: L/R selector switch

Choose which field of view to adjust by 
moving the switch left or right. Return the 
switch to the centre position after adjustment.

: Adjustment switch

This is the switch for adjusting the field of 
view vertically and horizontally. When 
adjusting the field of view, 

 will appear on 

the image.

Resetting the field of view

When the 

L/R

 selector switch 

 is set to the centre, hold the adjustment switch 


to up or to left for about five seconds to reset the field of view to factory settings.

Adjusting the Field of View

1

Side Camera Mirror System

If a camera unit receives a strong impact or repairing 
of the area near the camera is required, consult a 
dealer.

If a camera lens is covered with dirt or moisture, use 
a soft cloth moist with water or neutral detergent to 
clean it. Do not use wax or water repellent agent on 
the camera lens.
If a screen becomes dirty, use a soft cloth to keep it 
clean.

NOTICE

Do not apply hot water to camera units in cold 
weather. The camera lens may fog up or crack due to 
extreme changes in temperature.

1

Adjusting the Field of View

Adjust the field of view before driving.

You can change between normal view and wide 
view. The field of view will become wider when wide 
view is chosen.

2

How to Customize the Vehicle Settings


P. 336

When in wide view, you can choose between two 
horizontal fields of view. In wide view, you cannot 
move the switch vertically and 

 will display on the 

screen.

Continued

223

uu

Adjustment of Each Type of Mirror

u

Side Camera Mirror System

Co
ntrols

1

Adjusting the Field of View

To ensure a better view while reversing, when the 
shift position is changed to 

(

R

 the display will change 

to reverse view and the field of view will be lower.

You can adjust the field of view for the normal, wide, 
and reverse views.

You cannot reset the field of view for the reverse 
view.

Compared to normal view, the wide and reverse view 
display areas are wider, and people, objects, and 
vehicles may appear a different size from what they 
are. Check how the video looks before use.

The following icons will display on the image in their 
respective mode:

: Normal view

: Wide view
: Reverse view

uu

Adjustment of Each Type of Mirror

u

Side Camera Mirror System

224

Co
ntrols

Display when moving forward

When the power mode is in ON, press the side 
camera switch and the forward reference lines 
will display for several seconds. Press the 
switch once more while the display is on to 
turn it off.

The three lines indicate the following:

: About 3 m (10 feet) from rear bumper
: About 10 m (33 feet) from rear bumper
: About 20 m (66 feet) from rear bumper

Reference Lines

1

Reference Lines

The positioning of the reference lines may differ from 
the true distance due to vehicle height or road 
conditions. Please use them only as guidelines. 
Visually check your surroundings when changing 
lanes or reversing.

1

Display when moving forward

You can change the forward reference lines so they 
display together with the turn signals.

2

How to Customize the Vehicle Settings


P. 336

If you press the side camera switch while the display 
is off, the displays will turn on but there will be no 
reference lines.

Forward display

Side camera switch

Continued

225

uu

Adjustment of Each Type of Mirror

u

Side Camera Mirror System

Co
ntrols

Display when reversing

When the shift position is set to 

(

R

, the 

reverse reference lines will display.

The three lines indicate the following:

: About 25 cm (10 inches) from the side of 

the vehicle

: Position where tailgate can be opened or 

closed

: About 1 m (39 inches) from rear bumper

1

Display when reversing

You can change the reverse reference line display 
settings.

2

How to Customize the Vehicle Settings


P. 336

Reverse display


Content      ..     12      13      14      15     ..