Honda Odyssey (2019 year). Instruction - part 9


  Index      Honda     Honda Odyssey - instruction 2019 year in english


Search            


Content   ..  7  8  9  10   ..


Honda Odyssey (2019 year). Instruction - part 9


128

uu

Gauges and Displays

u

Driver Information Interface

In

strum

e

nt Pa

nel

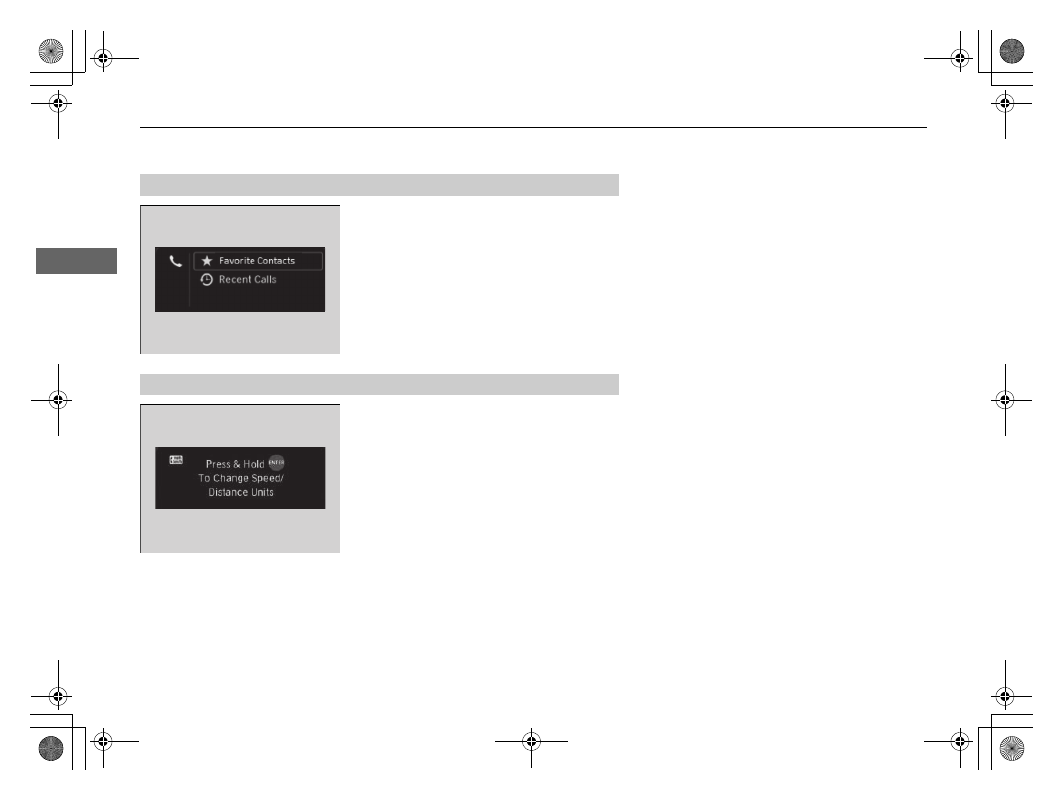
Shows the current phone information.

Bluetooth® HandsFreeLink® P. 496

Enables you to set the speedometer and the 
displayed measurements to read in either mph 
or km/h.

Press and hold the ENTER button. Each time 
you do this, the unit will change from mph to 
km/h or vice versa. After this, a confirmation 
screen will appear for a few seconds.

Phone

*

Units

* Not available on all models

129

uu

Gauges and Displays

u

Driver Information Interface

Continued

In

strum

e

nt Pa

nel

Shows blank screen.

Shows the current audio information.

Audio System Basic Operation P. 285

Blank

Now Playing

*

* Not available on all models

uu

Gauges and Displays

u

Driver Information Interface

130

In

strum

e

nt Pa

nel

You can show or hide the meter contents.

Select the content you wish to show or hide, 
then press ENTER.

u

Repeat it if you want to show or hide 
more than one app.

Show/Hide Apps

1

Show/Hide Apps

You cannot hide apps with the 

 icon on the right 

side.

Selecting Default All in Vehicle Customization 
does not restore these settings to their original state.

You can also add the Android AutoApple 
CarPlay
Sirius XM

*

My Honda MusicUSBAM

FMBluetooth AudioSocial PlaylistAUX Input
CD

*

 and Rear Entertainment

*

 apps.

Models with Display Audio

Shown

Press ENTER

Hidden

* Not available on all models

Continued

131

uu

Gauges and Displays

u

Driver Information Interface

In

strum

e

nt Pa

nel

Change the settings to your liking.

Arrange Apps

You can change the order of the apps on the home screen.

1. Press the 

/

 button to select Arrange 

Apps, then press ENTER.

2. Press the 

/

 button to select the icon 

you want to move, then press ENTER.

3. Press the 

/

 button repeatedly to move 

the icon to your desired position, then press 
ENTER.

Settings

1

Arrange Apps

Selecting Default All in Vehicle Customization 
does not restore these settings to their original state.

3 4

3 4

3 4

uu

Gauges and Displays

u

Driver Information Interface

132

In

strum

e

nt Pa

nel

Show Tachometer

You can show or hide the tachometer.

Press the 

/

 button to select Show 

Tachometer, then press ENTER.

u

The tachometer appears when the check 
box is checked.

1

Show Tachometer

Selecting Default All in Vehicle Customization 
does not restore these settings to their original state.

3 4

Continued

133

uu

Gauges and Displays

u

Driver Information Interface

In

strum

e

nt Pa

nel

Vehicle Customization

Use the driver information interface to customize certain vehicle features.

How to customize
First, make sure the vehicle is at a complete stop and that the power mode is set to 
ON. Next, press the 

 (home) button, then press the 

/

 button to select 

Settings. Finally, press the ENTER button.

Models with color audio system

1

Vehicle Customization

To customize other features, press the 

/

 button.

List of customizable options P. 136
Example of how to customize a setting 

P. 138

Change to 

(

P before you attempt to change a 

customized setting.

3 4

3 4

/

 Button

Scroll through the menu 
or items.

3 4

 Button

Goes back to the previous 
screen.

ENTER Button
Enters the selected 
item.

 Button

Goes to home 
screen.

Driver Information Interface:
Goes to Settings.

134

uu

Gauges and Displays

u

Driver Information Interface

In

strum

e

nt Pa

nel

Customization flow
Press the 

 (home) button.

ENTER

“Trip B” Reset Timing

Reverse Alert Tone

Fuel Efficiency Backlight

“Trip A” Reset Timing

Language Selection

Adjust Alarm Volume

Meter Setup

ENTER

Settings

Arrange Apps

Show Tachometer

3

4

3

4

3

4

3

4

3

4

Vehicle Customization

ENTER

 P. 131

 P. 132

Interior Light Dimming Time

Headlight Auto OFF Timer

ENTER

Lighting Setup

3

4

ENTER

135

uu

Gauges and Displays

u

Driver Information Interface

Continued

In

strum

e

nt Pa

nel

Default All

ENTER

ENTER

Auto Door Lock

Security Relock Timer

Auto Door Unlock

Key And Remote Unlock Mode

Keyless Lock Answer Back

Door Setup

Exit

3

4

3

4

3

4

3

4

3

4

136

uu

Gauges and Displays

u

Driver Information Interface

In

strum

e

nt Pa

nel

List of customizable options

*1:Default Setting

Setup Group

Customizable Features

Description

Selectable settings

Meter Setup

Language Selection

Changes the displayed language.

English

*1

/Français/Español

“Trip A” Reset Timing

Changes the setting of how the distance and 
average fuel economy of trip computer A is reset.

When Fully Refueled/IGN OFF/
Manually Reset

*1

“Trip B” Reset Timing

Changes the setting of how the distance and 
average fuel economy of trip computer B is reset.

When Fully Refueled/IGN OFF/
Manually Reset

*1

Adjust Alarm Volume

Changes the volume setting for buzzers, warnings, 
turn signals, and other alerting systems.

High/Mid

*1

/Low

Reverse Alert Tone

Causes the beeper to sound once when the gear 
position is changed to 

(

R.

ON

*1

/OFF

Fuel Efficiency 
Backlight

Turns the ambient meter feature on and off.

ON

*1

/OFF

Lighting 
Setup

Interior Light 
Dimming Time

Changes the length of time the interior lights stay on 
after you close the doors.

60sec/30sec

*1

/15sec

Headlight Auto OFF 
Timer

Changes the length of time the exterior lights stay 
on after you close the driver’s door.

60sec/30sec/15sec

*1

/0sec

137

uu

Gauges and Displays

u

Driver Information Interface

Continued

In

strum

e

nt Pa

nel

*1:Default Setting

Setup Group

Customizable Features

Description

Selectable settings

Door Setup

Auto Door Lock

Changes the setting for when the doors 
automatically lock.

With Vehicle Speed

*1

/Shift 

From P/OFF

Auto Door Unlock

Changes the setting for when the doors 
automatically unlock.

All Doors When Driver’s Door 
Opens

*1

/All Doors When 

Shifted To Park/All Doors When 
Ignition Switched OFF
/OFF

Key And Remote 
Unlock Mode

Sets up either the driver’s door or all doors to unlock 
on the first operation of the remote or built-in key.

Driver Door

*1

/All Doors

Keyless Lock Answer 
Back

LOCK/UNLOCK - The exterior lights flash.
LOCK (2nd push)- The beeper sounds.

ON

*1

/OFF

Security Relock Timer

Changes the time it takes for the doors to relock and 
the security system to set after you unlock the 
vehicle without opening a door.

90sec/60sec/30sec

*1

Default All

Cancels customized changes you have made or 
restores them to their default setting.

Cancel/Set

138

uu

Gauges and Displays

u

Driver Information Interface

In

strum

e

nt Pa

nel

Example of how to customize a setting
Below are steps that explain how to change the reset timing for trip A from the 
default setting (manual) so that it resets automatically when the vehicle is fully 
refueled.

1. Press the 

 (home) button and then the 

/

 button to select Settings, then 

press the ENTER button.

2. Press the 

/

 button to select Vehicle 

Customization, then press the ENTER 
button.

3 4

3 4

139

uu

Gauges and Displays

u

Driver Information Interface

Continued

In

strum

e

nt Pa

nel

3. Press the 

/

 button to select Meter 

Setup, then press the ENTER button.

u

Language Selection appears first in the 
display.

4. Press the 

/

 button to select “Trip A” 

Reset Timing, then press the ENTER 
button.

u

The display switches to the 
customization setup screen, where you 
can select When Fully RefueledIGN 
OFF
Manually Reset, or Exit.

5. Press the 

/

 button to select When 

Fully Refueled, then press the ENTER 
button.

u

The SETUP “When Fully Refueled” 
screen appears, then the display returns 
to the customization menu screen.

3 4

3 4

3 4

140

uu

Gauges and Displays

u

Driver Information Interface

In

strum

e

nt Pa

nel

6. Press the 

/

 button until Exit appears 

on the display, then press the ENTER 
button.

7. Repeat Step 6 until you return to the 

Vehicle Customization screen, then press 
the 

 (home) or 

 (back) button to 

return to the home screen.

3 4

141

Controls

This chapter explains how to operate the various controls necessary for driving.

Clock .................................................. 142
Locking and Unlocking the Doors

Key Types and Functions .................. 144
Low Remote Signal Strength ............ 146
Locking/Unlocking the Doors from the Outside.... 147
Locking/Unlocking the Doors from the Inside...154
Childproof Door Locks ..................... 157
Auto Door Locking/Unlocking .......... 158

Opening and Closing the Tailgate... 159
Opening and Closing the Sliding Doors ..... 170
Security System

Immobilizer System .......................... 179
Security System Alarm...................... 179

Opening and Closing the Windows .... 182
Opening and Closing the Moonroof

*

..... 185

Operating the Switches Around the 

Steering Wheel

ENGINE START/STOP Button............. 186
Turn Signals ..................................... 189
Light Switches.................................. 189
Fog Lights

*

...................................... 192

Daytime Running Lights ................... 193
Auto High-Beam

*

............................ 194

Wipers and Washers ........................ 197
Brightness Control ........................... 200
Rear Defogger/Heated Door Mirror

*

 Button...201

Heated Windshield Button ............... 202
Driving Position Memory System

*

.... 203

Adjusting the Steering Wheel........... 205

Canadian models

Adjusting the Mirrors....................... 206

Interior Rearview Mirror ................... 206
Power Door Mirrors .............................. 207

Adjusting the Seats

Front Seats ...........................................209
Head Restraints ....................................212
Maintain a Proper Sitting Position ......... 215

Interior Lights/Interior Convenience Items...... 225

Interior Lights .......................................225
Interior Convenience Items ...................227

Climate Control System

Using Automatic Climate Control ......... 248

Using Automatic Climate Control ......... 252
Automatic Climate Control Sensors ......257

Dual-zone climate control system

Tri-zone climate control system

* Not available on all models

142

Co
ntrols

Clock

Adjusting the Clock

You can adjust the time manually in the audio/information screen, with the power 
mode in ON.

1. Press and hold the MENU/CLOCK button.
2. Select Adjust Clock, then press 

.

3. Rotate 

 to adjust the hours.

4. Press 

 to switch to minute adjustment.

5. Rotate 

 to adjust the minutes.

6. Press 

 to switch to Set.

7. Press 

 to complete clock adjustment.

Adjusting the Time

1

Clock

The clock is automatically updated through the 
navigation system, so the time does not need to be 
adjusted.

These indications are used to show how to operate 
the selector knob.
Rotate 

 to select.

Press 

 to enter.

To change the setting between 12h and 24h:
1. Press the MENU/CLOCK button.
2. Rotate 

 to select Settings, then press 

.

3. Rotate 

 to select Clock Format, then press 

.

4. Rotate 

 to select 12h or 24h, then press 

.

Models with navigation system

Models with color audio system

Models with color audio system

143

uu

Clock

u

Adjusting the Clock

Co
ntrols

1. Select 

, then select Settings.

2. Select System.
3. Select Date & Time.
4. Select Set Date & Time.
5. Select Automatic Date & Time, then 

select OFF.

To adjust time:
6. 
Select Set Time.
7. Selecting /

.

u

AM/PM icon can be switched to each 
other either by selecting 

/

, or by 

directly touching the icon.

u

When you customize the clock display to 
24 hour clock, AM/PM icon is not 
displayed.

Customized Features P. 443

8. Select Save to set the time.

To adjust date:
6. 
Select Set Date.
7. Selecting /

.

8. Select Save to set the date.

1

Clock

You can also adjust the clock by touching the clock 
displayed on the upper right corner of the display or 
the Clock icon on the home screen.
1. Touch the clock on the display.

The clock screen of the select face-type appears.

2. Select Settings.
3. Select Date & Time Settings.
4. Select Set Date & Time.
5. Select Automatic Date & Time, then select OFF.
6. Select Set Date or Set Time.
7. Adjusting the dates, hours and minutes by 

selecting /

.

8. Select Save to set the time.

You can customize the clock display to show the 12 
hour clock or 24 hour clock.

Customized Features P. 443

Models with Display Audio

3 4

Set Time

Save

Hours

Minutes

AM

Cancel

Phone

Navigati..

FM

Models with Display Audio

3 4

3 4

3 4


Content   ..  7  8  9  10   ..