Honda Civic Hatchback (2018 year). Instruction - part 11
 

  Index      Honda     Honda Civic Hatchback - instruction 2018 year in english


Search            


Content   ..  9  10  11  12   ..


Honda Civic Hatchback (2018 year). Instruction - part 11


uu

Locking and Unlocking the Doors

u

Childproof Door Locks

160

Co
ntrols

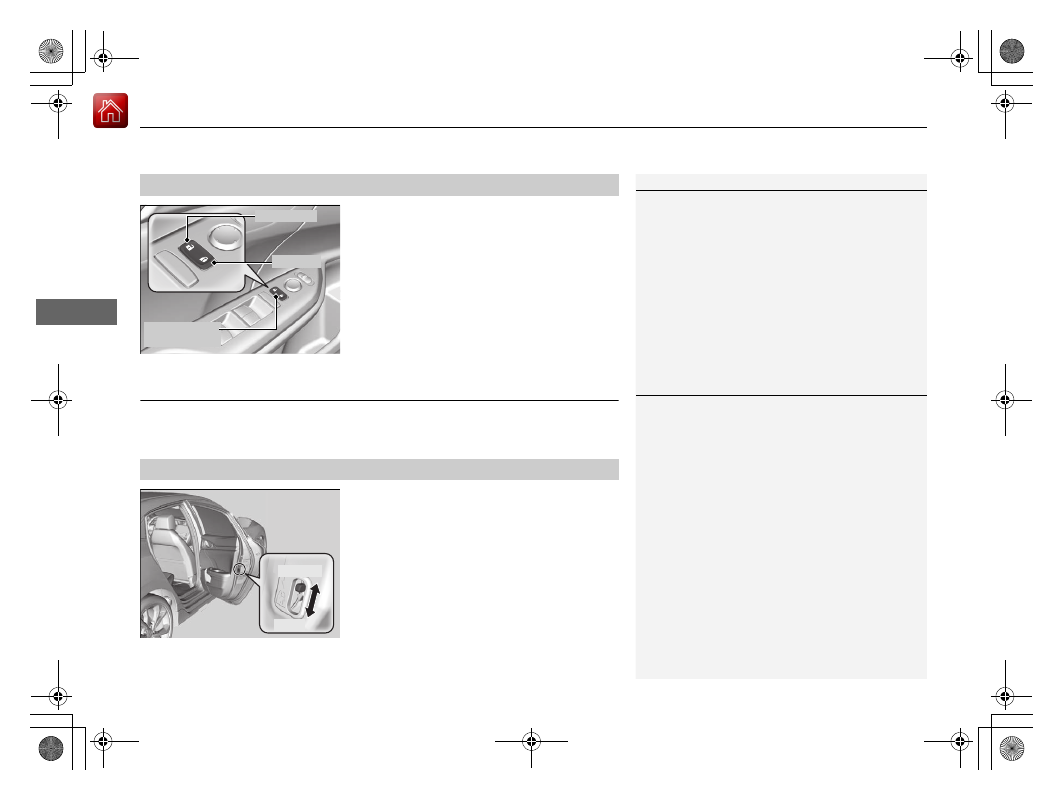
Press the master door lock switch in as shown 
to lock or unlock all the doors and the hatch.

Childproof Door Locks

The childproof door locks prevent the rear doors from being opened from the inside 
regardless of the position of the lock tab.

Slide the lever in the rear door to the lock 
position, and close the door.

When opening the door

Open the door using the outside door handle.

Using the Master Door Lock Switch

1

Using the Master Door Lock Switch

When you lock/unlock either of the front doors using 
the master door lock switch, all the other doors and 
the hatch lock/unlock at the same time.

To Unlock

Master Door 
Lock Switch

To Lock

Setting the Childproof Door Locks

1

Childproof Door Locks

To open the door from the inside when the 
childproof door lock is on, put the lock tab in the 
unlock position, lower the rear window, put your 
hand out of the window, and pull the outside door 
handle.

Lock

Unlock

161

uu

Locking and Unlocking the Doors

u

Auto Door Locking/Unlocking

Co
ntrols

Auto Door Locking/Unlocking

Your vehicle locks or unlocks all doors automatically when a certain condition is met.

Drive lock mode

All doors and the hatch lock when the vehicle’s speed reaches about 10 mph (15 
km/h).

Driver’s door open mode

All doors and the hatch unlock when the driver’s door is opened.

Auto Door Locking

Auto Door Unlocking

1

Auto Door Locking/Unlocking

You can turn off or change to another auto door 
locking/unlocking setting using the master door lock 
switch.

Customizing the Auto Door Locking/

Unlocking Setting

*

 P. 162

You can turn off or change to another auto door 
locking/unlocking setting using the driver 
information interface.

Customized Features P. 133

You can turn off or change to another auto door 
locking/unlocking setting using the audio/
information screen.

Customized Features P. 348

Models with Information Display

Models with driver information interface and color 
audio system

Models with Display Audio

* Not available on all models

162

uu

Locking and Unlocking the Doors

u

Customizing the Auto Door Locking/Unlocking Setting

*

Co
ntrols

Customizing the Auto Door Locking/Unlocking Setting

*

You can customize the auto door locking/unlocking setting to your liking using the master door lock switch.

Auto door locking

Auto door unlocking

*1:Default setting

List of the Auto Door Locking/Unlocking Customizable Options

Mode

Description

Drive Lock Mode

*1

All doors and the hatch lock when the vehicle’s speed reaches about 10 mph (15 km/h).

Off

The auto door locking is deactivated all the time.

Mode

Description

Driver's Door Open 
Mode

*1

All doors and the hatch unlock when the driver’s door is opened.

Park Unlock Mode

All doors and the hatch unlock when the shift lever is moved into 

(

P with the brake pedal depressed.

Off

The auto door unlocking is deactivated all the time.

Models with 
continuously variable 
transmission

* Not available on all models

163

uu

Locking and Unlocking the Doors

u

Customizing the Auto Door Locking/Unlocking Setting

*

Continued

Co
ntrols

*1:Default setting

Customizing Flow for Auto Door Locking Options

Steps

Drive Lock Mode

*1

Off

1

Apply the parking brake.

Move the shift lever out of 

(

P.

Apply the parking brake.

Move the shift lever to 

(

P.

2

Close the driver’s door.

Open the driver’s door.

3

Turn the ignition switch to ON 

(

w.

Turn the ignition switch to ON 

(

w.

4

Press and hold the right side of the master door lock switch on the driver’s door 
for more than five seconds. Release the switch after you hear a click twice.

Press and hold the right side of the master door 
lock switch on the driver’s door for more than 
five seconds. Release the switch after you hear 
one click.

5

Turn the ignition switch to ACCESSORY 

(

q within 20 seconds.

u

Customization is completed.

Models with continuously variable transmission

Models with continuously variable transmission

164

uu

Locking and Unlocking the Doors

u

Customizing the Auto Door Locking/Unlocking Setting

*

Co
ntrols

*1:Default setting

Customizing Flow for Auto Door Unlocking Options

Steps

Driver's Door Open Mode

*1

Park Unlock Mode

Off

1

Apply the parking brake.

Move the shift lever out of 

(

P.

Apply the parking brake.
Move the shift lever to 

(

P.

Apply the parking brake.

Move the shift lever to 

(

P.

2

Close the driver’s door.

Open the driver’s door.

3

Turn the ignition switch to ON 

(

w.

Turn the ignition switch to ON 

(

w.

4

Press and hold the left side of the master door lock switch on the driver’s door for more than five seconds. Release the switch 
after you hear a click twice.

5

Turn the ignition switch to ACCESSORY 

(

q within 20 seconds.

u

Customization is completed.

Models with continuously variable transmission

Models with continuously variable transmission

Models with continuously variable 
transmission

165

Co
ntrols

Opening and Closing the Hatch

Precautions for Opening/Closing the Hatch

Always make sure individuals and objects are clear of the hatch before opening or 
closing it.

• Open the hatch all the way.

u

If it is not fully opened, the hatch may begin to close under its own weight.

• Be careful when it is windy. The wind may cause the hatch to close.

Keep the hatch closed while driving to:

u

Avoid possible damage.

u

Prevent exhaust gas from leaking into the vehicle.

Carbon Monoxide Gas P. 74

1

Precautions for Opening/Closing the Hatch

Be careful not to hit your head on the hatch or to put 
your hands between the hatch and the cargo area 
when closing the hatch.

When you are storing or picking up luggage from the 
cargo area while the engine is idling, do not stand in 
front of the exhaust pipe. You may get burned.

Do not allow any passenger in the cargo space. They 
may get hurt during hard braking, a sudden 
acceleration, or a crash.

3

WARNING

Anyone caught in the path of a hatch that 
is being opened or closed can be seriously 
injured.

Make sure that all people are clear of the 
hatch before opening or closing it.

166

uu

Opening and Closing the Hatch

u

Using the Hatch Release Button

Co
ntrols

Using the Hatch Release Button

When all the doors are unlocked or press the 
hatch unlock button on the remote 
transmitter, the hatch is unlocked. Press the 
hatch release button and lift open the hatch.

If you are carrying the smart entry remote, you 
do not have to unlock the hatch before 
opening it.

To close the hatch, grab the inner handle, pull 
the hatch down, and push it closed from 
outside.

1

Using the Hatch Release Button

Do not leave the smart entry remote in the vehicle 
when you get out. Carry it with you.

Even if you are not carrying the smart entry remote, 
you can unlock the hatch while someone else with 
the remote is within range.

Do not leave the smart entry remote inside the 
cargo area and close the hatch when all the doors 
are locked. The beeper sounds and the hatch 
cannot be locked.

Models with smart entry system

Hatch Release Button

Models with smart entry system

Inner Handle

All models

167

uu

Opening and Closing the Hatch

u

Using the Hatch Release Button

Co
ntrols

Press the hatch unlock button to unlock the 
hatch.

Using the Remote Transmitter

1

Using the Remote Transmitter

If you have unlocked and opened the hatch using the 
remote transmitter, when closing, the hatch locks 
automatically.

Hatch 
Unlock 
Button

168

Co
ntrols

Security System

Immobilizer System

The immobilizer system prevents a key that has not been pre-registered from 
starting the engine. Each key contains electronic transmitters that use electronic 
signals to verify the key.

Pay attention to the following when inserting the key into the ignition switch

*

 or 

pressing the ENGINE START/STOP button

*

:

• Do not allow objects that emit strong radio waves near the ignition switch

*

 or the 

ENGINE START/STOP button

*

.

• Make sure the key is not covered by or touching a metal object.
• Do not bring a key from another vehicle’s immobilizer system near the ignition 

switch

*

 or the ENGINE START/STOP button

*

.

• Do not put the key near magnetic items. Electronic devices, such as televisions 

and audio systems emit strong magnetic fields. Note that even a key chain can 
become magnetic.

1

Immobilizer System

NOTICE

Leaving the key in the vehicle can result in theft or 
accidental movement of the vehicle. 
Always take the key with you whenever you leave the 
vehicle unattended.

Do not alter the system or add other devices to it.
Doing so may damage the system and make your 
vehicle inoperable.

Canadian models only: Apply and hold the brake 
pedal before turning the vehicle on the first time after 
the battery has been disconnected.

* Not available on all models

169

uu

Security System

u

Security System Alarm

Continued

Co
ntrols

Security System Alarm

The security system alarm activates when the hatch, hood or doors are forcibly 
opened. The alarm does not activate if the hatch or doors are opened with the key, 
remote transmitter or smart entry system

*

.

However, the alarm activates if a door is opened with the key and then the 
transmission is taken out of 

(

P (continuously variable transmission models) or the 

hood is opened before the ignition switch is turned to ON 

(

w

*1

.

When the security system alarm activates

The horn sounds intermittently and some exterior lights flash.

To deactivate the security system alarm

Unlock the vehicle using the key, remote transmitter or smart entry system

*

, or the 

ignition switch is turned to ON 

(

w

*1

. The system, along with the horn and flashing 

lights, is deactivated.

*1: Models with the smart entry system have an ENGINE START/STOP button instead of an 
ignition switch.

1

Security System Alarm

Do not alter the system or add other devices to it.
Doing so may damage the system and make your 
vehicle inoperable.

The security alarm continues for a maximum of two 
minutes until the security system alarm deactivates.

* Not available on all models

uu

Security System

u

Security System Alarm

170

Co
ntrols

Setting the security system alarm

The security system alarm automatically sets when the following conditions have 
been met:
• The ignition switch is in LOCK 

(

0

*1

, and the key has been removed from the 

ignition switch.

• The hood is closed.
• All doors and the hatch are locked from outside with the key, remote transmitter, 

or smart entry system

*

.

When the security system alarm sets

The security system alarm indicator in the instrument panel blinks. When the 
blinking interval changes after about 15 seconds, the security system alarm is set.

To cancel the security system alarm

The security system alarm is canceled when the vehicle is unlocked using the remote 
transmitter, smart entry system

*

, or the ignition switch is turned to ON 

(

w

*1

. The 

security system alarm indicator goes off at the same time.

*1: Models with the smart entry system have an ENGINE START/STOP button instead of an 
ignition switch.

1

Security System Alarm

Do not set the security system alarm when someone 
is in the vehicle or a window is open. The system can 
accidentally activate when:

Unlocking the door with the lock tab.

Opening the hood with the hood release.

Taking the transmission out of 

(

P.

If the battery goes dead after you have set the 
security system alarm, the security alarm may go off 
once the battery is recharged or replaced.
If this occurs, deactivate the security system alarm by 
unlocking a door using the key, remote transmitter or 
smart entry system

*

.

Continuously variable transmission models

* Not available on all models

171

uu

Security System

u

Security System Alarm

Co
ntrols

The panic button on the remote 
transmitter

If you press the panic button for 
approximately one second, the following will 
occur for about 30 seconds:
• The horn sounds.
• Some exterior lights flash.

Canceling panic mode

Press any button on the remote transmitter, or turn the ignition switch to ON 

(

w

*1

.

*1: Models with the smart entry system have an ENGINE START/STOP button instead of an 
ignition switch.

Panic Mode

Panic Button

172

Co
ntrols

Opening and Closing the Windows

Opening/Closing the Power Windows

The power windows can be opened and closed when the ignition switch is in ON 

(

w

*1

, using the switches on the doors.

The driver’s side switches can be used to open and close all the windows. The power 
window lock button on the driver’s side must be switched off (indicator off) to open 
and close the windows from anywhere other than the driver’s seat.

When the power window lock button is pressed, the indicator comes on and you 
can only operate the driver’s window. Turn the power window lock button on if a 
child is in the vehicle.

Manual operation

To open: Push the switch down lightly, and 
hold it until the desired position is reached.
To close: Pull the switch up lightly, and hold it 
until the desired position is reached.

Automatic operation

To open: Push the switch down firmly.
To close: Pull the switch up firmly.

The window opens or closes completely. To 
stop the window at any time, push or pull the 
switch briefly.

*1: Models with the smart entry system have an ENGINE START/STOP button instead of an 
ignition switch.

Opening/Closing Windows with Auto-Open/Close Function

1

Opening/Closing the Power Windows

The power windows can be operated for up to 10 
minutes after you turn the ignition switch to LOCK 

(

0

*1

.

Opening either front door cancels this function.

Auto Reverse
If a power window senses resistance when closing 
automatically, it will stop closing and reverse 
direction.

The driver’s window auto reverse function is disabled 
when you continuously pull up the switch.

The auto reverse function stops sensing when the 
window is almost closed to ensure that it fully closes.

3

WARNING

Closing a power window on someone's 
hands or fingers can cause serious injury.

Make sure your passengers are away from 
the windows before closing them.

Power Window 
Lock Button

Indicator

Driver’s 
Window 
Switch

Front Passenger’s 
Window Switch

173

uu

Opening and Closing the Windows

u

Opening/Closing the Power Windows

Continued

Co
ntrols

To open: Push the switch down.
To close: Pull the switch up.

Release the switch when the window reaches 
the desired position.

To open: Press the unlock button, and then 
within 10 seconds, press it again and hold it.

If the windows and moonroof stop midway, 
repeat the procedure.

Opening/Closing Windows without Auto-Open/Close 
Function

Close

Open

Opening the Windows and Moonroof

*

 with the Remote

Unlock 
Button

* Not available on all models

174

uu

Opening and Closing the Windows

u

Opening/Closing the Power Windows

Co
ntrols

To open: Unlock the driver’s door with the 
key. Within 10 seconds of returning the key to 
the central position, turn the key in the unlock 
direction and hold it there.
To close: Lock the driver’s door with the key. 
Within 10 seconds of returning the key to the 
central position, turn the key in the lock 
direction and hold it there.

Release the key to stop the windows and 
moonroof at the desired position. If you want 
further adjustment, repeat the same 
operation.

Opening/Closing the Windows and Moonroof

*

 with the Key

Close

Open

* Not available on all models

175

Co
ntrols

Opening and Closing the Moonroof

*

You can only operate the moonroof when the power mode is in ON. Use the switch 
in the front of the ceiling to open and close the moonroof.

Automatic operation

To open: Pull the switch back firmly.
To close: Push the switch forward firmly.

The moonroof will automatically open or close 
all the way. To stop the moonroof midway, 
push the switch briefly.

Manual operation

To open: Pull the switch back lightly, and 
hold it until the desired position is reached.
To close: Push the switch forward lightly, and 
hold it until the desired position is reached.

Tilting the moonroof up

To tilt: Push on the center of the moonroof 
switch.
To close: Push the switch forward firmly, 
then release.

Opening/Closing the Moonroof

1

Opening/Closing the Moonroof

NOTICE

Opening the moonroof in below freezing 
temperature or when it is covered with snow or ice 
can damage the moonroof panel or motor.

The power moonroof can be operated for up to 10 
minutes after you set the power mode to VEHICLE 
OFF (LOCK).
Opening either front door cancels this function.

When resistance is detected, the auto reverse 
function causes the moonroof to change directions, 
then stop. Auto reverse stops sensing when the 
moonroof is almost closed to ensure that it fully 
closes. Make sure that all objects, including fingers, 
are clear of the moonroof.

You can use the remote transmitter or the key to 
operate the moonroof.

Opening the Windows and Moonroof

*


with the Remote P. 173

Opening/Closing the Windows and 

Moonroof

*

 with the Key P. 174

3

WARNING

Opening or closing the moonroof on 
someone’s hands or fingers can cause 
serious injury.

Make sure all hands and fingers are clear of 
the moonroof before opening or closing it.

Open

Close

Tilt

* Not available on all models


Content   ..  9  10  11  12   ..