Honda Ridgeline. Manual - part 343


  Index      Honda     Honda Ridgeline - service repair manual 2006-2008 year


Search            


Content   ..  341  342  343  344   ..


Honda Ridgeline. Manual - part 343


01

02

03

04

SJC8A00J16126720801KBAT00

20-10

Doors

Front Door Latch Replacement

Fastener Location

: Bolt, 1

A

B

A

6 x 1.0 mm
8 N·m
(0.8 kgf·m,
6 lbf·ft)

Fastener Location

: Screw, 1

A

Fastener Locations

: Screw, 3

A

B

C

6 x 1.0 mm
6 N·m
(0.6 kgf·m,
4 lbf·ft)

A

B

C

D

E

NOTE: Put on gloves to protect your hands.

1. Raise the glass fully.

2. Remove these items:

• Door panel (see page 20-7)
• Plastic cover, as necessary (see step 2 on page

20-11)

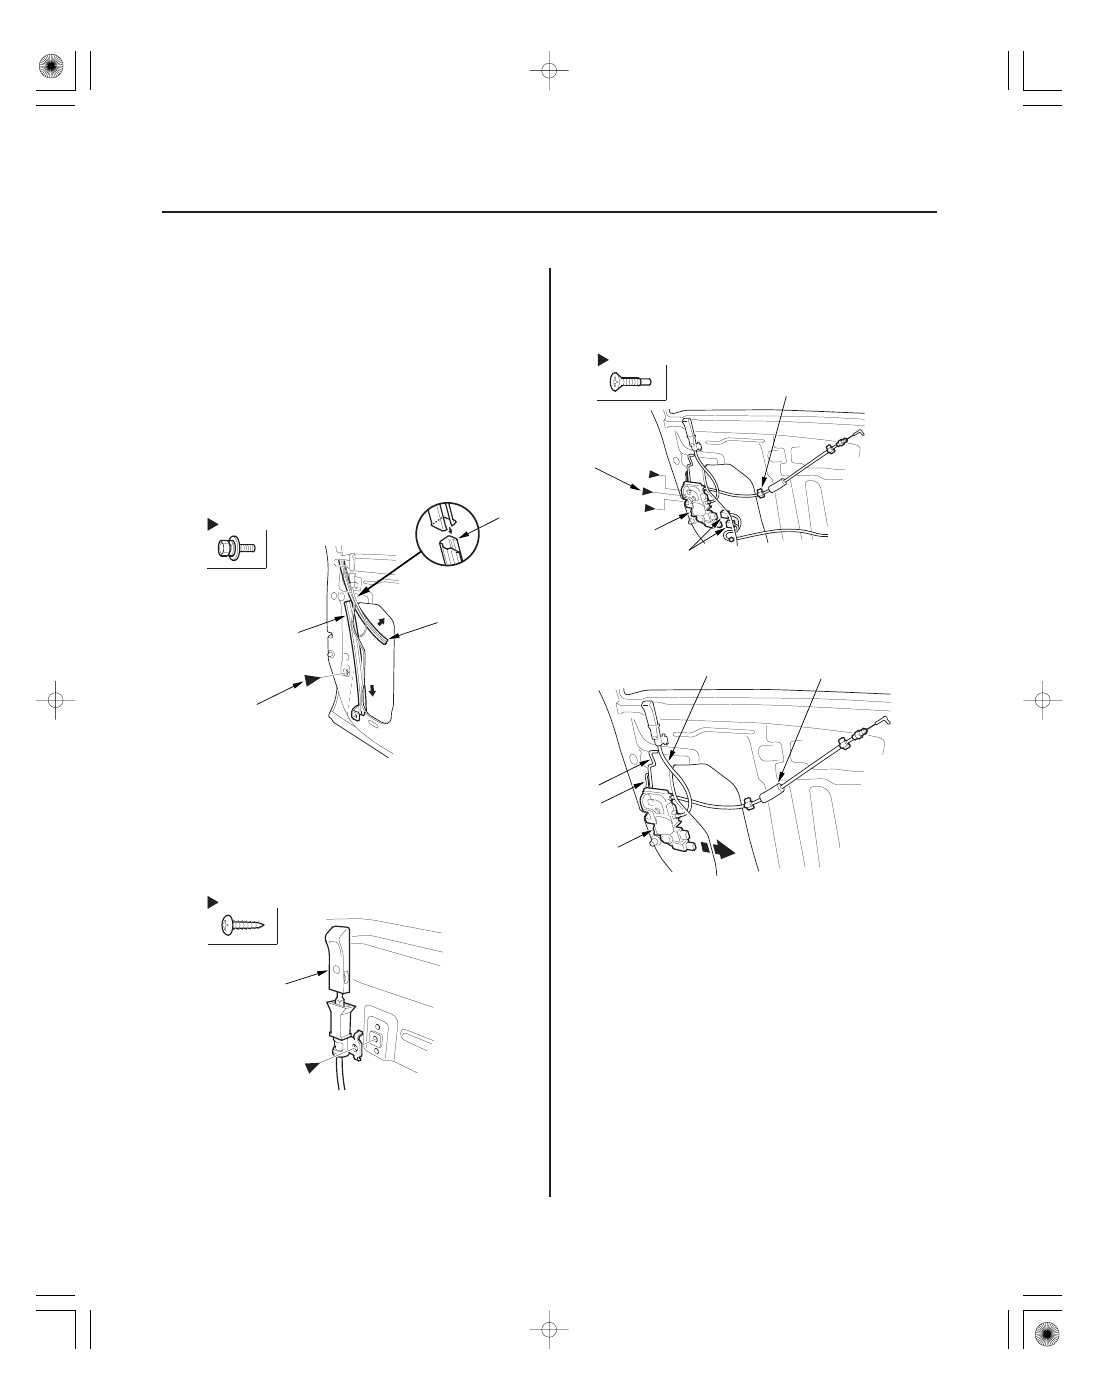
3. Pull the glass run channel (A) away as needed, and

remove the bolt, then remove the center lower
channel (B) by pulling it downward.

4. Remove the maintenance seal from the rear of the

door, then disconnect the outer handle rod and
cylinder rod (see step 3 on page 20-8).

5. Remove the screw securing the lock knob (A).

6. Disconnect the actuator connectors (A), and detach

the inner handle cable clip (B). Remove the screws
securing the latch (C).

7. Remove the latch (A) through the hole in the door.

Take care not to bend the outer handle rod (B),
cylinder rod (C), lock cable (D), and inner handle
cable (E).

05

06

01

02

SJC8A00J54400020371KBAT10

20-11

20-11

Front Door Glass and Regulator
Replacement

Fastener Location

: Screw, 1

A

B

A

A

B

A

B

C

D

E

F

C

Fastener Locations

: Bolt, 2

6 x 1.0 mm
9.8 N·m
(1.0 kgf·m, 7.2 lbf·ft)

A

8. Remove the screw and release the hooks (A), then

remove the latch protector (B).

9. Disconnect the inner handle cable (A) and lock

cable (B).

10. Install the latch in the reverse order of removal, and

note these items:

• Make sure the actuator connectors are plugged in

properly and that the cables and each rod is
connected securely.

• Make sure the door locks and opens properly.
• When reinstalling the door panel, make sure the

plastic cover is installed properly and sealed
around its outside perimeter to seal out water.

NOTE: Put on gloves to protect your hands.

1. Remove the door panel (see page 20-7).

2. Remove the plastic cover (A).

–1 Detach the harness clip (B) and remove the

caps (C).

–2 Slide the inner handle cable (D), the lock knob

(E) and the harness (F) in through the hole in
the plastic cover.

3. Carefully raise the glass (A) until you can see the

bolts, then remove them. Carefully pull the glass
out through the window slot. Take care not to drop
the glass inside the door.

(cont’d)

03

04

01

SJC8A00J16126720321KBAT00

Special Tools Required

20-12

20-12

Doors

Front Door Glass and Regulator
Replacement (cont’d)

Front Door Glass Outer Molding
Replacement

Fastener Locations

: Bolt, 2

C

: Bolt, 5

D

A

B

C

D

C

D

D

D

D

6 x 1.0 mm
9.8 N·m
(1.0 kgf·m,
7.2 lbf·ft)

A

A

B

A

4. Disconnect the connector (A) from the regulator (B).

5. Remove the bolts (C), and loosen the bolts (D), then

remove the regulator through the hole in the door.

6. Apply multipurpose grease to the sliding surfaces

of the regulator (A) where shown.

7. Install the glass and regulator in the reverse order

of removal, and note these items:

• Roll the glass up and down to see if it moves

freely without binding.

• Make sure that there is no clearance between the

glass and glass run channel when the glass is
closed.

• Adjust the position of the glass as necessary

(see page 20-23).

• Do the power window control unit reset

procedure (see page 22-209).

• Check for water leaks (see step 7 on page 20-23).
• Test-drive, and check for wind noise and rattles.
• When reinstalling the door panel, make sure the

plastic cover is installed properly and sealed
around its outside perimeter to seal out water.

• Make sure the power door locks, windows, and

power mirror operate properly.

KTC trim tool set SOJATP2014

Available through the American Honda Tool and
Equipment Program; call 888-424-6857

NOTE:

• Put on gloves to protect your hands.
• Take care not to scratch the door.
• Use the appropriate tool from the KTC trim tool set to

avoid damage when prying components.

1. Remove the power mirror (see page 20-27).

2. Starting at the front, pull the door glass outer

molding (A) to release the clips (B).

02

01

SJC8A00J16126722051KBAT50

20-13

20-13

Front Door Weatherstrip
Replacement

A

B

A

B

A
8 x 1.25 mm
29 N·m
(3.0 kgf·m, 22 lbf·ft)

Fastener Locations

A

: Bolt, 1

B

: Clip, 25

C

: Clip, 2

C

B

D

E

D

B

B

B

B

C

3. Release from the rear portion of the glass outer

molding (A) from the glass run channel (B).

4. Install the glass outer molding in the reverse order

of removal, and note these items:

• Check if the clips are damaged or stress-

whitened, and if necessary, replace them with
new ones.

• Make sure the rear portion of the glass outer

weatherstrip connected to the glass run channel
properly.

NOTE:

• Take care not to scratch the door.
• Use a clip remover to remove the clips.

1. Remove the door checker mounting bolt (A).

2. Detach the clips (B, C), then remove the door

weatherstrip (D).

3. Install the weatherstrip in the reverse order of

removal, and note these items:

• Check if the clips are damaged or stress-

whitened, and if necessary, replace them with
new ones.

• Make sure the weatherstrip is installed in the

holder (E) securely.

• Apply medium strength type liquid thread lock to

the door checker mounting bolt before
installation.

• Check for water leaks (see step 7 on page 20-23).


Content   ..  341  342  343  344   ..