Honda Ridgeline. Manual - part 243
 

  Index      Honda     Honda Ridgeline - service repair manual 2006-2008 year


Search            


Content   ..  241  242  243  244   ..


Honda Ridgeline. Manual - part 243


04

05

06

07

14-357

C

B

A

07LAE-PX40100 or
07HAE-PL50101

07LAE-PX40100

07GAE-PG40200 or
07GAE-PG4020A

A

B

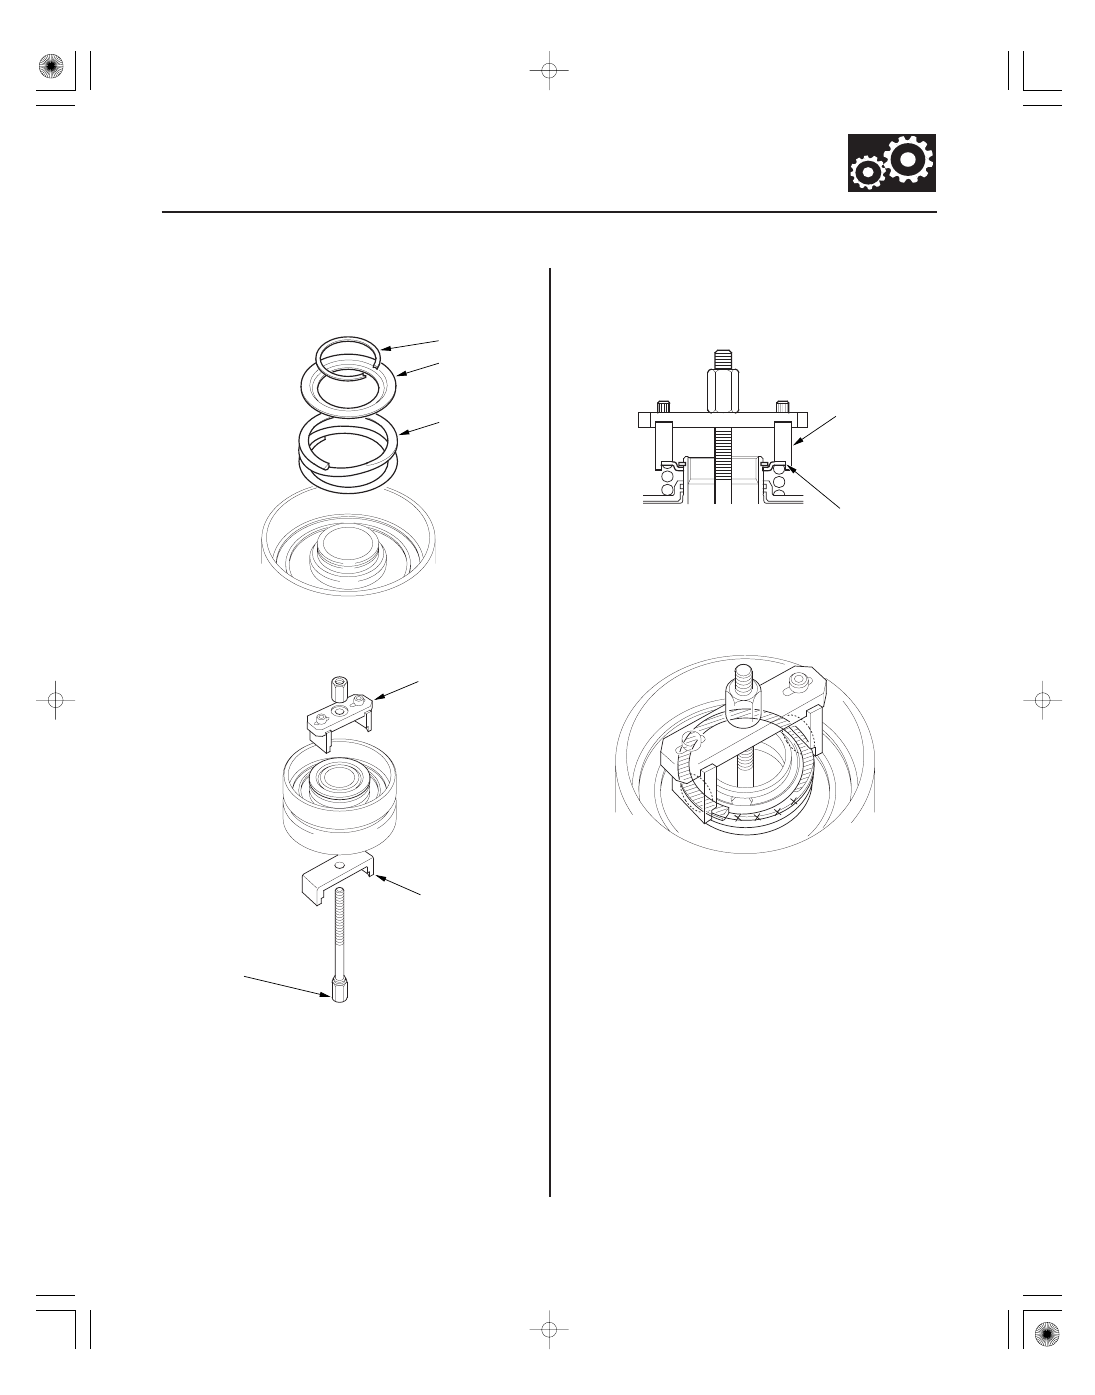
6. Install the return spring (A) and the spring retainer

(B), and position the snap ring (C) on the spring
retainer.

7. Install the clutch spring compressor attachment

and the clutch spring compressor bolt assembly.

8. Be sure the clutch spring compressor attachment

(A) is adjusted to have full contact with the spring
retainer (B) on the 1st, 2nd, and 4th clutches.

9. If either end of the clutch spring compressor

attachment is set over an area of the spring retainer
that is unsupported by the return spring, the
retainer may be damaged.

(cont’d)

08

09

10

11

14-358

Shafts and Clutches

Clutch Reassembly (cont’d)

A

B

C

A

10. Set the clutch spring compressor attachment (A) on

the spring retainer (B) of the 3rd and 5th clutches so
the clutch spring compressor attachment works on
the clutch return spring (C).

11. If either end of the clutch spring compressor

attachment is not set over the clutch return spring
end (A), the retainer may be damaged.

12. Compress the return spring until the snap ring can

be installed.

13. Install the snap ring with the snap ring pliers.

14. Remove the clutch spring compressor attachment

and the clutch spring compressor bolt assembly.

*01

13

14

14-359

A

B

D

E

F

G

H

I

C

C

B

B

A

B

D

E

B

D

B

D

B

A

B

A

B

A

B

C

C

D

E

F

D

E

D

C

D

C

D

A

B

15. Install the 1st-hold clutch flat-plate (A), alternately

install the clutch discs (B) (3) and the 1st-hold clutch
wave-plates (C) (2) in the 1st/1st-hold clutch drum
(D), then install the 1st-hold clutch plate B (E) with
the flat side down in the direction shown.

16. Install the disc spring (F) on the 1st-hold clutch

plate B in the direction shown. Starting with the 1st
clutch wave-plate, alternately install the wave-
plates (G) (5) and discs (H) (5), then install the
clutch end-plate (I) with the flat side down on the
top disc.

17. Starting with the 2nd clutch flat-plate, alternately

install the flat-plates (A) (4) and discs (B) (4) in the
2nd clutch drum (C), and alternately install the
wave-plates (D) (3) and discs (B) (3). Install the
clutch end-plate (E) with the flat side down on the
top disc.

18. Install the disc spring (A) in the 3rd clutch drum (B)

in the direction shown. Starting with the 3rd clutch
flat-plate, alternately install the flat-plates (C) (3)
and discs (D) (3), and alternately install the wave-
plates (E) (2) and discs (D) (2). Install the clutch end-
plate (F) with the flat side down on the top disc.

(cont’d)

15

16

17

14-360

Shafts and Clutches

Clutch Reassembly (cont’d)

F

D

E

A

B

C

D

D

E

D

D

C

C

C

D

E

F

D

E

D

C

D

C

D

A

B

19. Install the disc spring (A) in the 4th clutch drum (B)

in the direction shown. Starting with the 4th clutch
flat-plate, alternately install the flat-plates (C) (3)
and discs (D) (3), and alternately install the wave-
plates (E) (2) and discs (D) (2). Install the clutch end-
plate (F) with the flat side down on the top disc.

20. Install the disc spring (A) in the 5th clutch drum (B)

in the direction shown. Starting with the 5th clutch
flat-plate, alternately install the flat-plates (C) (3)
and discs (D) (3), and alternately install the wave-
plates (E) (2) and discs (D) (2). Install the clutch end-
plate (F) with the flat side down on the top disc.

21. Install the snap ring with a screwdriver to secure

the clutch end-plate.


Content   ..  241  242  243  244   ..