Honda Element. Manual - part 263
 

  Index      Honda     Honda Element - service repair manual 2007-2008 year


Search            


Content   ..  261  262  263  264   ..


Honda Element. Manual - part 263


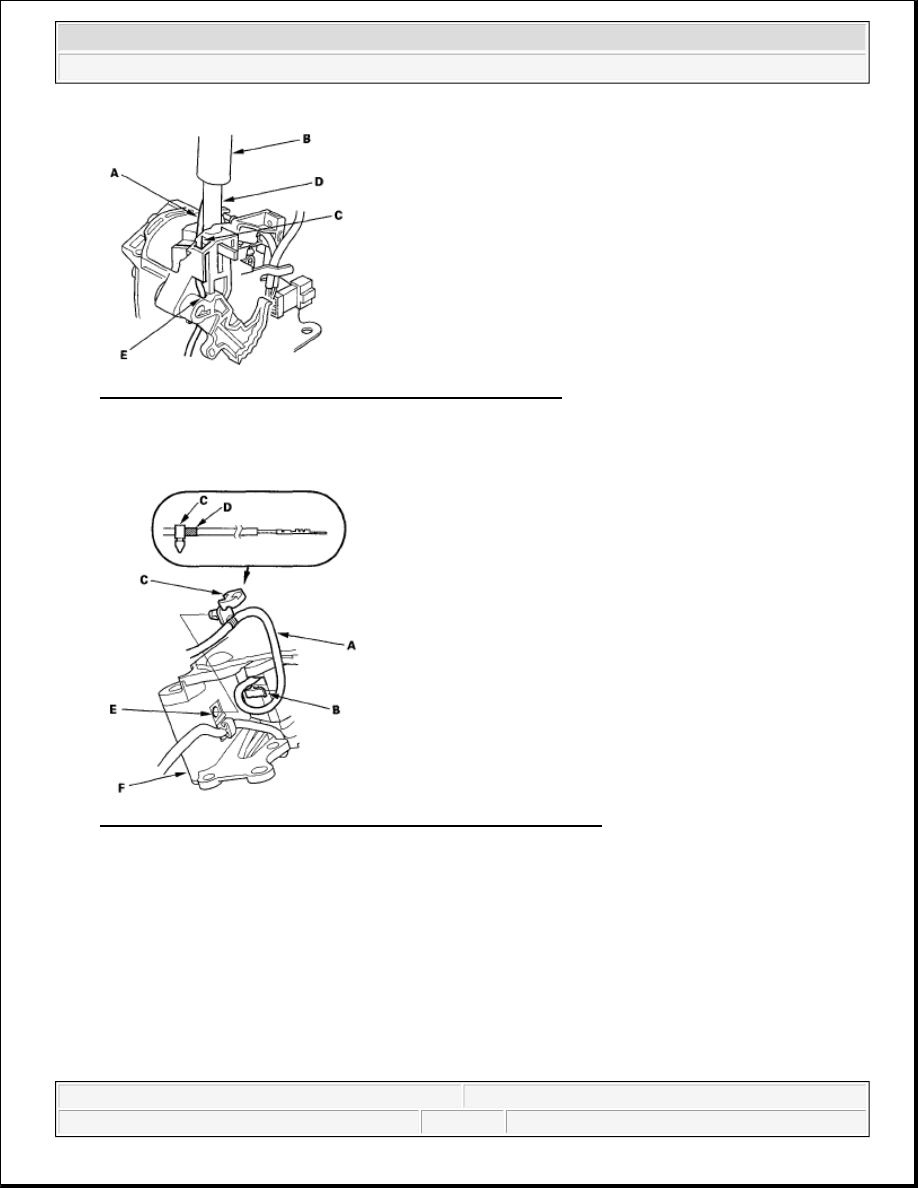
Fig. 358: Inserting D3 Switch Harness Into Shift Lever Ring 
Courtesy of AMERICAN HONDA MOTOR CO., INC. 

22. Wind the D3 switch harness (A) one turn around the clamp (B) on the bottom of the shift lever. 

Fig. 359: Identifying Harness Clamp Reference Tape On Harness 
Courtesy of AMERICAN HONDA MOTOR CO., INC. 

23. Install the harness clamp (C) at the reference tape (D) on the harness, then install the clamp in the hole (E)

of the shift lever bracket (F).  

24. Install the A/T gear position indicator panel (A) on the shift lever bracket. Apply silicone grease to the 

shift lever button (B), spring (C), and push rod (D) of the shift lever (E), and install the spring, shift lever 
button, and shift lever knob (F). Apply non-hardening thread lock sealant to screws (G), and secure the 
shift lever knob to the shift lever. 


2007 Honda Element EX 

2007-2008 TRANSMISSION Automatic Transmission - Element


Fig. 360: Identifying A/T Gear Position Indicator Panel On Shift Lever Bracket With Torque 
Specification
 
Courtesy of AMERICAN HONDA MOTOR CO., INC. 

25. Install the D3 switch (H) and the D3 switch cover (I).  

26. Install the A/T gear position indicator panel light socket. 

Fig. 361: Identifying A/T Gear Position Indicator Panel Light Socket 
Courtesy of AMERICAN HONDA MOTOR CO., INC. 

27. Install the BLU/RED harness terminal (A) of the shift lock solenoid in the No. 3 cavity, and BLK harness 

terminal (B) in the No. 4 cavity. 


2007 Honda Element EX 

2007-2008 TRANSMISSION Automatic Transmission - Element


Fig. 362: Identifying Shift Lock Solenoid Connector Terminal 
Courtesy of AMERICAN HONDA MOTOR CO., INC. 

28. Install the D3 switch harness terminals (C) in the No. 1 and No. 2 cavities. Either D3 switch harness 

terminal can be installed in No. 1 and No. 2 cavities.  

29. Make sure that all four terminals lock securely, then install the back cover (D) securely in place.  

30. Install the shift lever assembly (see SHIFT LEVER INSTALLATION ).  

A/T GEAR POSITION INDICATOR PANEL LIGHT HARNESS REPLACEMENT 

1. Remove the shift lever assembly (see SHIFT LEVER REMOVAL ).  

2. Remove the A/T gear position indicator panel light socket (A), and remove the bulb from the socket. 

Fig. 363: Identifying Bulb From Socket With Torque Specification 
Courtesy of AMERICAN HONDA MOTOR CO., INC.


2007 Honda Element EX 

2007-2008 TRANSMISSION Automatic Transmission - Element


3. Remove the park pin switch (B) and the switch connector (C).  

4. Pry the lock tabs on the back of the park pin switch connector (A), and remove the back cover (B). 

Fig. 364: Prying Lock Tabs On Back Of Park Pin Switch Connector 
Courtesy of AMERICAN HONDA MOTOR CO., INC. 

5. Remove the terminal (C) from the connector by pushing the lock tab (D) up in the connector using a thin 

blade screwdriver (E). Remove all four terminals.  

6. Replace the A/T gear position indicator panel light harness with the new one.  

7. Install the GRN harness terminals (A) of the park pin switch in the No. 1 and No. 2 cavities. Either park 

pin switch harness terminal can be installed in No. 1 and No. 2. 

Fig. 365: Identifying Either Park Pin Switch Connector Terminal 
Courtesy of AMERICAN HONDA MOTOR CO., INC. 

8. Install the RED/BLK harness terminals (B) in the No. 3 and No. 4 cavities. Either A/T gear position 

indicator panel light harness terminal can be installed in No. 3 and No. 4 cavities.  

9. Make sure that all four terminals lock securely, then install the back cover (C) securely in place.  

10. Install the park pin switch. Apply non-hardening thread lock sealant to screw threads, and secure the 

switch with the screw.  

11. Install the A/T gear position indicator panel light bulb in the socket. 


2007 Honda Element EX 

2007-2008 TRANSMISSION Automatic Transmission - Element


Content   ..  261  262  263  264   ..