Harley Davidson Electra Glide FL/FLH, Super Glide FX/FXE/FXEF/FXS (1978 1/2 to 1980). Service manual - page 5
Before installing shifter shaft cover (11), insert
bolt into mounting hole with arrow or it will be impossible to in• stall
the bolt later on in the assembly procedure.
SHIFTER FORKS
NOTE:
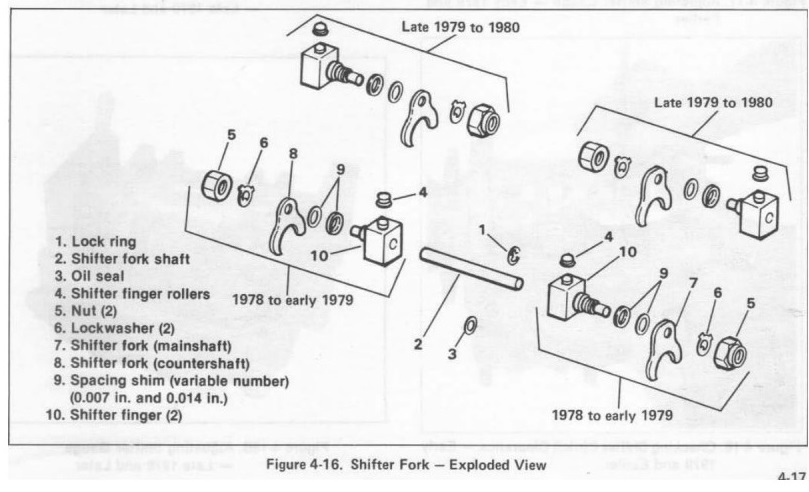
The disassembly and assembly procedure is the same for early and late
style transmissions. However, on late 1979 and later transmissions, the
shifter fork assemblies are reversed on the shifter shaft, that is, the
side with the nuts (5) face the center of the shaft. See Figure 416.
REMOVING SHIFTER FORKS (Figure 4-16)
Remove shifter cover and transmission side cover as described in
"Removing Shifter Cover."
Shifter fork shaft (2) is held in position by lock ring (1). With lock
ring (1) removed, shaft may be driven out by means of a drift inserted
in hole In starter cover joint face transmission case. Notice that a
rubber oil seal (3) is assembled in groove next to lock ring.
Mainshaft and countershaft shifter fork assemblies are not
interchangeable. Note exactly the arrangement of parts and components in
each. Keep parts separate to avoid needless adjusting when reassembling.
If inspection shows fork assemblies are not damaged, worn or bent, it
may not be necessary to disassemble them unless shifter clutches are
replaced. Adjustments are described in "Assembling Shifter Forks."
DISASSEMBLING SHIFTER FORKS (Figure 4-16)
If it is necessary to disassemble shifter forks, lift off shifter finger
rollers (4), pry back ear on lockwasher (6) and turn off nut (5). Lift
shifter fork (7, 8) and variable number of spacing shims (9) off shifter
finger (10).
CLEANING, INSPECTION AND REPAIR
Clean all parts in cleaning solvent and blow dry with compressed air.
If shifter forks are bent or worn, replace them. Straightened forks are
weak. They may break and cause extensive damage to transmission parts.
Check fit of shifter fingers on shaft. If they are loose enough to give
fork action lash, replace them. Check replacement part fit on shaft.
Lap out shifter fingers if they bind. Shifting will be difficult unless
fingers work freely on shaft.
ASSEMBLING SHIFTER FORKS
Assemble shifter forks in reverse of disassembly order making sure parts
are not transposed. Tighten nuts (5) to 25 ft-lbs torque.
Bend top tab of lockwasher down against flat on nut so lockwasher tab
does not interfere with shifter cam.
Place shifter forks In transmission case and install shifter fork shaft.
Fork with narrow opening is for high gear shifter clutch.