Freightliner Business Class M2. Manual - part 13


  Index      Freightliner     Freightliner Business Class M2 (M2 100, M2 106, M2 106V, M2 112, M2 112V) - service repair manual


Search            


Content   ..  11  12  13  14   ..


Freightliner Business Class M2. Manual - part 13


26–04 Eaton Fuller

Transmission Air Filter/
Regulator Element
Cleaning

NOTE: Eaton Fuller FS/FO and T/TX transmis-
sions do not have an air filter/regulator element
that can be serviced.

WARNING

Exhaust the air supply before servicing the air
filter/regulator; otherwise, serious personal injury
and component damage could result.

1.

Exhaust the air from the air reservoirs.

2.

Clean the outside of the air filter/regulator with
cleaning solvent, then let it air dry. See

Fig. 4

.

3.

Remove the end cap, large O-ring, and filter ele-
ment from the filter housing. See

Fig. 5

Remove

the small O-ring from the end cap.

NOTE: Do not remove, disassemble, or adjust
the air regulator. If the air regulator is not keep-
ing the air pressure between 57 to 62 psi (396
to 431 kPa), replace the air filter/regulator. It
cannot be repaired.

4.

Clean the filter element.

4.1

Dip the filter element in alcohol or other
cleaning solvent. Blow compressed air
through the filter element (inside to out-
side) to loosen surface dirt and to dry the
element. The sintered metallic filter ele-

f260007a

05/27/93

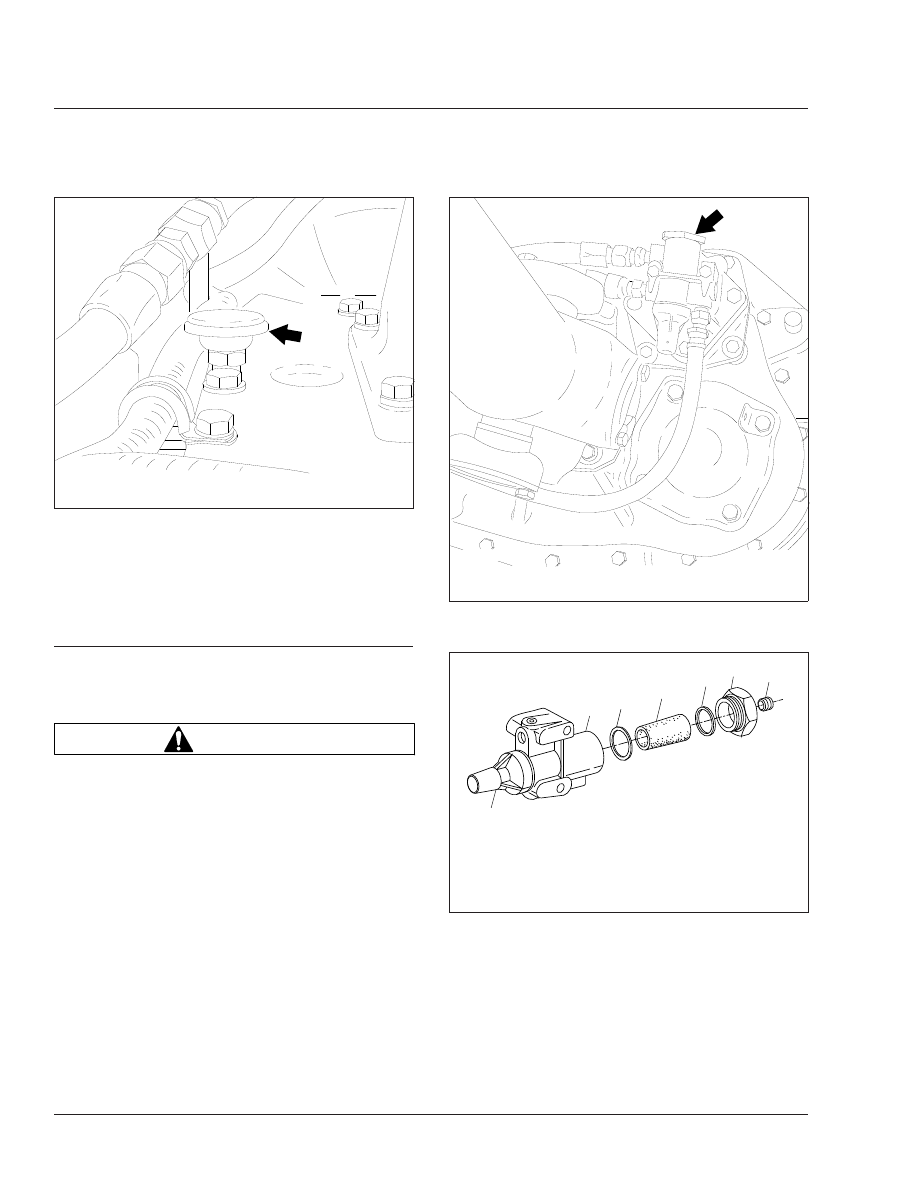
NOTE: Location of the transmission breather will vary
depending on transmission model.

Fig. 3, Transmission Breather (Eaton Fuller shown)

f260037a

05/27/93

NOTE: Location of the air filter/regulator will vary de-
pending on transmission model.

Fig. 4, Eaton Fuller Transmission Air Filter/Regulator

Location

1

2

3

4

5

6

7

f260052a

10/17/2001

1.

Air Regulator

2.

Housing

3.

Large O-Ring

4.

Filter Element

5.

Small O-Ring

6.

End Cap

7.

Plug

Fig. 5, Eaton Fuller Transmission Air Filter/Regulator

Components

Transmission

26

Business Class M2 Maintenance Manual, March 2016

26/6

ment will last the life of the vehicle, pro-
vided it is not damaged.

4.2

Wipe out the filter housing with a clean,
dry, lint-free rag.

5.

Clean and inspect the O-rings and the end cap.
Replace any parts that are damaged.

6.

Install the large O-ring, then the filter element
(small end first) into the filter housing.

7.

Install the small O-ring in the end cap, then in-
stall the end cap on the filter housing. Tighten
the end cap until firm.

8.

Start the engine, and build pressure in the air
system. Check for air leaks at the filter housing
and air line connections, and repair any leaks.

NOTICE

Repair any air leaks. A leaking air filter or air lines
can cause slow or hard shifting of the transmis-
sion, and eventual transmission damage.

26–05 Allison Transmission

Fluid and Filter
Changing

When draining transmission fluid, check for evidence
of dirt or water contamination. A small amount of
condensation will appear in the fluid during operation.

Water contamination is normally characterized as a
milky discoloration of the transmission fluid. Obvious
contamination of the transmission fluid indicates a
leak between the water and fluid areas of the trans-
mission cooler. Inspect and pressure-test the cooler
to confirm the leak; replace leaking transmission
coolers.

1000/2000/2400 Series

1.

Park the vehicle on a level surface and apply the
parking brakes.

2.

Run the engine until the transmission fluid
reaches the operating temperature of 160 to
200°F (71 to 93°C). Shift the transmission to
neutral (N) and shut down the engine.

NOTICE

To prevent dirt from entering the transmission,
use only clean containers and fillers for the trans-
mission fluid. Do not use fillers or containers that
have been used for water or antifreeze. Dirt, water,
or antifreeze could damage the transmission.

3.

Clean the area around the drain plug. Place a
drain pan under the transmission and remove the
drain plug. Examine the fluid while it drains. If
only the filter is being changed, do not drain the
fluid.

NOTE: A lot of fluid will drain when the filter is
removed.

4.

Using a standard strap-type filter wrench, remove
the filter by turning it counterclockwise.

5.

Remove the magnet from the filter attachment
tube or from the top of the filter element.

6.

Clean any metal debris from the magnet. Then,
install the magnet on the filter attachment tube.

7.

Using transmission fluid, lubricate the gasket on
the filter.

8.

Using your hand, install the filter by turning it
clockwise until the filter gasket contacts the con-
verter housing or cooler manifold. Then, turn the
filter one more complete turn.

9.

Install the drain plug and sealing washer. Tighten
the plug 22 to 30 lbf·ft (30 to 40 N·m).

10. Clean the area around the fill tube and remove

the dipstick. Using a clean funnel in the fill tube,
add transmission fluid. See

Table 7

for approved

transmission lubricants, and

Table 8

for lubricant

capacities.

11. Check and adjust the fluid level using the appro-

priate Allison Transmission procedure in

MOP

26–01

.

MD and HD Series

NOTICE

To prevent dirt from entering the transmission,
use only clean containers and fillers for the trans-
mission fluid. Do not use fillers or containers that
have been used for water or antifreeze. Dirt, water,
or antifreeze could damage the transmission.

Transmission

26

Business Class M2 Maintenance Manual, March 2016

26/7

Approved Allison Transmission Lubricants

Lubricant Type

*

Temperature: °F (°C)

All Allison Transmissions

Castrol TranSynd

(synthetic)

Above –22 (–30)

Dexron® III

Above –13 (–25)

*

Lubricants listed in order of preference. Do not mix types of oil.

Table 7, Approved Allison Transmission Lubricants

Allison Transmission Lubricant Capacities

Transmission Model

Fill Capacity:

*

qt (L)

On-Highway Transmissions

1000/2000/2400 Series (standard sump)

15 (14)

1000/2000/2400 Series (shallow sump)

13 (12)

HD/MD Series

HD4060/4560 (standard sump)

36 (34)

HD4060/4560 (shallow sump)

26 (25)

MD3060/3066/3560 (standard sump)

19 (18)

MD3060/3066/3560 (shallow sump)

10.5 (10)

*

Quantities listed are approximate. Add the recommended amount of fluid

as listed under fill capacity, then perform a "hot check" and add fluid as
needed. Do not overfill.

Add 3 quarts (3 liters) if equipped with a PTO.

Table 8, Allison Transmission Lubricant Capacities

1.

Park the vehicle on a level surface and apply the
parking brakes.

2.

Operate the vehicle until the transmission
reaches normal operating temperature: 160 to
200°F (71 to 93°C).

3.

Clean the area around the drain plug and the
transmission fluid pan. Place a drain pan under
the transmission and remove the drain plug. Ex-
amine the fluid as it drains. If only the filter is
being changed, do not drain the fluid.

4.

Remove the 12 mounting bolts (six each) from
the two filter covers.

NOTE: A lot of fluid will drain when the filter
covers are removed.

5.

Remove the filter covers, O-rings, and two
square-cut seals from the transmission. See

Fig. 6

.

6.

Remove the filters from the bottom of the control
module.

7.

Lubricate the new O-rings with transmission fluid,
and install them on the cover assemblies.

8.

Install a new square-cut seal on each cover as-
sembly, and install the fluid filter elements on the
cover assemblies.

1

1

1

1

2

2

3

3

4

4

f260317

08/25/95

1.

Filter Cover

2.

Filter Element

3.

Filter Element O-Ring

4.

Square-Cut Seal

Fig. 6, Allison MD and HD Series Transmission Filter

Locations and Components

Transmission

26

Business Class M2 Maintenance Manual, March 2016

26/8

9.

Install the filter and cover assemblies into the
filter compartment.

10. Align each cover assembly with the holes in the

channel plate sump, and push the cover assem-
blies in by hand to seat the seals.

NOTICE

Do not use the bolts to draw the filter covers to
the sump. This can damage the covers, seals, or
sump.

11. Install six bolts in each cover, and torque the

bolts 38 to 44 lbf·ft (51 to 61 N·m).

12. Install a new drain plug O-ring, and install the

drain plug. Tighten the drain plug 18 to 24 lbf·ft
(25 to 32 N·m).

13. Refill the transmission with fresh Dexron® trans-

mission fluid (see

Table 7

and check the fluid

level. See

Table 8

for lubricant capacities.

14. Check and adjust the fluid level using the appro-

priate Allison Transmission procedure in

MOP

26–01

.

26–06 Mercedes-Benz

Transmission Fluid
Changing and Magnetic
Plug Cleaning

Draining

1.

Park the vehicle on a level surface. Apply the
parking brakes and chock the rear tires.

NOTE: Drain the transmission fluid while the
transmission is warm.

2.

Drain the transmission fluid, as follows. See

Fig. 7

.

2.1

Remove the magnetic drain plug from the
bottom of the gear case.

2.2

Discard the aluminum gasket.

2.3

Catch the transmission fluid in a suitable
container and dispose of it properly.

3.

Clean the area around the fill plug. See

Fig. 7

for the location of the fill plug.

4.

Remove the fill plug from the side of the case.
Discard the aluminum gasket.

NOTE: Use a piece of key stock, or any other
convenient steel slug, to short the two magnetic
poles and divert the magnetic field.

5.

Clean the magnetic drain plug before installing it.

6.

Install the drain plug (p/n A 124 997 01 32) and a
new aluminum gasket (p/n N 00763 024105).
Tighten the drain plug 42 lbf·ft (57 N·m).

Filling

NOTICE

Operating a manual transmission with the fluid
level higher or lower than recommended can re-
sult in transmission damage. Do not overfill the
transmission; overfilling will force fluid out of the
case through the main shaft openings. Fluid over-
flow may also drain onto the clutch or clutch
brake, causing additional problems.

1.

Add transmission fluid until it is level with the
lower edge of the fill opening. See

Fig. 8

for the

correct level. See

Table 9

for approved transmis-

sion lubricants and

Table 10

for lubricant

capacities.

05/22/2001

f261102

1

2

3

NOTE: The transmission is shown from the left-hand
side.

1.

Transmission

2.

Fill Plug

3.

Drain Plug

Fig. 7, Mercedes-Benz Transmission Drain and Fill

Plugs

Transmission

26

Business Class M2 Maintenance Manual, March 2016

26/9


Content   ..  11  12  13  14   ..