Freightliner Business Class M2. Manual - part 11


  Index      Freightliner     Freightliner Business Class M2 (M2 100, M2 106, M2 106V, M2 112, M2 112V) - service repair manual


Search            


Content   ..  9  10  11  12   ..


Freightliner Business Class M2. Manual - part 11


2.

Slide the clutch brake tight against the transmis-
sion input-shaft bearing cap.

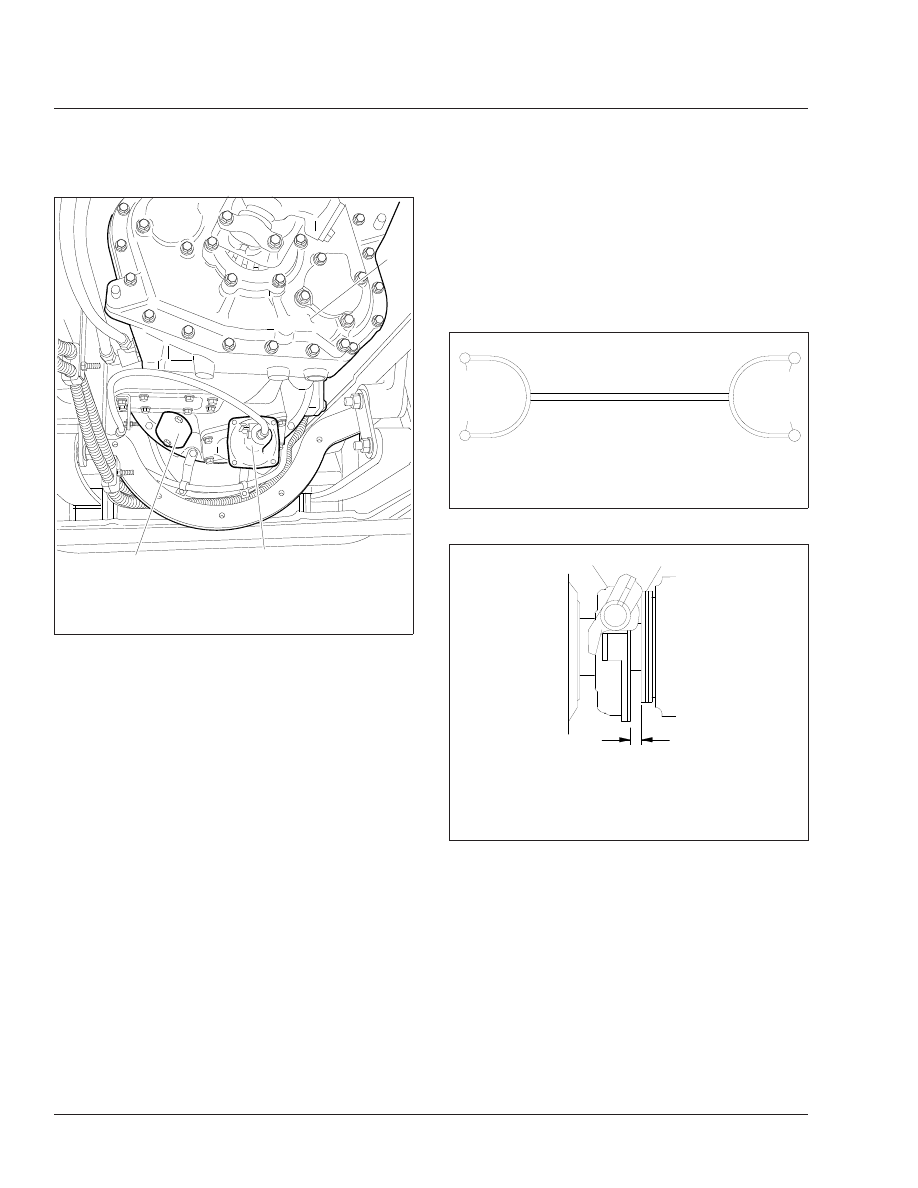
IMPORTANT: Release bearing travel tool A02-
12419-000 is available through the PDCs. The
fork at one end of the tool has green tape on it,
and has two 0.50-inch (12.7-mm) diameter tips;
the fork at the other end has blue tape on it,
and has 0.56-inch (14.3-mm) diameter tips. See

Fig. 9

.

3.

Measure the release bearing travel. See

Fig. 10

for the correct dimension to measure. Using both
ends of the release bearing travel tool, check this
gap as follows:

Position the tool so that the legs of the fork at
the blue 0.56-inch (14.3-mm) end straddle the
transmission input shaft. If the tool fits loosely,
the gap is too wide and adjustment is needed.
Go to the next step.

If the blue 0.56-inch (14.3-mm) end can’t be in-
serted in the gap, then try to insert the green
0.50-inch (12.7-mm) end.

If the green end of the tool can’t be inserted in
the gap, adjustment is needed. Go to the next
step.

If the green end of the tool fits — snugly or
loosely — then no adjustment is needed. Nothing
more needs to be done. Install the clutch inspec-
tion cover.

4.

Turn the engine flywheel until the lockstrap is
aligned with the clutch inspection-cover opening.

5.

Release the clutch by depressing the pedal.
Block the pedal in the released position, or have
someone assist you by holding the pedal down
during the adjustment procedure.

NOTE: An open-end wrench is not recom-
mended for the following step.

06/22/2005

f261355

1

2

3

1.

Clutch Inspection Cover

2.

Hydraulic Slave Cylinder

3.

Transmission

Fig. 8, View from Underneath the Vehicle

f580133   

A   

A   

B   

B   

03/26/96   

A. Green End (0.50 inch or 12.7 mm)
B. Blue End (0.56 inch or 14.3 mm)

Fig. 9, Release Bearing Travel Tool A02-12419-000

f250199a

10/14/94

1

2

A

A. Clearance between release bearing housing and

clutch brake must be 1/2 to 9/16 inch (12.7 to 14.3
mm).

1.

Release Bearing Housing

2.

Clutch Brake

Fig. 10, Release Bearing Travel Measurement

Clutch

25

Business Class M2 Maintenance Manual, August 2015

25/6

6.

Adjust the clutch, using a 5/8-inch box-end or
socket wrench on the adjustment bolt. See

Fig. 11

.

6.1

Insert the 5/8-inch box-end or socket
wrench through the inspection cover
opening.

6.2

To begin the adjustment, release the ad-
justment bolt by pressing down on the
bolt head.

NOTE: On Easy-Pedal 2000 clutches, each
complete turn of the adjustment bolt repre-
sents about 0.125 inch (3 mm) of release
bearing movement. On earlier Easy-Pedal
models, each complete turn of the adjust-
ment bolt represents about 0.02 inch (0.5
mm) of release bearing movement.

Normal wear increases the gap between the
release bearing and the transmission.

6.3

To decrease the gap: If clearance be-
tween the release bearing housing and
the clutch brake is more than 9/16 inch
(14.3 mm), turn the adjustment bolt clock-
wise (the release bearing moves toward
the transmission).

To increase the gap: If clearance between
the release bearing housing and the
clutch brake is less than 1/2 inch (12.7

mm), turn the adjustment bolt counter-
clockwise (the release bearing moves to-
ward the engine).

6.4

When the adjustment is complete, make
sure the adjustment bolt is locked (pulled
up flush with the mounting bolts).

7.

After adjusting, release the pedal and check the
clearance between the release bearing housing
and the clutch brake. When the adjustment is
correct, the green end of the tool should go in
and the blue should not (clearance of 1/2 to 9/16
inch, or 12.7 to 14.3 mm).

8.

Install the clutch inspection cover.


09/15/95

f250309

Fig. 11, Adjustment with Kwik-Adjust (shown with bell

housing removed)

Clutch

25

Business Class M2 Maintenance Manual, August 2015

25/7

Title of Maintenance Operation (MOP)

MOP Number

Allison Transmission Fluid and Filter Changing . . . . . . . . . . . . . . . . . . . . . . . . . . . . . . . . . . . . . . . . . . . . 26–05

Allison and Eaton Fuller Transmission Breather Checking . . . . . . . . . . . . . . . . . . . . . . . . . . . . . . . . . . . . 26–03

Eaton Fuller Transmission Air Filter/Regulator Element Cleaning . . . . . . . . . . . . . . . . . . . . . . . . . . . . . . . 26–04

Eaton Fuller Transmission Fluid Changing and Magnetic Plug Cleaning . . . . . . . . . . . . . . . . . . . . . . . . . . 26–02

Mercedes-Benz Transmission Fluid Changing and Magnetic Plug Cleaning . . . . . . . . . . . . . . . . . . . . . . . 26–06

Mercedes-Benz Transmission Leak Checking . . . . . . . . . . . . . . . . . . . . . . . . . . . . . . . . . . . . . . . . . . . . . 26–07

Safety Precautions . . . . . . . . . . . . . . . . . . . . . . . . . . . . . . . . . . . . . . . . . . . . . . . . . . . . . . . . . . . . . . . . . 26–00

Transmission Fluid Level Checking . . . . . . . . . . . . . . . . . . . . . . . . . . . . . . . . . . . . . . . . . . . . . . . . . . . . . 26–01

Transmission

26

Index, Alphabetical

Business Class M2 Maintenance Manual, March 2016

26–00 Safety Precautions

Safety Precautions in this section apply to all
procedures within this group.

DANGER

When working on the vehicle, shut down the en-
gine, set the parking brake, and chock the tires.
Before working under the vehicle, always place
jack stands under the frame rails to ensure the
vehicle can not drop. Failure to follow these steps
could result in serious personal injury or death.

26–01 Transmission Fluid

Level Checking

NOTICE

Operating a transmission with the fluid level
higher or lower than recommended can result in
transmission damage. Do not overfill the transmis-
sion. Overfilling will force fluid out of the case
through the main shaft openings. Fluid overflow
may also drain onto the clutch or clutch brake,
causing additional problems.

Do not mix types and brands of fluid, because of
possible incompatibility. Do not use fluid addi-
tives, friction modifiers, extreme-pressure gear
fluids, or multiviscosity lubricants.

Eaton Fuller Manual and
Automated

NOTE: This procedure does not apply to Proci-
sion transmissions. See the "Eaton Fuller Proci-
sion" procedure that follows.

1.

Park the vehicle on a level surface. Apply the
parking brakes and chock the rear tires.

2.

Check the oil level in the transmission as follows.

2.1

Clean the area around the fill plug, then
remove the plug from the side of the
case.

2.2

Using your finger or a bent pipe cleaner,
see if the oil is level with the lower edge
of the fill opening. See

Fig. 1

.

3.

If needed, fill the transmission with oil until level
with the lower edge of the fill opening. For ap-
proved lubricants, see

Table 1

(manual transmis-

sions) or

Table 2

(automated transmissions). For

more information and a complete listing of ap-
proved lubricants, refer to the Eaton website,

www.roadranger.com

.

Eaton Approved Manual Transmission Lubricants

Lubricant Type

*

Temperature:

°F (°C)

SAE

Viscosity

Synthetic transmission
lubricant meeting Eaton PS-
386 lubricant specification

All

Heavy-duty engine oil
meeting MIL-L-2104D or
Caterpillar TO-4 Specification

Above 10 (–12)

40 or 50

Below 10 (–12)

30

*

Lubricants listed in order of preference. Do not mix types of oil.

Table 1, Eaton Approved Manual Transmission

Lubricants

Eaton Approved Automated Transmission Lubricants

Lubricant Type

*

Temperature:

°F (°C)

SAE

Viscosity

Synthetic transmission
lubricant meeting Eaton PS-
386 lubricant specification

All

*

Do not mix types of oil.

Table 2, Eaton Approved Automated Transmission

Lubricants

IMPORTANT: If switching from a petroleum-
based lubricant to a synthetic, all areas of each
affected component must be thoroughly drained.
Switching to a synthetic lubricant, when a
petroleum-based lubricant has been used for
50,000 miles (80 000 km) or longer may affect
transmission performance. Monitor all seal

f260006b

10/05/94

A

B

A. Full

B. Low

Fig. 1, Transmission Oil Level Checking

Transmission

26

Business Class M2 Maintenance Manual, March 2016

26/1


Content   ..  9  10  11  12   ..