Ford Expedition (2024 year). Manual in english - page 2
 

  Index      Manuals     Ford Expedition (2024 year). Manual in english


Search            copyright infringement  


Content      ..      1      2      3      ..


Ford Expedition (2024 year). Manual in english - page 2


WARNING: 

Do not lean your head

on the door. The side airbag could injure
you as it deploys from the side of the
seatback.

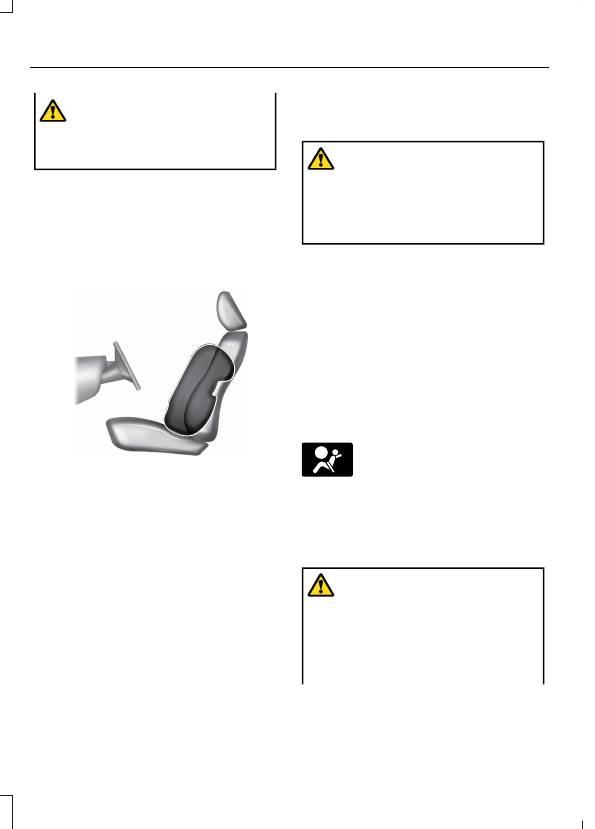
The side airbags are on the outermost side
of the seat backrests of the front seats. In
certain sideways crashes or rollovers, the
airbags will be inflated. The airbag was
designed to inflate between the door panel
and occupant to further enhance the
protection provided to occupants in side
impact crashes.

E152533

The system consists of the following:

A label or embossed side panel
indicating that side airbags are fitted
to your vehicle.

Side airbags inside the driver and front
passenger seat backrests.

Crash sensors and monitoring system
with readiness indicator.  See 

Crash

Sensors and Airbag Indicator

 (page

64).

HOW DO THE KNEE AIRBAGS
WORK

WARNING: 

Close the glove box

door when your vehicle is moving. Failure
to follow this instruction could reduce
the effectiveness of the passenger knee
airbag and increase the risk of injury in a
crash.

A driver knee airbag is under or within the
instrument panel. A passenger knee airbag
is within or under the glove compartment.

During a crash, the restraints control
module may activate the driver and
passenger knee airbags based on crash
severity and occupant conditions.

Under certain crash and occupant
conditions, the front airbags and the knee
airbags may not activate together. As with
front and side airbags, it is important to be
properly seated and restrained to reduce
the risk of death or serious injury.

E67017

Make sure the knee airbags are
operating properly.  See 

Crash

Sensors and Airbag Indicator

(page 64).

HOW DOES THE SAFETY
CANOPY™ WORK

WARNING: 

Do not place objects

or mount equipment on or near the
headliner at the siderail that may come
into contact with a deploying curtain
airbag. Failure to follow these
instructions may increase the risk of
personal injury in the event of a crash.

58

Airbags
WARNING: 

Do not lean your head

on the door. The curtain airbag could
injure you as it deploys from the
headliner.

WARNING: 

To reduce risk of injury,

do not obstruct or place objects in the
deployment path of the airbag.

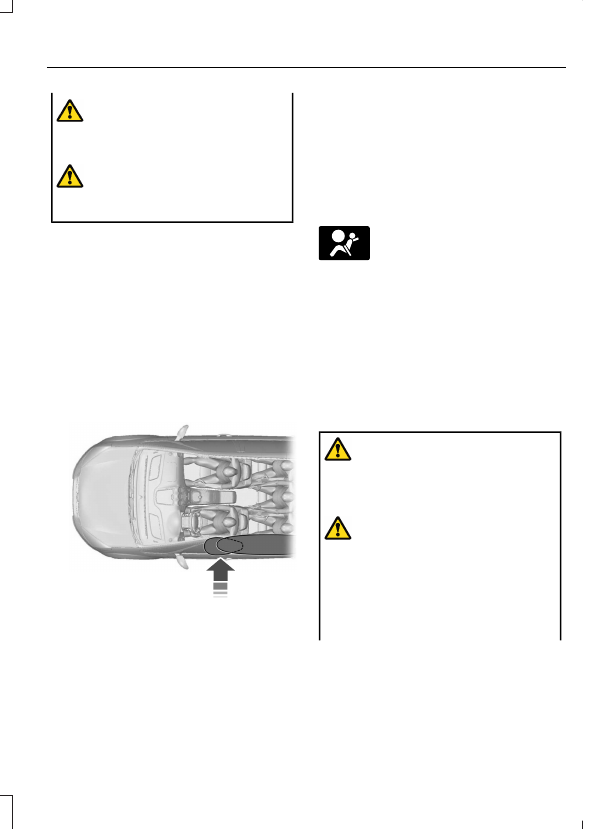
The Safety Canopy deploys during
significant side crashes or when a certain
likelihood of a rollover event is detected
by the rollover sensor. The Safety Canopy
is mounted to the roof side-rail sheet
metal, behind the headliner, above each
row of seats. In certain sideways crashes
or rollover events, the Safety Canopy will
be activated, regardless of which seats are
occupied. The Safety Canopy inflates
between the side window area and
occupants to further enhance protection
provided in side impact crashes and
rollover events.

E75004

The system consists of the following:

Safety Canopy curtain airbags above
the trim panels over the front and rear
side windows identified by a label or
wording on the headliner or roof-pillar
trim.

A flexible headliner which opens above
the side doors to allow air curtain
deployment

E67017

· Crash sensors and monitoring
system with a readiness
indicator.  See 

Crash Sensors

and Airbag Indicator

 (page 64).

Properly restrain children 12 years old and
under in the rear seats. The Safety Canopy
will not interfere with children restrained
using a properly installed child or booster
seat because it is designed to inflate
downward from the headliner above the
doors along the side window opening.

AIRBAG PRECAUTIONS

WARNING: 

Airbags do not inflate

slowly or gently, and the risk of injury
from a deploying airbag is the greatest
close to the trim covering the airbag
module.

WARNING: 

All occupants of your

vehicle, including the driver, should
always properly wear their seatbelts,
even when an airbag supplemental
restraint system is provided. Failure to
properly wear your seatbelt could
seriously increase the risk of injury or
death.

59

Airbags

WARNING: 

Properly secure

children 12 years old and under in a rear
seating position whenever possible. If
you are unable to properly secure all
children in a rear seating position,
properly secure the largest child on the
front seat. If you must use a forward
facing child restraint on the front seat,
move the seat as far back as possible.
Failure to follow these instructions could
result in personal injury or death.

WARNING: 

Do not place your arms

on the airbag cover or through the
steering wheel. Failure to follow this
instruction could result in personal injury.

WARNING: 

Keep the areas in front

of the airbags free from obstruction. Do
not affix anything to or over the airbag
covers. Objects could become projectiles
during airbag deployment. Failure to
follow this instruction could result in
personal injury or death.

WARNING: 

To reduce risk of injury,

do not obstruct or place objects in the
deployment path of the airbag.

WARNING: 

Do not place a

rearward facing child restraint in front of
an active airbag. Failure to follow this
instruction could result in personal injury
or death.

WARNING: 

Do not attempt to

service, repair, or modify the
supplementary restraint system or
associated components. Failure to
follow this instruction could result in
personal injury or death.

WARNING: 

Several airbag system

components get hot after inflation. To
reduce the risk of injury, do not touch
them after inflation.

WARNING: 

If a supplementary

restraint system component has
deployed, it will not function again. Have
the system and associated components
inspected as soon as possible. Failure to
follow this instruction could result in
personal injury or death.

PROPERLY ADJUSTING THE
DRIVER AND FRONT
PASSENGER SEATS

WARNING: 

National Highway

Traffic Safety Administration (NHTSA)
recommends a minimum distance of at
least 10 in (25 cm) between an
occupant's chest and the driver airbag
module.

To properly position yourself away from
the airbag:

Move your seat to the rear as far as you
can while still reaching the pedals
comfortably.

Recline the seat slightly one or two
degrees from the upright position.

After all occupants have adjusted their
seats and put on seatbelts, it is very
important that they continue to sit
properly. Properly seated occupants sit
upright, lean against the seat backrest, and
center themselves on the seat cushion,
with their feet comfortably extended on
the floor. Sitting improperly can increase
the chance of injury in a crash event. For
example, if an occupant slouches, lies
down, turns sideways, sits forward, leans
forward or sideways, or puts one or both
feet up, the chance of injury during a crash
greatly increases.

60

Airbags

CHILDREN AND AIRBAGS

WARNING: 

Do not place a

rearward facing child restraint in front of
an active airbag. Failure to follow this
instruction could result in personal injury
or death.

E142846

Children must always be properly
restrained. Accident statistics suggest that
children are safer when properly restrained
in the rear seating positions than in the
front seating position. Failure to follow
these instructions may increase the risk of
injury in a crash.

If two adults and a child occupy a vehicle
without rear seats, properly restrain the
child in the center front seat unless doing
so would interfere with driving your vehicle.
This provides lap and shoulder belt
protection for all occupants, and airbag
protection for the adults. A child or infant
properly restrained in the center front seat
should have a reduced risk to serious injury
from the airbags.

FRONT PASSENGER SENSING
SYSTEM

WHAT IS THE FRONT PASSENGER
SENSING SYSTEM

This system detects a properly seated
occupant and determines if the front
passenger airbag should be enabled.

HOW DOES THE FRONT
PASSENGER SENSING SYSTEM
WORK

The system uses a passenger airbag status
indicator which illuminates indicating that
the front passenger frontal airbag is either
enabled or disabled.

Note:

When you first switch the ignition on,

the passenger airbag status indicator off
and on lamps illuminate for a short period
to confirm they are functional.

E181984

The indicator lamps are in the overhead
console.

The front passenger sensing system is
designed to disable the front passenger
frontal airbag under these conditions:

The front passenger seat is
unoccupied.

The system determines an infant is
present in a child restraint.

A passenger takes their weight off of
the seat for a period of time.

If there is a problem with the airbag
system or the passenger sensing
system.

61

Airbags

Note:

Even with this technology, parents

are strongly encouraged to always properly
restrain children in the rear seat.

When the front passenger sensing
system disables the front passenger
frontal airbag, the passenger airbag
status indicator illuminates the off
lamp.

If you have installed the child restraint
and the passenger airbag status
indicator illuminates the on lamp,
switch your vehicle off, remove the
child restraint from your vehicle and
reinstall the restraint following the
child restraint manufacturer's
instructions.

The front passenger sensing system works
with sensors that are part of the front
passenger seat and seatbelt. The sensors
are designed to detect the presence of a
properly seated occupant and determine
if the front passenger frontal airbag should
be enabled.

When the front passenger sensing
system enables the front passenger
frontal airbag, the passenger airbag
status indicator illuminates the on
lamp.

If a person of adult size is sitting in the front
passenger seat, but the passenger airbag
status indicator off lamp is illuminated, it
is possible that the person is not sitting
properly in the seat. If this happens:

Switch your vehicle off and ask the
person to place the seat backrest in an
upright position.

Have the person sit upright in the seat,
centered on the seat cushion, with the
person's legs comfortably extended.

Restart your vehicle and have the
person remain in this position for about
two minutes. This allows the system
to detect that person and enable the
passenger frontal airbag.

If the indicator off lamp remains
illuminated even after this, you should
advise the person to ride in the rear
seat.

After all occupants have adjusted their
seats and put on seatbelts, it is very
important that they continue to sit upright,
leaning against the seat backrest, and
centered on the seat cushion, with their
feet comfortably extended on the floor.

Sitting improperly can increase the chance
of injury in a crash event. For example, if
an occupant slouches, lies down, turns
sideways, sits forward, leans forward or
sideways, or puts one or both feet up, the
chance of injury during a crash greatly
increases.

If you think that the state of the passenger
airbag status indicator lamp is incorrect,
check for the following:

Objects lodged underneath the seat.

Objects between the seat cushion and
the center console.

Objects hanging off the seat backrest.

Objects stowed in the seat backrest
map pocket.

Objects placed on the occupant's lap.

Cargo interference with the seat

Other passengers pushing or pulling on
the seat.

Rear passenger feet and knees resting
or pushing on the seat.

62

Airbags

The listed conditions could cause the
weight of a properly seated occupant to
be incorrectly interpreted by the front
passenger sensing system. The person in
the front passenger seat could appear
heavier or lighter due to the conditions
listed.

E67017

Make sure the front passenger
sensing system is operating
properly.  See 

Crash Sensors

and Airbag Indicator

 (page 64).

If the airbag readiness light is on, do the
following:

Pull your vehicle over.

Switch your vehicle off.

Check for any objects lodged
underneath the front passenger seat
or cargo interfering with the seat.

Remove the obstruction if found.

Restart your vehicle.

Wait at least two minutes and verify
that the airbag readiness light in the
instrument cluster is no longer
illuminated.

If the airbag readiness light in the
instrument cluster remains illuminated,
there may be a problem due to the
front passenger sensing system.

Do not attempt to repair or service the
system. Take your vehicle in for service
immediately.

If it is necessary to modify an advanced
front airbag system to accommodate a
person with disabilities, contact your
Customer Relationship Center.  See

Contacting Us

 (page 19).

FRONT PASSENGER SENSING
SYSTEM PRECAUTIONS

WARNING: 

Sitting improperly, out

of position or with the seatback reclined
too far can take weight off the seat
cushion and affect the decision of the
passenger sensing system, resulting in
serious injury or death in the event of a
crash. Always sit upright against your
seat back, with your feet on the floor.

WARNING: 

Any alteration or

modification to the front passenger seat
may affect the performance of the front
passenger sensing system. This could
seriously increase the risk of injury or
death.

WARNING: 

Do not place objects

under the front passenger seat or
between the seat and the center
console. Failure to follow this instruction
may interfere with the front passenger
seat sensing system and increase the
risk of injury or death in a crash.

WARNING: 

Check the passenger

airbag indicator lamp for proper airbag
status. Failure to follow this instruction
could result in personal injury or death.

63

Airbags

FRONT PASSENGER SENSING SYSTEM INDICATORS

Passenger Airbag

Passenger Airbag Status

Indicator

Occupant

Disabled

OFF: Illuminated

Empty

ON: Not Illuminated

Disabled

OFF: Illuminated

Child

ON: Not Illuminated

Enabled

OFF: Not Illuminated

Adult

ON: Illuminated

CRASH SENSORS AND
AIRBAG INDICATOR

WARNING: 

Modifying or adding

equipment to the front of your vehicle
could affect the performance of the
airbag system, increasing the risk of
injury. This includes the hood, bumper
system, frame, front body structure, tow
hooks, hood pins, push bar and
snowplows.

Your vehicle has a collection of crash and
occupant sensors. These sensors provide
information to the restraints control
module which activates the following:

Front seatbelt pretensioners.

Adaptive steering column.

Driver airbag.

Passenger airbag.

Seat mounted side airbags.

Safety Canopy.

Based on the type of crash, the restraints
control module deploys the appropriate
safety devices.

The restraints control module also
monitors the readiness of the above safety
devices plus the crash and occupant
sensors. The readiness of the safety
system is indicated by a warning indicator
light in the instrument cluster or by a
backup tone if the warning light is not
working. Routine maintenance of the
airbag is not required.

A difficulty with the system is indicated by
one or more of the following:

E67017

The readiness light will not
illuminate immediately after you
switch the ignition on.

The readiness light either flashes or
stays on.

You hear a series of five tones. The
tone pattern repeats periodically until
the problem, the light or both are
repaired.

If any of these things happen, even
intermittently, have the supplemental
restraint system serviced immediately.
Unless serviced, the system may not
function properly in the event of a crash.

64

Airbags

The fact that the seatbelt pretensioners
or front airbags did not activate for both
front seat occupants in a crash does not
mean that something is wrong with the
system. Rather, it means the restraints
control module determined the accident
conditions (crash severity, seatbelt usage)
were not appropriate to activate these
safety devices.

The front airbags activate only in
frontal and near-frontal crashes. Front
airbags may activate in rollovers, side
impacts or rear impacts if the crash
causes sufficient frontal deceleration.

The seatbelt pretensioners activate in
frontal, near-frontal and side crashes,
and in rollovers.

The side airbags inflate in certain side
impact crashes or rollover events. Side
airbags may activate in other types of
crashes if the vehicle experiences
sufficient sideways motion or
deformation.

The Safety Canopy inflates in certain
side impact crashes or rollover events.
The Safety Canopy may activate in
other types of crashes if the vehicle
experiences sufficient sideways motion
or deformation, or a certain likelihood
of rollover.

DISPOSING OF AIRBAGS

Contact your authorized dealer as soon as
possible. Airbags must be disposed of by
qualified personnel.

65

Airbags

WHAT IS 911 ASSIST

911 Assist is a SYNC system feature that
can call for help.

For more information, visit

www.owner.ford.com

.

HOW DOES 911 ASSIST WORK

If a crash deploys an airbag, excluding knee
airbags and rear inflatable seatbelts, or
activates the fuel pump shut-off, your
vehicle may be able to contact emergency
services by dialing 911 through a paired and
connected 

Bluetooth®

 enabled phone.

Not all crashes deploy an airbag or activate
the fuel pump shut-off. If a connected cell
phone sustains damage or loses its
connection to SYNC during a crash, SYNC
searches for and tries to connect to a
previously paired cell phone. SYNC then
attempts to call the emergency services.

Before making the call:

SYNC provides about 10 seconds to
cancel the call. If you fail to cancel the
call, SYNC attempts to dial 911.

SYNC says the following, or a similar
message: SYNC will attempt to call 911,
to cancel the call, press Cancel on your
screen or press and hold the phone
button on your steering wheel.

If you do not cancel the call and SYNC
makes a successful call a pre-recorded
message plays for the 911 operator. The
occupants in your vehicle are able to talk
with the operator. Be prepared to provide
your name, phone number and location
immediately because not all 911 systems
are capable of receiving this information
electronically.

During an emergency call the system
transmits vehicle data to the emergency
service.

EMERGENCY CALL
REQUIREMENTS

WARNING: 

Do not wait for 911

Assist to make an emergency call if you
can do it yourself. Dial emergency
services immediately to avoid delayed
response time which could increase the
risk of serious injury or death after a
crash. If you do not hear 911 Assist within
five seconds of the crash, the system or
phone may be damaged or
non-functional.

WARNING: 

Always place your

phone in a secure location in your vehicle
so it does not become a projectile or get
damaged in a crash. Failure to do so may
cause serious injury to someone or
damage the phone which could prevent
911 Assist from working properly.

WARNING: 

Unless the 911 Assist

setting is set on before a crash, the
system will not dial for help which could
delay response time, potentially
increasing the risk of serious injury or
death after a crash.

SYNC is powered and working properly
at the time of the incident and
throughout feature activation and use.

The 911 Assist feature must be set on
before the incident.

You must pair and connect a

Bluetooth®

 enabled and compatible

cell phone to SYNC.

A connected 

Bluetooth®

 enabled

phone must have the ability to make
and maintain an outgoing call at the
time of the incident.

66

911 Assist

A connected 

Bluetooth®

 enabled

phone must have adequate network
coverage, battery power and signal
strength.

The vehicle must have battery power
and be located in the U.S., Canada or
in a territory in which 911 is the
emergency number.

Note:

If any user sets 911 Assist to on or off,

that setting applies for all paired phones. If
911 Assist is off and the phone connected
to SYNC, an icon displays on the status bar.

Note:

Every phone operates differently.

While SYNC 911 Assist works with most
cellular phones, some may have trouble
using this feature.

EMERGENCY CALL
LIMITATIONS

The SYNC 911 Assist feature only operates
in the U.S., Canada or in a territory in which
911 is the emergency number. The following
are limitations of this feature:

Your cellular phone or 911 Assist
hardware sustains damage in a crash.

The vehicle's battery or the SYNC
system has no power.

The phone(s) thrown from your vehicle
are the ones paired and connected to
the system.

67

911 Assist

REMOTE CONTROL
LIMITATIONS

WARNING: 

Changes or

modifications not expressively approved
by the party responsible for compliance
could void the user's authority to operate
the equipment. The term "IC:" before the
radio certification number only signifies
that Industry Canada technical
specifications were met.

This device complies with Part 15 of the
FCC Rules and with Industry Canada
license-exempt RSS standard(s).
Operation is subject to the following two
conditions: (1) This device may not cause
harmful interference, and (2) This device
must accept any interference received,
including interference that may cause
undesired operation.

Make sure a valid remote control is within
3 ft (1 m) from the front door handles and
rear of vehicle.

The system may not function if:

The remote control remains stationary
for about a minute.

The vehicle battery has no charge.

The remote control battery has no
charge.

There is interference causing issues
with the remote control frequencies.

The remote control is too close to
metal objects or electronic devices, for
example keys or a cell phone.

USING THE REMOTE CONTROL

WARNING: 

Do not leave a key or

remote control unattended in the vehicle.
Children or pets could operate the power
windows, moonroof or other controls.
Failure to follow this instruction could
result in personal injury or death.

Use your remote control to access various
vehicle systems.

Note:

The buttons on your remote may vary

depending on the vehicle region or options.

Unlock

E138629

Press the button to unlock all
doors.  See 

Unlocking and

Locking the Doors Using the

Remote Control

 (page 76).

Lock

E138623

Press the button to lock all
doors.  See 

Unlocking and

Locking the Doors Using the

Remote Control

 (page 76).

Remote Start

 (If Equipped)

E138625

Press the button twice within
three seconds to remote start.
See 

Remotely Starting and

Stopping the Vehicle

 (page 138).

Opening and Closing the Liftgate

E267940

Press the button twice within
three seconds to open and close
the liftgate.  See 

Opening the

Liftgate Using the Remote Control

(page 87).

68

Keys and Remote Controls

Panic Alarm

 (If Equipped)

E138624

Press the button to sound the
panic alarm.  See 

Sounding the

Panic Alarm

 (page 69).

OPENING AND CLOSING THE
FLIP KEY

Opening Your Flip Key

Press the round button on the remote
control to extend the flip key.

E191532

Note:

Inspect the key blade for debris.

Periodically clean with a brush.

Closing Your Flip Key

Press and hold the round button on the
remote control to fold the key blade when
not in use.

E191532

REMOVING THE KEY BLADE

E322866

Push the release button on your passive
key and pull the key blade out.

SOUNDING THE PANIC ALARM

E138624

Press the button to sound the
panic alarm.  Press the button
again, or switch the ignition on

to turn it off.

69

Keys and Remote Controls

Note:

The panic alarm only operates when

the ignition is off.

LOCATING YOUR VEHICLE

E138623

Press the lock button twice
within three seconds.  The turn
signal lamps flash.

Note:

We recommend you use this method

to locate your vehicle.

CHANGING THE REMOTE
CONTROL BATTERY -
VEHICLES WITH: FLIP KEY

WARNING: 

Keep batteries away

from children to prevent ingestion.
Failure to follow this instruction could
result in personal injury or death. If
ingested, immediately seek medical
attention.

WARNING: 

If the battery

compartment does not securely close,
stop using the remote control and
replace it as soon as possible. In the
meantime, keep the remote control away
from children. Failure to follow this
instruction could result in personal injury
or death.

Battery Replacement Procedure

The remote control uses one coin-type
3-volt lithium battery CR2032 or
equivalent.

Press the button to release the key blade
before beginning the procedure.

E191533

1.

Insert a screwdriver, in the position
shown and gently push the clip.

2. Press the clip down to release the

battery cover.

E151799

3. Carefully remove the cover.

E151800

4. Insert a screwdriver as shown to

release the battery.

70

Keys and Remote Controls

E151801

Note:

Do not touch the battery contacts or

the printed circuit board with the
screwdriver.

5. Remove the battery.

6. Install a new battery with the 

+

 facing

up.

7.

Replace the battery cover.

E107998

Dispose of old batteries in an
environmentally friendly way.
Seek advice from your local

authority about recycling old batteries.

Note:

Do not wipe off any grease on the

battery terminals or on the back surface of
the circuit board.

Note:

 Replacing the battery does not erase

the programmed key from your vehicle.  The
remote control should operate normally.

CHANGING THE REMOTE
CONTROL BATTERY -
VEHICLES WITH: PUSH
BUTTON START

WARNING: 

Keep batteries away

from children to prevent ingestion.
Failure to follow this instruction could
result in personal injury or death. If
ingested, immediately seek medical
attention.

WARNING: 

If the battery

compartment does not securely close,
stop using the remote control and
replace it as soon as possible. In the
meantime, keep the remote control away
from children. Failure to follow this
instruction could result in personal injury
or death.

The remote control uses one coin-type
3-volt lithium battery CR2450 or
equivalent.

E322866

1.

Push the release button and pull the
key blade out.

71

Keys and Remote Controls

E303824

2. Twist a thin coin under the tab hidden

behind the key blade head to remove
the battery cover.

E218402

3. Insert a screwdriver, and carefully

remove the battery.

4. Install a new battery with the 

+

 facing

upward.

5. Reinstall the battery housing cover

onto the transmitter and install the key
blade.

E107998

Dispose of old batteries in an
environmentally friendly way.
Seek advice from your local

authority about recycling old batteries.

Note:

Do not wipe off any grease on the

battery terminals or on the back surface of
the circuit board.

Note:

 Replacing the battery does not erase

the programmed key from your vehicle.  The
remote control should operate normally.

REPLACING A LOST KEY OR
REMOTE CONTROL

You can purchase replacement keys or
remote controls from an authorized dealer.
Authorized dealers can program remote
controls for your vehicle.

72

Keys and Remote Controls

E151795

Note:

 Your vehicle keys came with a

security label that provides important key
cut information.  Keep the label in a safe
place for future reference.

PROGRAMMING THE REMOTE
CONTROL - VEHICLES WITH:
FLIP KEY

General Information

You can program your own remote control
to your vehicle. This procedure programs
both the engine immobilizer keycode and
the remote entry portion of the remote
control to your vehicle.

Only use remote controls with an
integrated mechanical key.

You must have two previously
programmed coded remote controls and
the new un–programmed remote readily
accessible. Contact an authorized dealer
to have the spare remote control
programmed if the two previously
programmed coded remote controls are
not available.

Read and understand the entire procedure
before you begin.

Steps for Programming Your Spare
Remote Control

1.

Insert the first previously programmed
coded key into the ignition.

2. Switch the ignition from off to on.  Keep

the ignition on for at least three
seconds, but no more than 10 seconds.

3. Switch the ignition off and remove the

first coded key from the ignition.

4. After three seconds but within 10

seconds of switching the ignition off,
insert the second previously coded key
into the ignition.

5. Switch the ignition from off to on.  Keep

the ignition on for at least three
seconds, but no more than 10 seconds.

6. Switch the ignition off and remove the

second previously programmed coded
key from the ignition.

7.

After three seconds but within 10
seconds of switching the ignition off
and removing the previously
programmed coded key, insert the new
un–programmed key into the ignition.

8. Switch the ignition from off to on.  Keep

the ignition on for at least six seconds
until you hear the door locks cycle.

9. Remove the newly programmed coded

key from the ignition.

The key starts the engine if programming
is successful. You can operate the keyless
remote entry system with the new remote
control with integrated key.

If programming was not successful, wait
20 seconds and repeat Steps 1 through 8.
If you are still unsuccessful, take your
vehicle to an authorized dealer.

Note:

You can program a maximum of six

coded remote controls to your vehicle.

73

Keys and Remote Controls

PROGRAMMING THE REMOTE
CONTROL - VEHICLES WITH:
PUSH BUTTON START

General Information

You must have two previously
programmed remote controls inside your
vehicle and the new unprogrammed
remote controls readily accessible. Contact
an authorized dealer to have the spare
remote control programmed if two
previously programmed remotes are not
available.  Make sure that your vehicle is
off before beginning this procedure.  Make
sure that you close all the doors before
beginning and that they remain closed
throughout the procedure.  Perform all
steps within 30 seconds of starting the
sequence.  Stop and wait for at least one
minute before starting again if you perform
any steps out of sequence.

Read and understand the entire procedure
before you begin.

Note:

You can program a maximum of four

remote controls to your vehicle.

Note:

If your programmed remote controls

are lost or stolen and you do not have an
extra coded remote, you need to have your
vehicle towed to an authorized dealer. Store
an extra programmed remote away from
your vehicle in a safe place to help prevent
any inconvenience. Contact an authorized
dealer to purchase additional spare or
replacement remotes.

Steps for Programming Your Spare
Remote Control

Programming Backup Location

E256153

1.

Access the backup slot.

2. Place the first programmed remote in

the backup slot with your foot off the
brake pedal, press and release the push
button ignition switch.

3. Wait five seconds and then press and

release the push button ignition switch
again.

4. Remove the remote control.

5. Within 10 seconds, place a second

programmed remote control in the
backup slot.  Press and release the
push button ignition switch.

74

Keys and Remote Controls

6. Wait five seconds and then press and

release the push button ignition switch
again.  Keep the ignition on for at least
three seconds, but no more than 10
seconds.

7.

Remove the remote control.

8. Place the unprogrammed remote

control in the backup slot and press
and release the push button ignition
switch.

Programming is now complete.  With your
foot on the brake pedal, press the push
button ignition switch to verify the remote
control functions operate and your vehicle
starts with the new remote control.

If programming was not successful, wait
10 seconds and repeat Steps 1 through 8.
If you are still unsuccessful, take your
vehicle to an authorized dealer.

KEYS AND REMOTE CONTROLS – TROUBLESHOOTING

KEYS AND REMOTE CONTROLS – INFORMATION MESSAGES

Action

Message

Replace remote control battery.

Key Battery Low Replace
Soon

75

Keys and Remote Controls

OPERATING THE DOORS
FROM OUTSIDE YOUR
VEHICLE

UNLOCKING AND LOCKING THE
DOORS USING THE REMOTE
CONTROL

You can only use the remote control when
your vehicle is stationary.

Unlocking the Doors

E267112

Press the button to unlock all
doors.  One long flash of the turn
signal lamps confirms that your

vehicle has unlocked.

Locking the Doors

E267111

Press the button to lock all
doors.  One short flash of the
turn signal lamps confirms that

your vehicle has locked.

UNLOCKING AND LOCKING THE
DOORS USING THE KEY BLADE

If there is a power door lock fault you can
use the key blade to lock and unlock the
doors.

E251885

Turn clockwise to lock.

Turn counterclockwise to unlock.

OPERATING THE DOORS
FROM INSIDE YOUR VEHICLE

UNLOCKING AND LOCKING THE
DOORS USING THE CENTRAL
LOCKING

The power door lock control is on the front
doors.

E267112

Press the button to unlock all
doors.

E267111

Press the button to lock all
doors.

Note:

The central locking only operates if

the front doors are fully closed.

76

Doors and Locks

OPENING THE DOORS FROM
INSIDE YOUR VEHICLE

Pull the interior door handle twice to
unlock and open a rear door.  The first pull
unlocks the door and the second pull
opens the door.

AUTOUNLOCK

WHAT IS AUTOUNLOCK

Autounlock is a feature that centrally
unlocks the vehicle doors when your
vehicle comes to a stop and you open the
driver door.

AUTOUNLOCK REQUIREMENTS

Autounlock unlocks all the doors after:

1.

The vehicle speed exceeds 12 mph
(20 km/h).

2. Your vehicle comes to a stop.

3. You open the driver door.

Note:

Autounlock operates for only 10

minutes after the ignition is switched off.

SWITCHING AUTOUNLOCK ON
AND OFF - VEHICLES WITH: 12
INCH SCREEN

1.

Press 

Settings

 on the touchscreen.

2. Press 

Vehicle Settings

.

3. Switch 

Autounlock

 on or off.

SWITCHING AUTOUNLOCK ON
AND OFF - VEHICLES WITH: 15
INCH SCREEN

1.

Access the vehicle drawer on the
touchscreen.

2. Press 

SETTINGS

.

3. Press 

Vehicle

.

4. Press 

Locks

.

5. Switch 

Autounlock

 on or off.

AUTOLOCK

WHAT IS AUTOLOCK

Autolock is a locking feature that centrally
locks your vehicle doors when driving.

AUTOLOCK REQUIREMENTS

Autolock locks all the doors after:

1.

All doors are closed and the ignition is
on.

2. Your vehicle speed exceeds 12 mph

(20 km/h).

Autolock repeats if:

1.

Your vehicle is stopped.

2. Any door is opened and closed again.
3. Your vehicle speed exceeds 12 mph

(20 km/h).

MISLOCK

WHAT IS MISLOCK

Mislock is a locking feature that warns you
if your vehicle has not locked.

MISLOCK LIMITATIONS

When you press the lock button once, the
turn signals do not flash if:

Any door or the tailgate is open.

The hood is open.

If you switch mislock off, the horn does not
sound if you press the lock button on the
remote control when a door is open.

77

Doors and Locks

SWITCHING MISLOCK ON AND
OFF - VEHICLES WITH: 12 INCH
SCREEN

1.

Press 

Settings

 on the touchscreen.

2. Press 

Vehicle Settings

.

3. Switch 

Mislock Chirp

 on or off.

SWITCHING MISLOCK ON AND
OFF - VEHICLES WITH: 15 INCH
SCREEN

1.

Access the vehicle drawer on the
touchscreen.

2. Press 

SETTINGS

.

3. Press 

Vehicle

.

4. Press 

Locks

.

5. Switch 

Mislock Chirp

 on or off.

DOORS AND LOCKS AUDIBLE
WARNINGS

Door Ajar Audible Warning

Sounds when any front door is not fully
closed and your vehicle is moving.

DOORS AND LOCKS –
TROUBLESHOOTING

DOORS AND LOCKS – WARNING

LAMPS

Door Ajar Warning Lamp

E249859

Illuminates when you switch the
ignition on and remains on if any
door or the hood is open.

DOORS AND LOCKS – INFORMATION MESSAGES

Details

Message

Displays if a door is open. Fully close the door.

Driver Door Ajar

Passenger Door Ajar

Rear Left Door Ajar

Rear Right Door Ajar

Displays if a hood is open. Fully close the hood.

Hood Ajar

78

Doors and Locks

DOORS AND LOCKS –
FREQUENTLY ASKED QUESTIONS

Can accessories such as steps or
handles be used with the latch
assembly?

Do not use the door latch assembly to
attach any accessory, such as handles
or steps, as this can cause damage to
your vehicle.

79

Doors and Locks

WHAT IS KEYLESS ENTRY

The system allows you to lock and unlock
your vehicle without taking the passive key
out of your pocket or purse.

KEYLESS ENTRY LIMITATIONS

Make sure your remote control is within 3 ft
(1 m) from the front door handles and the
tailgate.

The system could not function if:

The remote control remains stationary
for about a minute.

The vehicle battery has no charge.

The remote control battery has no
charge.

There is interference causing issues
with the remote control frequencies.

The remote control is too close to
metal objects or electronic devices, for
example keys or a cell phone.

KEYLESS ENTRY SETTINGS

Reprogramming the Unlocking
Function

You can enable two-stage unlocking
function allowing you to unlock only the
driver door when you touch the unlock
sensor.

Press and hold both the lock and unlock
buttons on the remote control for four
seconds to disable or enable two-stage
unlocking.

If you program the unlocking function so
that only the driver door unlocks, you can
unlock all of the other doors from inside
your vehicle using the power door lock
control. You can unlock individual doors
by pulling the interior door handles on
those doors.

USING KEYLESS ENTRY

Unlocking the Doors

E248553

With your passive key within 3 ft (1 m) of
your vehicle, touch the unlock sensor on
the back of the door handle for a brief
period and then pull on the door handle to
unlock, being careful not to touch the lock
sensor at the same time or pull on the door
handle too quickly. The intelligent access
system requires a brief delay to
authenticate your intelligent access key.

Using the Electronic Liftgate with
Passive Key (If Equipped)

E138632

With your passive key within 3 ft (1 m) of
your vehicle, press the exterior liftgate
release button inside of the liftgate handle.
The liftgate unlocks and opens.  See

Opening the Liftgate From Outside
Your Vehicle

 (page 86).

80

Keyless Entry

 (If Equipped)

Locking the Doors

E248554

With your passive key within 3 ft (1 m) of
your vehicle, touch the outer door handle
lock sensor for approximately one second
to lock, being careful not to touch the
unlock sensor on the back of the door
handle at the same time. After locking, you
can immediately pull on the door handle
to confirm locking occurred without
inadvertently unlocking.

KEYLESS ENTRY –
TROUBLESHOOTING

KEYLESS ENTRY – FREQUENTLY
ASKED QUESTIONS

Why does the keyless entry system
not function?

If the system does not function it may
be limited.  See 

Keyless Entry

Limitations

 (page 80).  If the system

still does not function use the remote
control or the key blade to lock and
unlock your vehicle.

Why can I not lock my vehicle?

If you electronically lock your vehicle
with a rear door or the liftgate open,
the system searches for a passive key
inside your vehicle after you close the
last door. If the system detects a key,
all doors unlock indicating that a key is
inside. Your vehicle locks if another
passive key is within the detection
range after you close the last door.

81

Keyless Entry

 (If Equipped)

WHAT IS THE KEYLESS ENTRY
KEYPAD

The keyless entry keypad allows you to
lock and unlock your vehicle using the
keypad on the window trim.

KEYLESS ENTRY KEYPAD
LIMITATIONS

The system may not function if:

The vehicle battery has no charge.

LOCATING THE KEYLESS
ENTRY KEYPAD

The keypad is near the driver window and
illuminates when you touch it.

E138637

KEYLESS ENTRY KEYPAD
MASTER ACCESS CODE

What is the Master Access Code

The master access code is a factory-set
five-digit entry code. You can operate the
keypad with the master access code at
any time. The master access code can be
displayed in the instrument cluster display
and is available from an authorized dealer.

Displaying the Master Access Code
in the Instrument Cluster Display

Read and understand the following before
you begin the process.

You must have two previously
programmed intelligent access key
inside your vehicle.

Make sure that your vehicle is off.

Make sure you do not press the brake
pedal during the procedure.

Make sure that you close all the doors
and that they remain closed
throughout the procedure.

Perform all steps within 30 seconds of
starting the sequence. If you perform any
of the steps out of sequence, stop and wait
for at least one minute before starting
again.

Note:

Do not place the device on the

wireless accessory charging area during the
procedure.

1.

Access the backup slot. See

Accessing the Passive Key Backup
Position

 (page 194).

2. Place the first intelligent access key

into the backup slot.

3. Press the push button ignition switch

once and wait for a few seconds.

4. Press the push button ignition switch

again and remove the intelligent access
key from the center console.

82

Keyless Entry Keypad

 (If Equipped)

5. Insert the second programmed

intelligent access key into the backup
slot in the center console, then press
the push button ignition switch.

The master access code appears in the
instrument cluster display for a few
seconds.

Note:

The code may not display until after

other warning messages display.

KEYLESS ENTRY KEYPAD
PERSONAL ACCESS CODES

Programming a Personal Entry
Code

1.

Enter the five-digit master code.

2. Press 

1·2

 on the keypad within five

seconds.

3. Enter your personal five-digit code.

You must do this within five seconds
of completing Step 2.

4. Press 

1·2

 on the keypad to save

personal code 1.

The doors lock then unlock to confirm that
programming was successful.

To program additional personal entry
codes, repeat Steps 1 through 3, then for
Step 4:

Press 

3·4

 to save personal code 2.

Press 

5·6

 to save personal code 3.

Press 

7·8

 to save personal code 4.

Press 

9·0

 to save personal code 5.

If your vehicle comes with the operating
system, you can also program the system
with a personal entry code.

Hints:

Do not set a code that uses five of the
same number.

Do not use five numbers in sequential
order.

The five-digit master code works even
if you have set your own personal code.

Erasing a Personal Code

1.

Enter the five-digit master code.

2. Press and release 

1·2

 on the keypad

within five seconds.

3. Press and hold 

1·2

 for two seconds.

You must do this within five seconds
of completing Step 2.

All personal codes erase and only the
five-digit master code works.

Anti-Scan Feature

The keypad goes into an anti-scan mode
if you enter the wrong code seven times.
This mode turns off the keypad for one
minute and the keypad lamp flashes.

The anti-scan feature turns off after:

One minute of keypad inactivity.

You press the unlock button on the
remote control.

You switch the ignition on.

You unlock your vehicle using keyless
entry.

83

Keyless Entry Keypad

 (If Equipped)

USING THE KEYLESS ENTRY
KEYPAD

Unlocking the Driver Door

E138637

Enter the factory-set five-digit code or your
personal code. You must press each
number within five seconds of each other.

Note:

All doors unlock if the two-stage

unlocking feature is disabled.  See 

Keyless

Entry Settings

 (page 80).

Unlocking All Doors

Enter the factory-set code or your personal
code, then press 3•4 within five seconds.

Locking the Doors

E138637

Press and hold 

7·8

 and 

9·0

 at the same

time with the driver door closed.

Note:

You do not need to enter the code

first.

KEYLESS ENTRY KEYPAD –
TROUBLESHOOTING

KEYLESS ENTRY KEYPAD –
FREQUENTLY ASKED QUESTIONS

Why does the keypad not accept
the access code?

If you enter the access code too fast
on the keypad, the unlock function may
not work. Slowly re-enter the access
code.

Why does the keypad not
function?

The keypad goes into an anti-scan
mode if you enter a wrong code seven
times. The anti-scan mode disables
the keypad for one minute and the red
light flashes.

84

Keyless Entry Keypad

 (If Equipped)

HOW DOES EASY ENTRY AND
EXIT WORK

Easy entry and exit moves the driver seat
rearward up to 2 in (5 cm) and the steering
column up when you switch the ignition
off. The driver seat and steering column
return to their previous positions when you
switch the ignition on.

Note:

Depending on your vehicle, the

column may move up and in.

SWITCHING EASY ENTRY AND
EXIT ON AND OFF

1.

Press 

Settings

 on the touchscreen.

2. Press 

Vehicle

.

3. Select 

Easy Entry/Exit

.

If you press any adjustment or memory
button when in easy exit mode, the system
cancels the operation.

85

Easy Entry and Exit

 (If Equipped)

LIFTGATE PRECAUTIONS

WARNING: 

Make sure all persons

are clear of the power liftgate area
before opening or closing the liftgate.

WARNING: 

It is extremely

dangerous to ride in a cargo area, inside
or outside of a vehicle. In a crash, people
riding in these areas are more likely to be
seriously injured or killed. Do not allow
people to ride in any area of your vehicle
that is not equipped with seats and
seatbelts. Make sure everyone in your
vehicle is in a seat and properly using a
seatbelt. Failure to follow this warning
could result in serious personal injury or
death.

WARNING: 

Make sure that you fully

close the liftgate to prevent exhaust
fumes from entering your vehicle. If you
are unable to fully close the liftgate,
open the air vents or the windows to
allow fresh air to enter your vehicle.
Failure to follow this instruction could
result in personal injury or death.

WARNING: 

Keep keys out of reach

of children. Do not allow children to
operate or play near an open or moving
power liftgate. You should supervise the
operation of the power liftgate at all
times.

OPENING THE LIFTGATE

OPENING THE LIFTGATE FROM
INSIDE YOUR VEHICLE

E138633

With the transmission in park
(P), press the button on the
instrument panel.

Note:

Be careful when opening or closing

the liftgate in a garage or other enclosed
area to avoid damaging the liftgate.

Note:

 Do not hang anything, for example

a bike rack, from the glass or liftgate.  This
could damage the liftgate and its
components.

Note:

 Do not leave the liftgate open while

driving.  This could damage the liftgate and
its components.

OPENING THE LIFTGATE FROM
OUTSIDE YOUR VEHICLE

1.

Unlock the liftgate with the remote
control or power door unlock control.
If a passive key is within 3 ft (1 m) of
the liftgate, the liftgate unlocks when
you press the liftgate release button.

E138632

2. Press and release the liftgate control

button.

Note:

Allow the power system to open the

liftgate. Manually pushing or pulling the
liftgate may activate the system’s obstacle
detection feature and stop the power
operation or reverse its direction, replicate
a strut failure, or damage mechanical
components.

Note:

Be careful when opening or closing

the liftgate in a garage or other enclosed
area to avoid damaging the liftgate.

86

Liftgate - Vehicles With: Power Liftgate

Note:

 Do not hang anything, for example

a bike rack, from the glass or liftgate.  This
could damage the liftgate and its
components.

Note:

 Do not leave the liftgate open while

driving.  This could damage the liftgate and
its components.

Switching the Power Liftgate On
or Off

You can switch the power liftgate on or off
through the vehicle settings on your
touchscreen.

1.

Press Settings.

2. Press Vehicle Settings.

3. Press Power Liftgate.

4. Select your option.

When switched off, the liftgate only
unlatches and will not power open or close.

OPENING THE LIFTGATE USING
THE REMOTE CONTROL

E267940

Press the button twice within
three seconds.

Note:

Be careful when opening or closing

the liftgate in a garage or other enclosed
area to avoid damaging the liftgate.

Note:

Do not hang anything, for example a

bike rack, from the glass or liftgate. This
could damage the liftgate and its
components.

Note:

Do not leave the liftgate open while

driving. This could damage the liftgate and
its components.

OPENING THE HANDS-FREE
LIFTGATE

 (If Equipped)

Make sure you have the passive key within
3 ft (1 m) of the liftgate.

1.

Stand behind your vehicle, and face the
liftgate.

2. Move your foot, in a single-kick motion,

without pausing, under and away from
the rear bumper detection area.

E300799

3. The liftgate opens.

Avoid the following actions when using the
hands-free opening feature:

Making physical contact with the
bumper.

Holding your foot under the bumper.

Sweeping your foot from side to side,
or kicking at an odd angle.

Detection Zones

E253799

The detection area is on the left-hand side
and right-hand side of the rear bumper
area.

87

Liftgate - Vehicles With: Power Liftgate

Note:

Some vehicles may have the ability

to detect the kicking motion from under the
trailer hitch.

Note:

Allow the power system to open the

liftgate. Manually pushing or pulling the
liftgate may activate the system’s obstacle
detection feature and stop the power
operation or reverse its direction, replicate
a strut failure, or damage mechanical
components.

Note:

Any physical actions that mimic a

kicking motion such as splashing water,
trailer chains or vacuum hoses may cause
the hands-free liftgate to activate. Switch
the power liftgate off through your vehicle
settings or keep the passive key away from
the rear bumper detection area.

SETTING THE LIFTGATE
OPENING HEIGHT

1.

Open the liftgate.

2. Stop the liftgate movement by pressing

the control button on the liftgate when
it reaches the desired height.

Note:

Once the liftgate stops moving, you

can manually move it to the desired height.

3. Press and hold the control button on

the liftgate until a tone sounds,
indicating programming is complete.

Note:

You can only use the liftgate control

button to program the height.

Note:

You cannot program the height if the

liftgate position is too low.

4. The power liftgate now opens at the

programmed height. To change the
programmed height, repeat the steps.

Note:

You can fully open the liftgate by

manually pushing it upward to the
maximum open position if it opens in a
lower position.

Note:

The system recalls the new

programmed height until you reprogram it,
even if you disconnect the battery.

CLOSING THE LIFTGATE

CLOSING THE LIFTGATE FROM
INSIDE YOUR VEHICLE

WARNING: 

Make sure all persons

are clear of the power liftgate area
before opening or closing the liftgate.

E138633

With the transmission in park
(P), press the button on the
instrument panel.

Note:

 Make sure that you close the liftgate

before operating or moving your vehicle,
especially in an enclosure like a garage or a
parking structure.  This could damage the
liftgate and its components.

Note:

 Make sure the area behind your

vehicle is free from obstruction and that
there is enough room for you to operate the
liftgate.  Objects too close to your vehicle,
for example a wall, garage door or another
vehicle may come into contact with the
moving liftgate.  This could damage the
liftgate and its components.

Note:

Make sure that you fully close the

liftgate to prevent cargo from falling out.

CLOSING THE LIFTGATE FROM
OUTSIDE YOUR VEHICLE

WARNING: 

Make sure all persons

are clear of the power liftgate area
before using the power liftgate control.

88

Liftgate - Vehicles With: Power Liftgate

E252965

Press and release the liftgate button.

Note:

 Make sure that you close the liftgate

before operating or moving your vehicle,
especially in an enclosure, like a garage or
a parking structure.  This could damage the
liftgate and its components.

Note:

 Make sure the area behind your

vehicle is free from obstruction and that
there is enough room for you to operate the
liftgate.  Objects too close to your vehicle,
for example a wall, garage door or another
vehicle may come into contact with the
moving liftgate  This could damage the
liftgate and its components.

Note:

Make sure you fully close the liftgate

to prevent cargo from falling out.

CLOSING THE LIFTGATE USING
THE REMOTE CONTROL

WARNING: 

Make sure all persons

are clear of the power liftgate area
before opening or closing the liftgate.

E267940

Press the button twice within
three seconds. A tone sounds
when the liftgate begins to close.

Note:

 Make sure that you close the liftgate

before operating or moving your vehicle,
especially in an enclosure like a garage or a
parking structure.  This could damage the
liftgate and its components.

Note:

 Make sure the area behind your

vehicle is free from obstruction and that
there is enough room for you to operate the
liftgate.  Objects too close to your vehicle,
for example a wall, garage door or another
vehicle may come into contact with the
moving liftgate.  This could damage the
liftgate and its components.

Note:

Make sure that you fully close the

liftgate to prevent cargo from falling out.

CLOSING THE HANDS-FREE
LIFTGATE

 (If Equipped)

Make sure you have the remote control
within 3 ft (1 m) of the liftgate.

1.

Stand behind your vehicle, and face the
liftgate.

2. Move your foot, in a single-kick motion,

without pausing, under and away from
the rear bumper detection area.

E300799

3. The liftgate closes.

89

Liftgate - Vehicles With: Power Liftgate


Content      ..      1      2      3      ..