Ford Police Interceptor Utility (2022 year). Manual in english - page 4
 

  Index      Manuals     Ford Police Interceptor Utility (2022 year). Manual in english


Search            copyright infringement  


Content      ..     2      3      4      5     ..


Ford Police Interceptor Utility (2022 year). Manual in english - page 4


GENERAL INFORMATION ON
RADIO FREQUENCIES

This device complies with Part 15 of the
FCC Rules and with Licence exempt RSS
Standards of Industry Canada. Operation
is subject to the following two conditions:

This device may not cause harmful
interference.

This device must accept any
interference received, including
interference that may cause undesired
operation.

WARNING: 

Changes or

modifications not expressively approved
by the party responsible for compliance
could void the user's authority to operate
the equipment. The term "IC:" before the
radio certification number only signifies
that Industry Canada technical
specifications were met.

The typical operating range for your
transmitter is approximately 33 ft (10 m).
Vehicles with the remote start feature will
have a greater range. One of the following
could cause a decrease in operating range:

Weather conditions.

Nearby radio towers.

Structures around the vehicle.

Other vehicles parked next to your
vehicle.

Other short distance radio transmissions,
for example amateur radios, medical
equipment, wireless headphones, remote
controls and alarm systems can also use
the radio frequency used by your remote
control.  If the frequencies are jammed, you
will not be able to use your remote control.
You can lock and unlock the doors with the
key.

Note:

Make sure to lock your vehicle before

leaving it unattended.

Note:

If you are in range, the remote control

will operate if you press any button
unintentionally.

Note:

 The remote control contains

sensitive electrical components.  Exposure
to moisture or impact may cause permanent
damage.

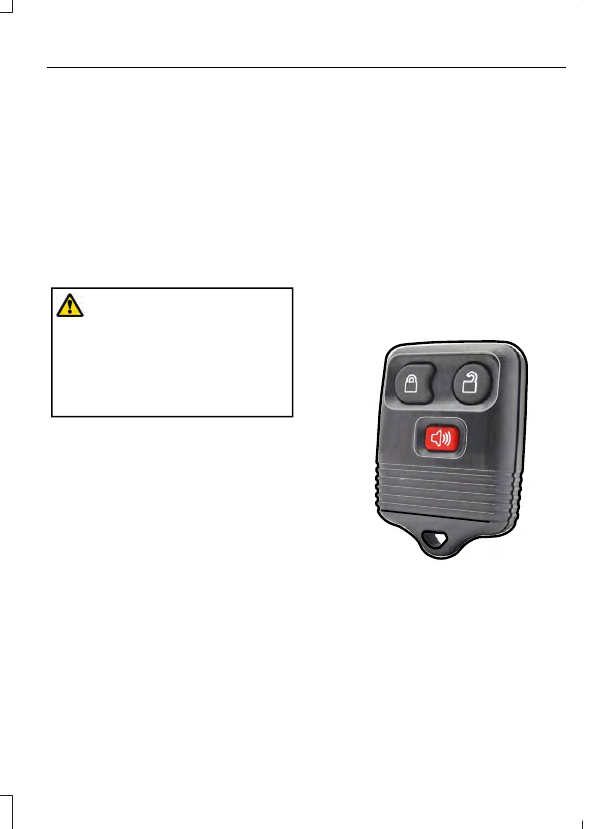
REMOTE CONTROL

 (IF EQUIPPED)

Note:

If there is a problem with the remote

entry system, make sure to take all remote
controls with you to an authorized dealer in
order to aid in troubleshooting the problem.

Type 1

E203600

55

Keys and Remote Controls

Type 2

E218100

Changing the Remote Control
Battery

WARNING: 

Keep batteries away

from children to prevent ingestion.
Failure to follow this instruction could
result in personal injury or death. If
ingested, immediately seek medical
attention.

WARNING: 

If the battery

compartment does not securely close,
stop using the remote control and
replace it as soon as possible. In the
meantime, keep the remote control away
from children. Failure to follow this
instruction could result in personal injury
or death.

The remote control uses one coin-type
three-volt lithium battery CR2032 or
equivalent.

E107998

Make sure you dispose of old
batteries in an environmentally
friendly way.  Seek advice from

local authorities about recycling old
batteries.

E203601

1.

Twist a thin coin in the slot of the
remote control near the key ring to
remove the battery cover.

Note:

Do not remove the rubber cover and

circuit board from the front housing of the
remote control.

Note:

Do not wipe off any grease on the

battery terminals or on the back surface of
the circuit board.

2. Remove the old battery.

3. Insert the new battery.  Refer to the

symbols inside the remote control for
the correct orientation of the battery.
Press the battery down to make sure
it is fully seated in the housing.

4. Reinstall the battery housing cover

onto the remote control.

Note:

 Replacing the battery does not erase

the programmed key from your vehicle. The
remote control operates normally.

56

Keys and Remote Controls

Sounding the Panic Alarm

 (If Equipped)

E138624

On Type 1, press the button to
sound the panic alarm.  Press the
button again or switch the

ignition on to turn it off.

Note:

The panic alarm operates regardless

of the ignition position.

Opening the Liftgate With the
Liftgate Button 

 (If Equipped)

On Type 2, press the button to
unlock the liftgate. The liftgate
unlocks for 45 seconds, during

which time you can open the liftgate using
the exterior liftgate release button.  See

Manual Liftgate

 (page 61).

Note:

Only the liftgate unlocks. All other

passenger doors remain in the previous
locking state.

Note:

If you do not open the liftgate within

45 seconds of unlocking it, the liftgate locks
again. Press the button on the remote
control or use the key blade inserted into
the liftgate lock cylinder to unlock the
liftgate again.

Note:

 The liftgate does not unlock when

you unlock all the doors using the remote
control or power door lock control, unless
you use the global unlock feature which
overrides the 45-second timer.

REPLACING A LOST KEY OR
REMOTE CONTROL

Replacement keys or remote controls can
be purchased from an authorized dealer.
Authorized dealers can program remote
controls for your vehicle.

57

Keys and Remote Controls

LOCKING AND UNLOCKING

Use the key blade, power door lock control
or the remote control to lock and unlock
your vehicle.

Note:

Do not use the door latch assembly

to attach any accessory, such as handles or
steps, as this can cause damage to your
vehicle.

Locking and Unlocking the Doors
with the Key Blade

Locking with the Key

Turn the top of the key toward the front of
your vehicle.

Unlocking with the Key

Turn the top of the key toward the rear of
your vehicle.

Power Door Locks

 (If Equipped)

The power door lock control is on the driver
and front passenger door panels.

E184784

A

B

Unlock.

A

Lock.

B

Hidden Rear Door Locks

 (If Equipped)

Manually lock or unlock the rear doors
using the hidden lock knob on the inside
front edge of the rear doors.

E203323

Open the front doors to access the lock
knob.  Pull the knob to unlock and push the
knob to lock.

Opening a Rear Door from the
Inside

Pull the interior door handle twice to
unlock and open a rear door.  The first pull
unlocks the door and the second pull
opens the door.

Note:

The rear doors do not open using the

interior door handles if your vehicle has the
rear door lock disable feature, or with the
child locks enabled.

58

Doors and Locks

Remote Control

 (If Equipped)

You can use the remote control at any
time.

Unlocking the Doors

E138629

Press the button to unlock the
driver door.

Press the button again within three
seconds to unlock all doors.

Press and hold both the lock and unlock
buttons on the remote control for three
seconds to change between driver door or
all doors unlock mode.  Driver door mode
only unlocks the driver door when you
press the unlock button once.  The
unlocking mode applies to the remote
control.

Locking the Doors

E138623

Press the button to lock all
doors.

Independent Liftgate Unlocking
Feature

 (If Equipped)

This feature allows you to unlock the
liftgate independent of the other doors.

Unlocking

The liftgate unlocks when you press the
liftgate release button on the overhead
console with the ignition on.

Liftgate Timed Release (If Equipped)

Switch the ignition to the run, start or
accessory position.

Press the liftgate release button
on the overhead console.

Note:

Only the liftgate unlocks. All other

passenger doors remain in the previous
locking state.

A warning lamp illuminates in the
instrument cluster for 45 seconds. See

Warning Lamps and Indicators

 (page

79).  You can then open the liftgate using
the exterior liftgate release button.

Once the 45 second timer expires, the
lamp turns off and the liftgate no longer
opens. Press the liftgate release button on
the overhead console again to restart the
timer.

Note:

The liftgate does not unlock when

you electronically unlock all the doors using
the remote control or power door lock
control, if your vehicle has this feature.

Note:

You can also unlock the liftgate by

inserting the key blade into the liftgate lock
cylinder, or by pressing the liftgate release
button on the remote control, if your vehicle
has this feature.

Locking

The liftgate locks when any of the
following occur:

You open and close the liftgate after
you press the liftgate release button
on the overhead console.

The 45 second timer expires.

Global Lock and Unlock

Global lock and unlock coordinates the
liftgate lock state with the four doors.
When switching the doors to an unlock
state, open the liftgate using the exterior
liftgate release button. When you switch
the doors to the locked state, this locks the
liftgate.

Note:

You can also unlock the liftgate by

inserting the key blade into the liftgate lock
cylinder.

Illuminated Entry

 (If Equipped)

The interior lamps and some exterior
lamps illuminate when you unlock the
doors with the remote control.

59

Doors and Locks

The lamps turn off if:

The ignition is on.

You press the remote control lock
button.

25 seconds have elapsed.

The lamps do not turn off if:

You switch them on with the lighting
control.

Any door is open.

Illuminated Exit

 (If Equipped)

The interior lamps and some exterior
lamps illuminate when all doors close and
you switch the ignition off.

The lamps turn off if all the doors remain
closed and:

25 seconds have elapsed.

You lock your vehicle from the outside.

Battery Saver

If you leave the courtesy lamps, interior
lamps or headlamps on, the battery saver
shuts them off 10 minutes after you switch
the ignition off.

60

Doors and Locks

MANUAL LIFTGATE

WARNING: 

It is extremely

dangerous to ride in a cargo area, inside
or outside of a vehicle. In a crash, people
riding in these areas are more likely to be
seriously injured or killed. Do not allow
people to ride in any area of your vehicle
that is not equipped with seats and
seatbelts. Make sure everyone in your
vehicle is in a seat and properly using a
seatbelt. Failure to follow this warning
could result in serious personal injury or
death.

WARNING: 

Make sure that you fully

close the liftgate to prevent exhaust
fumes from entering your vehicle. If you
are unable to fully close the liftgate,
open the air vents or the windows to
allow fresh air to enter your vehicle.
Failure to follow this instruction could
result in personal injury or death.

Note:

Be careful when opening or closing

the liftgate in a garage or other enclosed
area to avoid damaging the liftgate.

Note:

 Do not hang anything, for example

a bike rack, from the glass or liftgate.  This
could damage the liftgate and its
components.

Note:

 Do not leave the liftgate open while

driving. This could damage the liftgate and
its components.

Opening with the Outside Control
Button

E291352

Press the control button to the right of the
rear view camera to unlatch the liftgate
and then lift to open.

Opening with the Remote Control

(If Equipped)

Press the button to unlock the
liftgate. The liftgate unlocks for
45 seconds, during which time

you can open the liftgate using the outside
control button.

61

Liftgate

Closing the Liftgate

E291353

A handle is located inside the liftgate to
help with closing.

62

Liftgate

ANTI-THEFT ALARM

Alarm System

The perimeter alarm is a deterrent against
unauthorized access to your vehicle
through the doors, luggage compartment
and the hood.

Triggering the Alarm

Once armed, the alarm is triggered in any
of the following ways:

If someone opens a door, cargo area
or the hood without a valid key or
remote control.

If the alarm is triggered, the horn will sound
for 30 seconds and the hazard warning
flasher will flash for five minutes.

Any further attempts to perform one of the
above will trigger the alarm again.

Arming the Alarm

To arm the alarm, lock your vehicle.  See

Doors and Locks

 (page 58).

Disarming the Alarm

Disarm and silence the alarm by unlocking
the doors with the key and switching the
ignition on within 12 seconds, or by
unlocking the doors or the cargo area with
the remote control.

Police Perimeter Alert System

 (If

Equipped)

Note:

The Police Perimeter Alert System is

primarily intended to monitor moving
pedestrians but also detects objects like
vehicles and bikes. Fast vehicles, stationary
objects and small objects like birds may also
be ignored.

Note:

The Police Perimeter Alert System

feature does not function outside of Park
(P) or with any door open.

The system uses sensors to monitor
detected objects moving near your parked
vehicle.

Detected moving objects are displayed as
moving dots on the systems instrument
cluster display.

E298029

Once the system detects approaching
objects crossing the selected range
perimeter, the vehicle sounds a tone, and
may roll up the windows and lock the
doors.

The system may also activate the rear view
camera if the display is in the Information
and Entertainment screen.

Switching the Police Perimeter
Alert On and Off

E298031

63

Security

While the vehicle is running and in Park (P),
press and release the button located on
the center of the instrument panel.
Activating the feature will turn on the
Police Perimeter Alert System display in
the instrument cluster.

Note:

When the feature is active an icon

will display on the instrument cluster.

Police Perimeter Alert Settings

Note:

When the Police Idle feature is active,

windows will not automatically roll up.

Note:

When window or door locking is

active, corresponding icons will display in
the instrument cluster.

Note:

When Low mode is active, window

or door locking setting is not available.

The Police Perimeter Alert system has
three range settings Low, Medium or High
via the menu in the instrument cluster
display. Use the steering wheel controls to
adjust the settings when active.

Object Detection

Note:

A pedestrian near large obstructions

such as vehicles or walls may not be
detected until the person moves away from
the obstruction.

Note:

Sensor reflections from stationary

objects may cause false objects to briefly
appear on the Police Perimeter Alert System
display.

Note:

Sensor obstructions such as; dirt,

mud, precipitation, repair compound,
stickers, graphics, bumper guards, trailers,
or bicycle/cargo racks - in front of the
sensors can cause system sensing
degradation.

The Police Perimeter Alert system uses
sensors located behind the rear bumper
on both sides of your vehicle.   The sensors
will perform best if the vehicle is parked in
an open area without large obstructions
or walls nearby.

E298030

System Error

If the system senses a Police Perimeter
Alert System fault, a warning message will
appear in the information display. See

General Information

 (page 84).

System Configuration

See your authorized dealer for system
configurations.

64

Security

ADJUSTING THE STEERING
WHEEL

WARNING: 

Do not adjust the

steering wheel when your vehicle is
moving.

Note:

Make sure that you are sitting in the

correct position.  See 

Sitting in the Correct

Position

 (page 106).

E279960

1.

Unlock the steering column.

2. Adjust the steering wheel to the desired

position.

E279962

3. Lock the steering column.

AUDIO CONTROL

E280795

You can operate the following
functions with the control:

Press to access phone mode or
to answer a phone call.

E265040

Press to end a phone call.

E265045

Press to access the previous
media selection.

65

Steering Wheel

E265044

Press to access the next media
selection.

Auxiliary Steering Wheel Controls

E282079

You can configure the steering wheel
controls to operate police equipment.

VOICE CONTROL

The controls are on the steering wheel.

E142599

Press and release to activate
voice recognition.

CRUISE CONTROL

E282079

See 

What Is Cruise Control

 (page 164).

INFORMATION DISPLAY
CONTROL

E280795

See 

Information Displays

 (page 84).

HORN

E270945

Press on the center of the
steering wheel near the horn icon
to activate the horn.

66

Steering Wheel

WINDSHIELD WIPERS

Note:

Fully defrost the windshield before

you switch the windshield wipers on.

Note:

Make sure you switch the windshield

wipers off before entering a car wash.

Note:

 If streaks or smears appear on the

windshield, clean the windshield and the
wiper blades.  If that does not resolve the
issue, install new wiper blades.

Note:

 Do not operate the wipers on a dry

windshield.  This may scratch the glass,
damage the wiper blades or cause the wiper
motor to burn out.  Always use the
windshield washers before wiping a dry
windshield.

E208496

Rotate away from you for long wipe
interval.

Rotate toward you for short wipe
interval.

Speed Dependent Wipers

When your vehicle speed increases, the
interval between wipes decreases.

WINDSHIELD WASHERS

Note:

 Do not operate the wipers on a dry

windshield.  This may scratch the glass,
damage the wiper blades or cause the wiper
motor to burn out.  Always use the
windshield washer before wiping a dry
windshield.

Note:

 Do not operate the washers when

the washer reservoir is empty.  This may
cause the washer pump to overheat.

E208497

A brief press causes a single wipe
without washer fluid.

A brief press and hold causes the
wipers to swipe three times with
washer fluid.

A long press and hold turns on the
wipers and washer fluid for up to 10
seconds.

A wipe occurs a few seconds after washing
to clear any remaining washer fluid. You
can switch this feature on or off in the
information display.

REAR WINDOW WIPER AND
WASHERS

Note:

Make sure you switch the windshield

wipers off before entering a car wash.

67

Wipers and Washers

Rear Window Wiper Blade

E208498

Intermittent wipe.

2

Low speed wipe.

1

Off.

0

Rear Window Washer

Rotate and hold the control to the top or
bottom position to switch on the rear
window washer. The control returns to the

2

 or 

0

 position when you release it.

Rear Camera Washer

Switching on the rear washer also turns on
the rear camera washer.

68

Wipers and Washers

GENERAL INFORMATION

Condensation in Lamp Assemblies

Exterior lamps have vents to
accommodate normal changes in air
pressure.

Condensation can be a natural by-product
of this design. When moist air enters the
lamp assembly through the vents, there is
a possibility that condensation can occur
when the temperature is cold. When
normal condensation occurs, a fine mist
can form on the interior of the lens. The
fine mist eventually clears and exits
through the vents during normal operation.

Clearing time may take as long as 48 hours
under dry weather conditions.

Examples of acceptable condensation are:

The presence of a fine mist (no streaks,
drip marks or large droplets).

A fine mist covers less than 50% of the
lens.

Examples of unacceptable condensation
are:

A water puddle inside the lamp.

Streaks, drip marks or large droplets
present on the interior of the lens.

If you see any unacceptable condensation,
have your vehicle checked by an authorized
dealer.

Dark Car Feature

 (If Equipped)

The Dark Car feature may disable the
following features:

Welcome/farewell strategy.

Courtesy lighting.

Daytime running lamps.

Note:

In markets where daytime running

lamps are mandated by law, the Dark Car
feature does not disable the daytime
running lamps.

Switching the Backlighting Off

The Dark Car feature allows you to switch
the cabin backlighting off, this state can
be reached by:

1.

Switch the lighting control to the lamps
off position.

2. Use the instrument lighting dimmer

switch to lower the brightness to off.

LIGHTING CONTROL

Lighting Control Selections

E281337

Turn the dial to make a selection.

Note:

The indicator illuminates next to the

active selection.

E265031

Lamps off.

Parking lamps, instrument panel
lamps, license plate lamps and
rear lamps.

E281240

Autolamps.

E270968

Headlamps on.

Note:

The lighting control defaults to the

last known state every time you switch your
vehicle on.

69

Lighting

Switching High Beam Headlamps
On and Off

E167827

Push the lever away from you to
switch the high beam on.

Push the lever forward again or pull the
lever toward you to switch the high beams
off.

Flashing High Beam Headlamps

E163268

Pull the lever toward you and release it to
flash the high beam headlamps.

AUTOLAMPS

WARNING: 

The system does not

relieve you of your responsibility to drive
with due care and attention. You may
need to override the system if it does not
turn the headlamps on in low visibility
conditions, for example daytime fog.

Autolamps turn the headlamps on in low
light situations or when the wipers operate.

E281240

Switch the lighting control to the
autolamps position.

The headlamps remain on for a period of
time after you switch the ignition off. Use
the information display controls to adjust
the period of time that the headlamps
remain on.

Note:

 If you switch the autolamps on, you

cannot switch the high beams on until the
system turns the low beams on.

Windshield Wiper Activated
Headlamps

When you switch the autolamps on, the
headlamps turn on within 10 seconds of
switching the wipers on. They turn off
approximately 60 seconds after you switch
the windshield wipers off.

The headlamps do not turn on with the
wipers:

During a single wipe.

When using the windshield washers.

If the wipers are in intermittent mode.

Note:

If you switch the autolamps and the

autowipers on, the headlamps turn on when
the windshield wipers continuously operate.

70

Lighting


Content      ..     2      3      4      5     ..