Ford F-450 (2022 year). Manual in english - page 6
 

  Index      Manuals     Ford F-450 (2022 year). Manual in english


Search            copyright infringement  


Content      ..     4      5      6      7     ..


Ford F-450 (2022 year). Manual in english - page 6


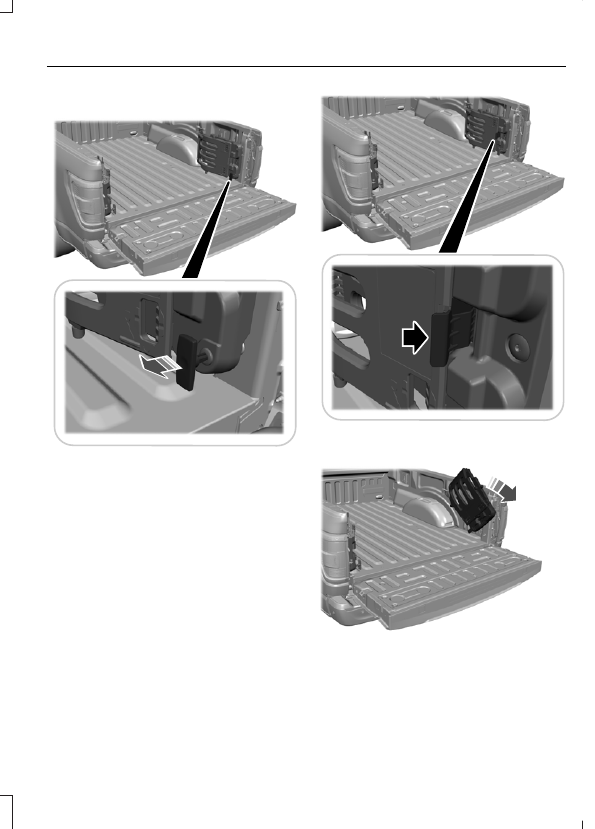
USING THE BED EXTENDER

E311521

1.

Pull the locking pin toward the center
of your vehicle.

E311522

2. Open the latches to release the panels.

A

B

A

1

2

20

3

A

A

E311523

3. Rotate the panels toward the tailgate.

Repeat steps 1-3 on the other side of
your vehicle.

97

Tailgate - Vehicles With: Manual Tailgate

E311524

4. Connect the two panels. Rotate both

knobs one-quarter turn clockwise to
secure the panels.

E311520

5. Insert the latch rod into the tailgate

hole.

6. Engage both sides of the locking pins

into their holes in the pick-up box.

Grocery Mode

E311519

1.

Follow steps 1-4.

2. Before engaging the locking pins, rotate

the panels away from the tailgate.

3. Engage both sides of the locking pins

into their holes in the pick-up box.

4. Close the tailgate.

98

Tailgate - Vehicles With: Manual Tailgate

TAILGATE PRECAUTIONS

WARNING: 

It is extremely

dangerous to ride in a cargo area, inside
or outside of a vehicle. In a crash, people
riding in these areas are more likely to be
seriously injured or killed. Do not allow
people to ride in any area of your vehicle
that is not equipped with seats and
seatbelts. Make sure everyone in your
vehicle is in a seat and properly using a
seatbelt. Failure to follow this warning
could result in serious personal injury or
death.

OPENING THE TAILGATE

OPENING THE TAILGATE FROM
INSIDE YOUR VEHICLE

The vehicle must be in park (P) to operate
the power tailgate.

E308661

Press the button on the
instrument panel.

Note:

A tone sounds while the tailgate

opens.

OPENING THE TAILGATE FROM
OUTSIDE YOUR VEHICLE

1.

Unlock the vehicle with the remote
control or power door unlock control.

Note:

If an intelligent access transmitter is

within 3 ft (1 m) of the tailgate, the tailgate
unlocks when you press the tailgate release
button.

E346998

2. Press the button in the top of the

tailgate handle.

OPENING THE TAILGATE USING
THE REMOTE CONTROL

E191530

Press the remote control button
twice within three seconds.

REMOVING AND INSTALLING
THE TAILGATE

WARNING: 

Always properly secure

cargo to prevent shifting cargo or cargo
falling from the vehicle. Failure to do so
could result in compromised vehicle
stability and serious personal injury to
vehicle occupants or others.

99

Tailgate - Vehicles With: Remote Release Tailgate

E248384

1.

Obtain the tailgate removal kit from
the glove box.

2. Locate and disconnect the frame

connections. They are on the left-hand
side of the vehicle.

Note:

Your vehicle may have up to three

frame connections.

3. Install the protective caps on the in-line

connector portion that remains under
the pickup box.

Note:

 If you do not install the caps on the

connectors, some features may not operate
as intended.

4. Partially lower the tailgate. Carefully

feed the tailgate harness up through
the gap between the pickup box and
the bumper and place it out of the way
under the pickup box.

5. Lower the tailgate.

E311529

6. Use a screwdriver to gently pry the

spring clip on each connector past the
head of the support screw. Disconnect
the cable.

7.

Disconnect the other cable.

Note:

To avoid damaging the tailgate, you

may need assistance when removing. The
tailgate weighs approximately 97 lb (44 kg).

8. Lift the tailgate to 45 degrees from the

horizontal position.

9. Lift the right-hand side off its hinge.

10.

Lift the tailgate to 80 degrees from
the horizontal position.

11.

Remove the tailgate from the
left-hand side hinge by sliding it to
the right.

12.

Install the tailgate in reverse order.

TAILGATE STEP

ACCESSING THE TAILGATE STEP

1.

Lower the tailgate.

2. Push the button in the center of the

step molding. The step pops out
slightly.

E187718

3. Pull the step out fully. Lower the step

to its lowest position.

100

Tailgate - Vehicles With: Remote Release Tailgate

E189557

4. Pull the yellow handle stop backward

out of the tailgate until it fully extends.

5. To lock the handle in place, rotate the

handle up from the horizontal to the
vertical position until you hear a click.

Note:

Do not tow with the step or grab

handle.

Replace the slip resistance tape or grab
handle molding if it appears as worn or
damaged.

To reduce the risk of falling:

Only operate the step when your
vehicle is on a level surface.

Only operate the step in areas with
sufficient lighting.

Make sure you use the grab handle
when climbing on the step.

Do not use the step with bare feet.

Make sure the step is clean before use.

Keep the step load below the total
maximum load of 350 lb (159 kg).

STOWING THE TAILGATE STEP

1.

Press the yellow button on the handle
to lower and then press the yellow
lever at the bottom of the handle to
unlock. Rotate the handle down from
the vertical to the horizontal position
and push it into the tailgate.

2. Rotate the step up until it is horizontal,

then push it back into the tailgate until
the step is secure.

Note:

Make sure to close and fully latch the

step before moving your vehicle. Do not
drive with the step or grab handle open.

Note:

The power tailgate cannot close if

the step is opened. A warning message
appears and a chime sounds. After stowing
step the power close function is restored.

BED EXTENDER

BED EXTENDER PRECAUTIONS

Note:

Do not use the bed extender when

driving off road.

Note:

Make sure to engage the locking pins

and knobs fully before driving your vehicle.

Note:

Make sure to secure all cargo.

Note:

Do not exceed 150 lb (68 kg) on the

tailgate when your vehicle is moving.

Note:

Do not keep the bed extender in the

tailgate mode when you are not using it for
restraining cargo. Always keep the bed
extender in the grocery mode or the stowed
position with the tailgate closed.

101

Tailgate - Vehicles With: Remote Release Tailgate

USING THE BED EXTENDER

E311521

1.

Pull the locking pin toward the center
of your vehicle.

E311522

2. Open the latches to release the panels.

A

B

A

1

2

20

3

A

A

E311523

3. Rotate the panels toward the tailgate.

Repeat steps 1-3 on the other side of
your vehicle.

102

Tailgate - Vehicles With: Remote Release Tailgate

E311524

4. Connect the two panels. Rotate both

knobs one-quarter turn clockwise to
secure the panels.

E311520

5. Insert the latch rod into the tailgate

hole.

6. Engage both sides of the locking pins

into their holes in the pick-up box.

Grocery Mode

E311519

1.

Follow steps 1-4.

2. Before engaging the locking pins, rotate

the panels away from the tailgate.

3. Engage both sides of the locking pins

into their holes in the pick-up box.

4. Close the tailgate.

103

Tailgate - Vehicles With: Remote Release Tailgate

TAILGATE – TROUBLESHOOTING

TAILGATE – INFORMATION MESSAGES

Action

Message

Reminder to check the tailgate due to it recently being opened
from the remote control or the button on the instrument panel
while the vehicle is on and the transmission is not in Park (P).

Check Tailgate Ajar

You must clear the message using the steering wheel controls.

Repeatedly closing the tailgate will not clear the message.

Reminder to check if tailgate is closed securely. If message

persists contact an authorized dealer.

Power Tailgate System

Fault Service Now

104

Tailgate - Vehicles With: Remote Release Tailgate

TAILGATE – FREQUENTLY ASKED
QUESTIONS

Why won't my tailgate open?

Make sure the transmission is in park
(P), ensure nothing is obstructing the
tailgate path and or causing resistance
(tonneau cover or other aftermarket
accessories, freezing conditions or
being parked downhill). If you have
continued issues, the battery voltage
may be low or other system issues.
See an authorized dealer.

105

Tailgate - Vehicles With: Remote Release Tailgate

PASSIVE ANTI-THEFT
SYSTEM

WHAT IS THE PASSIVE ANTI-
THEFT SYSTEM

The passive anti-theft system prevents
someone from starting the vehicle with an
incorrectly coded key.

HOW DOES THE PASSIVE ANTI-
THEFT SYSTEM WORK

The passive anti-theft system arms when
you switch the ignition off.

It disarms when the ignition is switched on
with a correctly coded key.

Note:

The system is not compatible with

non-Ford aftermarket remote start systems.

Note:

Do not leave a duplicate coded key

in your vehicle. Always take the keys and
lock all doors when leaving your vehicle.

ANTI-THEFT ALARM SYSTEM

WHAT IS THE ANTI-THEFT ALARM
SYSTEM

The Anti-Theft Alarm System warns you
of an unauthorized entry to your vehicle.

HOW DOES THE ANTI-THEFT
ALARM SYSTEM WORK

When armed, the anti-theft alarm is
triggered in any of the following ways:

If someone opens a door, the tailgate
or the hood without a correctly coded
key or remote control.

If you turn the power on without a
correctly coded key.

If the interior sensors detect movement
inside your vehicle.

If the inclination sensors detect an
attempt to raise your vehicle.

If someone disconnects the vehicle
battery or the battery backup alarm.

If someone disconnects the trailer. See

Connecting a Trailer

 (page 323).

Any further attempts to carry out one of
the above sounds the alarm again.

If the anti-theft alarm is triggered, the
alarm horn sounds for 30 seconds and the
direction indicators flash for five minutes.

WHAT IS THE PERIMETER ALARM

The perimeter alarm is designed to detect
unauthorized access to your vehicle.

WHAT ARE THE INTERIOR
SENSORS

The interior sensors are designed to detect
any movement inside your vehicle.

The interior sensors are in the overhead
console.

Note:

Do not cover the interior sensors.

WHAT ARE THE INCLINATION
SENSORS

The inclination sensor is designed to detect
an attempt to raise your vehicle, for
example to remove a wheel or to tow it
away.

WHAT IS THE BATTERY BACKUP
ALARM

The battery backup alarm is an additional
alarm system that has its own battery and
horn. It is designed to detect if the vehicle
battery or the battery backup alarm is
disconnected.

106

Security

 (If Equipped)

ARMING THE ANTI-THEFT ALARM
SYSTEM

The alarm is ready to arm when there is
not a key in your vehicle.

Lock your vehicle with your remote control
to arm the alarm.

DISARMING THE ANTI-THEFT
ALARM SYSTEM

Disarm the alarm by performing any of the
following actions:

Unlock the doors or luggage
compartment with the remote control.

Switch your vehicle on or start your
vehicle.

ANTI-THEFT ALARM SYSTEM
SETTINGS

WHAT ARE THE ALARM SECURITY
LEVELS

You can select two levels of alarm security,
all sensors and perimeter sensing.

All Sensors

All sensors is the standard setting.

In all sensors, all equipped sensors are on
when you arm the alarm.

Note:

Do not arm the alarm with all sensors

if passengers, animals or other moving
objects are inside your vehicle.

Perimeter Sensing

In perimeter sensing, the interior sensors
are off when you arm the alarm.

All the other equipped sensors activate
when you arm the alarm in this mode.

SETTING THE ALARM SECURITY
LEVEL

1.

Press 

Settings

 on the touchscreen.

2. Press 

Vehicle Settings

.

3. Press 

Alarm System

.

4. Press 

Motion Sensors

.

5. Press a setting.

WHAT IS ASK ON EXIT

You can choose which level of security you
require after you switch the ignition off.

Note:

If you do not choose a setting, the

system defaults to all sensors.

SWITCHING ASK ON EXIT ON AND
OFF

1.

Press 

Settings

 on the touchscreen.

2. Press 

Vehicle Settings

.

3. Press 

Alarm System

.

4. Switch 

Ask on Exit

 on or off.

107

Security

 (If Equipped)

SECURITY – TROUBLESHOOTING

SECURITY – INFORMATION MESSAGES

Action

Message

The system has not detected a correctly coded key.

No Key Detected

The system has malfunctioned. Have your vehicle checked
as soon as possible.

Starting System Fault

Displays when the alarm has been triggered due to unauthor-
ized entry.

Vehicle Alarm To Stop
Alarm, Start Vehicle.

Alarm Announcement

108

Security

 (If Equipped)

SECURITY – FREQUENTLY ASKED
QUESTIONS

What should I do if there is any
potential alarm problem with my
vehicle?

Take all remote controls to an
authorized dealer if there is any
potential alarm problem with your
vehicle.

What should I do if the vehicle is unable
to start with a correctly coded key?

Have your vehicle checked as soon as
possible.

109

Security

 (If Equipped)

POWER RUNNING BOARD
PRECAUTIONS

WARNING: 

In extreme climates,

excessive ice buildup may occur, causing
the running boards not to deploy. Make
sure that the running boards have
deployed, and have finished moving
before attempting to step on them. The
running boards will resume normal
function once the blockage is cleared.

WARNING: 

Switch off the running

boards before jacking or placing any
object under your vehicle. Never place
your hand between the extended running
board and your vehicle. A moving running
board may cause injury.

Do not use the running boards, front and
rear hinge assemblies, running board
motors, or the running board underbody
mounts to lift your vehicle when jacking.
Use proper jacking points.

The running boards could move slower in
cold temperatures.

POWER RUNNING BOARD
SETTINGS

1.

Using the instrument cluster display
controls on the steering wheel, select

Settings

.

2. Select 

Advanced Settings

.

3. Select 

Vehicle

.

4. Select 

Power Running Boards

.

5. Select a setting.

Power Running Board Settings

Off

The power running boards remain stowed,
regardless of door position.

Auto

The power running boards deploy when
you open the door and stow when you
close the door.

Out

The power running boards remain
deployed, regardless of door position.

DEPLOYING AND STOWING
THE POWER RUNNING
BOARDS

The power running boards deploy when
you open the door and stow when you
close the door.

Note:

The power running boards reverse

direction and move to the end of travel if
they encounter an object when moving.

POWER RUNNING BOARDS –
TROUBLESHOOTING

POWER RUNNING BOARDS –
FREQUENTLY ASKED QUESTIONS

Why is there unwanted noise coming
from my power running boards?

The power running board mechanism
could trap debris such as mud, dirt,
snow, ice and salt. If this happens, set
the running boards to the deployed
position. Then, wash the system, in
particular the front and rear hinge
arms, with a high-pressure car wash
wand.

110

Power Running Boards

 (If Equipped)

ADJUSTING THE STEERING
WHEEL - VEHICLES WITH:
POWER ADJUSTABLE
STEERING COLUMN

WARNING: 

Do not adjust the

steering wheel when your vehicle is
moving.

Note:

 Make sure that you are sitting in the

correct position.  See 

Sitting in the Correct

Position

 (page 158).

E261582

Use the control on the side of the steering
column to adjust the position.

To adjust:

Tilt: Press the top or bottom of the
control.

Telescope: Press the front or rear of
the control.

End of Travel Position

The steering column sets a stopping
position just short of the end of the column
position to prevent damage to the steering
column.  A new stopping position sets if
the steering column encounters an object
when tilting or telescoping.

To reset the steering column to its normal
stopping position:

1.

Confirm there is nothing obstructing
the motion of the steering column.

2. Press and hold the steering column

control until the steering column stops
moving.

3. Press the steering column control

again.

Note:

The steering column may begin to

move again.

4. When the steering column stops,

continue holding the control for a few
seconds.

5. Repeat for each direction as necessary.

A new stopping position sets.  The next
time you tilt or telescope the steering
column, it stops just short of the end of the
column position.

Memory Feature

 (If Equipped)

You can save and recall the steering
column position with the memory
function.  See 

What Is the Memory

Function

 (page 174).

Pressing the adjustment control during a
memory recall cancels the operation.

Easy Entry and Exit Feature

The column moves up when you switch
the ignition off.  Switch the ignition on to
return the system to its previous settings.
You can switch this feature on or off in the
information display.  See 

Instrument

Cluster Display

 (page 141).

111

Steering Wheel

Note:

 If you press any adjustment or

memory button when in easy exit mode, the
system cancels the operation.

Note:

Depending on your vehicle, the

column may move up and in.

ADJUSTING THE STEERING
WHEEL - VEHICLES WITH:
MANUAL ADJUSTABLE
STEERING COLUMN

WARNING: 

Do not adjust the

steering wheel when your vehicle is
moving.

Note:

 Make sure that you are sitting in the

correct position.  See 

Sitting in the Correct

Position

 (page 158).

E261502

1.

Unlock the steering column by pulling
down on the lever.

2. Adjust the steering wheel to the

preferred position. The wheel can move
up or down, in or out.

3. Lock the steering column into position

by pulling the lever up into the locked
position.

RESETTING THE STOPPING
POSITION - VEHICLES WITH:
POWER ADJUSTABLE
STEERING COLUMN

Note:

The steering wheel stops when it

detects an obstruction. This sets a new
stopping position.

To reset the steering column to its normal
stopping position:

1.

Confirm there is nothing obstructing
the motion of the steering column.

2. Press and hold the steering column

control until the steering column stops
moving.

3. Press the steering column control

again.

Note:

The steering column may start to

move again.

4. When the steering column stops,

continue holding the control for a few
seconds.

5. Repeat for each direction, as necessary.

HORN

E270945

Press on the center of the
steering wheel near the horn icon
to activate the horn.

SWITCHING THE HEATED
STEERING WHEEL ON AND OFF

(IF EQUIPPED)

To activate the heated steering
wheel, press the button on the
climate control unit.

112

Steering Wheel


Content      ..     4      5      6      7     ..