Mercury Villager (2002 year). Manual - part 5


  Index      Mercury     Mercury Villager (2002 year) - manual in english


Search            copyright infringement  


Content      ..     3      4      5      6     ..


Mercury Villager (2002 year). Manual - part 5


If unusual conditions exist (i.e.-window fogging, etc.), the manual
override controls allow you to select airflow locations and the fan control
allows you to adjust fan speed as necessary.

Temperature selection

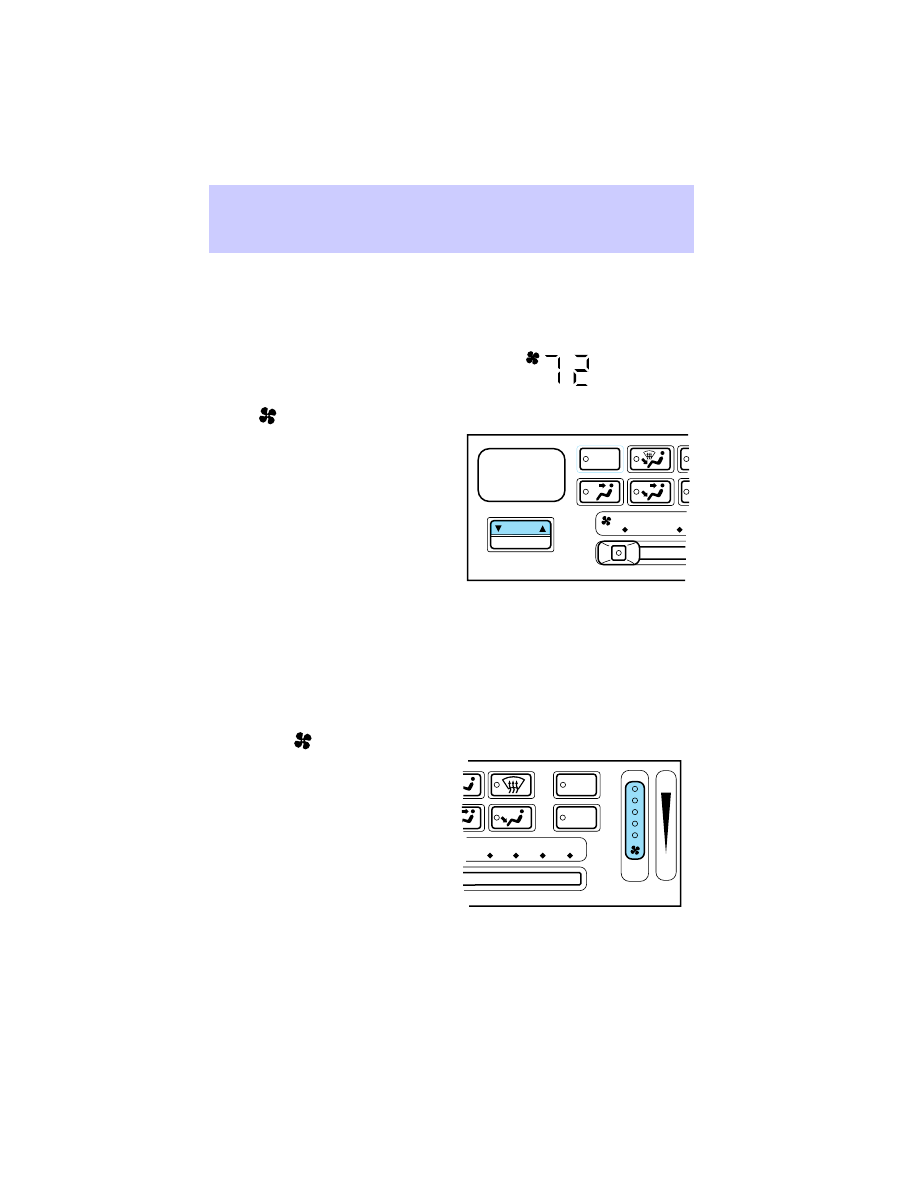
The display window indicates the
selected temperature, function
(AUTO or one of the override
controls) and manual control of fan
speed (

) if automatic fan speed is not desired.

To control the temperature, select
any temperature between 15°C
(60°F) and 32°C (90°F) by pressing
the temperature controls. However,
individual temperature settings
between 15°C (60°F) and 18°C
(65°F) cannot be selected. The 15°C
(60°F) and 18°C (65°F)
temperatures are the lowest settings
available.

For continuous maximum cooling, push the temperature control until
15°C (60°F) is shown in the display window. The EATC will continue
maximum cooling (disregarding the displayed temperature) until a
warmer temperature is selected by pressing the temperature controls.

For continuous maximum heating, push the temperature controls until
32°C (90°F) is shown in the display window. The EATC will continue
maximum heating (disregarding the displayed temperature) until a
cooler temperature is selected by pressing the temperature control.

Fan speed (

)

When AUTOMATIC is pressed, fan
speed is adjusted automatically for
existing conditions. You can override
fan speed at any time. To control
fan speed manually, use the
thumbwheel to cancel automatic fan
speed operation. Rotate the
thumbwheel or press the steering
wheel controls (if equipped) up for
higher fan speed or down for lower
fan speed.

˚

F

AUTO

TEMP

AUTOMATIC

OFF  REAR   1 

OFF

A/C

   1      2      3      4

A/C

MAX

HI

LO

Climate Controls

65

-------------------------------------------------------------------------------------------------------------------------------------------------------------

The display will show

to

indicate manual fan operation.

To return to automatic fan operation, press AUTOMATIC.

Manual override controls

The override controls allow you to:
• manually control where the airflow is directed
• manually control the air conditioning operation
• manually select between outside or recirculated air during air

conditioning operation

The air conditioning can operate in all modes except OFF. It will also
operate only when required when AUTOMATIC has been selected.
However, the air conditioning will only function if the outside
temperature is about 4°C (40°F) or higher.

Since the air conditioner removes considerable moisture from the air
during operation, it is normal if clear water drips on the ground under
the air conditioner drain while the system is working and even after you
have stopped the vehicle.
• OFF-Outside air is shut out and the fan will not operate. For short

periods of time only, use this mode to reduce undesirable odors from
entering the vehicle.

(Floor and defrost) - Distributes outside air through the

windshield defroster ducts and the front and rear floor ducts. Heating
and air conditioning capabilities are provided in this mode. For added
customer comfort, when the temperature control knob is anywhere in
between the full hot and full cold positions, the air distributed through
the front and rear floor ducts will be slightly warmer than the air sent
to the windshield defroster ducts.

˚

F

AUTO

TEMP

AUTOMATIC

OFF  REAR   1      2      3      4

OFF

A/C

A/C

MAX

HI

LO

Climate Controls

66

-------------------------------------------------------------------------------------------------------------------------------------------------------------

(Defrost) - Distributes outside air through the windshield

defroster ducts. It can be used to clear ice or fog from the windshield.
If the temperature is about 4°C (40°F) or higher, the air conditioner
will automatically dehumidify the air to reduce fogging.

(Panel) - Distributes outside air through the instrument panel

registers. Heating and air conditioning capabilities are provided in this
mode. Push

A/C

to cool the vehicle below the outside temperature.

(Panel and floor) - Distributes outside air through the instrument

panel registers and the front and rear floor ducts. Heating and air
conditioning capabilities are provided in this mode. Push

A/C

to cool

the vehicle below the outside temperature. For added customer
comfort, when the temperature control is anywhere in between the
full hot and full cold, the air distributed through the front and rear
floor ducts will be slightly warmer than the air sent to the instrument
panel registers.

(Floor) - Allows for maximum heating by distributing outside air

through the front and rear floor ducts. Heating and air conditioning
capabilities are provided in this mode. Push

A/C

to cool the vehicle

below the outside temperature.

• MAX A/C - Uses recirculated air to cool the vehicle. MAX A/C is

noisier than

A/C

A/C but more economical and will cool the inside of

the vehicle faster. After pressing the MAX control, both the MAX
and

A/C

A/C indicators will light and the airflow will be from the

instrument panel registers. In this mode, the air conditioning will
automatically engage if the outside temperature is about 4°C (40°F) or
higher.

Cooling your vehicle with outside air using override controls

Cooling your vehicle with air conditioned outside air using just the A/C
override control is quieter but less economical than using both the A/C
and the MAX control. It also has less cooling capacity and is not
recommended for high outside temperatures.

In order to cool your vehicle with outside air using the override controls:

1. Select the override control

,

or

.

2. Press

A/C

. The indicator light on

A/C

will illuminate.

3. Select the desired temperature for your comfort level.

4. Adjust the fan speed override knob to the position of your choice.

Climate Controls

67

-------------------------------------------------------------------------------------------------------------------------------------------------------------

During periods of high humidity, vapor may be emitted from the air
outlets when using the A/C system with outside air. This can be
corrected by using MAX A/C to cool the vehicle.

Rear seat heating

Rear seat heating is provided through the floor ducts located under the
front seats. Airflow and temperature to the rear seating are regulated by
the main climate control system.

Operating tips
• In humid weather, select

(Defrost) before driving. This will

reduce fogging on your windshield. Once the windshield has been
cleared, operate the climate control system as desired.

• To reduce humidity buildup inside the vehicle in cold weather

conditions, do not drive with the climate control system in the OFF or
MAX A/C position.

• To reduce humidity buildup inside the vehicle in warm weather

conditions, do not drive with the climate control system in the OFF
position.

• Under normal weather conditions, your vehicle’s climate control

system should be left in any position other than MAX A/C or OFF
when the vehicle is parked. This allows the vehicle to “breathe”
through the outside air inlet duct.

• Under snowy or dirty weather conditions, your vehicle’s climate

control system should be left in the OFF position when the vehicle is
parked. This allows the climate control system to be free from
contamination of outside pollutants.

• If your vehicle has been parked with the windows closed during warm

weather conditions, the air conditioner will perform more efficiently in
cooling the vehicle if driven for two or three minutes with the
windows open. This will force most of the hot, stale air out of the
vehicle. Once the vehicle has been “aired out”, operate the climate
control system as desired.

Climate Controls

68

-------------------------------------------------------------------------------------------------------------------------------------------------------------

• Do not place objects under the front seat that will interfere with the

airflow to the rear seats.

• Remove any snow, ice or leaves from the air intake area at the base of

the windshield.

• Do not place objects over the defroster outlets. These objects may

block airflow and reduce visibility through your windshield. Avoid
placing small objects on top of your instrument panel. These objects
can fall down into the defroster outlets and block airflow, in addition
to, damaging the climate control system.

To aid in defogging/demisting in cold weather conditions:

1. Select

.

2. Set the temperature control to full heat

3. Set the fan speed to HI

4. Direct the outer panel vents towards the side windows

To increase airflow to the outer panel vents, close the central panel
vents.

Do not place objects on top of the instrument panel, as these
objects may become projectiles in a collision or sudden stop.

REAR PASSENGER AIR CONDITIONING SYSTEM — EATC
SYSTEMS

On vehicles equipped with front passenger EATC systems, the vehicle
will also have rear passenger compartment climate controls, which allow
the rear seat occupants to adjust their air conditioning level.

Climate Controls

69

-------------------------------------------------------------------------------------------------------------------------------------------------------------

The rear A/C fan speed control allows rear passengers to control the
volume of air that is distributed from the rear registers.

The rear seat A/C system is controlled from the main climate control
system on the instrument panel. Ensure that the control is set to REAR
A/C to engage the rear passenger compartment air conditioning system.

0

1

2

3

4

REAR

A/C

TEMP

AUTOMATIC

OFF  REAR   1      2      3      4

OFF

A/C

A/C

MAX

HI

LO

Climate Controls

70

-------------------------------------------------------------------------------------------------------------------------------------------------------------

Turning the Rear A/C on

1. Set the main climate control rear fan control to Rear A/C; set the
mode selector to any position (other than OFF), and depress the A/C
control.

2. Set the fan speed on the Rear A/C fan control to a number between
1–4 to regulate the airflow to the rear seat section.

Turning the Rear A/C off:

There are two ways to turn the rear air conditioning system off. The first
way is to turn the Rear Fan Control on the main climate control system
to OFF.

TEMP

AUTOMATIC

OFF  REAR   1      2      3      4

OFF

A/C

A/C

MAX

HI

LO

1

0

2

3

4

REAR

A/C

OFF  REAR   1      2      3      4

A/C

Climate Controls

71

-------------------------------------------------------------------------------------------------------------------------------------------------------------

You can also turn the Rear Fan Control on the main climate control
system to Rear A/C and turn the Rear A/C Fan Control to 0.

For maximum cooling for the front seat passengers, set the rear fan
switch to the OFF (0) position.

Please note that the rear passenger air conditioning system is
designed for air conditioning purposes only, and does not heat the
rear compartment. Rear compartment heating is provided by the
underseat floor ducts. Refer to Rear Seat Heating.

REAR WINDOW DEFROSTER

The rear defroster control is located
on the instrument panel.

Press the rear defroster control to
clear the rear window of thin ice
and fog.
• The small LED will illuminate

when the rear defroster is
activated.

The ignition must be in the ON position to operate the rear window
defroster.

The defroster turns off automatically after 15 minutes or when the
ignition is turned to the OFF position. To manually turn off the defroster
before 15 minutes have passed, push the control again.

0

1

2

3

4

REAR

A/C

SECURITY

HAZARD

RR DEFOG

RR WIPER

RR WASH

Climate Controls

72

-------------------------------------------------------------------------------------------------------------------------------------------------------------

ODOR AND PARTICULATE AIR FILTRATION SYSTEM
(IF EQUIPPED)

The odor and particulate air filtration system is designed to reduce the
concentration of objectionable exterior odors as well as airborne particles
such as dust, spores and pollen in the air being supplied to the interior
of the vehicle. The extent of EXTERIOR odor reduction depends on the
odor itself and the perceptional threshold of the individual. The odor and
particulate filtration system gives the following benefits to customers:
• Improves the customer’s driving comfort by reducing odor and particle

concentration

• Improves the interior compartment cleanliness
• Protects the climate control components from particle deposits
The filter is located just in front of the windshield under the cowl grille
on the passenger side of the vehicle.

For more information, or to replace the filter, see your Ford, Lincoln or
Mercury Dealer.

Climate Controls

73

-------------------------------------------------------------------------------------------------------------------------------------------------------------

HEADLAMP CONTROL

Rotate the headlamp control
clockwise to the first position to
turn on the parking lamps. Rotate
clockwise to the second position to
also turn on the headlamps.

Push the control to turn on the
interior lamps. Push control again to
turn off the interior lamps.

Autolamp control (if equipped)

The autolamp system provides light
sensitive automatic on-off control of
the low-beam exterior lights
normally controlled by the headlamp
control.

The autolamp system also keeps the
lights on for a preselected period of
time after the ignition switch is
turned to OFF.
• To turn autolamps on, rotate the

headlamp control counter clockwise to one of the two settings. The
AUTO 1 position has a preselected time lapse of approximately 25
seconds. The AUTO 2 position has a preselected time lapse of
approximately 2

1

2

minutes.

• To turn autolamps off, rotate the headlamp control clockwise to the

OFF position.

Foglamp control (if equipped)

Turn on the low-beam headlamps
and press the foglamp control to
activate the foglamps. The foglamp
control will illuminate when the
foglamps are on.

Press the foglamp control a second
time to deactivate the foglamps.

OFF

AUTO

1


AUTO

2


PUSH INTERIOR

Lights

74

-------------------------------------------------------------------------------------------------------------------------------------------------------------

High beams

Push the lever toward the
instrument panel to activate. Pull
the lever towards you to deactivate.

Flash to pass

Pull toward you slightly to activate
and release to deactivate.

PANEL DIMMER CONTROL

Use to adjust the brightness of the
instrument panel.
• Push and hold top of control to

brighten.

• Push and hold bottom of control

to dim.

The dome lamp will not illuminate if the control switch is in the OFF
position.

AIMING THE HEADLAMPS

The headlamps on your vehicle are properly aimed at the assembly plant.
If your vehicle has been in an accident the alignment of your headlamps
should be checked by a qualified service technician.

HI
LO

F

S

OFF

HI
LO

F

S

OFF

DIM

Lights

75

-------------------------------------------------------------------------------------------------------------------------------------------------------------

TURN SIGNAL CONTROL
• Push down to activate the left

turn signal.

• Push up to activate the right turn

signal.

• In vehicles equipped with daytime

running lights, use of the turn
signals will shut off the
highbeams in daytime driving.

INTERIOR LAMPS

Dome lamps

The front dome lamp is located overhead between the driver and
passenger seats.

The dome lamp will stay on if the
control is moved to the ON position.
When the control is in the middle
position, the lamp will only come on
when a door is opened. If the
control is moved to the OFF
position, the lamp will not come on
at all.

The dome lamp will illuminate
whenever a front door is opened. If
either front door has been opened
from the outside, the lamp will remain on for 15 seconds after the door
is shut. If any other door has been opened from the inside, the lamp will
shut off immediately after the door is closed.

HI
LO

F

S

OFF

OFF    

    ON

    —         

Lights

76

-------------------------------------------------------------------------------------------------------------------------------------------------------------

Map lamps (if equipped)

The map lamps are located on the
overhead console and the side roof
panels. Press the lamp lens to
activate the lamps.

BULBS

Replacing exterior bulbs

It is a good idea to check the operation of the following lights frequently:
• Headlamps
• Turn signals
• Cornering lamps
• High-mount brakelamp
• Tail lamps
• Brakelamps
• Backup lamps
• License plate lamps
Do not remove lamp bulbs unless they will be replaced immediately. If a
bulb is removed for an extended period of time, contaminants may enter
the lamp housings and affect performance.

Using the right bulbs

Replacement bulbs are specified in the chart below. Headlamp bulbs
must be marked with an authorized “D.O.T.” for North America and an
“E” for Europe to assure lamp performance, light brightness and pattern
and safe visibility. The correct bulbs will not damage the lamp assembly
or void the lamp assembly warranty and will provide quality bulb burn
time.

Lights

77

-------------------------------------------------------------------------------------------------------------------------------------------------------------

Function

Number of

bulbs

Trade number

Parking lamps (front)

2

3157

Headlamps

2

9007

License plate lamps

2

194

High mount brakelamps

2

912

Backup lamps

2

3156

Brakelamps

1

3157

Cornering lamps

2

3157

Side marker lamps

2

194

Cargo liftgate lamp

1

211-2

Dome lamps

2

211-2

Turn signal lamps (front)

2

3157 AK

(amber)

Turn signal lamps (rear)

2

3156

Tail Lamps

2

3157

Personal reading lamps

2

578

Stepwell lamps

4

194

Glove compartment

1

194

All replacement bulbs are clear in color except where noted.

To replace all instrument panel lights - see your dealer.

Lights

78

-------------------------------------------------------------------------------------------------------------------------------------------------------------

Replacing headlamp bulbs

To remove the headlamp bulb:

1. Make sure headlamp switch is in OFF position, then open the hood.

2. Disconnect the electrical
connector from the bulb by pulling
rearward.

3. Remove the bulb retaining ring by
rotating it counterclockwise (when
viewed from the rear) to free it
from the bulb socket, and slide the
ring off the plastic base. Keep the
ring to retain the new bulb.

4. Without turning, remove the old
bulb from its socket by gently
pulling it straight back out of the
lamp assembly.

To install the new bulb:

Handle a halogen headlamp bulb carefully and keep out of
children’s reach. Grasp the bulb only by its plastic base and do

not touch the glass. The oil from your hand could cause the bulb to
break the next time the headlamps are operated.

Lights

79

-------------------------------------------------------------------------------------------------------------------------------------------------------------

1. With the flat side of the new bulb’s plastic base facing upward, insert
the glass end of the bulb into the lamp assembly. Turn the bulb left or
right to align the grooves in the plastic base with the tabs in the lamp
assembly. When the grooves are aligned, push the bulb into the lamp
assembly until the plastic base contacts the rear of the lamp assembly.

2. Install the bulb retaining ring over the plastic base until it contacts the
rear of the socket by rotating clockwise until you feel a “stop.”

3. Connect the electrical connector into the rear of the plastic base until
it snaps, locking it into position.

4. Turn the headlamps on and make sure they work properly. If the
headlamp was correctly aligned before you changed the bulb, you should
not need to align it again.

Replacing front cornering/side marker lamp bulbs

1. Remove screw from the lamp
assembly.

2. Disengage lamp assembly (it has
a snap fit).

3. Remove bulb socket by turning it
counterclockwise about

1

4

turn,

then slide it out of the lamp
assembly.

4. Carefully pull bulb straight out of
the socket and push in the new
bulb.

5. To complete installation, follow
removal procedure in the reverse
order.

Lights

80

-------------------------------------------------------------------------------------------------------------------------------------------------------------


Content      ..     3      4      5      6     ..