Ford Galaxy / Ford S-MAX. Manual - part 760
 

  Index      Ford     Ford Galaxy / Ford S-MAX - service repair manual 2006 year


Search            


Content   ..  758  759  760  761   ..


Ford Galaxy / Ford S-MAX. Manual - part 760


(GN/VT) between the lighting control module and 
the CJB with the aid of the Wiring Diagrams. 
CHECK system operates correctly 

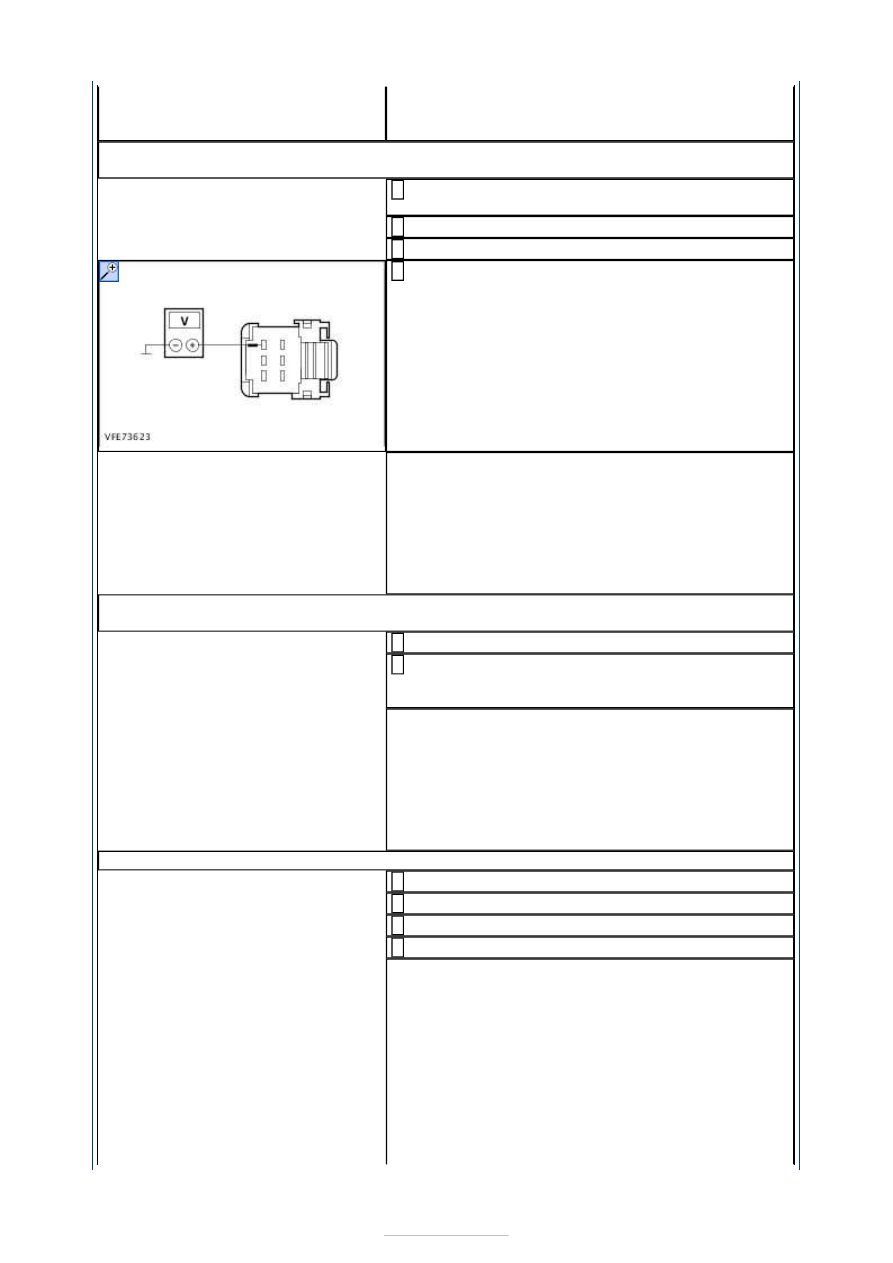
E8: CHECK THE LIN DATA BUS CONNECTION BETWEEN THE LIGHTS CONTROL 
MODULE AND THE CENTRAL JUNCTION BOX (CJB) FOR SHORT TO BATTERY VOLTAGE

Disconnect Lights control module from connector 
C2LF23D. 

Disconnect CJB from connector G3D134 . 

Ignition switch in position II. 

Measure the voltage between the lights control 
module, connector C2LF23D, pin 6, circuit VLF25A 

(GN/VT), wiring harness side and ground. 

Does the meter display battery voltage? 
Yes 

GO to E9

.  

No 

LOCATE and RECTIFY the short to battery voltage 
in circuit VLF25A (GN/VT) between the lighting 
control module and the CJB with the aid of the 
Wiring Diagrams. CHECK system operates correctly 

E9: CHECK THE LIN DATA BUS CONNECTION BETWEEN THE LIGHTING CONTROL 
MODULE AND THE CENTRAL JUNCTION BOX (CJB) FOR SHORT TO GROUND

Ignition switch in position 0. 

Measure the resistance between the lights control 
module, connector C2LF23D, pin 6, circuit VLF25A 

(GN/VT), wiring harness side and ground. 

Is a resistance of more than 10,000 Ohm measured? 
Yes 

GO to E10

.  

No 

LOCATE and RECTIFY the short to ground in circuit 
VLF25A (GN/VT) between the lighting control 
module and the CJB with the aid of the Wiring 
Diagrams. CHECK system operates correctly 

E10: RULE OUT THE CENTRAL JUNCTION BOX (CJB) AS CAUSE OF THE FAULT

Ignition switch in position 0. 

Disconnect CJB from connector C1BP02A. 

Ignition switch in position II. 

CHECK the headlamp. 

Is the left-hand low beam permanently lit? 
Yes 

- Left-hand low beam permanently lit: LOCATE and 
RECTIFY the short to battery voltage in circuit 
CLF04A (BN/BU) between the CJB and the 
headlamp using the Wiring Diagrams. CHECK 
system operates correctly 

No 

- Right-hand low beam permanently lit: LOCATE 
and RECTIFY the short to battery voltage in circuit 
CLF05A (BU/GN) between the CJB and the 


headlamp using the Wiring Diagrams. CHECK 
system operates correctly 
- Left-hand main beam permanently lit: LOCATE 
and RECTIFY the short to battery voltage in circuit 
CLF02A (GY/BN) between the CJB and the 
headlamp using the Wiring Diagrams. CHECK 
system operates correctly 
- Right-hand high beam permanently lit: LOCATE 
and RECTIFY the short to battery voltage in circuit 
CLF03A (VT/OG) between the CJB and the 
headlamp using the Wiring Diagrams. CHECK 
system operates correctly 
- None of the headlamps is permanently lit: RENEW 
THE CJB. CHECK system operates correctly If the 
concern persists:  
REFER to: 

Communications Network

 (418-00 

Module Communications Network, Diagnosis and 
Testing). 

PINPOINT TEST F : HEADLAMP FLASHER NOT FUNCTIONING 

TEST 

CONDITIONS

DETAILS/RESULTS/ACTIONS

F1: DETERMINE THE CONDITIONS UNDER WHICH THE FAULT OCCURS

Ignition switch in position II. 

SWITCH ON the low beam. 

CHECK the headlamps in every setting of the switch. 

OPERATE headlamp flasher. 

TURN ON the high beam. 

Are the high beam and headlamp flasher inoperative? 
Yes 

GO to Pinpoint Test 

B. 


No 

GO to F2

.  

F2: RULE OUT THE HIGH BEAM HEADLAMP SWITCH AS THE CAUSE OF THE FAULT

CHECK the high beam headlamp switch according to the component tests 
at the end of this subsection: 

Is the high beam headlamp switch OK? ? 
Yes 

CHECK the CJB and the steering wheel/steering column module with the 
aid of WDS and RENEW if necessary. CHECK system operates correctly If 
the concern persists:  
REFER to: 

Communications Network

 (418-00 Module Communications 

Network, Diagnosis and Testing). 

No 

RENEW the high beam headlamp switch. CHECK system operates correctly 

PINPOINT TEST G : ADAPTIVE FRONT LIGHTING INOPERATIVE 

TEST CONDITIONS

DETAILS/RESULTS/ACTIONS

G1: DETERMINE THE FAULT CONDITION

NOTE: The adaptive front lighting module only adjusts the headlamps when the vehicle is 
driving at a speed greater than 3km/h. 

Perform a road test to determine the exact 
conditions under which the fault occurs. 

Is the adaptive lighting inoperative on the left-hand 
side? 
Yes 

The adaptive lighting is inoperative on the left-hand 
side: 

GO to G12

.  

No 

- The adaptive lighting is inoperative on the right-
hand side: 

GO to G15

.  

- The adaptive lighting is inoperative on both sides: 

GO to G2

.  

G2: CHECK FUSE F43 (5 A) (EJB)

Ignition switch in position 0. 

Disconnect fuse F43 (5 A) (EJB). 

CHECK fuse F43 (5 A) (EJB). 

Is the fuse OK.? 
Yes 

GO to G3

.  

No 

RENEW fuse F43 (5 A) (EJB). CHECK system 
operates correctly If the fuse blows again, LOCATE 
and RECTIFY the short to ground using the Wiring 
Diagrams. CHECK system operates correctly 

G3: CHECK THE VOLTAGE SUPPLY TO FUSE F43 (5 A) (EJB) FOR OPEN CIRCUIT

Connect fuse F43 (5 A) (EJB). 

Ignition switch in position II. 

Measure the voltage between fuse F43 (5 A) (EJB) 
and ground. 

Does the meter display battery voltage? 
Yes 

GO to G4

.  

No 

LOCATE AND RECTIFY the break in the voltage 
supply of fuse F43 (5 A) (EJB) using the Wiring 
Diagrams. CHECK system operates correctly 

G4: CHECK FUSE F39 (15 A) (EJB)

Ignition switch in position 0. 

Disconnect fuse F39 (15 A) (EJB). 

CHECK fuse F39 (15 A) (EJB). 

Is the fuse OK.? 
Yes 

GO to G5

.  

No 

RENEW fuse F39 (15 A) (EJB). CHECK system 
operates correctly If the fuse blows again, LOCATE 
and RECTIFY the short to ground using the Wiring 
Diagrams. CHECK system operates correctly 

G5: CHECK THE VOLTAGE SUPPLY TO FUSE F39 (15 A) (EJB) FOR OPEN CIRCUIT

Connect fuse F39 (15 A) (EJB). 

Ignition switch in position II. 

Measure the voltage between fuse F39 (15 A) 
(EJB) and ground. 

Does the meter display battery voltage? 
Yes 

GO to G6

.  

No 

LOCATE AND RECTIFY the break in the voltage 
supply of fuse F39 (15 A) (EJB) using the Wiring 
Diagrams. CHECK system operates correctly 

G6: CHECK VOLTAGE SUPPLY TO THE ADAPTIVE FRONT LIGHTING MODULE FOR 
OPEN CIRCUIT

Ignition switch in position 0. 

Disconnect Adaptive front lighting module from 

connector C2LF23A. 

Ignition switch in position II. 

Measure the voltage between the adaptive front 
lighting module, connector C2LF23A, pin 10, circuit 

CBB43C (GY), wiring harness side and ground. 

Does the meter display battery voltage? 
Yes 

GO to G7

.  

No 

LOCATE and RECTIFY the break in the circuit(s) 
between fuse F43 (5 A) (EJB) and the adaptive 
front lighting module with the aid of the wiring 
diagrams. CHECK system operates correctly 

G7: CHECK VOLTAGE SUPPLY TO THE ADAPTIVE FRONT LIGHTING MODULE FOR 
OPEN CIRCUIT

Ignition switch in position 0. 

Disconnect Adaptive front lighting module from 
connector C2LF23B. 

Ignition switch in position II. 

Measure the voltage between the adaptive front 
lighting module, connector C2LF23B, pin 1, circuit 

CBB39D (VT/WH), wiring harness side and ground. 

Measure the voltage between the adaptive front 
lighting module, connector C2LF23B, pin 2, circuit 

CBB39G (VT/WH), wiring harness side and ground. 

Is battery voltage measured in both cases? 
Yes 

GO to G8

.  

No 

- If battery voltage is not measured during one of 
the measurements: LOCATE and RECTIFY the break 
in the relevant circuit(s) between soldered 
connection SP174 and the adaptive front lighting 
module with the aid of the Wiring Diagrams. CHECK 
system operates correctly 
- If battery voltage is not measured during both of 
the measurements: LOCATE and RECTIFY the break 
in the circuit(s) between fuse F39 (15 A) (EJB) and 
soldered connection SP174 with the aid of the 
Wiring Diagrams. CHECK system operates correctly 

G8: CHECK THE GROUND CONNECTION OF THE ADAPTIVE FRONT LIGHTING MODULE 
FOR OPEN CIRCUIT

Ignition switch in position 0. 

Measure the resistance between the adaptive front 
lighting module, connector C2LF23A, pin 1, circuit 

GD138BU (BK/WH), wiring harness side and 
ground. 


Content   ..  758  759  760  761   ..