Ford Galaxy / Ford S-MAX. Manual - part 243
 

  Index      Ford     Ford Galaxy / Ford S-MAX - service repair manual 2006 year


Search            


Content   ..  241  242  243  244   ..


Ford Galaxy / Ford S-MAX. Manual - part 243


7.   

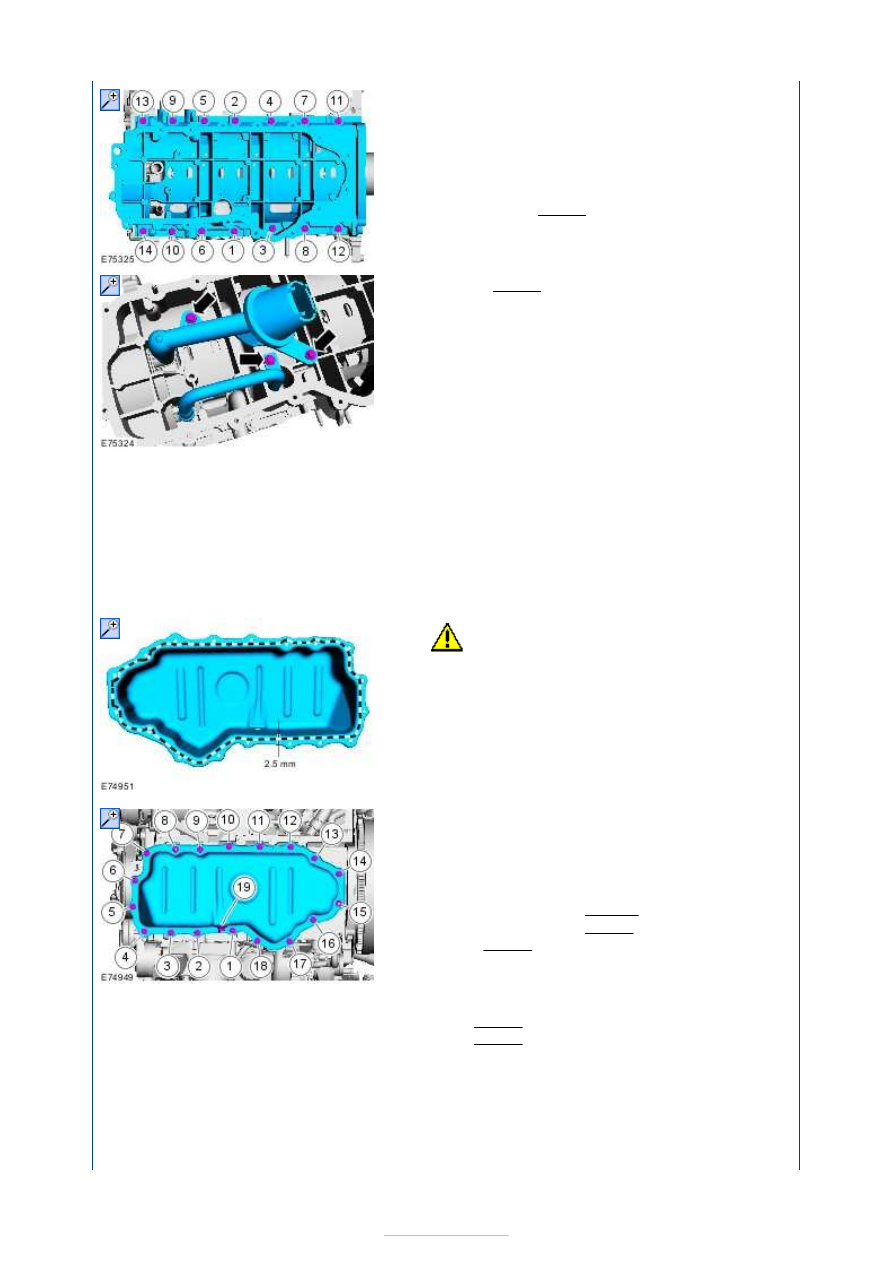
Align the ladder frame flush with the 
cylinder block. 
Tighten the ladder frame retaining bolts in 
the sequence shown. 

Torque: 

11 Nm 

8. Torque: 10 Nm 

9. Install the Crankshaft Rear Seal. 

Refer to: 

Crankshaft Rear Seal

 (303-01E Engine - 

1.8L Duratorq-TDCi (74kW/100PS) - Lynx/1.8L 
Duratorq-TDCi (92kW/125PS) - Lynx, Removal 
and Installation). 

10.

NOTE: Make sure that the mating faces are 
clean and free of foreign material. 

11.

CAUTION: Make sure that no excess 

sealant residue is evident. 
NOTE: The component must be installed 
within 5 minutes of applying the sealant. 

Apply a 2.5 mm diameter bead of sealant to the 
edge of the Oil Pan. 

Material: 

Silicone Sealant LB (WSE-M4G323-A4 / 

2U7J-M4G323-AA)


12. Tighten the Oil Pan retaining nuts and bolts in 

the sequence shown.  

Torque: 

1-18  

6.5 Nm 
14 Nm 

19 36 Nm 

Stage 1: 
Stage 2: 

13. Torque: 

1 23 Nm 
2 48 Nm 


Vehicles built up to 10/2007 

Vehicles built 10/2007 onwards 

14. Install a new gasket 

Torque: 

23 Nm 

15.  

16. Torque: 

Snug Torque 10 Nm 
Delay 2 Seconds 18 Nm 
Untighten 40° 
Final Torque 26 Nm 

17.  

18.   

1. Torque: 26 Nm 
2. Torque: 50 Nm 


All vehicles 

19. Torque: 

1 23 Nm 
2 24 Nm 
3 65 Nm 

20.  

21. Locate Alignment Tool into Oil Pump and Seal 

Pocket and align with Crank Sprocket. Start 
tighten the timing chain housing cover retaining 
bolts by hand, in the sequence shown. 

Special Tool(s): 

303-652


Torque: 

Alignment Tool 10 Nm 
1-5 10 Nm 
6 23 Nm 
7-19 10 Nm 

22. Torque: 

1 10 Nm 
2 23 Nm 

23. Clean the mating faces of the cylinder head and 

cylinder block with cleaner. 

Material: 

Spoiler Adhesive Kit 2 Component 


(WSK-M5B401-A1 / 2U7J-M2G376-AA)


24.

NOTE: The thickness and position of the new 
cylinder head gasket must be the same as 
that of the old one (hole/tooth and 
TOP/OBEN marked). 

25.

CAUTIONS: 

Make sure that new unoiled cylinder 

head bolts are installed. 

Place the two short cylinder head bolts 

on position 7 and 10 
NOTE: The pistons must not be at TDC. 

Tighten the cylinder head retaining bolts in the 
sequence shown in four stages. 

Torque: 


20 Nm 
54 Nm 
90° 

M12x137 70° 

M12x177 90° 

Stage 1: 
Stage 2: 
Stage 3: 
Stage 4: 

26.

NOTE: Only rotate the crankshaft in the 
normal direction of rotation. 

1. Remove the cylinder block blanking plug 

and install the special tool. 

Special Tool(s): 

303-193


2. Rotate the crankshaft slowly until the 

crankshaft stops. 

3. Make sure that the crankshaft does 

not rotate during installation of the 
special tool.Make sure that the 
crankshaft is at the TDC position 
before locking the special tool.
Using 
the special tool, lock the crankshaft. 

Special Tool(s): 

303-393


27. Using the special tool, install the crankshaft 

position (CKP) sensor retaining bracket. 

Special Tool(s): 

303-710


Torque: 

10 Nm 

28.

NOTE: Install a new crankshaft position 
(CKP) sensor. 
NOTE: The CKP sensor must make contact 


Content   ..  241  242  243  244   ..