Ford Ranger EV (2001 year). Manual - part 64
 

  Index      Ford     Ford Ranger EV - service repair manual 2001 year


Search            


Content   ..  62  63  64  65   ..


Ford Ranger EV (2001 year). Manual - part 64


307-05-2

307-05-2

Automatic Transaxle External Controls

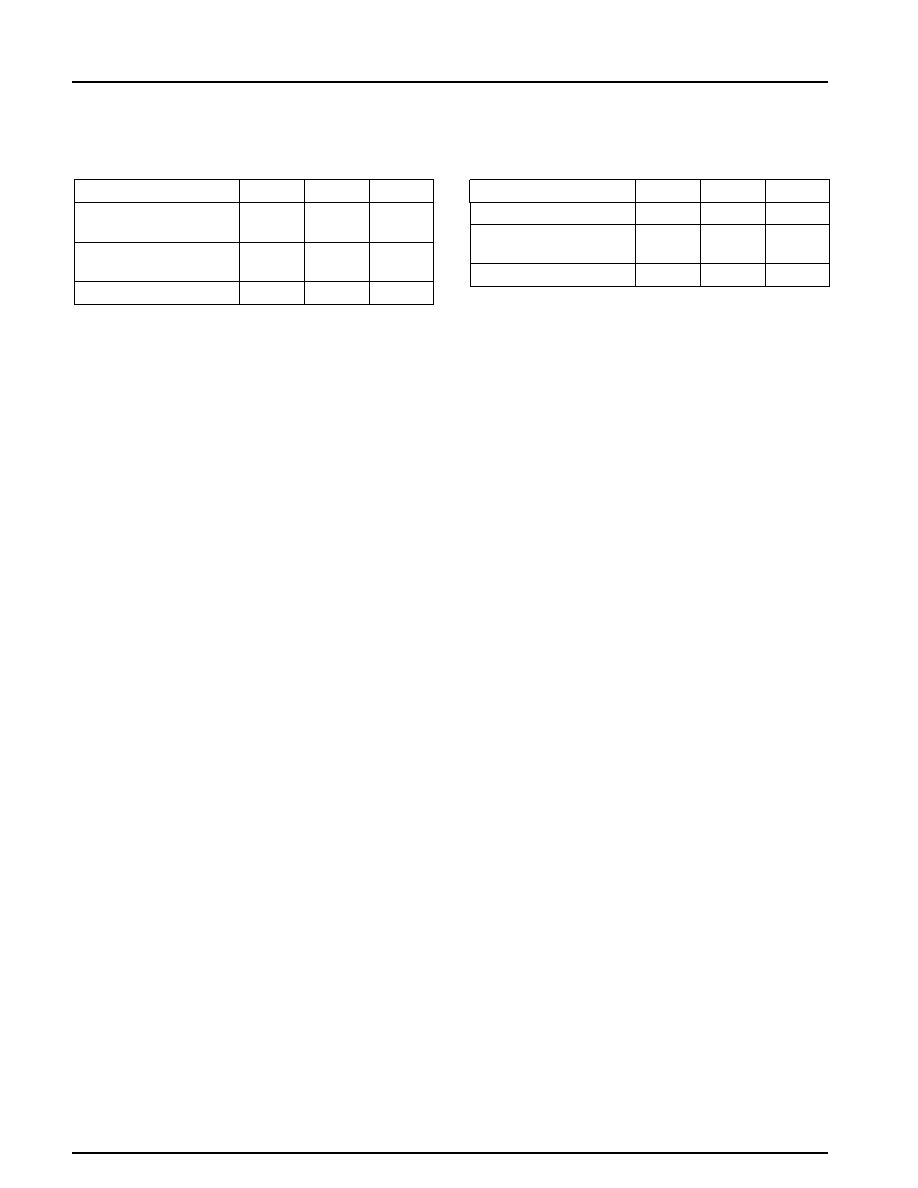
SPECIFICATIONS

Torque Specifications

Torque Specifications

Description

Nm

Lb-Ft

Lb-In

Description

Nm

Lb-Ft

Lb-In

Motor Mount Nuts

55

40.5

Bracket to

64

47

— 

Motor/Transaxle Bolts

Motor Mount Through

115

84.5

Bolt Nut

Digital Transmission

10

89

Range Sensor Bolts

Shift Lever Nut

13

116

Lug Nuts

115

85

(Continued)

DESCRIPTION AND OPERATION

Automatic Transaxle External
Controls

The motor/transaxle is switched into different modes
by moving the shift lever into the desired position.
A shift cable connects the shift lever to the
motor/transaxle. A digital transmission range (DTR)
sensor is mounted on the LH side of the
motor/transaxle. The DTR sensor moves in direct
relation to the shift lever. This sensor provides the
traction inverter module (TIM) with gear selection
information. The sensor is adjustable and must be
realigned whenever the sensor is  removed.

DTC C1861 PRNDL Input #4 Circuit Failure 

DIAGNOSIS AND TESTING

Digital Transmission Range (DTR)

— The digital transmission range (DTR) sensor

provides an analog input (TR3A) along with

Sensor

three digital inputs to indicate to the traction

Diagnostic Trouble Code (DTC) Definition

inverter module (TIM) which gear has been
selected. DTC C1861 is set if there is an

The following DTCs relate to the digital

invalid combination of  the TR3A input and

transmission range (DTR) sensor:

the three digital inputs from the DTR sensor.

DTC C1860 PRNDL Input #3 Circuit Failure 

If this failure occurs, the malfunction indicator

— The digital transmission range (DTR) sensor

lamp (MIL) illuminates, the power limit

provides an analog input (TR3A) along with

warning indicator flashes, and the TIM

three digital inputs to indicate to the traction

defaults the vehicle to NEUTRAL. 

inverter module (TIM) which gear has been

Electrical Schematic

selected. DTC C1860 is set if the voltage on
the TR3A input is  greater than 2.6 volts. If

Refer to Electrical and Vacuum Troubleshooting

this failure occurs, the malfunction indicator

Manual, Cell 26, Motor/Transaxle Control for

lamp (MIL) illuminates, the power limit

schematic and connector information.

warning indicator flashes, and the TIM

Inspection and Verification

defaults the vehicle to NEUTRAL. 

Refer to 

 Section 100-07

.

307-05-3

307-05-3

Automatic Transaxle External Controls

DIAGNOSIS AND TESTING (Continued)

Symptom Chart

Symptom Chart

Condition

Possible Sources

Action

DTC C1860 PRNDL Input #3

Digital transmission range

GO to Pinpoint Test A. 

Circuit Failure 

(DTR) sensor alignment. 

DTR sensor. 

Circuit(s). 

Traction inverter module

(TIM). 

Battery control module

(BCM). 

DTC C1861 PRNDL Input #4

Digital transmission range

GO to Pinpoint Test A. 

Circuit Failure 

(DTR) sensor alignment. 

DTR sensor. 

Circuit(s). 

Traction inverter module

(TIM). 

Battery control module

(BCM). 

Vehicle Will Not Start in

Shift cable alignment. 

CHECK shift cable

PARK or NEUTRAL 

Digital transmission range

alignment. REFER to PRNDE

(DTR) sensor alignment. 

Shifter Adjustment in this

DTR sensor. 

section. If OK, GO to

Circuit(s). 

Pinpoint Test A. 

Traction inverter module

(TIM). 

Battery control module

(BCM). 

Loss of Drive Operation —

Shift cable alignment. 

CHECK shift cable

Vehicle Will Not Move in

Digital transmission range

alignment. REFER to PRNDE

REVERSE or DRIVE 

(DTR) sensor alignment. 

Shifter Adjustment in this

DTR sensor. 

section. If OK, GO to

Circuit(s). 

Pinpoint Test A. 

Traction inverter module

(TIM). 

Battery control module

(BCM). 

Shift Lever Will Not Move to

Shift cable alignment. 

CHECK shift cable

the PARK Position, Is Stuck

Digital transmission range

alignment. REFER to PRNDE

in the PARK Position, or

(DTR) sensor alignment. 

Shifter Adjustment in this

Will Not Stay in the PARK

Motor/transaxle. 

section. If OK, VERIFY the

Position 

shift lever on the transaxle

can rotate. If the shift lever

cannot rotate, REMOVE the

DTR sensor and RETRY

rotating the shift lever. If

shift  lever still cannot rotate,

REPLACE the

motor/transaxle. REFER to

Section 303-01. If OK, GO to

Pinpoint Test B. 

307-05-4

307-05-4

Automatic Transaxle External Controls

DIAGNOSIS AND TESTING (Continued)

Symptom Chart (Continued)

Condition

Possible Sources

Action

Vehicle Does Not Remain

Halfshafts. 

CHECK halfshafts and motor

Stationary With Transmission

Motor mounts. 

mounts. REPAIR as

Range Selector Lever in the

Shift cable alignment. 

necessary. If OK, CHECK

PARK Position 

Digital transmission range

shift cable alignment. REFER

(DTR) sensor alignment. 

to PRNDE Shifter Adjustment

Motor/transaxle. 

in this section. If OK, GO to

Pinpoint Test B. 

Shift Lever Will Not Move to

Shift cable alignment. 

CHECK shift cable

the Selected Position, Is

Digital transmission range

alignment. REFER to PRNDE

Stuck in the Selected

(DTR) sensor alignment. 

Shifter Adjustment in this

Position, or Will Not Stay in

DTR sensor. 

section. If OK, VERIFY the

the Selected Position 

Circuit(s). 

shift lever on the transaxle

Traction inverter module

can rotate. If the shift lever

(TIM). 

cannot rotate, REMOVE the

Battery control module

DTR sensor and RETRY

(BCM). 

rotating the shift lever. If

shift  lever still cannot rotate,

REPLACE the

motor/transaxle. REFER to

Section 303-01. If OK, GO to

Pinpoint Test A.

Special Tool(s)

Pinpoint Tests

Traction Battery Low Voltage Service Cord 418-F219

Special Tool(s)

High Voltage Insulated Gloves 100-F036 or equivalent

104-Pin Breakout Box (BOB) 418-049 (014-00950) or

Face Shield 100-F035 or equivalent

equivalent 

Digital TR Sensor Alignment Tool 307-351

BCM/TIM Breakout Box (BOB) Adapter Cable

(T97L-70010-A)

418-F212

Transmission Tester 007-00130 or equivalent

BCM/TIM Breakout Box (BOB) Overlay 418-F220

TR-E Cable 418-F107 (007-00111) or equivalent

Traction Battery High Voltage Service Cord 418-F218

Digital TR Sensor Overlay 007-00131 or equivalent

(Continued)

PINPOINT TEST A: DIGITAL TRANSMISSION RANGE (DTR) SENSOR CIRCUIT FAILURE

TEST STEP

ACTION TO TAKE

A1 VERIFY DIGITAL TRANSMISSION RANGE (DTR) SENSOR

ALIGNMENT

With key OFF, set the gear selector to the PARK position. 

Yes =

REMOVE the alignment

tool. GO to A2.

NOTE: Check to make sure the DTR sensor harness connector C4996 is

No =

REALIGN the DTR sensor.

fully seated, terminals are fully engaged in connector and in good condition

REFER to Digital

before proceeding.

Transmission Range (DTR)

Apply the parking brake. 

Sensor Alignment in this

Set the gear selector to NEUTRAL and verify the shift linkage is

section.

adjusted in the NEUTRAL position. 

With the gear selector in NEUTRAL, verify the Digital TR Sensor

Alignment Tool fits in the appropriate slots. 

Is the DTR sensor correctly aligned?

A2 VISUALLY INSPECT DTR SENSOR CONNECTOR

Set the gear selector to the PARK position. 

Yes =

REPAIR as necessary.

(Continued)

307-05-5

307-05-5

Automatic Transaxle External Controls

DIAGNOSIS AND TESTING (Continued)

PINPOINT TEST A: DIGITAL TRANSMISSION RANGE (DTR) SENSOR CIRCUIT FAILURE

TEST STEP

ACTION TO TAKE

No =

GO to A3.

CAUTION: DO NOT PRY on connector. This will damage the

connector and result in a motor/transaxle concern.

With key OFF, disconnect DTR sensor C4996 and inspect both ends of

the connector for damage or pushed out pins, corrosion, loose wires, and

missing or damaged seals. 

Is there damage to the connector, pins, or harness?

A3 CHECK ELECTRICAL SYSTEM OPERATION FOR DTR

SENSOR AND TRACTION INVERTER MODULE (TIM)

With key OFF, reconnect DTR sensor C4996. 

Yes =

System OK.

Monitor the TIM PID TRANSGR. 

No =

If TRANSGR PID changes

Shift the transmission range selector lever into each gear and stop. 

when wiggling the harness

Observe the TRANSGR PID while wiggling harness and tapping on

or tapping on the sensor, the

sensor. 

concern may be intermittent.

Does the TRANSGR PID match the selected gear and does the

GO to A4.

TRANSGR PID remain steady when the harness is wiggled or when

the sensor is tapped?

A4 CHECK DTR SENSOR OPERATION

With key OFF, disconnect DTR sensor C4996. 

Yes =

The concern is not in the

DTR sensor. REMOVE

Transmission Tester and

TR-E Cable. GO to A5.

Connect TR-E Cable to Transmission Tester and DTR sensor. 

No =

REPLACE the DTR sensor

Place the Digital TR Sensor Overlay onto Transmission Tester. 

and ALIGN; REFER to

Digital Transmission Range

(DTR) Sensor Alignment in

this section.

NOTE: The D/2 status lamp on TR-E Cable should illuminate when the

transmission range selector lever is moved to the ECONOMY position.

Carry out Sensor Test as instructed on Digital TR Sensor Overlay. 

Does the status lamp on TR-E Cable match the selected gear positions? 

A5 CHECK TR1 INPUT SIGNAL STATUS

With key OFF, reconnect DTR sensor C4996. 

Yes =

GO to A9.

With key ON, monitor TIM PID PRNDE 1. 

No =

If all gears indicate notACT,

With brake pedal depressed, shift the transmission range selector lever

GO to A6.

through all gears and back to PARK. 

Compare PRNDE 1 PID to the values below: 

If all gears indicate

ACTIVE, GO to A8.

PARK = ACTIVE
REVERSE = ACTIVE
NEUTRAL = ACTIVE
DRIVE = notACT
ECONOMY = notACT

Is the PRNDE 1 PID correct?

A6 CHECK CIRCUIT 3500 (R) FOR OPEN

Connect 104-Pin Breakout Box (BOB) to TIM C4998, C4999 using the

Yes =

GO to A7.

BCM/TIM BOB Adapter Cable and Overlay; leave the TIM

disconnected. 

With key OFF, disconnect DTR sensor C4996 and measure the resistance No =

REPAIR the R wire.

of the R wire between pin 4 on the DTR sensor C4996 and BOB pin B7.

Is the resistance less than 5 ohms?

A7 CHECK CIRCUIT 3500 (R) FOR SHORT TO POWER

(Continued)


Content   ..  62  63  64  65   ..