Ford Falcon. Manual - part 50
 

  Index      Ford     Ford Falcon - service repair manual 2002-2005 year


Search            


Content   ..  48  49  50  51   ..


Ford Falcon. Manual - part 50


205-02A-24 

Rear Drive Axle / Differential — Beam Axle 

205-02A-24

DISASSEMBLY AND ASSEMBLY

3.  The bearing cone assembly should not be pulled

Rear Axle Wheel Bearing and Seal

from the axle shaft unless:

Replacement


1.  The seal is to be replaced.

NOTE: Refer to special tools in this section.


2.  The retaining plate has to be replaced due to

damage or distortion.

NOTE: When a bearing is replaced a complete


3.  The bearing is to be replaced.

assembly must be installed. Bearings are

manufactured with a built-in adjustment of 0.25 to

4.  A used bearing assembly should have all parts

0.53 mm "bench" end play or axial clearance. This

completely covered with rear axle oil prior to

"bench" end play is reduced when the bearing is

re-installation into the axle housing. Quarter fill the

pressed on the axle shaft. The final assembled end

cavity between the seal lips with grease.

play on the shaft of 0.04 to 0.5 mm is dependent on

the dimensions of the interference fit between the

Disassembly

cone and the axle shaft. The standard recommended

1.  Remove the retaining collar. This can be easily

cone fit is 0.025 to 0.055 mm tight. The cups are a

achieved by drilling a 6 mm hole in the outside

snug fit in the housing. Used bearings may have a

diameter of the collar to a depth approximately

maximum of 0.7 mm end play.

three-quarters of the thickness of the collar. Do

not drill all the way through the collar as the drill

could damage the axle shaft, necessitating

replacement of the shaft. After drilling the

retaining collar, position a chisel across the drilled

hole and strike sharply to break the collar.

Support the shaft on the collar opposite the drilled

hole.
NOTE: Retaining collars are not reusable after

having once been installed and must be scrapped

after removal even if some removal method is

used which does not cause obvious damage to

the collar.

2.  Slide the retaining plate and seal toward the axle

flange.

3.  Using special tools, press the bearing from the

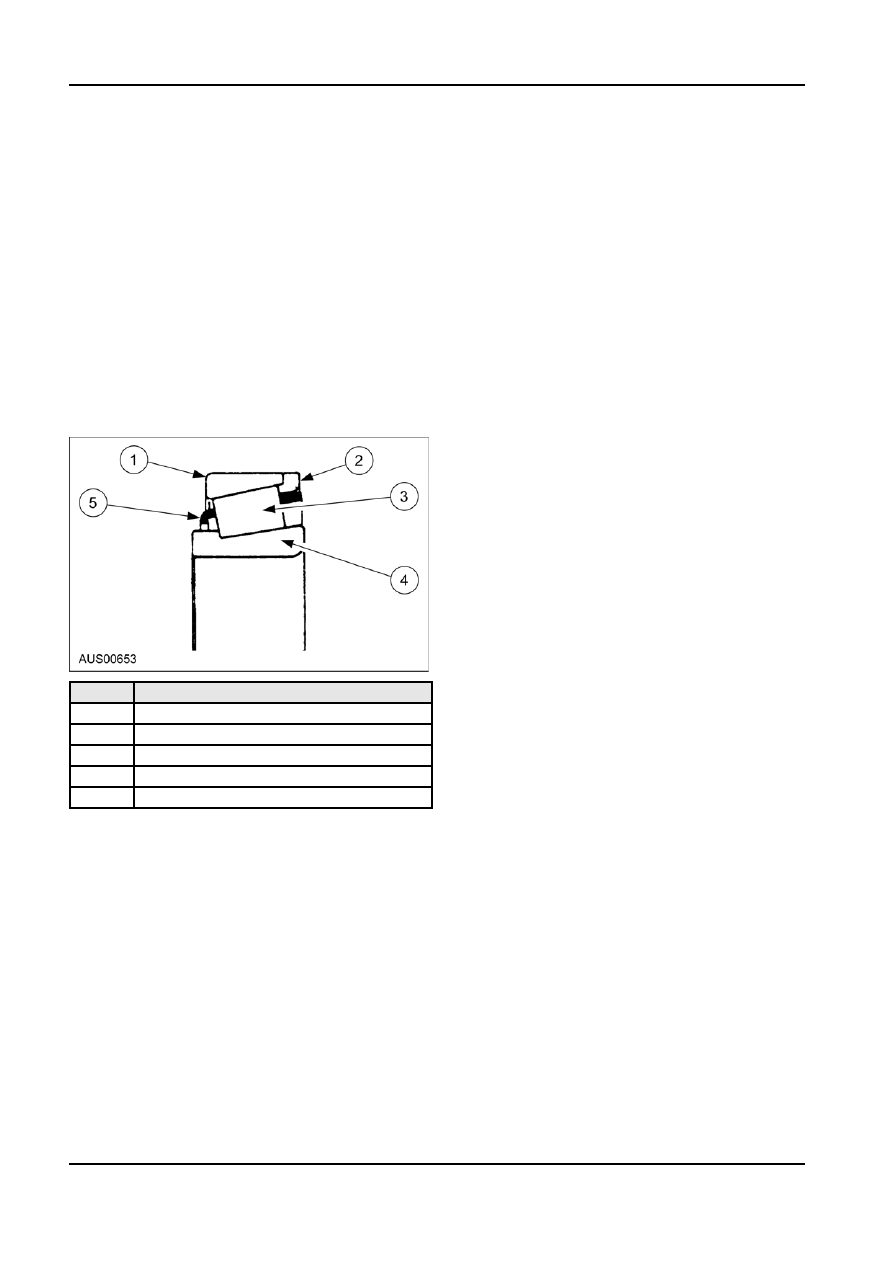
Item

Description

shaft. The special tools support the bearing

1

Cup

behind the bearing cone face and prevent

damage to the bearing and the seal surface of the

2

Cup rib ring

shaft.

3

Rollers

NOTE: Do not heat or cut the bearing assembly

4

Cone

as damage to the axle shaft will result.

5

Cage

4.  Likewise, using special tools, press the tone

1.  The bearing is held on the shaft by the

wheel from the shaft being careful to avoid

interference fit of the bearing cone and the

damaging the tone wheel location diameter shaft

retaining collar. The cup and rib ring are clamped

surface.

together in the axle housing through the seal by

Assembly

the retaining plate. The axle seal wipes on the

rotating axle shaft and at the same time functions 1.  When installing new bearings, new seals and

as a static seal to prevent lubricant from escaping

retaining collars must be used.

between the housing and seal outside diameter.

2.  Check the retaining plate for damage or distortion

2.  It is important to note that the seal also acts as a

with a straight edge. If the plate is distorted,

"spacer" in the clamp up of the bearing in the axle

replace it.

housing. It is imperative that the specified seal is

3.  Clean the axle shaft, ensuring that there are no

used.

burrs or nicks on the tone wheel location diameter

surface, bearing seat, seal surface, cone backing

shoulder and chamfer leading to the seal seat.

Sharp edges or nicks on the chamfer leading to

the seal surface will damage the seal lips during

installation of the seal on the shaft. To avoid

damage to the wheel studs, place the axle shaft

flange face on a support.

G98786 en

205-02A-25 

Rear Drive Axle / Differential — Beam Axle 

205-02A-25

DISASSEMBLY AND ASSEMBLY (Continued)

4.  Using Special Tools, press the tone wheel onto

9.  Install a new retaining collar on the axle shaft and

the axle shaft so that it is seated hard against the

press it down to ensure it is in contact with the

flange shoulder.

bearing cone assembly.

NOTE: Ensure that the large access hole in the

10. Press the bearing and the retaining collar on the

tone wheel is aligned with the large access hole in

axle shaft simultaneously using the relevant

the axle shaft flange before pressing to ensure

special tool. Apply sufficient load to assure the

tool access for installation of the retaining plate

proper seating of all parts. Check for proper

bolts during reassembly of the axle shaft

seating of the bearing cone assembly against the

assembly into the tube assembly is maintained.

shaft shoulder and the retaining collar against the

Refer to Figure for tone wheel orientation for

cone face by using feeler gauges.

pressing. Check for proper seating of the tone

NOTE: When pressing the bearing and retaining

wheel on the axle shaft by checking with feeler

collar on to the axle shaft, be sure all faces of the

gauges.

installation tubes are square, parallel and free

from any burrs. Installing the retaining collar in a

5.  Install the retaining plate on the axle shaft,

skewed manner can reduce its holding ability by

ensuring that it is positioned with the clamping

as much as 50%.

face of the plate towards the bearing. Apply

grease to the cavity between the seal lips and

carefully slide the seal into position on the seal

seat. When installed, the outer face of the seal

must be toward the axle flange.

6.  Do not wash a new bearing prior to installation.

The new bearing has protective grease that

provides initial lubrication until the rear axle

lubricating oil reaches the bearing.

If the new bearing has to be washed for any

reason, it must then be completely lubricated with

rear axle oil prior to installation.

Item

Description

1

Tool E1721 - Remove/Installer axle

bearing and bearing retainer (Collar)

2

Seal

Item

Description

3

Bearing

1

Seal

4

Bearing retainer (Collar)

2

Bearing Assembly

7.  Place the lubricated bearing on the axle shaft

3

Bearing Retaining Collar

ensuring the cup rib ring is facing toward the axle

flange and that the bearing is in hard contact with

4

Axle Housing

the axle shaft shoulder.

5

Brake Anchor Bracket

8.  Clean the journal diameter of any grease that may 6

Bearing Retaining Plate

have been left on the shaft during the pressing of

7

Tone Wheel (ABS)

the bearing.

G98786 en

205-02A-26 

Rear Drive Axle / Differential — Beam Axle 

205-02A-26

DISASSEMBLY AND ASSEMBLY (Continued)

3.  Refer to General Procedures for Inspection before

Differential and Drive Pinion

removal.

NOTE: Refer to special tools in this section.

4.  Identify the bearings, caps and remove the

bearing cap bolts and bearing caps.

Disassembly

5.  Use the differential housing special spreading tool

NOTE: All hardware must be correctly installed and

to facilitate the removal of the differential case,

torqued to specification.

bearings and spacers. Spread the carrier the

minimum amount which will allow the removal of

1.  Remove the axle shafts as described previously in

the differential assembly. Usually 0.1 to 0.2 mm

this Section.

will be adequate. (Spread is measured across the

2.  Loosen the cover plate attaching bolts and drain

carrier adjacent to the bearings.)

the oil. The lowest cover bolt is a drain plug.

Remove the cover plate.

 CAUTION: Under no circumstances

should the carrier be spread more than 0.5

mm.

6.  Mark the relationship of the driveshaft and the

pinion flanges and disconnect the driveshaft.

(Refer to Section 205-01.)

7.  Mark the relationship of the pinion flange to the

pinion shaft. Hold the pinion flange and remove

the pinion nut.

8.  Remove the pinion flange.
9.  With a soft-faced hammer, drive the pinion out of

the front bearing cone and remove it through the

rear of the carrier casting.

10. Drive the pinion flange seal and the bearing cone

out of the carrier casting.

11. If the pinion bearing cups are to be replaced,

remove them from the carrier using the special

tool.
NOTE: It is essential to renew the cups one after

the other so that in each Instance the other cup

serves as a guide for the replacer tool.

12. If the pinion rear bearing cone and roller is to be

replaced, lubricate the pinion shaft and remove

the bearing cone from the pinion. Discard the

bearing whenever it has been removed from the

pinion.

Item

Description

1

Tool E9255 - Differential housing spreader

2

Tool E9255 - Adaptor Differential housing

spreader

G98787 en

205-02A-27 

Rear Drive Axle / Differential — Beam Axle 

205-02A-27

DISASSEMBLY AND ASSEMBLY (Continued)

Item

Description

1

Tool - Push/puller with legs

2

Tool - Stepped plug

3

Tool - Knife edge puller

Differential Bearing Preload Spacer

Selection

NOTE: Refer to special tools in this section.

NOTE:
1.  Select any two spacer washers and place one

against each of the differential bearing cups.

Place the cups on the bearing cones and install

the differential assembly in the carrier. When

installed, there should be a small amount of end

play.

2.  With the differential held firmly against one side of

the carrier, use a feeler gauge on each side of the

centre line of the case to measure the end play

between the cup and the spacer. Rotate the

carrier to seat the bearing with the feeler gauges

in position, and check to see that the end play has

not been increased by this procedure. Remove

the assembly and measure the spacers.

Item

Description

1

Tool - Push/puller with legs

2

Tool - Knife edge puller

G98788 en


Content   ..  48  49  50  51   ..