Ford Thunderbird (2004 year). Manual - part 34
 

  Index      Ford     Ford Thunderbird - service manual 2004 year in english


Search            


Content   ..  32  33  34  35   ..


Ford Thunderbird (2004 year). Manual - part 34


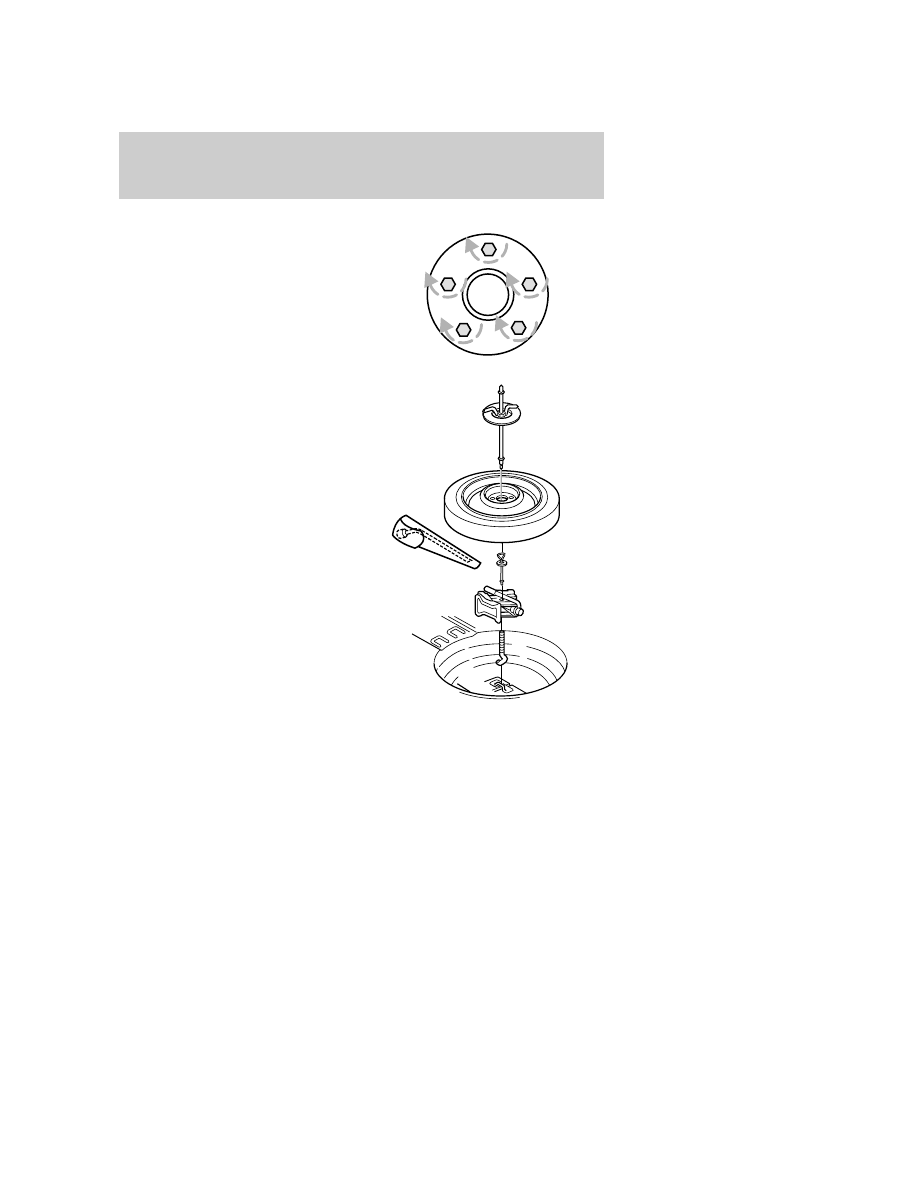
9. Remove the jack and fully tighten
the lug nuts in the order shown.

Note: The jack cannot be
properly stowed when a full size
tire is placed here. Secure the
jack and the temporary spare
tire as shown after the flat tire
has been fixed.

10. Put flat tire, jack away. Stow the
lug wrench in the bag along side of
the tire. Make sure jack is fastened
so it does not rattle when you drive.

11. Unblock the wheels.

1

4

3

2

5

Roadside Emergencies

140

Wheel lug nut torque specifications

Retighten the lug nuts to the specified torque at 800 km (500 miles)
after any wheel disturbance (tire rotation, changing a flat tire, wheel
removal, etc.).

Bolt size

Wheel lug nut torque*

Nm

Lb-ft

M12 x 1.5

115-156

85-115

* Torque specifications are for nut and bolt threads free of dirt and
rust. Use only Ford recommended replacement fasteners.

When a wheel is installed, always remove any corrosion, dirt or
foreign materials present on the mounting surfaces of the wheel

or the surface of the front disc brake hub and rotor that contacts the
wheel. Installing wheels without correct metal-to-metal contact at the
wheel mounting surfaces can cause the wheel nuts to loosen and the
wheel to come off while the vehicle is in motion, resulting in loss of
control.

JUMP STARTING YOUR VEHICLE

The gases around the battery can explode if exposed to flames,
sparks, or lit cigarettes. An explosion could result in injury or

vehicle damage.

Batteries contain sulfuric acid which can burn skin, eyes and
clothing, if contacted.

Do not attempt to push-start your vehicle. Automatic
transmissions do not have push-start capability; doing so may
damage the catalytic converter.

Preparing your vehicle

Your battery is located in the trunk of your vehicle.

When the battery is disconnected or a new battery is installed, the
transmission must relearn its shift strategy. As a result, the transmission
may have firm and/or soft shifts. This operation is considered normal and
will not affect function or durability of the transmission. Over time, the
adaptive learning process will fully update transmission operation to its
optimum shift feel.

Roadside Emergencies

141

1. Use only a 12–volt supply to start your vehicle.

2. Do not disconnect the battery of your disabled vehicle as this could
damage the vehicle’s electrical system. Keep the battery vent hose
attached at all times.

3. Park the booster vehicle close to the trunk of your disabled vehicle
making sure the two vehicles do not touch. Set the parking brake on
both vehicles and stay clear of the engine cooling fan and other moving
parts.

4. Check all battery terminals and remove any excessive corrosion before
you attach the battery cables. Ensure the vent caps are tight and level.

5. Turn the heater fan on in both vehicles to protect any electrical
surges. Turn all other accessories off.

Connecting the jumper cables

1. Connect the positive (+) jumper cable to the positive (+) terminal of
the discharged battery.

Note: In the illustrations, lightning bolts are used to designate the
assisting (boosting) battery.

+

+

Roadside Emergencies

142

2. Connect the other end of the positive (+) cable to the positive (+)
terminal of the assisting battery.

3. Connect the negative (-) cable to the negative (-) terminal of the
assisting battery.

+

+

+

+

Roadside Emergencies

143


Content   ..  32  33  34  35   ..