Ford F-150 (2018 year). Manual - part 69
 

  Index      Ford     Ford F-150 - service manual 2018 year in english


Search            


Content   ..  67  68  69  70   ..


Ford F-150 (2018 year). Manual - part 69


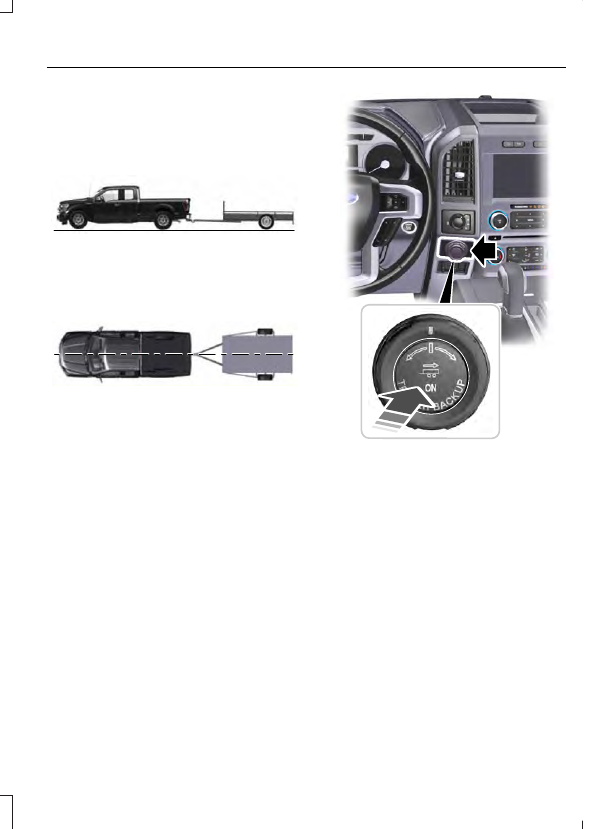
For best results, make sure that your trailer
rides level with the ground when you hitch
your vehicle. More information on selecting
your towbar is available in the Towing
section. See Towing (page 276).

E209759

Make sure your vehicle and the trailer are
in line with each other. You can do this by
driving straight forward.

E209760

Step 2: Follow the Information Display
Prompts

Press the button to turn the system on.

E209765

1.

Select the option to add a trailer in the
instrument cluster menu, using the
steering wheel control.  See General
Information (page 111).

2. Add a personalized name for the trailer

using the screen prompts. Use the
down arrow to scroll to the desired
letter and then press the right arrow to
advance to the next letter. Press OK to
continue.

3. Select the type of trailer brake system

for the trailer you are adding.

4. Select the brake effort level for the

trailer.

Note: The default option is low. This is
recommended for most trailers. If the
trailer's brakes require more initial voltage,
or if you prefer more aggressive braking then
select the other options as required.

5. Select the trailer type.

Some examples of conventional type
trailers are shown below.

Note: You cannot use the system with the
types of trailers marked with the cross.

The system only works with
conventional trailers. It does not work
with other types including goose neck
and fifth wheel.

E209766

Follow the information display prompts.

Step 3: Place the Sticker on the Trailer
Frame

The supplied sticker must be placed in an
area visible by the Rear View Camera.

Note: The cargo and trailer hookup lamps
turn on automatically to improve visibility.

Note: An assistant can help to carry out the
following procedure.

Note: Make sure nothing can obstruct the
Rear View Camera's view of the sticker. For
example, items such as a jack handle or
wiring.

Note: Position the sticker on a flat, dry and
clean horizontal surface. For best results
apply the sticker when temperatures are
above 32°F (0°C).

Note: Do not move stickers after they are
placed. Do not re-use any stickers if
removed.

Note: Additional stickers may be purchased
through your Ford Dealers parts department.

E209805

Use the supplied measurement card, a
tape measure and pen to carefully mark
the area where to attach the sticker
(supplied in the back cover pocket of your
quick start guide). Make sure the whole
sticker is within the zone between the two
arcs or distance markers on the diagram,
and is also visible in the Rear View Camera
display.

Step 4: Take Measurements

After the sticker is correctly placed on the
trailer you must take some key
measurements.

Note: Accurate measurements must be
taken for the system to operate properly.

Note: When rounding in inches, round
upward if the measured length is a quarter
inch or greater. Round downward if the
measured length is less than a quarter inch.
For example 12.25 in (31.11 cm) would be
rounded up to 12.50 in (31.75 cm). 12.13 in
(30.8 cm) would be rounded down to
12.00 in (30.48 cm).

Note: When rounding in centimeters, round
to the nearest whole centimeter. If the
measurement is less than 0.2 in (0.5 cm)
round downward. If the measurement is
more than 0.2 in (0.5 cm) round upward.
For example, 11.9 in (30.3 cm) would be
rounded down to 11.8 in (30 cm). 12.0 in
(30.5 cm) would be rounded up to 12.2 in
(31 cm).

Note: Use consistent metric or imperial
units as required by your country or vehicle.

Record the four key distances (A, B, C, D)
as required by the measurement card.

E209806

A

B

C

D

D

Distance A

The horizontal distance from the license
plate to the center of the ball hitch on the
trailer.

Distance B

The horizontal distance from the center of
the ball hitch to the center of the sticker.

Distance C

The distance from the Rear View Camera
to the center of the sticker.

Distance D

The horizontal distance from the tailgate
to the center of the trailer axle (single axle
trailers), or the center of the axles (trailers
with dual axles or more).

Step 5: Enter Measurements Using the
Information Display

Using the recorded measurements, enter
the required data into the system. Follow
the on screen prompts to enter each of the
measurements taken in step 4. When all
four distances have been entered, a
confirmation display will appear. Check
the values are correct before proceeding,
or go back to change any if required.

Step 6: Confirming the Sticker Location

Check the Rear View Camera display to
see if the sticker is identified by the system
and marked with a red circle.

Confirm that the red circle is correctly
located over the sticker image in the
display. The on screen prompt will ask you
to confirm this.

Note: If the system cannot locate the
sticker try cleaning the camera lens, and
also make sure the sticker is within the green
zone as indicated in step 3. Check your
measurements to make sure you measured
from the correct points.

Calibrating the System

To complete setup, drive your vehicle
straight forward between 4 mph (6 km/h)
and 24 mph (39 km/h) following the on
screen prompt.

Note: If you move the steering wheel during
this procedure, the calibration pauses.

Note: We recommend that you do not do
this at night.

A message will be displayed during
calibration and after calibration is
complete.

Using Pro Trailer Backup Assist

To use the system press the button and
select the required trailer from the display.

E209765

When the sticker is located, the display
prompts you to shift into reverse (R). The
system turns on.

Note: The system does not function if your
hands are on the steering wheel. Remove
your hands to resume operation.

Follow the screen prompts to steer your
vehicle and trailer.

Note: You may have to drive forward to
straighten the trailer.

Take your hands off the steering wheel and
turn the Pro Trailer Backup Assist control
knob instead. The knob acts as the steering
control for the trailer.

Note: The more you turn the knob, the
sharper the trailer turns.

E209812

Turn and hold counterclockwise to make
the trailer go left.

E209813

Turn and hold clockwise to make the trailer
go right.

Note: Practice maneuvering with the
system in a safe open area first.

Note: Try backing up in a straight line and
then turning the knob slowly in the direction
you want to go.

Note: Quickly turning and releasing the
knob results in a jerky movement of the
vehicle.

E209814


Content   ..  67  68  69  70   ..