Ford Explorer (2018 year). Manual - part 49
 

  Index      Ford     Ford Explorer - service manual 2018 year in english


Search            


Content   ..  47  48  49  50   ..


Ford Explorer (2018 year). Manual - part 49


USING TERRAIN CONTROL

The terrain management system optimizes
drivability and comfort as well as
maximizing traction while operating on
different types of terrain.

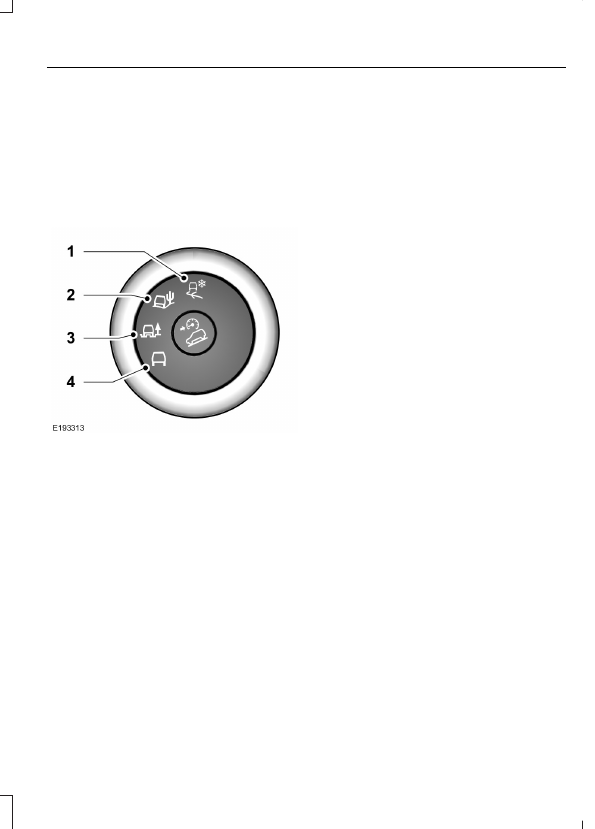
Turn the control located on the center
console to choose between the following
modes:

Grass/Gravel/Snow mode
should be selected where a firm
surface is covered with loose or
slippery material such as packed
snow, ice, water, grass, or a thin
layer of gravel or sand. For deep

1

gravel or sand, select Sand
mode. If the vehicle cannot gain
traction in deep snow, switching
off the traction control system
may help (switch traction
control back on when you regain
traction).  See Using Traction
Control (page 196).

Sand mode should be selected
in soft dry sand or deep gravel. If
crossing wet sand that may be
sufficiently deep enough for the
wheels to sink into the surface,
select Mud/Ruts mode.

2

Mud/Ruts mode should be
selected for muddy, rutted, soft
or uneven terrain.

3

Normal mode is for on-road
conditions and should be
selected before driving on
surfaces which are similar to a
hard road surface or once the
need for a special mode has
passed. Select Normal mode
when towing a trailer.

4

Note: The Sand and Mud/Ruts modes are
for off-road use only.

Note: The curve control portion of the
AdvanceTrac® system is unavailable when
you select Sand or Mud/Ruts.

If the system becomes inoperable,
selecting some modes may not be possible
and a message displays. If it becomes
inoperable due to a system malfunction,
all of the mode indicators on the control
turn off and one of the following messages
appears in the information display:

TERRAIN MANAGEMENT SYSTEM
FAULT: Turning the engine on and off may
clear the fault. If that does not work, have
the system serviced by an authorized
dealer.

MODE CHANGE NOT ACCEPTED,
RETRY: A mode change cannot be made
at the time of driver request. Try the mode
change again.

 (If Equipped)

USING HILL DESCENT
CONTROL

Principle of operation

WARNINGS

Hill descent control cannot control
descent in all surface conditions and
circumstances, such as ice or

extremely steep grades. Hill descent
control is a driver assist system and cannot
substitute for good judgment by the driver.
Failure to do so may result in loss of vehicle
control, crash or serious injury.

Hill descent control does not provide
hill hold at zero miles per hour (0
kilometers per hour). When stopped,

the parking brake must be applied or the
vehicle must be placed in P (Park) or it
may roll away.

Hill descent control allows the driver to set
and maintain vehicle speed while
descending steep grades in various surface
conditions.

Hill descent control can maintain vehicle
speeds on downhill grades between 3 mph
(5 km/h) and 20 mph (32 km/h). Above
20 mph (32 km/h), the system remains
armed, but descent speed cannot be set
or maintained.

Hill descent control requires a cooling
down interval after a period of sustained
use. The amount of time that the feature
can remain active before cooling varies
with conditions. The system provides a
warning in the message center and a chime
sounds when the system is about to
disengage for cooling. At this time,
manually apply the brakes as needed to
maintain descent speed.

Using hill descent control

Press and release the hill
descent button located in the
center of the terrain

management control. A light in the control
illuminates and a chime sounds when this
feature activates.

To increase descent speed, press the
accelerator pedal until you reach the
desired speed. To decrease descent speed,
press the brake pedal until you reach the
desired speed.

Whether accelerating or decelerating, once
you reach the desired descent speed,
remove your feet from the pedals and hill
descent control maintains the chosen
vehicle speed.

Note: You may observe noise from the ABS
pump motor during hill descent control
operation. This is a normal characteristic of
the ABS and should be no reason for
concern.

Hill descent modes

At speeds below 20 mph (32 km/h):
When you press the Hill Descent
Control and Hill Descent Control
activates, HILL DESCENT CONTROL
ACTIVE appears in the message
center for several seconds.

At speeds below 20 mph (32 km/h):
When you press the Hill Descent
Control switch and conditions are not
correct for hill descent activation, the
Hill Descent Control system enables,
the light on the button is solid and HILL
DESCENT CONTROL READY
displays in the message center for
several seconds.

 (If Equipped)

At speeds above 20 mph (32 km/h):
When you press the Hill Descent
Control switch, the Hill Descent Control
system enables, the light on the button
illuminates and FOR HILL CNTRL, 20
MPH OR LESS displays in the
message center for several seconds.

For Hill Descent Control to enable, the
vehicle must be in a drive gear or (R)
Reverse. If the vehicle is in P (Park) or
N (Neutral) and you press the button,
FOR HILL CNTRL, SELECT GEAR
displays in the message center for
several seconds.

Refer to the Information Displays for
additional Hill Descent Control messages.
See Information Messages (page 118).

 (If Equipped)

PRINCIPLE OF OPERATION

WARNINGS

To help avoid personal injury, always
use caution when in reverse (R) and
when using the sensing system.

The system may not detect objects
with surfaces that absorb reflection.
Always drive with due care and

attention. Failure to take care may result
in a crash.

Traffic control systems, inclement
weather, air brakes, external motors
and fans may affect the correct

operation of the sensing system.This may
cause reduced performance or false alerts.

The system may not detect small or
moving objects, particularly those
close to the ground.

Note: If your vehicle is equipped with
MyKey™, the sensing system cannot be
turned off when a MyKey™ is present. See
Principle of Operation (page 59).

Note: Keep the sensors, located on the
bumper or fascia, free from snow, ice and
large accumulations of dirt. If the sensors
are covered, the system’s accuracy can be
affected. Do not clean the sensors with
sharp objects.

Note: If your vehicle sustains damage to
the bumper or fascia, leaving it misaligned
or bent, the sensing zone may be altered
causing inaccurate measurement of
obstacles or false alerts.

Note: Certain add-on devices installed
around the bumper or fascia may create
false alerts. For example, large trailer
hitches, bike or surfboard racks, license plate
brackets, bumper covers or any other device
that may block the normal detection zone
of the system. Remove the add-on device
to prevent false alerts.

Note: When a trailer is connected to your
vehicle, the rear parking aid may detect the
trailer and therefore provide an alert. Disable
the rear parking aid when a trailer is
connected to prevent the alert.

The sensing system warns the driver of
obstacles within a certain range of your
vehicle. The system turns on automatically
whenever you switch the ignition on.

The system can be switched off through
the information display menu or from the
pop-up message that appears once you
shift the transmission into reverse (R).  See
General Information (page 104).

If a fault is present in the system, a warning
message appears in the information
display.  See Information Messages
(page 118).

REAR PARKING AID

The rear sensors are only active when the
transmission is in reverse (R). As your
vehicle moves closer to the obstacle, the
rate of the audible warning increases.
When the obstacle is less than 12 in
(30 cm) away, the warning sounds
continuously. If the system detects a
stationary or receding object farther than
12 in (30 cm) from the corners of the
bumper, the tone sounds for only three
seconds. Once the system detects an
object approaching, the warning sounds
again.


Content   ..  47  48  49  50   ..