Ford Fiesta (1989-1995). Instruction - part 43
wheel cylinder and backplate. Take great care
not to inhale the dust, as it may contain
asbestos.
4 If required, remove the hub from the drum
as described in Chapter 10.
Inspection
Note: If a brake drum requires renewal, BOTH
rear drums should be renewed at the same
time to ensure even and consistent
braking. New brake shoes should also be
fitted.
5 Clean the inside surfaces of the brake drum
and hub, then examine the internal surface of
the brake drum for signs of scoring or cracks.
If any deterioration of the friction surface is
evident, renewal of the drum is necessary. To
detach the hub from the drum, refer to
Chapter 10.
Refitting
6 Check that the automatic brake adjuster is
fully retracted, then refit the drum/hub to the
axle. Tighten the retaining bolts to the
specified torque.
7 With the brake drum refitted, refit the
roadwheel. Fully depress the brake pedal
several times, to actuate the rear brake
adjuster and take up the adjustment. Check
that the rear wheels spin freely when the
brakes are released, then apply the
handbrake, lower the vehicle and tighten the
wheel nuts to the specified torque.
6
Rear brake shoes - renewal
2
Warning: Drum brake shoes
MUST be renewed on both rear
wheels at the same time -
NEVER renew the shoes on only
one wheel, as uneven braking may result.
Also, the dust created by wear of the
shoes may contain asbestos, which is a
health hazard. Never blow it out with
compressed air, and don’t inhale any of it.
An approved filtering mask should be worn
when working on the brakes. DO NOT use
petroleum-based solvents to clean brake
parts - use brake cleaner or methylated
spirit only.
1 Remove the rear brake drum with reference
to Section 5.
2 Note the fitted positions of the springs and
the adjuster strut.
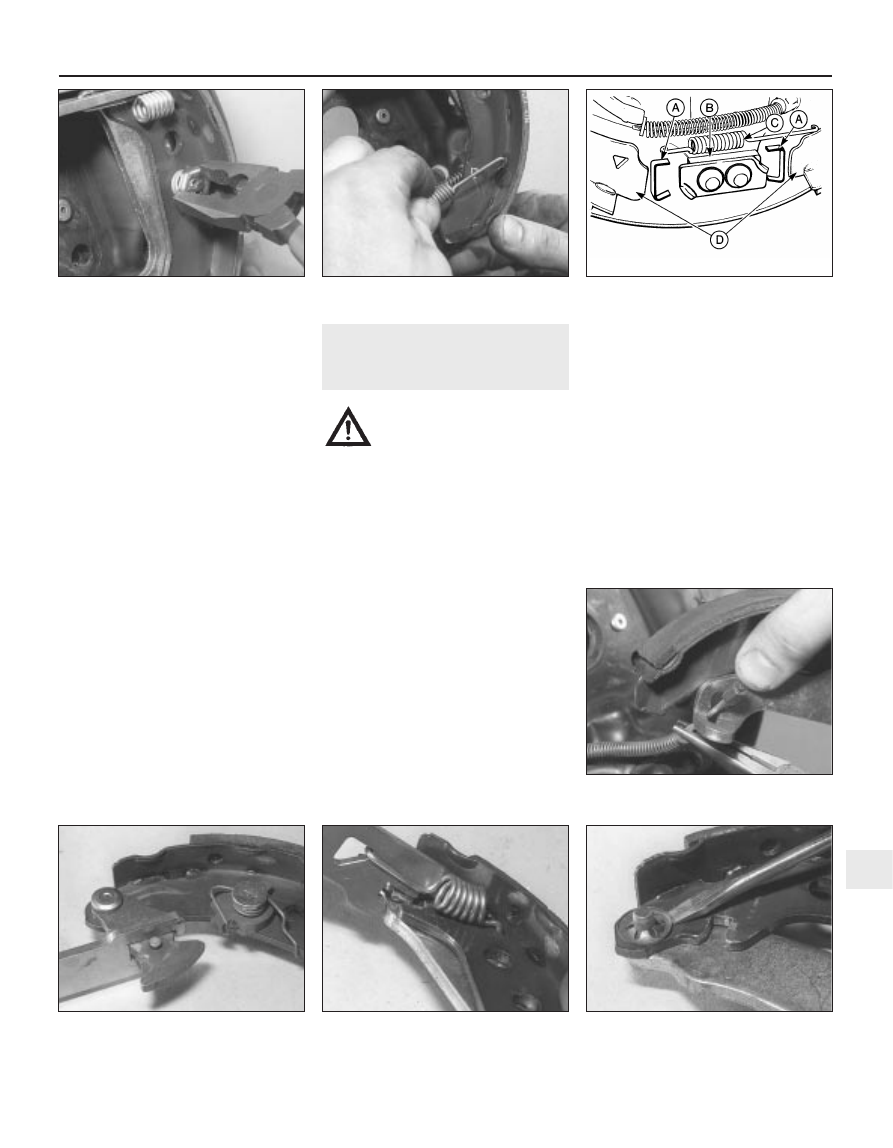
3 Depress the cups holding the brake shoes
in position and rotate them through 90° to
release them from the locking pins (see
illustration). Carefully remove the cups and
springs, then withdraw the locking pins from
the rear of the brake backplate.
4 Lift the shoes from their lower pivot and
remove the lower pull-off spring (see
illustration). Note that on some models anti-
rattle shims may be fitted between the brake
shoe and the lower pivot (see illustration). If
fitted, remove the shims and store them
safely.
5 With the shoe assembly pulled away from
the wheel cylinder, disengage the handbrake
cable from its operating lever on the trailing
shoe (see illustration).
6 Remove the upper pull-off spring, noting
the method of location.
7 Release the automatic brake adjuster cam
and pawl, then remove the adjuster strut
which is held in position by spring tension
(see illustrations).
8 Using a screwdriver, lever off the spring clip
securing the handbrake operating lever to the
trailing shoe and separate the assembly (see
illustration).
Braking system 9•5
6.4b Arrangement of brake shoe anti-
rattle shims - where fitted
A Shims
C Lower pull-off spring
B Lower pivot
D Brake shoes
6.5 Disengage the handbrake cable from
its operating lever on the trailing shoe
6.4a Detach the lower pull-off spring
6.3 Depress and turn the cups securing
the brake shoes
6.8 Lever off the spring clip securing the
handbrake operating lever to the trailing
shoe
6.7b Detach the adjuster strut
6.7a Release the automatic brake adjuster
cam and pawl
9
1595Ford Fiesta Remake