Fiat 500L Living (2019 year). Manual - part 2


  Index      Fiat     Fiat 500L Living (2019 year) - manual in english


Search            


Content      ..      1      2      3      ..


Fiat 500L Living (2019 year). Manual - part 2


A - fan knob and climate control system
compressor button.

B - recirculation control / air intake from
outside knob.
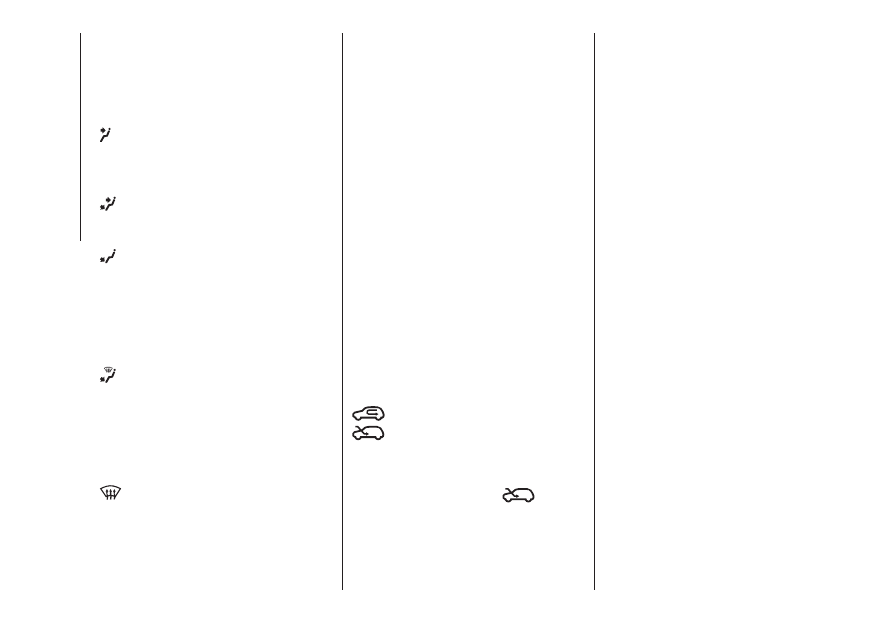
C - air distribution knob:

air flow to central and side
dashboard vents to ventilate the
chest and the face in warm
weather;

distribution between feet area
diffusers (warmest air) and
dashboard diffusers (coolest air);

towards the footwell diffusers. Due
to the natural tendency of heat to
spread upwards, this type of
distribution warms the passenger
compartment up as quickly as
possible, providing an immediate
feeling of warmth;

distribution between footwell
diffusers and windscreen/front
side window vents. This type of
distribution achieves effective
heating of the passenger
compartment and prevents the
windows from misting up;

air flow to the windscreen and
front side window diffusers to
demist or defrost them.

D - heated rear windscreen button.
E - temperature adjustment knob.

Press the knob A fig. 26 to turn the
climate control system on and off.
NOTE Optimal cooling/heating of the
passenger compartment may not
be guaranteed together with
Start&Stop. To prioritise the operation
of the climate control system,
deactivate the Start&Stop function.

NOTE To stop the air flow from the
vents, turn the knob to 0.

IMPORTANT It is advisable to switch
the air recirculation on whilst queueing
or in tunnels to prevent the introduction
of polluted air. However, it is better
not to use the function for long periods,
particularly if there are many people
on board, to prevent the windows from
misting.

AIR RECIRCULATION

(knob B fig. 26)

internal air recirculation

air intake from outside

Use air recirculation for maximum
climate control performance.
To demist the windows, set the
recirculation control to on

.

IMPORTANT In warm-humid weather
conditions, using cold air on the
windscreen may cause external
condensation, which could limit
visibility.

24

KNOWING

YOUR

CAR

-------------------------------------------------------------------------------------------------------------------------------------------------------------

AUTOMATIC CLIMATE CONTROL SYSTEM
(for versions/markets, where provided)

27

F0S0595

25

-------------------------------------------------------------------------------------------------------------------------------------------------------------

A - Climate control system
compressor on/off.

B - Adjustment of temperature
inside the passenger compartment.

: increase required temperature to

the HI value (maximum heating).

: increase required temperature to

the LO value (maximum cooling).

C - fan speed adjustment.

When the

or

buttons are pressed,

the fan speed, increases or decreases
as shown by the bars on the display
lighting.

D - Button for switching fast front
window demisting/defrosting on
and off.

IMPORTANT The function remains
active for approximately 3 minutes after
the coolant temperature exceeds 50°C.

IMPORTANT In warm-humid weather
conditions, using cold air on the
windscreen may cause external
condensation, which could limit
visibility.

E - Passenger compartment air
distribution.

By pressing the buttons, one of the five
possible air flow distribution patterns
can be selected:

air flow to the windscreen and front
side window diffusers to demist
or defrost them.

air flow to central and side
dashboard vents to ventilate the
chest and the face during the hot
season.

air flow to the front seat feet area
diffusers. Due to the natural
tendency of heat to spread
upwards, this type of distribution
warms the passenger
compartment up as quickly as
possible, providing an immediate
feeling of warmth.

+

distribution between feet area
diffusers (warmest air) and
dashboard diffusers (coolest
air).

+

distribution between footwell
diffusers and windscreen/
front side window vents. This
type of distribution achieves
effective heating of the
passenger compartment and
prevents the windows from
misting up.

F - Heated rear windscreen on/off
button.

IMPORTANT Do not apply stickers on
the inside of the rear window over
the heating filaments to avoid damage.

G - Switching off

H - Internal air recirculation on/off
button

It is advisable to switch the internal air
recirculation on whilst queuing or in
tunnels to prevent the introduction of
polluted air.
LED on button ON = recirculation ON.
LED on button OFF = recirculation OFF.

IMPORTANT It is inadvisable to use
air recirculation when the outside
temperature is low, since the windows
could mist rapidly.

I - Automatic climate control
system on/off

WARNING

2) The system uses R1234yf coolant,
which is compatible with the laws in force
in the countries where the vehicle is sold.
When charging, only use the gas indicated
on the dedicated plate in the engine
compartment . The use of other coolants
affects the efficiency and condition of
the system. The lubricant used for the
compressor is also strictly linked to the
type of cooling gas, please refer to a Fiat
Dealership.

26

KNOWING

YOUR

CAR

-------------------------------------------------------------------------------------------------------------------------------------------------------------

WARNING

10) Never use R12 or R134a coolant,
which is not compatible with climate
control system components.

ELECTRIC WINDOWS

20) 21)

These operate when the ignition key is
turned to MAR and for about two
minutes after turning the key to STOP
or removing it.
The power window control buttons are
located beside the gear lever and
activate fig. 28:

A Opening/closing of the left window.

B Opening/closing of the right

window.

Hold the button pressed for a few
seconds to wind the window down
automatically or hold it pressed to wind
the window up automatically (with the
key at MAR only).

WARNING

20) Improper use of the electric windows
can be dangerous. Before and during
operation, always check that nobody is
exposed to the risk of being injured either
directly by the moving window or through
objects getting caught or hit by it.
21) When leaving the vehicle, always
remove the ignition key to avoid the risk of
injury for people still on board due to
accidental operation of the electric
windows.

28

F0S0590

27

-------------------------------------------------------------------------------------------------------------------------------------------------------------

ROOF

FIXED GLASS SUNROOF
(for versions/markets, where provided)

The roof comprises a wide fixed glass
panel and a manually-operated sun
blind. The blind can be used in the "all
closed" or "all open" positions.
To open the blind, grab the handle,
press the tooth A fig. 29 and move it to
the completely open position.
To close it, grab the handle and move
the blind to the closing position until
tooth A is attached.

SUNROOF
(for versions/markets, where provided)

22)

11) 12) 13)

To move the sunshade, follow the
instructions in “fixed glass roof”.

Opening

Hold button A located near the front
ceiling light pressed fig. 30, to move the
roof to “spoiler” position.
With the roof open in “spoiler” position,
hold button A pressed again to move
the roof to all open position. The roof
will stop in the position reached when
the button is released.

Closing

Press button B fig. 30 from the all open
position: the front glass panel will move
into the “spoiler” position. The roof
will stop in the position reached when
the button is released. Hold button
B pressed again to reach the all closed
position of the roof.

ANTI-PINCH DEVICE

The sunroof has an anti-pinch safety
system capable of detecting the
presence of an obstacle whilst the roof
is closing. When this happens, the
system stops and the movement of the
roof is immediately reversed.

INITIALISATION
PROCEDURE

The sunroof must be re-initialised after
disconnecting the battery or if the
relevant protection fuse is blown.
Proceed as follows:

press button B fig. 30 and hold it

down so that the roof closes
completely in stages

after full closing, wait for the sunroof

motor to stop.

EMERGENCY OPERATION

If the electrical device for moving the
roof fails, the sun roof can be moved
manually proceeding as described
below:

for manual activation remove the

protective cap A fig. 31 from its housing
which is located on the internal
covering behind the sun blind

take the Allen key provided from the

tool box in the boot

29

F0S0097

30

F0S0096

28

KNOWING

YOUR

CAR

-------------------------------------------------------------------------------------------------------------------------------------------------------------

insert the key provided into housing

B fig. 31 and turn it clockwise to open
the roof or anticlockwise to close the
roof.

WARNING

22) When leaving the vehicle, always
remove the key from the ignition switch to
avoid the risk of injury to those still inside
the car due to accidental operation of
the sun roof. Improper use of the roof can
be dangerous. Before and during
operation, always check that no-one is
exposed to the risk of being injured by the
moving sunroof or by objects getting
caught or hit by it.

WARNING

11) Use the sun roof only at "spoiler"
position if a transverse roof rack is fitted.
12) Do not open the sun roof if there is
snow or ice on it: you may damage it.
13) Be careful not to hit objects on the
storage shelf when you open the tailgate.

SOFT TOP

Suggestions

it is advisable to close the soft top

when the car is parked. The closed soft
top effectively protects the car from
bad weather and from theft;

it is advisable to put valuables in the

boot and lock the lid even when the
top is closed.

SOFT TOP MOVEMENT

23) 24) 25)

14) 15) 16)

IMPORTANT The motor may overheat if
the soft top is repeatedly operated
within a short space of time, thus
causing the overheating protection to
inhibit system operation. Wait for a
minute and repeat.

Opening from roof fully closed
position

Press the button A fig. 32 once to open
the roof automatically to the horizontal
opening position (spoiler position).
If one of the two buttons is pressed
before reaching the spoiler position, the
roof may stop in an intermediate
horizontal opening position.

31

F0S0098

29

-------------------------------------------------------------------------------------------------------------------------------------------------------------

Opening from top in intermediate
horizontal position

From the horizontal intermediate
position press the button A fig. 32 to
move the roof automatically to the
horizontal all open position (spoiler
position) fig. 33.

Opening roof from spoiler to all
open position

From the spoiler position, pressing the
button A fig. 32 once, the roof goes
automatically to the full opening
position (vertical opening) fig. 34.

If one of the two buttons is pressed
before the final position is reached, the
soft top will stop and move back to
the initial position (spoiler position).

IMPORTANT The vertical opening will
be inhibited when the tailgate is open.

IMPORTANT If the soft top locks during
its movement, it may lose the position;
in this case, you should carry out a
complete opening / closing cycle.

Closing the roof from top fully open
position

Press the button B fig. 32 once to
automatically close the roof to spoiler
position (vertical section closing). If one
of the two buttons is pressed before
the spoiler position is reached, the roof
will stop and movement will be
reversed, moving to the initial position
(all open).

Initial condition: from spoiler
position to top all closed

Press the button B fig. 32 in the spoiler
position to bring the roof automatically
to the safety position (approximately
25 cm from fully closed position). If one
of the two buttons is pressed before
the stop position is reached, the soft
top may stop in an intermediate
horizontal open position.
NOTE The roof will not automatically
close completely; keep button B fig. 32
pressed to close the roof completely.
The roof will stop instantly if the button
is released before the all closed position
is reached.

32

F0S0542

33

F0S0546

34

F0S0545

30

KNOWING

YOUR

CAR

-------------------------------------------------------------------------------------------------------------------------------------------------------------

Initial condition: from intermediate
position to top all closed

Press the button B fig. 32 in the
horizontal intermediate position to bring
the roof automatically to the safety
position (approximately 25 cm from
horizontal all closed position).
Keep the button B fig. 32 pressed to
close the roof completely.
The roof will stop instantly if the button
is released before the all closed position
is reached.
IMPORTANT NOTES

The horizontal and vertical parts of

the soft top can be operated at any
speed lower than 100 and 80 km/h
respectively.

The top can be operated at any

temperature in the range from -18 to
+80 °C.

It is recommended to have the

engine running always when opening or
closing the soft top.

If required, remove the battery with

open or closed soft top, but NOT when
the soft top is moving.

Do not fix luggage transport devices

to the soft top and do not travel with
objects resting on the open top.

The activation of the heated rear

windscreen, upon request by the user,
is carried out only if the soft top is
completely closed. If the soft top is
closed incorrectly, the heated rear
window will not function and the
corresponding warning light will not turn
on.

When the soft top is opened using

the relevant control, if the heated rear
windscreen had been engaged it is
automatically deactivated and the
warning light switches off

Do not remove ice from the soft top

with a sharp item.

To prevent damage, do not use

scrapers or sprays to remove ice from
the heated rear window.

Do not put objects on the soft top:

they could fall if the it is operated,
causing damage and injury.

It is advisable to cover the soft top

with a protective sheet if the car is
left parked in the open for a long time.

Do not keep the soft top folded for a

long time: this could cause folds and
creases in the fabric.

Before moving the soft top, check

that there is enough room to carry
out the operation and that there are no
obstacles or people close to its moving
parts.

The cooled air flow into the

passenger compartment may decrease
if the automatic climate control system
is on and the top is not completely
closed.

With the soft top open and the car

travelling, the voice recognition system
may not recognise voice commands
because of the background noise: with
the soft top closed and at a high speed,
the voice function for number dialling
may not be recognised.

INITIALISATION
PROCEDURE

The soft top must be re-initialised after
disconnecting the battery or if the
relevant protection fuse is blown.
Proceed as follows:

before carrying out any other

operation, make sure the engine is on
during the whole initialisation
procedure;

keep the opening button pressed

until the soft top is completely open;

when the soft top is completely

open, keep the button pressed for at
least 2 seconds;

keep the closing button pressed

until the soft top is completely closed;

when the soft top is completely

closed, keep the button pressed for at
least 2 seconds.

31

-------------------------------------------------------------------------------------------------------------------------------------------------------------

When the procedure is terminated, the
soft top will automatically carry out a
complete opening and closing cycle (up
to 25 cm from the completely closed
position) to inform the driver that
correct operation has been restored.

WIND STOP

To use the Wind Stop fig. 35:

Release the backrest of the rear seat

(single or split).

Attach the Wind Stop by inserting

the central part inside the rear screen
guard, with the concave part in the
direction of the occupant, as shown in
the figure fig. 35;

re-position the backrest correctly;

the Wind Stop is locked between
the seat and parcel shelf.

FRONT SPOILER

The car is provided with a front spoiler
which can be raised to improve
aerodynamic comfort inside the
passenger compartment.
To lift the spoiler, release the catch by
means of the slider A moving it to
position 2 as shown in fig. 36.

WASHING/CLEANING THE
TOP

17) 18) 19) 20) 21) 22) 23) 24)

WARNING

23) Keep hands away from the top
mechanism while opening and closing the
top or if the top stops in a position before
completing the cycle to prevent damage
and injury.
24) Keep children away from the area in
which the top is folding during opening or
closing operations.

25) When leaving the car, always remove
the key from the ignition device to avoid the
risk of injury due to accidental operation
of the soft top: improper use of the roof
can be dangerous. Before and during
operation, always check that no-one is at
risk of being injured by the moving soft top
roof or by objects getting caught and
dragged by it.

WARNING

14) Never open the top in presence of
snow or ice to prevent damage.
15) Do not place objects on the rear
window shelf to prevent damage while the
top is closing.
16) Loads may not be secured on the roof.
17) Bird droppings and plant resins must
be washed off immediately and thoroughly
as the acid they contain is particularly
aggressive.
18) Never use high-pressure washing
systems.
19) When using steam washers or
high-pressure water washers, maintain a
suitable distance and do not exceed a
maximum temperature of 60°C. Damage,
alterations and water infiltration may occur
if the distance is too small and the pressure
is too high.
20) If a water jet is used, direct away from
the edges of the fabric and the rear
window frame to prevent water infiltration.
21) Never use alcohol, petrol, chemical
products, detergents, stain removers, wax,
solvents and "wash and polish" products.

35

F0S0550

36

F0S0548

32

KNOWING

YOUR

CAR

-------------------------------------------------------------------------------------------------------------------------------------------------------------

22) Rinse immediately to remove soap to
prevent stains and halos. Repeat the
operation if needed.
23) Rinse immediately, and repeat this
operation if necessary. If you choose to
waterproof the soft top, strictly follow the
instructions on the package of the
waterproofing product you have selected in
order to obtain optimal results.
24) The rubber seals on the soft top must
be cleaned exclusively with water. If you
notice that this trim is dry or is sticking,
apply talcum powder or products
specifically for rubber trim (silicone spray).

LUGGAGE
COMPARTMENT

26) 27) 28)

ELECTRIC HANDLE
(SOFT TOUCH)

The tailgate can be opened at any time
if the doors are unlocked.
To open it, enable the handle, opening
one of the front doors or unlocking
the doors with the remote control or
using the key without remote control.

Operate the electric handle A fig. 37

to open the tailgate.

To release the lock manually, use the

metal insert of the ignition key.

To release the lock with the remote

control, press button

.

To close, use the handle located

inside the tailgate.

If the tailgate is not shut properly the

dedicated instrument panel or colour
display warning light (where provided)
will switch on.

Opening the tailgate with soft top
all open

Pressing the tailgate opening one-touch
button A fig. 37 to automatically close
the soft top to spoiler position. The
tailgate can be opened in spoiler
position.

29)

EMERGENCY TAILGATE
OPENING

To open the tailgate from the inside if
the car battery is flat or the electric lock
of the tailgate is faulty, proceed as
follows:

take out the rear head restraints;

tilt the backrests;

to unlock the tailgate mechanically,

working from the inside of the luggage
compartment, use lever A fig. 38.

37

F0S0101

33

-------------------------------------------------------------------------------------------------------------------------------------------------------------

WARNING

26) Never exceed the maximum allowed
load in the luggage compartment, see
chapter “Technical specifications”. Also
make sure that the objects you place in the
luggage compartment have been properly
secured, to avoid them from being thrown
forward consequent to sudden braking
and injuring your passengers.
27) Be careful not to hit objects on the
storage shelf when you open the tailgate.
28) If you are travelling in areas with few
filling stations and you want to transport
fuel in a spare tank, comply with the law by
using only an approved, suitably secured
tank. In the event of a collision the fire
risk is increased all the same.
29) Do not drive with the tailgate open as
exhaust fumes may enter the vehicle.

BONNET

30) 31) 32) 33) 34)

OPENING

Proceed as follows:

pull lever A fig. 39 in the direction

indicated by the arrow;

move the release lever B in the

direction indicated by the arrow, and
raise the bonnet; locate the safety rod;

Insert the safety rod in the seat A fig.

40 integral to the bonnet.

CLOSING

To close the bonnet, remove the bonnet
stay and put it back in its own locking
device, slowly lower the bonnet to
about 20 cm from the engine
compartment, then let it drop into
position and check that it is completely
closed. If not, repeat the procedure.

WARNING

30) The bonnet may drop suddenly if the
supporting rod is not positioned correctly.
Only perform these operations when the
car is stationary.
31) Be careful working inside engine
compartment when the engine is hot to
avoid burning yourself. Do not place your
hands near the engine fan as it may be
activated even when the key is removed.
Wait until the engine has cooled.
32) Be very careful not to allow scarves,
neckties and other loose articles of clothing
from touching, even accidentally, any
moving parts. This may cause the clothing
to be pulled into the part, resulting in
serious injury to the wearer.

38

F0S0135

39

F0S0045

40

F0S0616

34

KNOWING

YOUR

CAR

-------------------------------------------------------------------------------------------------------------------------------------------------------------

33) For safety reasons, the bonnet must
always be properly closed while the car is
travelling. Make sure that the bonnet is
properly closed and that the lock is
engaged. If you notice when driving that
the bonnet has not been properly locked,
stop immediately and close the bonnet
correctly.
34) Use both hands to lift the bonnet.
Before lifting, check that the windscreen
wiper arms are not raised from the
windscreen, that the vehicle is stationary
and that the handbrake is engaged.

VERSION WITH LPG
SYSTEM

25)

INTRODUCTION

The "LPG" version of the car features
two fuel systems, one for petrol and
one for LPG. Like the petrol system, the
LPG system is timed, sequential
multipoint type with special injectors.

PASSIVE SAFETY / ACTIVE SAFETY

35) 36)

26) 27)

Passive safety

The car has the same passive safety
specifications as other versions. In
particular, the tank mountings (located
in the spare wheel housing) have been
designed to exceed the Fiat safety
standards for impact tests.

Active safety

The car has the same active safety
specifications as other versions.

Although the LPG system has
numerous safety features, it is advisable
to proceed as follows every time the
car is not in use for a long period or
moved in an emergency as a result of a
fault or accident:

unscrew the fixing devices A fig. 41,

then remove the cover B;

close the LPG cock by rotating the

knurled ring nut C fig. 42 clockwise;

41

F0S0541

42

F0S0531

35

-------------------------------------------------------------------------------------------------------------------------------------------------------------

refit the cover and retighten the

fastening devices.

LPG TANK

28)

The car has a (pressurised) tank A fig.
43 for accumulating LPG in a liquid
state. It is ring-shaped and located in
the spare wheel compartment with
suitable protection.

The LPG in the tank is always in both a
liquid and gaseous state, in physical
balance between the two stages.

The liquid, which cannot be
compressed, dilates by around 0.25%
for each increase in temperature of
one degree. For this reason a suitable
free gap allowing the increase in volume
of the liquid for all expected
temperature increases is guaranteed
(e.g. car parked in the sunshine in
summer), without compromising tank
integrity.
A safety valve has been fitted to this
end, to automatically limit the refilling of
the tank (during refuelling) to a
maximum level of 80% (liquid) of its
total capacity.

LPG tank certification

The LPG tank is certified in accordance
with the regulations in force.
In Italy, the tank has a life of 10 years
starting from the car registration date. If
the vehicle has been registered in a
country other than Italy, the duration
and the testing/inspection procedures
of the LPG tank can vary depending on
the national laws of that country. In all
case, when the time limit for your
country has expired, go to a Fiat Dealer
to have the tank replaced.
The tank identification data are printed
on the tank, under the multivalve unit:

type-approval country identification

and type-approval number;

type of gas for which it is designed

(LPG);

name of tank manufacturer;

tank commissioning pressure (30

bar);

maximum refilling percentage (80%);

tank dimensions;

rated tank capacity in litres;

tank manufacture date (month/year);

tank serial number.

LPG/PETROL SWITCH

37)

29)

It is located in the centre tunnel fig. 44
and includes:

petrol/LPG switch.

LPG quantity indicator; 5 LEDs,

four green and one orange to indicate
reserve. The orange LED turns on when
only one green LED is on.

petrol operating mode indicator:

orange LED next to the switch A.
This function is controlled directly by
the LPG control unit.

LPG operating mode indicator:

green LED next to the switch A. This
function is controlled directly by the
LPG control unit.

43

F0S0533

36

KNOWING

YOUR

CAR

-------------------------------------------------------------------------------------------------------------------------------------------------------------

IMPORTANT If the ignition key is turned
to MAR, all the device LEDs will stay
on for approximately 4 seconds (check
function).
Engine starting always occurs on petrol;
then, depending on the position of the
switch A fig. 44 the following occurs:

the switch A pressed on the right

side (identified by the

symbol)

indicates petrol operation with
activation of the associated amber LED
C;

switch A pressed on the left side

(identified by the symbol G) indicates
LPG operation with activation of the
associated green LED D.
Five LEDs B (one amber and four
green) on the top part of the switch
display the amount of LPG in the
cylinders.

If the LPG runs out, the system
automatically switches to petrol: the
orange LED C next to the switch
comes on and the green LED D
indicating LPG operation goes off.
When the car is refuelled with LPG after
a standard start-up on petrol, the fuel
system automatically returns to LPG:
the orange LED C next to the switch
goes off and the green LED D for LPG
operation turns on.
If you specifically wish to run on petrol,
press the switch A on the right-hand
side.
The amber LED C next to the switch
will turn on to indicate that switching
has taken place (the LPG fuel system
has been entirely disabled).
The fuel supply can only be returned to
LPG by operating switch A again,
green LED D next to the switch will turn
on to indicate that switching has taken
place.
In addition, when starting at outside
temperatures below approximately
–10°C, the switching times from petrol
to LPG increase to allow the pressure
regulator/reduction unit to heat up.

IMPORTANT If switching takes place
during acceleration or pick-up, there
may be a brief drop in power.

38)

30)

WARNING

35) Note that in some countries (including
Italy) there are legal restrictions in force
for parking/garaging motor vehicles fuelled
by gas that is denser than air; LPG comes
under this category.
36) If gas is smelt, switch from LPG
operation to petrol operation and
immediately go to a Fiat Dealership to have
the vehicle checked and possible system
faults excluded.
37) Do not switch between the two
operating modes whilst starting the engine.
38) The LPG supply system is equipped
with a "consumption" function linked to the
LED display of LPG level on the switch;
this function activates only after a
consistent variation in fuel level has been
detected. It is therefore advisable to fill
up with fuel at the first LPG refuelling
to obtain a more "precise" indication of the
level.

44

F0S0673

37

-------------------------------------------------------------------------------------------------------------------------------------------------------------

WARNING

25) The system operates at temperatures
ranging between −20°C and 100°C.
26) The car is equipped with a gaseous
LPG injection system designed specifically
for it: it is therefore absolutely forbidden
to alter the configuration of the system or
its components. The use of other
components or materials could cause
malfunctions and lead to a reduction in
safety; therefore, in the case of problems,
contact a Fiat Dealership. To prevent
damage to the gas system parts when
towing or raising the vehicle, follow the
instructions in the "Towing the vehicle"
paragraph of the Owner Handbook.
27) When painting in an oven, the LPG
tank must be removed from the car and
later refitted by a Fiat Dealership. Although
the LPG system has numerous safety
features, it is advisable to proceed
as follows every time the vehicle is not in
use for a long period or moved in an
emergency as a result of a breakdown or
accident: unscrew the fastening devices A
fig. 41
, then remove the cover B. Close
the LPG cock rotating the ring nut C
clockwise fig. 42; refit the cover and tighten
the fixing devices.

28) Periodically (at least once every six
months), it is advisable to let the LPG in the
tank run out and, at the next refuelling,
check that it does not exceed the
maximum capacity of 30.5 litres (reserve
included) (with a tolerance of 2 litres
excess) (see instructions in the "Capacities"
paragraph). If the level is above 30.5 litres
(reserve included) contact a Fiat Dealership
immediately.
29) In particular usage conditions, such as
starting and operation at low ambient
temperature or LPG supply with low
propane content, the system may switch
temporarily to petrol operation, without
a visual indication of switching on the
selector. If the level of LPG in the tank is
low or there is a request for high
performance (e.g. overtaking, car fully
laden, steep hills): the system can
automatically switch to petrol operation to
guarantee the required engine
performance; in this event, the performed
switching is shown by the orange (petrol)
LED lit and the green (LPG) LED off on the
switch. When the above conditions stop,
the system automatically restores the LPG
operation; the orange (petrol) LED turns
off and the green (LPG) LED is lit on the
switch. To achieve the automatic switching
described above, make sure that there is
always enough fuel in the petrol tank.
30) It is strictly forbidden to use any
additive in the LPG.

38

KNOWING

YOUR

CAR

-------------------------------------------------------------------------------------------------------------------------------------------------------------

KNOWING THE INSTRUMENT PANEL

This section of the handbook gives you
all the information you need to
understand, interpret and use the
instrument panel correctly.

CONTROL PANEL AND
ON-BOARD INSTRUMENTS ........... 40

DISPLAY ......................................... 42

TRIP COMPUTER ........................... 45

WARNING LIGHTS AND
MESSAGES .................................... 46

Red warning lights ............................ 46

Amber warning lights......................... 52

Green warning lights ......................... 57

Blue warning lights ............................ 58

Red symbols .................................... 59

Amber symbols ................................ 60

39

-------------------------------------------------------------------------------------------------------------------------------------------------------------


Content      ..      1      2      3      ..