DongFeng RICH. Service Manual - part 8
 

  Index      DongFeng     DongFeng RICH. Service Manual


Search            copyright infringement  


Content      ..     6      7      8      9     ..


DongFeng RICH. Service Manual - part 8


Maintenance and do-it-yourself

 7-13 

JUMP STARTING 

If  jump  starting is  necessary,  see 
the  “In  case  of  emergency” 
section.  If  the  engine  does  not 
start  by  jump  starting,  the  battery 
may have to be replaced. Contact 
your ParsKhodro dealer. 


DRIVE BELTS 

Be sure the ignition key is “OFF”. 
1.  Visually  inspect  each  belt  for 

signs  of  unusual  wear,  cuts, 
fraying  or  looseness.  If  the 
belt  is  in  poor  condition  or 
loose,  have  it  replaced  or 
adjusted by your ParsKhodro 
dealer. 

2.  Have  the  belts  checked 

regularly  for  condition  and 
tension  in  accordance  with 
the  maintenance  schedule  in 
this manual. 


SPARK PLUG 
REPLACEMENT 


CAUTION 

Be sure the engine and ignition 
switch  are  off  and  that  the 
parking 

brake 

is 

engaged 

securely. 
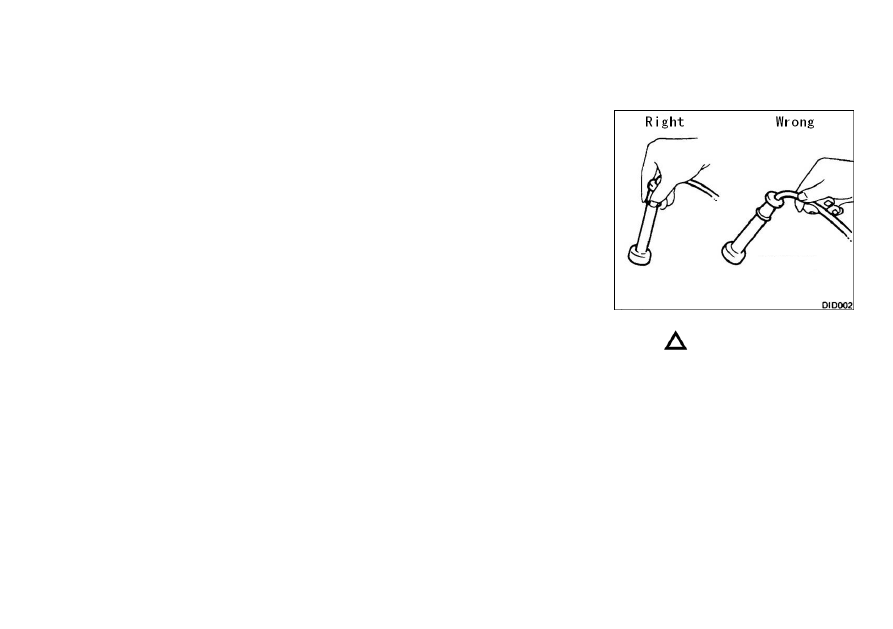
1.  Disconnect spark plug cables. 

Keep  track  of  the  original 
cable location. 

When  disconnecting,  always  hold 
the boots 

— not the cables. Mark 

all cables to identify. 

-------------------------------------------------------------------------------------------------------------------------------------------------------------

7-14      Maintenance and do-it-yourself 

2.  Remove  spark  plugs  with  a 

spark plug wrench. 


3.  Check  each  new  spark  plug 

gap with a feeler gauge. (The 
spark  plug  gap  is  shown  in 
the  “Technical  information” 
section.) 

Correct 

it 

as 

required. 

4.  Install spark plugs. 

CAUTION 

When installing a plug, turn it in 
two or three turns by hand and 
then  tighten  with  a  spark  plug 
wrench.  Be  careful  not  to  over 
tighten it. 


Spark plug tightening torque: 
  20 to 29 N⋅m 
(2.0 to 3.0 kg-m, 14 to 22 ft-lb) 
5.  Reconnect  the  spark  plug 

cables 

to 

their 

original 

positions. 


AIR CLEANER FILTER 


Check the filter element to see if it 
is  dirty.  If  it  is  dirty,  shake  the 
element  to  remove  dust.  We 
recommend  it  be  cleaned  or 
replaced 

according 

to 

the 

maintenance intervals shown in a 
separate  maintenance  booklet. 
When  cleaning  or  replacing  the 
filter,  wipe  the  inside  of  the  air 
cleaner  housing  and  the  cover 
with a damp cloth. 
Clean  the  filter  element  after 
driving in dusty conditions. 
 

Round type 


-------------------------------------------------------------------------------------------------------------------------------------------------------------

Maintenance and do-it-yourself

 7-15 


WARNING 

Operating  the  engine  with  the 
air cleaner off can cause you or 
others  to  be  burned.  The  air 
cleaner not only cleans the air, 
it  stops  flame  if  the  engine 
backfires.  If  it  is  not  there,  and 
the engine backfires, you could 
be  burned.  Don’t  drive  with  it 
off,  and  be  careful  working  on 
the  engine  with  the  air  cleaner 
off. 

WIPER BLADES 
REPLACEMENT 


CLEANING 

If your windshield is not clear after 
using  the  windshield  washer  or  if 
a  wiper  blade  chatters  when 
running,  wax  or  other  material 
may 

be 

on 

the 

blade 

or 

windshield. 
Clean 

the 

outside 

of 

the 

windshield with a washer solution 
or 

mild 

detergent. 

Your 

windshield is clean if beads do not 
form  when  rinsing  with  clear 
water. 


Clean the blade by wiping it with a 
cloth soaked in a washer solution 
or  a  mild  detergent.  Then  rinse 
the blade with clear water. If your 
windshield  is  still  not  clear  after 
cleaning the blades and using the 
wiper, replace the blades. 

REPLACEMENT 

Pull the wiper arm up. 
Push  the  lock  pin,  then  remove 
the wiper blade. 
Insert  the  new wiper blade  to  the 
wiper arm until a click sounds. 
 

Plain type 


-------------------------------------------------------------------------------------------------------------------------------------------------------------

7-16      Maintenance and do-it-yourself 

CAUTION 

● 

After 

wiper 

blade 

replacement,  return  the  wiper 
arm to its original position. 

● 

Otherwise 

it 

may 

be 

damaged when the engine hood 
is opened. 

● 

Make  sure  the  wiper  blade 

contacts  the  glass.  Otherwise, 
the  arm  may  be  damaged  from 
wind pressure. 


BRAKE CONDITIONS 

Parking brake 

Periodically  check  the  holding 
ability  of  the  parking  brake  by 
parking  on  a  steep  hill  and 
restraining  the  vehicle  by  using 
only  the  parking  brake.  If  it  does 
not  hold  satisfactorily,  see  your 
ParsKhodro dealer. 

Brake pedal 

If  the  brake  pedal  suddenly  goes 
down  further  than  normal,  the 
pedal feels “spongy” or the vehicle 
seems to take longer to stop, see 
your ParsKhodro dealer. 


-------------------------------------------------------------------------------------------------------------------------------------------------------------

Maintenance and do-it-yourself

 7-17 

BRAKE BOOSTER 

Check  the  brake  booster  function 
with the following steps: 
With  the  engine  off,  depress  the 
brake pedal several times to make 
sure that the pedal travel distance 
does not change. 
While depressing the brake pedal, 
start the engine. The pedal height 
should drop a little. 
With  the  brake  pedal  depressed, 
stop  the  engine.  Keeping  the 
pedal  depressed  for  about  30 
seconds,  the  pedal  height  should 
not change. 
Run  the  engine  for  one  minute 
without  depressing  the  brake 
pedal, then turn it off. Depress the 
brake  pedal  several  times.  The 
pedal 

travel 

distance 

will 

decrease  gradually  with  each 
depression  as  the  vacuum  is 
released from the booster. 
If  the  brakes  do  not  operate 
properly,  see  your  ParsKhodro 
dealer. 
 

FUSES 


Engine compartment 

If  any  electrical  equipment  does 
not  operate,  check  for  an  open 
fuse. 
1.  Be  sure  the  ignition  key  and 

the  headlight  switch  are 
“OFF”. 

2.  Open the engine hood. 
3.  Remove 

the  fusible 

link 

cover. 

4.  Remove  the  fuse  with  the 

fuse puller. 

5.  If the fuse is open, replace it 

with a new fuse. 


Never  use  a  fuse  of  higher 
amperage 

rating 

than 

that 

specified on the fuse box cover. 
6.  If  a  new  fuse  opens  again, 

have  the  electrical  system 
checked and repaired by your 
ParsKhodro dealer. 


-------------------------------------------------------------------------------------------------------------------------------------------------------------

7-18      Maintenance and do-it-yourself 


Passenger compartment 

If  any  electrical  equipment  does 
not  operate,  check  for  an  open 
fuse. 
1.  Be  sure  the  ignition  key  and 

the  headlight  switch  are 
“OFF”. 

2.  Remove the fuse box lid. 
3.  Remove  the  fuse  with  the 

fuse puller. 

4.  the  fuse  is  open,  replace  it 

with a new fuse. 


CAUTION 

If  never  use  a  fuse  of  higher 
amperage 

rating 

than 

that 

specified on the fuse box cover. 
5.  If  a  new  fuse  opens  again, 

have  the  electrical  system 
checked and repaired by your 
ParsKhodro dealer. 


-------------------------------------------------------------------------------------------------------------------------------------------------------------

Maintenance and do-it-yourself

 7-19 

LIGHT BULBS 

HEADLIGHTS 
(Semi-sealed beam type) 
The  headlight  is  a  semi-sealed 
beam 

type 

which 

uses 

replaceable headlight bulb. A bulb 
can be replaced inside the engine 
compartment  without  removing 
the headlight assembly. 
CAUTION: 
High  pressure  halogen  gas  is 
sealed inside the halogen bulb. 
The bulb may break if the glass 
envelope  is  scratched  or  the 
bulb  is  dropped.  Never  touch 
the glass envelope.


-------------------------------------------------------------------------------------------------------------------------------------------------------------

7-20      Maintenance and do-it-yourself 

Replacing the headlight bulb 
1.  Disconnect 

the 

negative 

battery cable. 

2.  Disconnect 

the 

electrical 

connector from the rear end of 
the  bulb  and  remove  the 
rubber cap. 

3.  Push  and  turn  the  retaining 

pin to loosen it. 

4.  Remove  the  headlight  bulb. 

Do  not  shake  or  rotate  the 
bulb when removing it. 

5.  Install  the  new  bulb  in  the 

reverse order of removal. 

        Press  the  rubber  cap  firmly 

so the lip comes into contact 

with the headlight body. 

CAUTION: 
  DO


NOT


TOUCH


THE


BULB. 

  Use  the  same  number  and 

wattage as originally installed: 
Wattage 60/55. 

  Aiming 

is 

usually 

not 

necessary after replacing the 
bulb. 

When 

aiming 

adjustment 

is 

necessary, 

contact your NISSAN dealer. 

  Do  not  leave  the  bulb  out  of 

the  headlight  reflector  for  a 
long  period  of  time  as  dust, 
moisture,  smoke  may  enter 
the headlight body and affect 

the 

performance 

of 

the 

headlight. 


OTHER LIGHTS 

Item 

Wattage(W) 

Front turn signal light 

21 

Front position lamp 

4.5

(0.5*9) 

Side turn signal light 

Rear combination light 


Turn signal light 

21 

Stop/Tail light 

21/5 

Back-up light 

21 

Rear fog light 

21 

License plate light 

Interior light 

10 

Personal light 


-------------------------------------------------------------------------------------------------------------------------------------------------------------

Maintenance and do-it-yourself

 7-21 

LIGHT LOCATION 


-------------------------------------------------------------------------------------------------------------------------------------------------------------


7-22      Maintenance and do-it-yourself 


Method for Replacement 

These  are  all  types  of  the 

light.  Remove  the  shade  first 

before you want to replace it. 


-------------------------------------------------------------------------------------------------------------------------------------------------------------

Maintenance and do-it-yourself

 7-23 


WHEELS AND TIRES 

If you have a flat tire, see “In case 
of emergency” section. 

Tire inflation pressure 

Periodically 

check 

the 

tire 

pressure  (including  spare).  Tire 
pressure should be checked when 
tires  are  COLD.  COLD  tire 
pressures  are  shown  on  the  tire 
placard affixed to the glove box or 
driver’s side center pillar. 

CAUTION 

Incorrect  tire  pressure  may 
adversely  affect  tire  life  and 
vehicle handling. 


-------------------------------------------------------------------------------------------------------------------------------------------------------------


7-24      Maintenance and do-it-yourself 

COLD pressure 

After vehicle has been parked for 
three hours or more or driven less 
than 1.6 km (1 mile). 
Insufficient  pressure  can  lead  to 
an  overheating  of  the  tire  and 
subsequent  internal  damage.  At 
high  speeds,  this  could  result  in 
tread 

separation 

and 

even 

bursting of the tire. 


Tire rotation 

ParsKhodro  recommends  that 
tires  be  rotated  every  10,000  km 
(6,000  miles)  for  2WD  vehicles 
and  5,000  km  (3,000  miles)  for 
4WD vehicles. 
See  “Flat  tire”  in  the  “In  case  of 
emergency”  section  for  tire 
replacing procedures. 


● 

After  rotating  the  tires, 

adjust the tire pressure. 

Warning 

Incorrect  tire  selection,  fitting, 
care  or  maintenance  can  affect 
vehicle  safety  with  risk  of 
accident and injury. If in doubt, 
consult 

your 

ParsKhodro 

dealer or the tire manufacturer. 


Tire wear and damage 

Tires 

should 

be 

periodically 

inspected  for  wear,  cracking, 
bulging  or  objects  caught  in  the 
tread.  If  excessive  wear,  cracks, 
bulging  or  deep  cuts  are  found, 
the tire should be replaced. 
The  original  tires  have  a  built-in 
tread  wear  indicator.  When  the 
wear  indicator  is  visible,  the  tire 
should be replaced. 

Tire age 

Remember  tire  age.  Never  use  a 
tire over six years old, regardless   

-------------------------------------------------------------------------------------------------------------------------------------------------------------

Maintenance and do-it-yourself

 7-25 

of  whether  it  has  been  used  or 
not. 
Tires degrade with age as well as 
the  use  they  are  subjected  to, 
have  your  tires  checked  and 
balanced 

frequently 

by 

recognized  tire  agent.  Report  all 
accidents  where  the  tire  is 
knocked however minor. 

Changing tires and wheels 

When  replacing  a  tire,  use  the 
same size, speed rating and load 
carrying  capacity  as  originally 
equipped.  Recommended  types 
and  sizes  are  s

hown  in  “Wheels 

and  tires”  in  the  “Technical 
information”  section.  The  use  of 
tires 

other 

than 

those 

recommended or the mixed use of 
tires 

of 

different 

brands, 

construction  (bias,  bias-belted  or 
radial),  or  tread  patterns  can 
adversely affect the ride, braking, 
handling, 

ground 

clearance, 

body-to-tire 

clearance, 

snow 

chain clearance, speedometer   
 
calibration,  headlight  aim  and 

bumper  height.  Some  of  these 
effects may lead to accidents and 
could  result  in  serious  personal 
injury. 
If the wheels are changed for any 
reason, 

always 

replace 

with 

wheels  which  have  the  same 
offset  dimension.  Wheels  of  a 
different  offset  could  cause  early 
tire  wear,  possibly  degraded 
vehicle  handling  characteristics 
and/or interference with the brake 
discs/drums.  Such  interference 
can  lead  to  decreased  braking 
efficiency  and/or  early  brake 
pad/shoe wear. 

WARNING 

Do not install a deformed wheel 
or  tire  even  if  it  has  been 
repaired.  Such  wheels  or  tires 
could  have  structural  damage 
and could fail without warning. 


CAUTION 

● 

Always  use  tires  of  the 

same  size,  brand,  construction 
(bias, bias-belted or radial), and 
tread pattern on all four wheels. 
Failure to do so may result in a 
circumference 

difference 

between  tires  on  the  front  and 
rear  axles  which  will  cause 
excessive  tire  wear  and  may 
damage 

the 

transmission, 

transfer  case  and  differential 
gears. 

● 

ONLY 

use 

spare 

tires 

specified for each 4-wheel drive 
model. 

Wheel balance 

Unbalanced  wheels  may  affect 
vehicle handling and tire life. Even 
with  regular  use,  wheels  can  get 
out  of  balance.  Therefore,  they 
should be balanced as required. 


-------------------------------------------------------------------------------------------------------------------------------------------------------------


7-26      Maintenance and do-it-yourself 

Care of wheels 

● 

Wash  the  wheels  when 

washing the vehicle to maintain 
their appearance. 

● 

Clean  the  inner  side  of  the 

wheels  when  the  wheel  is 
changed or the underside of the 
vehicle is washed. 

● 

Do 

not 

use 

abrasive 

cleaners  when  washing  the 
wheels. 

● 

Inspect 

wheel 

rims 

regularly for dents or corrosion. 
This 

may 

cause 

loss 

of 

pressure  or  damage  the  tire 
bead. 

● 

ParsKhodro  recommends 

that  the  road  wheels  be  waxed 
to  protect  against  road  salt  in 
areas  where  it  is  used  during 
winter. 

Tire chains 

Use  of  tire  chains  is  prohibited 
according  to  location.  Check  the 
local  laws  before  installing  tire 
chains. When installing tire chains, 
make sure they are of proper size 

for  the  tires  on  your  vehicle  and 
are  installed  according  to  the 
chain manufacturer’s suggestions. 
Use 

chain 

tensioners 

when 

recommended  by  the  tire  chain 
manufacturer to ensure a tight fit. 
Loose  end  links  of  the  tire  chain 
must  be  secured  or  removed  to 
prevent the possibility of whipping 
action  damage  to  the  fenders  or 
undercarriage. In addition, drive at 
a reduced speed. Otherwise, your 
vehicle  may  be  damaged  and/or 
vehicle handling and performance 
may be adversely affected. 
Never install tire chains on a small 
size spare tire. 
Tire chains must be installed only 
on the rear wheels and not on the 
front wheels. 
Do  not  drive  with  tire  chains  on 
paved  roads  which  are  clear  of 
snow. Driving with chains in such 
conditions  can  cause  damage  to 
the  various  mechanisms  of  the 
vehicle  due  to  some  overstress. 
When  driving  on  clear  paved 
roads, be sure to change to 2WD. 

CLUTCH HOUSING 


Checking water entry 

Whenever you drive in deep water 
or  mud,  check  water  entry  in  the 
clutch  housing  by  removing  the 
blind  plug  at  the  bottom  of  the 
transmission case. After checking, 
be sure to reinstall the plug. 


-------------------------------------------------------------------------------------------------------------------------------------------------------------

-------------------------------------------------------------------------------------------------------------------------------------------------------------

8-2    Maintenance schedule 

MAINTENANCE 
REQUIREMENTS 

Your  new  vehicle  has  been 
designed 

to 

have 

minimum 

maintenance  requirements  with 
longer  service  intervals  to  save 
you  both  time  and  money. 
However,  some  day-to-day  and 
regular  maintenance  is  essential 
to  maintain  your  vehicle

’s  good 

mechanical  condition,  as  well  as 
its 

emission 

and 

engine 

performance. 
It  is  the  owner’s  responsibility  to 
make 

sure 

that 

scheduled 

maintenance,  as  well  as  general 
maintenance, is performed. 
As  a  vehicle  owner,  you  are  the 
only  one  who  can  ensure  that 
your  vehicle  receives  the  proper 
maintenance care. You are a vital 
link in the maintenance chain. 

Scheduled maintenance 
For 

your 

convenience, 

the 

required  scheduled  maintenance 
items are described and listed in a 
separate  maintenance  booklet. 
You  must  refer  to  that  booklet  to 

ensure 

that 

necessary 

maintenance is performed on your 
vehicle at regular intervals. 

General maintenance 
General  maintenance  includes 
those  items  which  should  be 
checked during normal day-to-day 
operation of the vehicle. They are 
essential  if  your  vehicle  is  to 
continue  to  operate  properly.  It  is 
your  responsibility  to  perform 
these  procedures  regularly  as 
prescribed. 
Performing  general  maintenance 
checks 

require 

minimal 

mechanical  skill  and  only  a  few 
general automotive tools. 
These  checks  or  inspections  can 
be  done  by  yourself,  a  qualified 
technician  or,  if  you  prefer,  your 
ParsKhodro dealer. 

Where to go for service 
If maintenance service is required 
or  your  vehicle  appears  to 
malfunction,  have  the  systems 
checked 

and 

tuned 

by 

an 

authorized ParsKhodro dealer. 
ParsKhodro 

technicians 

are 

well-trained  specialists  and  are 
kept  up  to  date  with  the  latest 
service 

information 

through 

technical  bulletins,  service  tips, 
and 

in-dealership 

training 

programs.  They  are  completely 
qualified to work on ParsKhodro

’s 

vehicles before they work on your 
vehicle,  rather  than  after  they 
have worked on it. 
You  can  be  confident  that  your 
ParsKhodro 

dealer’s 

service 

department performs the best job 
to 

meet 

the 

maintenance 

requirements on our vehicle 

— in 

a reliable and economic way. 


-------------------------------------------------------------------------------------------------------------------------------------------------------------


Content      ..     6      7      8      9     ..