Tesla Model Y (2022 year). Manual in english - page 6
Charging Instructions
NOTE:
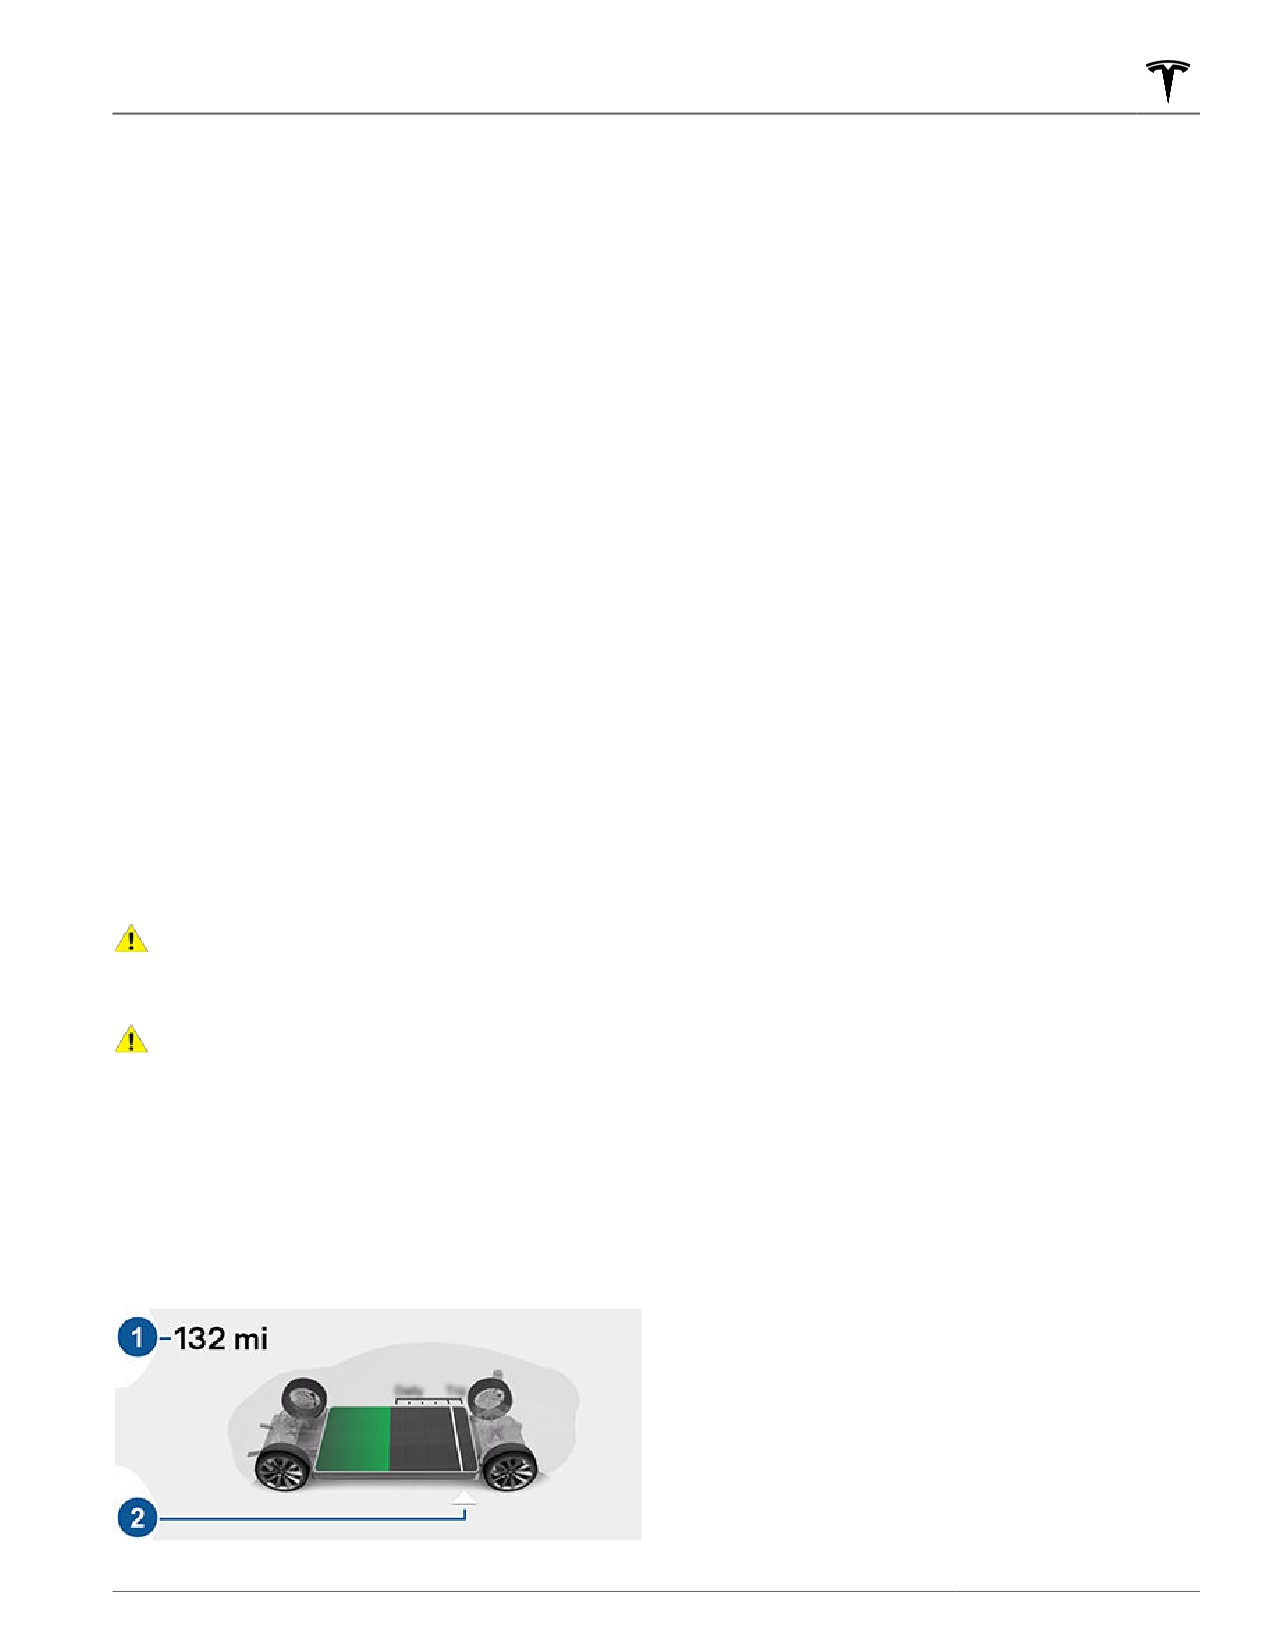
1. Driving distance: Displays the total estimated driving
distance available.
To disconnect the charge cable:
2. Set limit: Adjust the charge limit by dragging the
arrow below the battery to indicate the level of
1. Press and hold the button on the connector handle to
charging you want. The setting you choose applies to
release the latch.
immediate and scheduled charging sessions.
NOTE: You can also release the latch using the
NOTE: If your vehicle is equipped with an LFP
touchscreen or mobile app, or by pressing and
Battery, which you can determine by navigating to
holding the rear trunk button on the key fob.
Controls > Software > Additional Vehicle
Information, Tesla recommends you keep your charge
2. Pull the connector from the charge port. The charge
limit to 100%, even for daily use, and that you also
port door automatically closes.
fully charge your vehicle to 100% at least once per
week. See Lithium Iron Phosphate Batteries on page
To disconnect the charge cable when using an adapter
167 for more information.
at a public charge station:
NOTE: A portion of the battery image may appear
1. Unlock Model Y.
blue. This indicates that a small portion of the energy
stored in the battery is not available because the
2. While holding the public charging handle in one hand
battery is cold. This is normal and no reason for
and the adapter in the other hand, press and hold the
concern. When the battery warms up, the blue
button on the public charging handle and pull both
portion no longer displays.
outwards, removing the handle and adapter at the
same time.
You can further adjust charge settings:
NOTE: If the charging station handle separates from
the adapter, leaving the adapter in Model Y, use the
• Open Charge Port, Unlock Charge Port and Stop
touchscreen to unlock the charge port.
Charging: When not charging, touch Open Charge
Port or Unlock Charge Port to open the charge port
3. Press and hold the button on the charging handle
door or to unlock the charge cable from the charge
again to release the adapter from the public charging
port. Use Stop Charging when you are finished
handle.
charging.
NOTE: The charge port door automatically closes within
• Charge current at this location: The current
approximately 10 seconds of removing the connector
automatically sets to the maximum current available
from the charge port.
from the attached charge cable, unless it was
previously reduced to a lower level. If needed, touch -
CAUTION: Tesla strongly recommends leaving
or + to change the current (for example, you may
Model Y plugged in when not in use. This
want to reduce the current if you are concerned
maintains the Battery at the optimum level of
about overloading a domestic wiring circuit shared
charge.
by other equipment). It is not possible to set the
CAUTION: Model Y does not shift out of Park if the
charging current to a level that exceeds the maximum
charge port is unable to determine whether a
available from the attached charge cable. When you
charging cable is plugged in. Ensure the charging
change the current, Model Y remembers the location.
cable is unplugged and follow the instructions on
If you charge at the same location, you do not need
the touchscreen to proceed (see Park on page 53).
to change it again.
NOTE: If Model Y is charging and detects unexpected
Charge Settings
fluctuations in input power, the charging current is
automatically reduced by 25%. For example, a
Access charge settings by touching Controls > Charging
40 amp current is reduced to 30 amps. This
when Model Y is in Park. You can also touch the battery
automatic current reduction increases robustness and
icon on the touchscreen to access charge settings.
safety in situations when an external problem exists
(for example, a home wiring system, receptacle,
adapter or cord is unable to meet its rated current
capacity). As a precaution, when Model Y
automatically reduces current, it saves the reduced
current at the charging location. Although you can
manually increase it, Tesla recommends charging at
the lower current until the underlying problem is
resolved and the charging location can provide
consistent power.
Charging
171
Charging Instructions
• Schedule: Depending on the setting you select by
Using Scheduled Departure
touching Switch to Scheduled Departure/Scheduled
Charging, this displays either a departure time for
Use Scheduled Departure to set a daily time when you
when the vehicle should be preconditioned and/or
want Model Y to be ready to drive. Your vehicle
charged by or a time to start charging (see
automatically calculates when it needs to start
Scheduled Charging and Scheduled Departure on
preconditioning and/or charging. This ensures that
page 172).
charging is complete and/or the cabin climate and
• Supercharging: Displays supercharger usage fees, the
Battery are preconditioned by your departure time.
location, the time that charging started, and a cost
estimate for the session (see Supercharger Usage
When Scheduled Departure is displayed, touch
Fees and Idle Fees on page 173).
Schedule to set a daily time when you want Model Y to
be ready to drive. Specify a time, then touch Settings to
NOTE: To reduce congestion at high-usage
enable one or both of the following departure features.
supercharger sites, you may be limited to a maximum
When plugging in with Off-Peak Charging enabled, the
charge of 80% when not using Trip Planner (if
vehicle briefly draws power (you may hear clicking) to
available in your market region). See Trip Planner on
calculate the necessary charging start time.
page 139).
After you’ve specified your desired settings, touch Set.
The touchscreen displays your scheduled departure
Scheduled Charging and Scheduled
time.
Departure
• Preconditioning warms the Battery for improved
performance and ensures a comfortable cabin
Toggle between Scheduled Departure and Scheduled
climate at your set departure time.
Charging by touching Controls > Charging > Switch to
Scheduled Charging/Scheduled Departure when Model
NOTE: When Model Y is not plugged in,
Y is in Park.
preconditioning operates but only when the Battery's
charge level is above 20%.
NOTE: Scheduled Charging/Scheduled Departure
settings are also available on the Climate Controls
• Off-Peak Charging delays charging and automatically
screen and in the Tesla mobile app.
starts charging in order to finish before your
scheduled departure time while also ensuring to
Think of Scheduled Charging as "When do I want
charge the Battery during off-peak hours to reduce
charging to start?" compared to Scheduled Departure
energy costs. Touch Change Off-Peak Hours to
Off-Peak Charging which is "When do I want charging to
customize the time when off-peak utility rates end.
be complete?"
NOTE: Choosing Off-Peak Charging can reduce
energy costs even in market regions where off-peak
Scheduled Charging can be used together with
utility rates are not applicable. For example, if
Scheduled Departure Preconditioning but not with
charging starts as soon as you plug in, charging may
Scheduled Departure Off-Peak Charging.
complete much sooner. This causes the Battery to
cool down to ambient temperatures and requires
Scheduled Charging/Scheduled Departure settings are
energy to warm it back up by your departure time.
automatically saved for each location.
Therefore, even if off-peak utility rates are not
applicable to you, it is recommended that you set
NOTE: If you plug in Model Y with both Off-Peak
Off-Peak Hours to the same time as your departure
Charging and Scheduled Charging deselected, your
time in order to reduce energy consumption.
vehicle charges immediately.
NOTE: If there is not enough time to reach the charge
limit, charging starts immediately in order to charge
Using Scheduled Charging
as much as possible.
NOTE: Once charging has started and there is not
Use Scheduled Charging to specify a daily time in which
enough time to complete charging during off-peak
you want Model Y to start charging.
hours, charging continues until the charge limit is
With Scheduled Charging selected, enable the feature
reached.
then set a daily time to start charging.
You can limit Preconditioning and Off-Peak Charging to
NOTE: Scheduled Charging starts charging immediately
weekdays only.
if Model Y is plugged in up to 6 hours after the
scheduled start time. However, if Model Y is plugged in
after six hours of the scheduled charging time, charging
may not start until the scheduled time on the next day.
172
Charging Instructions
Supercharger Usage Fees and Idle
Fees
When charging at a Tesla supercharger, information
about the charging session displays at the bottom of the
charging screen. This includes the location, the time that
charging started, and a cost estimate for the session.
When you stop supercharging, the estimated cost of the
session displays until a new supercharging session
begins.
NOTE: Estimated cost may not reflect the final cost of
the supercharging session. Final pricing for
supercharging sessions can be found in your Tesla
account.
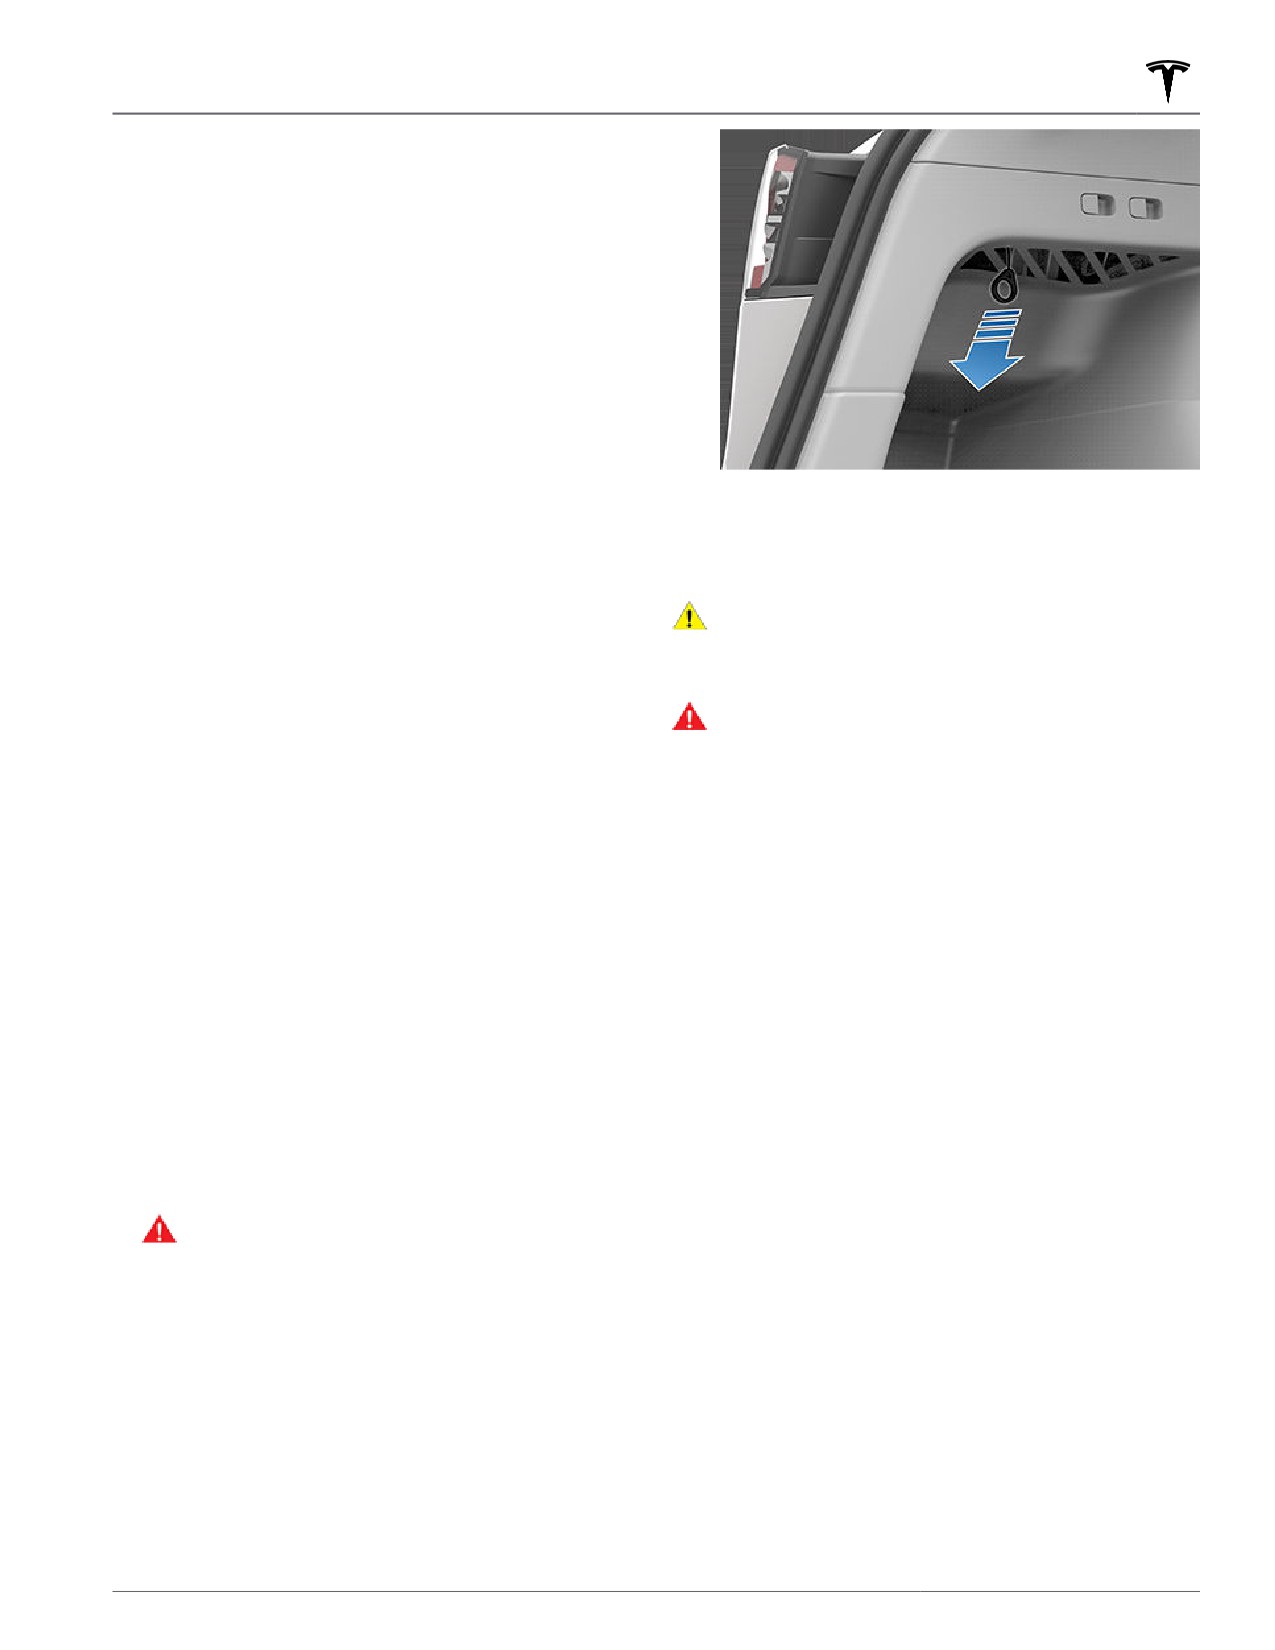
NOTE: The release cable may be recessed within the
opening of the trim.
When charging at a Tesla supercharger, you are subject
to idle fees. Idle fees are designed to encourage drivers
4. Pull the charge cable from the charge port.
to move their vehicle from the Supercharger when
charging is complete. Idle fees are in effect only when
half or more of the Superchargers at a site are occupied.
CAUTION: Use the release cable only in situations
The Tesla mobile app notifies you when charging is
where you can not release the charge cable using
almost complete, and again when charging is complete.
the usual methods. Continuous use can damage
Additional notifications are sent if idle fees are incurred.
the release cable or charging equipment.
Idle fees are waived if you move your vehicle within five
WARNING: Do not perform this procedure when
minutes of when charging completed.
your vehicle is charging, or if any orange high
voltage conductors are exposed. Failure to follow
Log into your Tesla account to view fees and details
these instructions can result in electric shock and
about Supercharger sessions, set up a payment method,
serious injury or damage to the vehicle. If you are
and make payments. Once a payment method is saved,
uncertain as to how to safely perform this
fees are automatically paid from your account.
procedure, contact your nearest Service Center.
Manually Releasing Charge Cable
If the usual methods for releasing a charge cable from
the charge port (using the charge handle release button,
touchscreen, or mobile app) do not work, carefully
follow these steps:
1. Ensure that Model Y is not actively charging by
displaying the charging screen on the touchscreen. If
necessary, touch Stop Charging.
2. Open the rear trunk.
3. Pull the charge port's release cable downwards to
unlatch the charge cable.
WARNING: Do not pull the release cable while
simultaneously attempting to remove the
charge cable from the charge port. Always pull
the release cable before attempting to remove
the charge cable. Failure to follow these
instructions can result in electric shock and
serious injury.
Charging
173
Maintenance
Software
• Approximate speed the vehicle was traveling (if
applicable).
Updating software is important to ensure proper
• Environmental conditions (rain, snow, cold, etc.).
operation and longevity of your vehicle's components.
• Road name and type of road (if applicable).
You must install a software update at the earliest
opportunity. See Software Updates on page 161.
• Quality of lane markings (if applicable).
• Applicable vehicle settings.
Tesla may update or reinstall your vehicle's software as
part of the normal diagnostic, repair, and maintenance
• Identifiable symptoms.
process within Service.
more information on scheduling service.
Service Intervals
Your vehicle should generally be serviced on an as-
Daily Checks
needed basis. However, Tesla recommends the following
maintenance items and intervals, as applicable to your
• Check the Battery’s charge level, displayed on the
vehicle, to ensure continued reliability and e
ciency of
touchscreen or mobile app.
your Model Y.
• Check the condition and pressure of each tire (see
Tire Care and Maintenance on page 176).
• Brake fluid health check every 2 years (replace if
necessary) or, if the vehicle is used for towing,
• Check that all exterior lights, horn, turn signals, and
replace the brake fluid every 2 years.
wipers and washers are working.
• A/C desiccant bag replacement every 4 years.
• Check for any unexpected indicator lights or vehicle
alerts on the touchscreen.
• Cabin air filter replacement every 2 years (or 3 years
for HEPA filter, if equipped).
• Check the operation of the brakes, including the
parking brake.
• Clean and lubricate brake calipers every year or
12,500 miles (20,000 km) if in an area where roads
• Check the operation of the seat belts (see Seat Belts
are salted during winter
on page 30).
• Rotate tires every 6,250 miles (10,000 km) or if tread
• Look for abnormal fluid deposits underneath Model Y
depth difference is 2/32 in (1.5 mm) or greater,
that might indicate a leak. It is normal for a small pool
whichever comes first
of water to form (caused by the air conditioning
system’s dehumidifying process).
NOTE: The above intervals are based on typical driving
• Look around the exterior of Model Y and immediately
behaviors and scenarios. However, Model Y should
remove any corrosive substances (such as bird
generally be serviced on an as-needed basis; depending
droppings, tree resin, tar spots, dead insects,
on various circumstances such as driving behavior,
industrial fallout, etc.) to prevent damage to the paint
usage, environmental conditions, etc., the above
(see Cleaning on page 183).
maintenance items may need to be replaced more or
less frequently than specified. Additionally, the above list
should not be considered comprehensive and does not
Monthly Checks
include consumable parts such as windshield wipers,
brake pads, etc.
• Check windshield washer fluid level and top up if
NOTE: Damages or failures caused by maintenance or
necessary (see Topping Up Windshield Washer Fluid
repairs performed by non-Tesla certified technicians are
on page 187).
not covered by the warranty.
• Check that the air conditioning system is operating
correctly (see Climate Controls on page 130).
Schedule Service
Scheduling a service visit through the mobile app is
easy. After touching Schedule Service, select the type of
service needed and follow the directions in the mobile
app. Provide as much detail as possible, such as:
• Photos, sound recordings, or videos.
• Date(s), time(s), and time zone when the issue
occurred.
• Country of use and location.
174
Maintenance
NOTE: In addition to cooling the interior, the air
WARNING: Some fluids (battery acid, Battery
conditioning compressor also cools the Battery.
coolant, brake fluid, windshield washer additives,
Therefore, in hot weather, the air conditioning
etc.) used in vehicles are poisonous and should not
compressor can turn on even if you turned it off. This is
be inhaled, swallowed, or brought into contact
normal because the system’s priority is to cool the
with open wounds. For your safety, always read
Battery to ensure it stays within an optimum
and follow instructions printed on fluid containers.
temperature range to support longevity and optimum
performance. Also, even when not in use, you may hear
Model Y emit a whining noise or the sound of water
circulating. These sounds are normal and occur when
the internal cooling systems turn on to support various
vehicle functions, such as maintaining the low voltage
battery and balancing the temperature of the high
voltage Battery.
WARNING: Contact Tesla immediately if you notice
any significant or sudden drop in fluid levels or
uneven tire wear.
Fluid Replacement Intervals
Your Battery coolant does not need to be replaced for
the life of your vehicle under most circumstances. Brake
fluid should be checked every 2 years, replacing if
necessary*.
*If the vehicle is used for towing, the brake fluid should
be replaced every 2 years regardless of the health check.
NOTE: Any damage caused by opening the Battery
coolant reservoir is excluded from the warranty.
High Voltage Safety
Your Model Y has been designed and built with safety as
a priority. However, be aware of these precautions to
protect yourself from the risk of injury inherent in all
high-voltage systems:
• Read and follow all instructions provided on the
labels that are attached to Model Y. These labels are
there for your safety.
• The high voltage system has no user-serviceable
parts. Do not disassemble, remove or replace high
voltage components, cables or connectors. High
voltage cables are colored orange for easy
identification.
• If a collision occurs, do not touch any high voltage
wiring, connectors, or components connected to the
wiring.
• In the unlikely event that a fire occurs, immediately
contact your local fire emergency responders.
WARNING: Always disconnect the charge cable
before working underneath Model Y, even if
charging is not in progress.
WARNING: Keep your hands and clothing away
from cooling fans. Some fans operate even when
Model Y is powered off.
Maintenance
175
Tire Care and Maintenance
If the indicator light flashes for one minute whenever
Displaying Tire Pressures
you power on Model Y, a fault with the TPMS is detected
(see TPMS Malfunction on page 180).
Display tire pressures on the touchscreen by touching
Controls > Service. The pressure of each tire displays in
NOTE: Your vehicle’s tire pressures will drop in cold
the visualization of your Model Y, in addition to what
ambient temperatures. If the TPMS indicator light
time your tire pressures were last measured. You can
appears, inflate the tires before driving. The tires will
choose whether you want to display tire pressures using
lose one PSI for every 10° F (6° C) drop in outside
Bar or PSI by touching Controls > Display > Tire
temperature. Proper tire pressures help protect tires
Pressure. The touchscreen also displays your vehicle's
from potholes and improve range when properly
recommended cold tire pressures so you can easily
inflated.
determine how much to inflate your tires.
WARNING: Under-inflation is the most common
NOTE: You may need to drive briefly before the
cause of tire failures and can cause a tire to
visualization displays the tire pressure values.
overheat, resulting in severe tire cracking, tread
separation, or blowout, resulting in unexpected
loss of vehicle control and increased risk of injury.
Maintaining Tire Pressures
Under-inflation also reduces the vehicle's range
and tire tread life.
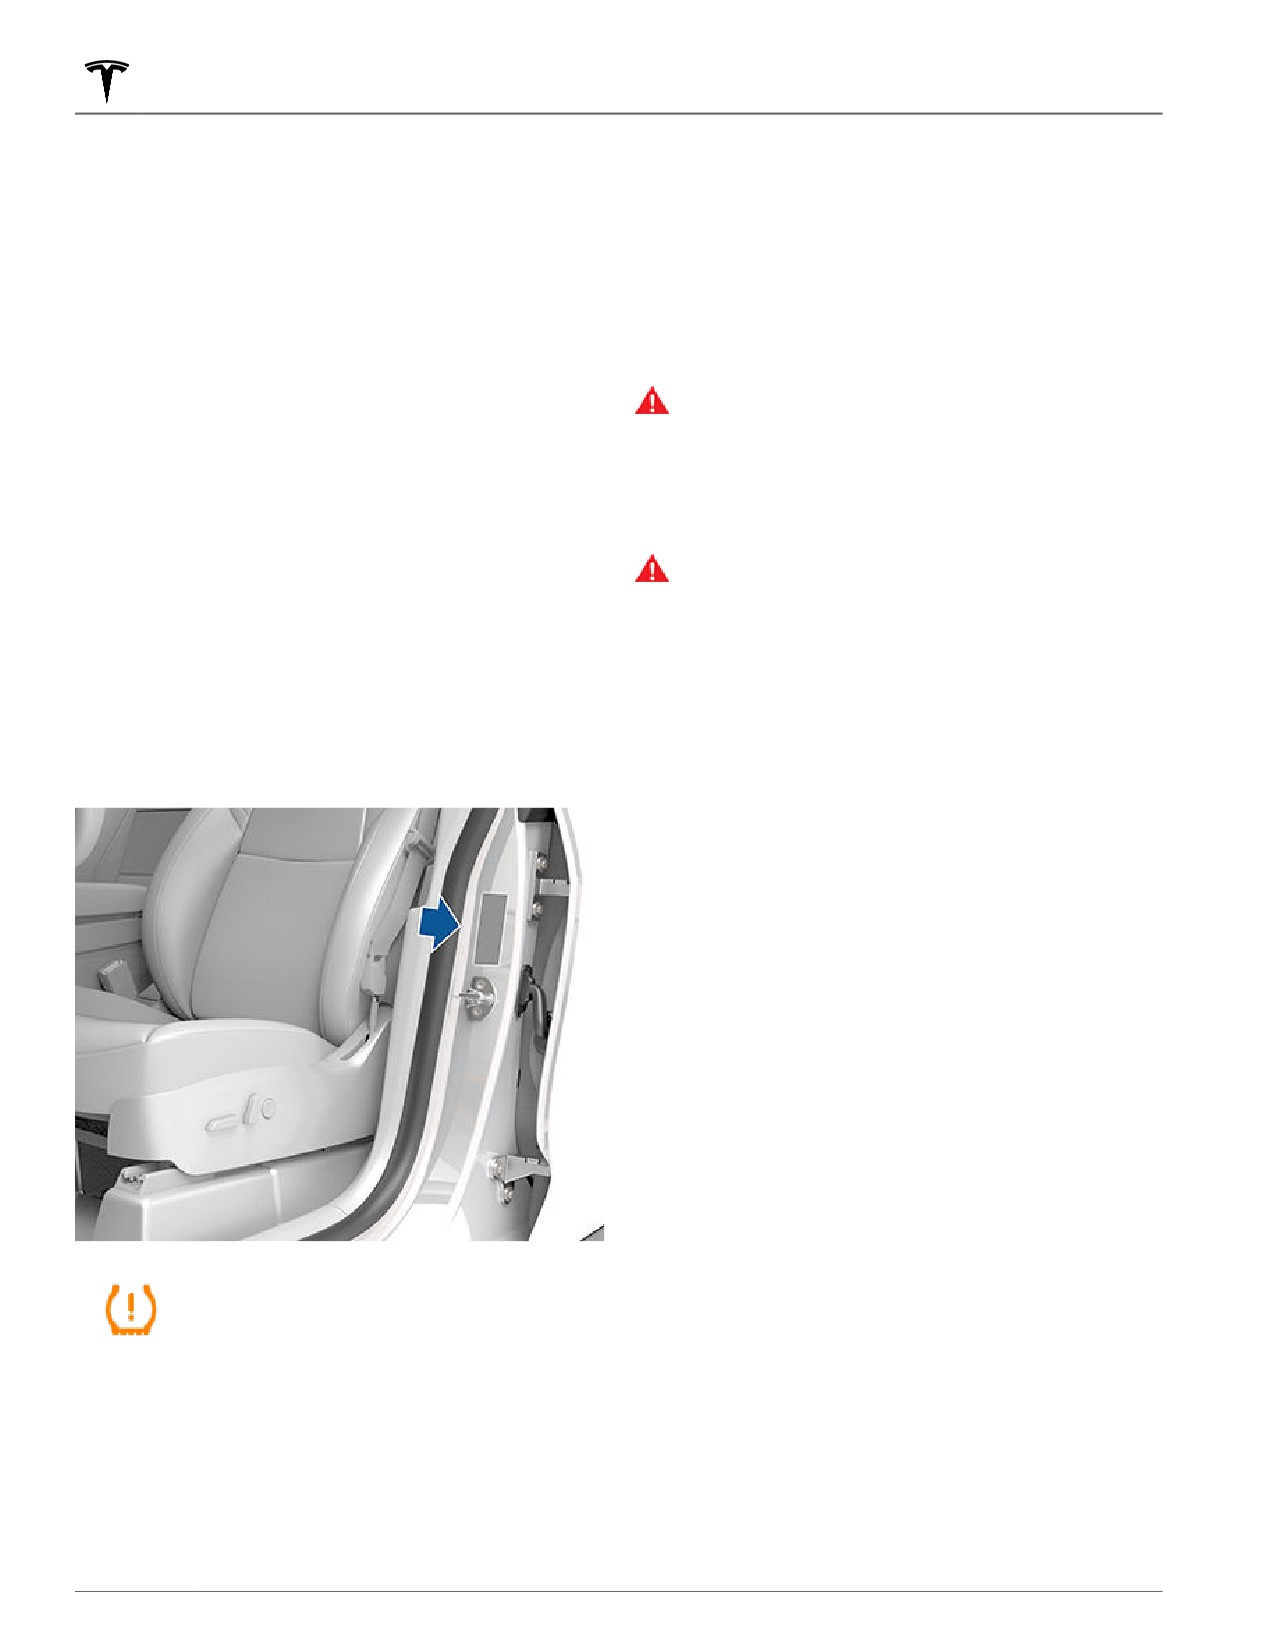
Keep tires inflated to the pressures shown on the Tire
WARNING: Check tire pressures using an accurate
and Loading Information label, even if it differs from the
pressure gauge when tires are cold. It takes only
pressure printed on the tire itself. The Tire and Loading
about one mile (1.6 km) of driving to warm up the
Information label is located on the center door pillar and
tires su
ciently to affect tire pressures. Parking
is visible when the front door is open.
the vehicle in direct sunlight or in hot weather can
also affect tire pressures. If you must check warm
If you are towing a trailer, do not use the tire pressures
tires, expect increased pressures. Do not let air out
printed on the Tire and Loading Information Label.
of warm tires in an attempt to match
Instead, refer to the tire pressures published in the
recommended cold tire pressures. A hot tire at or
towing section (see Towing and Accessories on page
below the recommended cold tire inflation
75).
pressure is dangerously under-inflated.
Checking and Adjusting Tire Pressures
Follow these steps when tires are cold and Model Y has
been stationary for over three hours:
1. Refer to the Tire and Loading Information label
located on the driver’s center door pillar for the
target tire pressure.
2. Remove the valve cap.
3. Firmly press an accurate tire pressure gauge onto the
valve to measure pressure.
4. If required, add or remove air to reach the
recommended pressure.
NOTE: You can release air by pressing the metal stem
in the center of the valve.
5. Re-check pressure using the accurate tire gauge.
The Tire Pressure indicator light on the
touchscreen alerts you if one or more tires
6. Repeat steps 3 and 4 as necessary until the tire
is under-inflated.
pressure is correct.
7. Reinstall the valve cap to prevent dirt from entering.
Periodically check the valve for damage and leaks.
The Tire Pressure indicator light does not immediately
Inspecting and Maintaining Tires
turn off when you adjust tire pressure. After inflating the
tire to the recommended pressure, you must drive over
15 mph (25 km/h) for a short amount of time to activate
Regularly inspect the tread and side walls for any sign of
the Tire Pressure Monitoring System (TPMS), which turns
distortion (bulges), foreign objects, cuts or wear.
off the Tire Pressure indicator light.
176
Tire Care and Maintenance
WARNING: Do not drive Model Y if a tire is
Your tubeless tires may not leak when penetrated,
damaged, excessively worn, or inflated to an
provided the object remains in the tire. If, however, you
incorrect pressure. Check tires regularly for wear,
feel a sudden vibration or ride disturbance while driving,
and ensure there are no cuts, bulges or exposure
or you suspect a tire is damaged, immediately reduce
of the ply/cord structure.
your speed. Drive slowly, while avoiding heavy braking
or sharp steering and, when safe to do so, stop the
vehicle. Arrange to have Model Y transported to a Tesla
Tire Wear
Service Center, or to a nearby tire repair center.
Adequate tread depth is important for proper tire
NOTE: In some cases, you can temporarily repair small
performance. Tires with a tread depth less than 4/32”
tire punctures (under 1/4” (6 mm)) using an optional tire
(3 mm) are more likely to hydroplane in wet conditions
repair kit available from Tesla. This allows you to slowly
and should not be used. Tires with a tread depth less
drive Model Y to Tesla or to a nearby tire repair facility.
than 5/32” (4 mm) do not perform well in snow and
WARNING: Do not drive with a punctured tire that
slush and should not be used when driving in winter
has not been repaired, even if the puncture has not
conditions.
caused the tire to deflate. A punctured tire can
deflate suddenly at any time.
Model Y is originally fitted with tires that have wear
indicators molded into the tread pattern. When the
tread has been worn down to 4/32” (3 mm), the
Flat Spots
indicators start to appear at the surface of the tread
pattern, producing the effect of a continuous band of
If Model Y is stationary for a long period, tires can form
rubber across the width of the tire. For optimal
flat spots. When Model Y is driven, these flat spots cause
performance and safety, Tesla recommends replacing
a vibration which gradually disappears as the tires warm
tires before the wear indicators are visible.
up and regain their original shape.
Tire Rotation, Balance, and Wheel
To minimize flat spots during storage, inflate tires to the
maximum pressure indicated on the tire wall. Then,
Alignment
before driving, release air to adjust tire pressure to the
recommended levels.
Tesla recommends rotating the tires every 6,250 miles
(10,000 km) or if tread depth difference is 2/32 in (1.5
Improving Tire Mileage
mm) or greater, whichever comes first.
Tire rotation is an essential part of tire maintenance. It
To improve the mileage you get from your tires, maintain
helps maintain an even treadwear pattern which
tires at the recommended tire pressures, observe speed
enhances the tire's overall wear quality, decreases road
limits and advisory speeds, and avoid:
noise and maximizes tire life.
• Pulling away quickly, or hard acceleration.
Vehicles with staggered tires can be rotated side-to-side
(left-to-right) but not front-to-back as the front and rear
• Fast turns and heavy braking.
tire size is different.
• Potholes and objects in the road.
• Hitting curbs when parking.
Unbalanced wheels (sometimes noticeable as vibration
through the steering wheel) affect vehicle handling and
• Contaminating tires with fluids that can cause
tire life. Even with regular use, wheels can get out of
damage.
balance. Therefore, they should be balanced as required.
If tire wear is uneven (on one side of the tire only) or
Replacing Tires and Wheels
becomes abnormally excessive, check the alignment of
wheels.
Tires degrade over time due to the effects of ultraviolet
light, extreme temperatures, high loads, and
environmental conditions. It is recommended that tires
Punctured Tires
are replaced every six years, or sooner if required, even if
tread depth is above the minimum.
A puncture eventually causes the tire to lose pressure,
which is why it is important to check tire pressures
When a tire set becomes worn, replace all four tires at
frequently. Permanently repair or replace punctured or
the same time. Choose a Tesla-approved tire which is
damaged tires as soon as possible.
designed specifically for your vehicle. Most Tesla-
approved tires can be identified with a Tx specification
(for example, T0, T1, T2). Tesla-approved tires are
designed to reduce road noise and optimize handling,
ride, and range. Contact Tesla Service for information.
Maintenance
177
Tire Care and Maintenance
If tires need to be replaced early, for example due to a
flat tire, we recommend replacing the tires in pairs
unless the other tires are within 2/32 in (1.5 mm) of tread
depth of the new tire. When replacing tires, it is
important to match the brand and model of the older
tires. Always place a pair of new tires on the rear if all
four tires are the same size. Always balance the wheel
and tire after replacing a tire. Consult with a professional
tire retailer and installer for further guidance.
WARNING: Road holding is seriously impaired if
NOTE: Regardless of the number of tires replaced, a
the tires are incorrectly installed on the wheels.
complete set of matching tires is recommended for
optimum performance.
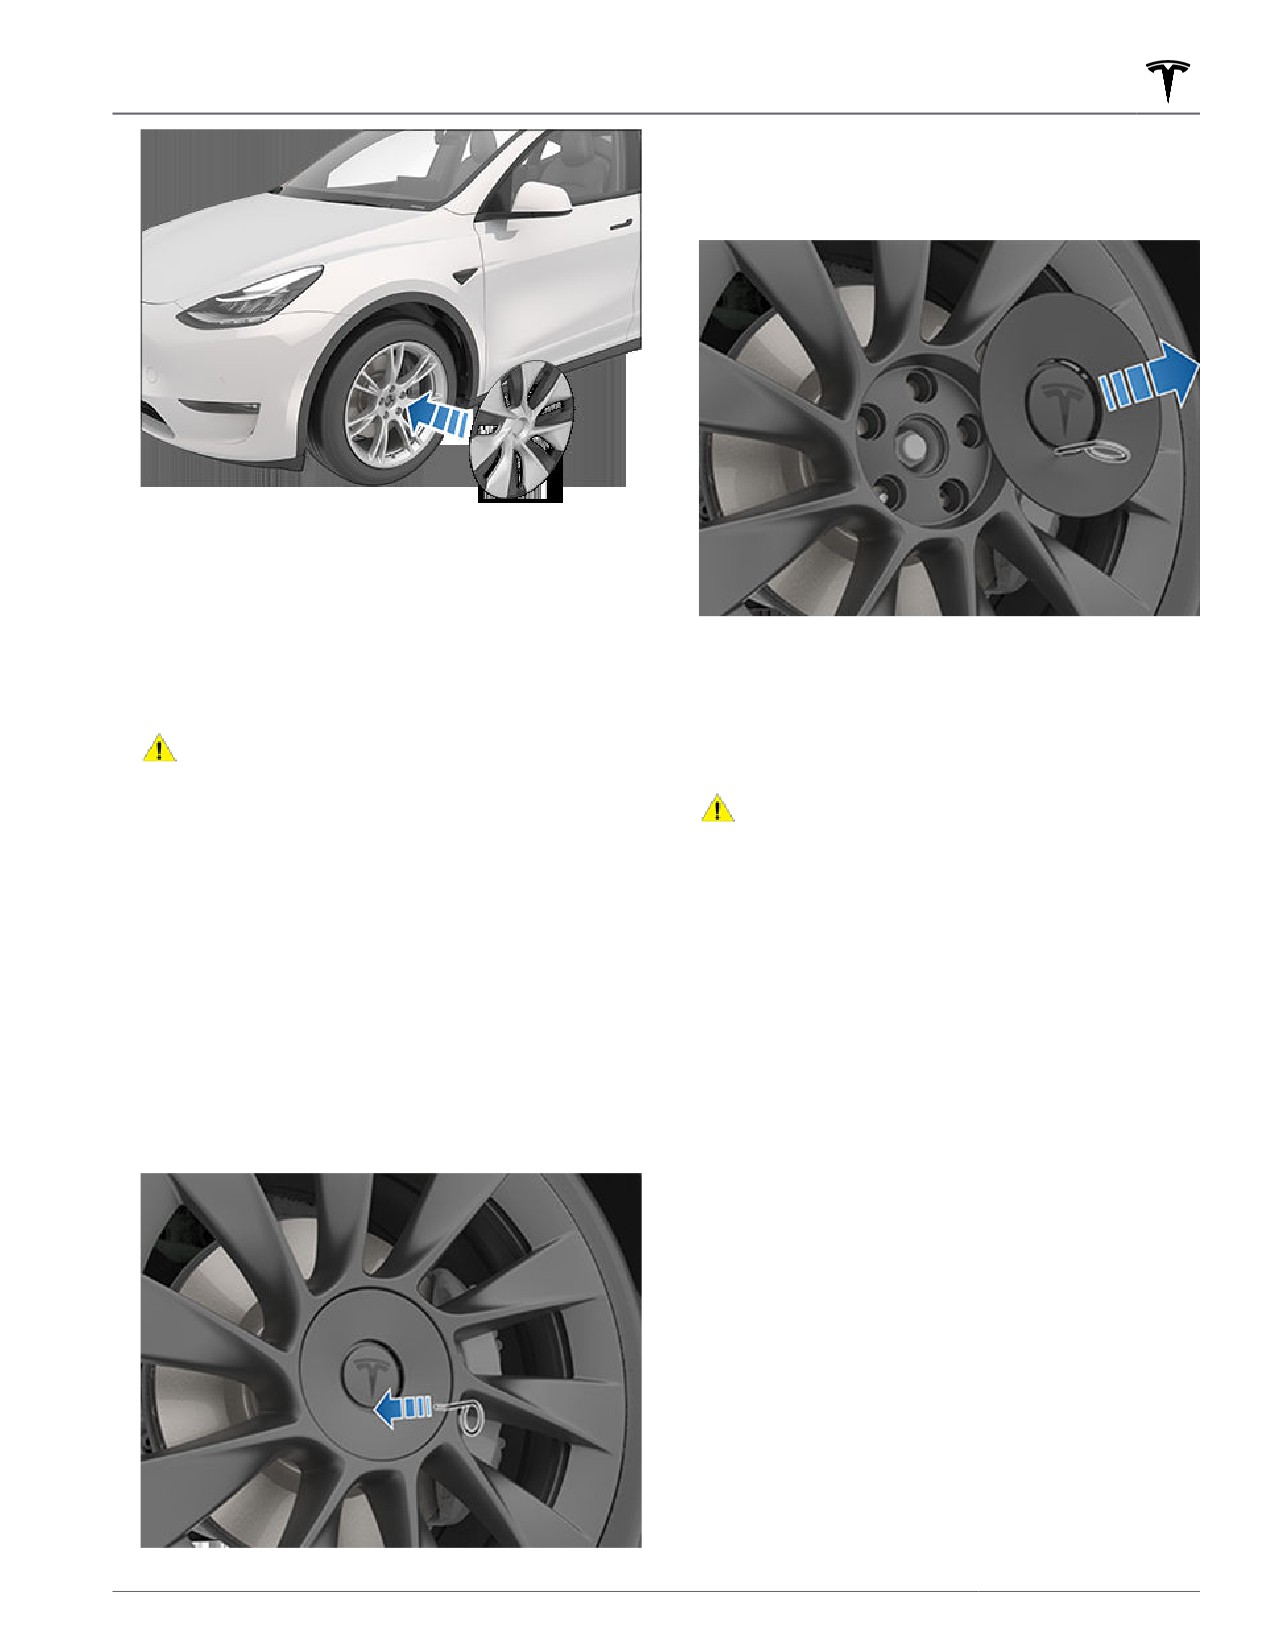
Removing and Installing Aero Covers
If tires other than those specified are used, ensure that
the load and speed ratings marked on the tire (see
If your Model Y is equipped with aero covers, you must
Understanding Tire Markings on page 202) equal or
remove them to access the lug nuts.
exceed those of the original specification.
To remove an aero cover:
For the specification of the original wheels and tires
installed on Model Y, see Wheels and Tires on page 201.
1. Grasp the aero cover firmly with both hands.
If you replace a wheel, the TPMS (Tire Pressure
2. Pull the aero cover toward you to release the
Monitoring System) sensors need to be reset to ensure
retaining clips.
they provide accurate warnings when tires are under-
inflated (see Automatic Reset of TPMS Sensors on page
180).
NOTE: Installing winter tires with aggressive compound
and tread design may result in temporarily-reduced
regenerative braking power. However, your vehicle is
designed to continuously recalibrate itself, and after
changing tires it will increasingly restore regenerative
braking power after some moderate-torque straight-line
accelerations. For most drivers this occurs after a short
period of normal driving, but drivers who normally
accelerate lightly may need to use slightly harder
accelerations while the recalibration is in progress.
WARNING: For your safety, use only tires and
wheels that match the original specification. Tires
that do not match the original specification can
affect the operation of the TPMS.
WARNING: Never exceed the speed rating of your
To install an aero cover:
vehicle's tires. The speed rating is shown on the
sidewall of your tires (see Understanding Tire
1. Align the aero cover into position so that the notch at
Markings on page 202).
the base of the Tesla "T" is aligned with the tire's
valve stem.
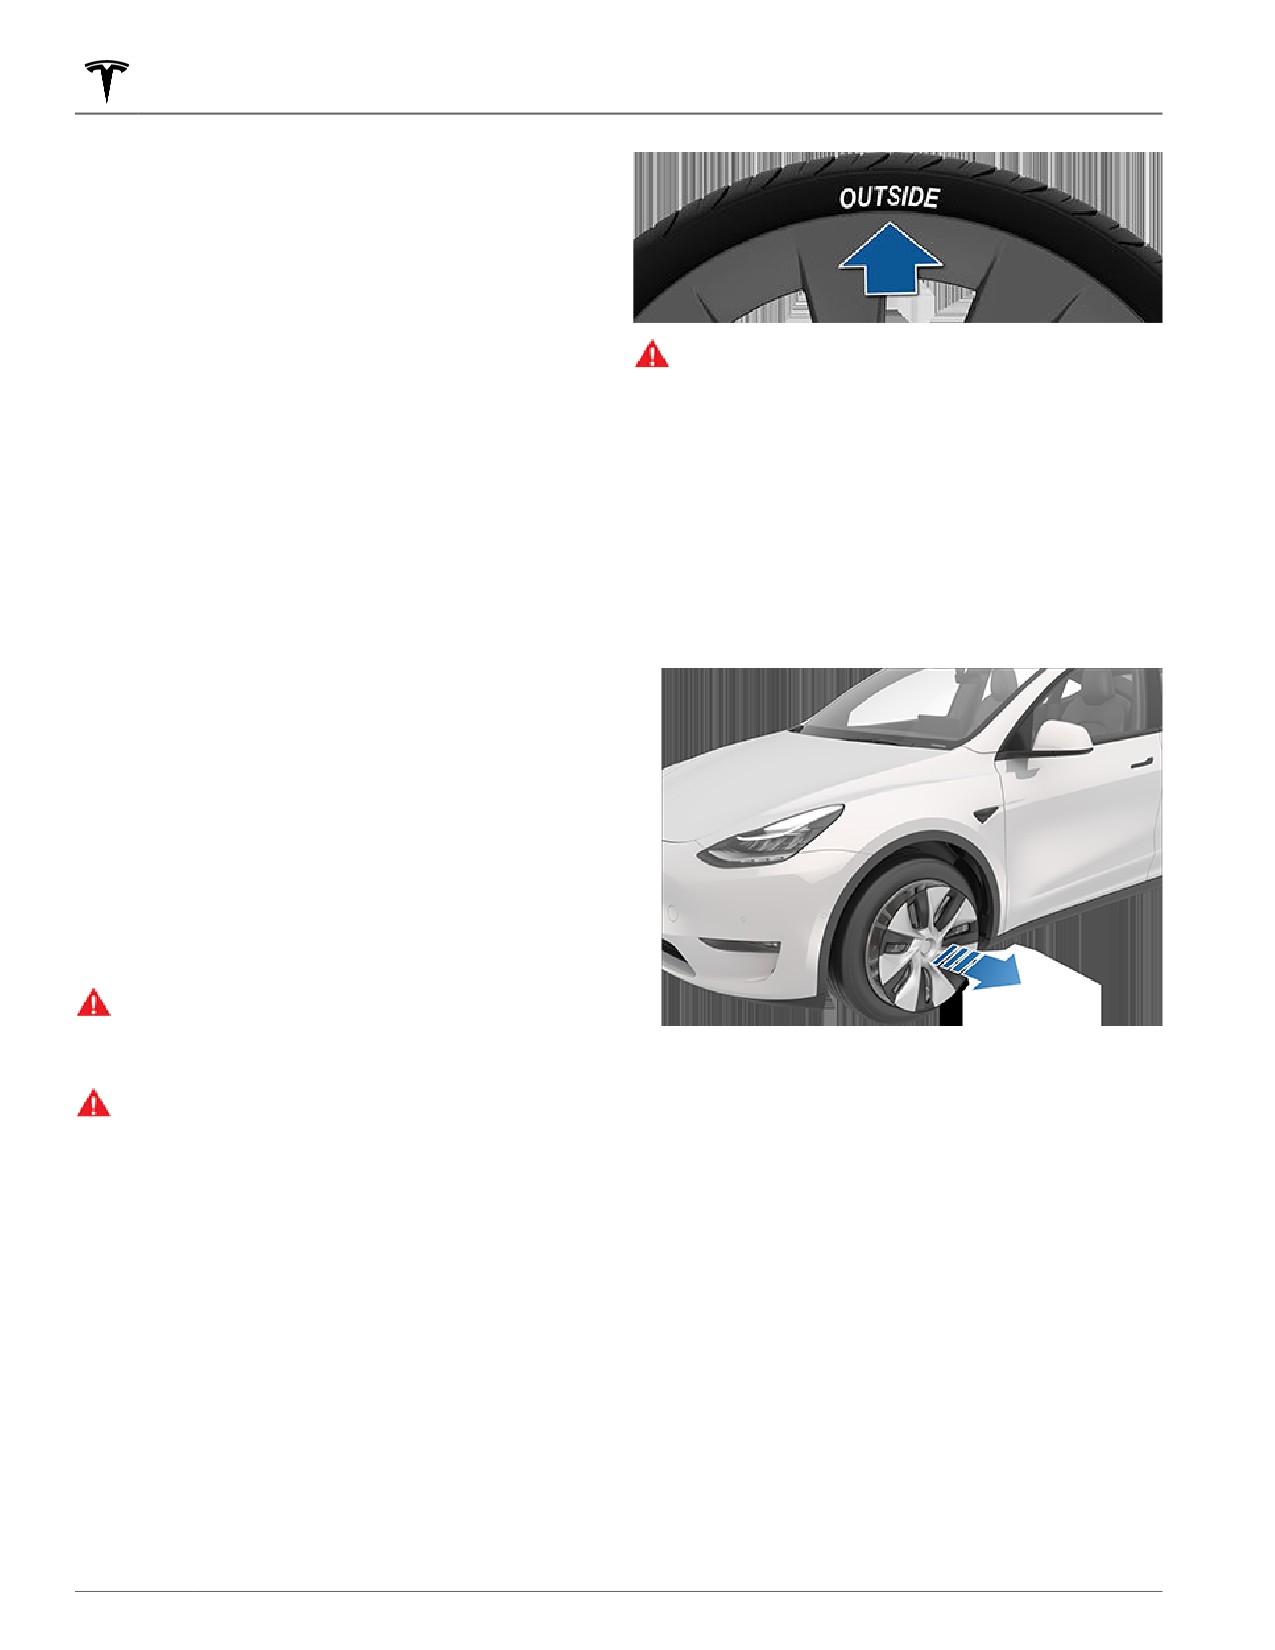
Asymmetric Tires
Model Y tires are asymmetric and must be mounted on
the wheel with the correct sidewall facing outward. The
sidewall of the tire is marked with the word OUTSIDE.
When new tires are installed, make sure that the tires are
correctly mounted on the wheels.
178
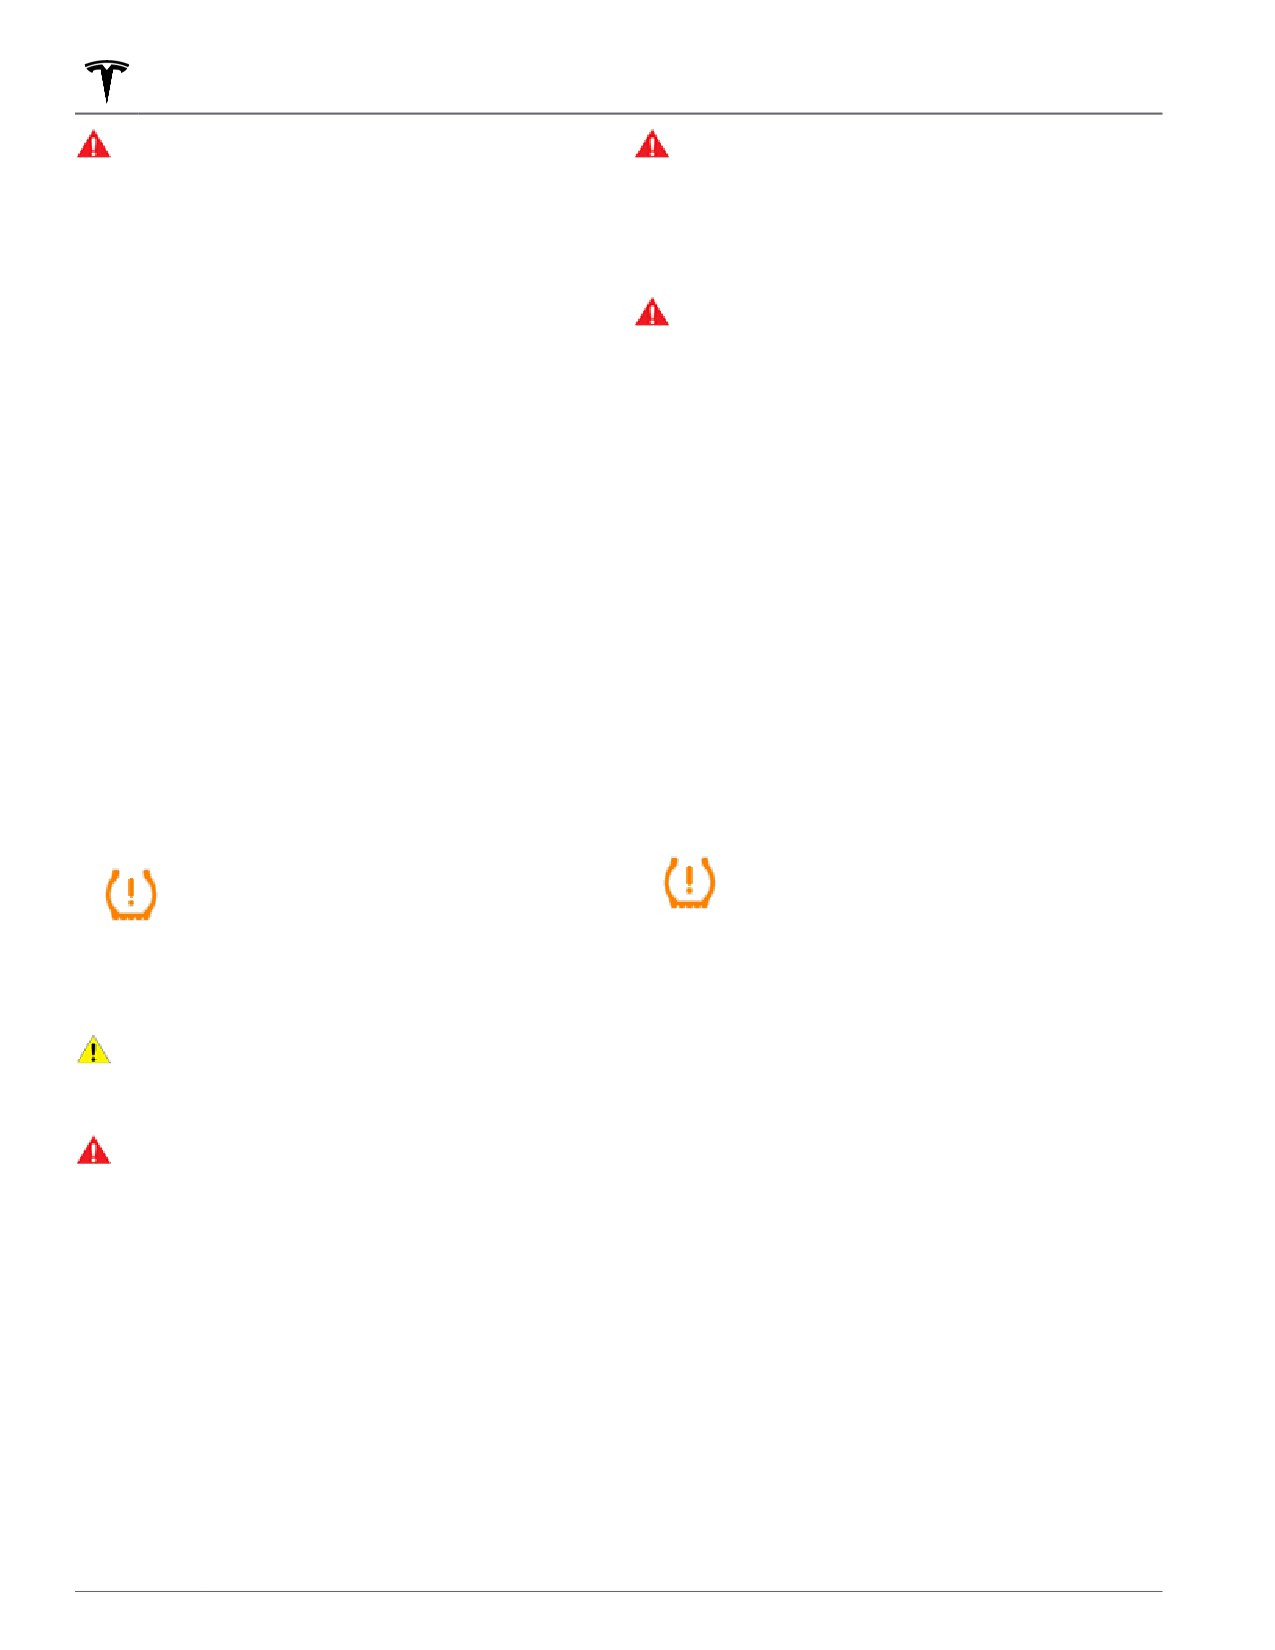
Tire Care and Maintenance
2. Twist the lug nut cover tool so that the end of the
curved part is facing away from the Tesla "T".
3. Firmly pull the lug nut tool away from the wheel until
the lug nut cover is released.
2. Push firmly around the perimeter of the aero cover
until it fully snaps into place.
For Gemini wheels, press on the perimeter of the
cover until it aligns with the wheel surface. Press on
the Tesla “T” in the center until the cap snaps into
To install the lug nut cover:
place. See Parts and Accessories on page 190 for
more information.
1. Align the lug nut cover into position.
CAUTION: To prevent the aero cover from
2. Push firmly on the lug nut cover until it fully snaps
falling off, ensure that it is fully secured before
into place.
driving.
CAUTION: Make sure the lug nut cover is fully
secure before driving to prevent it from falling
off.
Removing and Installing Lug Nut Covers
If your Model Y is equipped with lug nut covers, you
Wheel Configuration
must remove them to access the lug nuts.
If you are installing new wheels or swapping them for
To remove a lug nut cover:
different ones, update your vehicle's wheel configuration
by touching Controls > Wheel Configuration > Wheels.
1. Place the curved part of the lug nut cover tool
This allows Model Y to learn the new wheels and provide
(located in the glovebox for some vehicles, or you
more accurate status updates on your vehicle. Select a
can use a small allen wrench) into the lowered
wheel from the drop down menu that matches the new
perimeter around the middle of the lug nut cover.
wheels you plan to install on Model Y. Selecting new
NOTE: The lug nut cover tool can also be purchased
wheels in the wheel configuration also changes the
at an auto parts store or through online retailers.
wheels that appear on your vehicle's avatar on the
touchscreen.
Ensure you are aware if your vehicle is equipped with
staggered wheels, meaning the wheels are different
sizes in the front and rear. Check the front and rear tire
sizes marked on the tire sidewall to see if they match or
are different sizes. If the wheels are staggered, take
extra precaution to ensure the new wheels you install are
staggered in the same way as the previous wheels.
NOTE: Changing your vehicle's wheel configuration can
impact range estimates, tire pressure warning levels, and
vehicle visualization.
Maintenance
179
Tire Care and Maintenance
WARNING: Only use Tesla-approved wheels when
WARNING: If your Model Y is equipped with
installing or swapping wheels. Using non Tesla-
aftermarket tires that differ in size from those
approved wheels can cause serious damage. Tesla
printed on the Tire and Loading Information Label
is not liable for damage caused by using wheels
(see Vehicle Loading on page 194), it is the
not approved by Tesla.
driver's responsibility to determine the correct tire
pressure. Do not drive on public roads when tires
are not inflated to the correct pressure.
Tire Pressure Monitoring
WARNING: Do not depend on TPMS sensors to
accurately determine pressures and trigger alerts.
Each tire should be checked monthly when cold and
inflated to the recommended pressures that are printed
It is the driver's responsibility to maintain correct
on the Tire and Loading Information label located on the
tire pressures (see Maintaining Tire Pressures on
page 176). Over or under-inflated tires can result in
driver’s door pillar (see Maintaining Tire Pressures on
loss of control or tire damage, which can lead to
page 176). If your vehicle has tires of a different size than
serious injury.
the size indicated on the vehicle placard or tire inflation
pressure label, determine the proper tire inflation
pressure for those tires.
Replacing a Tire Sensor
As an added safety feature, your vehicle has been
If the Tire Pressure warning indicator displays frequently,
equipped with a TPMS that displays a tire pressure
contact Tesla to determine if a tire sensor needs to be
telltale (Tire Pressure Warning) on the touchscreen when
replaced. If a non-Tesla Service Center repairs or
one or more of your tires is significantly under-inflated.
replaces a tire, the tire sensor may not work until Tesla
Accordingly, when the Tire Pressure indicator light
performs the setup procedure.
displays on the touchscreen to alert you about tire
pressure, stop and check your tires as soon as possible,
and inflate them to the proper pressure (see Maintaining
TPMS Malfunction
Tire Pressures on page 176). Driving on a significantly
under-inflated tire causes the tire to overheat and can
Model Y has also been equipped with a TPMS
lead to tire failure. Under-inflation also reduces range
malfunction indicator to indicate when the system is not
e
ciency and tire tread life, and may affect the vehicle's
operating properly.
handling and stopping ability.
The TPMS malfunction indicator is
If Model Y detects a fault with the TPMS,
combined with the tire pressure indicator
this indicator flashes for one minute
light. When the system detects a
whenever you power on Model Y.
malfunction, the indicator flashes for
approximately one minute, then remains
continuously lit. This sequence continues
upon subsequent vehicle start-ups as long
NOTE: Installing accessories that are not approved by
as the malfunction exists. When the TPMS
Tesla can interfere with the TPMS.
malfunction indicator is on, the system
CAUTION: Avoid placing powered USB devices
might not be able to detect or signal
near the card reader on the center console (see
under-inflated tires as intended.
Key Card on page 7) as powered USB devices may
interfere with the tire pressure monitoring system.
TPMS malfunctions can occur for a variety of reasons,
WARNING: The TPMS is not a substitute for proper
including installing replacement or alternate tires or
tire maintenance, including manually checking tire
wheels that prevent the TPMS from functioning properly.
pressures and regularly inspecting the condition of
Always check the TPMS malfunction indicator light after
tires. It is the driver's responsibility to maintain
replacing one or more tires or wheels on your vehicle to
correct tire pressure, even if under- or over-
ensure that the replacement tires or wheels allow the
inflation has not reached the level for the TPMS to
TPMS to continue to function properly.
trigger the Tire Pressure Warning on the
touchscreen.
NOTE: If a tire has been replaced or repaired using a
different tire sealant than the one available from Tesla,
and a low tire pressure is detected, it is possible that the
Automatic Reset of TPMS Sensors
tire sensor has been damaged. Contact Tesla to have the
fault repaired as soon as possible.
After replacing one or more wheels (but not after
replacing a tire), the TPMS sensors are relearned to
ensure tire pressure warnings are accurate. TPMS
sensors reset automatically within two minutes of
driving over 15 mph (25 km/h).
180
Tire Care and Maintenance
NOTE: Installing winter tires with aggressive compound
Seasonal Tire Types
and tread design may result in temporarily-reduced
regenerative braking power. However, your vehicle is
Understand Your Tire Type
designed to recalibrate itself to restore regenerative
braking power after a short period of normal driving.
The type of tires that your vehicle is originally equipped
with depends on vehicle model and market region. It is
Driving in Low Temperatures
important to understand the capabilities of your
vehicle's tires and whether they are suited for summer,
Tire performance is reduced in low ambient
all-season, or winter driving. Check the information on
temperatures, resulting in reduced grip and an increased
the sidewall of a tire for information about a tire's
susceptibility to damage from impacts. Performance
performance characteristics (see Understanding Tire
tires (summer applications) have reduced traction in
Markings on page 202)
ambient temperatures below 40° F (5° C), and are not
recommended in snow/ice conditions. Performance tires
Summer and All-Season Tires
can temporarily harden when cold, causing you to hear
rotational noise for the first few miles (kilometers) until
the tires warm up.
Summer tires and all season tires are designed for
maximum dry and wet road performance but are not
designed to perform well in winter conditions. All-
Using Tire Chains
season tires are designed to provide adequate traction
in most conditions year-round, but may not provide the
Tesla has tested and approved the following tire chains
same level of traction as winter tires in snowy or icy
to increase traction in snowy conditions. Tire chains
conditions. All-season tires can be identified by “ALL
should only be installed on the rear tires. The approved
SEASON" and/or "M+S” (mud and snow) on the tire
tire chains can be purchased from Tesla.
sidewall.
Tire Size
Recommended Chain
If driving in cold temperatures or on roads where snow
or ice may be present, Tesla recommends using winter
19"/20"
KONIG XG-12 PRO SIZE 252
tires. If not equipped with winter tires, contact Tesla for
winter tire recommendations.
21"
KONIG K-SUMMIT XXL K66
WARNING: In cold temperatures or on snow or ice,
CAUTION: If your Model Y is equipped with aero
covers, you must remove them before installing
summer and all-season tires do not provide
tire chains (see Removing and Installing Aero
adequate traction. Selecting and installing the
appropriate tires for winter conditions is important
Covers on page 178). Failure to do so can cause
to ensure the safety and optimum performance of
damage not covered by the warranty.
your Model Y.
When installing tire chains, follow the instructions and
warnings provided by the tire chain manufacturer. Mount
Winter Tires
them evenly and as tight as possible.
Use winter tires to increase traction in snowy or icy
When using tire chains:
conditions. When installing winter tires, always install a
complete set of four tires at the same time. Winter tires
• Inspect the tire chains for loose fittings and damaged
must be the same diameter, brand, construction and
links before each use.
tread pattern on all four wheels. Contact Tesla for winter
• Avoid heavily loading Model Y (heavy loads can
tire recommendations.
reduce the clearance between the tires and the
body).
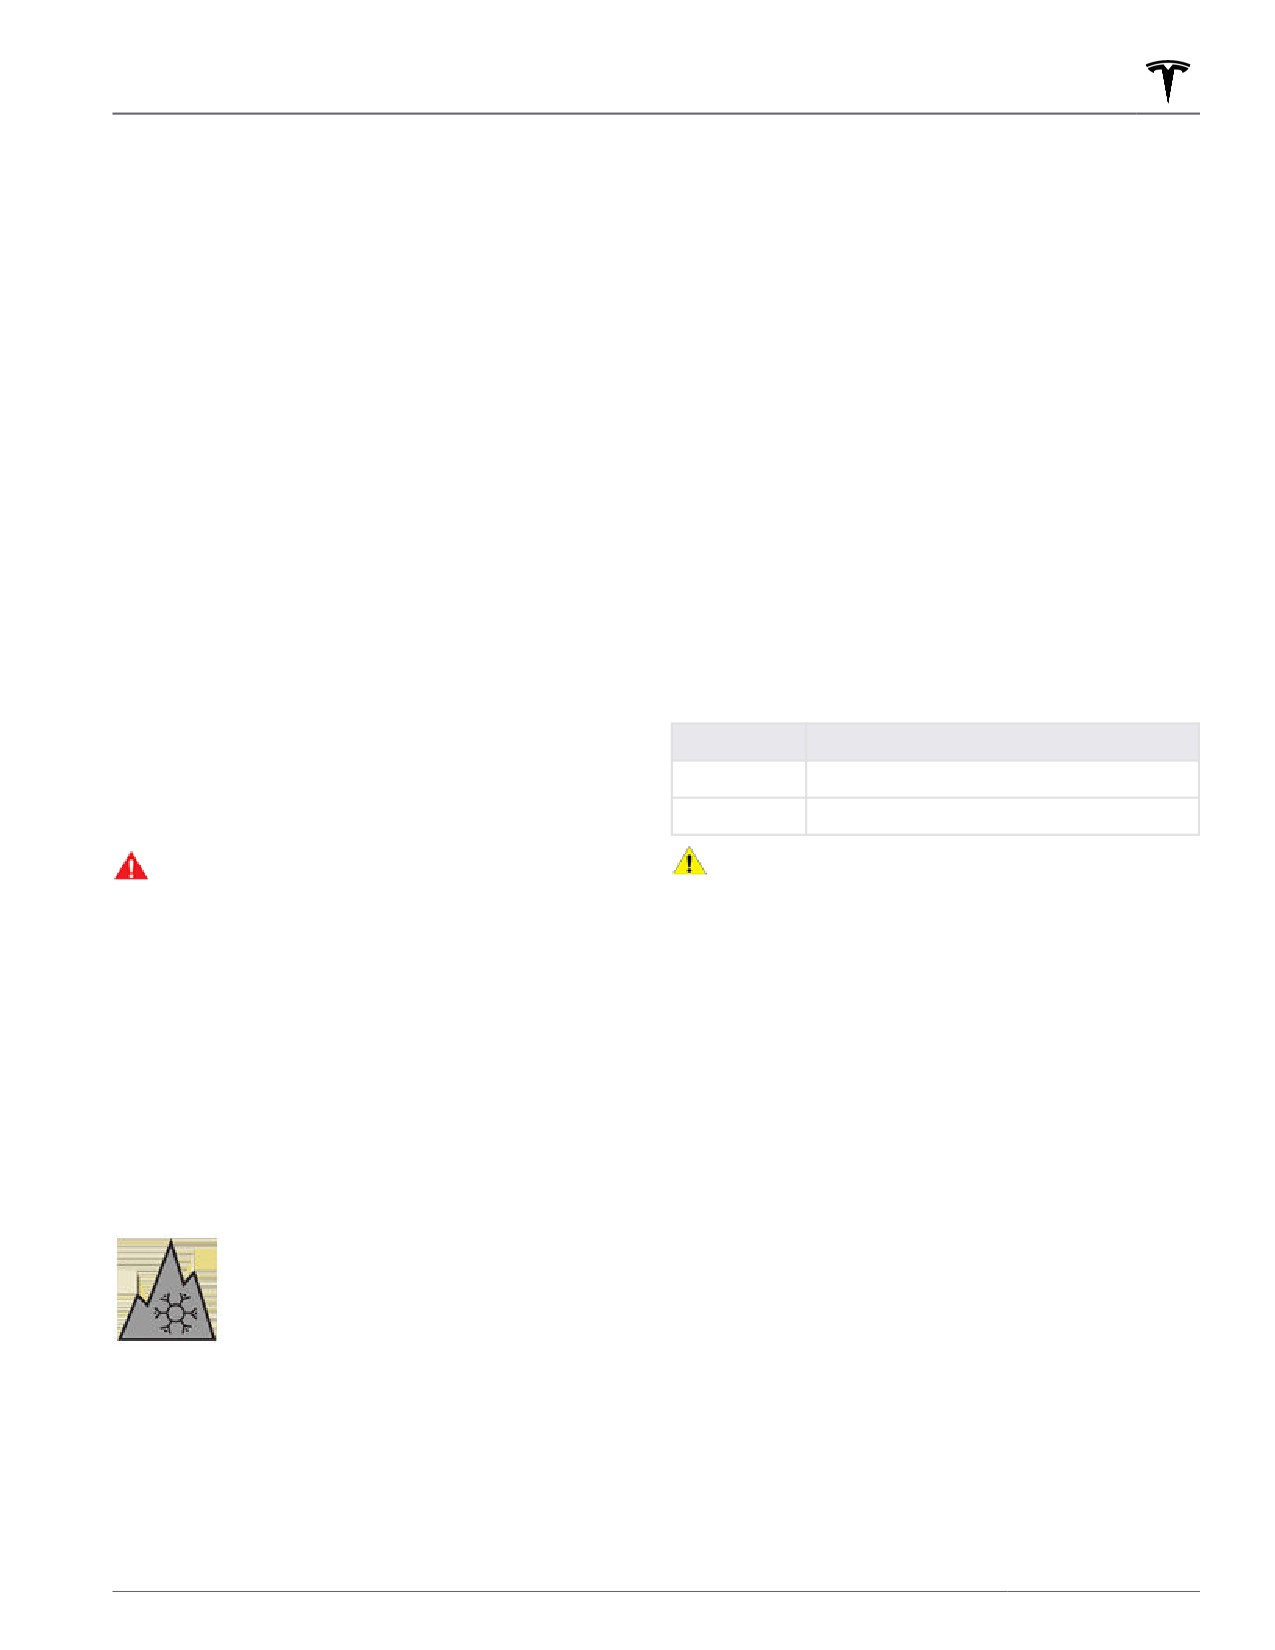
Winter tires can be identified by a
• Do not drive the vehicle without the chains properly
mountain/snowflake symbol on the tire's
installed.
sidewall.
• Drive slowly. Do not exceed 30 mph (48 km/h).
• Remove the tire chains as soon as conditions allow.
When driving with winter tires, you may experience
NOTE: Tire chains are prohibited in some jurisdictions.
more road noise, shorter tread life, and less traction on
Check local laws before installing tire chains.
dry roads.
Maintenance
181
Tire Care and Maintenance
CAUTION: Using non-recommended tire chains, or
using tire chains on other sized tires can damage
the suspension, body, wheels, and/or brake lines.
Damage caused by using non-recommended tire
chains, or incorrectly installing tire chains, is not
covered by the warranty.
CAUTION: Do not use tire chains on the front tires.
CAUTION: Never deflate your tires to put on tire
chains. When re-inflated, the chains might fit too
tightly and cause tire damage.
CAUTION: Ensure that the tire chains cannot touch
suspension components or brake lines. If you hear
the chains making unusual noises that would
indicate contact with Model Y, stop and investigate
immediately.
182
Cleaning
Cleaning the Exterior
Car Wash Mode
To prevent damage to the paint, immediately remove
When taking Model Y to a car wash, Car Wash Mode
corrosive substances (bird droppings, tree resin, dead
closes all windows, locks the charge port, and disables
insects, tar spots, road salt, industrial fallout, etc.). Do
windshield wipers, Sentry Mode, walk-away door
not wait until Model Y is due for a complete wash. If
locking, and parking sensor chimes. To enable, touch
necessary, use denatured alcohol to remove tar spots
Controls > Service > Car Wash Mode. Your vehicle must
and stubborn grease stains, then immediately wash the
be stationary and not actively charging.
area with water and a mild, non-detergent soap to
remove the alcohol.
If using an automatic car wash, Enable Free Roll keeps
your vehicle in Neutral and activates free roll for the
Keep the exterior cameras free of dirt, condensation, or
duration of the wash, while preventing Model Y from
obstructions. These substances can cause unclear
applying the Parking brake if you leave the driver's seat.
pictures or Autopilot and safety features to stop
To enable, press on the brake pedal and touch Enable
working (see Cleaning a Camera on page 183).
Free Roll; or shift into Neutral.
Follow these steps when washing the exterior of Model
Car Wash Mode disables if the vehicle's speed exceeds 9
Y:
mph (15 km/h) or by touching Exit on the touchscreen.
1. Rinse Thoroughly
CAUTION: Failure to put Model Y in Car Wash
Mode may result in damage (for example, to the
Before washing, flush grime and grit from the vehicle
charge port or windshield wipers). Damage caused
using a hose. Flush away accumulations of mud in
by car washes is not covered by the warranty.
areas where debris easily collects (such as wheel
wells and panel seams). If salt has been used on the
Cleaning a Camera
highways (such as during winter months), thoroughly
rinse all traces of road salt from the underside of the
To ensure a clear picture, the camera lens must be clean
vehicle, wheel wells, and brakes.
and free of obstructions. Remove any build-up of dirt or
debris by spraying water onto the camera lens with a
2. Hand Wash
spray bottle or pressure washer.
Hand wash Model Y using a clean soft cloth and cold
or lukewarm water containing a mild, high-quality car
CAUTION: Do not attempt to remove dirt or debris
shampoo.
by wiping an exposed lens with your hands or a
cloth. This debris can damage the surface of the
CAUTION: Some cleaners and car shampoos
lens when rubbed against it during wiping.
contain chemicals that can cause damage or
discoloration, especially to plastic trim pieces,
CAUTION: Do not use chemical-based or abrasive
lamps, or camera lenses. For example, some car
cleaners. Doing so can damage the surface of the
cleaning formulas contain hydroxide or other
lens.
highly alkaline or caustic ingredients that can
damage exterior components. Damage or
Cautions for Exterior Cleaning
discoloration resulting from cleaning products
is not covered by the warranty.
CAUTION: Do not wash in direct sunlight.
3. Rinse with Clean Water
CAUTION: Do not use windshield treatment fluids.
After washing, rinse with clean water to prevent soap
Doing so can interfere with wiper friction and
from drying on the surfaces.
cause a chattering sound.
CAUTION: Do not use hot water, detergents, or
4. Dry Thoroughly and Clean Exterior Glass
highly alkaline or caustic cleaning products,
especially those containing hydroxide.
After washing and rinsing, dry thoroughly with a
CAUTION: If using a pressure washer, maintain a
chamois. If necessary, dry the brakes by going on a
distance of at least 12" (30 cm) between the
short drive and applying the brakes multiple times.
nozzle and the surface of Model Y. Avoid aiming
the water jet directly at parking sensors (if
Clean windows and mirrors using an automotive glass
equipped). Keep the nozzle moving and do not
cleaner. Do not scrape, or use any abrasive cleaning
concentrate the water jet on any one area.
fluid on glass or mirrored surfaces.
CAUTION: Do not aim water hoses directly at
windows, door, or hood seals or at electronic
modules or exposed cabling.
Maintenance
183
Cleaning
CAUTION: To avoid corrosive damage that may
Airbags
not be covered by the warranty, rinse away any
road salt from the underside of the vehicle, wheel
Do not allow any substance to enter an airbag cover.
wells, and brakes. After cleaning the vehicle, dry
This could affect correct operation.
the brakes by going on a short drive and applying
the brakes multiple times.
Dashboard and Plastic Surfaces
CAUTION: Avoid using tight-napped or rough
cloths, such as washing mitts. A high-quality
microfiber cleaning cloth is recommended.
Do not polish the upper surfaces of the dashboard.
Polished surfaces are reflective and could interfere with
CAUTION: If washing in an automatic car wash, use
your driving view.
touchless car washes only. These car washes have
no parts (brushes, etc.) that touch the surfaces of
Model Y. Some touchless car washes use caustic
Seats
solutions that, over time, can cause discoloration
of decorative exterior trim. Avoid exposure to
Wipe spills and chemical residues from interior surfaces
soaps and chemicals above pH 13. If unsure, check
as soon as possible using a soft cloth moistened with
the product label or ask the staff at the car wash.
warm water and non-detergent soap. Wipe gently in a
Damage caused by improper washing is not
circular motion. Then wipe dry using a soft, lint-free
covered by the warranty.
cloth.
CAUTION: If washing in an automatic car wash,
Although seating surfaces are designed to repel stains,
make sure the vehicle is locked. In addition, avoid
using controls on the touchscreen that can result
Tesla recommends regular cleaning to maintain
in accidentally opening doors or trunks while the
performance and an as-new appearance. Promptly treat
dye transfer from clothing, such as indigo-dyed denim.
vehicle is being washed. Any damage caused is
Avoid contact with harsh chemicals, including certain
not covered by the warranty.
cosmetics. Never use cleaners containing alcohol or
CAUTION: Ensure the wipers are off before
bleach. Spot-test cleaners on an inconspicuous area
washing Model Y to avoid the risk of damaging the
before applying to visible surfaces.
wipers.
CAUTION: Do not use chemical based wheel
Vacuum cloth seats as needed to remove any loose dirt.
cleaners or pre-wash products. These can damage
CAUTION: Aftermarket, non-Tesla seat covers may
the finish on the wheels.
inhibit the sensitivity of a seat's occupancy sensors
WARNING: Never spray liquid at a high velocity
and may cause staining or damage.
(for example, if using a pressure washer) towards
the charge port while Model Y is charging. Failure
Carpets
to follow these instructions can result in serious
injury or damage to the vehicle, charging
equipment, or property.
Avoid over-wetting carpets. For heavily soiled areas, use
a diluted upholstery cleaner.
Cleaning the Interior
Seat Belts
Frequently inspect and clean the interior to maintain its
appearance and to prevent premature wear. If possible,
Extend the belts to wipe. Do not use any type of
immediately wipe up spills and remove marks. For
detergent or chemical cleaning agent. Allow the belts to
general cleaning, wipe interior surfaces using a soft cloth
dry naturally while extended, preferably away from
(such as microfiber) dampened with a mixture of warm
direct sunlight.
water and mild non-detergent cleaner (test all cleaners
on a concealed area before use). To avoid streaks, dry
Door Seals
immediately with a soft lint-free cloth.
Wipe door seals with a damp cloth to remove any
Interior Glass
debris. Excessive debris on the door seals can cause
paint damage when contacting surrounding surfaces.
Do not scrape, or use any abrasive cleaning fluid on
Avoid using alcohol wipes or any chemical products that
glass or mirrored surfaces. This can damage the
can potentially deteriorate the coating on the door seals.
reflective surface of the mirror and the heating elements
in the rear window.
184
Cleaning
Touchscreen
Repair rock chips, fractures or scratches. Refer to
more information on repair locations and available
Clean the touchscreen using a soft lint-free cloth
services.
specifically designed to clean monitors and displays. Do
not use cleaners (such as a glass cleaner) or alcohol-
CAUTION: Do not use cutting pastes, color
based gel products (such as hand sanitizer) and do not
restoration compounds, or polishes containing
use a wet wipe or a dry statically-charged cloth (such as
harsh abrasives. These can scour the surface and
a recently washed microfiber). To wipe the touchscreen
permanently damage the paint.
without activating buttons and changing settings, you
can enable Screen Clean Mode. Touch Controls > Display
CAUTION: Do not use chrome polish or other
> Screen Clean Mode. The display darkens to make it
abrasive cleaners.
easy to see dust and smudges. To exit Screen Clean
Mode, press and hold HOLD TO EXIT.
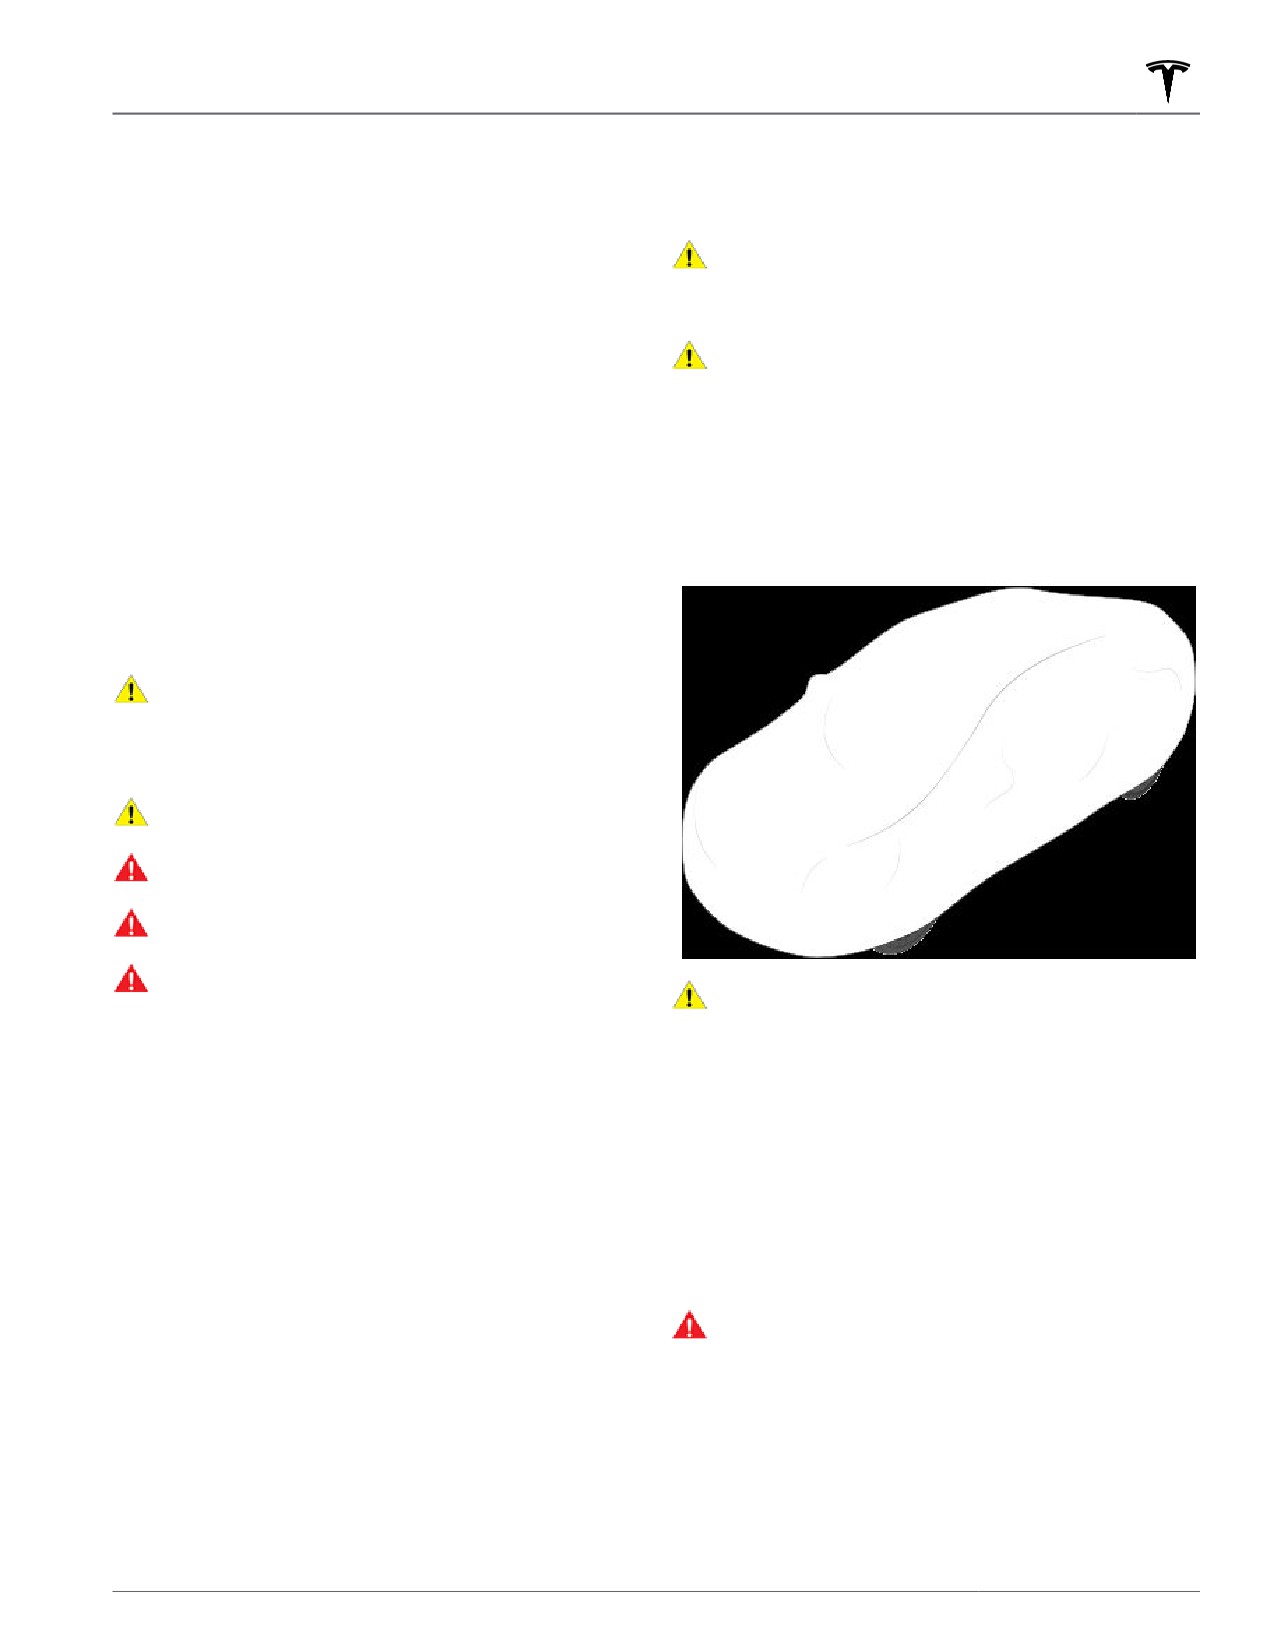
Using a Car Cover
Chrome and Metal Surfaces
To preserve the cosmetic appearance of the body when
Model Y is not being used, use a genuine Tesla car cover.
Car covers can be purchased from Tesla. See Parts and
Polish, abrasive cleaners, alcohol-based gel products
Accessories on page 190.
(such as hand sanitizer), and hard cloths can damage
the finish on chrome and metal surfaces.
Cautions for Interior Cleaning
CAUTION: Using solvents (including alcohol),
alcohol-based gel products (such as hand
sanitizer), bleach, citrus, naphtha, or silicone-based
products or additives on interior components can
cause damage.
CAUTION: Statically-charged materials can cause
damage to the touchscreen.
WARNING: If you notice any damage on an airbag
or seat belt, contact Tesla immediately.
WARNING: Do not allow any water, cleaners, or
fabric to enter a seat belt mechanism.
WARNING: Exposure to chemical cleaners can be
CAUTION: Use only a Tesla-approved car cover
hazardous and can irritate eyes and skin. Read and
when Model Y is plugged in. Using a non-Tesla car
observe the instructions provided by the
manufacturer of the chemical cleaner.
cover can prevent the Battery from being
adequately cooled during charging.
Polishing, Touch Up, and Body
Floor Mats
Repair
To extend the life of your carpet and make them easier
To preserve the cosmetic appearance of the body, you
to clean, use genuine Tesla floor mats (see Parts and
can occasionally treat the paint surfaces with an
Accessories on page 190). Maintain floor mats by
approved polish containing:
regularly cleaning them and checking that they are
properly attached. Replace floor mats if they become
• Very mild abrasive to remove surface contamination
excessively worn.
without removing or damaging the paint.
WARNING: To avoid potential interference with a
• Filling compounds that fill scratches and reduce their
foot pedal, ensure that the driver’s floor mat is
visibility.
securely fastened, and never place an additional
• Wax to provide a protective coating between the
floor mat on top of it. Floor mats should always
paint and environmental elements.
rest on top of the vehicle carpeting surface and
not on another floor mat or other covering.
Regularly inspect the exterior paint for damage. Treat
minor chips and scratches using a paint touch-up pen
(available for purchase from Tesla). Use the touch-up
pen after washing but before polishing or waxing.
Maintenance
185
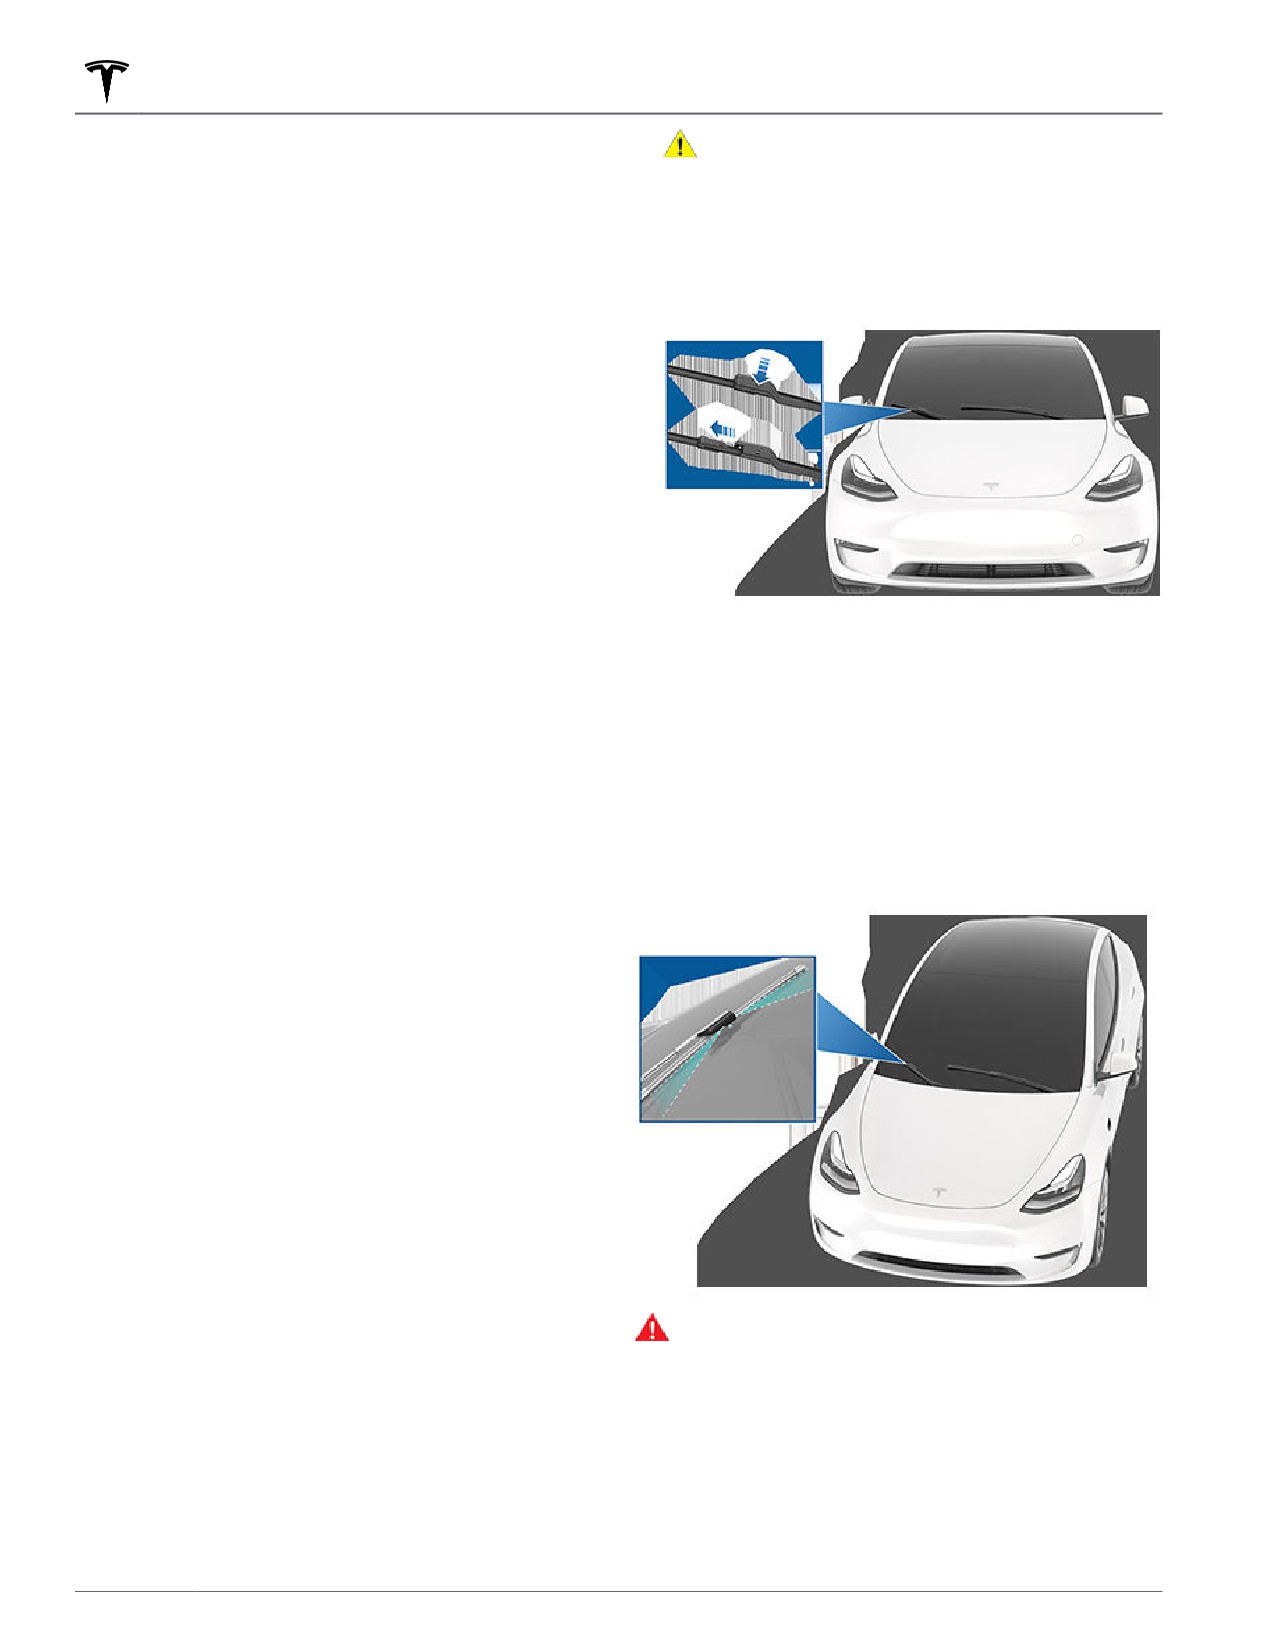
Wiper Blades and Washer Jets
CAUTION: Wiper blades do not lock into a lifted
Checking and Cleaning Wiper
position. Do not lift a wiper arm beyond its
Blades
intended position.
4. Place a towel between the wiper arm and windshield
Periodically clean the edge of the wiper blades and
to avoid scratching or cracking the windshield.
check the rubber for cracks, splits, and roughness. If
damaged, replace the blade immediately to prevent
5. Hold the wiper arm and press the locking tab while
damage to the glass and improve visibility.
sliding the blade down the arm.
Contaminants on the windshield, or on the wiper blades,
can reduce the effectiveness of the wipers.
Contaminants include ice, wax spray from car washes,
washer fluid with bug and/or water repellent, bird
droppings, tree sap, and other organic substances.
Follow these guidelines for cleaning:
• Clean the windshield and wiper blades using washer
fluid, isopropyl (rubbing) alcohol, or non-abrasive
glass cleaner approved for use on automotive glass
and rubber. Inappropriate products can cause
damage or smears, and create glare on the
windshield.
6. Align the new wiper blade on the wiper arm and slide
it toward the end of the wiper arm until it locks into
• Lift the wiper arm a short distance away from the
place.
windshield, just far enough to access the wiper blade.
Do not lift a wiper arm beyond its intended position.
7. Turn Wiper Service Mode off to return the wipers to
their normal position.
If the wipers remain ineffective after cleaning, replace
the wiper blades.
Cleaning Washer Jets
Replacing Wiper Blades
If a windshield washer becomes blocked, use a thin
strand of wire to clear any blockages from the nozzles.
For optimum performance, replace the wiper blades at
least once a year. Replacement blades must meet the
following criteria:
• The blade on the driver's side must be 26 inches (650
mm) long and 20 inches (500 mm) long for the blade
on the passenger's side.
• Ensure the connector on the replacement blade is the
same as the original blade. Different connectors may
prevent the replacement blade from connecting to
the wiper arm on the vehicle.
You can purchase replacement wiper blades on http://
www.tesla.com.
NOTE: Only install replacement blades that are identical
to the original blades. Using inappropriate blades can
damage the wiper system and windshield.
WARNING: Do not operate the washers while
To replace the wiper blades:
cleaning Model Y. Windshield washer fluid can
irritate eyes and skin. Read and observe the
1. Shift into Park and turn off the wipers.
washer fluid manufacturer’s instructions.
2. Touch Controls > Service > Wiper Service Mode > ON
to move the wipers to the service position.
3. Lift the wiper arm a short distance away from the
windshield, just far enough to access the wiper blade.
186
Fluid Reservoirs
Removing the Maintenance Panel
Checking Brake Fluid
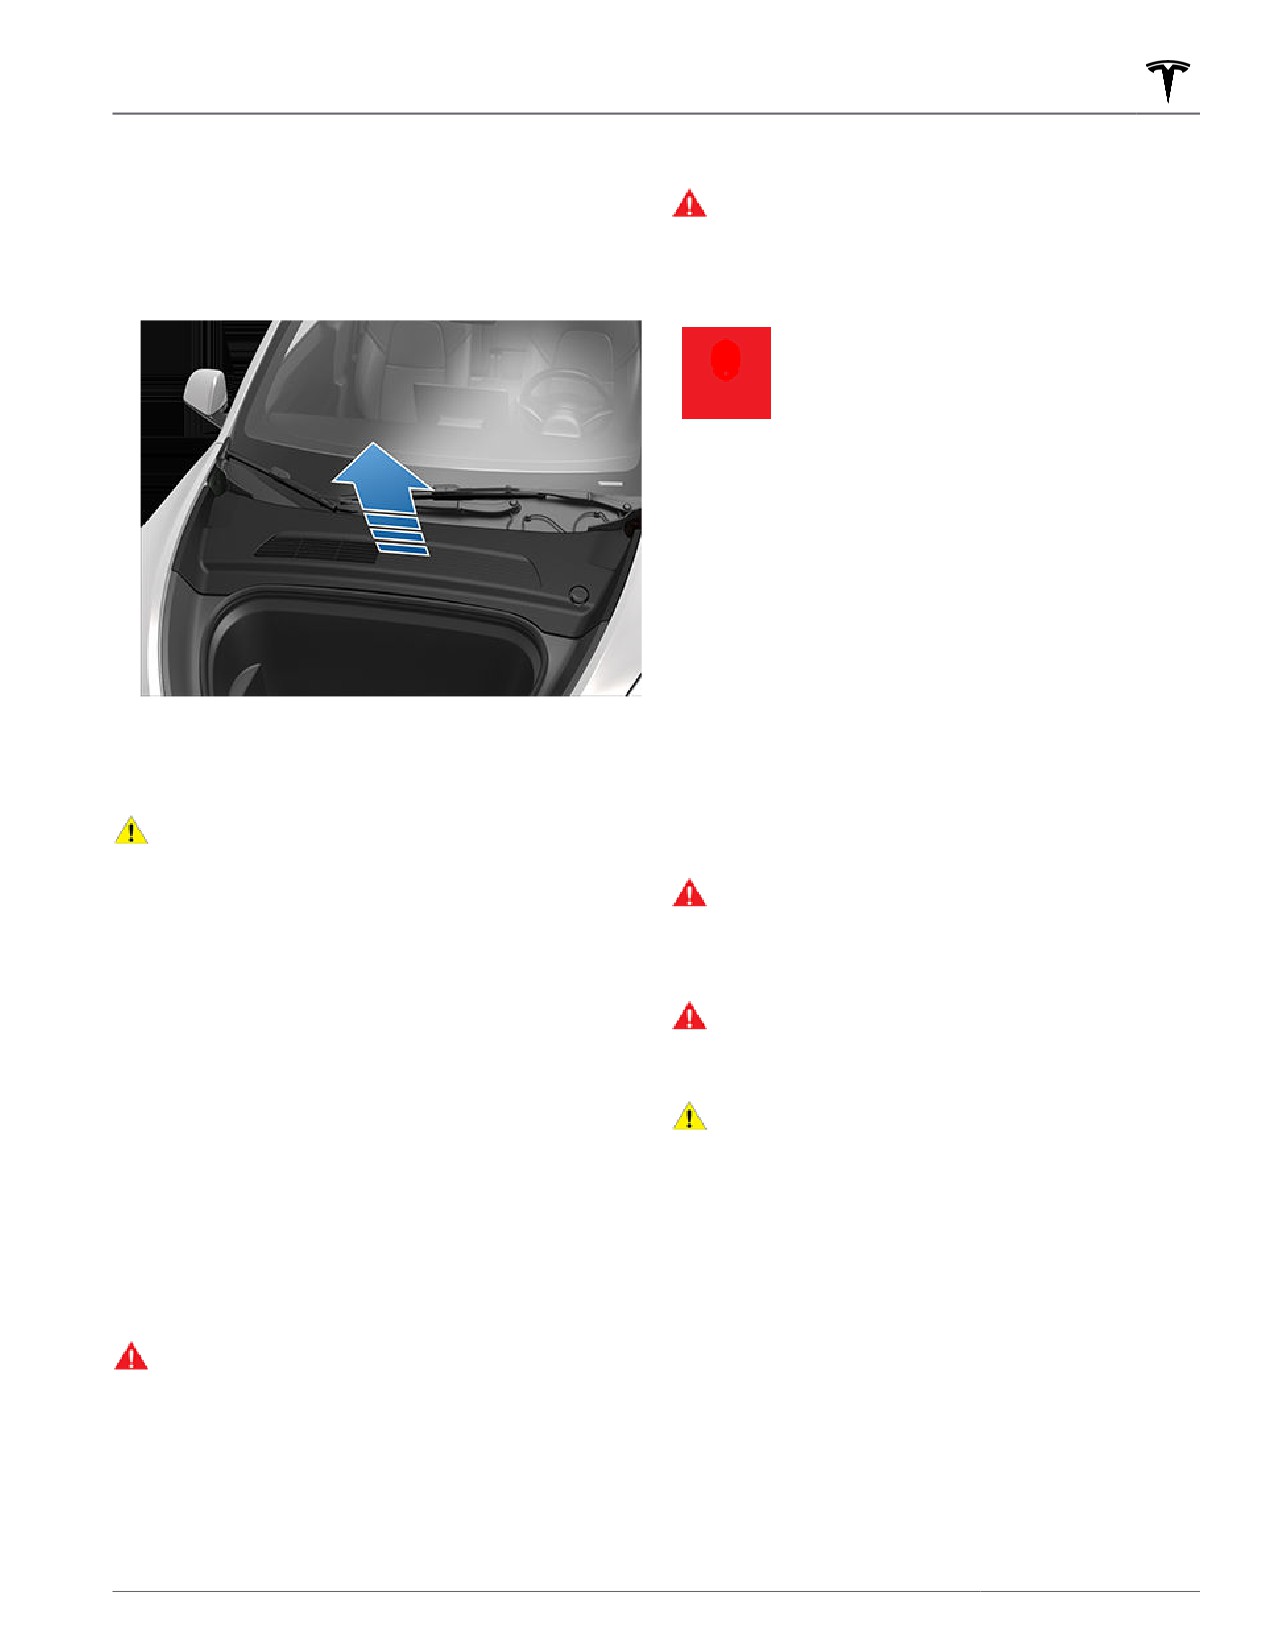
To check fluid levels, remove the maintenance panel:
WARNING: Contact Tesla immediately if you notice
increased movement of the brake pedal or a
1. Open the hood.
significant loss of brake fluid. Driving under these
conditions can result in extended stopping
2. Pull the maintenance panel upward to release the
distances or complete brake failure.
clips that hold it in place.
A red brake indicator on the touchscreen
alerts you if the quantity of fluid in the
brake reservoir drops below the
recommended level. If it displays while
driving, stop as soon as safety permits by
gently applying the brakes. Do not
continue driving. Contact Tesla
immediately.
Topping Up the Brake Fluid
Do not top up your brake fluid. The following
instructions are provided for information purposes and
future reference only:
1. Clean the filler cap before removing it to prevent dirt
from entering the reservoir.
3. If checking the Battery coolant, remove the cabin
intake trim panel by pulling it upwards to release the
2. Unscrew the cap and remove it.
clips that hold it in place.
3. Top up the reservoir to the MAX mark using the
appropriate brake fluid.
CAUTION: The maintenance panel protects the
4. Reinstall the filler cap, ensuring it is fully secured.
front trunk from water. When re-attaching, make
sure it is fully seated.
WARNING: Only use new fluid from a sealed air-
tight container. Never use previously used fluid or
Checking Battery Coolant
fluid from a previously opened container—fluid
absorbs moisture which decreases braking
Your Battery coolant should not need to be replaced for
performance.
the life of your vehicle under most circumstances.
WARNING: Brake fluid is highly toxic. Keep
However, if the quantity of fluid in the cooling system
containers sealed and out of the reach of children.
drops below the recommended level, the touchscreen
In the event of accidental consumption, seek
displays a warning message. Stop driving Model Y as
medical attention immediately.
soon as safety permits and contact Tesla.
CAUTION: Brake fluid damages painted surfaces.
Immediately soak up any spills with an absorbent
Fluid Level Check
cloth and wash the area with a mixture of car
shampoo and water.
DO NOT REMOVE THE FILLER CAP AND DO NOT ADD
FLUID. Doing so can result in damage not covered by
Topping Up Windshield Washer
the warranty.
Fluid
Do Not Top Up Battery Coolant
The only reservoir into which you can add fluid is the
windshield washer fluid reservoir, which is located
WARNING: Battery coolant can be hazardous and
behind the front trunk. When the level is low, a message
can irritate eyes and skin. Under no circumstances
displays on the touchscreen.
should you remove the filler cap and/or add
coolant. If the touchscreen warns you that the fluid
To top up the washer fluid:
level is low, contact Tesla immediately.
1. Open the hood.
Depending on your vehicle’s manufacture date, the
cooling system uses either G-48 (blue) or HTF-LS
2. Clean around the filler cap before opening it to
(orange-red) coolant. Contact Tesla for more specific
prevent dirt from entering the reservoir.
information about the coolant.
Maintenance
187
Fluid Reservoirs
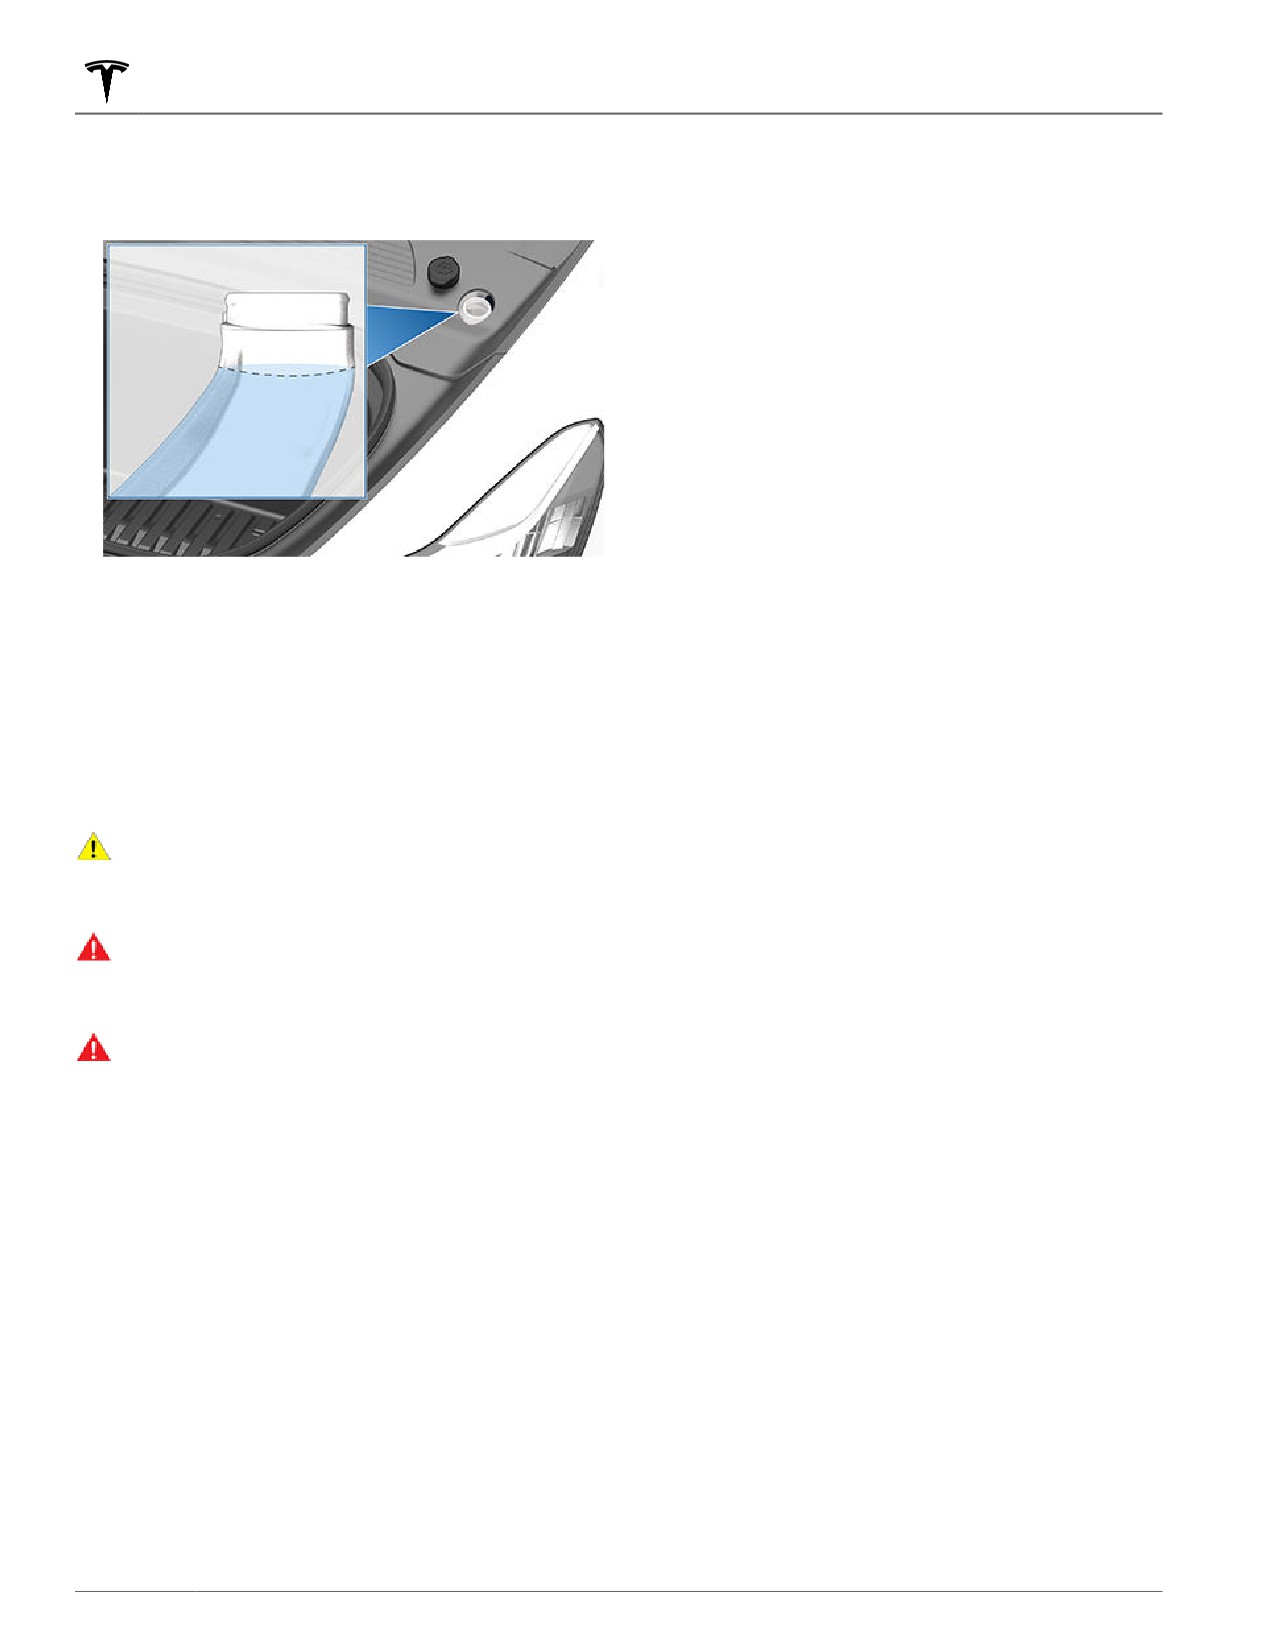
3. Open the filler cap.
4. While avoiding spilling, fill the reservoir until the fluid
level is visible just below the filler neck. The reservoir
has a capacity of 4.5 liters.
5. Wipe up any spills immediately and wash the
affected area with water.
6. Reinstall the filler cap.
NOTE: Some national or local regulations restrict the use
of Volatile Organic Compounds (VOCs). VOCs are
commonly used as antifreeze in washer fluid. Use a
washer fluid with limited VOC content only if it provides
adequate freeze resistance for all climates in which you
drive Model Y.
CAUTION: Do not add formulated washer fluids
that contain water repellent or bug wash. These
fluids can cause streaking, smearing, and
squeaking or other noises.
WARNING: In temperatures below 40° F (4° C),
use a washer fluid with antifreeze. In cold weather,
using a washer fluid without antifreeze can impair
visibility through the windshield.
WARNING: Windshield washer fluid can irritate
eyes and skin. Read and observe the instructions
provided by the washer fluid manufacturer.
188
Jacking and Lifting
Jacking Procedure
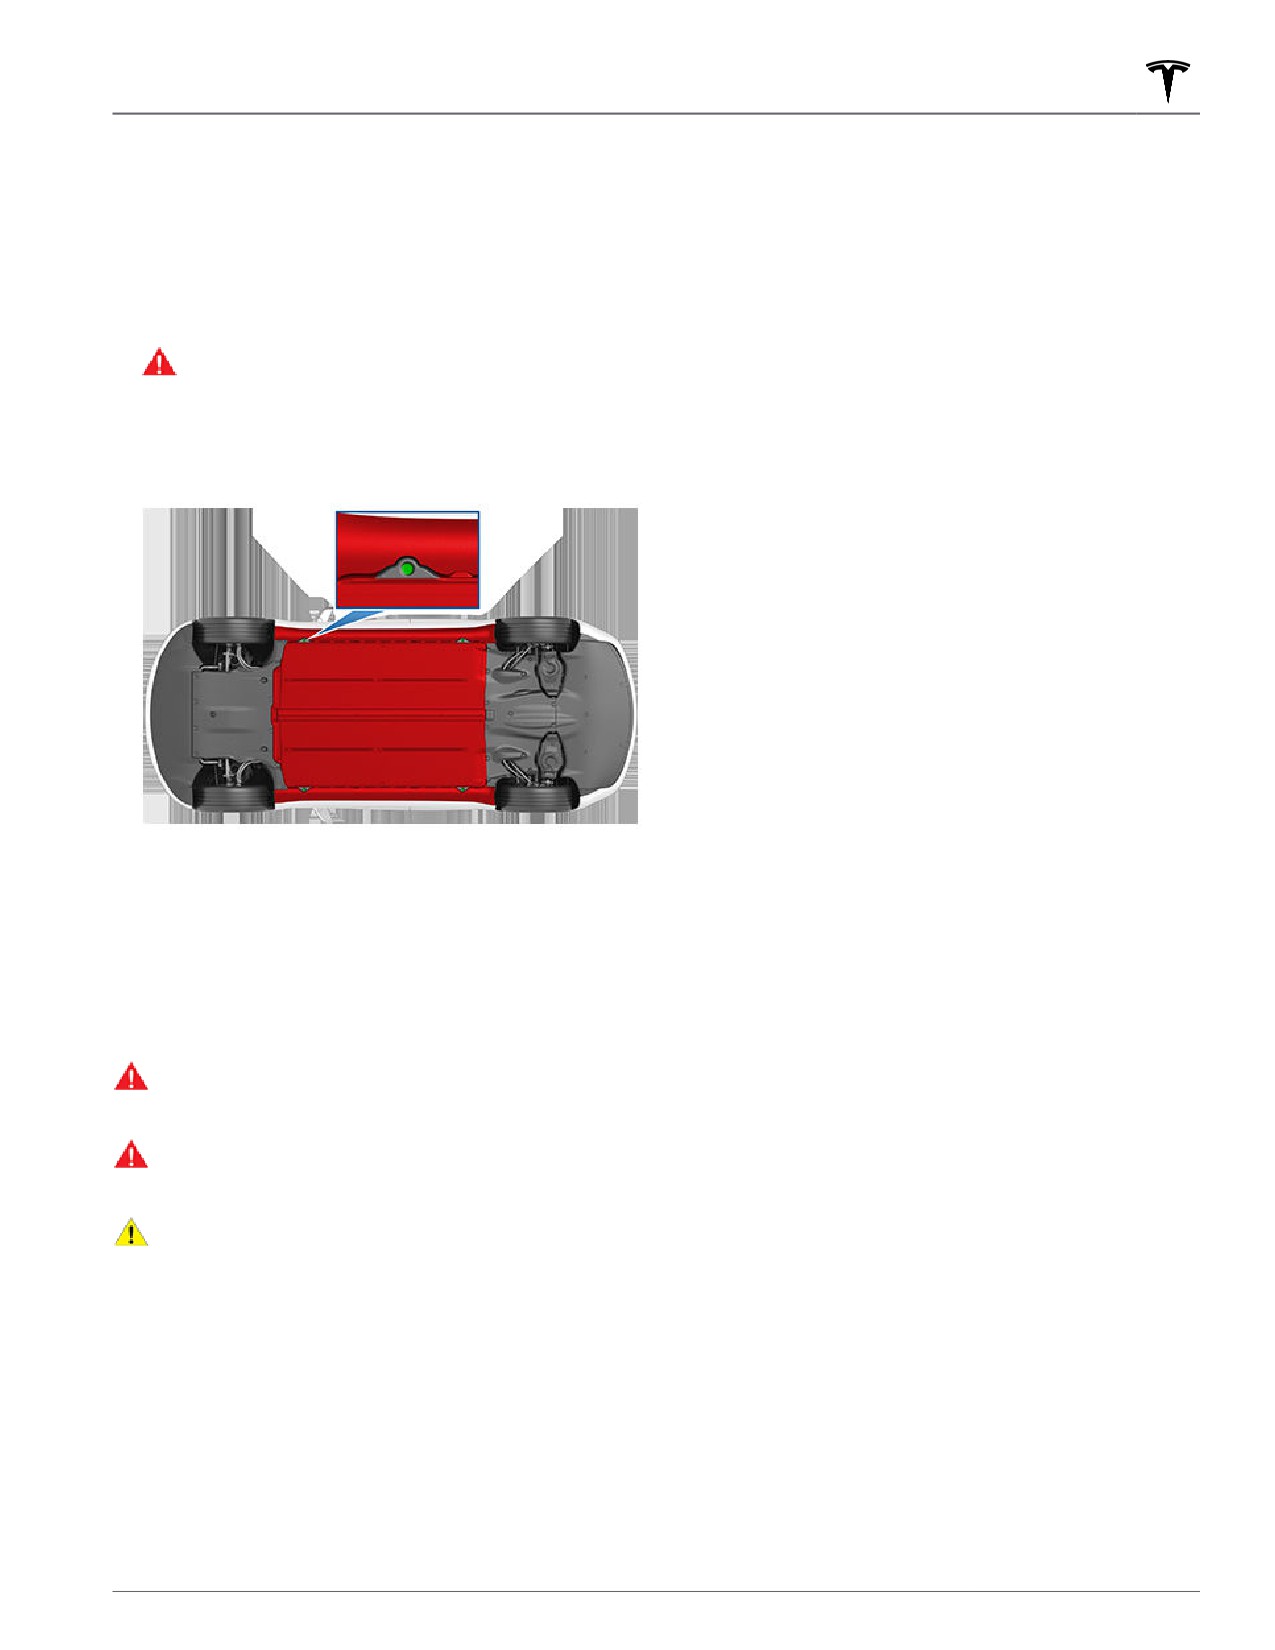
Follow the steps below to lift Model Y. Ensure that any
non-Tesla repair facility is aware of these lifting points.
1. Position Model Y centrally between the lift posts.
2. Position the lift arm pads under the designated body
lift points at the locations shown.
WARNING: DO NOT position the lift arm pads
under the Battery or side rails, as shown in red.
NOTE: The following illustration is provided to
improve conceptual understanding. The exact
location of the lift points may differ slightly. Check
the vehicle itself for exact location of lift points.
3. Adjust the height and position of the lift arm pads to
ensure that they are correctly located.
4. With assistance, raise the lift to the desired height,
ensuring the lift arm pads remain in their correct
positions.
5. Engage any lift safety locks. Follow the lift
manufacturer's instructions.
WARNING: Never raise Model Y when the charge
cable is connected, even if charging is not in
progress.
WARNING: Do not work on an incorrectly
supported vehicle. Doing so can cause serious
damage, bodily injury, or death.
CAUTION: DO NOT lift from under the Battery or
side rails. Place the lift arm pads under the
designated body lift points only. The locations
shown are the only approved lifting points for
Model Y. Lifting at any other points can cause
damage. Damage caused by incorrectly lifting
Model Y is not covered by the warranty.
Maintenance
189
Parts and Accessories
Parts, Accessories, and
2. Move the front passenger seat fully rearwards and
Modifications
remove the front passenger floor mat.
Use only genuine Tesla parts and accessories. Tesla
performs rigorous testing on parts to ensure their
3. Working from top-to-bottom, use a trim tool to
suitability, safety, and reliability. Purchase these parts
carefully release the right side panel from the center
from Tesla, where they are professionally installed and
console.
where you can receive expert advice about
modifications to Model Y. Accessories are available for
purchase from Tesla stores or online at www.tesla.com.
4. Remove the 6 mm screw that secures the cabin filter
cover to the heating, ventilation, and air conditioning
NOTE: Some accessories may not be available in your
(HVAC) module then release the cabin filter cover
market region.
and move it aside.
Tesla is unable to assess parts manufactured by other
distributors and therefore accepts no responsibility if
you use non-Tesla parts on Model Y.
5. Fold the upper cabin filter’s pull tabs outward.
WARNING: Installing non-approved parts and
accessories, or performing non-approved
6. Holding the tabs on the upper cabin filter, pull the
modifications, can affect the performance of
upper filter out from the HVAC module.
Model Y and the safety of its occupants. Any
damage caused by using or installing non-
approved parts, or by performing non-approved
modifications, is not covered by the warranty.
7. Holding the upper tab on the lower cabin filter, pull
the lower filter upwards and then out from the HVAC
WARNING: Tesla does not accept liability for
module.
death, personal injury or damage that occurs if you
use or install non-approved accessories or make
non-approved modifications.
8. Ensuring that the arrows on both new filters face
towards the rear of the vehicle, insert the lower cabin
Body Repairs
filter into the HVAC module and lower it into place.
Then, insert the upper cabin filter above it.
If your Model Y is in a collision, contact Tesla or a Tesla-
approved Body Shop to ensure that it is repaired with
genuine Tesla parts. Tesla has selected and approved
9. Fold the tabs inward so that the cabin filter cover can
body shops that meet strict requirements for training,
be installed.
equipment, quality, and customer satisfaction.
Some repair shops and insurance companies might
10. Install the cabin filter cover by engaging the lower
suggest using non-original equipment or salvaged parts
cover tab then securing the 6 mm screw. Tighten the
to save money. However, these parts do not meet Tesla's
screw to 1.2 Nm/0.89 ft-lbs.
high standards for quality, fit and corrosion resistance. In
addition, non-original equipment and salvaged parts
(and any damage or failures they might cause) are not
covered by the warranty.
11. Align the right side panel with the front and rear
locator slots on the center console, then apply
pressure until all of the clips are fully secure.
Replacing Cabin Filters
Model Y has air filters that prevent pollen, industrial
12. Reinstall the front passenger floor mat then move the
fallout, road dust, and other particles from entering the
front passenger seat back into place.
cabin through the vents. Tesla recommends replacing
these filters every 2 years (every year in China). Cabin
filters can be purchased at the Tesla online store.
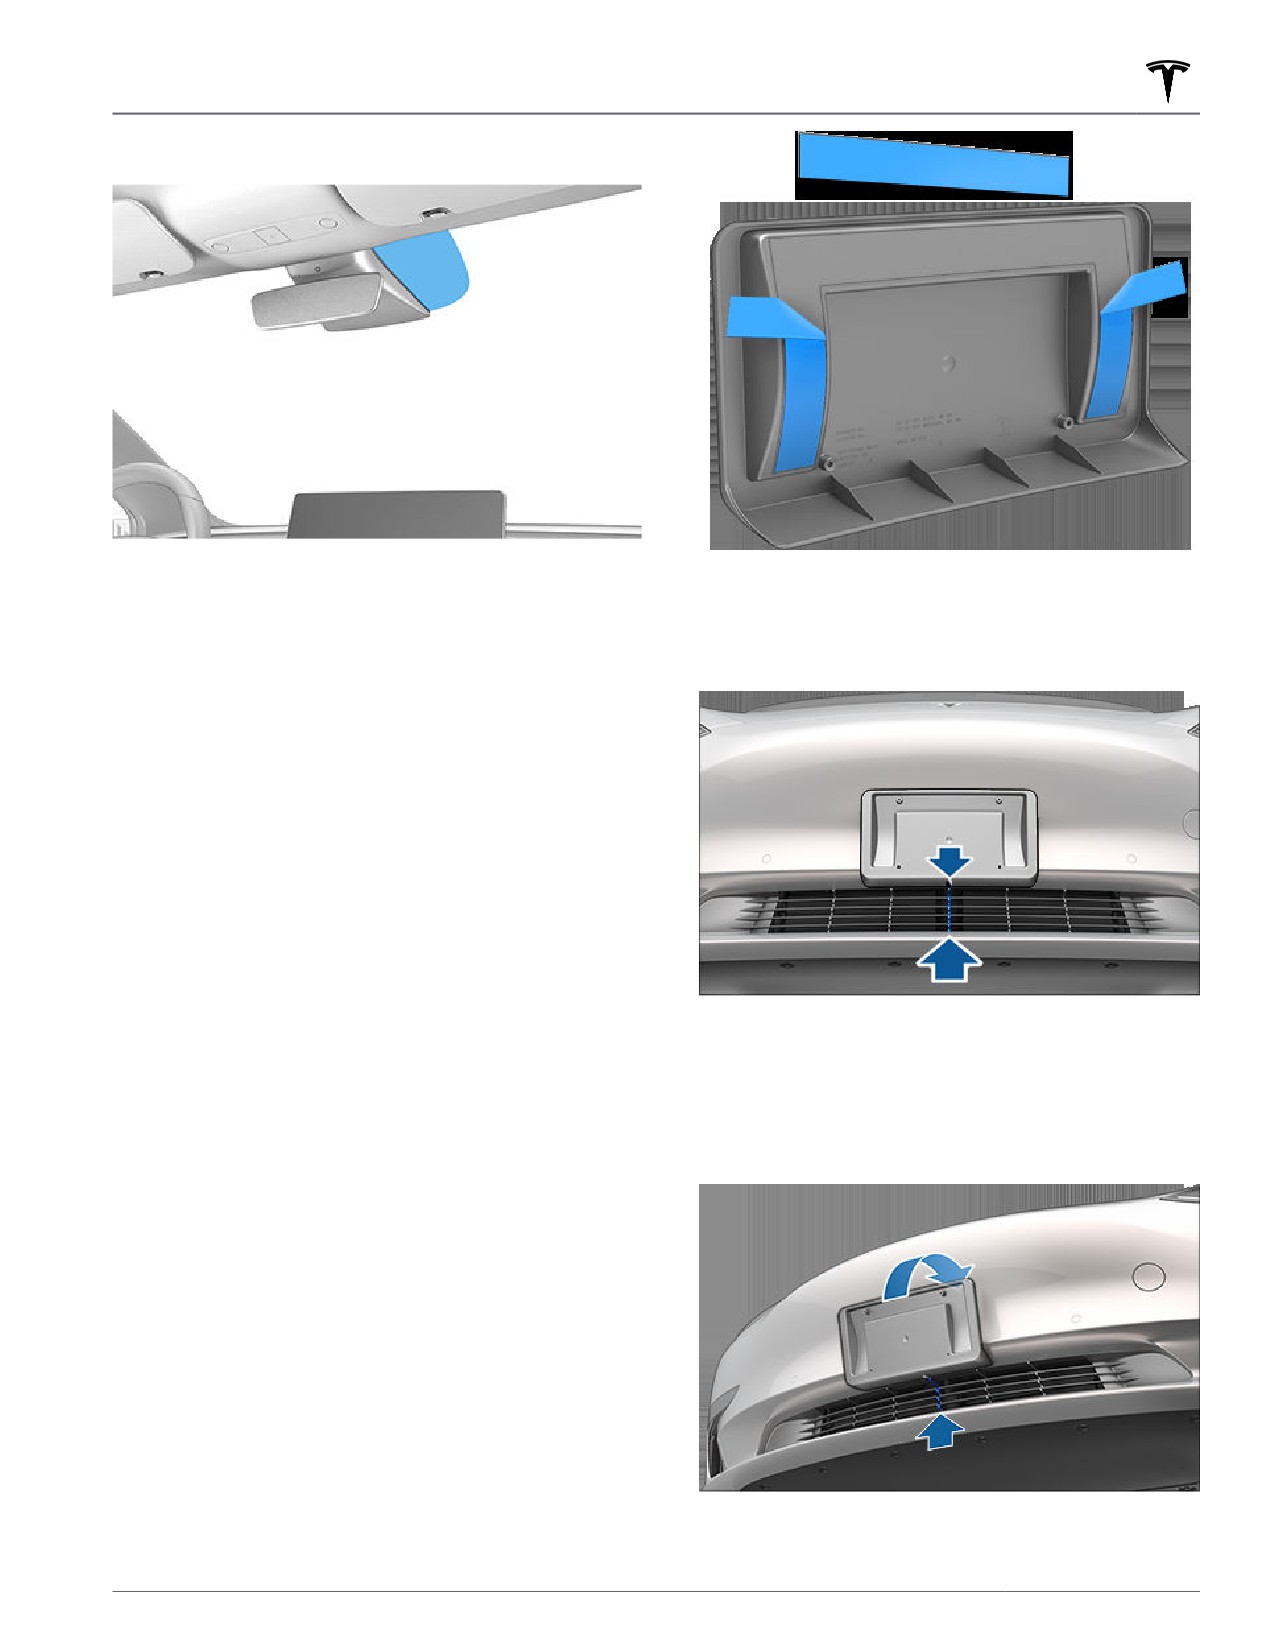
Using RFID Transponders
To replace the cabin filters:
When attaching an RFID transponder (used by many
automated toll systems) inside Model Y, place the
1. Turn off the climate control system.
transponder on the passenger side of the rear view
mirror as shown. This ensures best results and minimizes
any obstruction to your driving view.
190
Parts and Accessories
NOTE: You can also attach a weather-proof transponder
to the front license plate.
Installing Front License Plate
4. While tilting the top of the license plate bracket away
from the bumper (to prevent adhering it to the wrong
Bracket
location), align the bottom center of the license plate
bracket with the middle of the grille as shown.
To accommodate jurisdictions that require a license
plate on the front of your vehicle, Model Y is equipped
with a license plate bracket. This bracket conforms to
the shape of your vehicle's front bumper and is adhered
to it using strong adhesive.
NOTE: Tesla recommends performing this procedure on
a clean, dry vehicle during a warm day. Cold and/or wet
conditions may result in reduced performance of the
adhesive.
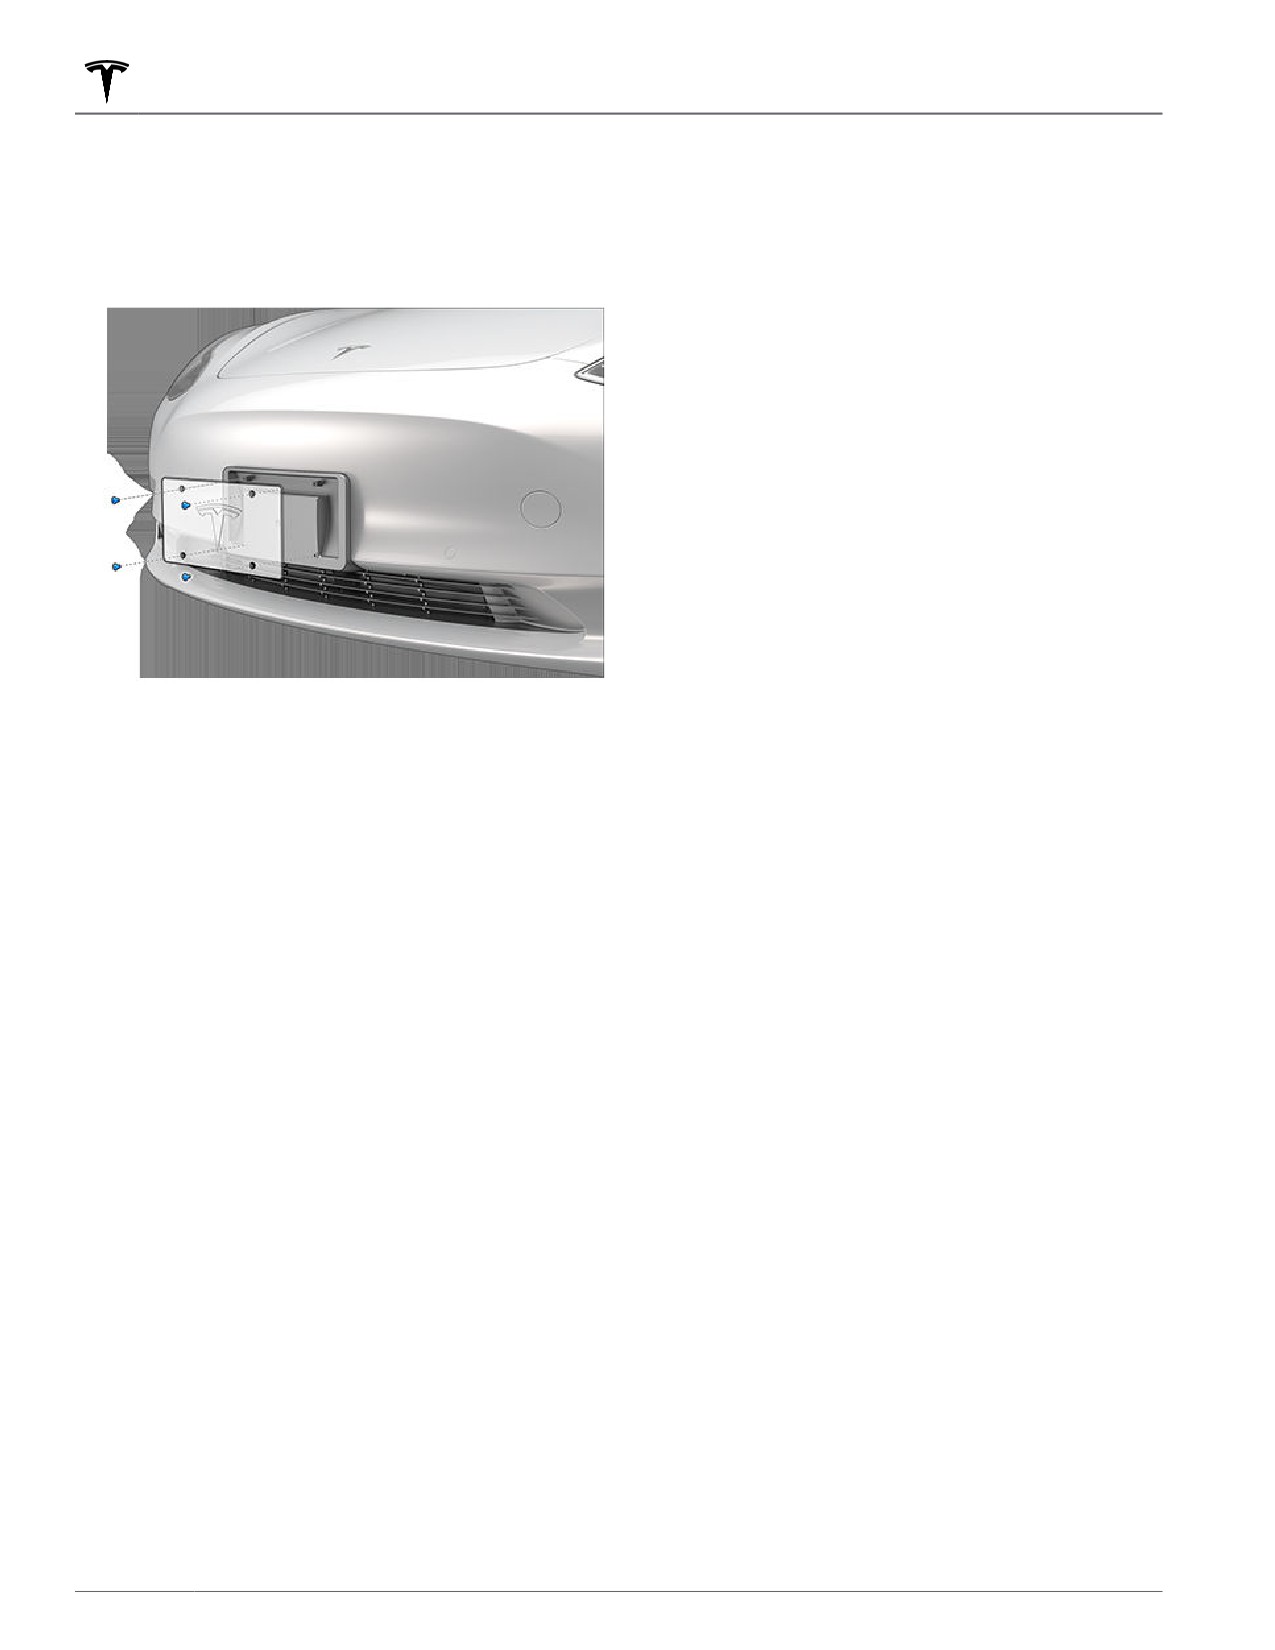
To install the front license plate bracket:
1. Get isopropyl alcohol and test it on a non-visible
painted surface of your vehicle to confirm that it does
not damage or remove the paint.
NOTE: Be as precise as possible when aligning the
2. Clean the mounting site with isopropyl alcohol and
bracket because you will be unable to reposition it
allow to dry for at least one minute.
once adhered to the bumper.
3. Fully remove the protective tape from the adhesive at
5. While correctly aligned, move the top of the bracket
the top of the bracket and partially remove the tape
against the bumper and apply pressure so that it is
from the top of the adhesive on each side. Leave the
held in place by the adhesive.
bottom half of the tape on the sides in place and fold
the unattached tape outward for easy removal after
aligning the bracket to the bumper.
Maintenance
191
Parts and Accessories
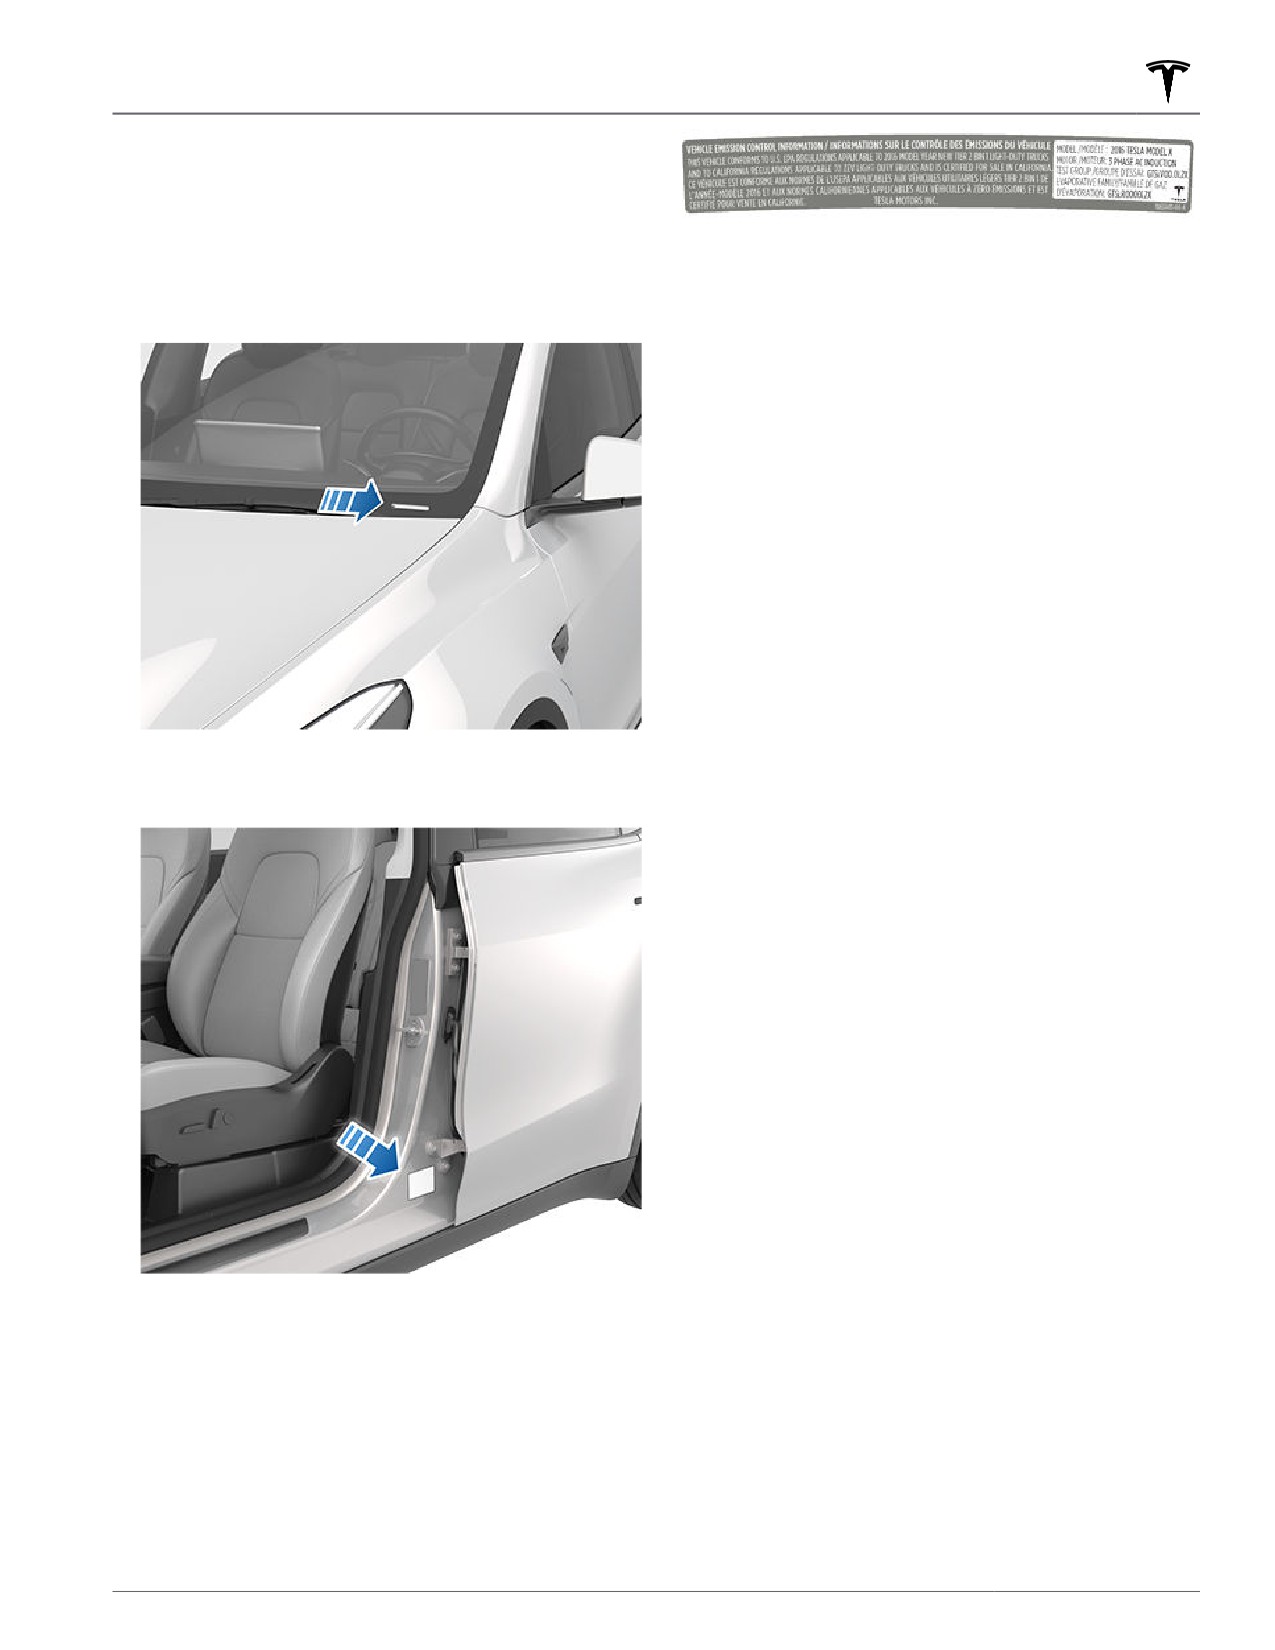
6. Remove the remaining tape from the sides of the
bracket then press the entire bracket firmly against
the bumper, ensuring the bracket is held in place by
all adhesive areas.
7. Once the bracket is securely mounted, use the four
supplied screws to attach your license plate to the
bracket (tighten to 3 Nm/2.2 ft-lbs).
192
Identification Labels
Vehicle Identification Number
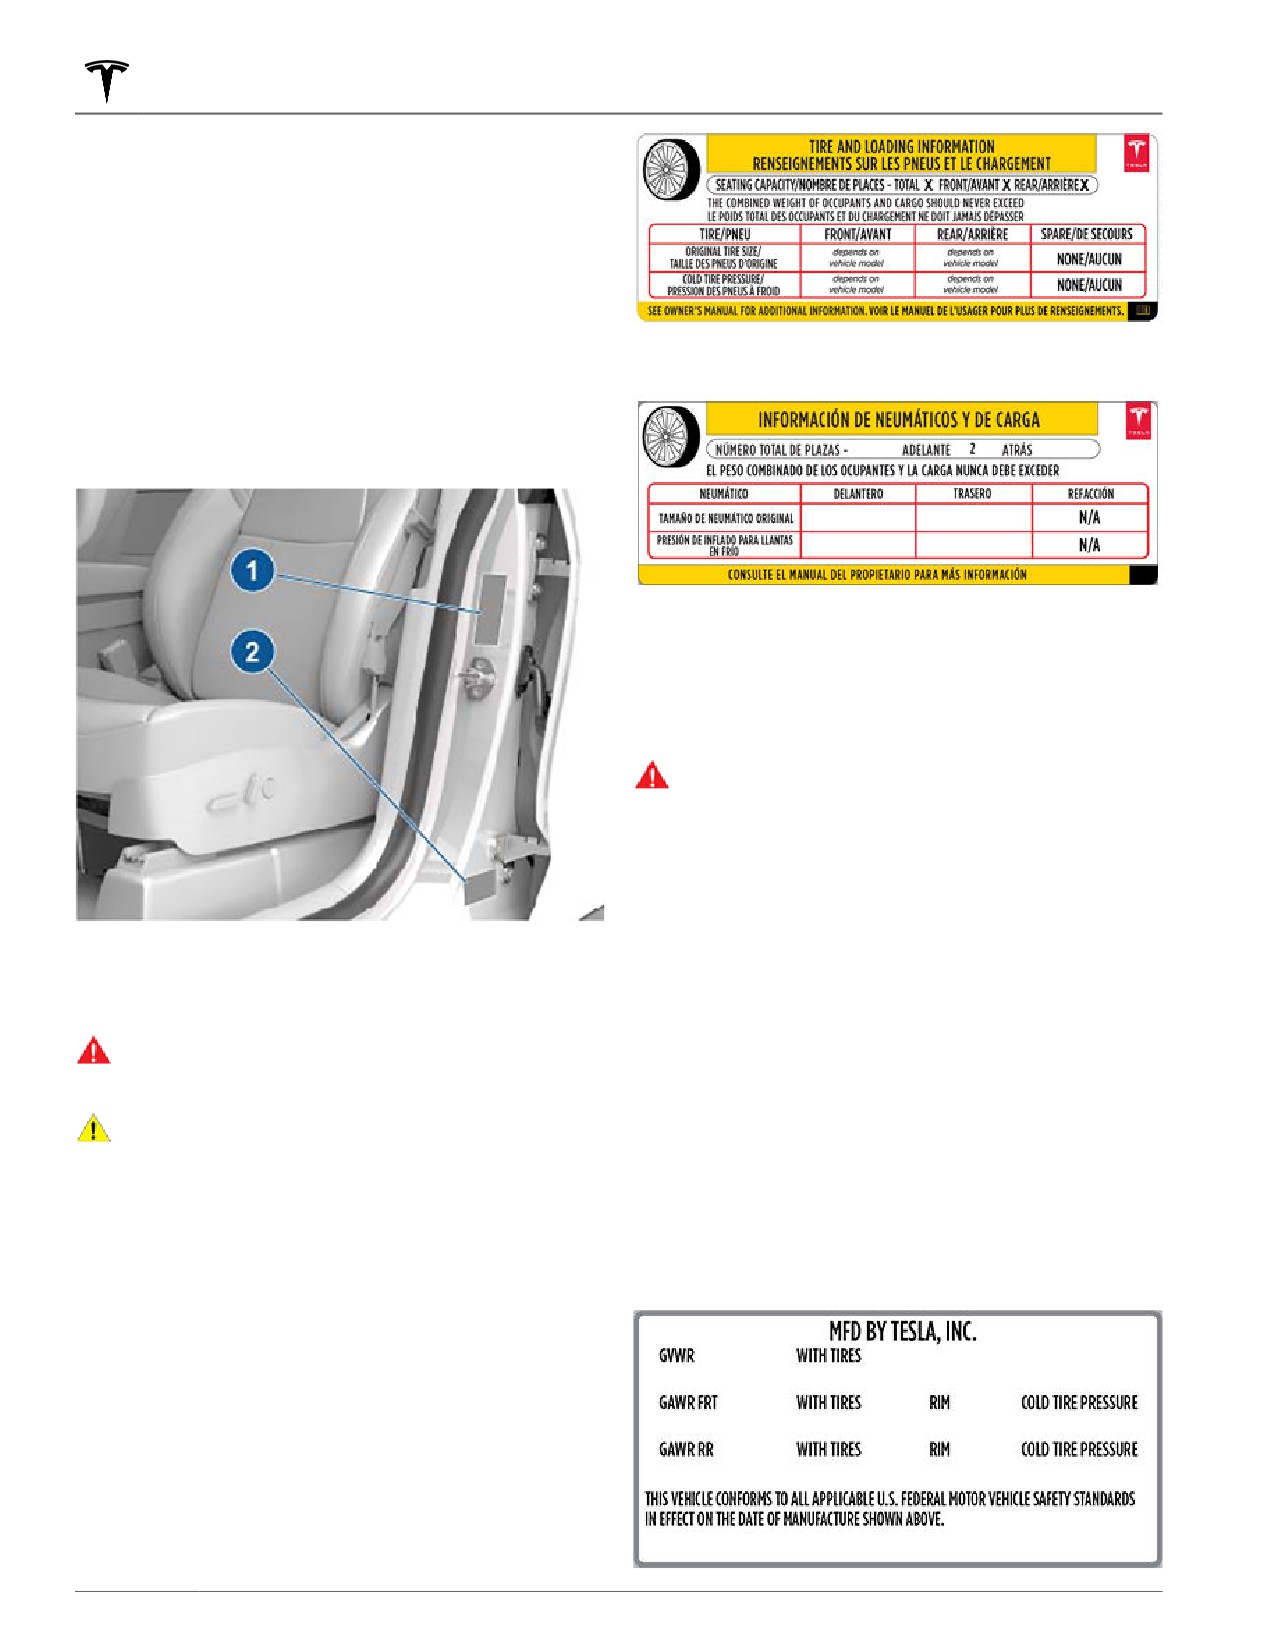
You can find the VIN at the following locations:
• Touch Controls > Software on the touchscreen.
• Stamped on a plate located at the top of the
dashboard. Can be seen by looking through the
windshield.
• Printed on the Vehicle Certification label, located on
the door pillar. This can be seen when the driver's
door is open.
Emission Control Label
The emission control label is located on the opening face
of the liftgate.
NOTE: For vehicles with a model year of 2022 or newer,
the emission control label is now located on the inside of
the front hood and may not match the label shown.
Specifications
193
Vehicle Loading
Vehicle Labeling
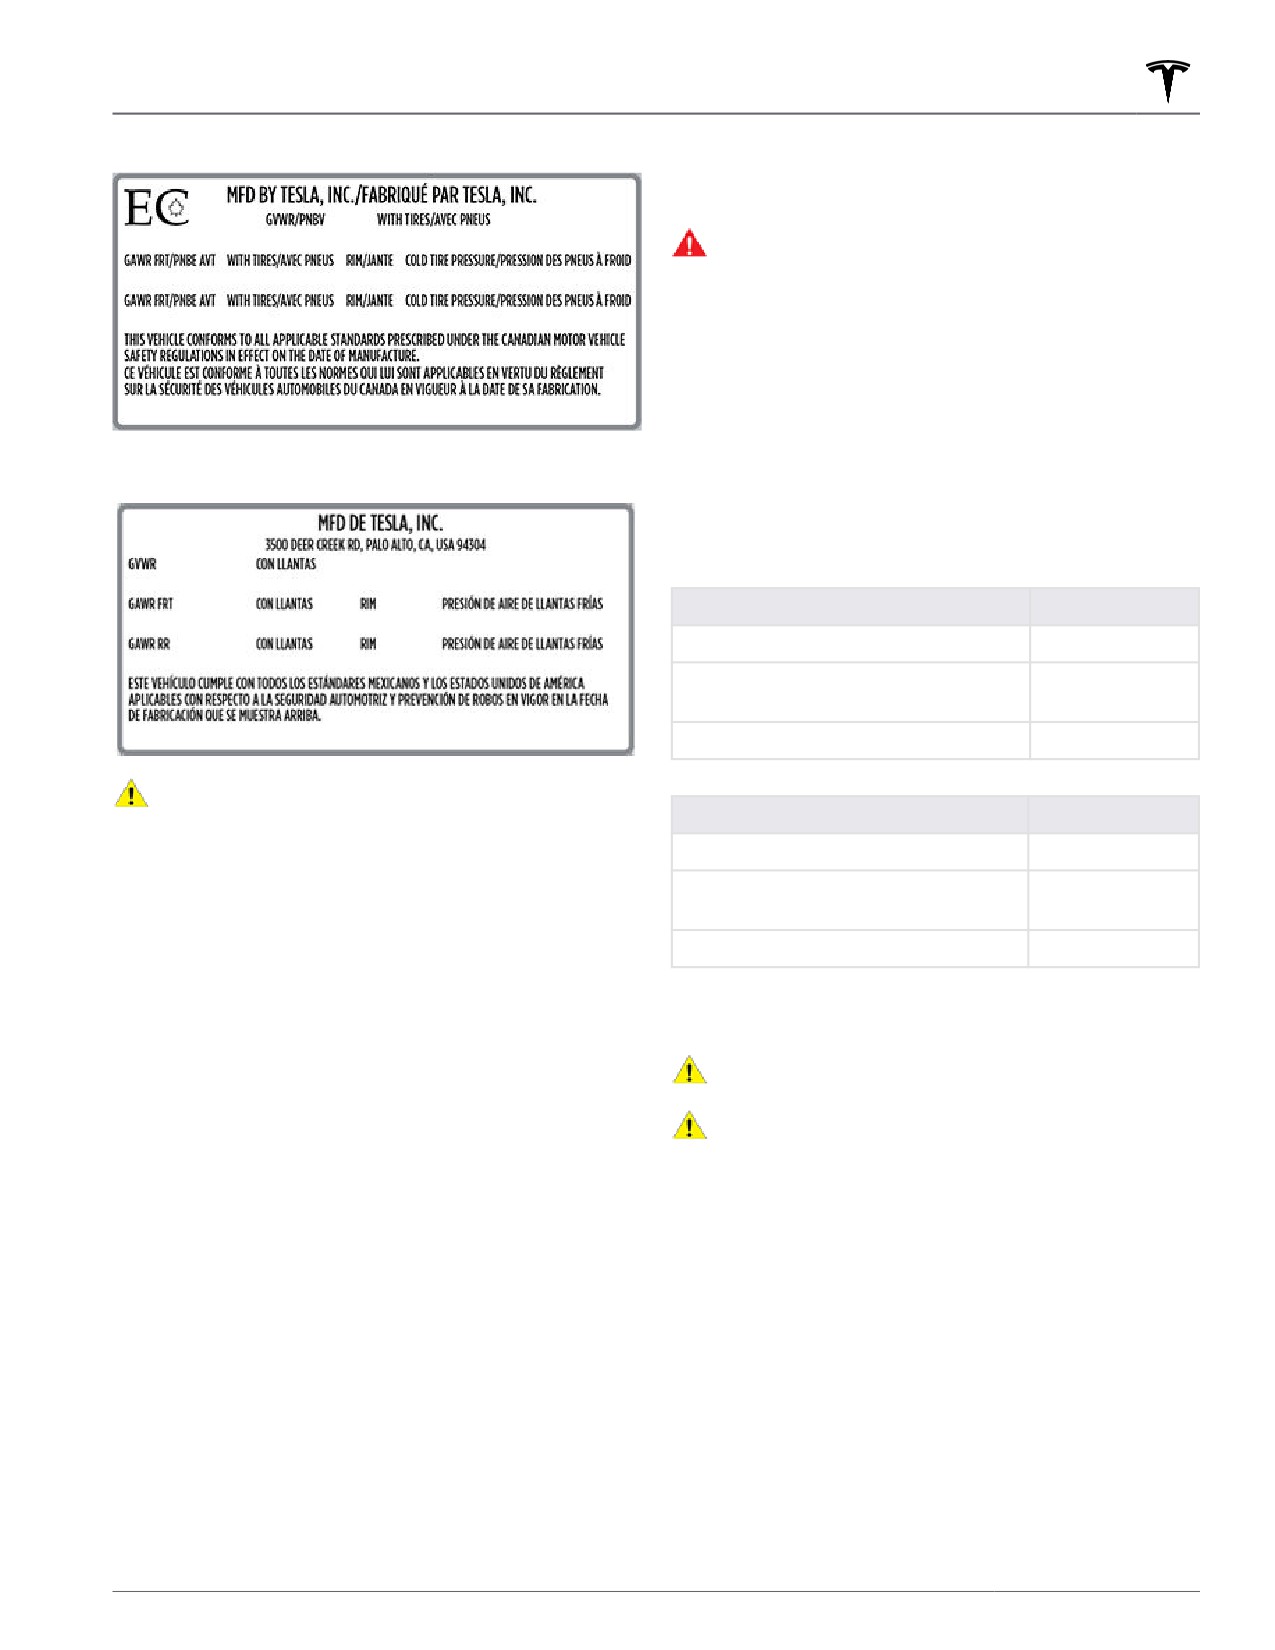
It is important to understand your vehicle's original tire
sizes and pressures, and the GVWR (Gross Vehicle
Weight Rating) and GAWR (Gross Axle Weight Rating).
This information can be found on two labels attached to
Model Y.
Both labels are visible on the door pillar when the front
door is open.
Mexico:
NOTE: If your Model Y is fitted with Tesla accessory
wheels or tires, your Model Y may include an additional
label indicating that values may differ from what is
stated on the label.
Never change this label, even if you use different tires in
the future.
NOTE: If Model Y is loaded to its full capacity, double
check all tires to ensure they are inflated to their
recommended pressure levels.
WARNING: Tire pressures printed on the Tire and
Loading Information label DO NOT APPLY to
towing. When towing, tire pressures must be
increased. For information about the tire pressures
required when towing, see Towing and Accessories
on page 75.
Vehicle Certification Label
1. Tire and Loading Information Label
The Vehicle Certification label provides:
2. Vehicle Certification Label
• GVWR - Gross Vehicle Weight Rating. The maximum
WARNING: Overloading Model Y has an adverse
allowable total mass of Model Y. This is calculated as
effect on braking and handling, which can
the weight of Model Y equipped with the heaviest
compromise your safety or cause damage.
factory selectable options, all passengers, fluids, and
CAUTION: Never store large amounts of liquid in
cargo.
Model Y. A significant spill can cause electrical
• GAWR FRT and GAWR RR - Gross Axle Weight
components to malfunction.
Rating for the front and rear axles. The GAWR is the
maximum distributed weight that each axle can
Tire and Loading Information Label
support.
The Tire and Loading Information label provides:
United States:
• The maximum number of occupant seating positions.
• The maximum vehicle capacity weight.
• The size of the original tires.
• The cold inflation pressures for the original front and
rear tires. These pressures are recommended to
optimize ride and handling characteristics.
United States/Canada:
194
Vehicle Loading
Canada:
5. Determine the combined cargo weight being loaded
on the vehicle. That weight must not exceed the
available cargo load capacity calculated in Step 4.
WARNING: Trunks are the preferred places to
carry objects. In a collision, or during hard braking
and sharp turns, loose items in the cabin could
injure occupants.
Example Load Limit Calculations
How much cargo Model Y can carry depends on the
number and weight of passengers. The following
calculated load limit examples assume passengers weigh
Mexico:
150 lbs (68 kg). If passengers weigh more or less,
available cargo weight decreases or increases
respectively.
Driver and one passenger
Description
Total
Vehicle capacity weight
954 lbs (433 kg)
Subtract occupant weight
300 lbs (136 kg)
(2 x 150 lbs/68 kg)
Available cargo weight
654 lbs (297 kg)
Driver and four passengers
CAUTION: To prevent damage, never load Model Y
so that it is heavier than GVWR or exceeds the
Description
Total
individual GAWR weights.
Vehicle capacity weight
954 lbs (433 kg)
Roof Racks
Subtract occupant weight (5 x 150
750 lbs (340 kg)
lbs/68 kg)
Model Y supports the use of Tesla-approved roof racks
Available cargo weight
204 lbs (93 kg)
using a Tesla mounting accessory. To install roof racks,
you must use this accessory and you must use only roof
The cargo weight should be distributed as evenly as
rack systems that have been approved by Tesla (see
possible between the front and rear trunks.
Parts and Accessories on page 190). Failure to do so can
cause significant damage.
CAUTION: Never load more than 110 lbs (50 kg) in
the front trunk. Doing so can cause damage.
Calculating Load Limits
CAUTION: Never load more than 176 lbs (80 kg) in
the lower tub compartment of the rear trunk or
1. Locate the statement “The combined weight of
more than 397 lbs (180 kg) on the upper floor.
occupants and cargo should never exceed XXX lbs or
Doing so can cause damage.
XXX kg” on the “Tire and Loading Information” label.
2. Determine the combined weight of all occupants that
will ride in the vehicle.
3. Subtract the combined weight of the occupants from
XXX lbs or XXX kg (see Step 1).
4. The resulting figure equals the available cargo load
capacity. For example, if the “XXX” amount equals
1400 lbs (635 kg) and there will be five 150 lb (68 kg)
passengers in the vehicle, the amount of available
cargo capacity is 650 lbs (1400 - 750
(5 x 150) = 650 lbs) or 295 kg (635 - 340
(5 x 68) = 295 kg).
Specifications
195
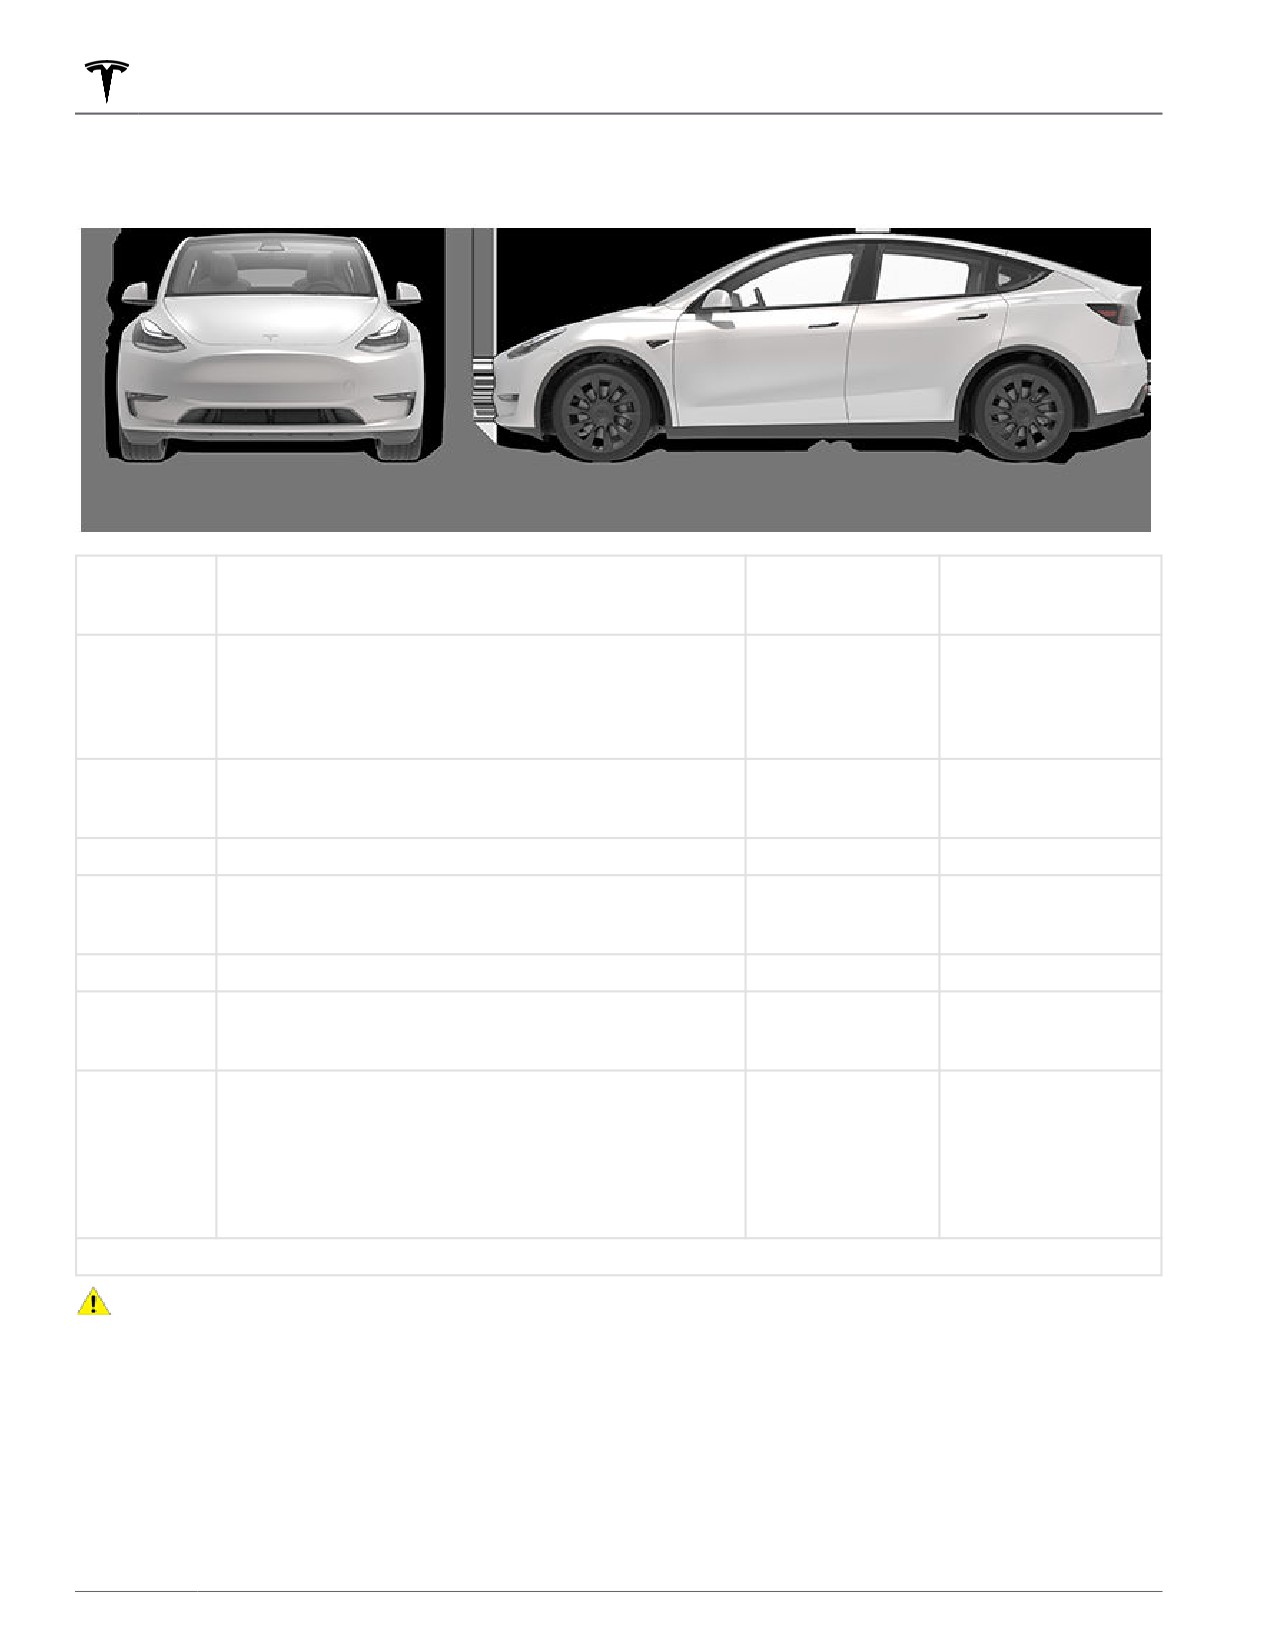
Dimensions
Exterior Dimensions
A
Overall Length
187 in
4751 mm
Overall Width (including mirrors)
83.8 in
2129 mm
B
Overall Width (including folded mirrors)
77.9 in
1978 mm
Overall Width (excluding mirrors)
75.6 in
1921 mm
C
Overall Height - coil suspension
64 in
1624 mm
D
Wheel Base
113.8 in
2890 mm
E
Overhang - Front
34.4 in
875 mm
F
Overhang - Rear
38.8 in
986 mm
G
Ground Clearance - coil suspension
6.6 in
167 mm
Track, non 21" wheels - Front
64.4 in
1636 mm
Track, non 21" wheels - Rear
64.4 in
1636 mm
H
Track, 21" wheels - Front
64.8 in
1646 mm
Track, 21" wheels - Rear
64.2 in
1630 mm
*Values are approximate. Dimensions can vary depending on a vehicle's options and various other factors.
CAUTION: Depending on configuration (such as wheel selection), your vehicle's liftgate can open up to
approximately 7.5 feet (2.3 meters) high. See Adjusting Liftgate Opening Height on page 14 to adjust the
liftgate height and prevent it from coming into contact with low ceilings or other objects.
Interior Dimensions
Model Y with 5 Seats:
196

Dimensions
Front
41.0 in
1041 mm
Head Room
Rear
39.4 in
1001 mm
Front
41.8 in
1063 mm
Leg Room
Rear
40.5 in
1029 mm
Front
56.4 in
1432 mm
Shoulder Room
Rear
54 in
1373 mm
Front
53.8 in
1367 mm
Hip Room
Rear
50.6 in
1286 mm
Model Y with 7 Seats:
Front
41.0 in
1041 mm
Head Room
Second Row
38.7 in
984 mm
Third Row
34.6 in
880 mm
Front
41.8 in
1063 mm
Leg Room
Second Row
41.6 in
1057 mm
Third Row
26.5 in
673 mm
Front
56.4 in
1432 mm
Shoulder Room
Second Row
54 in
1372 mm
Third Row
41 in
1041 mm
Front
53.8 in
1367 mm
Hip Room
Second Row
50.8 in
1290 mm
Third Row
36.5 in
928 mm
Cargo Volume
Model Y with 5 Seats:
Front trunk
4.1 cu ft (117 L)
Behind first row, second row seats folded
72.1 cu ft (2041 L)
Behind second row, seats not folded
30.2 cu ft (854 L)
Maximum total cargo volume with driver and front passenger
76.2 cu ft (2158 L)
Maximum total cargo volume with 5 passengers
34.3 cu ft (971 L)
Model Y with 7 Seats:
Front trunk
4.1 cu ft (117 L)
Behind first row, second and third row seats folded
67.9 cu ft (1923 L)
Specifications
197
Dimensions
Behind second row, third row seats folded
26.6 cu ft (753 L)
Behind third row
12.8 cu ft (363 L)
Maximum total cargo volume with driver and front passenger
72 cu ft (2040 L)
Maximum total cargo volume with 7 passengers
17 cu ft (480 L)
198
Subsystems
Motor Type(s)
Rear motor: AC permanent magnet synchronous motor, liquid-cooled, with variable frequency drive.
Front motor (AWD vehicles): AC induction motor, liquid-cooled, with variable frequency drive.
Transmission
Type
Single speed fixed gear
Gearbox Ratio
9:1
Steering
Steering
Specifications
Type
Rack and pinion with electronic power steering, speed sensitive
Number of turns lock to lock
2.00
Turning Circle (curb to curb)
39.8 ft (12.1 m)
Brakes
Type
4-wheel anti-lock braking system (ABS) with Electronic Brake Force
Distribution, Integrated Advanced Stability Control and Electronic Accelerator
pedal actuated regenerative braking system
Calipers
Front: Four piston fixed
Rear: Integrated Electronic Parking Brake Sliding
Rotor Diameter (ventilated)
Front (non-Performance): 14.0"/355 mm
Front (Performance): 14.0"/355 mm
Rear (non-Performance): 13.2"/335 mm
Rear (Performance): 13.2”/335 mm
Front Rotor thickness
New (non-performance): 0.98"/25 mm
New (performance): 1.06" / 27 mm
Service limit (non-performance): 0.91”/23 mm
Service limit (performance): 0.98" / 25 mm
Rear Rotor thickness
New (non-performance): 0.79"/20 mm
New (performance): 0.87" / 22 mm
Service limit (non-performance): 0.71”/18 mm
Service limit (performance): 0.79" / 20 mm
Specifications
199
Subsystems
Lateral runout
0.050 mm
Chordal runout
0.040 mm
Disk thickness variation (DTV)
0.010 mm
Front Brake Pad Thickness
(excluding back plate)
New: 0.393"/10 mm
Service limit: 0.085"/2.15 mm
Rear Brake Pad Thickness
(excluding back plate)
New: 0.354"/9 mm
Service limit: 0.078"/2 mm
Performance Front Brake Pad
New: 0.393"/10 mm Service limit: 0.085"/2.15 mm
Thickness (excluding back plate)
Performance Rear Brake Pad
New: 0.354"/ 9 mm Service limit: 0.071"/1.8 mm
Thickness (excluding back plate)
Parking brake
Electrically actuated parking brake integrated into rear caliper
Suspension
Suspension
Specifications
Front
Independent, double wishbone, coil spring/telescopic damper, sway bar
Rear
Independent, multi-link, coil spring/telescopic damper
Battery - Low Voltage
Battery - Low Voltage
Specifications
Rating
33 amp hour or higher
Voltage and Polarity
Low voltage negative (-) ground
Battery - High Voltage
Type
Liquid-cooled lithium ion (Li-ion)
Nominal Voltage
360 V DC
Temperature Range
Do not expose Model Y to ambient temperatures above 140° F (60° C) or below -22° F
(-30° C) for more than 24 hours at a time.
200
Wheels and Tires
Wheel Specifications (Factory)
Wheel Diameter
Location
Width (in)
Offset (mm)
19"
Front/Rear
9.5
45
20"
Front/Rear
9.5
45
21"
Front
9.5
40
21"
Rear
10.5
48
Lug Nut Torque
129 lb. ft (175 Nm)
Lug Nut Socket Size
21 mm
NOTE: For instructions on how to jack/lift Model Y, see Jacking and Lifting on page 189.
Tire Specifications (Factory)
Tire Size
Location
Size
19"
Front/Rear
255/45R19 XL
20"
Front/Rear
255/40R20 XL
21"
Front
255/35R21 XL
21"
Rear
275/35R21 XL
Tire pressures vary depending on the type of tires fitted. Refer to the tire pressures printed on the Tire and
Loading Information label. This label is located on the center door pillar and is visible when the driver’s door is
open (see Maintaining Tire Pressures on page 176).
Winter tires can be purchased from a Tesla service center or may be available for purchase on the Tesla web site.
Specifications
201
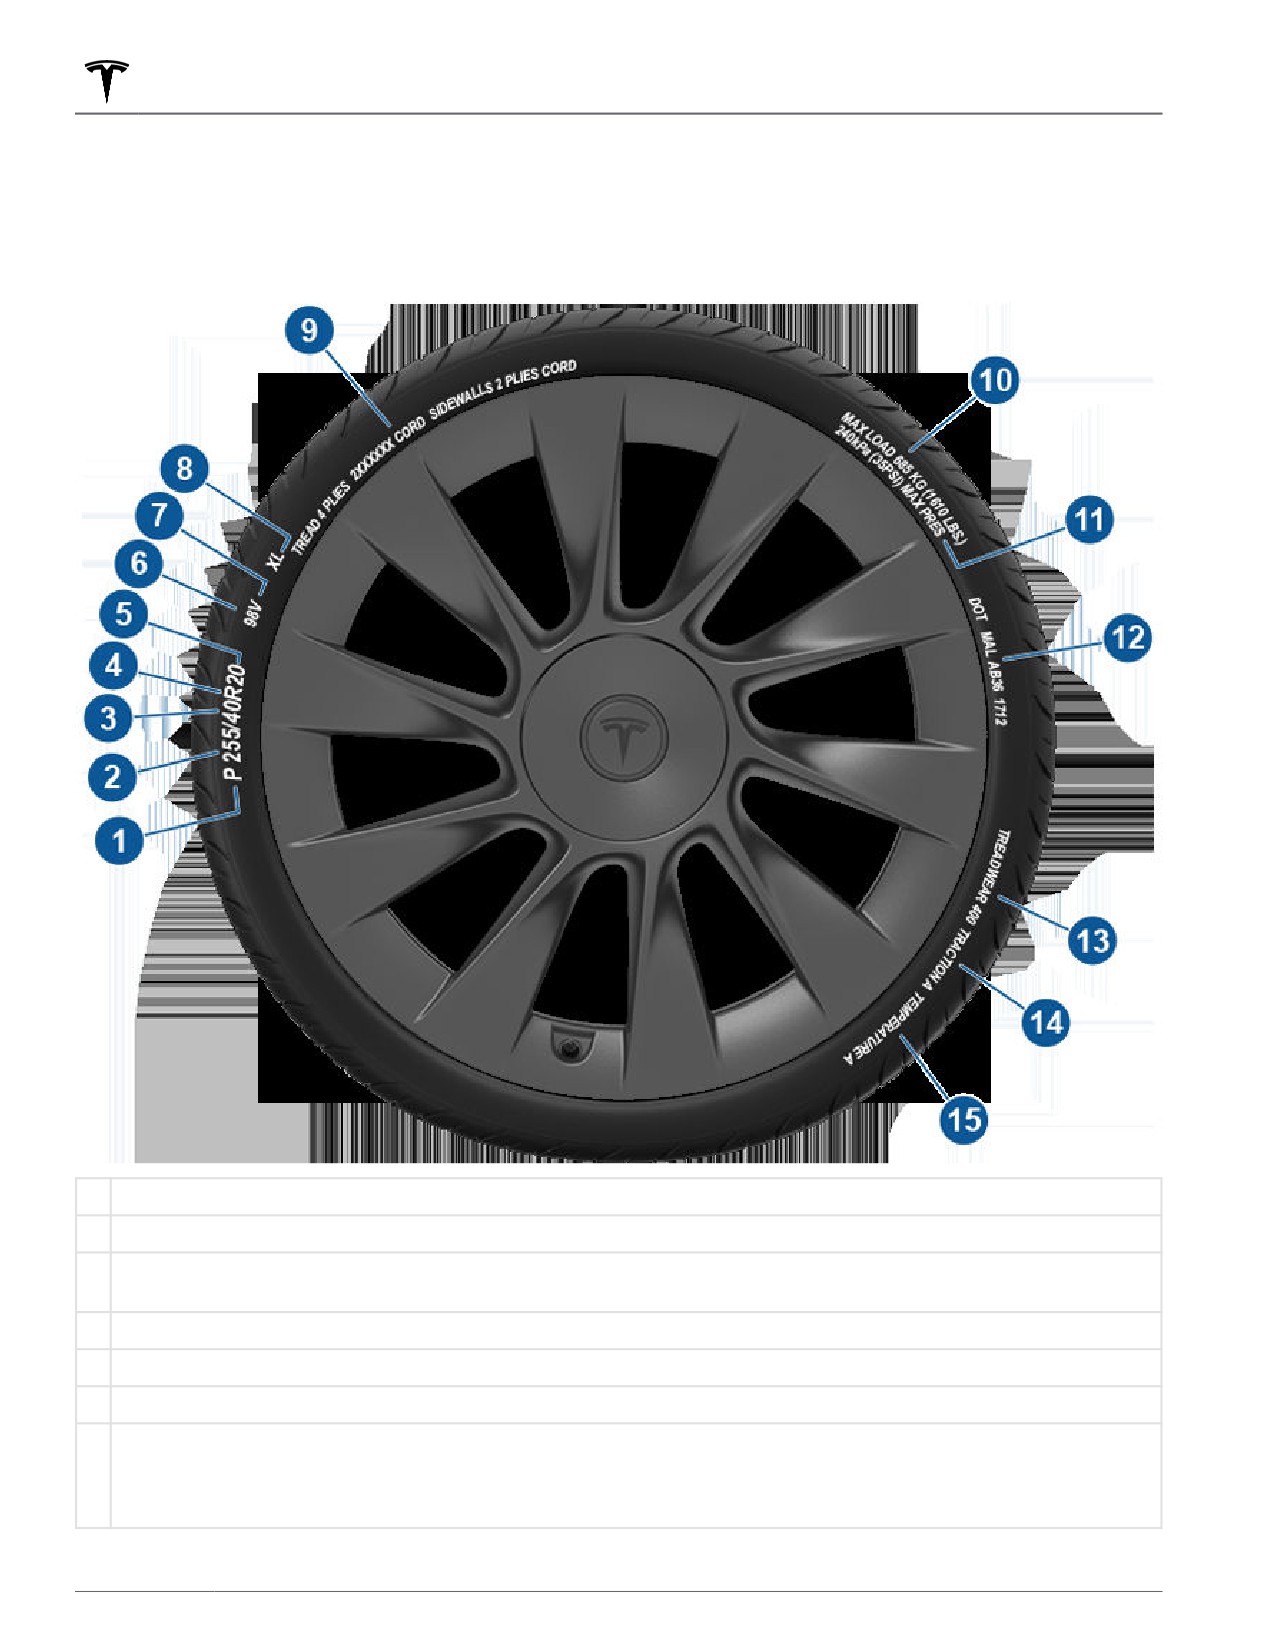
Wheels and Tires
Understanding Tire Markings
Laws require tire manufacturers to place standardized information on the sidewall of all tires. This information
identifies and describes the fundamental characteristics of the tire. It also provides the tire identification number
(TIN) for certification of safety standards, and in case of a recall.
1
Tire category. P indicates that the tire is for passenger vehicles.
2
Tire width. This 3-digit number is the width (in millimeters) of the tire from sidewall edge to sidewall edge.
3
Aspect ratio. This 2-digit number is the sidewall height as a percentage of the tread width. So, if the tread
width is 205 mm, and the aspect ratio is 50, the sidewall height is 102 mm.
4
Tire construction. R indicates that the tire is of Radial ply construction.
5
Wheel diameter. This 2-digit number is the diameter of the wheel rim in inches.
6
Load index. This 2 or 3-digit number is the weight each tire can support. This number is not always shown.
7
Speed rating. When stated, indicates the maximum speed (in mph) at which the tire can be used for extended
periods. Q=99 mph (160 km/h), R=106 mph (170 km/h), S=112 mph (180 km/h), T=118 mph (190 km/h),
U=124 mph (200 km/h), H=130 mph (210 km/h), V=149 mph (240 km/h), W=168 mph (270 km/h), Y=186 mph
(300 km/h), (Y)=vehicle's top speed (exceeds the "Y" rating).
202
Wheels and Tires
8
Load range. Shown as Standard Load (SL) or Extra Load (XL), the load range determines how much weight
your tires can support at a specified tire pressure. When replacing tires, only use tires of the same load range. If
towing with snow tires, ensure they are the same load range of the tires your vehicle came equipped with.
9
Tire composition and materials. The number of plies in both the tread area and the sidewall area indicates how
many layers of rubber coated material make up the structure of the tire. Information is also provided on the
type of materials used.
10
Maximum tire load. The maximum load which can be carried by the tire.
11
Maximum permissible inflation pressure. This pressure should not be used for normal driving.
12
U.S. DOT Tire Identification Number (TIN). Begins with the letters DOT and indicates that the tire meets all
federal standards. The next 2 digits/letters represent the plant code where it was manufactured, and the last 4
digits represent the week and year of manufacture. For example, the number 1712 is used to represent the 17th
week of 2012. The other numbers are marketing codes used at the manufacturer’s discretion. This information
can be used to contact consumers if a tire defect requires a recall.
13
Treadwear grade. This number indicates the tire’s wear rate. The higher the treadwear number is, the longer it
should take for the tread to wear down. A tire rated at 400, for example, lasts twice as long as a tire rated at
200.
14
Traction grade. Indicates a tire’s ability to stop on wet roads. A higher graded tire should allow you to stop your
vehicle in a shorter distance than a tire with a lower grade. Traction is graded from highest to lowest as AA, A,
B, and C.
15
Temperature grade. The tire’s resistance to heat is grade A, B, or C, with A indicating the greatest resistance.
This grading is provided for a correctly inflated tire, which is being used within its speed and loading limits.
Specifications
203
Wheels and Tires
Uniform Tire Quality Grading
The following information relates to the tire grading system developed by the National Highway Tra
c Safety
Administration (NHTSA), which grades tires by tread wear, traction and temperature performance. Tires that have
deep tread, and winter tires, are exempt from these marking requirements.
Where applicable, quality grades are found on the tire’s sidewall between the tread shoulder and maximum section
width. For example:
• TREADWEAR 180
• TRACTION AA
• TEMPERATURE A
The quality grades are described next.
NOTE: In addition to the marking requirements, passenger car tires must conform to Federal Safety Requirements.
Treadwear
The treadwear grade is a comparative rating based on the wear rate of the tire when tested under controlled
conditions on a specified government test course.
For example, a tire graded 150 wears one and a half times better on a government test course than a tire graded 100.
The relative performance of tires depends on the actual conditions of their use, however, and can depart significantly
from the norm due to variations in driving habits, service practices, road characteristics, and climate.
Traction
The traction grades, from highest to lowest, are: AA, A, B, and C. These grades represent a tire’s ability to stop on
wet pavement as measured under controlled conditions on test surfaces of asphalt and concrete. A tire marked C
might have poor traction performance.
WARNING: Defective tires are dangerous. Do not drive if a tire is damaged, excessively worn, or is inflated to
an incorrect pressure. The safety of the vehicle and occupants can be adversely affected. Check tires regularly
for wear and to ensure there are no cuts, bulges or exposure of the ply/cord structure.
WARNING: The traction grade assigned to the tire is based on straight-ahead braking tests, and does not
include: acceleration, cornering, hydroplaning or peak traction characteristics.
Temperature
The temperature grades are A (the highest), B, and C, representing the tire’s resistance to the generation of heat and
its ability to dissipate heat when tested under controlled conditions on a specified indoor laboratory test wheel.
Sustained high temperature can cause the tire to degenerate and reduce tire life, and excessive temperature can lead
to sudden tire failure.
The grade C corresponds to the minimum level of performance that all passenger car tires must meet under the
Federal Motor Safety Standard No. 109. Grades B and A represent levels of performance on the laboratory test wheel
that exceed the minimum requirements.
WARNING: A tire’s temperature grade is established for a tire that is properly inflated and not overloaded.
Excessive speed, under-inflation, or excessive loading, either separately or in combination, can cause heat
buildup and possible tire failure.
204