Lincoln MKZ (2020 year). Manual in english - page 9
 

  Index      Manuals     Lincoln MKZ (2020 year). Manual in english


Search            copyright infringement  


Content      ..     7      8      9      10     ..


Lincoln MKZ (2020 year). Manual in english - page 9


Linking a PreSet Position to your
Remote Control or Intelligent Access
Key Fob

Your vehicle can save the preset memory
positions for up to two remote controls or
intelligent access (IA) keys.

After you have saved your desired memory
preset positions:

1. Press and hold the desired preset button

for about three seconds until you hear a
single tone.

2. Within three seconds, press the lock

button on the remote control you are
linking.

To unlink a remote control, follow the same
procedure – except in step 2, press the
unlock button on the remote control.

Note: If more than one linked remote control
or intelligent access key is in range, the
memory function moves to the settings of
the first key to initiate a memory recall.

Easy Entry and Exit Feature

If you enable the easy entry and exit feature,
it automatically moves the driver seat
position rearward up to 2 in (5 cm) when you
switch the ignition off.

The driver seat returns to the previous
position when you switch the ignition on.

You can enable or disable this feature in the
information display.  See General
Information
 (page 109).

REAR SEATS

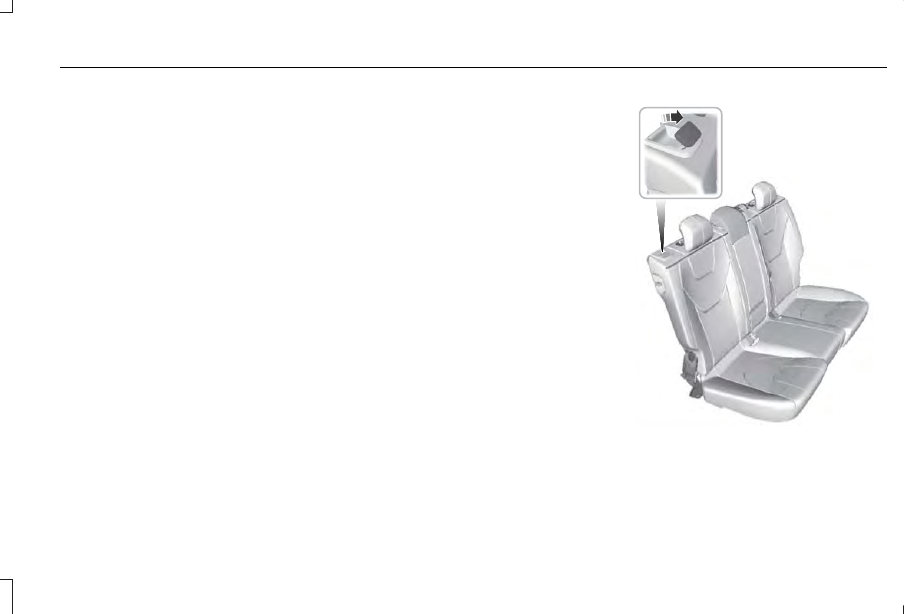
Note: Your vehicle may have split seatbacks
that you must fold individually.

Note: Make sure the center safety belt is
unbuckled before folding the seatback.

To lower the seat back(s) from inside the
vehicle, do the following:

E144634

1. Pull the handle to release the seatback.

2. Push the seatback forward.

147

Seats

-------------------------------------------------------------------------------------------------------------------------------------------------------------

E164098

3. Stow the safety belt in the stowage clip.

This will prevent the safety belt from
getting caught in the seat latch.

When raising the seat back(s), make sure you
hear the seat latch into place.

HEATED SEATS

Front Seats

WARNING: People who are unable

to feel pain to their skin because of
advanced age, chronic illness, diabetes,
spinal cord injury, medication, alcohol use,
exhaustion or other physical conditions,
must exercise care when using the heated
seat. The heated seat may cause burns
even at low temperatures, especially if
used for long periods of time. Do not place
anything on the seat that insulates against
heat, such as a blanket or cushion. This
may cause the heated seat to overheat.
Do not puncture the seat with pins,
needles or other pointed objects. This may
damage the heating element which may
cause the heated seat to overheat. An
overheated seat may cause serious
personal injury.

Do not do the following:

Place heavy objects on the seat.

Operate the heated seat if water or any
other liquid spills on the seat. Allow the
seat to dry thoroughly.

Operate the heated seats unless the
engine is running. Doing so can cause
the battery to lose charge.

E146322

Press the heated seat symbol to cycle
through the various heat settings and off.
More indicator lights indicate warmer
settings.

148

Seats

-------------------------------------------------------------------------------------------------------------------------------------------------------------

Rear Seats

WARNING: Persons who are unable

to feel pain to the skin because of
advanced age, chronic illness, diabetes,
spinal cord injury, medication, alcohol use,
exhaustion, or other physical conditions,
must exercise care when using the seat
heater. The seat heater may cause burns
even at low temperatures, especially if
used for long periods of time. Do not place
anything on the seat that insulates against
heat, such as a blanket or cushion,
because this may cause the seat heater to
overheat. Do not puncture the seat with
pins, needles, or other pointed objects
because this may damage the heating
element which may cause the seat heater
to overheat. An overheated seat may
cause serious personal injury.

Do not do the following:

Place heavy objects on the seat.

Operate the seat heater if water or any
other liquid is spilled on the seat. Allow
the seat to dry thoroughly.

Operate the heated seats unless the
engine is running. Doing so can cause
the battery to lose charge.

The rear seat heat controls are located on
the rear of the center console.

E146322

Press the heated seat symbol to cycle
through the various heat settings and off.
More indicator lights indicate warmer
settings.

The heated seat module resets at every
ignition run cycle. While the ignition is on,
press the high or low heated seat switch to
enable heating mode. When activated, they
will turn off automatically when you turn the
engine off.

CLIMATE CONTROLLED SEATS

 (IF

EQUIPPED)

Heated Seats

WARNING: People who are unable

to feel pain to their skin because of
advanced age, chronic illness, diabetes,
spinal cord injury, medication, alcohol use,
exhaustion or other physical conditions,
must exercise care when using the heated
seat. The heated seat may cause burns
even at low temperatures, especially if
used for long periods of time. Do not place
anything on the seat that insulates against
heat, such as a blanket or cushion. This
may cause the heated seat to overheat.

149

Seats

-------------------------------------------------------------------------------------------------------------------------------------------------------------

Do not puncture the seat with pins,
needles or other pointed objects. This may
damage the heating element which may
cause the heated seat to overheat. An
overheated seat may cause serious
personal injury.

Do not do the following:

Place heavy objects on the seat.

Operate the heated seat if water or any
other liquid spills on the seat. Allow the
seat to dry thoroughly.

Operate the heated seats unless the
engine is running. Doing so can cause
the battery to lose charge.

E146322

Touch the heated seat symbol to cycle
through the various heat settings and off.
More indicator lights indicate warmer
settings.

Cooled Seats

The cooled seats will only function when the
engine is running.

E146309

To operate the cooled seats:

Press the cooled seat symbol to cycle
through the various cooling settings and off.
More indicator lights indicate cooler settings.

If the engine falls below 350 RPM while the
cooled seats are on, the feature will turn itself
off. You will need to reactivate it.

Climate controlled seat air filter
replacement

Your vehicle is equipped with lifetime air
filters that are integrated with the seats.
Regular maintenance or replacement is not
needed.

150

Seats

-------------------------------------------------------------------------------------------------------------------------------------------------------------

UNIVERSAL GARAGE DOOR
OPENER

HomeLink Wireless Control System

WARNING: Do not use the system

with any garage door opener that does not
have the safety stop and reverse feature
as required by U.S. Federal Safety
Standards (this includes any garage door
opener manufactured before April 1, 1982).
A garage door opener which cannot detect
an object, signaling the door to stop and
reverse, does not meet current federal
safety standards. Using a garage door
opener without these features increases
the risk of serious injury or death.

Note:  Make sure that the garage door and
security device are free from obstruction
when you are programming.  Do not program
the system with the vehicle in the garage.

Note: Make sure you keep the original
remote control transmitter for use in other
vehicles as well as for future system
programming.

Note: We recommend that upon the sale or
lease termination of your vehicle, you erase
the programmed function buttons for security
reasons. See Erasing the Function Button
Codes
.

Note: You can program a maximum of three
devices. To change or replace any of the
three devices after it has been initially
programmed, you must first erase the current
settings. See Erasing the Function Button
Codes
.

E142657

The universal garage door opener replaces
the common hand-held garage door opener
with a three-button transmitter that is
integrated into the driver’s sun visor.

The system includes two primary features, a
garage door opener and a platform for
remote activation of devices within the home.
As well as being programmed for garage
doors, the system transmitter can be
programmed to operate entry gate operators,
security systems, entry door locks and home
or office lighting.

Additional system information can be found
online at www.homelink.com,
www.youtube.com/HomeLinkGentex or by
calling the toll-free help line on
1-800-355-3515.

In-Vehicle Programming

This process is to program your hand-held
transmitter and your in-vehicle HomeLink
button.

Note: The programming steps below assume
you will be programming HomeLink that was
not previously programmed.

Note: Put a new battery in the hand-held
transmitter. This will ensure quicker training
and accurate transmission of the
radio-frequency signal.

151

Garage Door Opener

-------------------------------------------------------------------------------------------------------------------------------------------------------------

E142658

1. With your vehicle parked outside of the

garage, turn your ignition to the on
position, but do not start your vehicle.

2. Hold your hand-held garage door

transmitter 2–6 in (5–14 cm) away from
the HomeLink button you want to
program.

3. Using both hands, simultaneously, press

and hold the desired HomeLink button
and the hand-held transmitter button. DO
NOT release either one until the
HomeLink indicator light flashes slowly
and then rapidly. When the indicator light
flashes rapidly, both buttons may be
released. The rapid flashing indicates
successful training.

Note: You may need to use a different
method if you live in Canada or have
difficulties programming your gate operator
or garage door opener. See Gate Operator
/ Canadian Programming.

4. Press and hold the HomeLink button you

programmed for two seconds, then
release. You may need to do this twice
to activate the door. If your garage door
does not operate, watch the HomeLink
indicator light.

If the indicator light stays on, the
programming is complete. No further action
is needed.

If the indicator light flashes rapidly for 2
seconds and then turns to a constant light,
the HomeLink button is not programmed yet.
See Programming Your Garage Door
Opener Motor.

To program additional buttons, repeat Steps
1 – 4.

For questions or comments, please contact
HomeLink at www.homelink.com,
www.youtube.com/HomeLinkGentex or
1-800-355-3515.

Programming Your Garage Door Opener
Motor

Note: You may need a ladder to reach the
unit and you may need to remove the cover
or lamp lens on your garage door opener.

E142659

1. Press the learn button on the garage

door opener motor and then you have
30 seconds to complete the next two
steps.

2. Return to your vehicle.

152

Garage Door Opener

-------------------------------------------------------------------------------------------------------------------------------------------------------------

E142658

3. Press and hold the function button you

want to program for 2 seconds, then
release. Repeat this step. Depending on
your brand of garage door opener, you
may need to repeat this sequence a third
time.

Gate Operator / Canadian Programming

Canadian radio-frequency laws require
transmitter signals to “time-out” (or quit) after
several seconds of transmission – which may
not be long enough for HomeLink to pick up
the signal during programming. Similar to
this Canadian law, some U.S. gate operators
are designed to “time-out” in the same
manner.

Note: If programming a garage door opener
or gate operator, it is advised to unplug the
device during the “cycling” process to
prevent possible overheating.

1. Press and hold the HomeLink button

while you press and release, every two
seconds
, your hand-held transmitter until
the HomeLink indicator light changes
from a slow to a rapidly blinking light.

2. Release both the HomeLink and

hand-held transmitter buttons.

3. Continue programing HomeLink. See

In-Vehicle Programming.

Erasing the Function Button Codes

Note: You cannot erase individual buttons.

E142660

1. Press and hold the outer two function

buttons simultaneously for approximately
20 seconds until the indicator lights
above the buttons flash rapidly.

2. When the indicator lights flash, release

the buttons. The codes for all buttons are
erased.

Reprogramming a Single Button

To program a device to a previously trained
button, follow these steps:

1. Press and hold the desired button. Do

NOT release the button.

153

Garage Door Opener

-------------------------------------------------------------------------------------------------------------------------------------------------------------

2. The indicator light will begin to flash after

20 seconds. Without releasing the
button, follow Step 1 in the Programming
section.

For questions or comments, contact
HomeLink at www.homelink.com,
www.youtube.com/HomeLinkGentex or
1-800-355-3515.

Programming to a Genie Intellicode 2
Garage Door Opener

Note: The Genie Intellicode 2 transmitter
must already be programmed to operate
with the garage door opener.

Note: To program HomeLink to the
transmitter you must first put the transmitter
into programming mode.

B

A

E142661

Red indicator light

A.

Green indicator light

B.

1. Press and hold one of the buttons on the

hand-held transmitter for 10 seconds. The
indicator light will change from green to
red and green.

2. Press the same button twice to confirm

the change to programming mode. If
done properly the indicator light will
appear red.

3. Hold the transmitter within 1–3 in

(2–8 cm) of the button on the visor you
want to program.

4. Press and hold both the programmed

Genie button on the hand-held
transmitter and the button you want to
program. The indicator light on the visor
will flash rapidly when the programming
is successful.

Note: The Genie transmitter will transmit for
up to 30 seconds. If HomeLink does not
program within 30 seconds the Genie
transmitter will need to be pressed again. If
the Genie transmitter indicator light displays
green and red, release the button until the
indicator light turns off before pressing the
button again.

Once HomeLink has been programmed
successfully, the Genie transmitter must be
changed out of program mode. To do this:

1. Press and hold the previously

programmed Genie button on the
hand-held transmitter for 10 seconds. The
indicator light will change from red to red
and green.

2. Press the same button twice to confirm

the change. If done correctly the indicator
light will turn green.

154

Garage Door Opener

-------------------------------------------------------------------------------------------------------------------------------------------------------------

Programming HomeLink to the Genie
Intellicode Garage Door Opener Motor

Note: You may need a ladder to access the
garage door opener motor.

E142662

1. Press and hold the program button on

the garage door opener motor until both
blue indicator lights turn on.

2. Release the program button. Only the

smaller round indicator light should be
on.

3. Press and release the program button.

The larger purple indicator light will flash.

Note: The next two steps must be completed
in 30 seconds.

4. Press and release the Genie Intellicode

2 hand-held transmitter’s previously
programmed button. Both indicator lights
on the garage door opener motor unit
should now flash purple.

5. Press and hold the previously

programmed button on the visor for 2
seconds. Repeat this step up to 3 times
until the garage door moves.

Programming is now complete.

Clearing a HomeLink Device

To erase programming from the three
HomeLink buttons press and hold the two
outer HomeLink buttons until the indicator
light begins to flash. The indicator light will
begin flashing in 10 to 20 seconds, at which
time both buttons should be released.
Programming has now been erased, and the
indicator light should blink slowly to indicate
the device is in train mode when any of the
three HomeLink buttons are pressed.

FCC and RSS-210 Industry Canada
Compliance

This device complies with Part 15 of the FCC
Rules and with RSS-210 of Industry Canada.
Operation is subject to the following two
conditions: (1) this device may not cause
harmful interference, and (2) this device must
accept any interference received, including
interference that may cause undesired
operation.

WARNING: Changes or modifications

not expressively approved by the party
responsible for compliance could void the
user's authority to operate the equipment.
The term "IC:" before the radio certification
number only signifies that Industry Canada
technical specifications were met.

155

Garage Door Opener

-------------------------------------------------------------------------------------------------------------------------------------------------------------

This equipment complies with FCC radiation
exposure limits set forth for an uncontrolled
environment. End Users must follow the
specific operating instructions for satisfying
RF exposure compliance. This transmitter
must be at least 8 in (20 cm) from the user
and must not be co-located or operating in
conjunction with any other antenna or
transmitter.

The term “IC:” before the
certification/registration number only signifies
that Industry Canada technical specifications
were met.

156

Garage Door Opener

-------------------------------------------------------------------------------------------------------------------------------------------------------------

12 Volt DC Power Point

WARNING: Do not plug optional

electrical accessories into the cigar lighter
socket. Incorrect use of the cigar lighter
can cause damage not covered by the
vehicle warranty, and can result in fire or
serious injury.

Note: When you switch the ignition on, you
can use the socket to power 12 volt
appliances with a maximum current rating
of 15 amps.

If the power supply does not work after you
switch the ignition off, switch the ignition on.
Note: Do not hang any accessory from the
accessory plug.

Note: Do not use the power point over the
vehicle capacity of 12 volt DC 180 watts or
a fuse may blow.

Note: Always keep the power point caps
closed when not in use.

Do not insert objects other than an accessory
plug into the power point.  This damages the
power point and may blow the fuse.

Run the vehicle for full capacity use of the
power point.

To prevent the battery from running out of
charge:

Do not use the power point longer than
necessary when the vehicle is not
running.

Do not leave devices plugged in
overnight or when you park your vehicle
for extended periods.

Locations

Power points may be in the following
locations:

On the front of the center console.

Inside the center console.

On the rear of the center console.

110 Volt AC Power Point

WARNING: Do not keep electrical

devices plugged in the power point
whenever the device is not in use. Do not
use any extension cord with the 110 volt
AC power point, since it will defeat the
safety protection design. Doing so may
cause the power point to overload due to
powering multiple devices that can reach
beyond the 150 watt load limit and could
result in fire or serious injury.

Note: The power point turns off when you
switch the ignition off, or when the battery
voltage drops below 11 volts.

You can use the power point for electric
devices that require up to 150 watts.  It is on
the rear of the center console.

157

Auxiliary Power Points

-------------------------------------------------------------------------------------------------------------------------------------------------------------

E194174

To gain access to the outlet contacts, press
the plug against the outlet and rotate
clockwise.

When the indicator light on the power point
is:

On: The power point is working, the
ignition is on and a device is plugged in.

Off: The power point is off, the ignition is
off or no device is plugged in.

Flashing: The power point is in fault
mode.

The power outlet temporarily turns off power
when in fault mode if the device exceeds the
150 watt limit.  Unplug your device and
switch the ignition off.  Switch the ignition
back on, but do not plug your device back
in.  Let the system cool off and switch the
ignition off to reset the fault mode.  Switch
the ignition back on and make sure the
indicator light remains on.

Do not use the power point for certain
electric devices, including:

Cathode-ray, tube-type televisions.

Motor loads, such as vacuum cleaners,
electric saws and other electric power
tools or compressor-driven refrigerators.

Measuring devices, which process
precise data, such as medical equipment
or measuring equipment.

Other appliances requiring an extremely
stable power supply such as
microcomputer-controlled electric
blankets or touch-sensor lamps.

158

Auxiliary Power Points

-------------------------------------------------------------------------------------------------------------------------------------------------------------

CENTER CONSOLE

Stow items in the cup holder carefully as
items may become loose during hard
braking, acceleration or crashes, including
hot drinks which may spill.

Available console features include:

E228739

Front storage bin with remote USB
port.

A

Cup holders.

B

Storage compartment with auxiliary
power point and USB port.

C

Heated rear seats.

D

AC power point, auxiliary power
point, and charger USB ports.

E

Two auxiliary power points.

F

OVERHEAD CONSOLE

E266392

Press near the rear edge of the door to open
it.

REAR SEAT ARMREST

E144635

Fold the armrest down to use the armrest.

159

Storage Compartments

-------------------------------------------------------------------------------------------------------------------------------------------------------------

E298216

Cup holders.

A

Storage compartment with optional
audio controls.

B

160

Storage Compartments

-------------------------------------------------------------------------------------------------------------------------------------------------------------

GENERAL INFORMATION

WARNING: Extended idling at high

engine speeds can produce very high
temperatures in the engine and exhaust
system, creating the risk of fire or other
damage.

WARNING: Do not park, idle or drive

your vehicle on dry grass or other dry
ground cover. The emission system heats
up the engine compartment and exhaust
system, creating the risk of fire.

WARNING: Do not start the engine

in a closed garage or in other enclosed
areas. Exhaust fumes can be toxic. Always
open the garage door before you start the
engine.

WARNING: Exhaust leaks may result

in entry of harmful and potentially lethal
fumes into the passenger compartment. If
you smell exhaust fumes inside your
vehicle, have your vehicle inspected
immediately. Do not drive if you smell
exhaust fumes.

If you disconnect the battery, your vehicle
may exhibit some unusual driving
characteristics for approximately 5 mi (8 km)
after you reconnect it.  This is because the
engine management system must realign
itself with the engine.  You can disregard any
unusual driving characteristics during this
period.

The powertrain control system meets all
Canadian interference-causing equipment
standard requirements regulating the
impulse electrical field or radio noise.

When you start the engine, avoid pressing
the accelerator pedal before and during
operation. Only use the accelerator pedal
when you have difficulty starting the engine.

KEYLESS STARTING

Note: The keyless starting system may not
function if the key is close to metal objects
or electronic devices such as cellular
phones.

Note: A valid key must be located inside
your vehicle to switch the ignition on and
start the vehicle.

Ignition Modes

E164319

161

Starting and Stopping the Engine

-------------------------------------------------------------------------------------------------------------------------------------------------------------

The keyless starting system has three
modes:

Off: Turns the ignition off.

Without applying the brake pedal,
press and release the button once
when the ignition is in the on mode,
or when the vehicle is running but is
not moving.

On: All electrical circuits are operational
and the warning lamps and indicators
illuminate.

Without applying the brake pedal,
press and release the button once.

Start: Starts the vehicle. The engine may
not start when the vehicle starts.

Press the brake pedal, and then press
the button until the vehicle starts. An
indicator light on the button
illuminates when the ignition is on
and when the vehicle starts.

STARTING A GASOLINE ENGINE

When you start the engine, the idle speed
increases, this helps to warm up the engine.
If the engine idle speed does not slow down
automatically, have your vehicle checked by
an authorized dealer.

Before starting the engine, check the
following:

Make sure all occupants have fastened
their safety belts.

Make sure the headlamps and electrical
accessories are off.

Make sure the parking brake is on.

Put the transmission in P.

Note: Do not touch the accelerator pedal.

1. Fully press the brake pedal.

2. Press the button.

The system does not function if:

The key frequencies are jammed.

The key battery has no charge.

If you are unable to start the engine, do the
following:

E155835

1. Remove the rubber covering (A) in the

cupholder. With the buttons facing
upward and the unlock button facing the
front of your vehicle, place the first
intelligent access key into the backup
slot (B).

2. With the key in this position, press the

brake pedal, then the START button to
switch the ignition on and start your
vehicle.

Fast Restart

The fast restart feature allows you to restart
the engine within 20 seconds of switching it
off, even if a valid key is not present.

162

Starting and Stopping the Engine

-------------------------------------------------------------------------------------------------------------------------------------------------------------


Content      ..     7      8      9      10     ..