Dodge Charger (2022 year). Manual in english - page 7
 

  Index      Manuals     Dodge Charger (2022 year). Manual in english


Search            copyright infringement  


Content      ..     5      6      7      8     ..


Dodge Charger (2022 year). Manual in english - page 7


STARTING AND OPERATING

105

STATIONARY OBJECTS AND VEHICLES

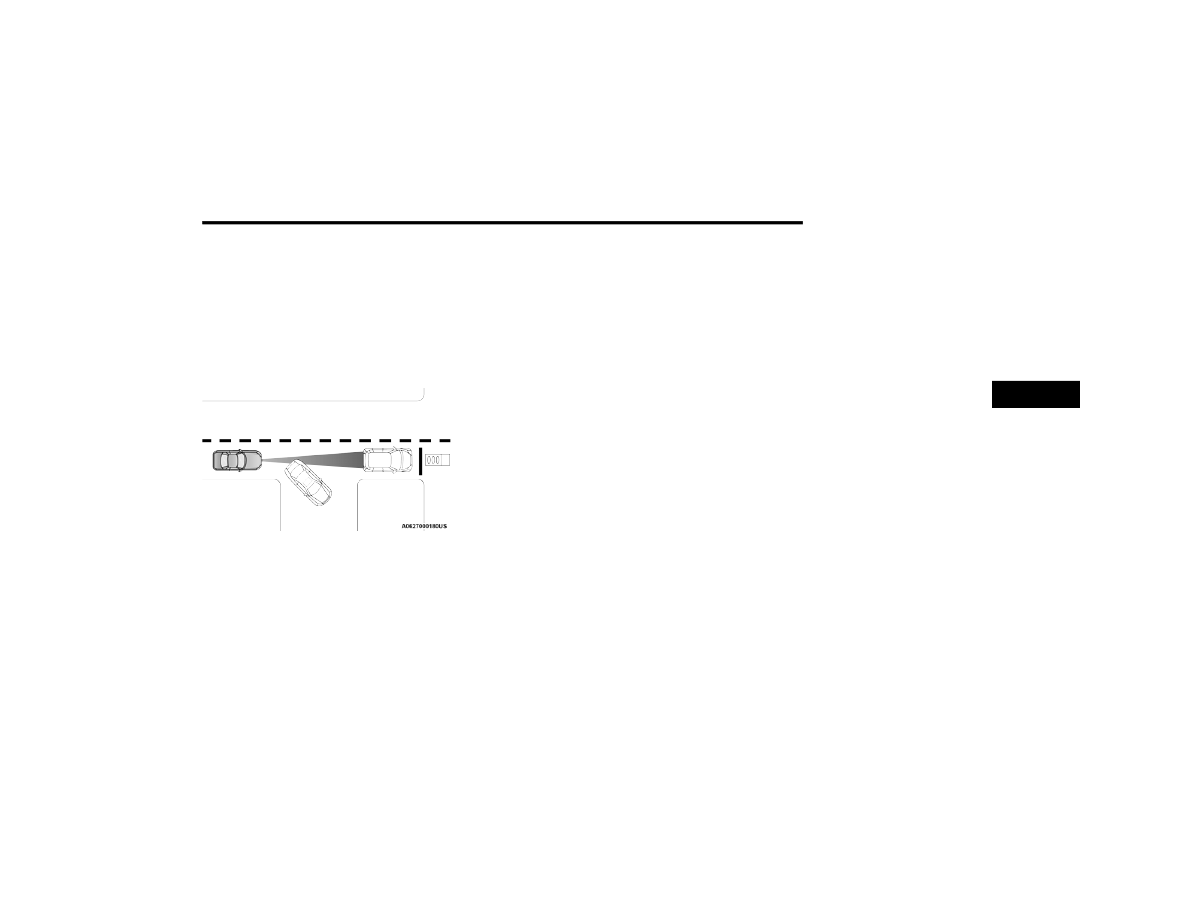
ACC does not react to stationary objects or 

vehicles. For example, ACC will not react in 

situations where the vehicle you are following exits 

your lane and the vehicle ahead is stopped in your 

lane. It will consider this stopped vehicle a 

stationary object as it did not previously detect 

movement from it. Always be attentive and ready 

to apply the brakes if necessary.

Stationary Object And Stationary Vehicle Example

PARKSENSE REAR PARK ASSIST —

IF EQUIPPED  

The ParkSense Rear Park Assist system provides 

visual and audible indications of the distance 

between the rear fascia/bumper and a detected 

obstacle when backing up (e.g. during a parking 

maneuver).
For limitations of this system and 

recommendations, see  

Ú

page 108.

ParkSense will retain the system state (enabled or 

disabled) from the previous ignition cycle when the 

ignition is changed to the ON/RUN position.
ParkSense can be active only when the gear 

selector is in REVERSE. If ParkSense is enabled at 

this gear selector position, the system will remain 

active until the vehicle speed is increased to 

approximately 7 mph (11 km/h) or above. The 

system will become active again if the vehicle 

speed is decreased to speeds less than 

approximately 6 mph (9 km/h).

P

ARK

S

ENSE

 S

ENSORS

The four ParkSense sensors, located in the rear 

fascia/bumper, monitor the area behind the 

vehicle that is within the sensors’ field of view. The 

sensors can detect obstacles from approximately 

12 inches (30 cm) up to 79 inches (200 cm) from 

the rear fascia/bumper. These distances depend 

on the location, type and orientation of the 

obstacle in the horizontal direction.

P

ARK

S

ENSE

 D

ISPLAY

The warning display will turn on indicating the 

system status when the vehicle is in REVERSE and 

an obstacle has been detected.
The system will indicate a detected obstacle by 

showing a single arc in the left and/or right front or 

rear regions based on the object’s distance and 

location relative to the vehicle.
If an object is detected in the left and/or right rear 

region, the display will show a single arc in the left 

and/or right rear region and the system will 

produce a tone. As the vehicle moves closer to the 

object, the display will show the single arc moving 

closer to the vehicle and the tone will change from 

a single 1/2 second tone to slow, to fast, to 

continuous.

4

106

STARTING AND OPERATING


Rear ParkSense Arcs

1 — Continuous Tone/Flashing Arc

4 — Slow Tone/Solid Arc

2 — Fast Tone/Flashing Arc

5 — Slow Tone/Solid Arc

3 — Fast Tone/Flashing Arc

6 — Single 1/2 Second Tone/Solid Arc

STARTING AND OPERATING

107

The vehicle is close to the obstacle when the instrument cluster display shows one flashing arc and sounds a continuous tone. The following chart shows the 

warning alert operation when the system is detecting an obstacle:

NOTE:

ParkSense will reduce the volume of the radio, if on, when the system is sounding an audio tone.

WARNING ALERTS

Rear Distance 

(inches/cm)

Greater than 

79 inches

(200 cm)

79-59 inches 

(200-150 cm)

59-47 inches 

(150-120 cm)

47-39 inches 

(120-100 cm)

39-25 inches 

(100-65 cm)

25-12 inches 

(65-30 cm)

Less than 

12 inches

(30 cm)

Audible Alert 

Chime

None

Single 1/2 

Second Tone

(for rear center 

only)

Slow

(for rear center 

only)

Slow

(for rear center 

only)

Fast

(for rear center 

only)

Fast

Continuous

Arc — Left Rear

None

None

None

None

None

2nd Flashing

1st Flashing

Arc — Center Rear

None

6th Solid

5th Solid

4th Solid

3rd Flashing

2nd Flashing

1st Flashing

Arc — Right Rear

None

None

None

None

None

2nd Flashing

1st Flashing

Radio Volume 

Reduced

No

Yes

Yes

Yes

Yes

Yes

Yes

4

108

STARTING AND OPERATING


Adjustable Chime Volume Settings
Rear chime volume settings can be selected from 

the Uconnect system  

Ú

page 123.

The chime volume settings include low, medium, 

and high.
ParkSense will retain its last known configuration 

state through ignition cycles.

P

ARK

S

ENSE

 W

ARNING

 D

ISPLAY

The ParkSense Warning screen will only be 

displayed if Sound and Display is selected from 

within the Uconnect system  

Ú

page 123.

The ParkSense Warning screen is located within 

the instrument cluster display  

Ú

page 69. It 

provides visual warnings to indicate the distance 

between the rear fascia/bumper and the detected 

obstacle.

E

NABLING

 A

ND

 D

ISABLING

 P

ARK

S

ENSE

ParkSense can be enabled and disabled 

with the ParkSense switch.
When the ParkSense switch is pushed to 

disable the system, the instrument cluster will 

display the “ParkSense Off” message for 

approximately five seconds. When the gear 

selector is moved to REVERSE and the system is 

disabled, the instrument cluster display will display 

the “ParkSense Off” message for as long as the 

vehicle is in REVERSE.

The ParkSense switch LED will be on when 

ParkSense is disabled or requires service. The 

ParkSense switch LED will be off when the system 

is enabled. If the ParkSense switch is pushed and 

the system requires service, the ParkSense 

switch LED will blink momentarily and then the 

LED will be on.

S

ERVICE

 T

HE

 P

ARK

S

ENSE

 P

ARK

 A

SSIST


S

YSTEM

During vehicle start up, when the ParkSense Rear 

Park Assist System has detected a faulted 

condition, the instrument cluster display will 

actuate a single chime, once per ignition cycle, and 

it will display the “PARKSENSE UNAVAILABLE WIPE 

REAR SENSORS” or the “PARKSENSE 

UNAVAILABLE SERVICE REQUIRED” message. 

When the gear selector is moved to REVERSE and 

the system has detected a faulted condition, the 

instrument cluster display will show the 

"PARKSENSE UNAVAILABLE WIPE REAR SENSORS" 

or "PARKSENSE UNAVAILABLE SERVICE 

REQUIRED" message for as long as the vehicle is in 

REVERSE. Under this condition, ParkSense will not 

operate.
If “PARKSENSE UNAVAILABLE WIPE REAR 

SENSORS” appears in the instrument cluster 

display, make sure the outer surface and the 

underside of the rear fascia/bumper is clean and 

clear of snow, ice, mud, dirt or other obstruction 

and then cycle the ignition. If the message 

continues to appear, see an authorized dealer.
If “PARKSENSE UNAVAILABLE SERVICE 

REQUIRED” appears in the instrument cluster 

display, see an authorized dealer.

C

LEANING

 T

HE

 P

ARK

S

ENSE

 S

YSTEM

Clean the ParkSense sensors with water, car wash 

soap and a soft cloth. Do not use rough or hard 

cloths. Do not scratch or poke the sensors. 

Otherwise, you could damage the sensors.

P

ARK

S

ENSE

 S

YSTEM

 U

SAGE


P

RECAUTIONS

NOTE:

Ensure that the rear fascia/bumper is free of 

snow, ice, mud, dirt and debris to keep the 

ParkSense system operating properly.

Jackhammers, large trucks, and other vibra

-

tions could affect the performance of 

ParkSense.

When you turn ParkSense off in DRIVE, the 

instrument cluster will display "PARKSENSE 

OFF" for five seconds. Furthermore, once you 

turn ParkSense off, it remains off until you turn 

it on again, even if you cycle the ignition.

STARTING AND OPERATING

109

When you move the gear selector to the 

REVERSE position and ParkSense is turned off, 

the instrument cluster display will show the 

“PARKSENSE OFF” message for as long as the 

vehicle is in REVERSE.

ParkSense will reduce the volume of the radio 

when it is sounding an audio tone.

Clean the ParkSense sensors regularly, taking 

care not to scratch or damage them. The 

sensors must not be covered with ice, snow, 

slush, mud, dirt or debris. Failure to do so can 

result in the system not working properly. The 

ParkSense system might not detect an obstacle 

behind the fascia/bumper, or it could provide a 

false indication that an obstacle is behind the 

fascia/bumper.

Use the ParkSense switch to turn the ParkSense 

system off if objects such as bicycle carriers, 

trailer hitches, etc. are placed within 12 inches 

(30 cm) from the rear fascia/bumper. Failure to 

do so can result in the system misinterpreting a 

close object as a sensor problem, causing the 

“PARKSENSE UNAVAILABLE WIPE REAR 

SENSORS” message to be displayed in the 

instrument cluster.

LANESENSE — IF EQUIPPED 

L

ANE

S

ENSE

 O

PERATION

The LaneSense system is operational at speeds 

above 37 mph (60 km/h) and below 112 mph 

(180 km/h). The LaneSense system uses a 

forward looking camera to detect lane markings 

and measure vehicle position within the lane 

boundaries.
When both lane markings are detected and the 

driver unintentionally drifts out of the lane (no turn 

signal applied), the LaneSense system provides a 

haptic warning in the form of torque applied to the 

steering wheel to prompt the driver to remain 

within the lane boundaries. If the driver 

unintentionally drifts out of the lane, the 

LaneSense system provides a visual warning 

through the instrument cluster display to prompt 

the driver to remain within the lane boundaries.
The driver may manually override the haptic 

warning by applying torque to the steering wheel at 

any time.
When only a single lane marking is detected and 

the driver drifts across the lane marking (no turn 

signal applied), the LaneSense system provides 

visual warnings through the instrument cluster 

display to prompt the driver to remain within the 

lane. When only a single lane marking is detected, 

a haptic or a torque warning will not be provided.

WARNING!

Drivers must be careful when backing up even 

when using ParkSense. Always check carefully 

behind your vehicle, look behind you, and be 

sure to check for pedestrians, animals, other 

vehicles, obstructions, and blind spots before 

backing up. You are responsible for safety and 

must continue to pay attention to your 

surroundings. Failure to do so can result in 

serious injury or death.

CAUTION!

ParkSense is only a parking aid and it is 

unable to recognize every obstacle, including 

small obstacles. Parking curbs might be 

temporarily detected or not detected at all. 

Obstacles located above or below the sensors 

will not be detected when they are in close 

proximity.

The vehicle must be driven slowly when using 

ParkSense in order to be able to stop in time 

when an obstacle is detected. It is recom

-

mended that the driver looks over his/her 

shoulder when using ParkSense.

4

110

STARTING AND OPERATING


NOTE:

When operating conditions have been met, the 

LaneSense system will monitor if the driver’s 

hands are on the steering wheel and provide an 

audible warning to the driver if removed. The 

system will cancel if the driver does not return their 

hands to the wheel.

T

URNING

 L

ANE

S

ENSE

 O

N

 O

R

 O

FF

The LaneSense button is located on the 

center stack below the Uconnect display.
To turn the LaneSense system on, push 

the LaneSense button (LED turns off). A 

“LaneSense On” message is shown in the 

instrument cluster display.
To turn the LaneSense system off, push the 

LaneSense button once (LED turns on).
NOTE:

The LaneSense system will retain the last system 

state, on or off, from the last ignition cycle when 

the ignition is placed in the ON/RUN position.

L

ANE

S

ENSE

 W

ARNING

 M

ESSAGE

The LaneSense system will indicate the current 

lane drift condition through the instrument cluster 

display.
When the LaneSense system is on, the lane lines 

are gray when both of the lane boundaries have 

not been detected and the LaneSense telltale is 

solid white.

System On (Gray Lines/White Telltale)

Left Lane Departure — Only Left Lane Detected 

When the LaneSense system is on, the 

LaneSense telltale is solid white when only the 

left lane marking has been detected and the 

system is ready to provide visual warnings in the 

instrument cluster display if a lane departure 

occurs.

When the LaneSense system senses the lane 

has been approached and is in a lane departure 

situation, the left lane line flashes yellow (on/

off), and the LaneSense telltale changes from 

solid white to flashing yellow.

Lane Approached With Flashing Yellow Line/Flashing 

Yellow Telltale

NOTE:

The LaneSense system operates with similar 

behavior for a right lane departure when only the 

right lane marking has been detected.

STARTING AND OPERATING

111

Left Lane Departure — Both Lanes Detected 

When the LaneSense system is on, the lane 

lines turn from gray to white to indicate that 

both of the lane markings have been detected. 

The LaneSense telltale is solid green when both 

lane markings have been detected and the 

system is “armed” to provide visual warnings in 

the instrument cluster display and a torque 

warning in the steering wheel if an unintentional 

lane departure occurs.

Lanes Sensed (White Lines/Green Telltale)

When the LaneSense system senses a lane drift 

situation, the left lane line turns solid yellow. 

The LaneSense telltale changes from solid 

green to solid yellow. At this time torque is 

applied to the steering wheel in the opposite 

direction of the lane boundary.
For example, if approaching the left side of the 

lane the steering wheel will turn to the right.

Lane Drift With Solid Yellow Line/Solid Yellow Telltale

When the LaneSense system senses the lane 

has been approached and is in a lane departure 

situation, the left lane line flashes yellow (on/

off). The LaneSense telltale changes from solid 

yellow to flashing yellow. At this time torque is 

applied to the steering wheel in the opposite 

direction of the lane boundary.
For example, if approaching the left side of the 

lane the steering wheel will turn to the right.

Lane Approached With Flashing Yellow Line/Flashing 

Yellow Telltale

NOTE:

The LaneSense system operates with similar 

behavior for a right lane departure.

4

112

STARTING AND OPERATING


C

HANGING

 L

ANE

S

ENSE

 S

TATUS

The LaneSense system has settings to adjust the 

intensity of the torque warning and the warning 

zone sensitivity (early/med/late) that you can 

configure through the Uconnect system  

Ú

page 123.

NOTE:

When enabled the system operates above 

37 mph (60 km/h) and below 112 mph 

(180 km/h).

The warnings are disabled with the use of the 

turn signal.

The system will not apply torque to the steering 

wheel whenever a safety system engages 

(Anti-Lock Brakes, Traction Control System, 

Electronic Stability Control, Forward Collision 

Warning, etc.).

PARKVIEW REAR BACK UP CAMERA  

The ParkView Rear Back Up Camera allows you to 

see an on-screen image of the rear surroundings of 

your vehicle whenever the gear selector is put into 

REVERSE. The image will be displayed on the 

Navigation/Multimedia radio display screen along 

with a caution note to “Check Entire Surroundings” 

across the top of the screen. After five seconds this 

note will disappear. The ParkView Rear Back Up 

Camera is located on the rear of the vehicle above 

the rear license plate.
NOTE:

The ParkView Rear Back Up Camera has program

-

mable modes of operation that may be selected 

through the Uconnect system  

Ú

page 123.

When the vehicle is shifted out of REVERSE with 

camera delay turned off, the rear camera mode is 

exited and the previous screen appears. When the 

vehicle is shifted out of REVERSE with camera 

delay turned on, the camera image will continue to 

be displayed for up to 10 seconds unless the 

following conditions occur: The vehicle speed 

exceeds 8 mph (13 km/h), the vehicle is shifted 

into PARK, the vehicle’s ignition is placed in the 

OFF position, or the user presses image defeat X to 

exit out of the camera video display.
When manually activated, a counter will be 

initiated after the vehicle speed is above 8 mph 

(13 km/h). The rear view camera image will turn 

off when this counter reaches 10 seconds. The 

counter will be reset when the vehicle speed is 

8 mph (13 km/h) or below. If the vehicle speed 

remains below 8 mph (13 km/h), the rear view 

camera image will continue to be displayed until 

the transmission is shifted into PARK, the vehicle’s 

ignition is placed in the OFF position, or the image 

defeat X button is pressed.

When enabled, active guidelines are overlaid on 

the image to illustrate the width of the vehicle and 

its projected backup path based on the steering 

wheel position. Different colored zones indicate 

the distance to the rear of the vehicle. The 

following table shows the approximate distances 

for each zone:

Zone

Distance To The Rear Of 

The Vehicle

Red

0 - 1 ft (0 - 30 cm)

Yellow

1 ft - 6.5 ft (30 cm - 2 m)

Green

6.5 ft or greater 

(2 m or greater)

WARNING!

Drivers must be careful when backing up even 

when using the ParkView Rear Back Up Camera. 

Always check carefully behind your vehicle, and 

be sure to check for pedestrians, animals, other 

vehicles, obstructions, or blind spots before 

backing up. You are responsible for the safety of 

your surroundings and must continue to pay 

attention while backing up. Failure to do so can 

result in serious injury or death.

STARTING AND OPERATING

113

(Continued)

NOTE:

If snow, ice, mud, or any foreign substance builds 

up on the camera lens, clean the lens, rinse with 

water, and dry with a soft cloth. Do not cover the 

lens.

REFUELING THE VEHICLE

1. Put the vehicle in PARK and switch the 

ignition off.

2. Push near the rear edge and center of the of 

the fuel filler door to release. The door will pop 

open to allow hand access to open the door 

the rest of the way.

Fuel Filler Door

3. Open the fuel filler door.

Fuel Filler

NOTE:

In certain cold conditions, ice may prevent the fuel 

door from opening. If this occurs, lightly push on 

the fuel door to break the ice buildup.

4. There is no fuel filler cap. Two flapper doors 

inside the pipe seal the system.

5. Insert the fuel nozzle fully into the filler pipe – 

the nozzle opens and holds the flapper doors 

while refueling.

6. Fill the vehicle with fuel – when the fuel nozzle 

“clicks” or shuts off the fuel tank is full.

7. Wait five seconds before removing the fuel 

nozzle to allow excess fuel to drain from 

nozzle.

8. Remove the fuel nozzle and close the fuel 

door.

9. To close the fuel filler door, push the 

center-rear edge (three o’clock position) of the 

fuel filler door then release.

NOTE:

A funnel is provided (located in the trunk in the 

spare tire area) to open the flapper doors to allow 

for emergency refueling with a gas can.

CAUTION!

To avoid vehicle damage, ParkView should 

only be used as a parking aid. The ParkView 

Rear Back Up Camera is unable to view every 

obstacle or object in your drive path.

To avoid vehicle damage, the vehicle must be 

driven slowly when using ParkView to be able 

to stop in time when an obstacle is seen. It is 

recommended that the driver look frequently 

over his/her shoulder when using ParkView.

WARNING!

Never have any smoking materials lit in or 

near the vehicle when the fuel door is open or 

the tank is being filled.

4

114

STARTING AND OPERATING


VEHICLE LOADING   

The load carrying capacity of your vehicle is shown 

on the Vehicle Certification Label. This information 

should be used for passenger and luggage loading 

as indicated.
Do not exceed the specified Gross Vehicle Weight 

Rating (GVWR) or the Gross Axle Weight Rating 

(GAWR).

V

EHICLE

 C

ERTIFICATION

 L

ABEL


Your vehicle has a Vehicle Certification Label 

affixed to the driver’s side B-pillar or the rear of the 

driver’s door.
The label contains the following information:

Name of manufacturer.

Month and year of manufacture.

Gross Vehicle Weight Rating (GVWR).

Gross Axle Weight Rating (GAWR) front.

Gross Axle Weight Rating (GAWR) rear.

Vehicle Identification Number (VIN).

Type of vehicle.

Month, Day, and Hour (MDH) of manufacture.

The bar code allows a computer scanner to read 

the VIN.

G

ROSS

 V

EHICLE

 W

EIGHT

 R

ATING


(GVWR)  

The GVWR is the total allowable weight of your 

vehicle. This includes driver, passengers, and 

cargo. The total load must be limited so that you do 

not exceed the GVWR.

G

ROSS

 A

XLE

 W

EIGHT

 R

ATING

 (GAWR) 

The GAWR is the maximum capacity of the front 

and rear axles. Distribute the load over the front 

and rear axles evenly. Make sure that you do not 

exceed either front or rear GAWR.

O

VERLOADING

The load carrying components (axle, springs, tires, 

wheels, etc.) of your vehicle will provide 

satisfactory service as long as you do not exceed 

the GVWR and the front and rear GAWR.
The best way to figure out the total weight of your 

vehicle is to weigh it when it is fully loaded and 

ready for operation. Weigh it on a commercial scale 

to ensure that it is not over the GVWR.
Figure out the weight on the front and rear of the 

vehicle separately. It is important that you 

distribute the load evenly over the front and rear 

axles.

Never add fuel when the engine is running. 

This is in violation of most state and federal 

fire regulations and may cause the Malfunc

-

tion Indicator Light to turn on.

A fire may result if fuel is pumped into a 

portable container that is inside of a vehicle. 

You could be burned. Always place fuel 

containers on the ground while filling.

CAUTION!

To avoid fuel spillage and overfilling, do not “top 

off” the fuel tank after filling.

WARNING!

WARNING!

Because the front wheels steer the vehicle, it is 

important that you do not exceed the maximum 

front or rear GAWR. A dangerous driving 

condition can result if either rating is exceeded. 

You could lose control of the vehicle and have a 

collision.

STARTING AND OPERATING

115

Overloading can cause potential safety hazards 

and shorten useful service life. Heavier axles or 

suspension components do not necessarily 

increase the vehicle's GVWR.

L

OADING


To load your vehicle properly, first figure out its 

empty weight, axle-by-axle and side-by-side. Store 

heavier items down low and be sure you distribute 

their weight as evenly as possible. Stow all loose 

items securely before driving. If weighing the 

loaded vehicle shows that you have exceeded 

either GAWR, but the total load is within the 

specified GVWR, you must redistribute the weight. 

Improper weight distribution can have an adverse 

effect on the way your vehicle steers and handles 

and the way the brakes operate.
NOTE:

Refer to the Vehicle Certification Label affixed to 

the rear of the driver's door for your vehicle's 

GVWR and GAWR.

Refer to the Tire and Loading Information 

Placard for your vehicle's proper tire pressure  

Ú

page 270.

TRAILER TOWING  

In this section you will find safety tips and 

information on limits to the type of towing you can 

reasonably do with your vehicle. Before towing a 

trailer, carefully review this information to tow your 

load as efficiently and safely as possible.
To maintain the New Vehicle Limited Warranty 

coverage, follow the requirements and 

recommendations in this manual concerning 

vehicles used for trailer towing.

C

OMMON

 T

OWING

 D

EFINITIONS

The following trailer towing related definitions will 

assist you in understanding the following 

information:

Gross Vehicle Weight Rating (GVWR) 

The GVWR is the total allowable weight of your 

vehicle. This includes driver, passengers, cargo 

and tongue weight. The total load must be limited 

so that you do not exceed the GVWR  

Ú

page 114.

Gross Trailer Weight (GTW)

The GTW is the weight of the trailer plus the weight 

of all cargo, consumables, and equipment 

(permanent or temporary) loaded in or on the 

trailer in its "loaded and ready for operation" 

condition.
The recommended way to measure GTW is to put 

your fully loaded trailer on a vehicle scale. The 

entire weight of the trailer must be supported by 

the scale.

Gross Combination Weight Rating (GCWR)

The GCWR is the total allowable weight of your 

vehicle and trailer when weighed in combination.

Gross Axle Weight Rating (GAWR) 

The GAWR is the maximum capacity of the front 

and rear axles. Distribute the load over the front 

and rear axles evenly. Make sure that you do not 

exceed either front or rear GAWR  

Ú

page 114.

WARNING!

It is important that you do not exceed the 

maximum front or rear GAWR. A dangerous 

driving condition can result if either rating is 

exceeded. You could lose control of the vehicle 

and have a collision.

4

116

STARTING AND OPERATING


Tongue Weight (TW)

The TW is the downward force exerted on the hitch 

ball by the trailer. You must consider this as part of 

the load on your vehicle.

Trailer Frontal Area

The frontal area is the maximum height multiplied 

by the maximum width of the front of a trailer.

Trailer Sway Control (TSC)

The TSC can be a mechanical telescoping link that 

can be installed between the hitch receiver and the 

trailer tongue that typically provides adjustable 

friction associated with the telescoping motion to 

dampen any unwanted trailer swaying motions 

while traveling.
If equipped, the electronic TSC recognizes a 

swaying trailer and automatically applies individual 

wheel brakes and/or reduces engine power to 

attempt to eliminate the trailer sway.

Weight-Carrying Hitch

A weight-carrying hitch supports the trailer tongue 

weight, just as if it were luggage located at a hitch 

ball or some other connecting point of the vehicle. 

These kinds of hitches are commonly used to tow 

small and medium sized trailers.

Weight-Distributing Hitch

A weight-distributing system works by applying 

leverage through spring (load) bars. They are 

typically used for heavier loads to distribute trailer 

tongue weight to the tow vehicle's front axle and 

the trailer axle(s). When used in accordance with 

the manufacturer's directions, it provides for a 

more level ride, offering more consistent steering 

and brake control thereby enhancing towing 

safety. The addition of a friction/hydraulic sway 

control also dampens sway caused by traffic and 

crosswinds and contributes positively to tow 

vehicle and trailer stability. Trailer sway control and 

a weight distributing (load equalizing) hitch are 

recommended for heavier Tongue Weights (TW) 

and may be required depending on vehicle and 

trailer configuration/loading to comply with Gross 

Axle Weight Rating (GAWR) requirements.

WARNING!

An improperly adjusted weight-distributing 

hitch system may reduce handling, stability, 

braking performance, and could result in a 

collision.

Weight-distributing systems may not be 

compatible with surge brake couplers. Consult 

with your hitch and trailer manufacturer or a 

reputable Recreational Vehicle dealer for 

additional information.

STARTING AND OPERATING

117

T

RAILER

 H

ITCH

 C

LASSIFICATION

The following chart provides the industry standard for the maximum trailer weight a given trailer hitch class can tow and should be used to assist you in selecting 

the correct trailer hitch for your intended towing condition.

T

RAILER

 T

OWING

 W

EIGHTS

 (M

AXIMUM

 T

RAILER

 W

EIGHT

 R

ATINGS

)  

Trailer towing with the 6.4L or 6.2L Supercharged engine is not recommended.

Trailer Hitch Classification Definitions

Class

Max. Trailer Hitch Industry Standards

Class I - Light Duty

2,000 lb (907 kg)

Class II - Medium Duty

3,500 lb (1,587 kg)

Class III - Heavy Duty

6,000 lb (2,722 kg)

Class IV - Extra Heavy Duty

10,000 lb (4,535 kg)

Refer to the “Trailer Towing Weights (Maximum Trailer Weight Ratings)” chart for the Maximum Gross Trailer Weight (GTW) towable for your given drivetrain.
All trailer hitches should be professionally installed on your vehicle.

Engine/Transmission

Frontal Area

Maximum GTW

Maximum Trailer TW

3.6L Automatic

12 sq ft (1.11 sq m)

1,000 lb (454 kg)

100 lb (45 kg)

5.7L Automatic

12 sq ft (1.11 sq m)

1,000 lb (454 kg)

100 lb (45 kg)

Refer to local laws for maximum trailer towing speeds.

4

118

STARTING AND OPERATING


(Continued)

T

RAILER

 A

ND

 T

ONGUE

 W

EIGHT


Never exceed the maximum tongue weight 

stamped on your fascia/bumper or trailer hitch.

Weight Distribution

Consider the following items when computing the 

weight on the rear axle of the vehicle:

The tongue weight of the trailer.

The weight of any other type of cargo or equip

-

ment put in or on your vehicle.

The weight of the driver and all passengers.

NOTE:

Remember that everything put into or on the trailer 

adds to the load on your vehicle. Also, additional 

factory-installed options or dealer-installed options 

must be considered as part of the total load on 

your vehicle. Refer to the Tire and Loading Infor

-

mation placard for the maximum combined weight 

of occupants and cargo for your vehicle.

T

OWING

 R

EQUIREMENTS

To promote proper break-in of your new vehicle 

drivetrain components, the following guidelines 

are recommended.

WARNING!

Always load a trailer with 60% of the weight in 

the front of the trailer. This places 10% of the 

GTW on the tow hitch of your vehicle. Loads 

balanced over the wheels or heavier in the rear 

can cause the trailer to sway severely side to 

side which will cause loss of control of the 

vehicle and trailer. Failure to load trailers heavier 

in front is the cause of many trailer collisions.

WARNING!

Make certain that the load is secured in the 

trailer and will not shift during travel. When 

trailering cargo that is not fully secured, 

dynamic load shifts can occur that may be 

difficult for the driver to control. You could lose 

control of your vehicle and have a collision.

When hauling cargo or towing a trailer, do not 

overload your vehicle or trailer. Overloading can 

cause a loss of control, poor performance or 

damage to brakes, axle, engine, transmission, 

steering, suspension, chassis structure or tires.

Safety chains must always be used between 

your vehicle and trailer. Always connect the 

chains to the hook retainers of the vehicle hitch. 

Cross the chains under the trailer tongue and 

allow enough slack for turning corners.

Vehicles with trailers should not be parked on 

a grade. When parking, apply the parking 

brake on the tow vehicle. Put the tow vehicle 

transmission in PARK. Always, block or 

"chock" the trailer wheels.

GCWR must not be exceeded.

Total weight must be distributed between the 

tow vehicle and the trailer such that the 

following four ratings are not exceeded:

Max loading as defined on the “Tire and 

Loading Information” placard.

GTW

GAWR

Tongue weight rating for the trailer hitch 

utilized.

WARNING!

STARTING AND OPERATING

119

(Continued)

Perform the maintenance listed in the “Scheduled 

Servicing” for the proper maintenance intervals  

Ú

page 234. When towing a trailer, never exceed 

the GAWR or GCWR ratings.

Towing Requirements — Tires

Do not attempt to tow a trailer while using a 

compact spare tire.

Do not drive more than 50 mph (80 km/h) when 

towing while using a full size spare tire.

Proper tire inflation pressures are essential to 

the safe and satisfactory operation of your 

vehicle.

Check the trailer tires for proper tire inflation 

pressures before trailer usage.

Check for signs of tire wear or visible tire 

damage before towing a trailer. For the proper 

inspection procedure.

Replacing tires with a higher load carrying 

capacity will not increase the vehicle's GVWR 

and GAWR limits.

For further information  

Ú

page 264.

Towing Requirements — Trailer Brakes

Do not interconnect the hydraulic brake system 

or vacuum system of your vehicle with that of 

the trailer. This could cause inadequate braking 

and possible personal injury.

An electronically actuated trailer brake 

controller is required when towing a trailer with 

electronically actuated brakes. When towing a 

trailer equipped with a hydraulic surge actuated 

brake system, an electronic brake controller is 

not required.

Trailer brakes are recommended for trailers 

over 1,000 lb (453 kg) and required for trailers 

in excess of 2,000 lb (907 kg).

Towing Requirements — Trailer Lights And 

Wiring

Whenever you pull a trailer, regardless of the trailer 

size, stoplights and turn signals on the trailer are 

required for motoring safety.
The Trailer Tow Package may include a four- and 

seven-pin wiring harness. Use a factory approved 

trailer harness and connector.
NOTE:

Do not cut or splice wiring into the vehicle’s wiring 

harness.

CAUTION!

Do not tow a trailer at all during the first 500 miles 

(805 km) the new vehicle is driven. The engine, 

axle or other parts could be damaged.

Then, during the first 500 miles (805 km) that 

a trailer is towed, do not drive over 50 mph 

(80 km/h) and do not make starts at full 

throttle. This helps the engine and other parts 

of the vehicle wear in at the heavier loads.

WARNING!

Do not connect trailer brakes to your vehicle's 

hydraulic brake lines. It can overload your 

brake system and cause it to fail. You might 

not have brakes when you need them and 

could have an accident.

Towing any trailer will increase your stopping 

distance. When towing, you should allow for 

additional space between your vehicle and the 

vehicle in front of you. Failure to do so could 

result in an accident.

CAUTION!

If the trailer weighs more than 1,000 lb (453 kg) 

loaded, it should have its own brakes and they 

should be of adequate capacity. Failure to do 

this could lead to accelerated brake lining wear, 

higher brake pedal effort, and longer stopping 

distances.

WARNING!

4

120

STARTING AND OPERATING


The electrical connections are all complete to the 

vehicle but you must mate the harness to a trailer 

connector. Refer to the following illustrations.
NOTE:

Disconnect the trailer wiring connector from the 

vehicle (or any other device plugged into the 

vehicle's electrical connectors) before 

launching a boat into water.

Be sure to reconnect after clear from water 

area.

Four-Pin Connector

Seven-Pin Connector

T

OWING

 T

IPS


Before towing, practice turning, stopping, and 

backing up the trailer in an area located away from 

heavy traffic.

Automatic Transmission

Select the DRIVE range when towing. The 

transmission controls include a drive strategy to 

avoid frequent shifting when towing. However, if 

frequent shifting does occur while in DRIVE, you 

can use the AutoStick shift control to manually 

select a lower gear.
NOTE:

Using a lower gear while operating the vehicle 

under heavy loading conditions will improve perfor

-

mance and extend transmission life by reducing 

excessive shifting and heat buildup. This action will 

also provide better engine braking.

Cruise Control — If Equipped

Do not use on hilly terrain or with heavy loads.

When using the Cruise Control, if you experience 

speed drops greater than 10 mph (16 km/h), 

disengage until you can get back to cruising 

speed.

Use Cruise Control in flat terrain and with light 

loads to maximize fuel efficiency.

1 — Ground
2 — Park
3 — Left Stop/Turn
4 — Right Stop/Turn

1 — Backup Lamps
2 — Running Lamps
3 — Left Stop/Turn
4 — Ground
5 — Battery
6 — Right Stop/Turn
7 — Electric Brakes


Content      ..     5      6      7      8     ..