Dodge Caravan (2008 year). Manual - part 26


  Index      Dodge     Dodge Caravan (2008 year) - manual in english


Search            copyright infringement  


Content      ..     24      25      26      27     ..


Dodge Caravan (2008 year). Manual - part 26


Towing Requirements — Trailer Lights and Wiring
Whenever you pull a trailer, regardless of the trailer size,
stop lights and turn signals on the trailer are required for
motoring safety.

The Trailer Tow Package may include a four-pin or a
seven-pin wiring harness. Use a factory approved trailer
harness and connector.

NOTE:

Do not cut or splice wiring into the vehicles

wiring harness.

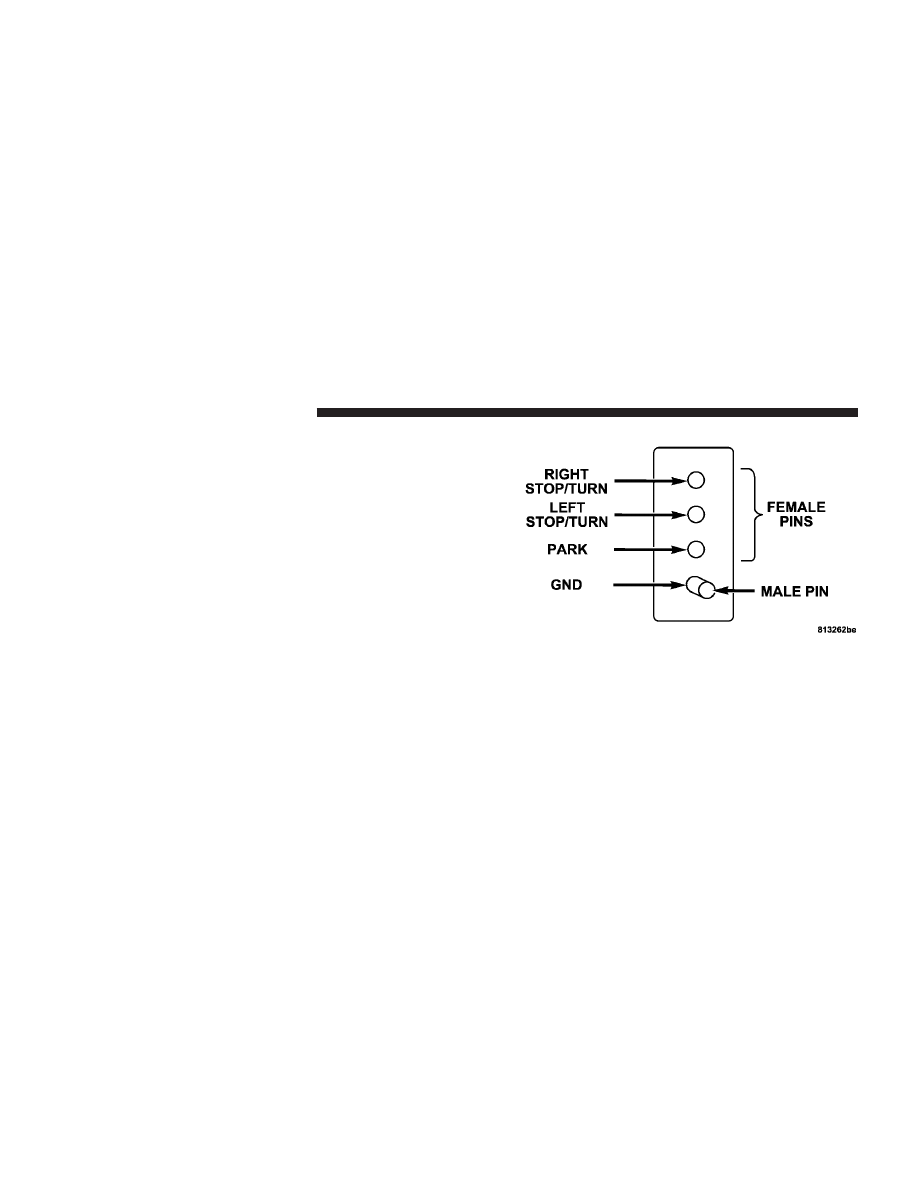
The electrical connections are all complete to the vehicle
but you must mate the harness to a trailer connector.
Refer to the following four-pin connector and seven-pin
connector illustrations.

Four-Pin Connector

404

STARTING AND OPERATING

Towing Tips

Before setting out on a trip, practice turning, stopping
and backing the trailer in an area away from heavy
traffic.

Towing Tips — Automatic Transmission
The DRIVE gear can be selected when towing. However,
if frequent shifting occurs while in DRIVE, move the gear
selector lever into third gear (with four-speed transmis-
sion) or fifth gear (with six-speed transmission).

NOTE:

Moving the gear selector lever into third gear

(with four-speed transmission) or fifth gear (with six-
speed transmission) while operating the vehicle under
heavy operating conditions will improve performance
and extend transmission life by reducing excessive shift-
ing and heat build up. This action will also provide better
engine braking.

The automatic transmission fluid and filter should be
changed if you REGULARLY tow a trailer for more than
45 minutes of continuous operation. Refer to the “Main-
tenance Schedule” in Section 8 of this manual for trans-
mission fluid change intervals.

Seven-Pin Connector

STARTING AND OPERATING

405

5

NOTE:

• Check the automatic transmission fluid level before

towing.

• The six-speed automatic transmission is sealed and

requires an authorized dealer service center to check
the transmission fluid.

Towing Tips — Electronic Speed Control (If
Equipped)

• Don’t use in hilly terrain or with heavy loads.
• When using the speed control, if you experience speed

drops greater than 10 mph (16 km/h), disengage until
you can get back to cruising speed.

• Use speed control in flat terrain and with light loads to

maximize fuel efficiency.

Towing Tips — Cooling System
To reduce potential for engine and transmission over-
heating, take the following actions:

• City Driving
When stopped for short periods of time, put transmission
gear selector lever in NEUTRAL but do not increase
engine idle speed.

• Highway Driving
Reduce speed.

• Air Conditioning
Turn off temporarily.

• Refer to Cooling System Operating information in the

Maintenance section of this manual for more informa-
tion.

406

STARTING AND OPERATING

RECREATIONAL TOWING (BEHIND
MOTORHOME, ETC.)

CAUTION!

Towing this vehicle behind another vehicle (flat-
towing with all four wheels on the ground) IS NOT
RECOMMENDED.

NOTE:

If the vehicle requires towing make sure all four

wheels are off the ground.

STARTING AND OPERATING

407

5

WHAT TO DO IN EMERGENCIES

CONTENTS

Hazard Warning Flasher . . . . . . . . . . . . . . . . . . 410
If Your Engine Overheats . . . . . . . . . . . . . . . . . 410
Jacking And Tire Changing . . . . . . . . . . . . . . . . 412

▫ Jack Location . . . . . . . . . . . . . . . . . . . . . . . . 413

Jump-Starting Procedure . . . . . . . . . . . . . . . . . . 425
Freeing A Stuck Vehicle . . . . . . . . . . . . . . . . . . 427
Towing A Disabled Vehicle . . . . . . . . . . . . . . . . 428

▫ Towing With The Ignition Key . . . . . . . . . . . . 428

6

HAZARD WARNING FLASHER

The hazard flasher switch is located in the center of
the instrument panel below the radio.

To engage the Hazard Warning Flashers, depress the
switch on the instrument panel. When the Hazard Warn-
ing Switch is activated, all directional turn signals will
flash on and off to warn oncoming traffic of an emer-
gency. Push the switch a second time to turn off the
flashers.

This is an emergency warning system and should not be
used when the vehicle is in motion. Use it when your
vehicle is disabled and is creating a safety hazard for
other motorists.

When you must leave the vehicle to seek assistance, the
Hazard Warning Flashers will continue to operate even
though the ignition switch is OFF.

NOTE:

With extended use, the Hazard Warning Flash-

ers may wear down your battery.

IF YOUR ENGINE OVERHEATS

In any of the following situations, you can reduce the
potential for overheating by taking the appropriate ac-
tion.

• On the highways — Slow down.
• In city traffic — While stopped, shift the transmission

gear selector lever into NEUTRAL, but do not increase
engine idle speed.

NOTE:

There are steps that you can take to slow down

an impending overheat condition. If your air conditioner
is on, turn it off. The air conditioning system adds heat to
the engine cooling system and turning off the A/C
removes this heat. You can also turn the Temperature
control to maximum heat, the Mode control to floor, and

410

WHAT TO DO IN EMERGENCIES

the fan control to High. This allows the heater core to act
as a supplement to the radiator and aids in removing heat
from the engine cooling system.

CAUTION!

Driving with a hot cooling system could damage
your vehicle. If temperature gauge reads “H”, pull
over and stop the vehicle. Idle the vehicle with the air
conditioner turned off until the pointer drops back
into the normal range. If the pointer remains on the
“H”, turn the engine off immediately, and call for
service.

WARNING!

A hot engine cooling system is dangerous. You or
others could be badly burned by steam or boiling
coolant. You may want to call a service center if your
vehicle overheats. If you decide to look under the
hood yourself, see Section 7, Maintenance, of this
manual. Follow the warnings under the Cooling
System Pressure Cap paragraph.

WHAT TO DO IN EMERGENCIES

411

6

JACKING AND TIRE CHANGING

WARNING!

• Getting under a jacked-up vehicle is dangerous.

The vehicle could slip off the jack and fall on you.
You could be crushed. Never get any part of your
body under a vehicle that is on a jack. If you need
to get under a raised vehicle, take it to a service
center where it can be raised on a lift.

• The jack is designed to use as a tool for changing

tires only. The jack should not be used to lift the
vehicle for service purposes. The vehicle should
be jacked on a firm level surface only. Avoid ice or
slippery areas.

WARNING!

For vehicles equipped with Stow ’n Go seating, if it
is necessary to retrieve the spare tire from under the
vehicle on the side of the vehicle close to moving
traffic. Pull far enough off the road to avoid the
danger of being hit.

412

WHAT TO DO IN EMERGENCIES

Jack Location

The jack, jack handle and winch handle tools are stowed
behind the rear left side trim panel in the rear cargo area.
Turn the two cover latches to release the cover.

Remove the pouch containing the scissors jack, jack
handle, and tools.

Rear Compartment Features

1 - Tie Down

5 - Liftgate Close Switch

2 - Switch Bank

6 - Bag Holders

3 - Tire Jack/Handle

7 - Child Seat LATCH Anchor

4 - Cubby/Speaker

8 - Rechargeable Flash Light

WHAT TO DO IN EMERGENCIES

413

6

Spare Tire Removal
For vehicles equipped with Stow ’n Go seating, the spare
tire is stowed inside a protective cover located under the
center of the vehicle by means of a cable winch mecha-
nism. The “spare tire drive” nut is located on the floor,
under a plastic cap at the front of the floor console.

NOTE:

The base console, if equipped, must be removed

to raise and lower the spare tire. Refer to “Console
Features” in Section 3, for the console removal procedure.

The tool pouch contains three pieces and can be as-
sembled into a Spare Tire Hook; to remove the compact
spare tire/cover assembly from under the vehicle, or a
Winch “T” Handle; to raise/lower the compact spare
tire/cover assembly.

Stow ’n Go Tools

414

WHAT TO DO IN EMERGENCIES

Preparations For Jacking
Park the vehicle on a firm level surface, avoid ice or
slippery areas, set the parking brake and place the gear
selector in PARK. Turn OFF the ignition.

• Turn on the Hazard Warning Flasher.

• Block both the front and rear

of the wheel diagonally oppo-
site the jacking position. For
example, if changing the right
front tire, block the left rear
wheel.

• Passengers should not remain in the vehicle when the

vehicle is being jacked.

Jacking Instructions

Jack Warning Label

WHAT TO DO IN EMERGENCIES

415

6

WARNING!

Carefully follow these tire changing warnings to
help prevent personal injury or damage to your
vehicle:
• Always park on a firm, level surface as far from

the edge of the roadway as possible before raising
the vehicle.

• Block the wheel diagonally opposite the wheel to

be raised.

• Set the parking brake firmly and set an automatic

transmission in park; a manual transmission in
reverse.

WARNING!

Carefully follow these tire changing warnings to
help prevent personal injury or damage to your
vehicle:
• Never start or run the engine with the vehicle on a

jack.

• Do not let anyone sit in the vehicle when it is on a

jack.

• Do not get under the vehicle when it is on a jack.
• Only use the jack in the positions indicated and

for lifting this vehicle during a tire change.

• If working on or near a roadway, be extremely

careful of motor traffic.

• To assure that spare tires, flat or inflated are

securely stowed, spares must be stowed with the
valve stem facing the ground.

• Turn on the Hazard warning flasher.

416

WHAT TO DO IN EMERGENCIES

1. Loosen (but do not remove) the wheel lug nuts by
turning them to the left one turn while the wheel is still
on the ground.

2. To remove the compact spare tire/cover assembly,
assemble the winch handle extensions to form a “T’ and
fit the winch “T” handle over the drive nut. Rotate the
nut to the left until the winch mechanism stops turning
freely. This will allow enough slack in the cable to allow
you to pull the spare tire out from under the vehicle.

CAUTION!

The winch mechanism is designed for use with the
winch “T” handle only. Use of an air wrench or other
power tools is not recommended and can damage the
winch.

3. Assemble the winch handle extensions to form the
Spare Tire Hook and pull the compact spare tire/cover
assembly from under the vehicle.

WARNING!

Getting under a jacked-up vehicle is dangerous. The
vehicle could slip off the jack and fall on you. You
could be crushed. Never get any part of your body
under a vehicle that is on a jack. If you need to get
under a raised vehicle, take it to a service center
where it can be raised on a lift.

WHAT TO DO IN EMERGENCIES

417

6

NOTE:

If either front tire is flat, it may be necessary to

jack up the vehicle to remove the compact spare tire/
cover assembly from under the vehicle. Refer to jack
engagement locations in the following steps for proper
jack placement.

4. When the compact spare tire/cover assembly is clear
of the vehicle, stand the tire/cover assembly upright and
remove the wheel spacer by squeezing the two retaining
tabs together.

Spare Tire Hook & Removal

Squeezing Winch Retainer Tabs

418

WHAT TO DO IN EMERGENCIES

5. There are two jack engagement locations on each side
of the vehicle body. These locations are on the sill flange
of the vehicle body.

NOTE:

Rear jack location is between a pair of down-

standing tabs on the sill flange of the vehicle body.

Front jack location is on the sill flange of the vehicle body
and aligns with the front door edge.

WHAT TO DO IN EMERGENCIES

419

6


Content      ..     24      25      26      27     ..