Dodge 2500-3500 (Diesel) (2006 year). Manual - part 27
 

  Index      Dodge     Dodge 2500-3500 (Diesel) (2006 year) - manual in english


Search            copyright infringement  


Content      ..     25      26      27      28     ..


Dodge 2500-3500 (Diesel) (2006 year). Manual - part 27


Tail, Stop, Turn and Backup Lights

1. Remove the two (2) screws that pass through the bed
sheetmetal.

2. Pull the housing straight out from the body, with a
quick motion, to separate the housing from the body. If
not pulled straight, locators may be damaged.

428

MAINTAINING YOUR VEHICLE

-------------------------------------------------------------------------------------------------------------------------------------------------------------

3. Push the red lock slide in on the connector and remove
the housing from the vehicle.

4. Remove the four (4) screws from the bulb strip in the
housing.

5. Pull the appropriate bulb straight from the bulb strip.

• Top Bulb: Park/Turn/Hazard
• Center Bulb: Stop/Park/Sidemarker
• Bottom Bulb: Backup Lights

6. Reverse procedure for installation of bulbs and hous-
ing.

MAINTAINING YOUR VEHICLE

429

7

-------------------------------------------------------------------------------------------------------------------------------------------------------------

7. While holding the taillight firmly in place, fasten the
top screw first.

Center High-Mounted Stoplight With Cargo Light

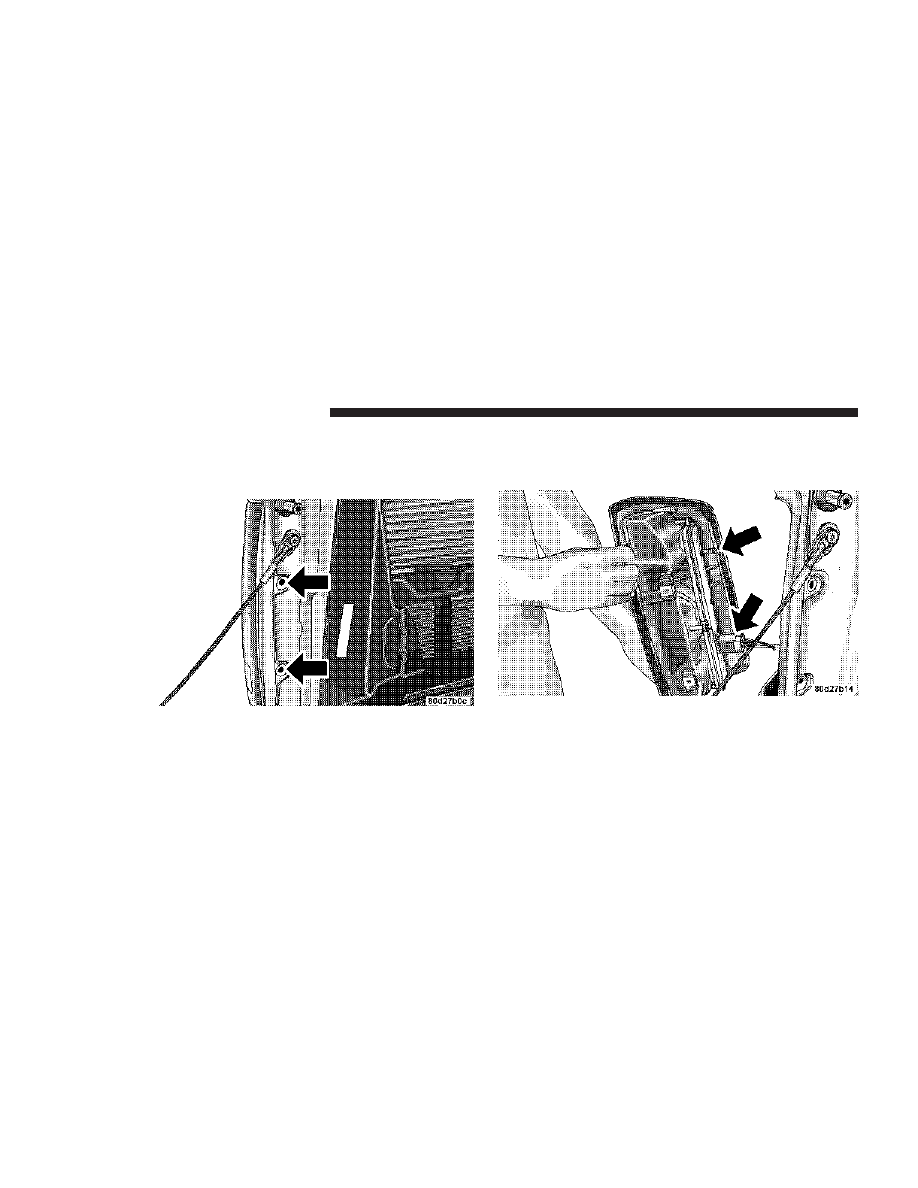
1. Remove the two (2) screws holding the housing/lens
to the body as shown.

2. Separate the connector holding the housing and wir-
ing harness to the body.

3. Turn desired bulb socket

1

4

turn and remove socket

and bulb from housing.

430

MAINTAINING YOUR VEHICLE

-------------------------------------------------------------------------------------------------------------------------------------------------------------

4. Pull desired bulb straight from the socket.

• Outside Bulbs: Cargo Lamps
• Inside Bulb: Center High Mount Stop Lamp

5. Reverse procedure for installation of bulbs and hous-
ing.

Cab Top Clearance Lights — If Equipped

1. Remove the two screws from the top of the light.

MAINTAINING YOUR VEHICLE

431

7

-------------------------------------------------------------------------------------------------------------------------------------------------------------

2. Rotate the socket

1

4

turn and pull it from the light

assembly.

3. Pull the bulb straight from it’s socket and replace.

432

MAINTAINING YOUR VEHICLE

-------------------------------------------------------------------------------------------------------------------------------------------------------------

Tailgate ID Lights (Dual Rear Wheels) — If
Equipped

1. Remove the two screws and housing and access the
bulb sockets from the rear.

MAINTAINING YOUR VEHICLE

433

7

-------------------------------------------------------------------------------------------------------------------------------------------------------------

2. Turn socket

1

4

turn counterclockwise to access the

bulb.

3. Pull bulb straight out from socket.

4. Reverse procedure for installation of bulbs and hous-
ing.

Rear Light Bar ID Marker (Dual Rear Wheel) – If
Equipped

1. Loosen the two screws and the housing to gain access
to the bulb sockets.

434

MAINTAINING YOUR VEHICLE

-------------------------------------------------------------------------------------------------------------------------------------------------------------

2. Turn the socket 1/4 turn counterclockwise to access
the bulb.

3. Pull the bulb straight out from the socket.

4. Reverse procedure for installation of bulbs and hous-
ing.

Side Marker Lights (Dual Rear Wheels)

1. Push rearward on the side marker light assembly.

2. Pull the entire assembly from the fender.

MAINTAINING YOUR VEHICLE

435

7

-------------------------------------------------------------------------------------------------------------------------------------------------------------

3. Turn socket

1

4

turn counterclockwise and remove from

assembly to access the bulb.

4. Pull bulb straight out from socket.

5. Reverse procedure for installation of bulbs and hous-
ing.

Fog Lights

1. Reach under the vehicle, unlock and twist connector
counterclockwise

1

4

turn and remove connector and bulb

from housing.

436

MAINTAINING YOUR VEHICLE

-------------------------------------------------------------------------------------------------------------------------------------------------------------

2. Pull bulb straight from the connector.

3. Reverse procedure for installation of bulbs and hous-
ing.

FLUID CAPACITIES

FLUID CAPACITIES

U.S.

Metric

Fuel

2500 Shortbed Models

34 gal.

128L

2500 Longbed Models

35 gal.

132L

3500 Shortbed Models

34 gal.

128L

3500 Longbed Models

35 gal.

132L

Engine Oil

5.9L Diesel Engine I-6

12.0 qts.

11.4L

Cooling System

5.9L Diesel Engine I-6

7 gal.

26.5L

MAINTAINING YOUR VEHICLE

437

7

-------------------------------------------------------------------------------------------------------------------------------------------------------------

FLUIDS, LUBRICANTS AND GENUINE PARTS

Engine

Component

Fluids, Lubricants and Genuine Parts

Engine Coolant

Mopar

威 Antifreeze/Coolant 5 Year/100,000 Mile Formula HOAT (Hybrid Or-

ganic Additive Technology) or equivalent.

Engine Oil

For the proper quality and SAE Grade oil for your engine, refer to the section

⬙Maintenance Procedures.⬙

Engine Oil Filter

Mopar

威 Engine Oil Filter, P/N 05083285AA or equivalent.

Engine Fuel Filter

Mopar

威 Fuel Filter, P/N 05015581AB or equivalent.

Fuel Selection

Use good quality diesel fuel from a reputable supplier. For most year-round
service, No. 2 diesel fuel meeting ASTM specification D-975 will provide
good performance. This vehicle is fully compatible with biodiesel blends
up to 5% biodiesel meeting ASTM specification D-975. (See page 314 for
more information.)

438

MAINTAINING YOUR VEHICLE

-------------------------------------------------------------------------------------------------------------------------------------------------------------

Chassis

Component

Fluids, Lubricants and Genuine Parts.

Automatic Transmission

Mopar

威 ATF+4, Automatic Transmission Fluid.

Transfer Case

Mopar

威 ATF+4, Automatic Transmission Fluid.

Manual Transmission Fluid G-56

Mopar

威 ATF+4, Automatic Transmission Fluid.

Clutch Linkage

Multipurpose Grease, NLGI Grade 2 E.P. or equivalent.

Front and Rear Axle Fluid 2500/3500
Models

GL-5 SAE 75W-90 Synthetic or equivalent. 2500/3500 axels do not require
limited slip additive.

Brake Master Cylinder

Mopar

威 DOT 3 and SAE J1703 should be used or equivalent. If DOT 3

brake fluid is not available, then DOT 4 is acceptable. Use only recom-
mended brake fluids.

Power Steering Reservoir

Mopar

威 ATF+4, Automatic Transmission Fluid.

MAINTAINING YOUR VEHICLE

439

7

-------------------------------------------------------------------------------------------------------------------------------------------------------------

-------------------------------------------------------------------------------------------------------------------------------------------------------------

MAINTENANCE SCHEDULES

CONTENTS

䡵 Emission Control System Maintenance . . . . . . . . 442
䡵 Maintenance Schedules — 24–Valve Cummins

Turbo Diesel . . . . . . . . . . . . . . . . . . . . . . . . . . 442

▫ Schedule “B” . . . . . . . . . . . . . . . . . . . . . . . . 445
▫ Schedule “A” . . . . . . . . . . . . . . . . . . . . . . . . 459

8

M

A

I

N

T
E

N
A
N
C

E

S
C
H
E
D
U
L
E
S

-------------------------------------------------------------------------------------------------------------------------------------------------------------

EMISSION CONTROL SYSTEM MAINTENANCE
The “Scheduled” maintenance services, listed in bold
type

in this section (Section 8) must be done at the times

or mileages specified to assure the continued proper
functioning of the emission control system. These, and all
other maintenance services included in this manual,
should be done to provide best vehicle performance and
reliability. More frequent maintenance may be needed for
vehicles in severe operating conditions such as dusty
areas and very short trip driving.

Inspection and service also should be done any time a
malfunction is suspected.

NOTE:

Maintenance, replacement, or repair of the emis-

sion control devices and systems on your vehicle may be
performed by any automotive repair establishment or
individual using any automotive part which has been
certified pursuant to U.S. EPA or, in the State of Califor-
nia, California Air Resources Board regulations.

MAINTENANCE SCHEDULES — 24–VALVE
CUMMINS TURBO DIESEL
There are two maintenance schedules that show the
required

service for your vehicle.

First is Schedule “B”. It is for vehicles that are operated
under one or more of the following conditions that are
listed below and at the beginning of the schedule.

• Frequent short trips where the engine does not achieve

full operating temperature (operating temperature de-
fined as 190° F (66° C ) coolant temperature).

• Extensive engine idling (over 10 minutes per hour of

operation) at ambient temperatures less than 32° F (0°
C).

• Driving in dusty conditions.
• Frequent trailer towing.
• Taxi, police, or delivery service (commercial service).

442

MAINTENANCE SCHEDULES

8

M

A

I

N

T
E

N
A
N
C

E

S
C
H
E
D
U
L
E
S

-------------------------------------------------------------------------------------------------------------------------------------------------------------

• Off-road or desert operation.
• Extensive operation at high engine speeds (greater

than 2900 rpm) and loads (greater than 70% throttle).

NOTE:

Most vehicles are operated under the conditions

listed for Schedule

⬙B⬙.

NOTE:

If ANY of these apply to you then change your

coolant every 101,250 miles (162 000 km) or 60 months,
whichever comes first and follow schedule “B” of the

⬙Maintenance Schedules⬙ section of this manual.

Second is Schedule “A”. It is for vehicles that are not
operated under any of the conditions listed under Sched-
ule

⬙B⬙.

Use the schedule that best describes your driving condi-
tions. Where time and mileage are listed, follow the
interval that occurs first.

CAUTION!

Failure to perform the required maintenance items
may result in damage to the vehicle.

At Each Stop for Fuel

• Check the engine oil level about 15 minutes after a

fully warmed engine is shut off. Checking the oil level
while the vehicle is on level ground will improve the
accuracy of the oil level reading. Add oil only when
the level is at or below the ADD or MIN mark.

• Check the windshield washer solvent and add if

required. When refilling the washer fluid reservoir,
take some washer fluid and apply it to a cloth or towel
and wipe clean the wiper blades, this will help blade
performance.

• Drain water from the fuel filter.

MAINTENANCE SCHEDULES

443

8

M

A

I

N

T
E

N
A
N
C

E

S
C
H
E
D
U
L
E
S

-------------------------------------------------------------------------------------------------------------------------------------------------------------


Content      ..     25      26      27      28     ..